| C H A P T E R 4 |
|
Installing Windows Server 2003 |
This chapter describes the installation process for installing Windows Server 2003 on a Sun Fire X2250 server.
This chapter contains the following topics:
Before starting the Windows Server installation, you should ensure that following requirements are met.
http//www.sun.com/servers/x64/X2250/downloads.jsp
The following tasks must be performed in the order in which they are listed. Note that not all tasks are mandatory.
|
Established installation environment. For more information see: |
||
|
Set optimal default settings in the BIOS Utility. For more information, see Configure BIOS Settings for New Installations. |
||
|
Locate the Sun Fire X2250 Tools and Drivers CD or download the mandatory device drivers for Windows 2003 from the following site: |
||
|
Implement a software RAID using the BIOS Setup Utility. For more information, see: |
||
|
Boot Windows Server 2003 installation media to initiate the operating system installation. For more information see one of the following sections: |
||
|
Installed the required system device drivers for Windows Server 2003 installations. For more information, see one of the following sections: |
The Sun-supplied hard disk drives for the X2250 servers are shipped without a RAID configuration. If a RAID configuration is required, you will need to (1) configure the IDE RAID Controller in the BIOS Setup Utility, (2) create a RAID driver floppy diskette, then (3) load the RAID driver into system memory during the Windows Server 2003 installation.
If you are performing a Windows Server 2003 RIS image installation, you will need to add the RAID driver to the RIS image. For more information, seeTo Add Drivers to the RIS Image
|
1. Reboot the server and press F2 when the Sun Logo appears.
The BIOS Utility dialog appears.
2. In the BIOS Utility dialog, select Advanced -> IDE Configuration.
The IDE Configuration menu appears.
3. In the IDE Configuration menu, select Configure SATA AS and press Enter.
A menu appears listing the SATA options: IDE, RAID. IDE is set by default.
4. In the SATA Options menu, select RAID and press Enter.
5. Press F10 to save your changes, exit the BIOS Utility, and reboot the server.
6. While the server is rebooting, press <Ctrl-I> to access the RAID configuration.
The Intel Matrix Storage Manager option ROM dialog appears.
7. In the main menu of the Intel Matrix Storage Manager option ROM dialog, select (1) Create RAID Volume and press Enter.
The Create RAID Volume menu appears.
8. In the Create RAID Volume menu, do the following:
a. Provide a name for the RAID volume and press Enter, or press Enter to accept the default name.
b. Select either RAID 1 (Mirror) or RAID 0 (Stripe) as the RAID level and press Enter.
Use the up and down arrow keys to scroll through the available RAID level values.
c. Specify the volume capacity and press Enter; or press Enter to accept the default volume capacity.
d. Select Create Volume and press Enter.
A warning message appears stating that all data could be lost. Are you sure you want to create this volume? Y or N.
e. In the warning message press Y to confirm the volume creation.
The new RAID volume is created. Information describing the RAID volume appears (for example, the RAID ID, Volume Name, Level, Status).
9. Select EXIT and press Enter to exit the Intel Matrix Storage Manager utility.
A confirmation message appears confirming that you want to exit the Intel Matrix Storage Manager utility.
10. In the confirmation message, press Y to confirm the exit.
|
To prepare the RAID driver for installation, you will need to copy the RAID driver from the Sun Fire X2250 Systems Tools and Drivers CD to a floppy diskette.
Follow these steps to create a floppy diskette that contains the RAID driver required during the Windows Server 2003 installation.
1. On a Windows system, do the following:
a. Insert the Sun Fire X2250 Server Tools and Drivers CD into a CD/DVD-ROM drive.
b. Insert a formatted floppy diskette into an attached floppy diskette drive.
2. In the Sun Fire X2250 Server Tools and Drivers CD browse to the following directory:
drivers/windows/RAID/Intel-ESP.
3. Copy the contents of one the following directories to the root directory of the floppy diskette:
If your X2250 server has a 32-bit version of the Windows operating system copy the RAID driver from the 2003_32 directory.
If your X2250 server has a 64-bit version of the Windows operating system copy the RAID driver from the 2003_64 directory.
This section describes how to boot the Windows Server 2003 installation media from local or remote media.
The following requirements must be met prior to performing the Windows Server 2003 installation:
If necessary, you can set a temporary boot device during the server’s start-up phase (after Step 2 in this procedure) by pressing F8.
For more information about creating the RAID driver floppy diskette, see To Copy RAID Driver to a Floppy Diskette. For more information about configuring redirection of a floppy storage device in the Sun ILOM Remote Console, see Appendix A.
|
1. Prepare the installation media by performing one of the following:
Note that if you are using the Sun ILOM Remote Console application to perform the installation, ensure that the CD-ROM option is selected in the Device menu of the Sun ILOM Remote Console application.
For more information about redirecting storage devices in the Sun ILOM Remote Console, see Appendix A.
2. Reset the X2250 server, for example:
The BIOS splash screen appears.
As the server begins the power-up sequence, it will go through a series of tests and provides you the opportunity to configure the BIOS boot order and storage controllers.
3. When prompted, Press any key to boot CD, press any key on the keyboard to boot from CD.
The Windows text-mode setup program begins and the blue Windows Setup screen appears.
A message appears informing you to press F6 to install third-party drivers.
4. (Optional - Third Party Drivers)
If required, press F6 to load RAID drivers then perform the following steps.
a. In the Windows Setup screen, press S to manually specify the device drivers to install.
The Windows Setup screen listing the available drivers appears.
b. In the Windows Setup screen listing the available drivers, you must load the following mandatory RAID driver into memory:
c. Press Enter to load the driver into memory.
The Windows Welcome to Setup screen appears.
5. In the Windows Welcome to Setup screen, press Enter to set up Windows now.
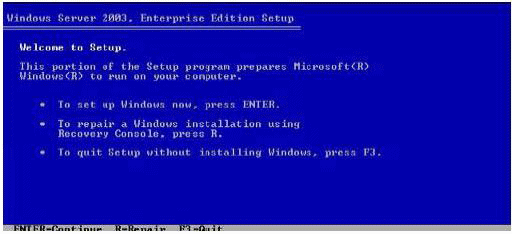
The Windows Server Express or Custom screen appears.
6. Continue the normal Windows installation.
For more details, see Microsoft’s Windows Server 2003 documentation.
7. After the Windows installation completes, you must install the mandatory system device drivers for Windows Server 2003 installations.
For more information, see the following section Install Mandatory Windows System Device Drivers (Post Windows Installation).
After installing Windows Server 2003 software on the X2250 server, you must install, in the order specified, the following mandatory Windows system device drivers.
4. Trusted Platform Module (TPM) security driver
http//www.sun.com/servers/x64/X2250/downloads.jsp
|
The following procedure describes how to install the mandatory Windows system drivers on the X2250 server from the Sun Fire X2250 Server Tools and Drivers CD.
1. Insert the Sun Fire X2250 Server Tools and Drivers CD into the local CD/DVD drive on the X2250 server or virtual CD/DVD drive on the client hosting the Sun ILOM Remote Console application.
Note that if you are using the Sun ILOM Remote Console application to perform the installation, ensure that the CD-ROM option is selected in the Device menu of the Sun ILOM Remote Console application.
For more information about redirecting storage devices from the Sun ILOM Remote Console, see Appendix A.
A list of menu options available on the Sun Fire X2250 Tools and Drivers CD appears.
2. In the Sun Fire X2250 Tools and Drivers menu, select Install and Update System Device Drivers.
The required system device drivers for Windows Server 2003 are automatically installed on the X2250 server.
This section describes how to install Windows Server 20003 over an established PXE-based network using a customer-provided Windows 2003 Remote Installation Services (RIS) image.
The procedures presented in this section document the initial steps you must perform to install Windows Server 2003 over the network using a RIS image. Specifically, this section explains:
This section does not explain how to create a RIS image or how to setup and deploy a RIS network environment. Information concerning how to properly set up and deploy a RIS network environment is outside the scope of this installation guide. For more information, see Microsoft’s documentation for deploying and using Windows Remote Installation Services.
The following requirements must be met prior to performing the Windows Server 2003 installation from a RIS image:
For information concerning how to create a RIS image, see the README.TXT file stored in the drivers/windows/IntelNIC/RIS directory of the Sun Fire X2250 Server Tools and Drivers CD.
Use the following procedure to add Window System Device Drivers to a RIS image.
| Note - Note that the Intel-ESB2 SATA RAID Controller driver is only required if you are implementing a software RAID. For more information about configuring a software RAID, see Configure Software RAID (optional). |
|
1. Create the following directories in RIS_Image (root of your Windows image on the RIS server.):
$OEM$\textmode
$OEM$\$1\Sun\Drivers
2. Add drivers from the Sun Fire X2250 Tools and Drivers CD. Refer to the Readme file on the Sun Fire X2250 Tools and Drivers CD for more information.
3. Update the RIS_Image with the platform-specific drivers:
For more information about adding the drivers to a RIS image, see the Readme file located in the RIS directory of the Sun Fire X2250 Tools and Drivers CD directory.
|
1. Reset the X2250 server, for example:
2. In the Boot Agent screen, press F12 for a network service boot.
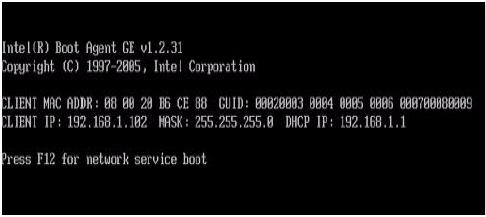
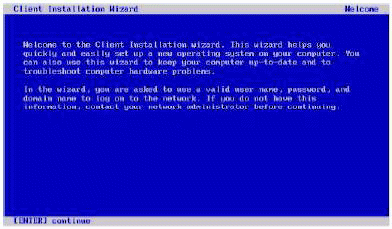
The Welcome to Client Installation wizard appears.
3. In the Welcome to Client Installation wizard, press Enter to continue.
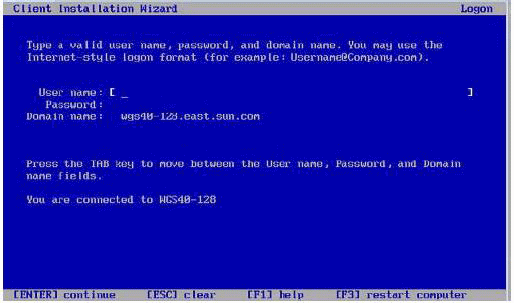
4. The next screen prompts you for a user name, password, and domain name.
5. In the user name and password screen, specify your user name and password, then press Enter.
Use the Tab key to move between fields.
The Windows Server 2003 version screen appears.
6. In the Windows Server 2003 version screen, select the version (32-bit or 64-bit) you are installing, then press Enter.
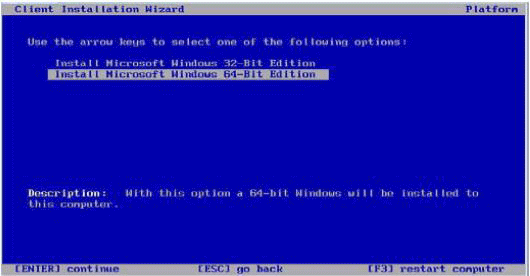
The Windows Server 2003 operating system choice screen appears.
7. In the OS choice screen, select the OS option you are installing, then press Enter.
| Note - The OS choice screen identifies the names of the OS images that are available for you to install from your RIS server. |
8. In the Caution screen, press Enter to continue.
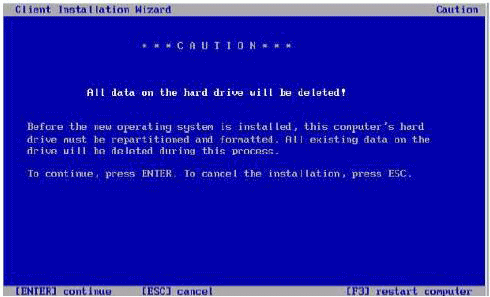
The Installation Information screen appears.
9. In the Installation Information screen, press Enter to continue.
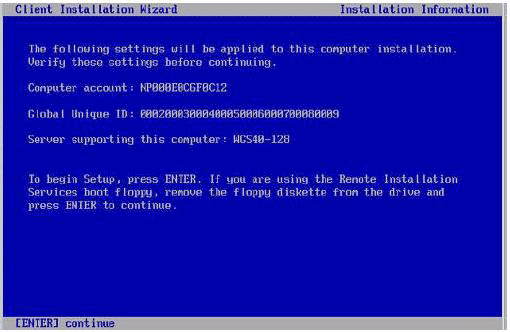
The Administrator Password screen appears.
10. In the Administrator Password screen, specify an OS Administrator password and press Enter.
Note that this password is assigned to the OS installation target.
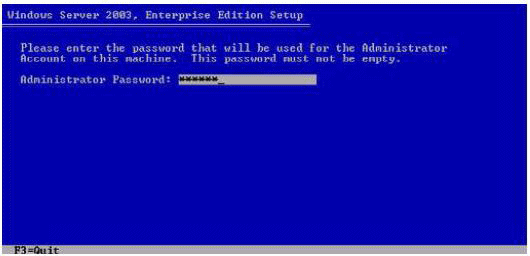
You will be asked to confirm the password.
11. In the Administrator Password Confirmation screen, retype the password and press Enter.
The Windows Setup starts and a message appears that the setup is formatting the partition.
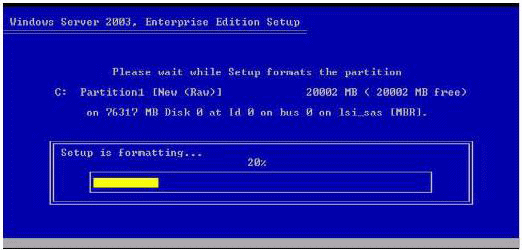
12. Continue the normal Windows Server 2003 installation. For more details, see Microsoft’s Windows Server 2003 installation documentation.
Copyright © 2009 Sun Microsystems, Inc. All rights reserved.