| C H A P T E R 7 |
|
Replacing Chassis Components |
This chapter provides removal and installation procedures for the chassis components.
This chapter contains the following sections:

|
Caution - To prevent equipment damage, review the safety requirements, safety symbols, and safety precautions in Chapter 4before you perform any replacement procedure. Additional cautions, warnings, and instructions are provided in the Ultra 40 Workstation Safety and Compliance Guide, part number 820-0122-10. The document is available at:
http://www.sun.com/documentation |
This section describes the removal and installation of the fan tray and fan tray backplane.

|
Caution - Do not operate the workstation without the fan tray. |
1. Power off the system and open the chassis.
Refer to Section 4.3, Preparing the Workstation for Servicing.
2. Using the handle, pull the fan tray from the chassis and set it aside.
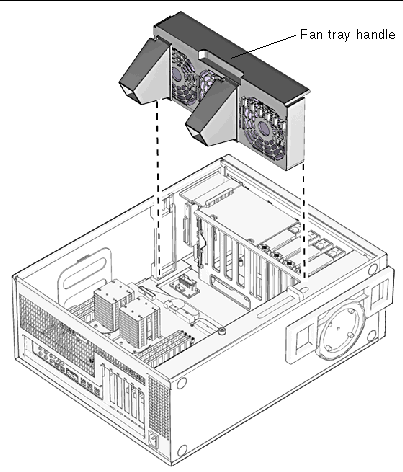
FIGURE 7-1 Removing the Fan Tray (Ultra 40 Shown)
To remove and replace the fan tray backplane:
Refer to Section 7.1.1, Removing the Fan Tray.
2. Disconnect the fan tray backplane power cable from the fan tray backplane.
See FIGURE 7-1.
3. If you are replacing the fan tray backplane power cable, disconnect the cable from the motherboard FAN connector and set it aside.
4. Using a No. 2 Phillips screwdriver, remove the two screws securing the fan tray backplane.
5. Slide the fan tray backplane toward the front of the system so that the two studs protrude from the wide side of the slots.
6. Remove the fan tray backplane and set it aside.
7. Remove the new fan tray backplane (and cable) from its wrapping.
8. Place the new fan tray backplane so that the studs protrude from the wide side of the slots,
9. Slide the new fan tray backplane toward the back of the system so that the studs hold the backplane in place.
10. Using a No. 2 Phillips screwdriver, replace the two screws that secure the backplane.
11. If you are replacing the fan tray backplane power cable, connect one end of the cable to the motherboard FAN connector,
12. Connect the fan tray backplane cable to the fan tray backplane.
Refer to Section 7.1.3, Installing the Fan Tray
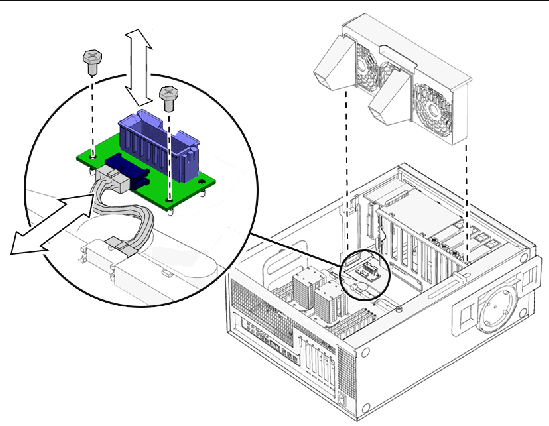
FIGURE 7-2 Removing the Fan Tray Backplane (Ultra 40 Shown)
1. If you have not already done this, power off the system, open and position the chassis, and remove the access panel.
Refer to Section 4.3, Preparing the Workstation for Servicing.
2. Align the fan tray in the chassis slot so that the connector is closest to the top of the chassis and the air ducts point toward the motherboard.
See FIGURE 7-2.
3. Slide the fan tray into place.
Ensure that it does not pinch or tangle any wires or cables.
4. If you are finished working, install the side cover and the access panel, power on the system, and verify the installation.
Refer to Section 8.1, Reassembling the Workstation.
This section describes the removal and installation of the power supply.
TABLE 7-1 lists the power supply specifications.
|
100 VAC (Range 1)
|
|

|
Caution - If you need to replace the power supply unit or system DC fan unit, contact your local Sun Service personnel. Go to the following URL for contact information: http://www.sun.com/service/contacting/solution.html |

|
Caution - Electrical hazard or personal injury can result from using a fan or power supply unit not recommended by Sun Service personnel. |
1. Power off the system, open and position the chassis, and remove the access panel.
Refer to Section 4.3, Preparing the Workstation for Servicing.
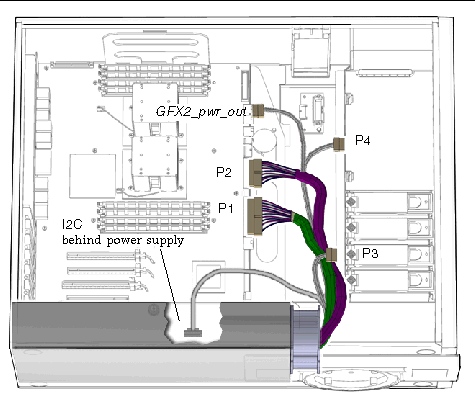
FIGURE 7-3 Power Supply Cables
2. Squeeze the power supply connector clip to disconnect the following cables from the motherboard.
See FIGURE 7-3.
3. Remove the hard drive power cable at connector P3.
4. If P4 is connected to the second hard drive backplane, disconnect it (Ultra 40 M2 only/optional).
If there is no second hard drive backplane, allow P4 to dangle.
| Note - If any extended PCI cards interfere with your ability to access the power cords or connectors, remove the cards as described in Section 5.4, Replacing PCI Cards. |
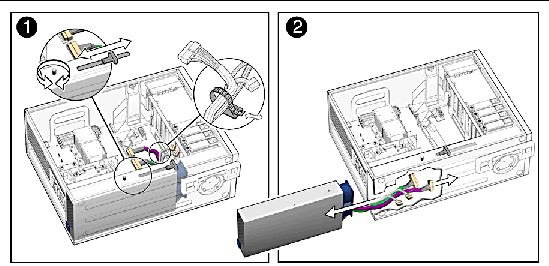
FIGURE 7-4 Removing the Power Supply (Ultra 40 Shown)
5. Turn the captive screw that secures the power supply to the chassis.
See FIGURE 7-4.
6. Using the plastic handle, push the power supply out of the back of the chassis.
7. Guide the power cables out of the chassis as you push the power supply out the back of the chassis.
Place the power supply aside on an antistatic mat.
Proceed to Section 7.2.2, Installing the Power Supply.
1. Open and position the chassis.
Refer to Section 4.3, Preparing the Workstation for Servicing.
2. Remove the new power supply from its package.
3. Align the power supply IEC-320 connector (power cord socket) so that the socket is nearest the left rear of the chassis (left rear when viewed from the back).
See FIGURE 7-5.
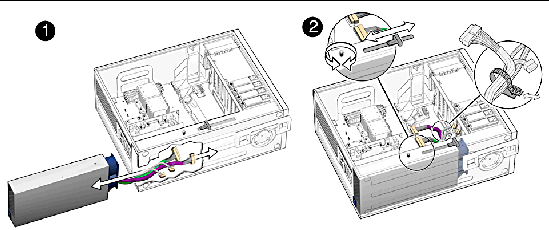
FIGURE 7-5 Replacing the Power Supply (Ultra 40 Shown)
4. Guide the cables and push the power supply into the chassis opening until the back of the power supply aligns with the back of the chassis.
5. Tighten the captive screw that secures the power supply to the chassis.
See FIGURE 7-5.
6. Route the cables under the hard drive signal cable, and over the DVD signal cable.

|
Caution - Take particular care to ensure that cables will not interfere with or get tangled in the fan tray. |
7. Connect the following cables to the motherboard.
See FIGURE 7-3.
8. Connect the hard drive power cable at P3.
9. Connect the splitter on cable P4 to GFX2_pwr_in (or GFX2_pwr_out) on the motherboard.
10. If a second hard drive backplane is present, connect P4 to it (Ultra 40 M2 only/optional).
See FIGURE 7-3.
11. Inspect the power supply fasteners to verify that they are connected properly.
12. Inspect the power supply cabling to verify that the cables are routed and connected properly.
13. If you removed any extended PCI cards to access the cables or connectors, replace them.
Refer to Section 5.4, Replacing PCI Cards.
14. Install the side cover and the access panel, power on the system, and verify the installation.
Refer to Section 8.1, Reassembling the Workstation.
| Tip - Boot the system with the -r option, so that the Solaris operating system can reconfigure itself for the new component. See Section 8.1, Reassembling the Workstation. |
Copyright © 2008, Sun Microsystems, Inc. All Rights Reserved.