JavaScript is required to for searching.
Skip Navigation Links
Exit Print View
Sun Fire X4800 Server Service Manual
search filter icon
search icon

Document Information

Using This Documentation

Product Information Web Site

Documentation and Feedback

About This Documentation (PDF and HTML)

Contributors

Change History

Sun Fire X4800 Server Service Manual Overview

Server and Component Overview

Sun Fire X4800 Server Overview

Component Overviews

Power and Reset

Power Modes

Power Button and Power OK LED

How to Power On the Server

How to Power Off the Server

Controlling Server Power Remotely

Removing and Installing Components

Preparing for Service and Operation

Removal and Installation Procedures

Removing and Installing a Power Supply (CRU)

Removing and Installing a Hard Drive (CRU)

Removing and Installing a Hard Drive Filler

Replacing the Hard Drive Backplane (FRU)

Adding, Removing, and Installing a CMOD (CRU)

CPU Module (CMOD) Designation and Population Rules

Removing and Installing a CMOD Filler

How to Replace the CMOD Battery (CRU)

Removing and Installing DIMMs (CRU)

DIMM Population Rules

Removing and Installing a RAID Expansion Module (CRU)

How to Replace the RAID Expansion Module Battery (CRU)

Removing and Installing a Fabric Expansion Module (CRU)

Replacing a CPU and Heatsink Assembly (FRU)

Removing and Installing a Fan Module (CRU)

Replacing a Fan Module Controller Board (FRU)

Removing and Installing a NEM or a NEM Filler (CRU)

Removing and Installing a PCIe EM (CRU)

Removing and Installing the Service Processor Module (CRU)

Removing and Installing the Multi port Cable

Removing and Installing the Subassembly Module (FRU)

How to Remove the Subassembly Module

How to Install the Subassembly Module

Sun Fire X4800 Server Service Procedures, and Information

Managing FRUID Information

Firmware Information and Procedures

How to Access the BIOS Setup Utility

Updating the CPLD

Component LED Locations and Meanings

Sun Fire X4800 Server Specifications

Physical Specifications

Power Specifications

Environmental Specifications

Index

How to Install the Subassembly Module

Before You Begin

Sun Fire X4800 Server Subassembly Module Overview

  1. Prepare the server for service. See How to Prepare for Service.
  2. Remove the SAM. See .How to Remove the Subassembly Module.
  3. From the back of the server, ensure that the hard drive backplane cables are correctly routed. See Hard Drive Backplane Cable Routing and Designations.
  4. Position the SAM with the Fan module drive bay on the left.
  5. Insert the SAM into rear of the server chassis.
  6. Carefully slide the SAM into the chassis until it stops.

    In this position the screws that secure the SAM to the interior chassis might not be touching their corresponding screw holes.

  7. To ensure that the SAM mounting screws touch the interior screw holes on the chassis, firmly push the SAM inward until you can engage the screws.
  8. To partially secure the SAM in the server, use a long No. 2 screwdriver to tighten the three right–most green captive screws.

    Two of the captive screws are accessible through the airflow vanes of Fan module bays FM 0 and FM 2. To access the screws lift open the top and bottom airflow vanes.
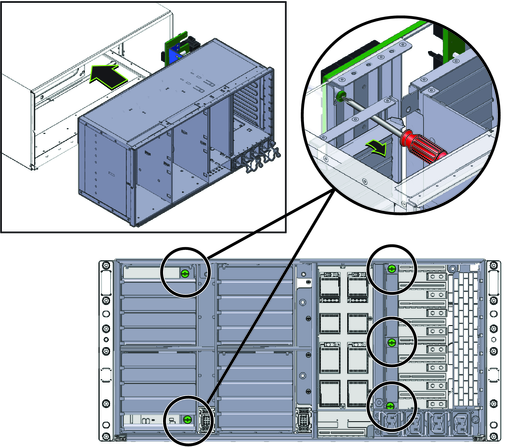
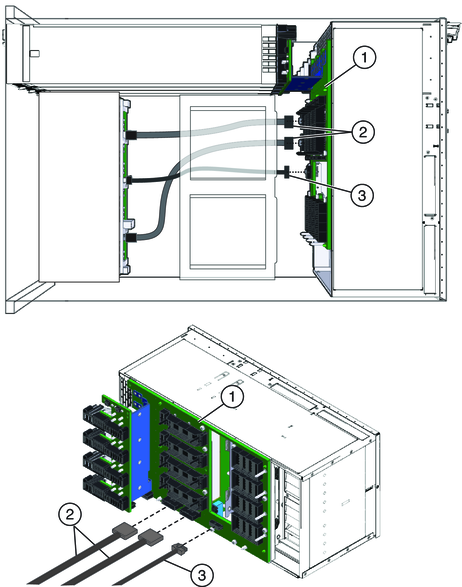
    image:An illustration showing how to install the SAM.
  9. To fully secure the SAM in the server, carefully open the air vanes of the two left FMs and tighten the two green captive screws.
  10. From the front of the server, connect the three hard drive backplane cables to the midplane.
    image:An illustration showing where to connect the hard drive backplane cables on the midplane.
  11. At the rear of the server, install the fan controller boards. See How to Install a Fan Module Controller Board.
  12. Install the four Fan modules. See How to Install a Fan Module.
  13. Install the Network Express modules or Network Express module fillers. See How to Install a NEM or a NEM Filler.
  14. Install the PCIe Express modules or PCIe Express module fillers. See How to Install a PCIe EM or PCIe EM Filler.
  15. Install the SP module. See How to Install the SP Module.
  16. Connect any cables network cables to the rear of the server.
  17. Prepare the server for operation. See How to Prepare for Operation.
  18. Backup and update the FRUID for the SAM serial number. See Managing FRUID Information.

See Also

How to Remove the Subassembly Module