|
| |
| Sun Java[TM] System Identity Manager 7.1 Admininstration | |
Chapter 2
Getting Started with Identity ManagerRead this chapter to learn about the Identity Manager graphical interfaces and how you can quickly begin using Identity Manager. Topics covered include:
Identity Manager InterfacesThe Identity Manager system includes three primary graphical interfaces through which users perform tasks:
Identity Manager Administrator Interface
The Identity Manager Administrator interface serves as the primary administrative view of the product. Through this interface, Identity Manager administrators manage users, set up and assign resources, define rights and access levels, and audit compliance in the Identity Manager system.
Interface organization is represented by these elements:
- Navigation bar tabs — Located at the top of each interface page, these tabs let you navigate major functional areas.
- Subtabs or menus — Depending on your specific implementation, you may see secondary tabs or menus below each navigation bar tab. These subtab or menu selections let you access tasks within a functional area.
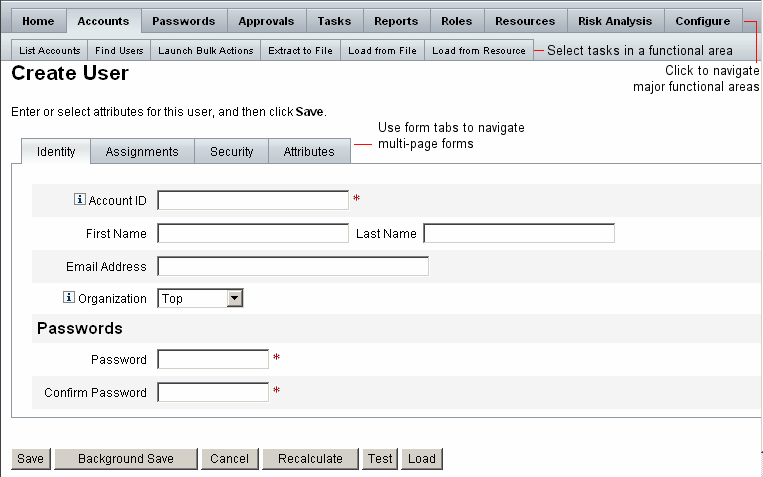
In some areas, such as Accounts, tabbed forms divide longer forms into one or more pages, enabling you to navigate them more easily. This is illustrated in Figure 2-1.
Figure 2-1 Identity Manager Administrator Interface
Administrator Interface Logon
When you log on to the Administrator interface, you remain logged on according to the session limits established for your implementation, with one exception. If cookies are disabled for your Web browser, then these actions will cause the system to prompt you to log in again during the session:
To avoid multiple login requests, enable cookies.
Identity Manager User Interface
The Identity Manager User interface presents a limited view of the Identity Manager system. This view is specifically tailored to users without administrative capabilities.
When a user logs in to the Identity Manager User interface, any pending work items and delegations for the user are displayed on the Home tab, as illustrated in the following figure:
Figure 2-2 User Interface (Home Tab):
The Home tab provides quick access to any pending items. Click an item in the list to respond to a work item request or perform other available actions. After the action has been completed, click Return to Main Menu to go back to the Home page.
A user can perform various activities from the User interface, such as changing their password, performing self-provisioning tasks, and managing work items and delegations.
The following options are available to a user from the User interface:
- Delegations — View current delegations or specify a delegation.
- Profile — Change your user password or account attributes or perform other self-provisioning tasks using the following subtabs:
- Change Password — Select this option to change your password on a selected resource or all resources.
- Account Attributes — Select this option to change user-editable attributes, such as your account email address. (This is the email address that Identity Manager uses to send out notifications about your account.)
- Authentication Questions — Select this option to change your answers to authentication questions for your user account.
- Access Privileges — Select this option to view the resource assignments (direct or indirect) for this account.
Customizing the User Interface
The User interface is often customized to present a unique, company-specific view and offer custom selections.
Customizing Navigation Layout
If preferred, the navigation in the User interface can be changed from a horizontal-tab view (default) to a vertical tree view. To configure the vertical navigation view, set the following configuration object:
ui.web.user.menuLayout = 'vertical'
For more detailed information about customizing and branding the User interface, read Identity Manager Technical Deployment Overview.
Customizing Dashboard Display Options
From the Administrator interface, you can select which options you want to display on the user dashboard. To configure display options, select Configure, and then select User Interface.
By default, all available, configurable information displays on the user dashboard. You can de-select one or more of these options to prevent information display:
- displayPasswordExpirationWarning — Select to display messages related to password expiration if password policy is applied to an account.
- displayAttestationReviews — Select to display the number of attestation work items.
- displayOtherWorkItems — Select to display the number of other work items.
- displayRemediations — Select to display the number of remediation work items.
- displayApprovals — Select to display the number of approval work items.
- displayLoginFailures — Select to display the number of unsuccessful password or authentication question login attempts. Appears only if a value for maximum login attempts has been configured for the user's account policy.
- displayDelegations — Select to display a string that indicates that the user has defined an approval delegation.
- displayRequests — Select to display the number of outstanding requests for role, group, or resource updates for an account.
Identity Manager IDE
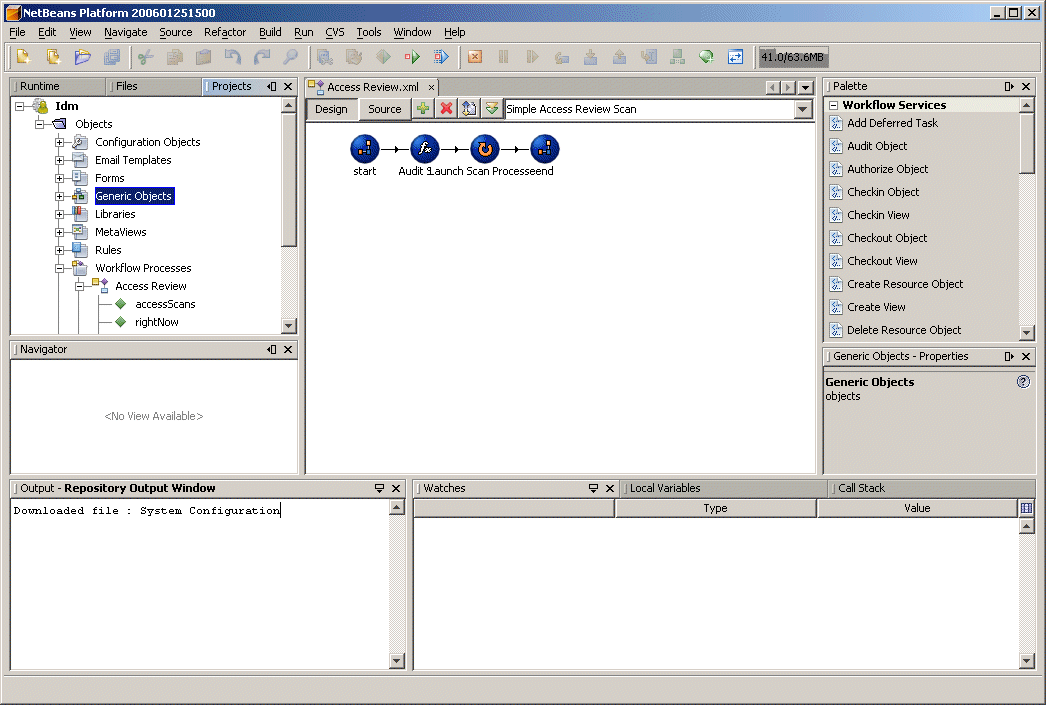
The Sun Identity Manager Integrated Development Environment (IDE) provides a graphical view of Identity Manager forms, rules, and workflows. Using the IDE, you create and edit forms that establish the features available on each Identity Manager page. You can also modify Identity Manager workflows, which define the sequence of actions followed or tasks performed when working with Identity Manager user accounts. Additionally, you can modify rules defined in Identity Manager that determine workflow behaviors. The following figure shows the IDE interface.
Figure 2-3 Sun Identity Manager IDE interface
For more information about the IDE and using it to work with Identity Manager forms and workflows, see Identity Manager Workflows, Forms, and Views.
You can also use the Business Process Editor (BPE) to make customizations, if you have it installed with earlier versions of Identity Manager.
Help and GuidanceTo successfully complete some tasks, you might need to consult Help and Identity Manager guidance (field-level information and instructions). Help and guidance are available from the Identity Manager Administrator and User interfaces.
Identity Manager Help
For task-related help and information, click the Help button, which is located at the top of each Administrator and User interface page, as depicted in Figure 2-4.
Figure 2-4 Help button in the
Identity Manager interface
At the bottom of each Help window is a Contents link that guides you to other Help topics and the Identity Manager terms glossary.
Finding Information
Use the search feature in the Help window to locate topics and information included in Identity Manager Help and documentation. To search the online documentation, use the following procedure:
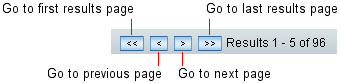
The search returns linked search results. Use the Previous/Next or First/Last buttons to page through the listed results, as demonstrated in Figure 2-5.
Figure 2-5 Search Results Navigation
Clicking Reset clears the contents of the Help window.
Search Behavior
If you search for more than one word, the search feature returns results that include each word, both words, and variants.
For example, if you enter the following search term:
resource adapter
then the returned results will include matches to the following words:
However, if you include search terms in quotations (for example, “resource adapter”), then the search feature returns only exact matches to that phrase.
Alternatively, you can use advanced query syntax to specifically include, exclude, or order query elements.
Advanced Query Syntax
The Search feature supports advanced query syntax, including:
See Appendix B, "Advanced Search for Online Documentation" in this guide for more information about Identity Manager’s advanced documentation search features.
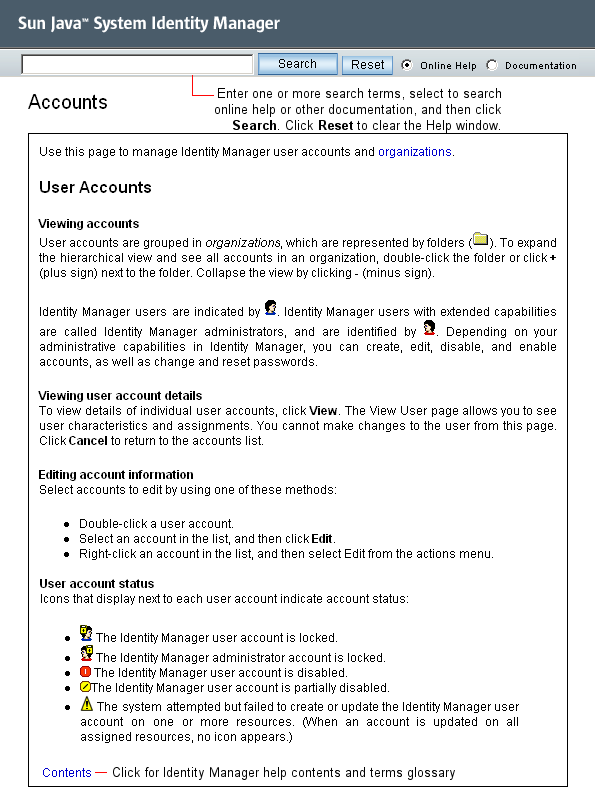
Figure 2-6 Identity Manager Help
Identity Manager Guidance
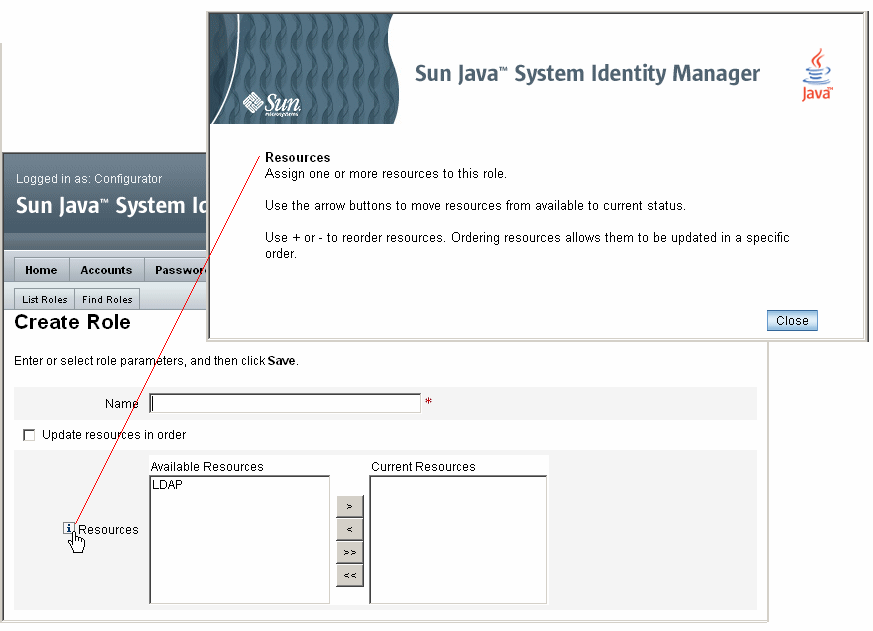
Identity Manager guidance is brief, targeted help that appears next to many page fields. Its goal is to help you enter information or make selections as you move through a page to perform a task.
A symbol marked with the letter “i” displays next to fields with guidance. Click the symbol to open a window and display its associated information.
Figure 2-7 Identity Manager Guidance
Logging In to Identity ManagerTo log in to the Identity Manager Administrator or User interfaces, enter your user ID and password, and then click Login.
Forgotten User ID
Identity Manager allows you to retrieve your forgotten user ID. When you click Forgot Your User ID? from the login page, a lookup page appears and requests identity attribute information associated with your account, such as first and last name, email address, or phone number.
Identity Manager then constructs a query to find a single user matching the entered values. If no match is found, or multiple matches are found, then an error message appears on the Lookup User ID page.
By default, the lookup feature is enabled. However, it can be disabled by one of the following actions:
The set of user attribute names presented are configured through the system configuration attributes security.authn.<Administrator Interface | User Interface>.lookupUserIdAttributes. The attributes that can be specified are those defined as queryable attributes in the UserUIConfig configuration object.
If recovered, then Identity Manager sends email to the email address of the recovered user by using the User ID Recovery email template.
Identity Manager TasksThe following tasks matrix provides a quick reference to commonly performed Identity Manager tasks. It shows the primary Identity Manager interface location where you will go to begin each task, as well as alternate locations or methods (if available) that you can use to perform the same task.
Where to Go from HereAfter you become familiar with Identity Manager interfaces and the ways that you can find information, use the following reference to guide you to the topics you want to focus on: