Defining Worklist Manager Tasks
Perform these tasks in the following order to create a WLM project and define worklist tasks:
(Optional) Connecting to the LDAP Server
If you are using an LDAP directory as your source for security, you should connect to the LDAP server from NetBeans before defining your tasks. Once you are connected, you can use the WLM SE LDAP browser to assign users and groups to Worklist Manager tasks by dragging and dropping entries from the LDAP directory into the Task Definition Editor.
 To Connect to the LDAP Server
-
On the NetBeans IDE, click the Services tab.
-
Right-click LDAP Servers and then select Add LDAP Connection.
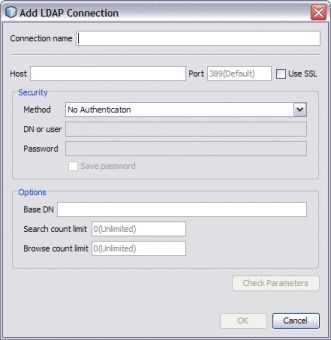
The Add LDAP Connection dialog box appears.
-
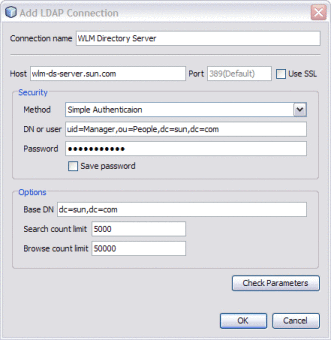
In the Connection Name field, enter a name for the connection.
-
In the Host field, enter the name of the LDAP server.
-
If you are using SSL, select Use SSL.
Note that the port number changes from 389 to 636.
-
In the Security section, do one of the following:
-
If authentication is not required, leave the authentication method at No Authentication.
-
If authentication is required, select Simple Authentication and then enter the following information:
-
DN or user: The distinguished name (DN) of the security principal used for connecting to the LDAP server.
-
Password: The password of the security principal.
-
To save the password information in NetBeans, select Save Password.
-
-
-
In the Options section, do the following:
-
In the Base DN field, enter the root DN for the user's directory.
For example, dc=sun,dc=com.
-
In the Search Count Limit field, enter the maximum number of results to return from a search of the LDAP directory.
-
In the Browse Count Limit field, enter the maximum number of LDAP entries to show when browsing the directory.
The above two options are useful if the directory is very large.
-
-
Click Check Parameters.
NetBeans verifies that the connection parameters are correct and lets you know whether the connection succeeded or failed.
-
Click OK to close the Add LDAP Connection dialog box.
-
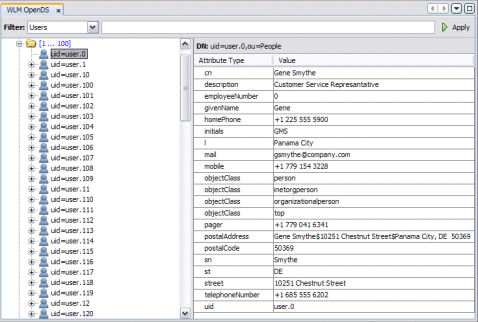
To browse the LDAP directory, expand LDAP Servers and double-click the connection you just added.
The LDAP Browser appears with the directory information displayed.
-
To install the sample console projects, continue to (Optional) Installing the Sample Worklist Manager Console Projects; otherwise skip to Creating the Worklist Module Project.
(Optional) Installing the Sample Worklist Manager Console Projects
A default Worklist Manager Console is automatically deployed to the application server when you install the WLM SE. The corresponding sample Worklist Manager Console projects are also included in the NetBeans Samples projects. You can use this console for testing purposes or you can customize it for use in production.
Note –
Two Worklist Manager samples, WLM Purchase Order and WLM Advanced Purchase Order, are also provided.
 To Install the Sample Worklist Manager Console
-
Right-click in the Projects window of the NetBeans IDE.
-
Select New Project.
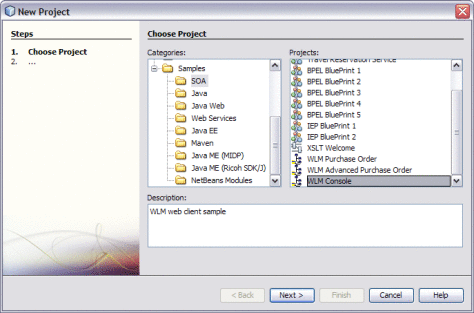
The New Project Wizard appears.
-
In the Categories panel, expand Samples and then select SOA.
-
Under Projects, select WLM Console.
-
Click Next, and then click Finish.
Two projects are installed: WLMConsoleWeb and WLMConsoleCompApp.
-
Continue to Creating the Worklist Module Project.
Creating the Worklist Module Project
You create Worklist Manager tasks in a Worklist Module project. This project stores the XML schema definitions, WSDL files, and Worklist Manager task definition files.
 To Create the Project
-
If you are using LDAP for task assignment and authentication, complete the steps under (Optional) Connecting to the LDAP Server.
-
On the NetBeans IDE, click the Projects tab.
-
Right-click in the Projects window, and select New Project.
The New Project Wizard appears.
-
Select SOA under Categories, and then select Worklist Module under Projects.
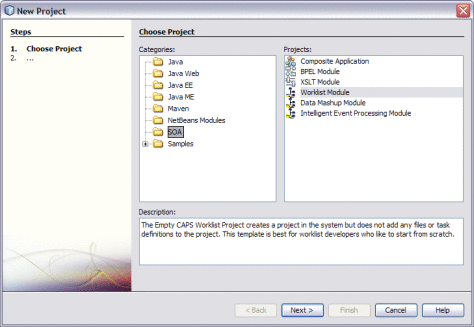
-
Click Next.
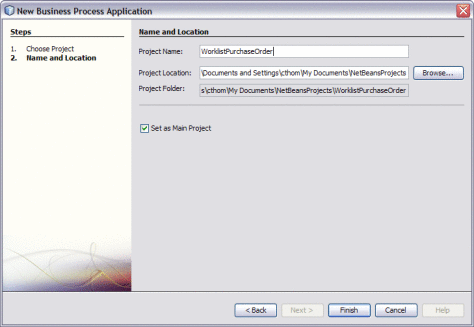
The Name and Location window appears.
-
Enter a unique name for the Project and verify or update the directory for the project files.
-
Click Finish.
The new project appears in the Projects window with two folders – Worklist Files and Referenced Resources.
-
Continue to Creating the XML Schema Definition (XSD).
Creating the XML Schema Definition (XSD)
The XML schema defines the message structure and operations for the input and output data. Complex message structures are defined in the XSD file and then imported into the WSDL documents. Make sure that the input for the task matches the data structure that will be sent from the workflow or business process. This procedure provides very general instructions for creating an XSD file.
 To Create the XML Schema Definition
-
Complete the steps under Creating the Worklist Module Project.
-
In the NetBeans Projects window, right-click Worklist Files in the project you just created, and select New XML Schema.
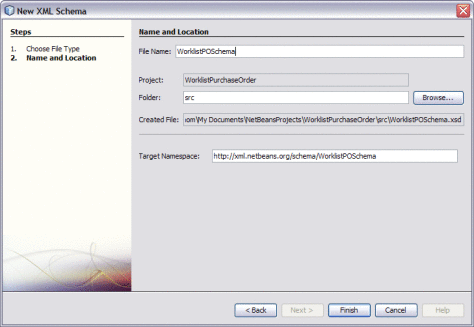
The New XML Schema Wizard appears.
-
Enter a unique name for the schema, and verify or change the folder location for the file.
-
Click Finish.
The new file appears in the Project window in the Worklist Files folder of the worklist project, and opens in the XML Editor.
-
Define the schema for the WSDL document by adding complex types, simple types, elements, and so on.
-
Continue to Creating the WSDL Document.
Creating the WSDL Document
The WSDL document defines the interface for the worklist project. The instructions below outline how to create a very simple WSDL document. Yours may be more complex, depending on your data processing needs.
Note –
If this WSDL is used in a main BPEL process, communication is synchronous. If it is used in a subprocess, communication can be asynchronous.
 To Create the WSDL Document
-
Complete the steps under Creating the XML Schema Definition (XSD).
-
In the NetBeans Projects window, right-click the Worklist Files folder in the worklist project, and then select WSDL Document.
The New WSDL Document Wizard appears.
-
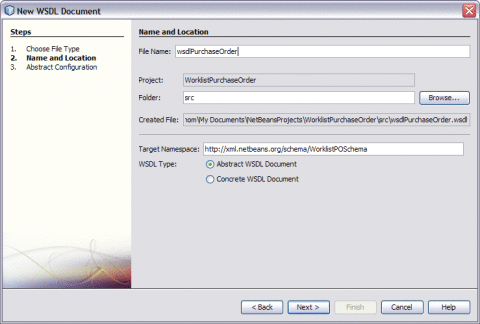
Enter a name for the WSDL document, and verify or update the folder location for the file.
-
Select Abstract WSDL Document.
For Worklist Manager purposes, you generally only need an abstract WSDL document. Since Worklist Manager tasks are typically used within a BPEL process, there is no need to define bindings and services.
-
Click Next.
The Abstract Configuration window appears.
-
In the Input section, click the ellipses next to part1, select the appropriate input type from the XML schema you created, and then click OK.
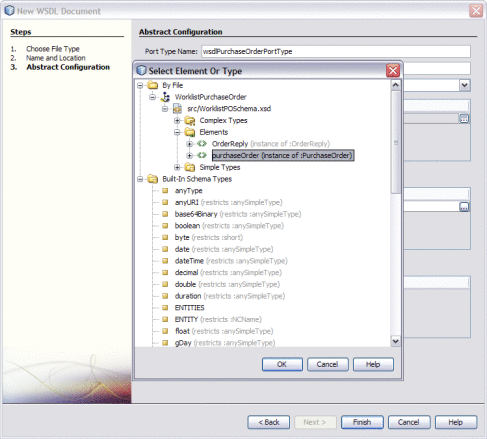
Note –If you have trouble accessing your schema elements from the dialog box, copy the schema file into the Referenced Resources folder of the project using the Refactor > Copy option.
-
Repeat the above step for the Output section.
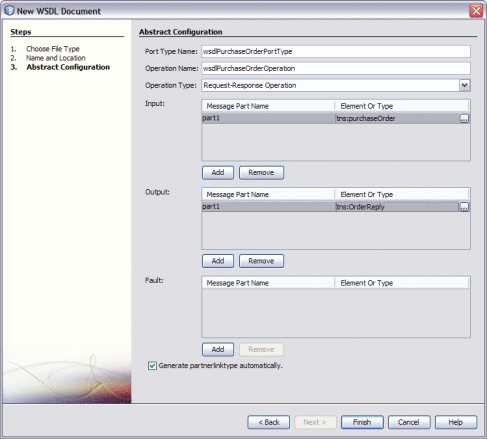
-
On the New WSDL Document Wizard, click Finish.
-
Continue to Creating the Worklist Manager Task Definition.
Creating the Worklist Manager Task Definition
Once the XSD and WSDL files are created and configured, you can define the Worklist Manager task. This includes the basic steps outlined below as well as the more advanced tasks described in Configuring Advanced Task Options, such as defining notifications and escalations.
 To Create the Worklist Manager Task Definition
-
Complete the steps under Creating the WSDL Document.
-
In the NetBeans Projects window, right-click Worklist Files in the worklist project, point to New, and then select Worklist Task Definition.
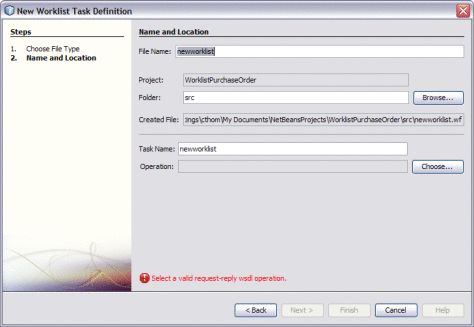
The Task Definition Wizard appears.
-
Enter a name for the task definition file, and verify or update the file location in the Folder field.
-
Update the task name (optional).
-
Click Choose next to the Operation field.
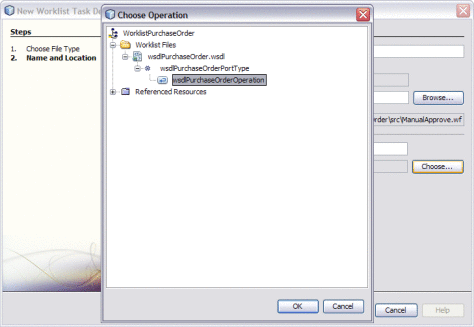
The Select Operation dialog box appears with the project file hierarchy shown.
-
Expand the project nodes until you see the WSDL operation you want to implement, select the operation, and then click OK.
-
On the Task Definition Wizard, click Finish.
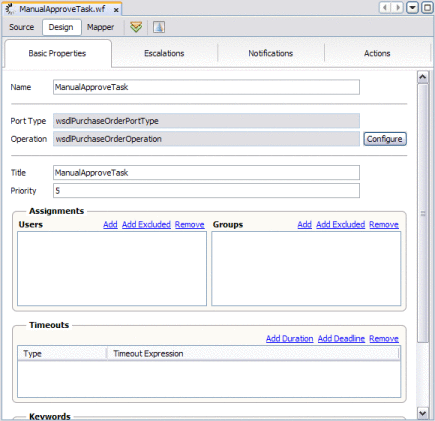
The new task definition file appears in the project tree and opens in the Task Definition Editor.
-
Register the namespace prefix of the schema file by doing the following:
-
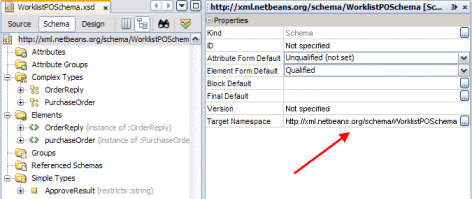
Open the schema file you created for this project and display its properties (Window > Properties).
-
Copy the value of the Target Namespace property.
-
Return to the task definition file, and click the Source tab.
-
Add an attribute named xmlns:namespace-prefix to the task element, and paste the namespace from the schema file as the value (within double-quotes).
The following example registers the namespace prefix as 'po'.
<task xmlns:xsi="http://www.w3.org/2001/XMLSchema-instance"
      ...
      xmlns:po="http://xml.netbeans.org/scheme/WorklistPOSchema">
-
-
Save the changes and click the Design tab.
-
In the Title field, enter a title for the task.
This is the name of the task as it appears in the Worklist Manager Console's task list.
Tip –You can use XPath expressions to define variables that derive the values for the Title and Priority properties from the incoming data. For more information on using XPath expressions, see Using XPath Expressions and Functions in Task Definitions.
-
In the Priority field, enter a priority for the task from 1 to 10, with 10 being the highest priority.
-
Continue to Assigning Users and User Groups to a Task.
Assigning Users and User Groups to a Task
As part of the task definition, you need to assign users or groups of users to the task in order for those users to be able to view and edit the task on the Worklist Manager Console or client. You can also specify that a user or group be excluded from a task.
The WLM SE supports security through either a file realm or through LDAP. The method you use to assign users and user groups to a task depends on which of the security methods you use. Perform the appropriate task below, depending on whether you are using file realm or LDAP security.
In this step, you create either static or dynamic assignments. With static assignments, you specify the specific users and groups to whom tasks will be assigned. With dynamic assignments, you specify a field in the incoming data that contains the name of the users or groups to whom the task will be assigned. This is done using XPath expressions. For more information, see Entering XPath Variables in Design View.
 To Assign File Realm Users and Groups to a
Task
This procedures describes how to manage user and group assignments for a task using file realm security through the GlassFish server. The users and groups you enter here must also be defined for the file realm as described in Defining Worklist Manager Console Security Using a File Realm.
Tip –
Instead of entering the actual user names and groups, you can assign users and groups using XPath expressions, which derive the values from the input data. For information and instructions, see Using XPath Expressions and Functions in Task Definitions.
-
Complete the steps under Creating the Worklist Manager Task Definition.
-
If it is not already open, double–click the task definition file to open it in the Task Definition Editor.
-
To assign a user to the task, do the following:
-
In the Assignments section under Users, click Add.
A new row appears in the Users list.
-
Select NewUser, and replace it with either the user login name or the XPath expression that will obtain the name from the input data.
Note –The user names you enter here must be defined in the GlassFish server file realm security.

-
-
To specify that a user be excluded from a task, do the following:
-
To delete an entry from the Users list, select the entry to delete and then click Remove in the Users section.
-
To assign a group to the task, do the following:
-
In the Assignments section under Groups, click Add.
A new row appears in the Groups list.
-
Select New Group, and then enter either a name for the group or an XPath expression that will obtain the group name from the input data.
Note –The group names you enter here must be defined in the GlassFish server file realm security.

-
-
To specify that a group be excluded from a task, do the following:
-
In the Assignments section under Groups, click Add Excluded.
A new row appears in the Groups list.
-
Select NewExcludedGroup, and then enter either a name for the group or an XPath expression that will obtain the group name from the input data.
The new name or expressions appears with strikes through the text.

-
-
To delete an entry from the Groups list, select the entry to delete and then click Remove in the Groups section.
-
Continue to Configuring Advanced Task Options.
 To Assign LDAP Users and Groups to a Task
The Task Definition Editor includes an LDAP browser that allows you to browse the LDAP directory, and then drag and drop users and groups directly from the LDAP browser into the assignment lists.
-
Complete the steps under (Optional) Connecting to the LDAP Server and Creating the Worklist Manager Task Definition.
-
If it is not already open, double–click the task definition file to open it in the Task Definition Editor.
-
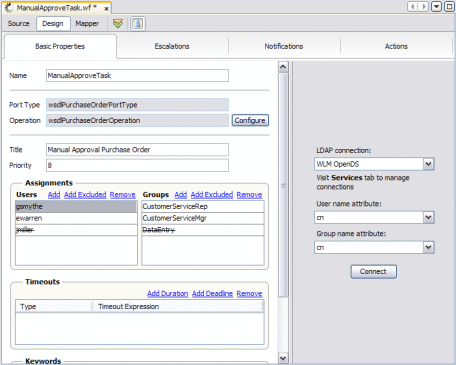
In the Task Definition Editor toolbar, click the LDAP Connection icon (this looks like a blue triangle).
The LDAP Connection pane appears.
-
Select the name of the LDAP connection to connect to, and then select the user and group name attributes you want to browse. To select an attribute that is not in the list, select Other and then enter the attribute name in the dialog box that appears.
-
Click Connect.
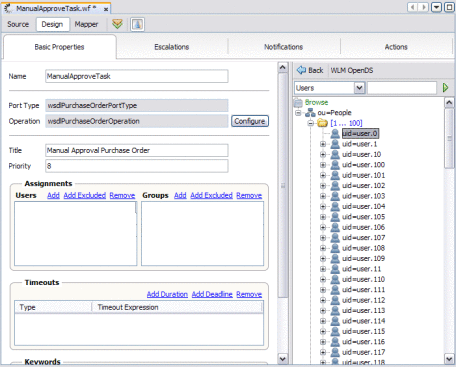
The directory opens in the LDAP Connection panel.
-
To search for a user or group entry, do the following:
-
In the top left field, select the LDAP entity or attribute you want to search by.
-
In the top right field, enter a value for that entity.
To perform a wildcard search, enter an asterisk (*) for any characters you are unsure of.
-
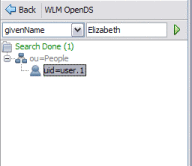
Click the right arrow button to initiate the search.
The results appear in the browser panel.
-
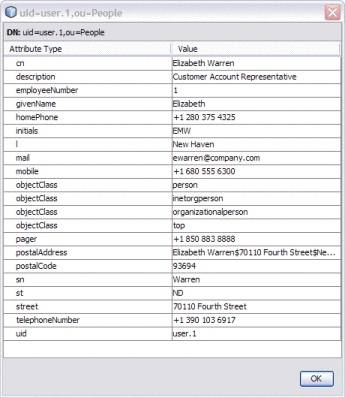
Double-click a result to view detailed information about the entry.
-
-
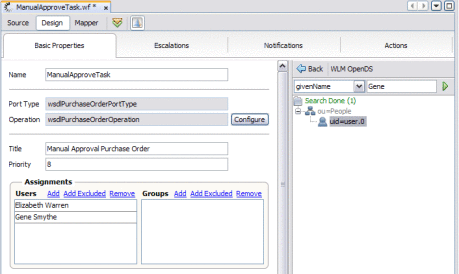
To assign a user to a task, display their entry in the browser panel and then drag and drop the entry into the Users list.
The user's name appears in the list.
-
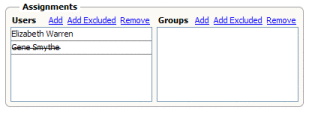
To exclude a user from a task, display their entry in the browser panel and then press the Ctrl key and drag and drop the entry into the Users list.
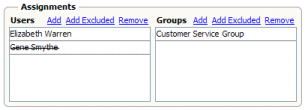
The user's name appears in the list with strikes through the text.
-
To delete an entry from the Users list, select the entry to delete and then click Remove in the Users section.
-
To assign a group to a task, display the group entry in the browser panel and then drag and drop the entry into the Groups list.
The group name appears in the list.
-
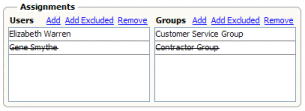
To exclude a group from a task, display their entry in the browser panel and then press the Ctrl key and drag and drop the entry into the Users list.
The user's name appears in the list with strikes through the text.
-
To delete an entry from the Groups list, select the entry to delete and then click Remove in the Groups section.
-
Click Save All on the NetBeans toolbar.
-
Continue to Configuring Advanced Task Options (optional).
- © 2010, Oracle Corporation and/or its affiliates

