Part II End-User Information
This part includes end-user information.
Chapter 2 Introduction to the Korean Solaris Software
This chapter describes the design of the Korean Solaris software. The chapter also provides information about the locales supported in the Korean Solaris environment. The chapter discusses the following topics:
Design of the Korean Solaris Software
The Korean localization of the internationalized release of CDE provides two work environments: a user environment and a development environment. Each environment is localized to handle the linguistic and cultural conventions that are unique to the Korean language.
-
The user environment has desktop tools and a window manager (dtwm) that are customized to communicate in the language of a particular locale.
-
The development environment provides internationalized versions of Xlib and Motif that programmers use to develop localized applications. For further information, see the International Language Environments Guide.
Korean Locales
You can set any of the following locales when you login to your Korean desktop:
-
C – ASCII English environment.
-
ko – Korean extended UNIX code (EUC). This locale supports the KS C 5601-1992 standard.
-
ko.UTF-8 – Korean Universal Multiple Octet Coded Character Set (UCS) Transmission Format. This locale supports the Unicode 3.2 standard.
-
ko_KR.EUC – Symbolic link to the ko locale.
-
ko_KR.UTF-8 – Symbolic link to the ko.UTF-8 locale.
How to Set the Locale at Login
You can set your default locale or change it using the following procedure.
-
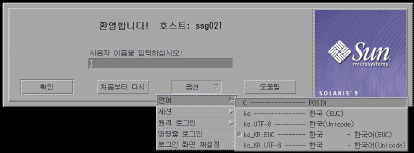
Choose Language from the Options menu on the login screen.
-
Select the desired locale for your CDE session.
Your choices are the C, ko, ko.UTF-8, ko_KR.UTF-8, and the ko_KR.EUC locales.
Chapter 3 CDE
The following sections provide information on the Korean localization of the Korean Common Desktop Environment (CDE) for windowed applications.
Korean Graphical User Interface
The Korean CDE Motif graphical user interface is similar in layout and design to the U.S. release of CDE. Korean CDE supports multibyte characters and Korean messages with Motif objects. Differences in character width and proportional spacing cause minor differences in the exact layout of some Motif objects.
All application windows that can take Korean input include a status area associated with their input window to show the current conversion mode. With an input conversion mode on, as Korean is being typed its entry point becomes a highlighted (reverse video) preedit area until the input is converted to Korean or special characters and committed. Some input modes also provide conversion choices among several Korean characters on menus.
Korean Input/Output
To accommodate the diversity of Korean, the Solaris software provides several different input methods for entering Korean characters. With these methods you can enter ASCII/English characters and Korean Hangul/Hanja characters using an ASCII keyboard or a Korean keyboard.
Your Korean input is stored temporarily as an intermediate representation. The Korean language engine then transforms the representation into the displayed character string.
Localized CDE Desktop
The following desktop tools are available in this release. All of the tools can handle Korean input and output.
-
Address Manager – Carries out remote operations and finds information about the systems and users on your network. This application can speed up such tasks as sending email, logging in remotely, and setting appointments on someone else's calendar.
-
Application Manager – Manages the tools and other software applications available on your system.
-
Audio Tool – Records, plays, and saves audio files in AU, AIFF, and WAV format.
-
Calendar Manager – Manages appointments and To Do lists. You can use this application to set and distribute appointment reminders.
-
Clock – Displays the current time in analog or digital format. You can control the display of local time with this application.
-
Console – Starts a dtterm terminal emulator as your workspace console window.
-
File Manager – Displays the files and folders on your system. You can move, copy, open, and delete files and folders with this application. You can also use the application to view the contents of your floppy diskettes and CD-ROM discs.
-
Find Files – Enables you to search your system for files or folders that match specific search criteria. Your criteria might include, for example, the name, location, or the size of a file or folder you want to find.
-
Front Panel – Contains controls for access to applications and utilities on the system. The Front Panel is a centrally-located window that occupies all workspaces.
-
Icon Editor – Enables you to create new icons or modify existing icons.
-
Image Viewer – Enables you to view, print, and save the contents of file types such as GIF, TIFF, JPEG, and PostScript. You can use the Snapshot function of this application to capture a picture of a window or another part of your screen. The picture is saved as a raster file in bitmap format.
-
Mailer – Handles the distribution and receipt of your electronic mail messages.
-
Performance Meter – Monitors various aspects of system performance.
-
Print Manager – Enables you to submit, view, and cancel print jobs. This application is the graphical front-end to the print command. It supports drag-and-drop file transfer operations.
-
Process Manager – Displays the processes that are currently running on your workstation. This information enables you to perform actions on the active processes.
-
Style Manager – Enables you to customize some of the visual elements and system device behaviors of your workspace environment, such as colors and fonts, keyboard, mouse, window, and session start-up behaviors.
-
Terminal – Acts as an ASCII character terminal that you can use to enter UNIX® commands at a system shell prompt.
-
Text Editor – Enables you to create and edit text files. This application is used in CDE tools such as the Mailer composition window.
Chapter 4 Entering Korean Text
This chapter provides procedures and other information that you can use to enter Korean text.
This chapter includes the following sections:
Character Input Overview
This chapter describes the Korean Solaris input modes that you can use to enter the following kinds of characters.
-
ASCII/English
-
Hangul
-
Hanja
-
Special symbols
You can type all of these characters in the input areas of the following application windows:
-
In terminal emulation (TTY) windows, such as Terminal windows
-
In text entry areas, such as those found in the Text Editor and Mailer applications
-
In dialog boxes, such as the new folder name box in the File Manager application
-
In other special use subwindows, such as pop-ups
Supported Character Sets
The locale that you choose determines the characters that are available for input. If you select the ko_KR.EUC locale, for example, you can enter the characters in the KS X 1001 code set. In the ko_KR.UTF–8 locale, you can input all of the 11,172 Korean characters that are composed according to the Johap principle. The following descriptions summarize the encoding standards that define the characters for the ko_KR.EUC locale and for the ko_KR.UTF–8 locale.
Table 4–1 Character Code Standards
Input Window Areas
In the Korean Operating System, application subwindows contain two areas that are used to enter Korean characters. A lookup choice window and an auxiliary window are also available in Korean input mode.
-
Preedit area – The text entry area that holds your character formations before you commit them.
Note –When you commit characters, the characters are put in the text block that is assembled for the application.
-
Status area – The area at the lower left of the application subwindow that displays the current conversion mode and the active keyboard. Later sections in this chapter discuss keyboard switching and using the available conversion modes.
-
Lookup choice window – A popup window that displays Hanja or special character lookup choices which are available for the conversion of characters or radicals in the preedit area.
-
Auxiliary window – This window contains a palette of icons that you can click to make the following choices:
-
Select your input mode
-
Toggle between the full_width and the half_width character modes
-
Convert Hangul characters in the preedit area to Hanja
-
Select your virtual keyboard
-
Basic Functions for Korean Input
This section describes the process you use to enter, edit, and commit Hangul characters. The section also provides information on switching keyboard layout.
Starting to Input Hangul
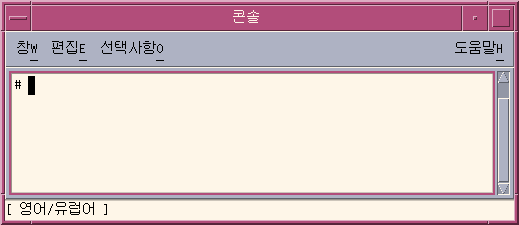
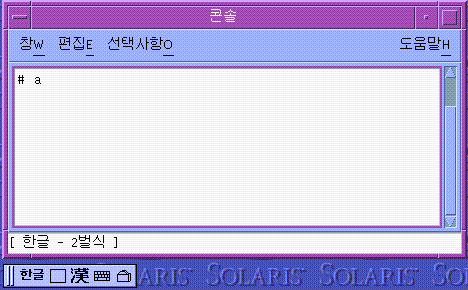
ASCII/English is the initial default input mode. When the status area at the lower left corner of the application subwindow shows the input mode as ASCII/English, whatever you type from the keyboard will appears as ASCII text.
The status region in the lower left corner shows ASCII/English input mode.
How to Switch to the Hangul Input Mode
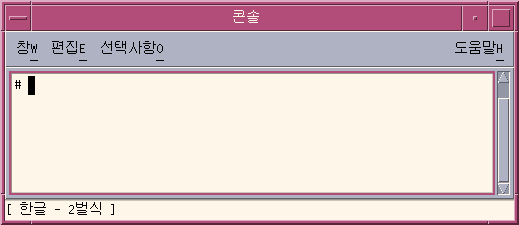
To enter Korean characters, type Control-spacebar to turn on Hangul input conversion. Alternatively, if you have a Hangul keyboard, you can press the Hangul/English key to turn on Hangul input conversion.
The status region shows Hangul as the conversion mode. The area also shows the active keyboard layout.
Note –
You can also use Contol-spacebar or the Hangul/English key to toggle off Hangul input conversion.
When Hangul input conversion is on, an auxiliary window appears with a palette of icons that you can use to make mode and keyboard selections.

How to Enter Hangul Characters
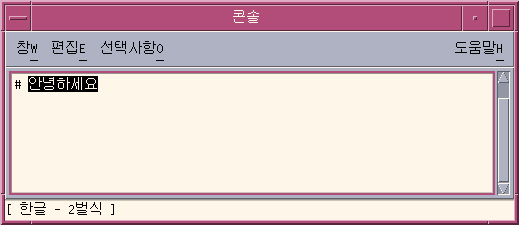
Type Control-spacebar press the Hangul/English key on a Hangul keyboard to turn on Hangul input conversion.
Type the appropriate sequence of keystrokes to compose Hangul characters in the preedit area.
How to Backspace and Delete Korean Characters
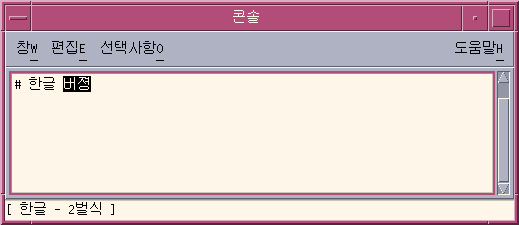
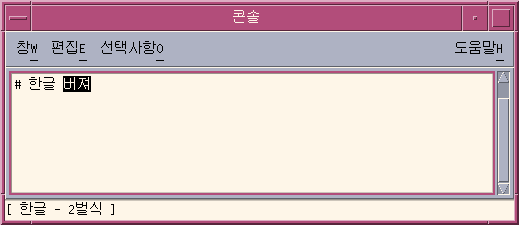
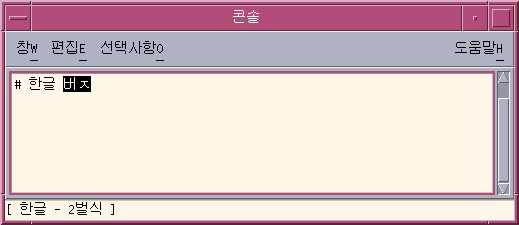
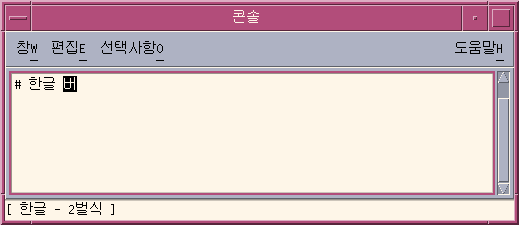
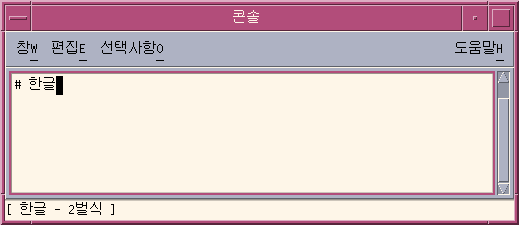
The Backspace and Delete keys remove the last character (JaMo) of the current syllable. The following procedure demonstrates how to delete characters of a syllable with the Backspace key.
-
Notice that the text you are composing appears highlighted in the preedit area.
-
To remove the last character of the last syllable, press the Backspace key once.
Notice that the last character of the syllable changes.
-
Press the Backspace key a second time.
The last character changes again.
-
Press the Backspace key a third time.
Notice that only the first character of the syllable remains.
-
Press the Backspace key twice more.
You have now removed each character in the syllable.
How to Commit Hangul Input
The following figure shows five Hangul syllables that have not been committed. Until the syllables are added to a text block that is being assembled for the application, the syllables are not considered to be committed.
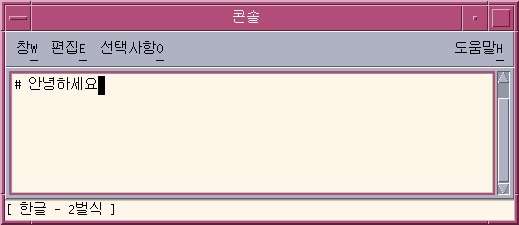
Press Control-K to commit the syllables.
Control-K is treated as a nonprinting character that is not committed with the Hangul syllables in the input string.
A character such as a space, a number, a punctuation mark, or another printable character can be committed to appear with Hangul syllables.
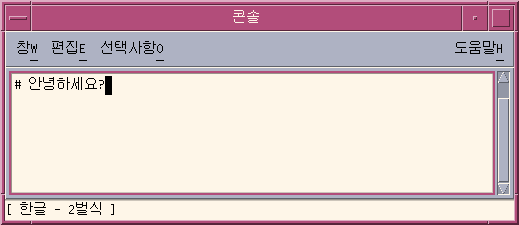
How to Return to the ASCII/English Input Mode
-
When you finish using the Hangul input mode, press Control-spacebar to return to the ASCII/English input mode.
Switching Keyboard Layouts
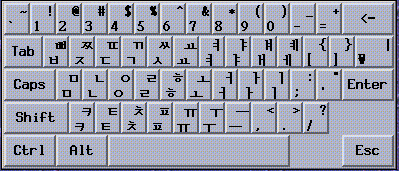
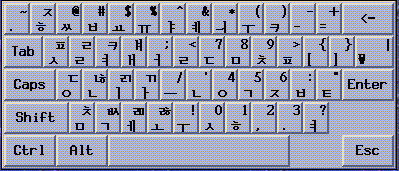
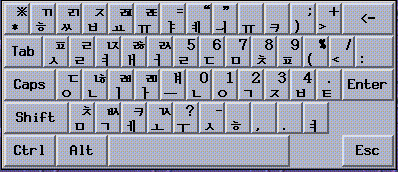
You can switch to one of the three most commonly used keyboard layouts, each of which is supported for use on your Korean desktop:
-
2 Beol Sik
-
3 Beol Sik 390
-
3 Beol Sik final
How to Switch Keyboard Layouts
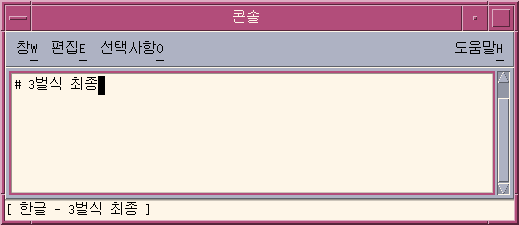
Press Shift-F2 to switch from one keyboard layout to another.
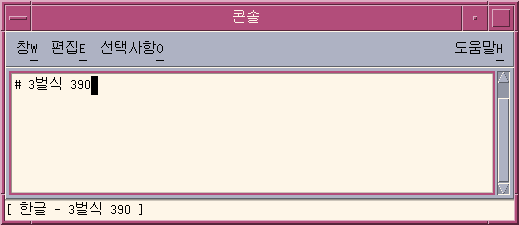
The following figures show three application subwindows. In each subwindow,
the status area indicates that one of the three supported keyboard layouts
is active.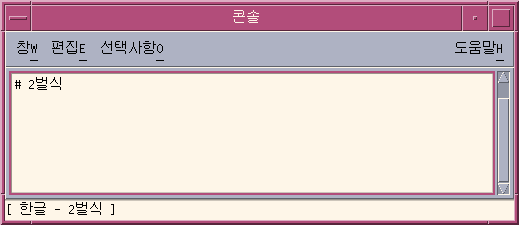
Using Hangul/Hanja Conversion to Enter Hanja
You can enter Hanja by converting Hangul input to Hanja character by character or word by word. You convert the Hangul characters to Hanja in the preedit area in one of two ways.
-
Select the Hanja for your pronunciation from the candidates that appear in a lookup choice window.
-
Select the Hanja for your pronunciation from the candidates that you cycle through in the preedit area.
The procedures in this section explain how to convert Hangul to Hanja character by character. You can use the same methods to convert Hangul to Hanja word by word.
How to Use the Hanja Lookup Mode
-
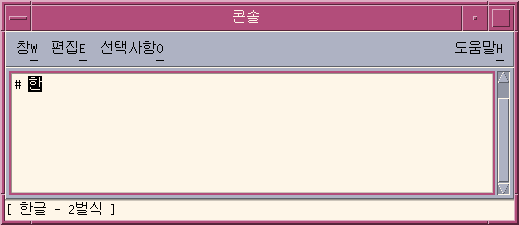
Type the appropriate sequence of keystrokes to compose a Hangul character in the preedit area for your Hanja pronunciation.
-
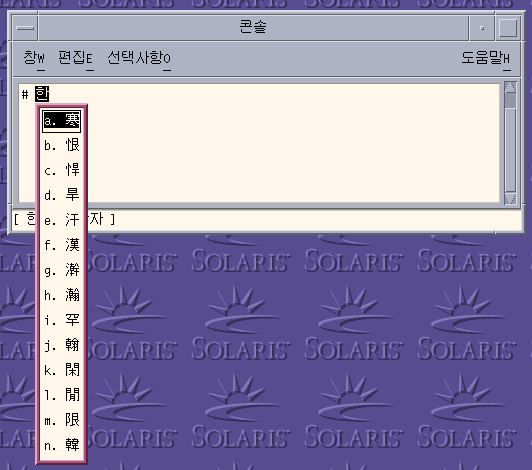
Type Control-W to display the lookup window.
Note –If the Hanja candidate is the only one in the dictionary, Control-W could automatically commit the candidate depending on option set in the Input Method Options Auxiliary window. For information on the Options Auxiliary window, see Input Method Options
-
Press the following keys to navigate page by page through the lookup choices that are available for the Hanja pronunciation you enter.
Table 4–2 Lookup Choice Navigation KeysKeys
Operation
Control-N
Next Page
Page Up
Next Page
Control-P
Previous Page
Page Down
Previous Page
-
When you find a page with the character you want, click the character or press the Enter key to select it. To move from one character to another on the same page, press the Spacebar.
-
You change the format of a committed string using the keys in the following table.
Table 4–3 Formatting Keys for Committed StringsKeys
Committed Format
Control-Q
Hanja characters
Control-E
Hangul characters (converted Hanja characters)
Control-R
Hanja characters (converted Hangul characters)
Control-W
Format set in the Input Method Option Auxiliary window
How to Convert Hanja to Hangul in Character Step Mode
-
Press Control-spacebar to turn on Hangul input conversion.
-
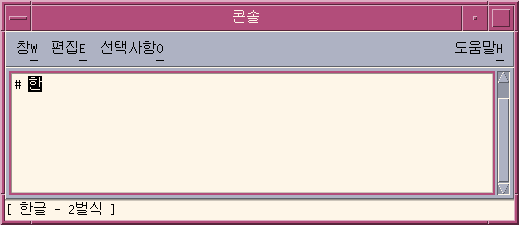
Type the appropriate sequence of keystrokes to compose a Hangul character in the preedit area for your Hanja pronunciation.
The status area indicates that you are in Hanja conversion mode.
-
Press Control-N to convert the Hangul to Hanja.
You can press Control-N again to see another Hanja choice if one exists. Once you cycle through the available choices, the original Hanja reappears. Control-P converts the Hanja to a previous choice.
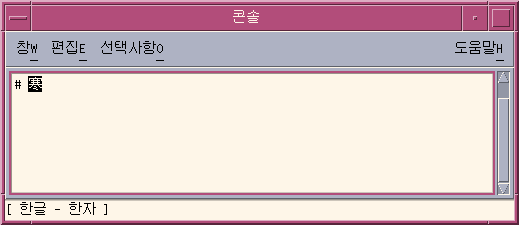
-
Press Control-K or any other nonprinting character except Control-N or Control-P to commit the highlighted Hanja. The preedit area next to the committed Hanja is then open for new Hangul input.
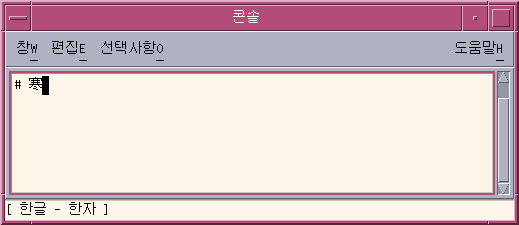
You can type a space, a number or another printable character to commit the nonprinting character along with the Hanja. When the highlighted Hanja and the printable character are committed, the preedit area next to the character is open for new Hangul input.
How to Convert Hanja to Hangul Using Word Conversion Modes
You can convert Hangul to Hanja, word-by-word, in a similar manner converting Hangul to the character by character as described in the previous section. The steps that you use for word by word conversion are the same as those for character conversion, with one exception. You turn on Hangul input conversion after you enter a Hangul word in the preedit area.
-
Type the appropriate sequence of keystrokes to compose a Hangul character in the preedit area for your Hanja pronunciation.
-
Press Control-spacebar to turn on Hangul input conversion.
-
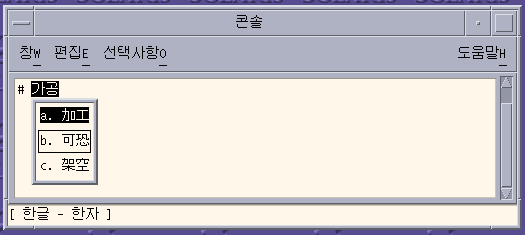
Press Control-N to use step mode or Control-W to use the lookup mode to see the available Hanja choices.
The choices consist of Hanja words as well as Hanja characters for the last syllable of a Hangul word.
The following figure shows the Hanja word choices that are available for the Hangul word in the preedit area.
-
Press Control-K or any other nonprinting character except Control-N or Control-P to commit the highlighted Hanja. The preedit area next to the committed Hanja is then open for new Hangul input.
You can type a space, a number, or another printable character to commit the character along with the Hanja. When the highlighted Hanja and the printable character are committed, the preedit area next to the character is open for new Hangul input.
Entering Special Symbol Characters
In the symbol input mode, you can enter non-Hangul/Hanja characters that you cannot type directly on the keyboard . Once you enter symbol input mode, the process you use to page through lookup choices and to make selections is the same as the one you use in Hanja lookup mode.
-
Press Control-N or Control-P to move forward or backward through lookup choice pages.
-
Type the letter of the choice to commit the symbol and to return to the Hangul input mode.
-
Press Control-A at any point to abort the symbol lookup without making a selection, and to return to the Hangul input mode.
How to Enter Special Symbol Characters
-
Press Control-spacebar to turn on Hangul input conversion.
-
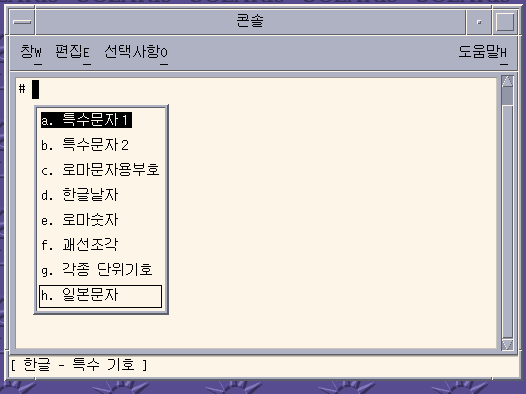
Press Control-J to turn on symbol input mode.
The input method server displays a page of category choices and the status area indicates that you are in symbol input mode.
-
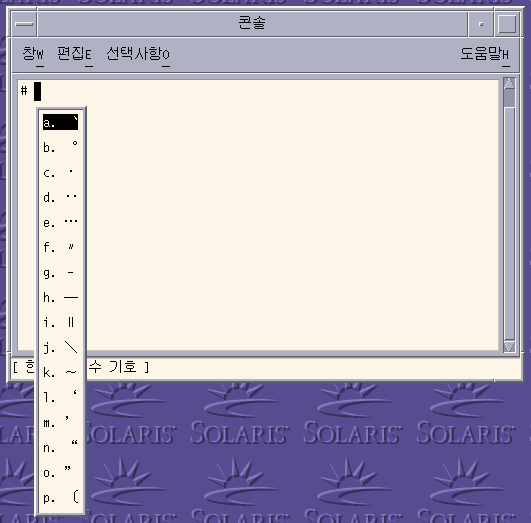
Type the letter of a category for the page of choices you want to display.
Category a is selected in the following figure. You can also scroll down the list of choices with the spacebar and press Enter to make a selection.
-
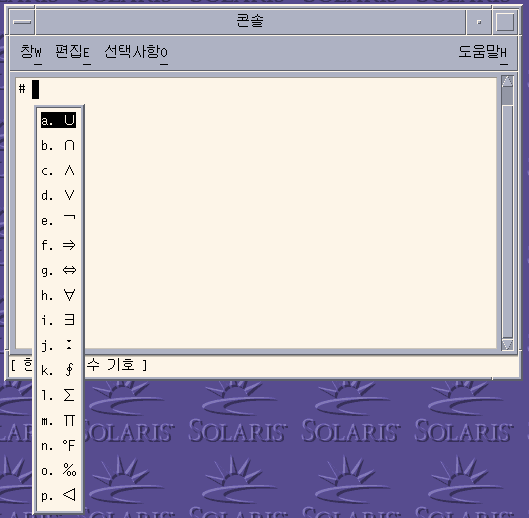
Press Control-N six times in category you selected in previous step to see the following page.
-
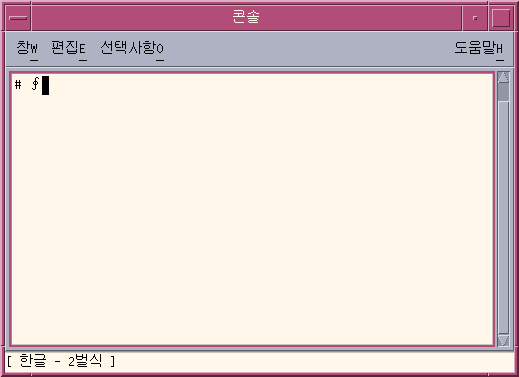
Type the letter k to commit the corresponding character of the page displayed in the previous step.
Entering Hangul Characters Using Hex Input Mode
You can enter any character defined in a character set supported for a locale by typing the encoding value of the character.
-
In the ko_KR.EUC locale, you can use the KS X 1001 encoding values to enter the characters that are defined in the character set.
-
In the ko_KR.UTF-8 locale, you can use the encoding values that are defined in the following character sets to input the characters of each set.
-
KS X 1001, known as KS C 5601–1987
-
UTF-8 encoded values from Unicode 3.2
-
The following table shows you the key sequences you can use to select character sets in each locale.
|
Current Locale |
Key Sequence |
Character Set |
|---|---|---|
|
ko_KR.EUC |
Control-X |
KS X 1001 |
|
ko_KR.UTF-8 |
Control-X |
KS X 1001 |
|
ko_KR.UTF-8 |
Control-Shift-X |
UTF-8 |
How to Use the Hex Input Mode
-
Press Control-spacebar to turn on Hangul input conversion.
-
Press Control-X to turn on hex mode in the ko_KR.EUC locale or the ko_KR.UTF-8 locale.
Alternatively, you can select the hex input mode from the palette auxiliary window.
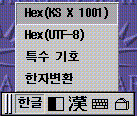
The status area indicates that you are in hex input mode and that you can use KS X encoding values to input Hangul characters.
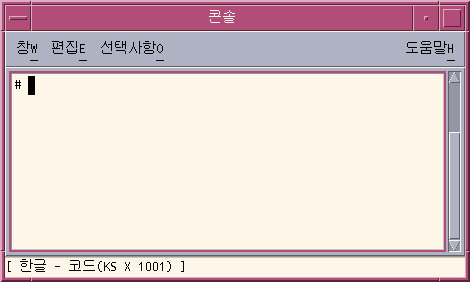
The palette window changes to indicate that you are in hex mode.

The only keys that are available in hex mode are the letters a through f, the numbers 0 through 9, and the Delete key. You can also use Control-X to exit hex mode.
Note –The Control-X option appears in this procedure to access the KS X 1001 character set for example purposes. You can press Control-Shift-X to enter a hex code from the UTF-8 character set.
-
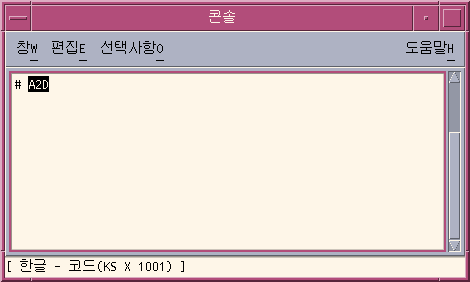
Type the first three keys of the hex code for the character. For example, you could type a2d in the preedit area as shown in the following figure.
-
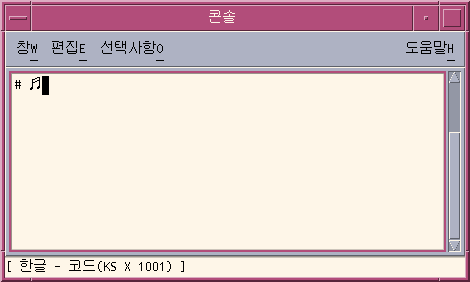
Type the last key of the hex code to display and to automatically commit the character. For example, if you type d in the preedit area, the glyph for two notes of music appears.
-
Press Control-X to turn off hex mode.
Switching Between the Half_Width and the Full_Width Character Modes
You can toggle between full_width and half_width character modes in the Korean Solaris environment. In full_width mode, the full_width character of the input key is committed in the application subwindow. In half_width mode, the half_width character is committed.
How to Switch Between Half_Width and Full_Width Character Modes
In Korean input mode, you can press Shift-spacebar to switch between the half_width and the full_width character modes.
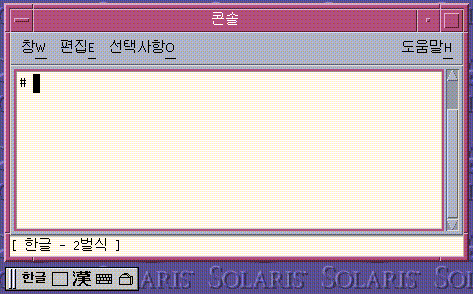
For example, if you press the a key in full_width mode, the full_width form of the a character is committed.
Auxiliary Windows for the Korean Input Method
This section describes the four auxiliary windows available for the Korean input method.
Palette Auxiliary Window
The following buttons are available on the Palette Auxiliary window:
-
Grabber – You click the left mouse button to move the palette from the grabber bar on the left.
-
Input mode selector – Click this button to display a submenu with the following input mode options.
-
Normal Hangul input mode
-
Hex input mode (in KS X 1001)
-
Symbol input mode (in UTF-8)
-
Symbol input mode
-
-
Half_width/Full_width mode selector. – Click this button to toggle between the half_width and the full_width input modes.
-
Hangul to Hanja convertor – Click this button convert the Hangul characters in the preedit area to Hanja.
-
Virtual Keyboard launcher – Click this button to show the virtual keyboard window.
-
Utilities – Click this button to activate the Input Method Options Auxiliary window.
Input Method Options
Use the Options
Auxiliary window to save your preference settings and to make the preferences
available by default. To launch this window, click the Utilities button on
the Palette Auxiliary window and select the Input Method Property Configuration
menu.
The Options Auxiliary window appears.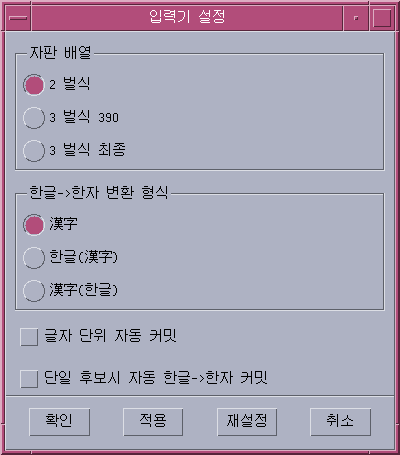
You can specify the following options the Options Auxiliary window:
-
-
2 Beol Sik
-
3 Beol Sik 390
-
3 Beol Sik final
-
-
Default Hangul to Hanja conversion format
-
Hangul to Hanja
-
Hanja to Hangul (Hanja)
-
Hanja to Hangul (Hangul)
-
-
Automatic commit on a character basis
The option enables you to commit a character in the preedit buffer as soon as you completely enter the character.
-
Automatic commit on a single-candidate conversion
This option enables you to automatically commit Hanja when only a single candidate is available for the characters you want to convert.
Virtual Keyboard Auxiliary Window
To launch this window, click the Virtual Keyboard launcher in the Palette Auxiliary window. The auxiliary window appears for one of the following three virtual keyboards that you have selected as your default.
Lookup Table Auxiliary Window
To launch this window, click the Utilities button in the Palette Auxiliary window and select the Code Point Table menu.

The Lookup Table Auxiliary Window appears.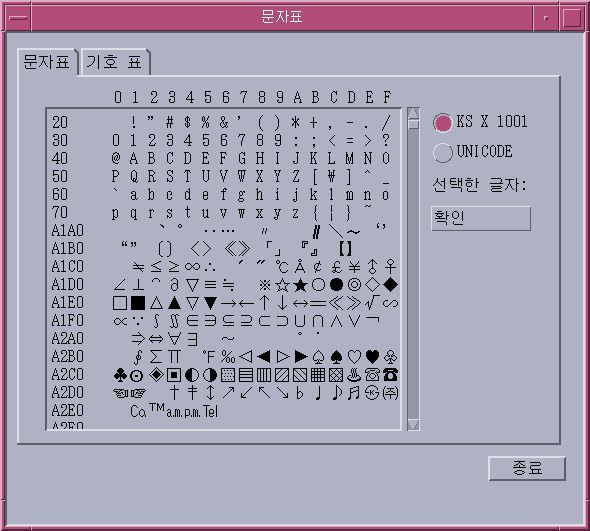
To input any character of a table, double click the character or select the character and press the Insert button on the right side of the window.
Input Method Help
To launch this window, click the Utilities button in the Palette Auxiliary window and select the Input Method Help item. Information on the Korean input methods will appear in your web browser.
Chapter 5 Hanja Tool
The following sections describe the features of the Hanja tool and provide procedures that you can use to create and edit local Hangul-Hanja conversion dictionaries.
Hanja Tool Features
The Hanja Tool enables you to add or delete entries in a local Hangul–Hanja dictionary. This capability controls the available Hanja choices in the Hangul–Hanja conversion mode.
Note –
The system-wide Hangul–Hanja dictionary is read-only and cannot be edited.
The Hanja Tool is a viewer for the Hangul–Hanja dictionary, Because the dictionary file is in binary format, you would be unable to view it without the Hanja Tool.
Hanja Tool allows you to add an user-based Hangul–Hanja entry. The Hanja Tool adds the user-based Hangul–Hanja entry as an extension to the read-only, system-wide Hangul–Hanja dictionary, /usr/lib/im/locale/ko_KR/common/data/syshjd. Each user's entry for Hangul–Hanja conversion works seamlessly together with the system-wide Hangul–Hanja entry.
Using Hanja Tool
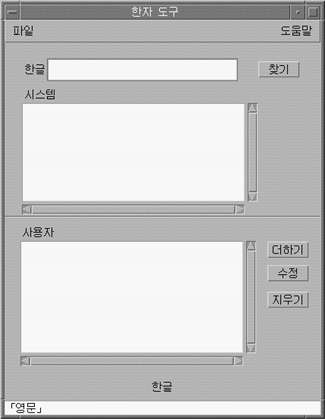
The Hanja Tool initially appears in ASCII input mode, as shown in the status area of the figure. Before you can type Korean characters in the Hanja Tool fields, you must type Control-Space to turn on the Hangul input mode.
The Hanja Tool input fields, scrolling list areas, and buttons are labelled and used as described in the following.
-
Hangul – In this field you type the Hangul associated with certain Hanja characters in the Hangul–Hanja dictionaries.
-
System Dictionary – This scrolling-list area displays the system-wide Hangul–Hanja dictionary entries. When you click the Find button, this area displays the System Dictionary's Hanja entries associated with the Hangul characters committed in the Hangul field. You can scroll through the available Hanja choices for the Hangul characters or you can scroll through the entire System Dictionary.
-
User Dictionary – This scrolling-list area displays the Hanja entries defined by a user. When you click the Find button, this area displays the user-defined Hanja entries associated with the Hangul in the Hangul field. You can scroll through the available Hanja choices for the Hangul characters.
-
Find – Click this button to search the Hangul–Hanja dictionary for Hanja associated with the Hangul entry committed in the Hangul field.
-
Add – Click this button bring up the Add/Modify dialog box. You can use this box to add a Hangul-Hanja conversion to the User Dictionary.
-
Modify – Click this button to modify a Hangul-Hanja conversion in the User Dictionary. The Add/Modify dialog box appears only when the Hanja you select is from the User Dictionary. Otherwise, a system message is displayed.
-
Delete – Click this button to delete the selected Hanja from the User Dictionary. A delete confirmation dialog box is displayed before the Hanja is deleted.
-
Quit – Click this button to quit the Hanja Tool.
How to Launch the Hanja Tool
Enter the following command to launch the Hanja Tool.
system% sdthanja |
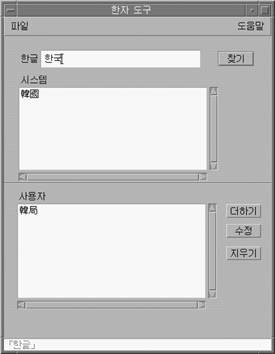
This command displays a Hanja Tool window, such as the following.
How to Find the Hanja for a Hangul word
Use the following procedure to find the Hanja associated with a Hangul word in the system and user parts of the Hangul-Hanja dictionary.
-
Use the Launch the Hanja Tool.
-
Type the Hangul word in the Hangul field.
The entry appears highlighted in the preedit area as you type
-
Type Control-K to commit the entry.
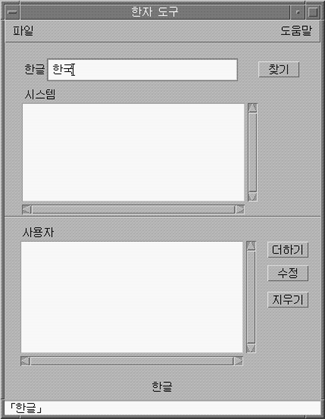
-
Click the Find button to search for the Hanja to associate with the committed Hangul.
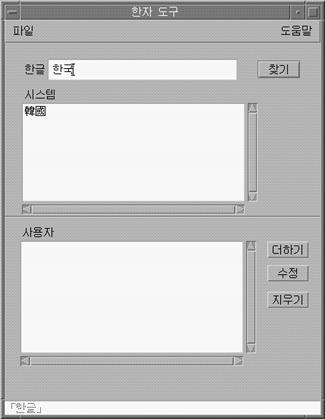
The line beneath the status area shows the number of the word in the User and System dictionaries.
How to Add Hanja to the Hangul-Hanja Dictionary
Use the following procedure to add a Hanja word to the Hangul–Hanja dictionary.
-
Click the Add button of the main screen to bring up the Add/Modify dialog box.
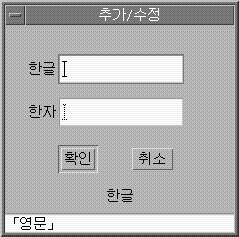
-
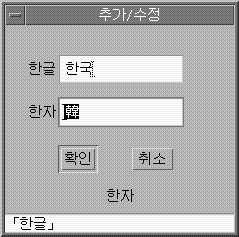
Type a new word or change the existing word in the Add/Modify dialog box. Then use Control-K to commit the Hangul characters you want to associate with the Hanja in your dictionary.
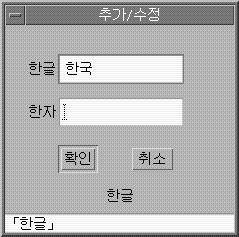
-
In the Hanja field, type the Hanja associated with the Hangul that you want to add to your dictionary.
Use the character-by-character methods described in Using Hangul/Hanja Conversion to Enter Hanja.
-
Click the Add button.
A display such as the following appears.
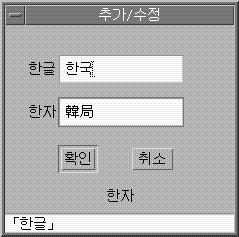
The line beneath the status area tells you the word was added to the User Dictionary. The User Dictionary is changed. The read-only System Dictionary cannot be changed.
How to Modify Hanja in the Hangul-Hanja Dictionary
Modifying a Hanja word is similar to the process for adding a Hanja word.
-
Select a Hanja word from the User Dictionary and click the Modify button.
-
Edit the Hangul associated with the Hanja in the Add/Modify dialog box. Then use Control-K to commit the Hangul characters you want to associate with the Hanja.
-
In the Hanja field, type the Hanja associated with the modified Hangul.
Use the character-by-character methods described in Using Hangul/Hanja Conversion to Enter Hanja.
-
Click the Modify button.
How to Delete Hanja from the Hangul-Hanja Dictionary
To delete Hanja from the User Dictionary, use the following procedure.
-
In the Hangul field type the Hangul word associated with the Hanja in your User Dictionary.
-
Type Control-K to commit the Hangul input.
-
Click the Find button.
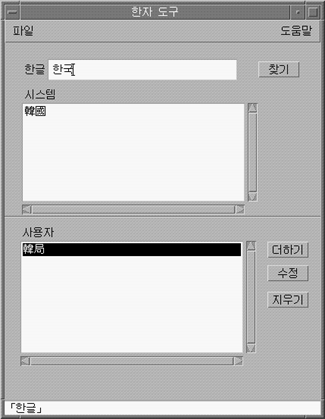
This displays the Hanja in the User Dictionary list area. Scroll through the list area to find the Hanja you want to delete.
-
Click the Hanja you want to delete.
-
Click the Delete button to delete the Hanja from the User Dictionary.
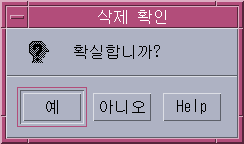
A delete confirmation dialog box appears.
-
Click OK if you are sure you want to delete the Hanja. Otherwise, click Cancel.
The line beneath the status area tells you that the word was deleted from the User Dictionary. The User Dictionary is changed. The System Dictionary is read-only and cannot be changed.
Chapter 6 Localized Applications
The following sections in this chapter describe the utilities and applications that you use in the Korean Solaris Operating System.
Using the mailx Utility with Korean Characters
The encoding variable in mailrc does not affect Mailer behavior, but it does set mailx function. To send email in formats other than 7-bit ASCII, such as to send (8-bit) Korean characters you must use /usr/SUNWale/bin/mailx. The encoding variable in .mailrc sets encoding formats for mailx.
International transmission conventions require that header information use only ASCII characters. Korean characters should not be used in the header (including the Subject line) with Mailer or with mailx.
Note –
The /bin/mailx application has not been localized and cannot send or receive Korean characters.
Using talk with Korean Characters
To use Korean characters with talk, the /usr/SUNWale/bin/talk application is required because /bin/talk is not localized.
The xtobdf Utility
Korean Solaris software provides the following BDF font generator:
-
xtobdf — Converts from an X server font to a BDF font
The Sdtconvtool Utility
Sdtconvtool is a graphic user interface utility that enables file conversion between various code sets. Its functionality is similar to iconv.
How to Use the Sdtconvtool Utility
The following procedure shows how to convert a file encoded in UTF-8 to ko_KR.EUC encoding.
-
Select the code set of the file to be converted.
Scroll through the pull-down list and select the code set of the file to be converted. In this case, select UTF-8.
-
Enter the path of the file to be converted.
You can enter the path manually in the source file path area, or you can use the browse button to find and select the file. In this case. For example, you could enter or select /tmp/ko_KR.UTF-8.
-
Select the code set to for the converted file.
Select the target code set. For example, you could select ko_KR-euc.
-
Enter the path for the target file.
You can enter the path manually in the target file path area, or you can use the browse button to find and select the file. For example, you could enter or select /tmp/ko-euc.txt.
-
Click the start conversion button.
The iconv Utility
The iconv command converts the characters or sequences of characters in a file from one code set to another and writes the results to standard output. Korean Solaris software includes special filters for the iconv command.
If no conversion exists for a particular character, it is converted to the underscore _ in the target code set. The following options are supported:
-
-f from-code - Symbol of the input code set
-
-t to-code - Symbol of the output code set
The following code set conversion modules are supported in Korean Solaris software. For more information, see iconv(1).
Table 6–1 Korean iconv Code Conversion Modules (ko locale)|
Easy Name from-code |
Actual Name from-code |
Easy Name to-code |
Actual Name to-code |
|---|---|---|---|
|
IBM CP933 |
ko_KR.cp933 |
UTF-8 (Unicode 3.2) |
ko_KR-UTF-8 |
|
IBM CP933 |
ko_KR.cp933 |
UTF-8 |
UTF-8 |
|
ISO646 |
646 |
KS X 1001 |
5601 |
|
ISO2022–KR |
ko_KR.iso2022-7 |
KS X 1001 |
ko_KR-euc |
|
ISO2022–KR |
ko_KR.iso2022-7 |
UTF-8 (Unicode 3.2) |
ko_KR-UTF-8 |
|
ISO2022–KR |
ko_KR.iso2022-7 |
UTF-8 |
UTF-8 |
|
KS X 1001 |
5601 |
UTF-8 |
UTF-8 |
|
KS X 1001 |
EUC-KR |
UTF-8 |
UTF-8 |
|
KS X 1001 |
KSC5601 |
UTF-8 |
UTF-8 |
|
KS X 1001 |
ko_KR-euc |
UTF-8 (Unicode 3.2) |
ko_KR-UTF-8 |
|
KS X 1001 |
ko_KR-euc |
UTF-8 (Unicode 3.2) |
ko_KR-UTF-8 |
|
KS X 1001 |
ko_KR.EUC |
UTF-8 |
UTF-8 |
|
KS X 1001 |
ko_KR-euc |
KS X 1001 |
ko_KR-johap |
|
KS X 1001 |
ko_KR-euc |
KS X 1001 |
ko_KR-johap92 |
|
KS X 1001 |
ko_KR-euc |
KS X 1001 |
ko_KR-nbyte |
|
KS X 1001 |
ko_KR-nbyte |
KS X 1001 |
ko_KR-euc |
|
KS X 1001 |
ko_KR-johap92 |
UTF-8 (Unicode 3.2) |
ko_KR-UTF-8 |
|
KS X 1001 |
ko_KR-johap92 |
KS X 1001 |
ko_KR-euc |
|
UTF-8 |
UTF-8 |
KS X 1001 |
5601 |
|
UTF-8 |
UTF-8 |
KS X 1001 |
KS X 1001 |
|
UTF-8 |
UTF-8 |
KS X 1001 |
EUC-KR |
|
UTF-8 |
UTF-8 |
KS X 1001 |
KSC5601 |
|
UTF-8 |
ko-KR-UTF-8 |
IBM CP933 |
ko_KR.cp933 |
|
UTF-8 |
UTF-8 |
IBM CP933 |
ko_KR.cp933 |
|
UTF-8 |
ko-KR-UTF-8 |
ISO2022-KR |
ko_KR-iso2022-7 |
|
UTF-8 |
UTF-8 |
ISO2022-KR |
ko_KR-iso2022-7 |
|
UTF-8 |
UTF-8 |
ISO2022-KR |
ISO2022-KR |
|
UTF-8 |
ko-KR-UTF-8 |
KS X 1001 |
ko_KR-johap |
|
UTF-8 |
UTF-8 |
KS X 1001 |
ko_KR-johap |
|
UTF-8 |
ko-KR-UTF-8 |
KS X 1001 |
ko_KR-johap92 |
|
UTF-8 |
UTF-8 |
KS X 1001 |
ko_KR-johap92 |
|
Wansung |
ko_KR-euc |
Johap |
ko_KR-johap92 |
|
Wansung |
ko_KR-euc |
Packed |
ko_KR-johap |
|
Wansung |
ko_KR-euc |
N-Byte |
ko_KR-nbyte |
|
ILEG=KS X 1001 |
ko_KR-euc |
ISO-2022-KR |
ko_KR-iso2022-7 |
|
Johap |
ko_KR-johap92 |
Wansung |
ko_KR-euc |
|
Packed |
ko_KR-johap |
Wansung |
ko_KR-euc |
|
N-Byte |
ko_KR-nbyte |
Wansung |
ko_KR-euc |
|
ISO-2022-KR |
ko_KR-iso2022-7 |
Wansung |
ko_KR-euc |
The following modules perform character-based code conversion on the KS C 5700 character set. They convert KSC 5700 characters between Korean UTF-8, completion code (Wansung), and combination code (Johap).
Table 6–2 Common Korean iconv Code Conversion Modules (ko and ko.UTF-8 locales)|
Easy Name from-code |
Actual Name from-code |
Easy Name to-code |
Actual Name to-code |
|---|---|---|---|
|
UTF-8 |
ko_KR-UTF-8 |
KS X 1001 |
ko_KR-euc |
|
UTF-8 |
ko_KR-UTF-8 |
KS X 1001 |
ko_KR-euc |
|
UTF-8 |
UTF-8 |
KS X 1001 |
ko_KR-euc |
|
UTF-8 |
UTF-8 |
KS X 1001 |
ko_KR.EUC |
|
UTF-8 |
ko_KR-UTF-8 |
Johap |
ko_KR-johap92 |
|
UTF-8 |
ko_KR-UTF-8 |
Packed |
ko_KR-johap |
|
UTF-8 |
ko_KR-UTF-8 |
ISO-2022-KR |
ko_KR-iso2022-7 |
|
Wansung |
ko_KR-euc |
UTF-8 |
ko_KR-UTF-8 |
|
Wansung |
ko_KR-euc |
UTF-8 |
UTF-8 |
|
Johap |
ko_KR-johap92 |
UTF-8 |
ko_KR-UTF-8 |
|
Johap |
ko_KR-johap92 |
UTF-8 |
UTF-8 |
|
Packed |
ko_KR-johap |
UTF-8 |
ko_KR-UTF-8 |
|
Packed |
ko_KR-johap |
UTF-8 |
UTF-8 |
|
ISO-2022-KR |
ko_KR-iso2022-7 |
UTF-8 |
ko_KR-UTF-8 |
|
ISO-2022-KR |
ko_KR-iso2022-7 |
UTF-8 |
UTF-8 |
|
UTF-8 |
ko_KR.UTF-8 |
Unified Hangul |
ko_KR-cp949 |
|
UTF-8 |
UTF-8 |
Unified Hangul |
ko_KR-cp949 |
|
Unified Hangul |
ko_KR-cp949 |
UTF-8 |
ko_KR-UTF-8 |
|
Unified Hangul |
ko_KR-cp949 |
UTF-8 |
UTF-8 |
In the following example, a KS C 5601 file (Korean EUC) is converted to KS C 5700 (ko.UTF-8).
system% iconv -f ko_KR-euc -t ko_KR-UTF-8ko_euc_file > ko_UTF-8_file |
For further information, see the iconv(3C), iconv_ko.UTF-8(5), and iconv_utf(5) man pages. You can use these utilities to convert files for printing.
Chapter 7 Korean Solaris Printing
The Korean Solaris Operating System supports the printing of Korean output to the following types of printers.
-
Line printer with built-in Korean fonts
-
PostScript-based printer with built-in scalable fonts
-
Any PostScript-based printer for bitmap printing
Note –
Review the manufacturer's documentation on installing the printer before you complete the procedures in this chapter.
Line Printer Support
For the Korean Solaris Operating System to run a line printer, the printer must recognize at least one of the supported code sets.
-
Completion code, also called Wansung (Korean EUC, based on KS C 5601)
-
Combination code, also called Johap (either KS C 5601-1987-3 or KS C 5601-1992-3)
-
N-byte code
Printing an EUC (Wansung) File to a Printer that Does Not Support EUC
A printer that does not support EUC requires filters to convert the EUC files before your can print them. Use the commands in this section to print EUC files to a non-EUC printers.
The following command lines install the printer lp1 on port ttya and signal the print service that the lp1 accepts only Packed format files. Packed is the KS C 5601-1987 combination code.
# lpadmin -p lp1 -v /dev/ttya -I PACK # accept lp1 # enable lp1 |
The following command lines install the printer lp1 on port ttya and signal the print service that lp1 accepts only Johap format files. Johap is the KS C 5601-1992 combination code.
# lpadmin -p lp1 -v /dev/ttya -I JOHAP # accept lp1 # enable lp1 |
See the lpadmin(1M) man page for more information.
You can use an lpfilter command line such as the following to print files with formats that are not supported by the printer. The command line signals the print service that a converter called filter-name is available through the filter description file named pathname.
# lpfilter -f filter-name -F pathname |
The following example shows the output of pathname for a converter called comptopack.
Input types: simple Output types: PACK Command: comptopack |
The pathname filter converts the default input type to Packed format with the comptopack converter.
Input types: simple Output types: JOHAP Command: wansungtojohap |
To print an EUC file, use a command line such as the following.
system% lp euc-filename |
To print a Packed format file, use a command line such as the following.
system% lp -T PACK PACK-filename |
To print a Johap format file, use a command line such as the following.
system% lp -T JOHAP JOHAP-filename |
Printing a ko_KR.UTF-8 File to Printers that Do Not Support UTF-8
Use the commands in this section to convert ko_KR.UTF-8 files to EUC and Johap files.
You can use command lines such as the following to convert a ko_KR.UTF-8 file and to print the converted file to an EUC printer.
system% iconv -f ko_KR-UTF-8 -t ko_KR-euc ko_KR.UTF-8_filename >euc-filename system% lp euc-filename |
Note –
The output will include only the characters that are defined in the EUC code set.
You can use command lines such as the following to convert an ko_KR.UTF-8 file and to print the converted file to a Johap printer.
system% iconv -f ko_KR-UTF-8 -t ko_KR-johap92 ko_KR.UTF-8_filename > johap92-filename system% lp johap92-filename |
Note –
The output will include only the characters that are defined in the Johap code set.
Laser Printer Support
To print Korean characters to a PostScript-based printer, a Korean Solaris application recognize the mp utility.
Using the mp Utility
The mp utility supports all Asian locales. As a print filter, mp generates a properly formatted version of content in PostScript format. The Postscript output contains scalable or bitmap fonts, depending on the system font configuration formp in the current locale. The mp filter can print a ko file in ko locale or a UTF-8 file in the ko_KR.UTF-8 locale. For more information, see the mp(1) man page.
The following example shows a typical command line that you could use to print a file named filename that contains Korean characters, with or without ASCII/English characters.
system% mp filename | lp -d printer |
- © 2010, Oracle Corporation and/or its affiliates

