|
| |
| Sun Java[TM] System Identity Manager 7.0 Administration | |
Chapter 11
Identity AuditingThis chapter describes the features in Identity Manager that enable you to set up audit controls to monitor and manage auditing and compliance across enterprise information systems and applications.
The features described focus on how to conduct audit reviews and implement practices that help you maintain security controls and manage compliance with federally mandated regulations.
In this chapter, you will learn about the following concepts and tasks:
Goals of Identity AuditingThe identity auditing solution facilitates improved audit performance by:
Identity Manager audit policy features let you define rules (criteria) for violations. Once defined, the system scans for actions that violate established policies, such as unauthorized access changes or erroneous access privileges. Upon detection, the system notifies the appropriate persons or applications according to a defined escalation chain. User-invoked tasks, or workflows that are automatically invoked by policy violations, can then remediate (correct) the violation.
The Auditor Reports provide summary status information about violations and exceptions for quick analysis of risk status. The Reports tab also provides graphical reports of violations. View violations by resource, organization, or policy, customizing each chart according to the report characteristics you define.
The Reports area lets you define detailed reports and charts that provide information on access history and privileges, and other policy violations. The system keeps a secure and comprehensive identity audit trail that can be mined, through reporting capabilities, for access data and user profile updates.
Periodic Access Reviews (PARs) can be conducted to collect user entitlement records and determine which entitlements require review. The PAR process then notifies designated attestors of pending requests for review and updates the status or pending requests when attestor actions on the requests are completed.
Understanding Identity AuditingIdentity Manager provides two distinct features for auditing user account privileges and access rights and maintaining and certifying compliance. These features are policy-based compliance and periodic access reviews.
Policy-Based Compliance
Identity Manager employs an Audit Policy system to enable administrators to maintain compliance of company-established requirements for all user accounts.
Audit Policy can be used to ensure compliance in two different and complementary ways: continuous compliance and periodic compliance.
These two techniques are particularly complementary in an environment where provisioning operations may be performed outside of Identity Manager. Any time an account can be changed by a process that does not execute or honor the existing audit policies, periodic compliance is necessary.
Continuous Compliance
Continuous compliance means that policy is applied to all provisioning operations, such that an account cannot be modified in a way that would not be compliant with current policy.
Continuous compliance is enabled by assigning an Audit Policy to an organization and or to a user. Any provisioning operations on a user will cause both the user-assigned and the organization-assigned policies to be invoked.
Organization assigned policy is a single-valued, hierarchically obtained policy. In other words, there is only one Organization policy in effect for any user, and the policy is the one assigned to the lowest-level Organization. For example:
Periodic Compliance
Periodic compliance means that Identity Manager evaluates policy on demand and any non-compliant conditions are captured as Compliance Violations.
When executing periodic compliance scans, you can select which policies to use in the scan. The scan process blends directly-assigned policies (User-assigned and Organization-assigned policies) and an arbitrary set of selected policies.
Identity Manager administrators with Auditor Administrator capabilities can create audit policies and monitor compliance with those policies through periodic reviews and policy violations. Violations can be managed through remediation and mitigation procedures. For more information about the Auditor Administrator capabilities, see Understanding and Managing Capabilities.
Identity Manager auditing allows for regular scans of users and executes audit policies to detect deviations from established account limits. When a violation is detected, remediation activities are initiated. The rules may be standard audit policy rules provided by Identity Manager or customized user-defined rules.
Note
Before you can conduct audit reviews and manage compliance, auditing must be enabled and configured for compliance management. For information, see Enabling Auditing.
Logical Task Flow for Policy-Based Compliance
The following diagram shows a logical task flow for completing the auditing tasks discussed in this section:
Periodic Access Reviews
Identity Manager provides for periodic access reviews that enable managers and other responsible parties to review and verify user access privileges on an ad-hoc or periodic basis. For more information about this feature, see the section Periodic Access Reviews and Attestation.
Enabling AuditingThe Identity Manager audit logging system must be enabled and configured to collect audit events before you can begin managing compliance and access reviews. By default, the auditing system is enabled. An Identity Manager administrator with the Configure Audit capability can configure auditing.
Identity Manager provides the Compliance Management audit configuration group. To view or modify the events stored by the Compliance Management group, select Configure from the menu bar, and then click Audit. On the Audit Configuration page, select the Compliance Management audit group name.
For more information about setting up audit configuration groups, see Configuring Audit Groups and Audit Events in the Configuration chapter.
For information about how the audit system records events, see Chapter 12, "Audit Logging."
The Compliance Area of the InterfaceAudit policies are created and managed from the Compliance area in the Identity Manager Administrator interface. Select Compliance in the menu bar to access the Manage Policies page, which lists the policies that you have permission to view and edit. You can also manage access scans from this area.
Manage Policies
From the Manage Policies page you can work with audit policies to accomplish the following tasks:
More detailed information about these tasks follows in the section Working with Audit Policies.
Manage Access Scans
Use the Manage Access Scans tab in the Compliance area to define, modify, and run access review scans. You use this area to define scans that you want to run or schedule for Periodic Access Reviews. For more information about this feature, see Periodic Access Reviews and Attestation.
Access Review
This tab in the Compliance area enables you to access information that helps you monitor the progress of your access reviews. It displays a summary report of the scan results with information links (available in the Web-based interface) that enable you to access more detailed information about the review status and pending activities.
For more information about this feature, see Managing Access Reviews.
About Audit PoliciesAn audit policy is the definition of account limits for a set of users of one or more resources. It is composed of rules that define the limits of a policy and workflows to process violations after they occur. Audit scans use the criteria defined in the audit policy to evaluate whether violations have occurred in your organization.
The following components comprise an audit policy:
- Policy rules, which can contain functions written in the XPRESS, XML Object, or JavaScript languages, that define specific violations.
- Remediation workflow, which optionally is launched when an audit scan identifies a violation of the policy rules.
- Remediators, or designated administrators who are authorized to respond to the policy violation. Remediators can be individual users or groups of users.
- Organization assignments, which define the organizations to which this policy should be available
- User assignments, which define the users to which this policy should be applied.
Audit Policy Rules
Within an audit policy, rules define potential conflicts on an attribute basis. Variables in an auditor rule are restricted to attributes on particular resources that are associated with the user. An audit policy can contain hundreds of rules that reference a wide range of resources.
Arguments can be passed to a rule to control its behavior, and a rule can reference and modify variables maintained by the form or remediation workflow.
Rules must contain the SUBTYPE_AUDIT_POLICY_RULE type definition. Rules generated by the Audit Policy Wizard or referenced from it are automatically assigned this type.
Rule subtype='SUBTYPE_AUDIT_POLICY_RULE'
See Working with Rules in Identity Manager Deployment Tools for a discussion of rule logic.
Remediation Workflows
After you have created rules to define policy violations, you select the workflow that will be launched whenever a violation is detected during an audit scan. Identity Manager provides the default Standard Remediation workflow, which provides default remediation processing for Audit Policy scans. Among other actions, this default remediation workflow generates notification email to each designated Level 1 remediator (and subsequent levels of remediators, if necessary).
Note
Unlike Identity Manager workflow processes, remediation workflows must be assigned the AuthType=AuditorAdminTask and the SUBTYPE_REMEDIATION_WORKFLOW type. If you are importing a workflow for use in audit scans, you must manually add this attribute. See (Optional) Import a Workflow into Identity Manager for more information.
Remediators
If you assign a remediation workflow, you must designate at least one remediator. You can designate up to three levels of authorized remediators. For additional information about remediation, see Remediation and Mitigation in this chapter.
You must assign a remediation workflow before you can assign remediators.
Sample Audit Policy Scenario
You are responsible for accounts payable and receivable and must implement procedures to prevent a potentially risky aggregation of responsibilities in employees working in the accounting department. This policy implements four rules to check whether personnel with responsibility for accounts payable do not also have responsibility for accounts receivable.
After the rules identify policy violations (that is, users with too much authority), the associated workflow can launch specific remediation-related tasks, including automatically notifying select remediators.
Level 1 remediators are the first remediators who are contacted when an audit scan identifies a policy violation. When the escalation period identified in this area is exceeded, Identity Manager notifies the remediators identified in the next level, if more than one level is specified for the audit policy.
Organizations and Remediation Workflow Area
Displays the organizations with both potential and current access to this policy.
This area also lists the remediation workflow associated with the audit policy. The Standard Remediation workflow generates a work item and email notification for each individual Level 1 Remediator. The first remediator to act on a work item for the violation permits processing to continue. If no remediator acts within the timeout limit specified in the policy, Identity Manager escalates the violation to the next level of remediation in the policy (assuming a new set of remediators and timeout).
Working with Audit PoliciesIdentity Manager provides an Audit Policy Wizard to help you easily set up audit policies. After defining an audit policy you can perform various actions on the policy, such as modify or delete it. The topics in this section describe how to create and manage audit policies and audit policy rules.
Creating an Audit Policy
The Audit Policy Wizard guides you through the process of creating an audit policy. To access the Audit Policy Wizard, in the Compliance area of the interface, click Manage Policies and create a new audit policy.
Using the wizard, you will perform the following tasks to create an audit policy:
After completing the task presented in each wizard screen, click Next to move to the next step.
Before You Begin
Considerable planning precedes the creation of an audit policy, including the following tasks:
- Identify the rules you will use to create the policy in the Audit Policy Wizard. These rules are determined by the type of policy you are creating and the specific limitations you want to define.
- Import any remediation workflow or rule that you want to include in the new policy.
- Ensure that you have the required administrator capabilities to create audit policies. See the required capabilities in Understanding and Managing Capabilities.
Identify the Rules You Need
The limitations you are specifying in the policy are implemented in a set of rules that you create or import. When creating a rule using the Audit Policy Wizard, you:
(Optional) Import Separation of Duty Rules into Identity Manager
The Audit Policy Wizard cannot create Separation of Duty rules. These rules must be constructed outside of Identity Manager and imported using the Import Exchange File option on the Configure tab.
(Optional) Import a Workflow into Identity Manager
To use a remediation workflow that is not currently available from Identity Manager, complete the following tasks to import the external workflow:
After you have successfully imported the workflow, it appears in the Audit Policy Wizard Remediation Workflow list of options.
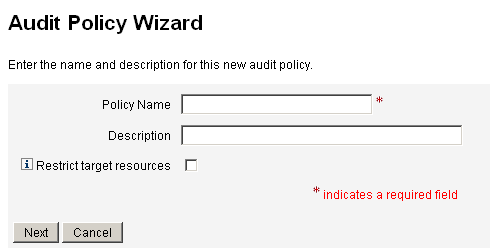
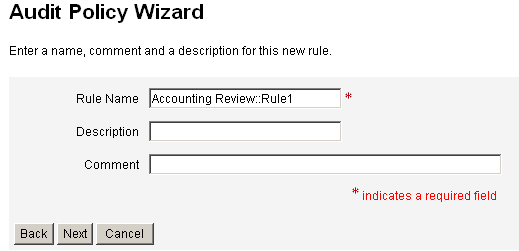
Name and Describe the Audit Policy
Enter the name of the new policy and a brief description in the Audit Policy Wizard screen (shown in Figure 11-1).
Figure 11-1 Auto Policy Wizard: Enter Name and Description Screen
If you choose not to name the rule, Identity Manager assigns a default name in the format: Policy_Name::Rule1.
If you want only selected resources to be accessed when executing the scan, enable the Restrict target resources option.
Click Next to proceed to the next page.
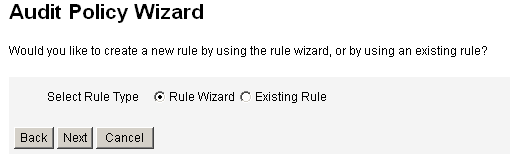
Select a Rule
Use this screen to start the process of defining or including rules in your policy. The bulk of your work while creating a policy is defining and creating rules.
As shown in Figure 11-2, you can choose to create your own rule using the Identity Manager rule wizard, or incorporate an existing rule. By default, the Rule Wizard option is selected. Click Next to launch the Rule Wizard and go to Creating a New Rule Using the Rule Wizard for instructions on creating a rule.
Figure 11-2 Audit Policy Wizard: Select Rule Type Screen
Select an Existing Rule
When selecting a rule option, click Existing Rule to include an existing rule in the new policy. Then, click Next to view and select the existing audit policy rules to which you have access.
Select additional rules from the Rules list of options, and then click Next.
Note
If you cannot see the name of a rule that you have previously imported into Identity Manager, confirm that you have added to the rule the additional attributes that are described in Audit Policy Rules.
Adding Rules
You can create additional rules as well as import existing rules. The Rule Wizard only allows one resource to be used in a rule. Imported rules can reference as many resources as needed.
Click AND or OR to continue adding rules as necessary. To remove a rule, select it and then click Remove.
Policy violations occur only if the boolean expression of all rules evaluates to true. By grouping rules with AND/OR operators, it is possible for the policy to evaluate to true, even though all rules do not. Identity Manager creates violations only for rules that evaluate to true, and only if the policy expression evaluates to true.
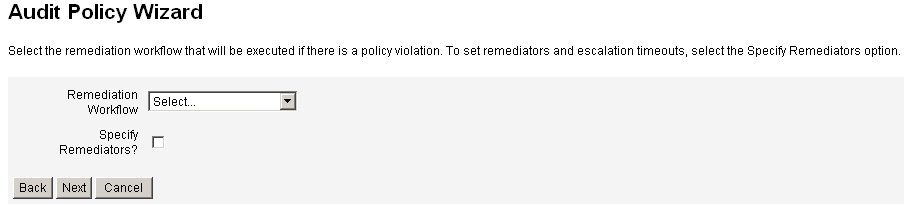
Select a Remediation Workflow
Use this screen to select a Remediation workflow to associate with this policy. The workflow assigned here determines the actions taken within Identity Manager when an audit policy violation is detected.
Figure 11-3 Audit Policy Wizard: Select Remediation Workflow Screen
Note
For information about importing a workflow that you have created in either an XML editor or the Identity Manager Integrated Development Environment (IDE), see (Optional) Import a Workflow into Identity Manager.
To specify remediators to be associated with this remediation workflow, click Specify Remediators? If you enable this check box, subsequently clicking Next will display the Assign Remediators page. If you do not enable this check box, the wizard will next display the Audit Policy Wizard Assign Organizations screen.
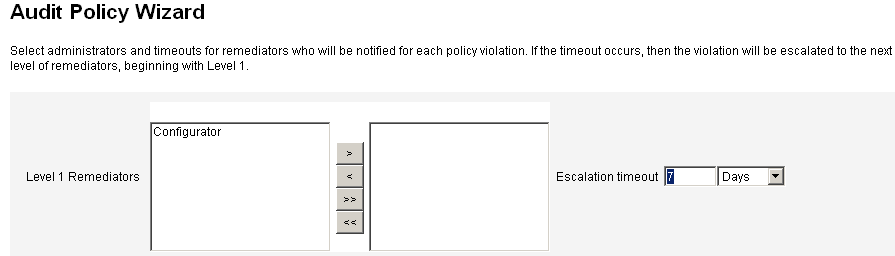
Select Administrators and Timeouts for Remediations
If you select to specify remediators, the remediators assigned to this audit policy will be notified when a violation of this policy is detected.
You might choose to assign at least one Level 1 remediator, or designated administrator. Level 1 Remediators will be contacted first through email launched by the remediation workflow when a policy violation has been detected. If the designated escalation timeout period is reached before a Level 1 remediator responds, Identity Manager next contacts the Level 2 remediators that you specify here. Identity Manager contacts Level 3 remediators only if neither Level 1 or Level 2 remediators respond before the escalation time period lapses.
Assigning Remediators is optional. If you select this option, click Next to proceed to the next screen after specifying the settings.
Figure 11-4 Audit Policy Wizard: Select Level 1 Remediator Area
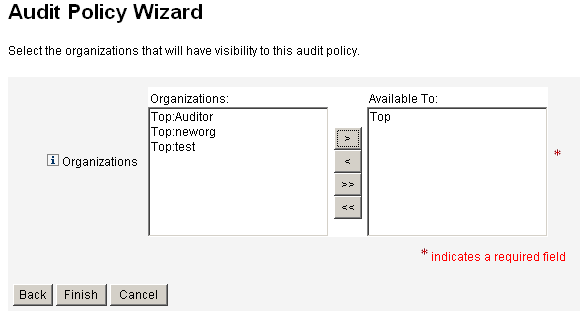
Select Organizations that Can Access this Policy
Use this screen, illustrated in Figure 11-5, to select the organizations that can view and edit this policy.
Figure 11-5 Audit Policy Wizard: Assign Organizations Visibility Screen
After you have created a policy, it will be listed in the policy view available from the Compliance tab.
Creating a New Rule Using the Rule Wizard
If you choose to create a rule by using the Rule Wizard selection in the Audit Policy Wizard, proceed by entering information in the screens discussed in the following sections.
Name and Describe the New Rule
(Optional) Use this screen to enter descriptive text that appears next to the rule name whenever Identity Manager displays the rule. Enter a concise and clear description that is meaningful in describing the rule. This description is displayed within Identity Manager in the Review Policy Violations page.
Figure 11-6 Audit Policy Wizard: Enter the Rule Description Screen
For example, if you are creating a rule that will identify users who have both an Oracle ERP responsibilityKey attribute value of Payable User and a Receivable User attribute value, you could enter the following text in the Description field: Identifies users with both Payable User and Receivable User responsibilities.
Use the Comments field to provide any additional information about the rule.
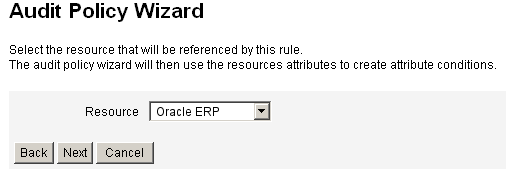
Select the Resource Referenced by the Rule
Use this screen to select the resource that the rule will reference. Each rule variable must correspond to an attribute on this resource. All resources that you have view access to will appear in this options list. In this example, Oracle ERP is selected.
Figure 11-7 Audit Policy Wizard: Select Resource Screen
Note
Most, but not all, attributes of each available resource adapter are supported. For information on the specific attributes that are available, see Identity Manager Resources Reference.
Click Next to move to the next page.
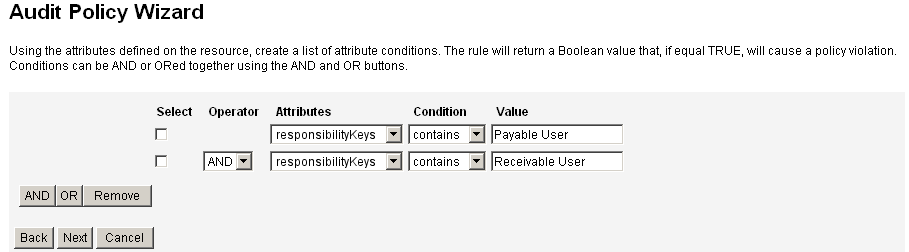
Create the Rule Expression
Use this screen to enter the rule expression for your new rule. This example creates a rule in which a user with an Oracle ERP responsibilityKey attribute value of Payable User cannot also have a Receivable User attribute value.
- Select a user attribute from the list of available attributes. This attribute will directly correspond to a rule variable.
- Select a logical condition from the list. Valid conditions include = (equal to), != (not equal to), < (less than), <= (less than or equal to), > (greater than), >= (greater than or equal to), is true, is null, is not null, and contains. For the purpose of this example, you could select contains from the list of possible attribute conditions.
- Enter a value for the expression. For example, if you enter Payable user, you are specifying an Oracle ERP user with the value of Payable user in the responsibilityKeys attribute.
- (Optional) Click AND or OR operators to add another line and create another expression.
Figure 11-8 Audit Policy Wizard: Select Rule Expression Screen
This rule returns a Boolean value. If both statements are true, then the rule returns the value of TRUE, which causes a policy violation.
The following code example shows the XML for the rule you have created in this screen:
Code Example 11-1 Example of XML Syntax for a Newly Created Rule
To remove an expression from the rule, select the attribute condition and then click Remove.
Click Next to continue in the Audit Policy Wizard. You will then have the opportunity to add additional rules by either creating new rules with the wizard or adding existing rules.
Editing an Audit Policy
Common editing tasks on audit policies include:
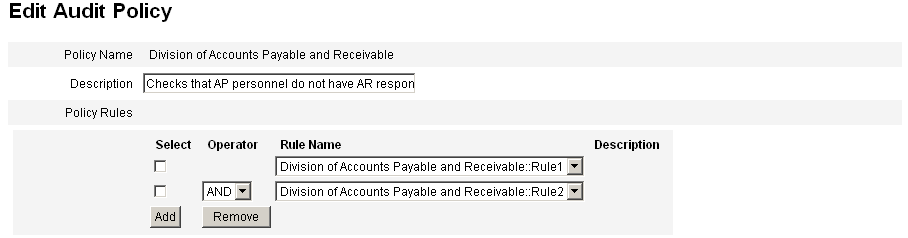
The Edit Policy Page
Click the name of the policy in the Audit Policy name column to open the Edit Audit Policy page. The Edit Audit Policy page opens. This page categorizes audit policy information into the following areas:
Use this area of the page to:
Edit Audit Policy Name and Description
Edit the Policy Description field and Rule Name fields by selecting the text in the fields and entering new text.
Delete a Rule from a Policy
Click the Select button that precedes the rule name, then click Remove.
Add a Rule to the Policy
Click Add to append a new field that you can use to select a rule to add.
Change a Rule used by the Policy
In the Rule Name column, select another rule from the selection list.
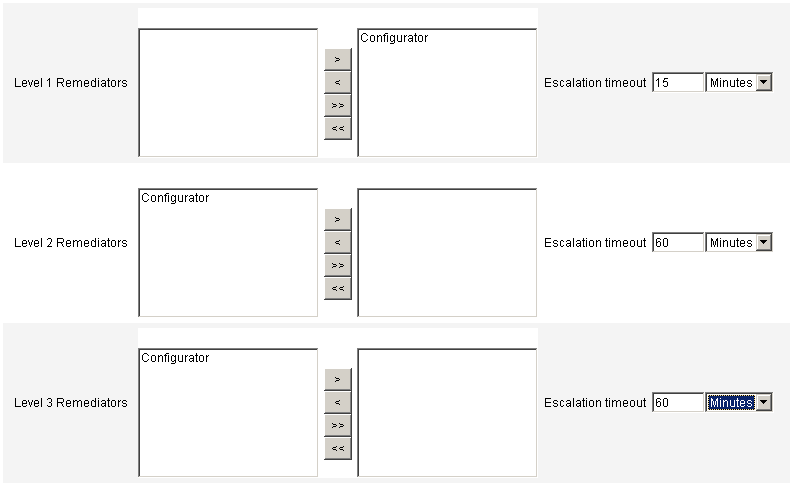
Remediators Area
Figure 11-10 shows the Remediators area where you assign remediators for a policy.
Figure 11-10 Edit Audit Policy Page: Assign Remediators
Use this area of the page to:
Remove or Assign Remediators
Select remediators for one or more remediation levels by selecting the names and using the
to move the selection from the left column to the right column for each remediation level. You must select at least one remediator.
Adjust Escalation Timeouts
Select the timeout value, then enter the new value. The default timeout value is 60 minutes.
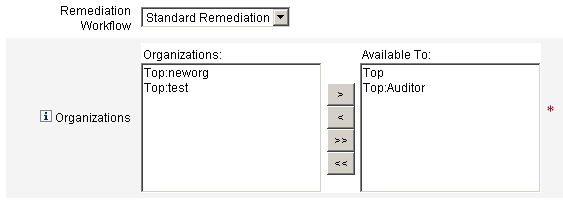
Remediation Workflow and Organizations Area
Figure 11-11 shows the area in which you specify the remediation workflow and organizations for an audit policy.
Figure 11-11 Edit Audit Policy Page: Remediation Workflow and Organizations
Use this area of the page to:
Change the Remediation Workflow
To change the workflow assigned to a policy, you can select an alternative workflow from the list of options. By default, no workflow is assigned to an audit policy.
Note
If no workflow is assigned to the Audit Policy, the violations will not be assigned to any remediators.
Select a remediation workflow from the list, and then click Save.
Assign or Remove Visibility to Organizations
Adjust the organizations to which this audit policy will be available, and then click Save.
Deleting an Audit Policy
When an audit policy is deleted from the system, all violations that reference the policy are also deleted.
Policies can be deleted from the Compliance area of the interface, when you click Manage Policies to view policies. To delete an audit policy, in the policy view select the policy name, then click Delete.
Troubleshooting Audit Policies
Problems with your audit policy will typically be best addressed with policy rule debugging.
Debugging Rules
To debug a rule, add the following trace elements to the rule code.
<block trace='true'>
<and>
<contains>
<ref>accounts[AD].firstname</ref>
<s>Sam</s>
</contains>
<contains>
<ref>accounts[AD].lastname</ref>
<s>Smith</s>
</contains>
</and>
</block>Problem: I can’t see my workflow in the Identity Manager interface.
Confirm that you have added subtype='SUBTYPE_REMEDIATION_WORKFLOW' attribute to your workflow. Workflows without this subtype will not be visible in the Identity Manager interface.
Assigning Audit PoliciesTo assign an Audit Policy to an Organization, the user must have at least the Assign Organization Audit Policies capability. To assign an Audit Policy to a User, the user must have the Assign User Audit Policies capability. A user with the Assign Audit Policies capability has both of these capabilities.
To assign organization-level policy, select the Organization on the Accounts tab and then select the policies in the Assigned audit policies list.
To assign user level policy, click on the User in the Accounts tab. Then, choose the Compliance tab in the user form and select policies in the Assigned audit policies list.
Audit Policy Scans and ReportsThis section provides information about audit policy scans, and provides procedures for running and managing audit scans.
Scanning Users and Organizations
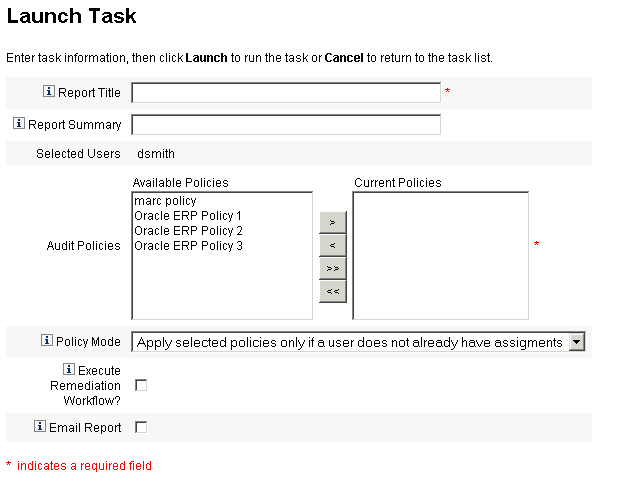
A scan is a way to run selected audit policies on individual users or organizations. You might want to scan a user or organization for a specific violation or execute policies not assigned to the user or organization. You can launch a scan from the Accounts area of the interface.
To initiate a scan on a user account or organization from the Accounts area:
The Launch Task dialog displays. Table 11-2 is an example of the Launch Task page for an audit policy user scan.
Figure 11-12 Launch Task dialog
- Specify a title for the scan in the Report Title field. This field is required. You can optionally specify a description for the scan in the Report Summary field.
- Select one or more audit policies to run. At least one policy must be specified.
- Select a Policy Mode. This determines how the selected policies should interact with users who already have policy assignments. Assignments can come directly from the user or from the organization to which the user is assigned.
- Check Execute Remediation Workflow? to run the remediation workflow assigned in the audit policy. If the audit policy does not define a remediation workflow, no remediation will run.
- Check Email Report to specify recipients for the report. You may also have Identity Manager attach a file containing a report in CSV (comma-separated values) format.
- If you prefer to override the default PDF options, enable the Override default PDF options check box.
- Click Launch to begin the scan.
To view the reports resulting from an audit scan, view the Auditor Reports.
Working with Auditor Reports
Identity Manager provides a number of Auditor Reports. The following table describes these reports.
Table 11-1 Auditor Reports Descriptions
Auditor Report Type
Description
Access Review Detail Report
Shows the current status of all user entitlement records. This report can be filtered by a user’s organization, Access Review and Access Review Instance, state of an entitlement record, and attestor.
Access Review Summary Report
Provides summary information about all access reviews. It summarizes the status of users scanned, policies scanned, and attestation activities for each access review scan listed.
Audit Policy Summary Report
Summarizes the key elements of all audit policies, including the rules, remediators, and workflow for each policy.
Audited Attribute Report
Shows all audit records indicating a change of a specified resource account attribute.
This report mines the audit data for any auditable attributes that have been stored. It will mine the data based on any extended attributes, which can be specified from WorkflowServices or resource attributes marked as auditable.
AuditPolicy Violation History
Graphical view of all compliance violations per policy that were created during a specified period of time. This report can be filtered by policy, and grouped by day, week, month, or quarter.
User Access Report
Shows the audit record and user attributes for a specified user.
Organization Violation History
Graphical view of all compliance violations per resource, that were created during a specific period of time. Can be filtered by organization, and grouped by day, week, month, or Quarter.
Resource Violation History
Graphical view of all compliance violations per resource that were created during the specified time range.
Separation of Duties Report
Shows separation of duties violations arranged in a conflicts table. Using a Web-based interface, you can access additional information by clicking the links.
This report can be filtered by organization, and grouped by day, week, month, or quarter.
Violation Summary Report
Shows all current compliance violations. This report can be filtered by remediator, resource, rule, user, or policy
The reports are available from the Reports tab in the Identity Manager interface.
Creating an Auditor Report
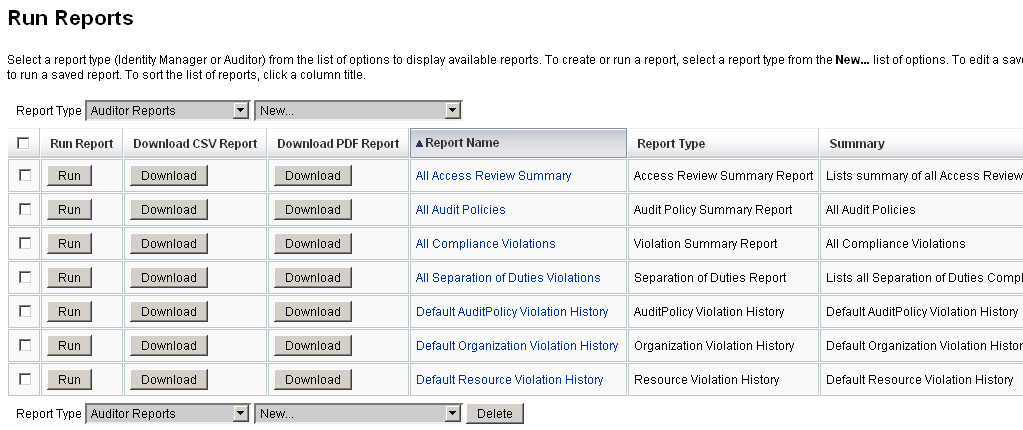
To generate a report, you must first create the report. You can specify various criteria for the report, including specifying email recipients to receive the report results. After a report has been created and saved, it is available from the Run Reports page.
Figure 11-13 shows an example of the Run Reports page with a list of defined Auditor Reports.
Figure 11-13 Run Reports Page Selections
To create an auditor report, use the following procedure:
A report dialog is displayed. The fields and layout of the report dialog varies for each type of report. Refer to the online Help for information about specifying the report criteria.
After entering and selecting report criteria, you can:
- Run the report without saving – Click Run to start running the report. Identity Manager does not save the report (if you defined a new report) or the changed report criteria (if you edited an existing report).
- Save the report – Click Save to save the report. After it is saved, you can run the report from the Run Reports page (the list of reports).
After running a report from the Run Reports page, you can view the output immediately or at a later time from the View Reports tab.
- For information about scheduling a report, see Scheduling Reports.
Remediation and MitigationThis section describes how to use Identity Manager Remediation to protect your critical assets. The following topics discuss elements of the Identity Manager Remediation process:
About Remediation
When Identity Manager detects an unresolved (not mitigated) audit policy violation, it creates a remediation request, which must be addressed by a remediator — designated administrators who are allowed to evaluate and respond to audit policy violations.
Identity Manager allows you to define three levels of remediator escalation. Remediation requests are initially sent to Level 1 remediators. If a Level 1 remediator does not act on a remediation request before the time-out period expires, Identity Manager escalates the violation to the Level 2 remediator(s) and begins a new time-out period. If a Level 2 remediator does not respond before the time-out period expires, then the request is escalated once again to the Level 3 remediator.
To perform remediation, you must designate at least one remediator for your enterprise. Specifying more than one remediator for each level is optional, but recommended. Multiple remediators help ensure workflow is not delayed or halted.
Instructions for assigning remediators are provided in Assigning Remediation Capabilities.
Remediation Workflow Process
By default, Identity Manager implements the Standard Remediation Workflow to provide remediation processing for Audit Policy scans.
The Standard Remediation Workflow generates a remediation request (a review-type work item) containing information about the compliance violation and sends an email notification to each Level 1 remediator named in the audit policy. When a remediator mitigates the violation, the workflow changes the state of, and assigns an expiration to, the existing compliance object.
A compliance violation is uniquely identified by the combination of the user, policy name, and rulename. When an audit policy evaluates to true, a new compliance violation is created for each user/policy/rule combination, if an existing violation for this combination does not already exist. If a violation does exit for the combination, and the violation is in a mitigated state, then the workflow process takes no action. If the existing violation is not mitigated, then its recurrent count is incremented.
For more information about remediation workflows, see About Audit Policies.
Remediation Responses
By default, there are three response options given to each remediator:
If the violation is deliberate (for example, there is a business case for belonging to two groups), you can mitigate the violation for an extended period of time. You can also mitigate the violation for a short period of time (for example, in cases where the resource’s system administrator is on vacation and you do not know how to fix the problem).
Identity Manager stores the name of the remediator that mitigated the violation along with the expiration date assigned to the exemption and any comments provided by that person.
For example, your enterprise establishes a rule in which a user cannot be responsible for both Accounts Payable and Accounts Receivable, and you receive notice that a user is violating this rule.
- If the user is a supervisor who has responsibility for both roles until the company hires a second person for that position, you might mitigate the violation and issue an exemption for up to six months.
- If the user is violating the rule, you might ask your Oracle ERP Administrator to correct the conflict, and then remediate the violation when the problem is fixed for that resource.
Remediation Email Template
Identity Manager provides a Policy Violation Notice email template (available by selecting the Configuration tab, then the Email Templates subtab. You can configure this template to notify remediators of pending violations. For more information, see Customizing Email Templates.
Assigning Remediation Capabilities
To assign the remediation capability to an administrator in your enterprise, use the following steps:
- Select the Accounts tab and click the administrative account from the Accounts list to open the Edit User page.
- On the Edit User page, click the Security subtab.
- Select Auditor Remediator from the Available Capabilities list and use the
- When you are finished, click Save.
Note
For more information about the Auditor Remediator capabilities, see Understanding and Managing Capabilities.
Working with the Remediations Page
Select Work Items, and then the Remediations tab in Identity Manager to access the Remediations page.
You can use this page to:
Viewing Remediation Requests
You can use the Remediations page to view details about remediation requests before taking action on them.
Note
Depending on your capabilities, you may be able view and take action on remediation requests for other remediators or administrators.
The following topics are related to viewing remediation requests
Viewing Pending Requests
By default, your login name and your pending requests are displayed in the Remediation table.
You can use the List Remediations for option to view pending remediation requests for a different remediator:
The resulting table provides the following information about each request:
- Remediator: Assigned remediator’s name.
- Request: Action requested of the remediator. Click the request text to view more information about the policy violation and to process the request.
- Date of Request: Date and time the remediation request was issued.
- Description: Brief description of the policy violation.
Viewing Completed Requests
To view your completed remediation requests, click the My Work Items tab, and then click the History tab. A list of Previously remediated work items displays.
The resulting table (which is generated by an AuditLog report) provides the following information about each remediation request:
- Timestamp: Date and time the request was remediated
- Subject: Name of the remediator who processed the request
- Action: Whether the remediator mitigated or remediated the request
- Type: Always indicates ComplianceViolation
- Object Name: Name of the audit policy that was violated
- Resource: Provides the remediator’s account ID (or may indicate N/A)
- ID: Always indicates N/A
- Result: Always indicates Success
Clicking a timestamp in the table opens an Audit Events Details page.
The Audit Events Details page provides information about the completed request, including information about the remediation or mitigation, event parameters
(if applicable), and auditable attributes.Clicking OK returns you to the Previously remediated by Configurator page, and clicking OK on the Previously remediated by Configurator page returns you to the Remediations page.
Sorting Requests in the Remediations Table
You can sort the contents of the Remediations table by clicking the table headers. Click once to sort in ascending order, or click again to sort in descending order.
To sort pending requests in the Remediations tab:
To sort completed requests in the History tab:
- Click Timestamp to sort the table chronologically by time and date.
- Click Subject to sort the table alphabetically by name of the remediator who processed the request.
- Click Action to sort the table alphabetically by action.
- Click Object Name to sort the table alphabetically by the violated policy name.
Updating the Table
To update the information provided in the Remediations table, click Refresh. The Remediation page updates the table with any new policy violations.
Mitigating Policy Violations
You can mitigate policy violations from the Remediations page or from the Review Policy Violations page.
From the Remediations Page
To mitigate pending policy violations from the Remediations page:
- Select rows in the table to specify which requests to mitigate.
- Click Mitigate.
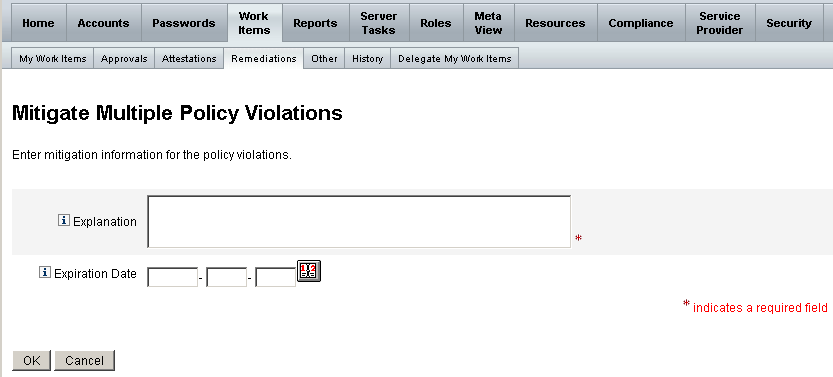
The Mitigate Policy Violation page (or Mitigate Multiple Policy Violations page) displays as follows:
Figure 11-14 Mitigate Policy Violation Page
- Enter your comments about the mitigation into the Explanation field. (This field is required.)
Remember, your comments provide an audit trail for this action, so be sure to enter complete and meaningful information. For example, explain why you are mitigating the policy violation, the date, and why you chose the exemption period.
- Provide an expiration date for the exemption by typing the date (YYYY-MM-DD) directly into the Expiration Date field or by clicking the date
button and selecting a date from the calendar.
- When you are finished, click OK to save your changes and return to the Remediations page.
Remediating Policy Violations
To remediate one or more policy violations,
- Use the check boxes in the table to specify which requests to remediate.
- Click Remediated.
- The Remediate Policy Violation page (or Remediate Multiple Policy Violations page) displays.
- Enter your comments about the remediation into the Comments field.
Remember, your comments provide an audit trail for this action, so be sure to enter complete and meaningful information. For example, explain why you are remediating the policy violation and perhaps the date.
- When you are finished, click OK to save your changes and return to the Remediations page.
Forwarding Remediation Requests
If necessary, you can forward one or more remediation requests to another remediator, as follows:
When the Remediations page redisplays, the new remediator’s name displays in the Remediator column of the table.
Periodic Access Reviews and AttestationIdentity Manager provides a process for conducting access reviews that enable managers or other responsible parties to review and verify user access privileges. This process helps to identify and manage user privilege accumulation over time, and helps to maintain compliance with Sarbanes-Oxley, HIPAA, and other federally regulated mandates.
Access reviews can be performed ad hoc or scheduled to occur periodically, for example every calendar quarter, enabling you to conduct Periodic Access Reviews to maintain the correct level of user privileges. An access review can include audit scans.
About Periodic Access Reviews
Periodic Access Review is a periodic process of attesting that a set of employees has the appropriate privileges on the appropriate resources at a specific point in time.
A periodic access review involves the following activities:
- Access review scans — This is a scan that you define and run or schedule to run, which evaluates user entitlements for a specified set of users and performs rule-based evaluations to determine if attestation is needed.
- Attestation — This is the process of responding to attestation requests by approving or rejecting user entitlements.
A user entitlement is a record indicating details of a user’s accounts or a specific set of resources.
Access Review Scans
To initiate a Periodic Access Review, you must first define at least one access scan.
The access scan defines who will be scanned, what resources will be included in the scan, any audit policies to be evaluated during the scan, and rules to determine which entitlement records will be manually attested, and by whom.
Access Review Workflow Process
In general, the Identity Manager access review process works as follows:
- Constructs a list of users, gets account information for each user, and evaluates audit policies
- Creates user entitlement records
- Determines if attestation is required for each user entitlement record
- Assigns work items to each attestor
- Waits for all attestors to approve or for the first rejection
- Escalates to the next attestor, if no response to a request is received within a specified time-out period
- Updates user entitlement records with resolutions
Required Administrator Capabilities
To conduct a Periodic Access Review and manage the review processes, a user must have the Auditor Periodic Access Review Administrator capabilities. A user with Auditor Access Scan Administrator capability can create and manage access scans.
To assign these capabilities, edit the user account and modify the security attributes. For more information about these and other auditor capabilities, see Understanding and Managing Capabilities.
Attestation
Attestation is the certification process performed by one or more designated attestors to confirm a user entitlement as it exists on a specific date. During an access review, the attestor (or attestors) receives notice of the access review attestation requests through email notification. An attestor must be an Identity Manager user, but is not required to be an Identity Manager administrator.
Attestation Workflow
Identity Manager uses an attestation workflow that is launched when an access scan identifies entitlement records requiring review. The workflow makes this determination based on the rules defined in the access scan.
A rule evaluated by the access scan determines if the user entitlement record needs to be manually attested, or if it can be automatically approved or rejected. If the user entitlement record needs to be manually attested, the access scan uses a second rule to determine who the appropriate attestors are.
Each user entitlement record that is to be manually attested is assigned to a workflow, with one work item per attestor. Notification to the attestor of these work items can be sent using a ScanNotification workflow that bundles the items into one notification per scan. Unless the ScanNotification workflow is selected, notification will be per user entitlement. This means an attestor could receive multiple notifications per scan, and possibly a large number depending on the number of users scanned.
Attestation Security Access
The following Identity Manager users are authorized to access an attestation work item:
These authorization options are for workitems of authType AttestationWorkItem. By default, the behavior for authorization checks is as follows:
The second and third checks are independently configurable by modifying the following options:
The integer values for firstLevel and lastLevel default to 0 and -1 meaning direct and indirect subordinates.
These options can be added or modified in the following:
UserForm: AccessApprovalList approval/editAttestation.jsp
Delegated Attestation
By default, the access scan workflow respects delegations created by users for attestation work items and notifications. The access scan administrator may deselect the Follow Delegation option to ignore delegation settings. If an attestor has delegated all work items to another user but the Follow Delegation option is not set for an access review scan, then the attestor—not the user to which delegations have been assigned—will receive attestation request notifications and work items.
Planning for a Periodic Access Review
An access review can be a labor- and time-intensive process for any business enterprise. The Identity Manager Periodic Access Review process helps minimize the cost and time involved by automating many parts of the process. However, some of the processes still are time-consuming. For example, the process of fetching user account data from a number of locations for thousands of users can take a considerable amount of time. The act of manually attesting records can be time-consuming as well. Proper planning improves the efficiency of the process and greatly reduces the effort involved.
Planning for a Periodic Access Review involves the following considerations:
A single Periodic Access Review for a large sized organization can take one or more days for scanning, as well as one or more weeks for manual attestation to complete.
For example, for an organization with 50,000 users and ten resources, an access scan might take approximately one day to complete, based on the following calculation:
1 sec/resource * 50K users * 10 resources / 5 concurrent threads = 28 hours
If resources are spread across geographies, it can add to the process time.
Running parallel scans is most effective when the resources are not common across the scans. When defining an access review, create multiple scans and restrict resources to a specific set of resources, using different resources for each scan. Then when you launch the task, select multiple scans and schedule them to run immediately.
Creating an Access Scan
To define the access review scan, follow these steps:
- Select Compliance > Manage Access Scans.
- On the Create New Access Scan page, assign a name to the access scan.
- Optionally, add a description that is meaningful in identifying the scan.
- Select the User Scope Type from the following options: (This field is required.)
- Members of Organization(s) — Choose this option to scan all members of one or more selected organizations.
- Reports to manager(s) — Choose this option to scan all users reporting to selected managers. Manager hierarchy is determined by the Identity Manager attribute of the user’s Lighthouse account.
- According to attribute condition rule — Choose this option to select a rule to specify the type of users to scan. Identity Manager provides the following rules:
- All Administrators
- All Non-Administrators
- Users without a Manager
Note
You can add user scoping rules by using the Identity Manager Integrated Development Environment (IDE). See Identity Manager Deployment Tools for more information.
If the user scope is organization or manager, the Recursive Scope option is available. This option allows for user selection to occur recursively through the chain of controlled members.
- If you choose to also scan audit policies to detect violations during the access review scan, select the audit policies to apply to this scan by moving your selections from Available Audit Policies to the Current Audit Policies list.
Adding audit policies to an access scan results in the same behavior as performing an audit scan over the same set of users. However, in addition any violations detected by the audit policies are stored in the user entitlement record. This information can make automatic approval or rejection easier, because the rule can use the presence or absence of violations in the user entitlement record as part of its logic.
- If you chose to also scan audit policies in the preceding step, you can use the Policy mode option to specify how the access scan determines which audit policies to execute for a given user. A user can have policies assigned both at the user level and/or at the organization level. The default access scan behavior is to apply the policies specified for the access scan only if the user does not already have any assigned policies.
- (Optional) Specify the Review Process Owner. Use this option to specify an owner of the access review task being defined. If a Review Process Owner is specified, then an attestor who encounters a potential conflict in responding to an attestation request can abstain in lieu of approving or rejecting a user entitlement and the attestation request is forwarded to the Review Process Owner. Click the selection (ellipsis) box to search the user accounts and make your selection.
- Follow delegation — Select this option to enable delegation for the access scan. The access scan will only honor delegation settings if this option is checked. Follow Delegation is enabled by default.
- Restrict target resources — Select this option to restrict scanning to targeted resources.
This setting has a direct bearing on the efficiency of the access scan. If target resources are not restricted, each user entitlement record will include account information for every resource the user is linked to. This means that during the scan every assigned resource is queried for each user. By using this option to specify a subset of the resources, you can greatly reduce the processing time required for Identity Manager to create user entitlement records.
- Execute Violation Remediations — Select this option to enable the audit policy’s remediation workflow when a violation is detected.
If this option is selected, then a violation detected for any of the assigned audit policies will result in the respective audit policy’s remediation workflow being executed.
- Access Approval Workflow — Select the default Standard Attestation workflow or select a customized workflow if available.
This workflow is used to present the user entitlement record for review to the appropriate attestors (as determined by the attestor rule). The default Standard Attestation Workflow creates one work item for each attestor. If the access scan specifies escalation, this workflow is responsible for escalating work items that have been dormant too long. If no workflow is specified, the user attestation will remain in the pending state indefinitely.
- Attestor Rule — Select the Default Attestor rule, or select a customized attestor rule if available.
The attestor rule is given the user entitlement record as input, and returns a list of attestor names. If Follow Delegation is selected, the access scan transforms the list of names to the appropriate users following the delegation information configured by each user in the original list of names. If an Identity Manager user’s delegation results in a routing cycle, then the delegation information is discarded, and the work item is delivered to the initial attestor. The Default Attestor rule indicates that the attestor should be the manager (idmManager) of the user that the entitlement record represents, or the Configurator account if that user’s idmManager is null. If attestation needs to involve resource owners as well as managers, you must use a custom rule. For information about customizing rules, see the Identity Manager Deployment Tools guide.
- Attestor Escalation Rule — Use this option to specify the Default Escalation Attestor rule, or select a customized rule if available. You can also specify the Escalation Timeout value for the rule.
This rule specifies the escalation chain for a work item that has passed the Escalation Timeout period. The Default Escalation Attestor rule escalates to the assigned attestor’s manager (idmManager), or to Configurator if the attestor’s idmManager value is null.
You can specify the Escalation Timeout value in minutes, hours, or days.
- Review Determination Rule — Select one of the following rules to specify how the scan process will determine the disposition of an entitlement record: (This field is required.)
- Reject Changed Users — Automatically rejects a user entitlement record if it is different than the last user entitlement from the same access scan definition and the last user entitlement was approved. Otherwise, forces manual attestation and approves all user entitlements that are unchanged from the previously approved user entitlement.
- Review Changed Users — Forces manual attestation for any user entitlement record if it is different than the last user entitlement from the same access scan definition and the last user entitlement was approved. Approves all user entitlements that are unchanged from the previously approved user entitlement.
- Review Everyone — Forces manual attestation for all user entitlement records.
Note
The Reject Changed Users and Review Changed Users rules compare the user entitlement to the last instance of the same access scan in which the entitlement record was approved.
You can change this behavior by copying and modifying the rules to restrict comparison to selected parts of the account data. See Identity Manager Deployment Tools for information about customizing rules.
- Notification Workflow — Select one of the following options to specify the notification behavior for each work item.
- None — This is the default selection. This selection results in an attestor getting an email notification for each individual user entitlement that he must attest.
- ScanNotification —This selection bundles attestation requests into a single notification. The notification indicates how many attestation requests were assigned to the recipient.
If there is a Review Process Owner specified in the access scan, the ScanNotification Workflow will also send a notification to the review process owner when the scan begins, and when it ends. See Step 7.
The ScanNotification workflow uses the following email templates
You can customize the ScanNotification Workflow.
- Violation limit — Use this option to specify the maximum number of compliance violations that can be emitted by this scan before the scan aborts. The default limitation is 1000. An empty value field is equal to no limit.
Although, typically during an audit scan or access scan the number of policy violations is small compared to the number of users, setting this value could provide protection from the impact of a defective policy that increases the number of violations significantly. For example, consider the following scenario:
If an access scan involves 50K users and generates two to three violations per user, the cost of remediation for each compliance violation can have a detrimental effect on the Identity Manager system.
- Organizations — Select the organizations to which this access scan object is available. This is a required field.
Click Save to save the scan definition.
Deleting an Access Scan
You can delete one or more access scans. To delete an access scan, from the Compliance tab select Manage Access Scans, select the name of the scan, and then click Delete.
Managing Access Reviews
After defining an access scan, you can use it or schedule it as part of an Access Review. After initiating an access review, several tasks are available to manage the review process.
Use the following tasks to launch and manage access reviews.
Launching an Access Review
To launch an access review, select the Access Review task in the Server Tasks > Run Tasks area of the Administrator interface. On the Launch Task page, specify a name for the access review. Select the scans from the Available Access Scans list and move them to the Selected list. If you select more than one scan, you can choose one of the following launch options:
- immediately — This option starts running the scan immediately upon clicking the Launch button. If you select this option for multiple scans in the launch task, then the scans will run in parallel.
- after waiting — This option allows you to specify a period of time to wait before launching the scan, relative to the launch of the access review task.
Note
You may initiate more than one scan during an access review session. However, consider that each scan may involve a large number of users, and therefore the scan process can take as much as several days to complete. Best practice dictates that you manage your scans accordingly. For example, you might launch one scan to run immediately and schedule other scans at staggered intervals.
Click Launch to start the access review process.
Note
The name you assign to an access review is important. Access reviews run on a periodic basis with the same name can be compared by some reports.
When you launch an access review, the workflow process diagram is displayed showing the steps in the process.
Scheduling Access Review Tasks
An access review task can be scheduled from the Server Tasks area. For example to set up access reviews on a periodic basis, use the Manage Schedule tab, to define the schedule. You might schedule the task to occur every month or every quarter.
To define the schedule, select the task on the Schedule Tasks page and then complete the information in the Create task schedule page.
Click Save to save the scheduled task.
Note
Identity Manager keeps the results from access review tasks for one week, by default. If you choose to schedule a review more often than one a week, set the Results Options to delete. If Results Options are not set to delete, the new review will not run because the previous task results still exist.
Managing Access Review Progress
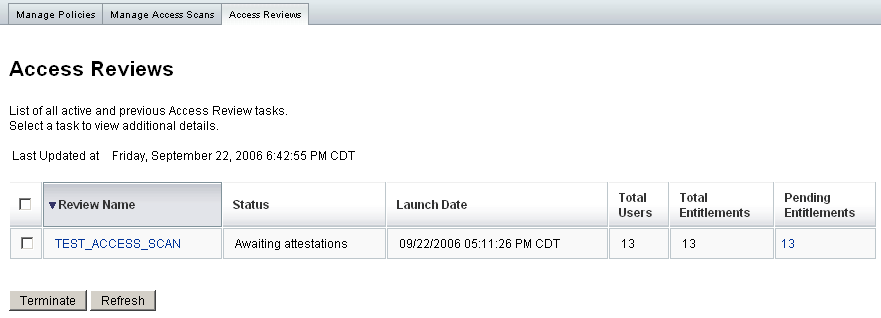
Use the Access Reviews tab to monitor the progress of an access review. Access this feature through the Compliance tab.
Figure 11-16 Access Reviews Page
As shown in the preceding figure, from the Access Reviews tab you can review a summary of all active and previously processed access reviews. The following information is provided for each access review listed:
- Status — Current status of the review process: initializing, terminating, terminated, number of scans in progress, number of scans scheduled, awaiting attestations, or completed.
- Launch Date — The date (timestamp) the access review task started.
- Total Users — Total number of users to be scanned.
- Total Entitlements — Total number of entitlement records generated for review.
- Pending Entitlements — Number of entitlement records not yet attested.
To view more detailed information about the review, select it to open a summary report.
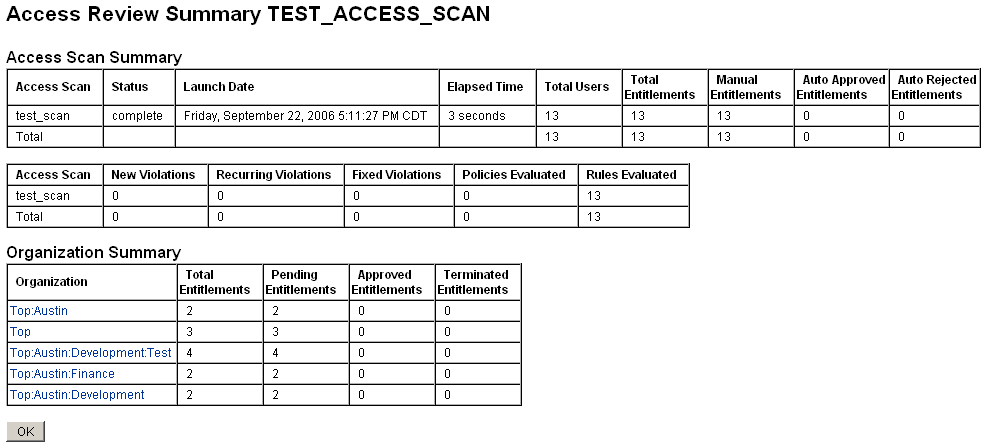
Figure 11-17 shows a sample Access Review Summary report.
Figure 11-17 Access Review Summary Report Page
From a Web-based interface, you can click a link to access status information on each access scan, organization, and attestor.
You can also review and download this information in a report by running the Access Review Summary Report.
Modifying Scan Attributes
After setting up an access scan, you can edit the scan to specify new options, such as specifying target resources to scan or specifying audit policies to scan for violations while the access scan is running.
To edit a scan definition, select it from the list of Access Scans and modify the attributes on the Edit Access Review Scan page.
You must click Save to save any changes to the scan definition.
Note
Changing the scope of an access scan might change the information in newly-acquired user entitlement records, as it can have an effect on the Review Determination Rule if that rule is comparing user entitlements to older user entitlement records.
Canceling an Access Review
From the Access Reviews tab, you can click Terminate to stop a selected review in progress. Terminating a review causes the following actions to occur:
Deleting an Access Review Task
You can delete an access review task if the status of the task is terminated or completed. An access review task in progress cannot be deleted unless it is first terminated.
Deleting an access review task deletes all user entitlement records that were generated by the review. The deletion action is recorded in the audit log.
To delete an access review task, select Server Tasks in the menu bar and then select Run Tasks > Delete Access Review.
Managing Attestation Duties
You can manage attestation requests from the Identity Manager Administrator or User interface. This section provides information about responding to attestation requests and the duties involved in attestation.
Access Review Notification
During a scan, Identity Manager sends a notification to Attestors when attestation requests require their approval. If the attestor responsibilities have been delegated, the attestation requests are sent to the delegate. If multiple attestors are defined, each attestor receives an email notification.
Requests appear as Attestation work items in the Identity Manager interface. Pending attestation work items are displayed when the assigned attestor logs in to Identity Manager.
Viewing Pending Requests
View attestation work items from the Work Items area of the interface. Selecting the Attestation tab in the Work Items area lists all the entitlement records requiring approval. From the Attestations page, you can also list entitlement records for all your direct reports and for specified users for which you have direct or indirect control.
The My Work Items tab displays each category of assignments and the number of your pending work items for each.
Reviewing and Approving Entitlement Records
Attestation work items contain the user entitlement records requiring review. Entitlement records provide information about user access privileges, assigned resources, and policy violations.
The following are possible responses to an attestation request:
- Approve — Attests that the entitlement is appropriate as of the date recorded in the entitlement record.
- Reject — The entitlement record indicates possible discrepancies that cannot be currently validated.
- Forward — Enables you to specify another recipient for review.
- Abstain — Attestation for this record is not appropriate, and a more appropriate attestor is not known. The attestation work item is forwarded to the Review Process Owner. This option is available only if a Review Process Owner has been defined in the Access Review task.
If an attestor does not respond to a request by taking one of these actions before the specified escalation timeout period, notice is sent to the next attestor in the escalation chain. The notification process continues until a response is logged.
Attestation status can be monitored from the Compliance > Access Reviews tab.
Access Review Reports
Identity Manager provides the following reports to enable you to evaluate the results of an access review:
- Access Review Detail Report — This report provides the following information, in table format:
- Name — Name of user entitlement record
- Status — Current status of the review process: initializing, terminating, terminated, number of scans in progress, number of scans scheduled, awaiting attestation, or completed
- Attestor — Identity Manager user(s) assigned as the attestor for the record
- Scan Date — Timestamp recorded for when the scan occurred
- Disposition Date — Date (timestamp) when entitlement record was attested
- Organization — Organization of user in the entitlement records
- Manager — Manager of a scanned user
- Resources — Resources the user has accounts on that were captured in this user entitlement
- Violations — Number of violations detected during the review
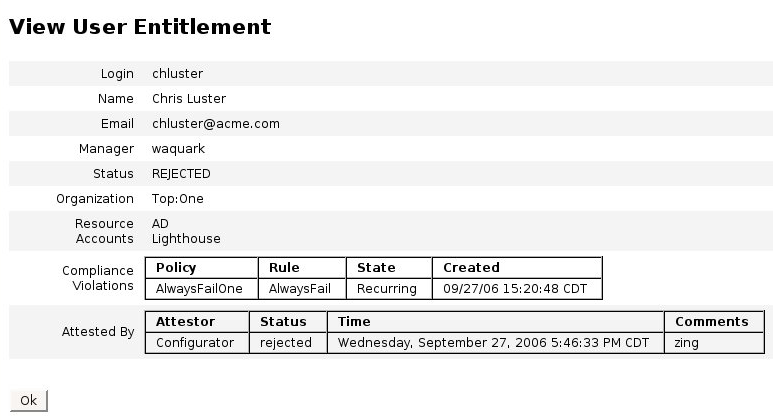
Click a name in the report to open the user entitlement record. Figure 11-18 shows a sample of the information provided in the user entitlement record view.
Figure 11-18 User Entitlement Record
- Access Review Summary Report — This report, also discussed in Managing Access Review Progress and illustrated in Figure 11-17, shows the following summary information about the access scans you select for the report:
- Review Name — Name of the access scan
- Status — Timestamp for when the review was launched
- User Count — Number of users scanned for the review
- Entitlement Count — Number of entitlement records generated
- Approved — Number of entitlement records approved
- Rejected — Number of entitlement records rejected
- Pending — Number of entitlement records still pending
- Canceled — Number of entitlement records canceled
These reports are available for download, in Portable Document Format (PDF) or comma-separated value (CSV) format, from the Run Reports page.
Identity Auditing Tasks ReferenceTable 11-2 provides a quick reference to commonly performed identity auditing tasks. The table shows the primary Identity Manager interface location where you will go to begin each task, as well as alternate locations or methods (if available) that you can use to perform the task.
Table 11-2 Identity Auditing Task Reference
To Do This:
Go To:
Create, edit, or delete an audit policy
Compliance tab, Manage Policies subtab
Define remediators and assign remediation workflows
Compliance tab, Manage Policies subtab
Perform an audit scan on one or more users or organizations
Accounts tab, select Scan from the User Actions or Organization Actions list
Respond to policy violation remediation requests
Work Items tab, Remediations subtab
Mitigate policy violations
Work Items tab, Remediations subtab
Review remediated policy violations
Work Items tab, Remediations subtab
Generate audit policy reports
Reports tab, Run Report subtab
Disable or enable auditing
Configure tab, Audit subtab
Set up audit events to capture
Configure tab, Audit subtab
Edit administrator audit capabilities
Security tab, Capabilities subtab
Set up email templates for audit notification
Configure tab, Email Templates subtab
Import data files/rules (such as XML-format forms)
Configure tab, Import Exchange File subtab
Define an access review scan
Compliance tab, Manage Scans subtab
Run an access review
Server Tasks tab, Run Task subtab
Terminate an access review
Compliance tab, Access Reviews subtab
Schedule an access review
Server Tasks tab, Manage Schedule subtab
Set up periodic access reviews
Compliance tab, Manage Access Scans subtab
Monitor access review status
Compliance tab, Access Reviews subtab
Assign attestors
Compliance tab, Manage Access Scans subtab
Perform Attestor duties (review and certify user entitlements)
Work Items tab, My Work Items tab, Attestation subtab
Review separation-of-duties report
Reports tab, Run Report subtab