Scheduling Appointments and To Do Items
To schedule an appointment on your calendar, do the following:
-
Double-click SELECT on the day you would like to schedule an appointment.
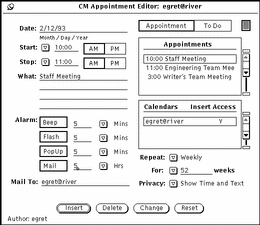
This opens an Appointment Editor window, shown in Figure 5-9.
Figure 5-9 Calendar Manager Appointment Window

-
If the commitment is a task rather than an appointment click SELECT on the To Do box.
The Appt (appointment) box is selected by default.
You may enter a To Do item with or without an associated time.
-
To set the time, move the pointer onto the Start abbreviated menu button and press MENU to display a menu from which you can choose times.
The hours displayed on this menu are determined by the setting of day boundaries from the Properties window.
Each hour item has a submenu with 00, 15, 30, and 45 minute items.
Highlight the time you want and release MENU to enter the time in the text field. When you choose a time from the menu, the correct a.m. or p.m. setting is automatically chosen for you. If you choose the menu item None, no time is associated with the appointment. If you choose All Day, the appointment is set from 12:00 a.m. to 11:59 p.m.
Alternatively, you type a time in the Start text field. If necessary, click SELECT on the PM setting.
The time in the Stop text field is automatically set to one hour later than the time in the Start text field.
-
To change the duration for the appointment from the default of one hour, move the pointer onto the Stop menu button and press MENU to display the time menu as described in Step 2.
Alternatively, you can type a time in the Stop text field. If necessary, click SELECT on the PM setting.
-
If the appointment is one that is repeated on a regular basis, choose the appropriate Repeat setting from the menu displayed through the Repeat abbreviated menu button.
You can use the Repeat menu to choose a variety of intervals. These are outlined in the "Appointment Editor Options". When Repeat is set to One Time, the For text field is inactive and is dimmed to show you that it will not accept input. When you choose a repeating appointment, the For text field and abbreviated menu button are active and the units are displayed in the text field.
You use the For menu and text field to choose the time frame you want the appointment to repeat. For example, you may know that a weekly meeting will be scheduled for the next ten weeks.
The default number in the For text field usually sets the appointment to repeat for a year. For example, the default number is 365 when the repeat interval is Daily, or 52 when the repeat interval is Weekly. The default number for the Yearly setting is two years. If you want the appointment to repeat indefinitely, you can choose forever from the For menu or type the word "forever" in the text field.
-
Choose a Privacy setting, if applicable.
If this is a private appointment that you do not want anyone to view, you can use the abbreviated menu button from the Privacy field to select Show Time Only or Show Nothing about the appointment. For complete information refer to "Appointment Editor Options".
-
Choose the way you want to be reminded of this appointment.
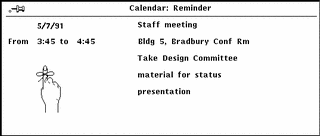
You can set none, some, or all of the Alarm options. Beep and Flash cause the Calendar Manager icon to beep and flash if it is closed. The Calendar Manager window itself will beep and flash if it is open. If you choose PopUp, at the time specified for PopUp the appointment Reminder window is displayed showing the appointment information. Figure 5-10 shows an example of the Reminder pop-up window.
Figure 5-10 Example of the Reminder Pop-up Window

Choosing the Mail setting automatically mails a reminder to the email addresses you type into the To text field.
-
Change the Alarm times, if necessary by typing a new number into the appropriate text field.
Decimals and fractions are not accepted formats.
You can also change the default Alarm times from the Properties window. See "Customizing Your Calendar Manager" for information.
-
When you have entered all the information for the appointment, click SELECT on the Insert button.
The appointment is added to the scrolling list in the Appointment Editor window and to the Calendar Manager window.
If you want to enter appointments for another day, double-click SELECT on the new day in the Calendar Manager window or type a new date in the Date field.
- © 2010, Oracle Corporation and/or its affiliates
