|
| |
| Sun Java System Directory Editor 1 2005Q1 Installation and Configuration Guide | |
Chapter 2
Installing Directory EditorUse the information and procedures described in this chapter to install Directory Editor for use with different application servers. This chapter is organized as follows:
Before You BeginBefore starting the Directory Editor installation process,
- Ensure that your application server or servlet container uses Java 1.4.2 J2SDK (or later).
Note
Generally, if you are using the Java that came with your application server, you are using the correct version. However, if you encounter a problem, Directory Editor provides a Java System Properties page that shows all Java system properties being used in the application — including the current Java version.
For more information about the Directory Editor Java System Properties debug page, see Chapter 10, "Error Logging and Troubleshooting."
- Ensure you have the following information at-hand:
Reinstalling or Upgrading Directory EditorBefore upgrading or reinstalling Directory Editor, you must uninstall the older product version first or the installer will not provide the de.war file you need to complete the installation process.
To upgrade or reinstall Directory Editor
- If necessary, save your configuration as described in Chapter 8, "Backing Up and Restoring Configurations."
- Uninstall Directory Editor as described in Chapter 9, "Removing the Software."
- Install Directory Editor as described in Installing Directory Editor.
Installing Directory EditorUse the following steps to install Directory Editor:
Step 1: Install an Application Server
Install an application server using the installation instructions provided with that product.
You must have a Java compiler and a Java Virtual Machine (JVM) installed on your machine to run the Java classes that perform actions in Directory Editor. Both items are available with the Java 2 Software Developer’s Kit (J2SDK). (The JRE packages do not provide a compiler.)
You can download the J2SDK from http://java.sun.com, and follow the installation instructions provided with the product or many application servers bundle a J2SDK with their installation.
Step 2: Install the Directory Editor Software
Note
If you are upgrading or reinstalling Directory Editor, you must uninstall the old product version first. (See Reinstalling or Upgrading Directory Editor.)
Use the following instructions to download and install the Directory Editor de.war file.
- Download the DE12005Q1.zip file from the Sun website to a safe location in your deployment directory. This zip file contains the following files:
- Extract these files from the DE12005Q1.zip file.
- Open a command window, cd to the DE12005Q1 folder, and type java de to launch the Directory Editor installer.
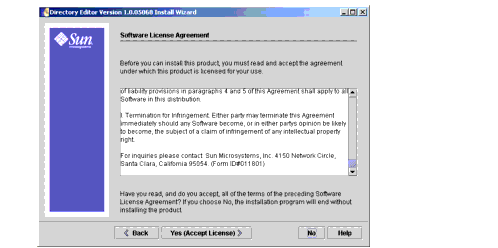
- When the Welcome screen is displayed, click Next to open the Directory Editor Software License Agreement (shown in the following figure).
Figure 2-1 Directory Editor License Agreement
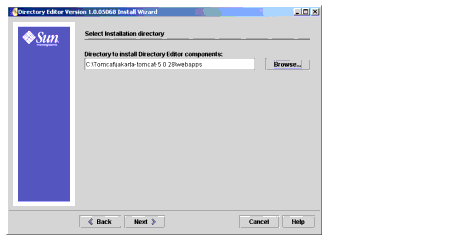
- Enter the directory and path where you want to install the product components (or click Browse to locate and select a directory).
Figure 2-2 Select Installation Directory Screen
- Click Next and the Ready to Install screen is displayed to provide information about the product.
- When you ready, click the Install Now button.
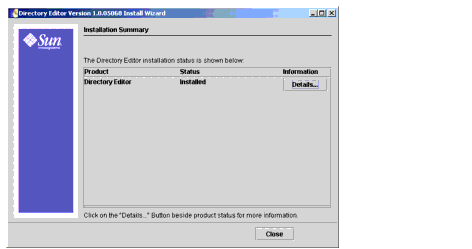
An Installing... screen displays briefly, and then the Installation Summary screen (Figure 2-3) is displayed to report the installation status.
Figure 2-3 Installation Summary Screen
If necessary, click the Details button for additional information.
- Click Close to exit the installer.
Next, you must install and deploy the de.war file on your application server. Continue to Step 3: Install Directory Editor on an Application Server for instructions.
Step 3: Install Directory Editor on an Application Server
After downloading and installing the Directory Editor de.war file, use the instructions provided in this section to install and deploy the software on your application server.
The information is organized as follows:
Installing Directory Editor on Sun ONE Application Server 7
or Sun Java System Application Server 8 Platform EditionThis section provides instructions for installing Directory Editor on SunONE Application Server 7 or Sun Java System Application Server 8 Platform Edition.
This installation process consists of the following steps:
Installing the Sun Application Server Software
Note
The following information is provided for general reference only. For detailed installation instructions, refer to the installation instructions provided with the application server or download the product documentation from http://docs.sun.com.
You may need to perform one or more of these general steps when installing the software:
Configuring the Sun Application Server’s Policy File
Directory Editor requires access to some privileged operations that the application server may not allow by default. You must edit the Application Server’s policy file (server.policy) to give Directory Editor the necessary access.
To configure the server.policy file
- Define a de.home variable as follows:
- Launch and log into the Sun ONE Admin Console.
- On the left side of the Console, click the folder name for the Application Server instance on which Directory Editor will be installed.
- On the right side of the Console, select the JVM settings tab, and then click the JVM Options link.
- Add the following JVM option for de.home:
-Dde.home=<SunONEHome>/<domain_name>/<App_Server_Instance>/
applications/j2ee-modules/<de_1>
Note
Application Server, version 7 appends an _1 to the end of the application name (for example, de_1), but Application Server version 8 does not.
For example:
- In the left panel, navigate to the Web Apps folder (Web Applications folder on version 8) and click the folder icon.
For example, select App Server Instance > server1 > Applications > Web Apps and click the Web Apps folder icon.
- Open the <App Server Home>/domains/<Domain Name>/config/server.policy file and add the following lines to the end of the block granting access to “all remaining code” (see Code Example 2-1):
grant codeBase "file:${de.home}/-" {
permission javax.security.auth.AuthPermission "getLoginConfiguration";
permission javax.security.auth.AuthPermission "setLoginConfiguration";
permission javax.security.auth.AuthPermission "createLoginContext.SunDirectoryLogin";
permission javax.security.auth.AuthPermission "modifyPrincipals";
};Code Example 2-1 Example Sun ONE Application Server 7 server.policy File (Partial File)
- Save the file.
- Restart the application server to apply the changes you made to the server.policy file.
Deploying Directory Editor into the Sun Application Server
Use the following steps to deploy Directory Editor into the Application Server:
- Launch the Application Server Admin Console and log in.
- Navigate to the Web Apps folder icon in the left panel (for example, select
App Server Instance >server1 >Applications >Web Apps) and click the folder icon.- In the right panel, select the Deploy tab.
- Enter the file path for the de.war file, and then click OK.
- When prompted, set both the Web Application Name and the Context Root to de, and then click OK.
- If you used the defaults at install time and you are not using a Web Server, open your browser and type http://localhost:<port_number>/de/ into the URL field. (The port number will vary.)
Note
If you are running your web browser on a host other than the application server you may have to change or adjust the host name in the URL.
The Directory Editor Startup Properties page is displayed. Continue to Step 4: Specify the Startup Properties for instructions.
Installing Directory Editor on Sun Java System Application Server 8 Enterprise Edition
This section provides instructions for installing Directory Editor on Sun Java System Application Server 8 Enterprise Edition.
This installation process consists of the following steps:
Installing the Sun Application Server 8 Enterprise Edition Software
Note
The following information is provided for general reference only. For detailed installation instructions, refer to the installation instructions provided with your Application Server or download the product documentation from http://docs.sun.com.
You may need to perform one or more of these general steps when installing the software:
Configuring the Sun Application Server 8 Enterprise Edition’s Policy File
You must configure the Application Server’s policy file to give Directory Editor permission to access the Application Server.
- Define a de.home variable as follows:
- Launch and log into the Sun ONE Admin Console.
- On the left side of the Console, expand the Configurations folder.
Then, expand the server-config (Admin Config) node.- Click the JVM Settings node, and then select the JVM Options tab on the right side of the Console.
- Add the following JVM option for de.home:
-Dde.home=<SunONEHome>/<domain_name>/<App_Server_Instance>/
applications/j2ee-modules/<de>For example:
-Dde.home=/var/opt/SUNWappserver8/domain1/server11/applications/j2ee-modules/de
- Open the <App Server Home>/domains/<Domain Name>/config/server.policy file and add the following lines (see Code Example 2-2):
grant codeBase "file:${de.home}/-" {
permission javax.security.auth.AuthPermission "getLoginConfiguration";
permission javax.security.auth.AuthPermission "setLoginConfiguration";
permission javax.security.auth.AuthPermission "createLoginContext.SunDirectoryLogin";
permission javax.security.auth.AuthPermission "modifyPrincipals";
};Code Example 2-2 Example Sun Java System Application Server Platform Edition 8 Policy File
//
// Copyright 2004 Sun Microsystems, Inc. All rights reserved.
// SUN PROPRIETARY/CONFIDENTIAL. Use is subject to license terms.
//
grant codeBase "file:${de.home}/-" {
permission javax.security.auth.AuthPermission "getLoginConfiguration";
permission javax.security.auth.AuthPermission "setLoginConfiguration";
permission javax.security.auth.AuthPermission "createLoginContext.SunDirectoryLogin";
permission javax.security.auth.AuthPermission "modifyPrincipals";
};
// Core server classes get all permissions by default
grant codeBase "file:${com.sun.aas.installRoot}/lib/-" {
permission java.security.AllPermission;
};
- Save the file.
- Restart the application server to apply the changes you made to the server.policy file.
Deploying Directory Editor into Sun Application Server 8 Enterprise Edition
Use the following steps to deploy Directory Editor into the Application Server:
- Launch the Application Server Admin Console and log in.
- Navigate to the Web Apps folder icon in the left panel (for example, expand the Applications folder and select the Web Applications icon).
- In the right panel, select the Deploy tab.
- Enter the file path for the de.war file, and then click OK.
- When prompted, set both the Web Application Name and the Context Root to de, select a target (such as server), and then click OK.
- If you used the defaults at install time and you are not using a Web Server, open your browser and type http://localhost:<port_number>/de/ into the URL field. (The port number will vary.)
Note
If you are running your web browser on a host other than the application server, you may have to change or adjust the host name in the URL.
The Directory Editor Startup Properties page is displayed. Continue to Step 4: Specify the Startup Properties for instructions.
Installing Directory Editor for Tomcat 5.0.x
This section provides general instructions for installing an Apache Tomcat application server, and then explains two methods for installing Directory Editor on an Tomcat application server. The information is organized as follows:
Installing Tomcat
Note
The instructions provided in this section are provided for general reference only. For detailed installation instructions, consult the Apache website (http://jakarta.apache.org/tomcat/) or the reference information provided for the application server software.
If you are installing the application server from the Tomcat installer
- Download and unpack the Tomcat installation bundle.
- Decide where to install your Tomcat installation.
- Specify to start Tomcat as a service (on Windows only).
- Select a port (default is 8080).
- Modify the Tomcat start-up script as follows:
- On UNIX: Open the $CATALINA_HOME/bin directory and add the following lines to the top of the setclasspath.sh file:
JAVA_HOME=<J2SDK location>
export JAVA_HOME
- On Windows: Open the $CATALINA_HOME/bin directory and add the following lines to the top of the setclasspath.bat file:
SET JAVA_HOME=<J2SDK location>
Configuring the Policy File
If you will be running Tomcat with the Security Manager turned on, you must configure the application server’s catalina.policy file (located in $Appserver_home\conf\catalina.policy) to give Directory Editor permission to access the application server.
Note
Every application server requires a different set of permissions, and these permissions can change from release to release.
- Add the following line to the bottom of the policy file to grant all permissions:
grant codeBase "file:${catalina.home}/webapps/de/-" {
permission java.security.AllPermission;
};- Add the following lines to the policy file to grant specific permissions for Tomcat (see Code Example 2-3):
grant codeBase "file:C:/tomcat41/webapps/de/-" {
permission javax.security.auth.AuthPermission "getLoginConfiguration";
permission javax.security.auth.AuthPermission "setLoginConfiguration";
permission javax.security.auth.AuthPermission "createLoginContext.SunDirectoryLogin";
permission javax.security.auth.AuthPermission "modifyPrincipals";
permission java.util.PropertyPermission "*", "read,write";
permission java.net.SocketPermission "*", "connect,resolve";
permission java.io.FilePermission "*", "read, write";
permission java.util.PropertyPermission "Debug.enable", "read";
};grant {
permission java.lang.reflect.ReflectPermission "suppressAccessChecks";
permission java.lang.RuntimePermission "accessClassInPackage.sun.beans.*";
permission java.lang.RuntimePermission "accessClassInPackage.sun.io";
permission java.lang.RuntimePermission "accessDeclaredMembers";
};
Code Example 2-3 Example catalina.policy File (Partial File)
// The permission granted to your JDBC driver
// grant codeBase "jar:file:${catalina.home}/webapps/examples/WEB-INF/lib/driver.jar!/-" {
// permission java.net.SocketPermission "dbhost.mycompany.com:5432", "connect";
// };// The permission granted to the scrape taglib
// grant codeBase "jar:file:${catalina.home}/webapps/examples/WEB-INF/lib/scrape.jar!/-" {
// permission java.net.SocketPermission "*.noaa.gov:80", "connect";
// };
grant codeBase "file:C:/tomcat41/webapps/de/-" {permission javax.security.auth.AuthPermission "getLoginConfiguration";
permission javax.security.auth.AuthPermission "setLoginConfiguration";
permission javax.security.auth.AuthPermission "createLoginContext.SunDirectoryLogin";
permission javax.security.auth.AuthPermission "modifyPrincipals";
permission java.util.PropertyPermission "*", "read,write";
permission java.net.SocketPermission "*", "connect,resolve";
permission java.io.FilePermission "*", "read, write";
permission java.util.PropertyPermission "Debug.enable", "read";
};
grant {
permission java.lang.reflect.ReflectPermission "suppressAccessChecks";
permission java.lang.RuntimePermission "accessClassInPackage.sun.beans.*";
permission java.lang.RuntimePermission "accessClassInPackage.sun.io";
permission java.lang.RuntimePermission "accessDeclaredMembers";
};
Installing Directory Editor Using Tomcat Manager
This section explains how to install Directory Editor using Tomcat Manager:
Note
You must have a manager role in Tomcat to use this installation method. To verify your status, check the following file:
file <Tomcat_base_directory>/conf/tomcat-users.xml
Use the following steps to install Directory Editor using the Tomcat Manager:
- Navigate to the Tomcat bin directory and use one of the following methods to
start Tomcat:- Open your browser and type localhost:<port_number>/manager/html into the URL field.
Note
If you are running your web browser on a host other than the application server you may have to change or adjust the host name in the URL.
- When you are prompted for your Tomcat Manager Application user name and password, enter the information and then press OK.
The Tomcat Manager page is displayed.
- Scroll down until you locate the Deploy section called “War file to deploy.”
- Click Browse to locate the Directory Editor de.war file.
- Select the de.war file and then click Deploy.
Installing Directory Editor Manually
Use the following steps to install Directory Editor manually:
- Copy the Directory Editor de.war file from its current location into the Tomcat webapps directory. For example,
C:\Tomcat\jakarta-tomcat-5.0.28\webapps)
- Navigate to the Tomcat bin directory and use one of the following methods to
stop Tomcat:- From the same directory, use one of the following methods to restart Tomcat:
- Open your browser and type localhost:<port_number>/de/ into the URL field.
The Directory Editor Startup Properties page is displayed. Continue to Step 4: Specify the Startup Properties for instructions.
Installing Directory Editor for WebLogic
Use the procedures described in this section to install Directory Editor for use with the BEA WebLogic application server. The information is organized as follows:
Configuring the WebLogic Software
If necessary, install WebLogic (using that product’s installation instructions) and select the domain that will be referenced when you install Directory Editor.
Installing Directory Editor
Use the following steps to install Directory Editor:
- Copy the Directory Editor de.war file from its current location into the folder where you want to install Directory Editor.
- The Application Home panel will display the location where Directory Editor will be installed. Click Next to begin installation.
- Navigate to the WebLogic bin directory and use one of the following methods to stop WebLogic:
- From the same directory, restart WebLogic using one of the following methods:
Next you must configure the WebLogic server for use with Directory Editor.
Continue to one of the following sections for instructions:Configuring a WebLogic 7x Server
Use these steps to configure a WebLogic 7x server:
- Start the WebLogic server.
- Start the BEA WebLogic Administration Console.
- In the left panel, expand Deployments and then click Web Applications.
The console displays the Web Applications panel.
- Click Configure a new Web Application.
- Using the links, locate the de folder and select it.
- Specify the target server. Select a server from the Available Servers list, move it to the Target Servers area, and then click Configure and Deploy.
- Click Deploy to deploy Directory Editor.
- Open your browser and type localhost:<port_number>/de into the URL field. (The port number will vary.)
Note
If you are running your web browser on a host other than the application server you may have to change or adjust the host name in the URL.
The Directory Editor Startup Properties page is displayed. Continue to Step 4: Specify the Startup Properties for instructions.
Configuring a WebLogic 8.1 SP1Server
Use these steps to configure a WebLogic 8.1 SP1 server:
- Start the WebLogic server.
- Start the BEA WebLogic Administration Console.
- In the left panel, expand Deployments, and then choose Web Application Modules.
The console displays the Web Applications panel.
- Click Deploy a new Web Application Module.
- Using the links under applications, locate and select the de folder where you put the de.war file.
- Click Target Module.
- Review the Targets, Accessibility and Identity configuration, and make any necessary changes.
- Click Deploy to deploy Directory Editor.
- Open your browser and type localhost:<port_number>/de into the URL field. (The port number will vary.)
Note
If you are running your web browser on a host other than the application server you may have to change or adjust the host name in the URL.
The Directory Editor Startup Properties page is displayed. Continue to Step 4: Specify the Startup Properties for instructions.
Installing Directory Editor for WebSphere 5.1
Use the following steps to install Directory Editor for use with the IBM WebSphere 5.1 (or later) application server.
- Start the application server.
- Start the WebSphere administration console, and then select
Applications >Install New Application.- Add the de.war file name in the Path:Local Path field.
- Add the path to the Context Root for the Directory Editor installation (for example, /de), and then click Next.
- Select the Generate Default Bindings option (using the default selections for Override and Virtual Host), and then click Next.
- Install a new applications page. If you do not want to install the application in WebSphere’s default location, enter the path to a different location into the Directory to Install Application field. For example:
c:\Program Files\WebSphere\AppServer\installedApps\Hostname
- Be sure the Distribute Application and Use Binary Configuration options are selected.
- Be sure the Create Mbeans for Resources and Deploy EJBs options are not selected.
- Enter the name of the application in the Application Name field (the default is de).
- Selecting the Enable class reloading option is optional. Click Next.
- To prepare for the new application’s installation, make sure the panel displays a line for the current release of Directory Editor, and that it maps to the appropriate virtual host. Click Next.
- Be sure the panel displays a line for the current release of Directory Editor, and that it maps to the appropriate server. Click Next and then click Finish.
- Click Save to Master Configuration to save the configuration.
- Click Save, and then wait for the page to clear.
- Select Applications >Enterprise Applications, and then click the application name (the name you specified in the Application Name field).
- Be sure the Use Metadata From Binaries option is selected.
- Select PARENT_LAST in the Classloader Mode field.
- Select Application in the WAR Classloader Policy field.
- Click Apply, and then click OK.
- From the menu bar, click Save.
- Click Save to save the changes to the Master Configuration.
- Stop and restart the application server.
- Open your browser and type localhost:<port_number>/de into the URL field. (The port number will vary.)
Note
- With some platforms, there is a performance impact if you use the JCE provided with that platform. If you experience a long start-up time, see (more...) in Chapter 10, "Error Logging and Troubleshooting".
- If you are running your web browser on a host other than the application server you may have to change or adjust the host name in the URL.
The Directory Editor Startup Properties page is displayed. Continue to Step 4: Specify the Startup Properties for instructions.
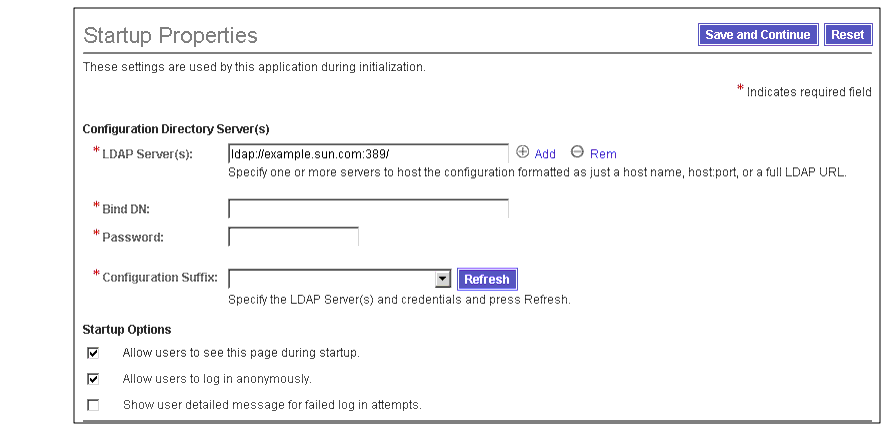
Step 4: Specify the Startup Properties
The first time you open Directory Editor, a Startup Properties page is displayed, similar to the following:
Figure 2-4 Startup Properties Page
You will be prompted to specify these Startup properties and Managed Directory properties (described in the next section).
Note
Directory Editor automatically completes some of the properties fields, but you can change the information if necessary.
Use the following information to complete the Startup Properties page:
- Specify the following Configuration Directory Server parameters:
Note
The Directory Editor configuration directory is a directory where you store the product’s configuration information. This directory server does not have to be a configuration directory as defined by the Sun ONE Server Console 5.x Server Management Guide.
- LDAP Server(s): Specify one or more hosts where your configuration Directory Server is located.
- If you are going to use the default port (389) you can specify the server host by entering a host name, <host>:<port>, or the full LDAP URL.
- If you are going to use a secure port, you must use the following full LDAP URL format to specify the server host:
ldaps://example.sun.com:<secure_port>/
To specify multiple servers, click the Add button
and Directory Editor will add another text field to the page.
Note
If you specify more than one server, you must configure the Directory Servers on each host to replicate master-to-master. Directory Editor will load-balance and provide failover between the configured hosts.
- Bind DN: Enter the bind distinguished name used to authenticate to Directory Server in the bind request.
- Password: Enter the password you use to access the configuration directory.
- Configuration Suffix: After specifying the LDAP Server(s), Bind DN, and Password fields, click the Refresh button and Directory Editor will automatically populate this field with the naming contexts of the Directory Server available for storing the configuration.
If you specified more than one naming context for the directory, use the drop-down menu to select a configuration suffix from the list.
- Specify the Startup Options, as follows:
- Allow users to see this page during startup: Enable or disable the checkbox to control whether the Startup Properties page is displayed to end users.
Note
The Startup Properties page is displayed if Directory Editor cannot connect to the configuration directory when the user first starts the application.
For security purposes, disable this checkbox after the initial Directory Editor installation. After disabling this checkbox, you can edit the configuration directory settings by selecting Configuration > Startup Page or by editing the startup.properties file in the WEB-INF directory.
- Allow users to log in anonymously: Enable or disable the checkbox to control whether your users can log in to Directory Editor anonymously.
If users log in anonymously, they can access Directory Editor’s Home, Browse, and Search pages only. They will not have access to the Create or Configure pages.
Note
After a user logs in, Directory Editor will not allow them to delete, disable, or rename the object (dn) they used to login.
If they try to change the object an error message will result.
- Show user detailed message for failed log in attempts: Enable or disable the checkbox to control whether the end-user will see more-detailed failed log-in messages.
For example,
- If you disable this option and a user enters an invalid password, the following message displays:
Authentication Failed: Invalid Credentials
- If you enable this option and a user enters an invalid password, the following message displays:
Authentication Failed: Invalid Password
Note
For Advanced Users Only:
The following properties are configurable, but they are not represented in the Directory Editor user interface:
- datastore.objectClass: Specify the LDAP object class that Directory Editor can use to store configuration objects in the directory.
- datastore.dmlIdAttribute: Specify an attribute from the specified object class that Directory Editor can use to store configuration object IDs.
- datastore.xmlObjectAttribute: Specify an attribute from the specified object class that Directory Editor can use to store configuration content in XML format.
- datastore.location: Specify the configuration location when it is prepended with the datastore.configSuffix.
You can configure these properties in the startup.properties file located in <application_home>\WEB-INF; however, changing these attributes, may cause issues with the program and can make support more difficult.
- When you are finished with this page, click the Save and Continue button to save the information.
Note
Your application server must allow write access to Directory Editor’s WEB-INF directory to persist startup.properties.
If your application server does not allow write access, you will be allowed to continue, but Directory Editor will remain in non-production mode.
Note
After this initial configuration of the Startup Properties page, you can edit any of the configuration parameters by selecting Configuration > Startup.
A Managed Directory page displays (similar to the following figure).
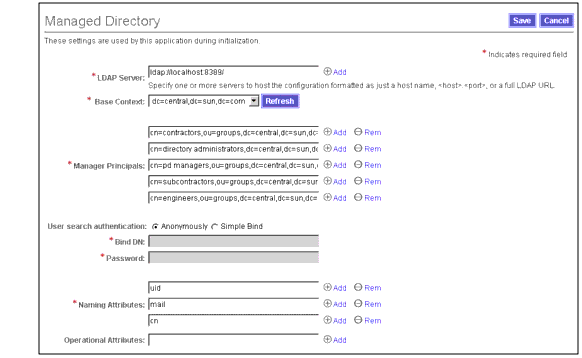
Figure 2-5 Managed Directory Page
Instructions for completing this page are provided in the next section.
Step 5: Specify the Managed Directory Properties
Use the following information to complete the Managed Directory page (Figure 2-5):
- Specify the following parameters:
- LDAP Server(s): Specify one or more hosts where your managed directory is located.
- If you are going to use the default port (389) you can specify the server host by entering a host name, <host>:<port>, or the full LDAP URL.
- If you are going to use a secure port, you must use the following full LDAP URL format to specify the server host:
ldaps://example.sun.com:<secure_port>/
To specify multiple servers, click the Add button
and Directory Editor will add another text field to the page.
Note
If you specify more than one server, you must configure the Directory Servers on each host to replicate master-to-master. Directory Editor will load-balance and provide failover between the configured hosts.
- Base Context: After specifying the LDAP Server(s), Bind DN, and Password fields, click the Refresh button and Directory Editor will automatically populate this field with the naming contexts being managed by Directory Editor.
If you configured more than one naming context for the directory, use the drop-down menu to select the base suffix that contains the users and groups that you want Directory Editor to manage.
Note
Be sure to set the base context high enough in the tree to ensure that you have access to all the information you need.
- Manager Principals: Enter the name or distinguished name (DN) of one or more LDAP groups under the base context whose members are considered Directory Editor directory managers (administrators). These directory managers will have access rights to all Directory Editor functionality. (For more information, see Configuring Directory Editor.)
For additional manager principals, click the Add button. To remove principals, click the Rem button.

Note
After completing the initial configuration of Directory Editor, you will be able to browse the directory for manager principals to add to the Manager Principals list.
(For more information, see Editing the Managed Directory Properties.)
- User search authentication: Enter the method by which Directory Editor will search the directory for authenticating users.
- Anonymously: Enable this button if your user objects are visible to anonymous search queries. (The Bind DN and Password text fields will become inactive and you cannot type in those fields.)
- Simple Bind: Enable this button and then specify a Bind DN and Password if your user objects are not visible to anonymous search queries.
- Bind DN: Enter the bind distinguished name used to authenticate to the managed directory in the bind request (not required for anonymous user search authentication). This option enables Directory Editor to search for users during the login process only.
- Password: Enter the password you use to access your managed directory to search for user object DNs (not required for anonymous user search authentication).
- Naming Attributes: Enter the attributes used in the directory tree.
For additional attributes, click the Add button. To remove attributes, click the Rem button.When a user tries to log in, Directory Editor uses the Account ID field on the Log In form to search for a user object that matches one of these naming attributes exactly.
- When you are finished, click Save to save the information and to open the Directory Editor Log In page.
What’s Next?Continue to Chapter 3, "Getting Started" to log-in and begin customizing applications with Directory Editor.