Setting Up a Print Client
A print client is a system that is not the server for the printer, yet has access to the printer. A print client uses the services of the print server to spool, schedule and filter the print jobs. Note that one system may be a print server for one printer and be a print client for another printer.
Access to a remote printer may be configured on a domain-wide basis or on a per-machine basis. A combination of these two may also be used. To add access to a remote printer on a per machine basis see "How to Add Printer Access on the Print Client Using Admintool" or "How to Add Access on the Print Client using LP Commands". To add access on a domain wide basis, follow the instructions under "Adding Access to a Remote Printer Using a Name Service". See also printers.conf(4), printers(4), and lpset(1M).
How to Add Printer Access on the Print Client Using Admintool
-
Start Admintool on the system where you want to add access to a remote printer.
See the procedure on "" for detailed information.
-
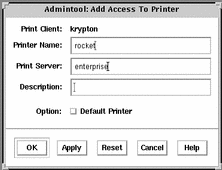
Select Add Access to Remote Printer from the Edit menu.
The Add Access to Remote Printer window is displayed.
-
Fill in the window.
If you need information to complete a field, click on the Help button to see field definitions for this window.
-
Click on OK.
-
Exit Admintool.
Click on button in upper-left corner; select quit.
Example--Adding Printer Access on the Print Client
In the following example, the print client rogue is given access to the printer rocket on the print server enterprise.

How to Add Access on the Print Client using LP Commands
-
Collect the required information.
All that is required is the name of the printer and the name of the server for that printer.
-
Define the printer by using the lpadmin command.
# lpadmin -p printer_name -s server_name
-
(Optional) Add a description to the printer.
# lpadmin -p printer_name -D "description"
-
Verify the printer is correctly configured by using the lpstat command.
# lpstat -p printer-name
Example--Adding Access on the Print Client using LP Commands
If you want to print to a remote printer, you must add access to the remote printer. This example shows how to configure access to a printer named luna, whose print server is saturn. The system saturn becomes a print client of the printer luna.
- © 2010, Oracle Corporation and/or its affiliates
