How to Add a Local Printer Using Admintool
-
Select the system which is to be the printer server.
Verify that the print server has the following print packages installed by using the pkginfo command: SUNWpcr, SUNWpcu, SUNWpsr, SUNWpsu, SUNWscplp, and SUNWpsf.
# pkginfo package_instance
-
Connect the printer to the printer server and turn on the power to the printer.
Consult the printer vendor's installation documentation for information about the hardware switches and cabling requirements.
-
Start Admintool on the printer server where you connected the printer.
See the procedure on "" for detailed information.
-
Select Add Local Printer from the Edit menu.
-
If you need information to complete a field, click on the Help button to see field definitions for this window.
-
Click on OK.
-
Exit Admintool.
Click on button in upper-left corner; select quit.
-
Add client access to the new printer.
Now that the printer has been added, create access to the printer for the clients. See "Setting Up a Print Client".
-
Optional tasks to complete.
There are several optional tasks you may want to complete when setting up a printer. See "Setting Up Printing Task Map" for pointers to the remaining tasks.
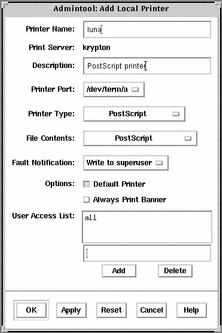
Example--Completed Add Local Printer Window
In the following example, the printer luna is added on the print server krypton.

- © 2010, Oracle Corporation and/or its affiliates
