Using the JMS JCA Wizard
The following topics provide information for using the JMS JCA, along with instructions for configuring specific scenarios with the JMS JCA Wizard.
About the JMS JCA Wizard
The JMS JCA Wizard provides tools for Java EE users to easily connect to JMS message servers from their Java EE applications. The wizard is a NetBeans IDE plug-in module and provides GUI support for the JMS JCA inbound configuration and for code fragment generation through a drag-and-drop code palette. The wizard leverages the EJB 3.0 and JCA 1.5 APIs to simplify code creation. The runtime components are GlassFish Enterprise Server and the JMS JCA Adapter. The JMS JCA Adapter is a JCA 1.5 compliant resource adapter. The advantage of using the JMS JCA Adapter is that it allows you to connect transparently to the message servers from different vendors, such as WebSphere, WebLogic, JBoss, and Sun Java System Message Queue.
Receiving a JMS Text Message
This topic provides instructions for building a Message-Driven Bean (MDB) that will monitor a designated queue on a JMS destination (of the JMS Server) in order to receive JMS messages. Upon receipt of the a JMS message, the MDB will print out the content of the message if it is of the type TextMessage.
Perform the following steps to receive a JMS text message:
 To Create an Admin Object Resource
For this example, the message is being received from Queue1, so you need to create the corresponding JMS Queue object resource in GlassFish.
-
Start the GlassFish server and use a browser to connect to the Admin Console.
The URL for the Admin Console is http://HostName:PortNumber. The default port number is 4848.
-
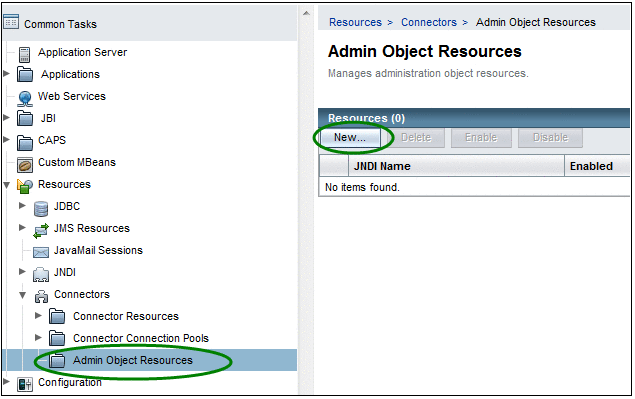
In the left navigation bar, expand Resources and Connectors and then select Admin Object Resources.
Figure 1 Admin Object Resources
-
Click New.
The New Admin Object Resource window appears (Step 1 of 2).
-
Fill in the required fields.
For the purposes of this exercise, use the following values:
-
JNDI Name = jms/Queue1
-
Resource Type = javax.jms.Queue
-
Resource Adapter = sun-jms-adapter
Figure 2 New Admin Object Resources (Step 1 of 2)

-
-
Click Next.
-
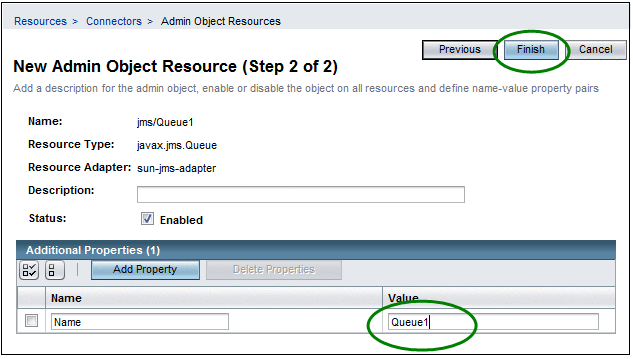
Enter a name for the resource.
For this exercise, enter Queue1. This is the physical destination name of the resource.
Figure 3 New Admin Object Resources (Step 2 of 2)
-
Click Finish.
 To Create the EJB Module Project
-
Right–click in the Projects Panel of the NetBeans IDE and select New Project.
-
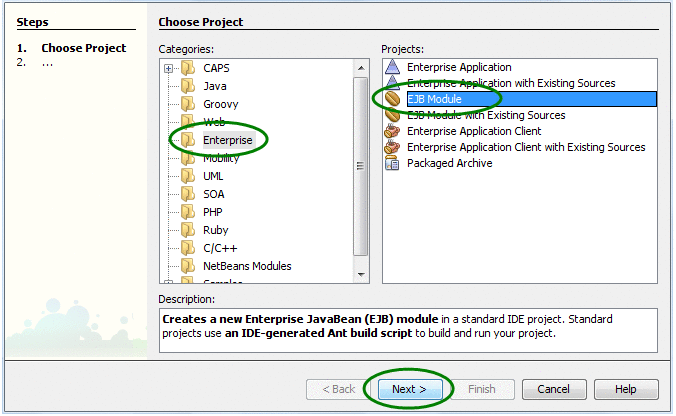
On the New Project Wizard, select Java EE under Categories, and then select EJB Module under Projects.
Figure 4 Choose New Project
-
Click Next.
The Name and Location window appears.
-
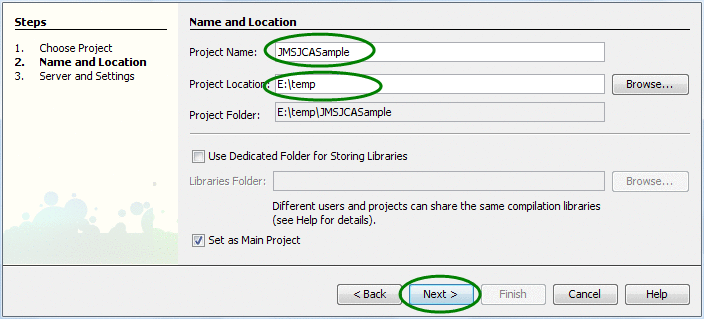
Enter the Project Name and Location fields.
For the purposes of this exercise, enter the following values:
-
Project Name = JMSJCASample
-
Project Location = the location to store NetBeans project files
Figure 5 EJB Module Project Name and Location
-
-
Click Next.
The Server and Settings window appears.
-
In the Server and Settings window, keep the default values for all fields.
-
Click Finish.
 To Create the JCA Message-Driven Bean
-
Right-click on the Project node, and then select New->Other.
-
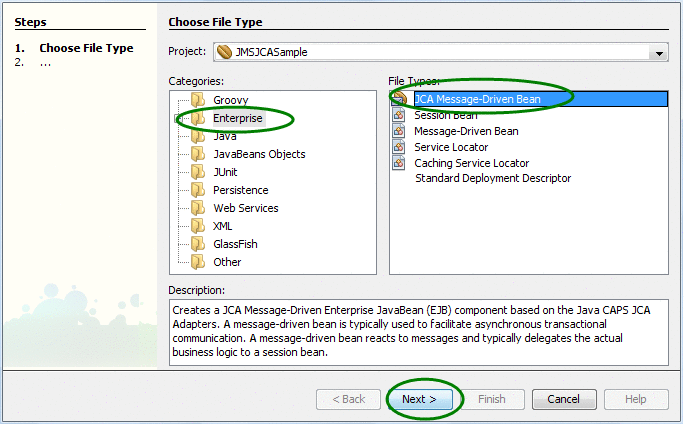
On the wizard, select Java EE under Categories, and select JCA Message-Driven Bean under File Types.
Figure 6 Choose JCA Message-Driven Bean
-
Click Next.
The JCA Message-Driven Bean Name and Location window appears.
-
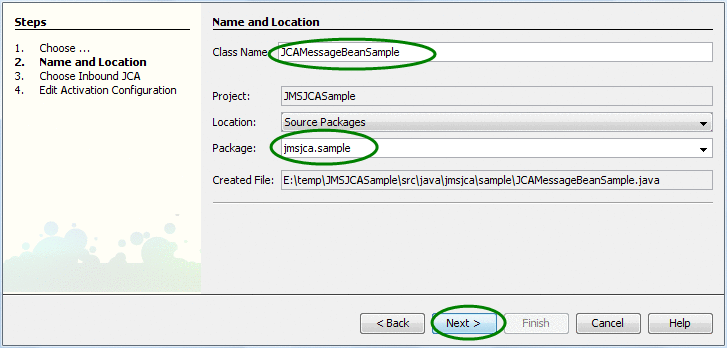
Enter the Name and Location fields.
For this exercise, enter the following values:
-
Class Name = JCAMessageBeanSample
-
Package = jmsjca.sample
Figure 7 JCA Message-Driven Bean Name and Location
-
-
Click Next.
The Choose Inbound JCA window appears.
-
Select JMS Adapter and click Next.
Note –Currently only JMS Adapter can be selected in the window.
The Edit Activation Configuration window appears.
-
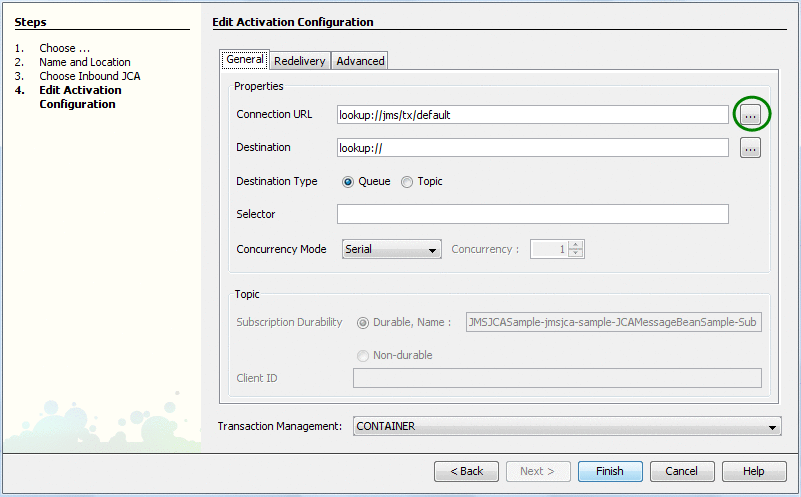
Configure the Inbound JMS connection by clicking on the ellipsis button next to the Connection URL box (as shown below).
You can configure many different options for the Inbound JMS connection, such as the JNDI name of the JMS connection resource or the JNDI name of the JMS destination. You can also configure the more advanced options such as message re-delivery, selector, concurrency mode, and so on. In this simple case, only the Connection URL and Destination options for our sample code to work.
Figure 8 Edit Activation Configuration
-
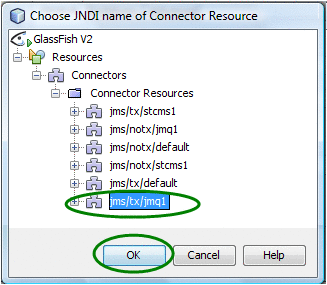
Expand the tree node all the way and select jms/tx/jmq1 (as shown below).
This resource connects the embedded Sun MQ JMS server inside the GlassFish server and is created by default with the installer. The default connection URL is mq://localhost:7676.
Figure 9 Connector Resource — Connection URL
-
Click on the ellipsis button next to Destination box.
The Connector Resource dialog box for the Destination appears.
-
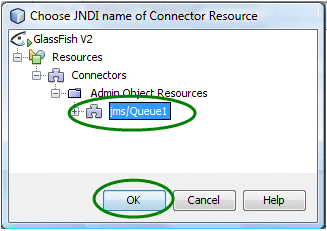
Expand the tree node all the way and select jms/Queue1 (as shown below).
This is the Admin Object Resource created earlier for the Queue1 destination using the GlassFish Admin Console.
Figure 10 Connector Resource — Destination
-
Click Finish.
A Java source file is created and opened in the editor view. The source file is a skeleton file with most of the boilerplate code already generated, as shown below.
Figure 11 Java Source Code
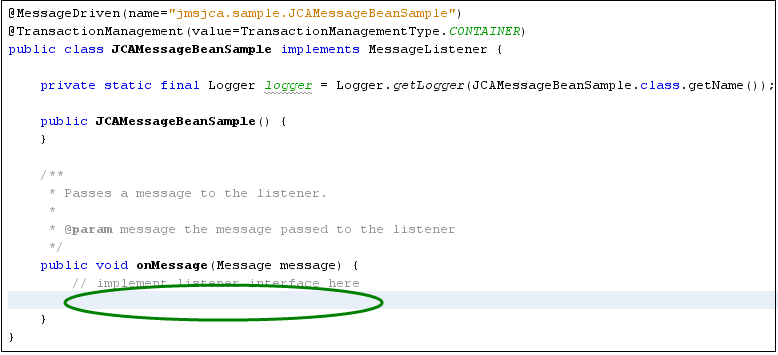
Any JMS messages sent to the Queue1 destination are passed to the onMessage(...) method in this Java file. The login can be processed inside the onMessage() method as needed. Because the purpose of this task is to simply print out the message content of the JMS message (if the message is of type javax.jms.TextMessage), the implementation code would be similar to the following:
public void onMessage(Message message) {
    try {
        if (message instanceof javax.jms.TextMessage) {
            logger.log(Level.INFO, "JMS message conecnt is: " +
              ((javax.jms.TextMessage) message).getText());
        }
    } catch (JMSException ex) {
        Logger.getLogger(JCAMessageBeanSample.class.getName()).log(Level.SEVERE,
                         null, ex);
        return;
    }
}
Note –The above code has been wrapped to fit the page.
-
Click Save when you are done editing the file.
 To Test the Sample Code
-
Right-click the Project node and select Build.
-
When the build process is complete, right-click the Project node and select Undeploy and Deploy.
-
Use a JMS client to send a text message to Queue1 on the to JMS server (located at mq://localhost:7676, by default).
The contents of the message is logged in the server log file.
Sending a JMS Text Message
This topic provides instructions for sending a JMS message to a destination (Queue2). For purposes of this exercise, the message content to Queue2 is "Hello " concatenated with the message content received from the onMessage() method from Queue1. For more information about receiving JMS messages, see Receiving a JMS Text Message.
Perform the following steps to send a JMS text message:
 To Create an Admin Object Resource
-
Start the GlassFish server and use a browser to connect to the Admin Console.
The URL for the Admin Console is http://HostName:PortNumber. The default port number is 4848.
-
In the left navigation bar, expand Resources and Connectors, and then select Admin Object Resources.
-
Click New.
-
For this exercise, enter the following values:
-
JNDI Name = jms/Queue2
-
Resource Type = javax.jms.Queue
-
Resource Adapter = sun-jms-adapter
-
-
Click Next.
-
Enter Queue2 in the Name property.
This is the physical destination name of the resource.
-
Click Finish.
 To Define a JMS Session Instance
You need to create a JMS message, object, or message producer to send a message to Queue2 once the JMS message is received inside the MDB file of the onMessage() method.
-
Launch the NetBeans IDE and open the Message-Driven Bean file you created in To Create the JCA Message-Driven Bean.
The file is located in the Enterprise Beans node of the JMSJCASample project.
-
Drag-and-drop the Session icon from the Palette panel on the right side to the inside of the onMessage() method, as shown in the figure below:
Figure 12 JCA Message Bean Sample — Session
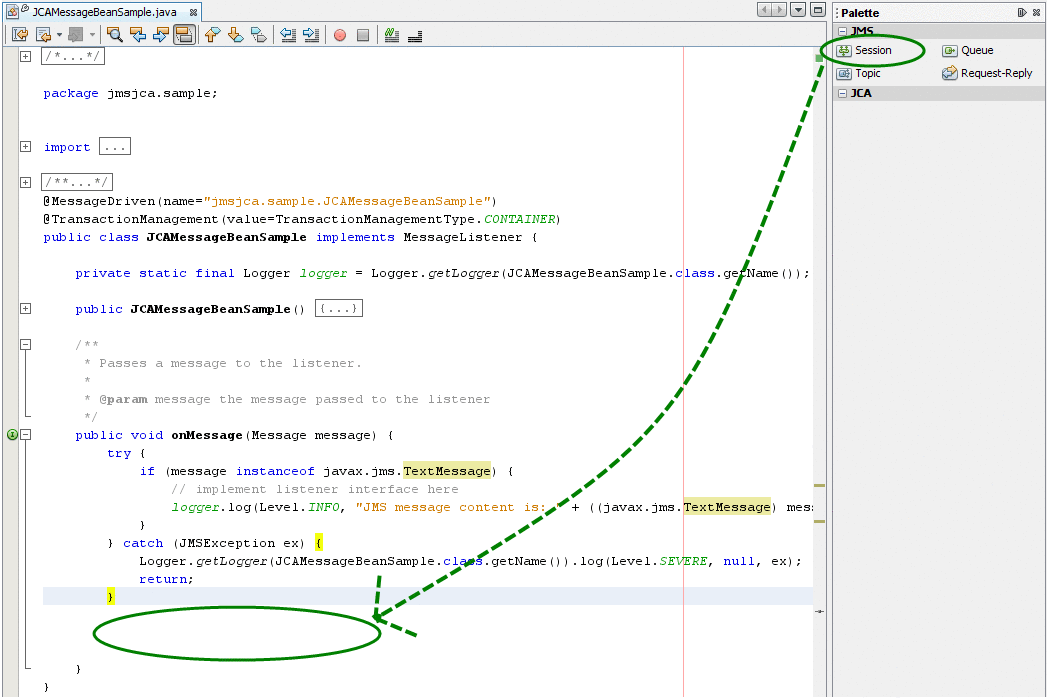
The JCA Wizard dialog box appears.
-
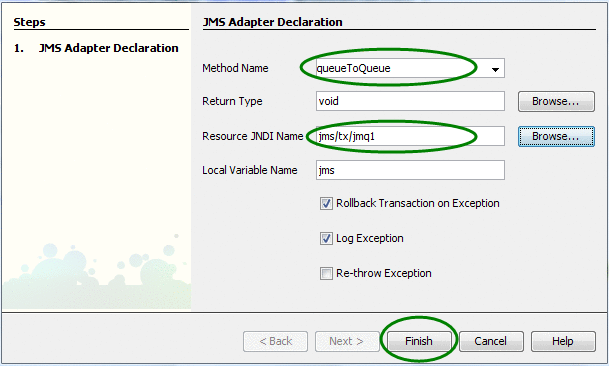
For this exercise, enter the following values:
-
Method Name = queueToQueue
-
Resource JNDI Name = jms/tx/jmq1
Figure 13 JCA Adapter Declaration
-
-
Click Finish.
Several Java code fragments is generated as a result, in particular the queueToQueue(...) method, which can be implemented to process the incoming message.
-
Save the MDB file.
 Create a Reference to the Destination Object
Creating a reference to the destination object allows a message to be sent to the destination object in the Java code. For this exercise, the destination object is Queue2.
-
In the NetBeans IDE, open the Message-Driven Bean file you created in To Create the JCA Message-Driven Bean.
The file is located in the Enterprise Beans node of the JMSJCASample project.
-
Drag-and-drop the Queue icon from the Palette panel on the right to any place in Java editor, as shown below.
Figure 14 JCA Message Bean Sample — Queue
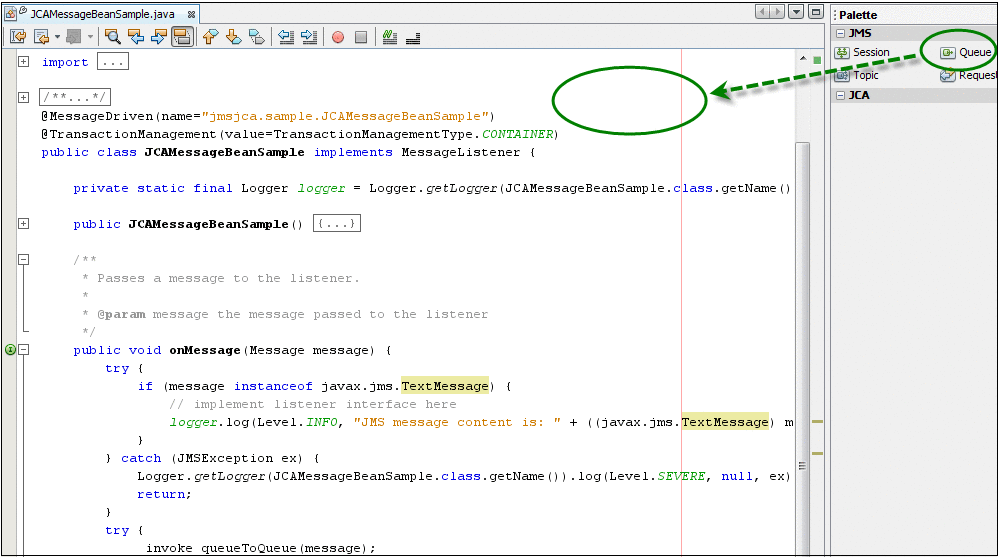
The Create JMS Destination dialog box appears.
-
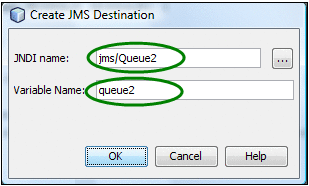
For this exercise, enter the following information into the fields:
-
JNDI Name = jms/Queue2 (You can select this value by clicking the ellipsis button and expanding the tree.)
-
Variable Name = queue2
Figure 15 Create JMS Destination
-
-
Click OK.
-
Write the actual code to create a new JMS message and send it to Queue2.
The code fragment inside the queueToQueue(...) method should be similar to the example shown below:
private void queueToQueue(Message message, javax.jms.Session jmsSession)
           throws java.lang.Exception {
    if (message instanceof javax.jms.TextMessage)  {
        String oldContent = ((javax.jms.TextMessage) message).getText();
        javax.jms.TextMessage newMessage = jmsSession.createTextMessage("Hello "
               + oldContent);
        jmsSession.createProducer(queue2).send(newMessage);
    }
}
Note –The above code has been wrapped to fit onto the page.
-
Save the changes.
 To Test the Sample Code
To test that JMS messages are being properly passed from Queue1 to Queue2, complete the following steps.
-
Right-click on the Project node and select Build.
-
After the build process is complete, right-click on the Project node, and then select Undeploy and Deploy.
-
Use your preferred JMS client to send a text message to Queue1 (located at mq://localhost:7676,).
-
Use another JMS client (or the same client) to receive a text message from Queue2 in the JMS server (located at mq://localhost:7676,).
Initiating a Request-Reply Transaction
JMS messaging solutions need to satisfy the requirements of operating on a fire-and-forget or a store-and-forward basis. This messaging infrastructure is used to deliver each message to the intended recipient whether that recipient is active at the time of send or not. In a request-reply pattern, messages are delivered to the messaging system, which immediately acknowledges that it has taken the responsibility for delivery to the ultimate recipient. That delivery might take some time if the recipient is not active for a period or might not take place at all if the recipient never appears.
Perform the following steps to initiate a request-reply transaction:
 To Create the EJB Module Project
-
From the File menu, select New Project.
The New Project dialog box appears.
-
Select Java EE under Categories, and then select EJB Module under Projects.
-
Click Next.
The Name and Location window appears.
-
Enter a unique Project Name and the location to store the project files.
-
Click Next.
The Server and Settings window appears.
-
Accept the default settings for the server and click Finish.
The new project is created.
 To Create a Message Driven Bean
-
Right-click the new project, and then select New -> Other.
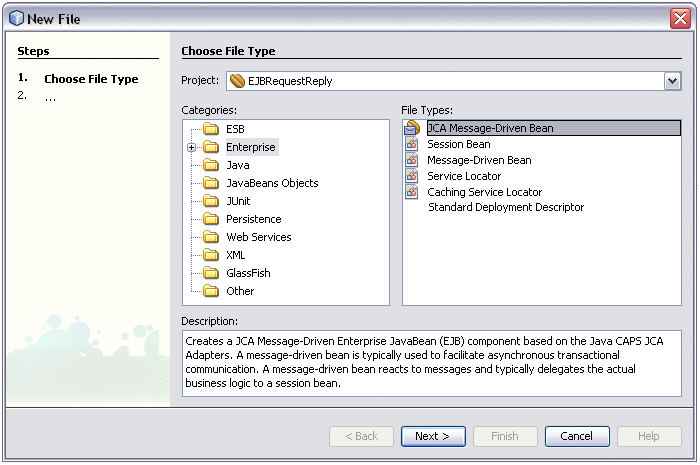
The New File Wizard appears.
Figure 16 New JCA Message-Driven Bean
-
Select Java EE under Categories, and then select JCA Message-Driven Bean under File Types .
-
Click Next.
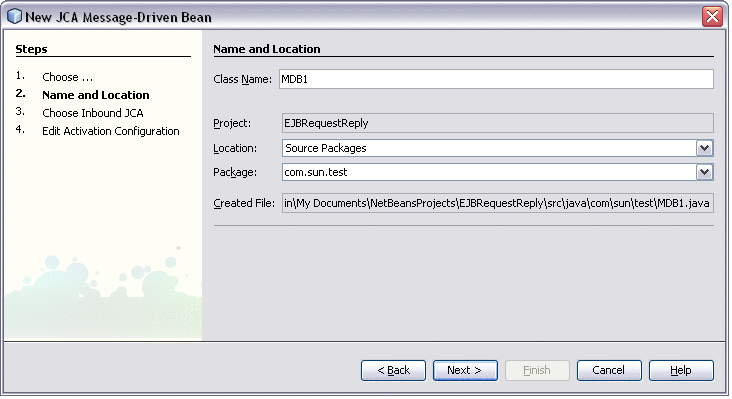
The Name and Location window appears.
Figure 17 Configuring the Message-Driven Bean
-
Enter a unique Class Name and a valid Package name.
-
Click Next.
The Choose Inbound JCA window appears.
-
Select the JMS Adapter and click Next.
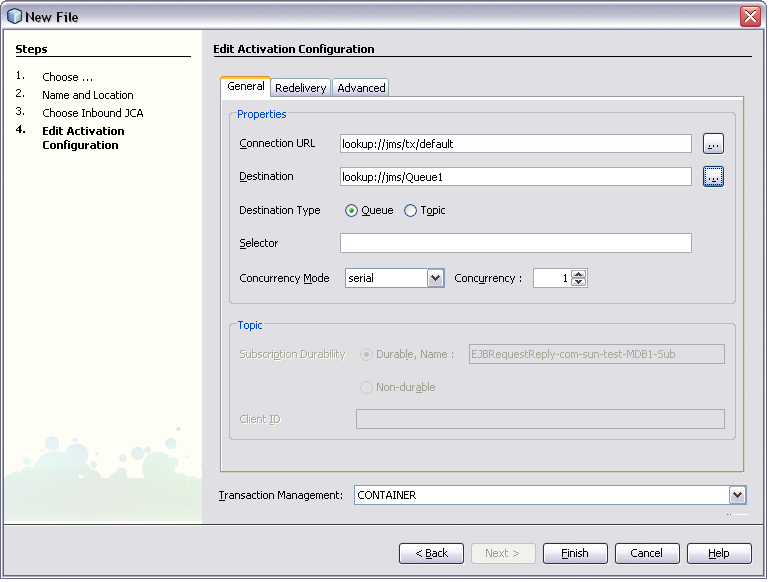
The Edit Activation Configuration window appears.
Figure 18 Edit Activation Configuration
-
Set the Destination lookup to the JNDI Name of the Queue and click Finish.
A new Message-Driven Bean is created.
-
Drag a Queue rom the Palette panel on the right into the Java Editor.
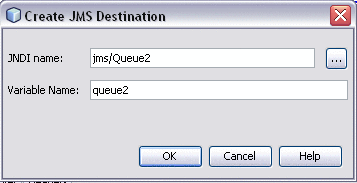
The Create JMS Destination dialog box appears.
Figure 19 JMS Destination
-
Enter a valid JNDI Name, Variable Name, and click OK.
The Java code for the Queue instance is populated into the Java Editor. Repeat the above steps for as many Queues that are needed.
-
Drag a Session from the Palette panel in the right into the onMessage() method in the Java Editor.
The JMS Adapter Declaration dialog box appears.
Figure 20 JMS Adapter Declaration

-
Enter a valid method name, such as RequestReply and click Finish.
The Java code for the JMS Session is populated into the Java Editor.
-
Drag a Request-Reply from the Palette panel on the right into the new method.
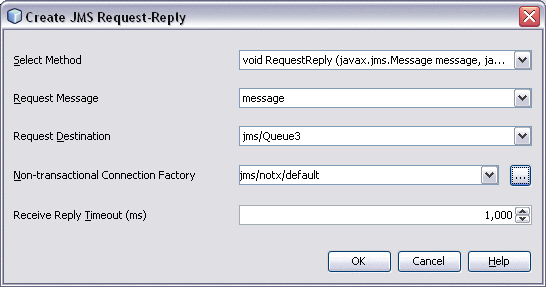
The Create JMS Request-Reply dialog box appears.
Figure 21 JMS Request-Reply
-
Select following values for the fields:
-
Select Method – Select the method you specified earlier on the JMS Adapter Declaration dialog box.
-
Request Message – Select message.
-
Request Destination – Select the JMS queue or topic you created for the adapter.
-
Non-transactional Connection Factory – Select a connection factory that contains “notx” in the name.
-
-
Click OK.
-
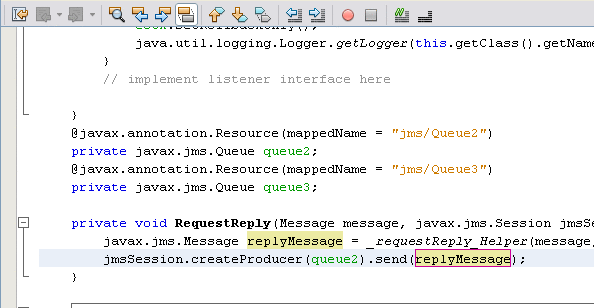
In the Request-Reply method, enter the following code beneath the first line of code:
jmsSession.createProducer(queue2).send(replyMessage);
Figure 22 Request-Reply Method
-
Save the file.
 To Create a JCA Message-Driven Bean for the
Destination
-
From the NetBeans Palette window, drag an instance of the JMS Session into the onMessage() method in the Java Editor.
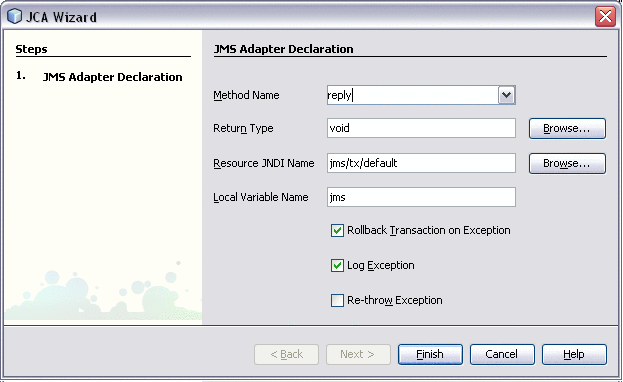
The JMS Adapter Declaration dialog box appears.
Figure 23 Reply Method
-
Enter reply as the method name and click Finish.
The Java code for the JMS Session is populated into the Java Editor.
-
In the reply method enter the following code:
jmsSession.createProducer(message.getJMSReplyTo()).send(message);
Figure 24 Reply Method in the Java Editor
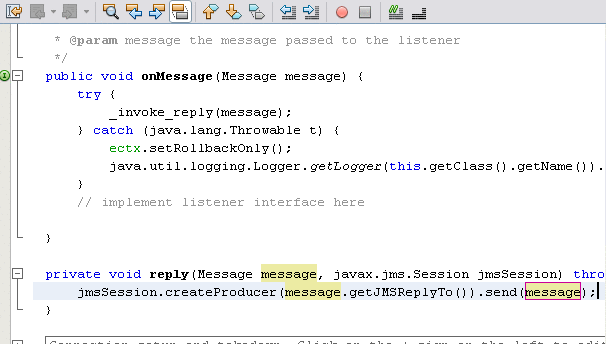
This code sends the incoming message to the reply destination.
-
Save the file.
-
Build and deploy the project.
- © 2010, Oracle Corporation and/or its affiliates
