Appendix A SunVTS Tutorial
Follow the procedures in this chapter to become familiar with the basic methods used to configure and run SunVTS. For more specialized SunVTS functionality refer to additional chapters in this book.
Tutorials in this chapter:
Overview of SunVTS Procedures
The following list describes typical steps that you perform to test your system with the SunVTS diagnostic:
-
Become superuser
-
Load required test media and/or loopback connectors
-
Start your desired window environment (CDE, OPEN LOOK, or none)
-
Start the SunVTS diagnostic
-
Configure SunVTS with the desired options
-
Run the tests
-
Review the test results
Note -
The tutorials in this chapter guide you through these steps, however, numbered steps in this list do not correspond to the numbered steps in the tutorials.
Running SunVTS With CDE (Tutorial)
This section is divided into the following subsections:
Initial Steps
Follow these steps when you start SunVTS:
-
Log in to the system and become superuser.
-
Insert test media (optional, see the note below):
Several devices require media or loopback connectors for testing. Install such requirements before starting SunVTS to allow the SunVTS kernel to properly identify each device.
You must install media in these devices if you plan to test them in Functional mode:
-
Tape drive--load a scratch tape in the tape drive that you plan to test. The tape test has a Read-only mode, but use a scratch tape to avoid inadvertently writing over data.
-
CD-ROM drive--load a compact disc (CD) into the drive. It can be an audio or data CD.
-
Diskette drive--load a scratch diskette in the drive. The diskette test has a Read-only mode, but use a scratch diskette to avoid inadvertently writing over data.
-
Communication ports--many of these tests require a loopback connector attached to the port. Attach any required loopback connectors for the ports you plan to test. For more information about loopback connectors refer to the SunVTS 3.0 Test Reference Manual.
Note -This tutorial does not assume that you have a tape, CD-ROM, or diskette drive or loopback connectors attached to the system that you are testing. Therefore, the following procedures in this tutorial do not require installation of test media or connectors.
-
Start SunVTS on Your System
The following steps assume that the SunVTS package and the CDE environment is installed on your system, and that you have performed the steps in "Initial Steps"".
-
Start the CDE graphical user interface environment if it is not already running.
-
# /opt/SUNWvts/bin/sunvts The sunvts command starts the SunVTS kernel (vtsk) and the SunVTS user interface (vtsui, the CDE GUI, in this case). As the kernel initializes, it determines what devices are connected to your system, probes the devices, and passes this information to the user interface.
The user interface that starts is determined on the following criteria:
-
When the CDE window manager (DTWM) is running, the default SunVTS GUI is CDE.
-
When the OPEN LOOK window manager (OLWM) is running, the default SunVTS GUI is OPEN LOOK.
-
If no window manager is running, then SunVTS starts the TTY mode interface.
Note -If you receive an error message such as: connection to ":0.0" refused by server Xlib: Client is not authorized to connect to Server Error: Can't open display: :0.0 You may need to grant xhost permissions by typing: xhost +
There are command line options that can be used on the SunVTS command line. For details refer to "To Start SunVTS on a Local System ".
-
SunVTS Testing (Part 1 - Basic Concepts)
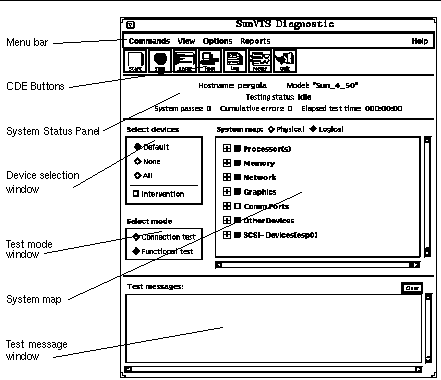
After performing the steps in the previous section, the SunVTS CDE user interface is displayed on your screen as shown below. SunVTS is in an idle state with all testing parameters set to default values.
This section will step you through basic SunVTS configuration concepts, test execution, and review of test results.
Figure A-1 SunVTS Display (CDE)
Note -
Refer to "CDE User Interface" for more detailed information on the CDE User Interface.
-
Select the test mode (refer to Figure A-2):
-
Connection test mode--provides a low-stress, quick testing of the availability and connectivity of selected devices. These tests are non-intrusive meaning they will release the devices after a quick test, and they will not place a heavy load on system activity.
-
Functional test mode--provides more robust testing of your system and devices. It will use your system resources for thorough testing and it assumes that there are no other applications running.
-
Functional test mode through SyMON--When SunVTS is invoked by the SyMON Online GUI, Functional mode runs in a restricted fashion. When SyMON is running it is assumed that the system is in production use. For this reason functional mode means the tests run in a non- intrusive fashion so that they do not significantly affect other applications.
Note -Functional mode, when executed from SyMON, invokes non-intrusive tests which do not significantly affect other applications.
-
Click on the Connection test button.
-
Click on the Functional test button.
As you change modes, the tests that are selectable change.
Figure A-2 SunVTS Select Mode Buttons

-
-
Identify the configuration of your system in the System Map:
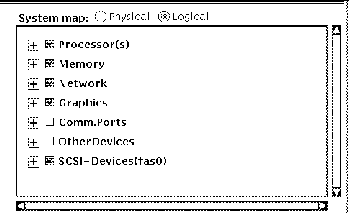
The devices that SunVTS identified on your system are listed in the System Map window of the SunVTS display (see Figure A-3 ).
SunVTS can display devices in two ways:
-
Physical mapping--which shows the exact location of each device on the system for Field Replaceable Unit (FRU) identification. From physical mapping, you can determine the actual location of the devices. When possible, the board number and controller type for the device are also displayed. This view is only available on systems that have the configd program installed (part of the SyMON SUNWsyc package). Do not select Physical Mapping at this time.
-
Logical mapping-- organizes the list of devices, according to their function, into groups. For example, disk, tape, and CD-ROM drives are placed in the SCSI-Devices group. You can focus your testing on a specific group or on all of the groups on the system.
Figure A-3 SunVTS System Map (Logical View)
-
-
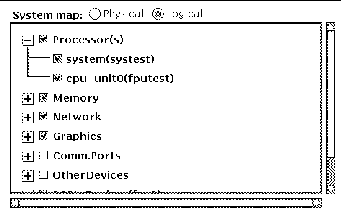
Expand the Processor(s) device group to show the individual testable devices by clicking on the plus symbol. (See Figure A-4 below.)
A "+" (plus) indicates that the device group is collapsed, meaning individual devices are grouped together and hidden from view under a device category.
A "-" (minus) indicates that the device group is expanded so you see each device for a given category.
For example, clicking on the plus symbol next to "Processors(s)" expands the Processor category to show the types of testable devices for that group (such as "system" and "CPU-init0") as well as the name of the SunVTS test in parenthesis (such as systest and fputest) that is used to test each device.
Note - Detailed information about each SunVTS test is located in the SunVTS 3.0 Test Reference Manual.
Figure A-4 SunVTS System Map (Processor Group Expanded)
-
Click on the check mark next to "system" and "cpu" to deselect these devices for testing.
If a check mark is present then the device is selected for testing.
Some devices are initially selected when SunVTS is first started. These devices are the default set of devices to test in Functional mode.
When you select or deselect a device group, all devices in that group become selected or deselected.
You will not be able to select some devices such as the Comm-ports and other devices at this time. They require that Intervention mode to be enabled (refer to the next step).
-
Click on the Intervention button (see Figure A-5) to enable the selection of additional tests.
Certain devices like the Comm-port, tape drive, CD_ROM, and diskette device tests require that you intervene before such devices can be selected for testing. These devices require the installation of media or loopback connectors (in Functional mode only).
This tutorial does not test these devices, however, if you wish to run such tests, and you have not loaded the required media, do so now. Afterwards, click the Intervention button (refer to Figure A-5 below) to indicate that the required media is in place. These tests are now selectable, however SunVTS does not verify that the proper media is installed. If you attempt to run such tests without the media, the test will fail.
Note -If you are loading test media after SunVTS is started, it may be necessary to have the SunVTS kernel reprobe the system. Refer to Figure 4-3 for details.
-
Use the Select devices buttons (see Figure A-5) to select and deselect devices to test:
-
Click on the "None" button.
All tests for all devices are deselected.
-
Click on the "All" button.
All tests for all devices are selected. However, if intervention is not enabled then those tests that require intervention will not be selected.
-
Click on the "Default" button.
SunVTS selects the default set of tests. If interventions is selected then the default tests may be the entire set of tests for your system.
Figure A-5 SunVTS Select Devices Button

-
-
Set up the following test configuration:
-
Start the test by clicking on the green Start button in the upper left corner.
Testing starts immediately. Since SunVTS is in Connection mode, only one pass of the selected test runs and SunVTS Returns to an idle state.
Messages are displayed in the Test message window in the lower section of the SunVTS display. Error messages, if they occur, are also reported in this window.
Colors in the system map indicate pass or fail conditions. During testing, the name of a device changes color from black to green if it has at least one pass and no failures. The moment a device has a failure, the name changes to red.
-
View the results of the test:
-
Look at the Status area of the display (see Figure A-6).
-
Testing status--provides the following status of SunVTS:
-
Idle indicates that no testing is taking place
-
Testing indicates that SunVTS is running
-
Suspend indicates that testing is suspended
-
Replay indicates that a previously recorded session is displayed
-
Stopping is momentarily displayed as SunVTS stops testing
-
-
System passes--displays the total number of successful system passes (a system pass is when all selected tests have been run once).
-
Cumulative errors--reports the total number of errors from all selected tests.
-
Elapsed test time--indicates the total number of hours, minutes, and seconds that elapsed during testing.
Figure A-6 Test Status Area

-
-
Look at the Test messages window:
This window displays the test status and error messages. There is a scrollbar that gives you access to messages that exceed the window size.
Figure A-7 Test Messages Window

-
Look at the Test logs:
-
Click on the Log button at the top of the display.
The log file window is displayed. Three different files contain test results:
-
SunVTS error status log (/var/opt/SUNWvts/logs/sunvts.err)--contains test error messages.
-
SunVTS information log (/var/opt/SUNWvts/logs/sunvts.info)--contains informative messages that are generated when you start and stop SunVTS. These messages include start and stop times, as well as information that appears in the Status area of the main display.
-
Solaristm system message log (/var/adm/messages)--contains a log of all the general UNIX messages (as determined by the /etc/syslog.conf file).
-
-
Click on the Log file button to select a different log file to view.
-
Click on the Close button.
The Log file window is dismissed.
-
-
-
Reset the current test statistics by clicking on the Reset button (at the top of the display).
The test status information is reset to zero. This does not clear the log files.
-
Clear the Test messages window by clicking on the Clear button (lower right corner of the SunVTS display).
The window is cleared. This does not clear the log files.
The previous steps introduced you to important SunVTS functionality. To investigate additional SunVTS features continue with the tutorial below. Or, if you want to quit the SunVTS diagnostic, select Quit SunVTS from Commands in the menu bar, and click on UI and Kernel.
SunVTS Testing (Part 2 - Using Additional Features)
The following steps assume that SunVTS is started and that you are familiar with its basic operation as described in part 1.
This section will have you run morethorough tests.
-
Select Functional test mode.
-
Use SunVTS to get a report of your system configuration (see Figure A-8 ):
-
Click on Reports from the Menu bar.
The Reports menu appears.
-
Click on System configuration from the menu.
A window showing your system configuration is displayed.
If you have access to a printer and you wish to print a copy of this list, click on the Print button, specify your printer name in the window, and click OK.
-
Click on the Close button in the system configuration window.
The configuration window is dismissed.
Figure A-8 CDE Reports Menu

-
-
Use the SunVTS Notify option to receive email:
-
Click on Options from the Menu bar
The Option menu appears.
-
Click on Notify from the menu.
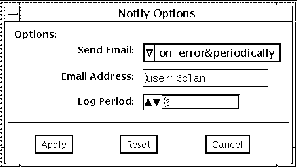
The Notify window appears (see the figure below). The following options are available:
-
Send Email--determines how email notification will be handled:
-
Disabled (never send email)
-
Now (send email immediately)
-
On Error (send email when an error occurs)
-
Periodically (send email every x number of minutes, as defined by Log Period)
-
On Error & Periodically (send on error and periodically)
-
-
Email Address--indicates the email address where the test status messages are sent.
-
Log Period--specifies the time, in minutes, for sending test status email messages.
Figure A-9 Notify Option Menu
-
-
Set up the Notify menu as follows:
-
Send Email--On Error and Periodically
-
Email Address--your email address (e.g., user1@pergola)
-
Log Period--15 (fifteen minutes)
-
Click on Apply.
Email will be sent to you the next time that SunVTS testing is started, provided that testing exceeds the time specified in the log period, or an error was detected.
-
-
-
Set up test execution options:
-
Click on Options in the Menu bar.
-
Select Test Execution from the menu (see Figure A-10).
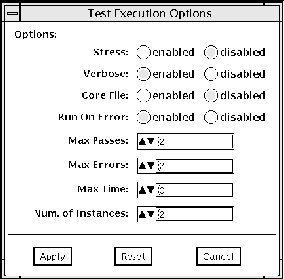
Global test execution parameters are displayed. Use these parameters to control the overall testing activity. These parameters can also be set on individual groups and on individual devices (covered later). The following list summarizes each setting. Additional descriptions are located in "Options Menu".
-
Stress--runs certain tests in stress mode, working the device harder than normal.
-
Verbose--displays verbose messages in the SunVTS Console window
-
Core File --when enabled, creates a core file if certain events occur. When disabled, no core file is created, but the event is displayed in the message window and logged in the error log.
-
Run On Error--when disabled, SunVTS stops testing when an error occurs. When enabled, SunVTS continues testing until the Max Errors value (see below) is met.
-
Max Passes--specifies the maximum number of test passes to perform. If this value is zero, Functional Mode tests will run indefinitely, or until the number of errors meets the Max Error value or Max Time value.
-
Max Errors--specifies the maximum number of allowable errors before testing is stopped. If this value is zero, testing continues regardless of errors.
-
Max Time--states the time limit (in minutes) for testing. If this value is zero, there is no time limit.
-
Number of Instance --specifies the number of test instances (simultaneous copies of a test) for each test that supports multiple instances.
-
-
-
Stress - disabled
-
Verbose - enabled
-
Core - disabled
-
Run-on Error - enabled
-
Max Passes - 2
-
Max Errors - 10
-
Max Time - 0
-
Num. of Instances - 2
Note -These parameters are not applicable when SunVTS is in Connection test mode.
Figure A-10 Test Execution Option Menu
-
-
Click on apply.
The Test Execution menu is dismissed.
-
-
Expand all Device Groups:
Instead of expanding each device group by clicking on each plus in the System Map, you can accomplish the same thing through the View commands as follows:
-
Access the Test Parameter Options for a specific device:
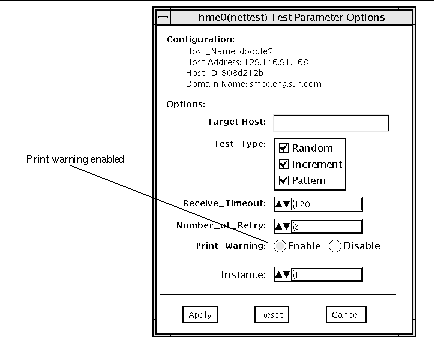
These options allow you to specify specific test options for each test. The menu that is displayed is different for each test. This tutorial looks at the options for nettest as an example. To see the options for other tests, bring up the Test Parameters menu the same way. For detailed information about each test and associated options, refer to the SunVTS 3.0 Test Reference Manual.
-
Click the right mouse button (menu button) on nettest to display a pull-down menu.
-
Click on Test Parameter Options.
The Test Parameter Options menu is displayed (see the figure below).
Figure A-11 Example of a Test Parameter Menu
-
Click on Enable for the Print_Warning option (refer to the above figure).
-
Click on Apply.
-
-
Access the Test Execution Options for a device group:
The Test Execution Options pop-up menu provides the access to the same options as Test Execution under Options in the Menu bar. The difference is that these Test Execution options apply only to a specific device or device group (used in this tutorial) and are not global settings. For descriptions on each setting refer to "Options Menu".
-
Click the right mouse button (menu button) on Processor(s).
The pull-down menu provides access to configuration menus for all devices within that device group.
-
Select Test Execution.
-
Change the Max Passes parameter to 4.
In an earlier step, you set the global Max Passes parameter to 10. By changing this parameter, all device tests will be limited to ten passes, but all devices in the Processor group will be limited to 4.
-
Click on Apply.
-
-
View the performance statistics for the system by clicking on the Meter button (at the top of the display).
The Sun Performance Meter panel is displayed (see Figure A-12). This meter shows a graphical display of the system performance statistics even while SunVTS is in the idle state. It may be convenient to watch these meters when you are performing stress testing.
The following statistics are reported:
-
CPU--percentage of CPU being used
-
pkts--Ethernet packets per second
-
page--paging activity in pages per second
-
swap--jobs swapped per second
-
intr--number of device interrupts per second
-
disk--disk traffic in transfers per second
-
contxt--number of context switches per second
-
load--average number of processes over the last minute
-
colls--Ethernet collisions per second
-
errs--receiving packet errors per second
Figure A-12 The Performance Meter Panel

-
-
Set up the following test configuration:
-
Click on the Start button.
Testing starts and will run for quite a while.
-
Observe the following while testing is in progress:
-
Many messages are displayed in the Test message window because the SunVTS Verbose option is enabled.
-
Asterisks appear next to the device indicating which devices are currently being tested.
-
The devices under test change color. Green indicates that at least one pass is complete and there are no errors. Red indicates that at least one error has occurred.
-
The Performance meter panel indicates changes in system activity levels.
-
You may have received email, provided the log period has been met.
-
-
Click on the Stop button.
-
Check the status of individual tests as follows:
-
To quit the SunVTS diagnostic, select Quit SunVTS from Commands in the menu bar, and click on UI and Kernel.
Note -Before quitting SunVTS, you must stop any tests that are running. Some tests, such as the tape test, do not stop immediately because they require time to rewind.
This concludes the "Running SunVTS With CDE (Tutorial)"".
Additional SunVTS features are described throughout this book.
Running SunVTS With the TTY Interface (Tutorial)
To Use SunVTS With the TTY Interface
The TTY interface is a ASCII based, screen-oriented interface that does not require a graphical window environment. Most of the control and monitoring options that are available in the SunVTS GUI interface are also available in the TTY interface.
You can use the TTY interface to run SunVTS from a terminal, shelltool, command tool, or a modem attached to a serial port.
-
Start SunVTS with the TTY interface:
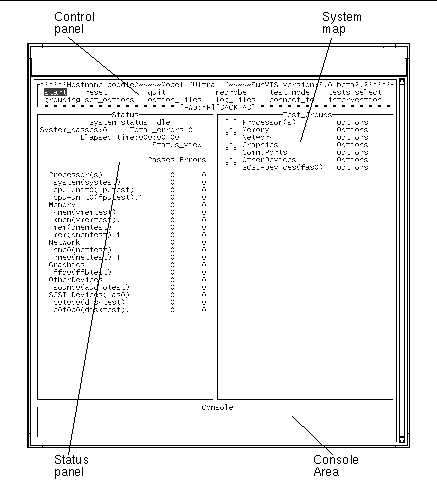
The TTY main window is displayed (figure below):
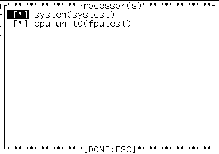
# /opt/SUNWvts/bin/sunvts -t Figure A-13 TTY Main Window
-
Identify the four main areas in the display (see Figure A-13):
-
Control panel--access to SunVTS commands and options.
-
System map--shows the testable devices (categorized in test groups) and provides access to their test options.
-
Status panel--displays the SunVTS test status information
-
Console Area--the area where test and error messages are displayed. No user input is possible in this area.
-
-
Review these keyboard commands:
Keyboard commands, instead of mouse and pointer action, are used to control SunVTS with the TTY interface. The following steps lead you through some of the common procedures. In all cases, use these keyboard commands to select and apply your test input.
Table A-1 TTY Keyboard CommandsKey
Description of Action
Tab
Moves the highlight or shifts the focus to the next window. For example, if you are working in the Control panel and press the Tab key, the focus (or highlight) shifts to the Status panel. A panel that is highlighted will be bordered by asterisks (*). Before you can change an option, you must first highlight that panel.
Return
- Displays a menu
- Selects and applies a choice or a command in a menu
Spacebar
Selects or deselects an option checkbox; [ ]= select; [*]= deselect
Arrow keys
Moves between options in a highlighted panel
Backspace key
Deletes text in a text field
Escape
Closes a pop-up menu or window
Control-F
Scrolls forward in a scrollable window
Control-B
Scrolls backward in a scrollable window
Control-X
Quits the TTY user interface but leaves the SunVTS kernel running
Control-L
Refreshes the TTY window
-
Move between the main display areas (press the Tab key several times).
As you use the Tab key, your position in the display is indicated by dark rectangle. It is important to keep track of your position in the display. When the dark triangle is over a word or command, it is highlighted (ready to be selected).
As you press the Tab key, you move from the Control panel to the Status panel to the System Map, and back.
-
Select your test mode:
-
Use the Tab key until you are in the Control panel area (Start will be highlighted).
-
Use the right arrow key to highlight test_mode.
-
Use the Return key to display the test_mode menu.
-
Use the down arrow to highlight Connectivity (Connection mode).
(The up and down arrows are used to move between options.)
For descriptions of Connection and Functional test modes refer to "Test Modes".
-
Press Return to apply the change and exit the menu.
-
Press the Return key again to reenter the test_mode menu.
-
Use the arrow key to highlight Functional and press Return.
SunVTS prompts you to verify this change.
-
Use the arrow key to highlight OK and press Return.
-
-
Use the Tab key to move to the System map (Test_Group area).
The asterisk([*]) in the brackets, next to group name, indicates that all devices in that group are selected for testing.
-
To see devices listed inside a group:
-
Deselect test groups:
-
Modify device specific test options:
-
Press the Tab key to move to the System Map.
-
Use the arrow key to highlight Network and press Return.
Your network device(s) are shown in the menu.
-
Highlight nettest (or whatever network test is available on your system), and press Return.
-
Highlight Test_Parameters and press Return.
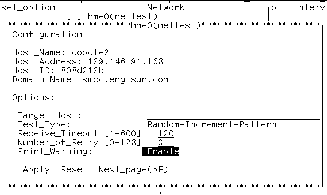
The Test Parameters menu for nettest is displayed. For the purpose of this tutorial, you will only be directed to change the Print_Warning option.
-
Use the arrow keys to highlight the word Disabled (next to Print_Warning, refer to the following figure).
Figure A-15 nettest Test_Parameters (TTY Interface)
-
Press Return once to open the enable/disable menu, and again to select enable.
The Print_Warning value is set to enable. Do not press the Escape key; the change must be applied.
-
Use the arrow keys to highlight Apply, and press Return.
The change is applied and you return to the previous menu.
-
Press Return to enter the nettest option menu again.
-
Highlight Test_Execution, and press Return.
-
Highlight the Verbose option "disabled", and press Return twice to change it to enabled.
-
Use the arrow keys to highlight Apply, and press Return.
-
-
Select a device for testing:
Any number of tests can be selected. For the purpose of this tutorial, you will only be directed to select one test (nettest).
-
Use the arrow key to highlight the brackets ([ ]) next to nettest.
-
Press the space bar.
An asterisk appears in the brackets indicating that this test is selected.
-
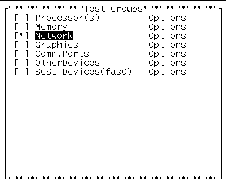
Press Escape to return to the main TTY window.
The system map will show an asterisk next to the Network group (refer to the following figure).
Figure A-16 Network Group Selected in the System Map (TTY Interface)
-
-
To set global options:
-
Use the Tab key to move to the Control panel area.
-
Use the down arrow to move to the second row of commands.
-
Use an arrow key to highlight set_options.
-
Press Return to open the set_options menu.
-
Press Return again to open the Thresholds menu.
-
Type 3 next to Max_System_Passes.
-
Use the arrow keys to highlight Apply and press Return.
-
-
To start testing:
-
Use the arrow keys to highlight Start in the Control panel area.
-
Press Return once to get the start menu, and again to select Start.
Testing begins. The Console window displays messages because the verbose option is enabled. The Status panel displays the testing status such as the system status, passes, errors, and the elapsed time.
Note -nettest checks all the networking hardware on the system CPU board and separate networking controller cards. For this test to be meaningful, the system must be attached to a network.
-
-
Review the test results:
-
Review the log files:
SunVTS events are recorded in three log files. Refer to "The Log Files Button" for details. This tutorial directs you to view the contents of the Information log.
-
Tab to the Control panel area.
-
Highlight log_files and press Return.
-
Highlight Information and press Return.
-
Highlight Display and press Return.
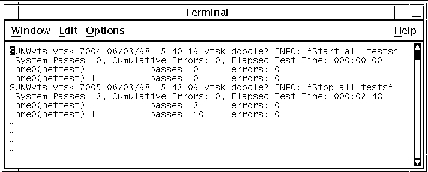
The contents of the SunVTS Information log are displayed.
To display the log file, SunVTs opens a temporary file using the default editor for the shell (Bourne, korn, or c-shell, and so on) that you are using. In many cases, this is the vi editor. All of the standard editor commands are valid in this file, however, no changes will alter the permanent log file.
Assuming that you are using the vi editor, use the following vi commands to view the log file contents:
-
Arrow keys--move the cursor one line, or character at a time.
-
Control-F--display the next screen
-
Control-B--display the previous screen
-
/string--search forward for string
-
Esc,Q--quit
Figure A-18 SunVTS Information Log (TTY Interface)
-
-
When you are done reading the information log file, press the Escape key, then :q to dismiss it.
-
Press Escape again to dismiss the log_file menu.
-
-
To reset the current test status information:
It is a good idea to reset previous test status information before you begin another test session.
-
To Exit SunVTS:
Running a Test From the Command Line (Tutorial)
In some cases it may be more convenient to run a single SunVTS test from the command line. Unless specified, the test runs without the SunVTS kernel (vtsk). All events and errors are sent to stdout or stderr, and are not logged in the log files.
There are two directories where tests reside:
-
32-bit tests- /opt/SUNWvts/bin/testname
-
64-bit tests- /opt/SUNWvts/bin/sparcv9/testname
Use the pathname based on the type (32-bit or 64-bit) of operating system that is running.
When you run a test in this way, you must specify all test options in the form of command line arguments.
There are two types of command line arguments:
-
Standard arguments--common to all tests. Refer to Table A-2 below for details.
-
Test specific arguments--unique to a specific test. Refer to the SunVTS 3.0 Test Reference Manual for details.
The standard syntax for command line execution is:
| testname [-scruvdtelnf] [-p number] [-i number] [-w number] [-o test_specific_arguments] |
The standard command-line argument usage for all SunVTS tests is:
Table A-2 Standard Command-line Arguments| Argument | Definition |
|---|---|
| -s | Run a test as though it were invoked from the SunVTS kernel (vtsk). This causes the test to send output to an RPC port that the SunVTS kernel is using. The default is to send the output to stdout or stderr. |
| -c | Enables a core image of the test process to be created in the current working directory upon receipt of certain signals, otherwise those signals are caught and handled to prevent a core from being generated. The default is to disable the creation of a core image. |
| -r | Enables run on error so that when an error occurs, the test continues with the next test sequence instead of exiting. The default is false. |
| -u | Displays command line usage information. |
| -v | Runs the test in Verbose mode and displays messages with more detailed information about the testing process. The default is false. |
| -d | Runs the test in debug mode and displays messages to help programmers debug their test code. The default is false. |
| -t | Runs the test in test Trace mode and displays messages that track function calls and sequences currently in use by the test code. The default is false. |
| -e | Runs the test in Stress mode by increasing the system load. The default is false. |
| -l | Runs the test in Online Functional mode. This is the same mode that tests run in when executed through SyMON. It is a non-intrusive version that will not significantly affect other applications. See the note below. The default is true. |
| -n | Runs the test in Connection mode. See the note below.The default is false. |
| -f | Runs the test in full Functional test mode. This mode assumes that the test has complete control of the device under test. See the note below. The default is false. |
| -i number | Defines the number of instances for scalable tests. |
| -p number | Defines the number of passes. |
| -w number | For scalable tests, defines to which instance the test is assigned. |
| -o | Used to indicate that the options and arguments that follow are test specific. Note: Separate each test specific argument by commas, with no space after each comma. |
Note -
If you choose to specify a test mode with the l, n, or f option, specify only one option at a time because only one test mode can be selected at a time.
Run A Single Test from the Command Line
-
Review the command line syntax and arguments for the test you plan to run:
There are nearly fifty individual SunVTS tests. The tests that you choose to run depends on the configuration of your system. For this exercise you are directed to run one of three tests (for devices that are somewhat common to all configurations.) Choose the test that matches your system configuration (choices are listed below). For information on cammand line systax and test options refer to the SunVTS 3.0 Test Reference Manual.
-
Load any required test media (tape, CD, or diskette) or loopback connectors required by the test.
Note -This is a necessary step for several tests, however, none of the examples in this exercise require test media or loopback connectors.
-
Run the test (choose one of the examples below):
# /opt/SUNWvts/bin/audiotest -vf -p1 -o M,X In this example, -vf -p1 -o are standard arguments (common to all tests), and M,X are two arguments specific to the audiotest. Notice that the test specific arguments are separated by a comma and no spaces.
# /opt/SUNWvts/bin/disktest -n -p2 -o dev=c0t0d0 This example tests a disk drive called c0t0d0. You may need to replace this device name with a device name of a disk that is connected to your system.
# /opt/SUNWvts/bin/systest -v -f -p3 -i5 -
Watch the display as the tests run.
If an error occurs, an error message will be reported to the screen. Since the test is running without the SunVTS kernel, events and error are not logged in log files.
- © 2010, Oracle Corporation and/or its affiliates

