Running SunVTS With the TTY Interface (Tutorial)
To Use SunVTS With the TTY Interface
The TTY interface is a ASCII based, screen-oriented interface that does not require a graphical window environment. Most of the control and monitoring options that are available in the SunVTS GUI interface are also available in the TTY interface.
You can use the TTY interface to run SunVTS from a terminal, shelltool, command tool, or a modem attached to a serial port.
-
Start SunVTS with the TTY interface:
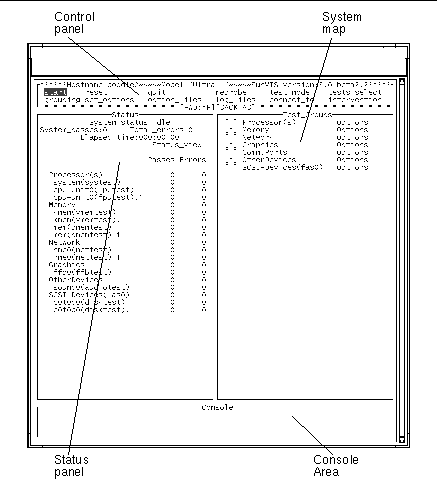
The TTY main window is displayed (figure below):
# /opt/SUNWvts/bin/sunvts -t Figure A-13 TTY Main Window
-
Identify the four main areas in the display (see Figure A-13):
-
Control panel--access to SunVTS commands and options.
-
System map--shows the testable devices (categorized in test groups) and provides access to their test options.
-
Status panel--displays the SunVTS test status information
-
Console Area--the area where test and error messages are displayed. No user input is possible in this area.
-
-
Review these keyboard commands:
Keyboard commands, instead of mouse and pointer action, are used to control SunVTS with the TTY interface. The following steps lead you through some of the common procedures. In all cases, use these keyboard commands to select and apply your test input.
Table A-1 TTY Keyboard CommandsKey
Description of Action
Tab
Moves the highlight or shifts the focus to the next window. For example, if you are working in the Control panel and press the Tab key, the focus (or highlight) shifts to the Status panel. A panel that is highlighted will be bordered by asterisks (*). Before you can change an option, you must first highlight that panel.
Return
- Displays a menu
- Selects and applies a choice or a command in a menu
Spacebar
Selects or deselects an option checkbox; [ ]= select; [*]= deselect
Arrow keys
Moves between options in a highlighted panel
Backspace key
Deletes text in a text field
Escape
Closes a pop-up menu or window
Control-F
Scrolls forward in a scrollable window
Control-B
Scrolls backward in a scrollable window
Control-X
Quits the TTY user interface but leaves the SunVTS kernel running
Control-L
Refreshes the TTY window
-
Move between the main display areas (press the Tab key several times).
As you use the Tab key, your position in the display is indicated by dark rectangle. It is important to keep track of your position in the display. When the dark triangle is over a word or command, it is highlighted (ready to be selected).
As you press the Tab key, you move from the Control panel to the Status panel to the System Map, and back.
-
Select your test mode:
-
Use the Tab key until you are in the Control panel area (Start will be highlighted).
-
Use the right arrow key to highlight test_mode.
-
Use the Return key to display the test_mode menu.
-
Use the down arrow to highlight Connectivity (Connection mode).
(The up and down arrows are used to move between options.)
For descriptions of Connection and Functional test modes refer to "Test Modes".
-
Press Return to apply the change and exit the menu.
-
Press the Return key again to reenter the test_mode menu.
-
Use the arrow key to highlight Functional and press Return.
SunVTS prompts you to verify this change.
-
Use the arrow key to highlight OK and press Return.
-
-
Use the Tab key to move to the System map (Test_Group area).
The asterisk([*]) in the brackets, next to group name, indicates that all devices in that group are selected for testing.
-
To see devices listed inside a group:
-
Deselect test groups:
-
Modify device specific test options:
-
Press the Tab key to move to the System Map.
-
Use the arrow key to highlight Network and press Return.
Your network device(s) are shown in the menu.
-
Highlight nettest (or whatever network test is available on your system), and press Return.
-
Highlight Test_Parameters and press Return.
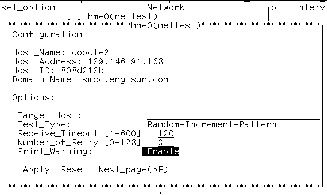
The Test Parameters menu for nettest is displayed. For the purpose of this tutorial, you will only be directed to change the Print_Warning option.
-
Use the arrow keys to highlight the word Disabled (next to Print_Warning, refer to the following figure).
Figure A-15 nettest Test_Parameters (TTY Interface)
-
Press Return once to open the enable/disable menu, and again to select enable.
The Print_Warning value is set to enable. Do not press the Escape key; the change must be applied.
-
Use the arrow keys to highlight Apply, and press Return.
The change is applied and you return to the previous menu.
-
Press Return to enter the nettest option menu again.
-
Highlight Test_Execution, and press Return.
-
Highlight the Verbose option "disabled", and press Return twice to change it to enabled.
-
Use the arrow keys to highlight Apply, and press Return.
-
-
Select a device for testing:
Any number of tests can be selected. For the purpose of this tutorial, you will only be directed to select one test (nettest).
-
Use the arrow key to highlight the brackets ([ ]) next to nettest.
-
Press the space bar.
An asterisk appears in the brackets indicating that this test is selected.
-
Press Escape to return to the main TTY window.
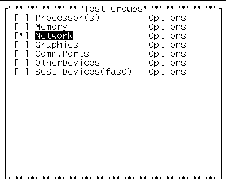
The system map will show an asterisk next to the Network group (refer to the following figure).
Figure A-16 Network Group Selected in the System Map (TTY Interface)
-
-
To set global options:
-
Use the Tab key to move to the Control panel area.
-
Use the down arrow to move to the second row of commands.
-
Use an arrow key to highlight set_options.
-
Press Return to open the set_options menu.
-
Press Return again to open the Thresholds menu.
-
Type 3 next to Max_System_Passes.
-
Use the arrow keys to highlight Apply and press Return.
-
-
To start testing:
-
Use the arrow keys to highlight Start in the Control panel area.
-
Press Return once to get the start menu, and again to select Start.
Testing begins. The Console window displays messages because the verbose option is enabled. The Status panel displays the testing status such as the system status, passes, errors, and the elapsed time.
Note -nettest checks all the networking hardware on the system CPU board and separate networking controller cards. For this test to be meaningful, the system must be attached to a network.
-
-
Review the test results:
-
Review the log files:
SunVTS events are recorded in three log files. Refer to "The Log Files Button" for details. This tutorial directs you to view the contents of the Information log.
-
Tab to the Control panel area.
-
Highlight log_files and press Return.
-
Highlight Information and press Return.
-
Highlight Display and press Return.
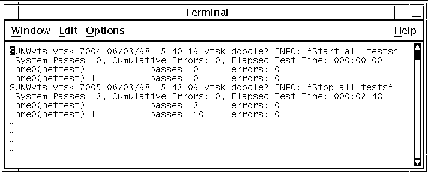
The contents of the SunVTS Information log are displayed.
To display the log file, SunVTs opens a temporary file using the default editor for the shell (Bourne, korn, or c-shell, and so on) that you are using. In many cases, this is the vi editor. All of the standard editor commands are valid in this file, however, no changes will alter the permanent log file.
Assuming that you are using the vi editor, use the following vi commands to view the log file contents:
-
Arrow keys--move the cursor one line, or character at a time.
-
Control-F--display the next screen
-
Control-B--display the previous screen
-
/string--search forward for string
-
Esc,Q--quit
Figure A-18 SunVTS Information Log (TTY Interface)
-
-
When you are done reading the information log file, press the Escape key, then :q to dismiss it.
-
Press Escape again to dismiss the log_file menu.
-
-
To reset the current test status information:
It is a good idea to reset previous test status information before you begin another test session.
-
To Exit SunVTS:
- © 2010, Oracle Corporation and/or its affiliates

