Chapter 7 Implementing a SAMLv2 Identity Provider Proxy
A SAMLv2 Identity Provider Proxy acts as a conduit connecting federated identity providers with federated services providers. In OpenSSO Enterprise, Identity Provider Proxy enables an Identity Provider to proxy authentication requests from federated Service Providers to various Identity Providers to which the user has previously authenticated.
This chapter provides information to help you determine if Identity Provider Proxy is suitable for your environment. The following topics are contained in this chapter:
About the SAMLv2 Identity Provider Proxy Specification
The OpenSSO Enterprise Identity Provider Proxy is based on the SAMLv2 specification which states the following:
If an identity provider that receives an <AuthnRequest> has not yet authenticated the presenter or cannot directly authenticate the presenter, but believes that the presenter has already authenticated to another identity provider or a non-SAML equivalent, it may respond to the request by issuing a new <AuthnRequest> on its own behalf to be presented to the other identity provider, or a request in whatever non-SAML format the entity recognizes. The original identity provider is termed the proxying identity provider.
Upon the successful return of a <Response> (or non-SAML equivalent) to the proxying provider, the enclosed assertion or non-SAML equivalent MAY be used to authenticate the presenter so that the proxying provider can issue an assertion of its own in response to the original <AuthnRequest>, completing the overall message exchange.
See the complete SAMLv2 specifications at http://saml.xml.org/saml-specifications.
About the OpenSSO Enterprise Identity Provider Proxy
The OpenSSO Enterprise Identity Provider Proxy is designed to enable the following:
-
Identity Providers can proxy an authentication request from a Service Provider to a different Identity Provider that has already authenticated the user.
-
Multiple Identity Provider Proxies can be configured between the Service Provider and the actual Identity Provider.
-
Existing SAMLv2 single sign-on and single logout process flows are seamlessly integrated.
-
Users can turn off identity proxying per each connection request. This is done by specifying a special URL parameter idpproxy=false.
-
Administrators can use customized SPI plug-ins with the Identity Provider Proxy to determine the user's preferred Identity Provider.
OpenSSO Enterprise provides the SPI com.sun.identity.SAMLv2.profile.SAMLv2IDPProxy and SPI which enables an administrator to customize the plug-in used to find a preferred identity provider. If the Introduction Cookie is enabled, the Identity Provider Proxy relies on the plug-in to determine the user's preferred Identity Provider. The default implementation of this plug-in interface in OpenSSO Enterprise is based on the Identity Provider Discovery Service. The Identity Provider Discovery Service can help retrieve information about the preferred Identity Provider. The details of this SPI are described in the Sun OpenSSO Enterprise 8.0 Java API Reference.
In this first offering of Identity Provider Proxy, the same protocol (for example OASIS SAMLv2 or Liberty ID-FF) must be used for all communications between the participating entities. Participating entities may include service providers, intermediate identity provider proxies, and the actual Identity Provider. However, Identity Provider Proxy is planned to be extended in the future to support heterogeneous environments with multiple identity federation protocols. For example, in the future, Identity Provider Proxy may be used in an environment using SAMLv2 between Service Provider and Identity Provider Proxy. In the same environment, Liberty ID-FF might be used between the Identity Provider Proxy and the actual Identity Provider.
Analyzing the Deployment Architecture
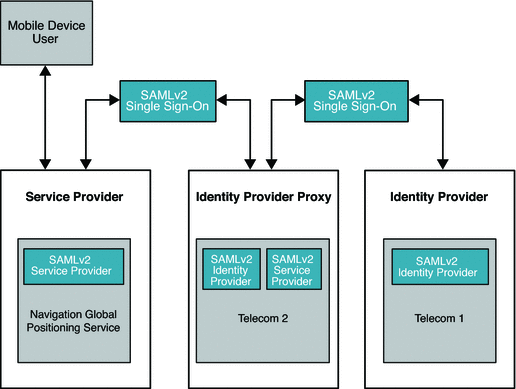
Identity Provider Proxy uses the SAMLv2 protocol to transfer identity data among the communicating entities. The following figure illustrates the major components in a typical deployment using Identity Provider Proxy.
In this deployment, the mobile device user is from France and has an account with Telecom1. The mobile device user travels to the United States and wants to access the global positioning service (GPS) provided by Telecom2 . Telecom2 is a United States service provider . The Telecom2 Identity Provider is the sole identity provider with which Telecom2 has a business affiliation.
Telecom2 receives and processes the authentication requests coming from Telecom2 Global Positioning Service, and responds with the required authentication information. Telecom2, like so many other wireless phone service providers in the world, always maintains the trust relationship with other carriers in different countries. Telecom1 is one such trusted partner which provides roaming services to their customers based on bilateral agreements. In this illustration, because of an established business relationship, Telecom2 doesn't need to know the mobile user at all. Telecom2 can process the authentication request from Telecom2 Global Positioning Service on behalf of Telecom1 based on the following trust relationships:
-
Telecom2 Global Positioning Service trusts Telecom2 for user authentication.
-
Telecom2 and Telecom1 trust each other for authentication and for the roaming services.
Figure 7–1 Deployment Architecture of Identity Provider Proxy

Considering Assumptions, Dependencies, and Constraints
Assumptions and Dependencies
-
Both Service Provider and Identity Provider can set up the trust base.
-
Service Provider and Identity Provider both achieve single sign-on using the SAMLv2 protocol (persistent and transient).
-
Service Provider and Identity Provider must achieve single logout using SAMLv2 protocol.
-
The extended configuration metadata define the attributes needed for this feature.
-
Required APIs are provided to access the attributes defined in the extended configuration metadata.
Constraints
One protocol such as OASIS SAMLv2 or Liberty ID-FF must be used across all the communications between the participating entities. Participating entities can include Service Provider, intermediate Identity Provider Proxies, and the actual Identity Provider. Currently there is no support for a heterogeneous environment that includes both SAMLv2–compliant systems and non-SAMLv2 equivalents.
Understanding Typical Business Cases
The Identity Provider Proxy feature is designed to be used by two types of users. Administrators configure the SAMLv2 Identity Provider Proxy. End–users access the services provided by service providers that initiate the single sign-on process across different circles of trust.
The following are typical business cases:
-
Single Sign-On, Introduction Cookie not enabled
-
Single Sign-On, Introduction Cookie enabled
-
Single Logout
Single Sign-On, Introduction Cookie is Not Enabled
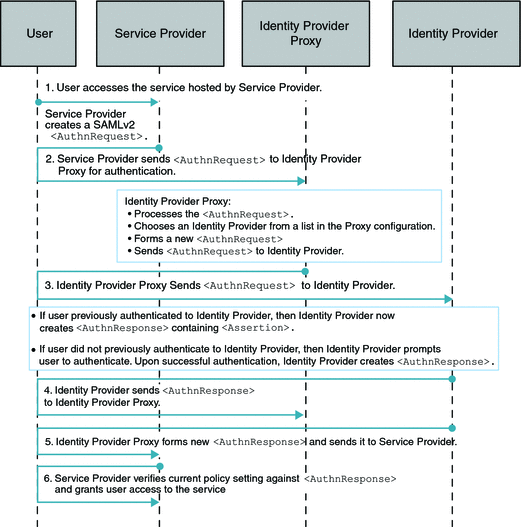
How the Identity Provider Proxy obtains the information about the actual Identity Provider is determined by whether or not the Introduction Cookie is enabled. Introduction Cookie is turned off, the Identity Provider Proxy retrieves an Identity Provider name from a list of pre-configured Identity Providers specified in the configuration.
The following figure illustrates the process for this use case. In this example, persistent federation is in place. In the transient federation mode, the Identity Provider Proxy does not contain any user information. The Identity Provider Proxy is used for proxying. The user information is only stored in the actual Identity Provider. The following figure illustrates the process flow for this use case.
Figure 7–2 Process Flow for Single Sign-On When Introduction Cookie is Not Enabled

Single Sign-On (SSO) with Introduction Cookie Enabled
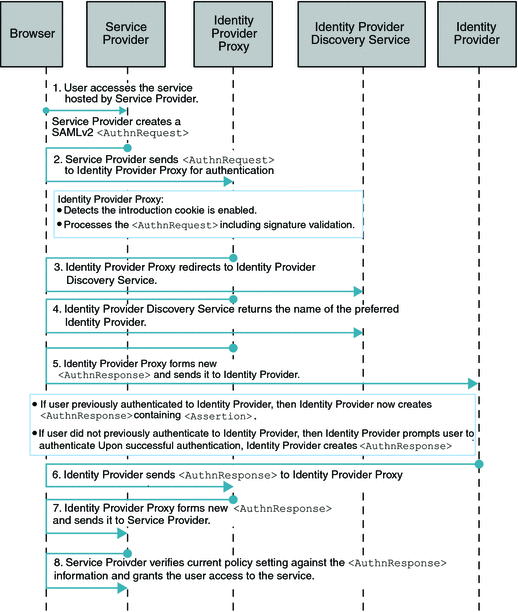
When the Introduction Cookie is enabled at the Service Provider, the Identity Provider Proxy relies on the com.sun.identity.SAMLv2.profile.SAMLv2IDPProxy plug-in to determine the preferred Identity Provider to proxy the authentication request to. The default implementation of this plug-in interface in OpenSSO Enterprise 8.0 is to consult the Identity Provider Discovery Service to get the information about the preferred Identity Provider . The following figure illustrates the process flow for this use case.
Figure 7–3 Process Flow for Single Sign-On (SSO) with Introduction Cookie Enabled

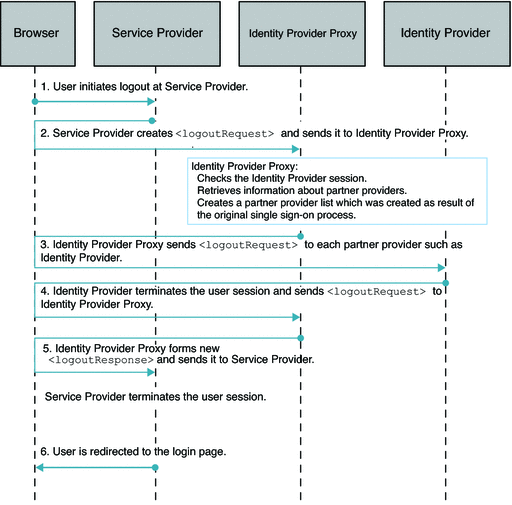
Single SAMLv2 Identity Provider Proxy Logout
The following figure illustrates the process for this use case.
Figure 7–4 Process Flow for Single Logout

Setting Up and Configuring SAMLv2 Identity Provider Proxy
The following provides a high-level description of setup and configuration steps. For more detailed instructions, see the Sun OpenSSO Enterprise 8.0 Administration Guide.
There is no other software component is required to implement a SAMLv2 Identity Provider Proxy. Everything you need is contained in the OpenSSO Enterprise fam.war file.
Setting Up a SAMLv2 Identity Provider Proxy
Install OpenSSO Enterprise instances on three separate host computers, preferably in different domains:
-
One OpenSSO Enterprise instance to act as the Service Provider
-
At least one OpenSSO Enterprise instance to act as the Identity Provider Proxy.
-
One OpenSSO Enterprise instance to act as the actual Identity Provider.
Configuring the SAMLv2 Identity Provider Proxy with No Introduction Cookie
This is the default configuration. You can use the OpenSSO Enterprise administration console or the ssoadmin command-line interface to generate and import metadata (steps 3 through 6).
-
Create your own keystore using keytool.
You can also use the keystore.jks file created during deployment of OpenSSO Enterprise instance. The keystore.jks file is located in the opensso/opensso directory. The keystore.jks file contains a private key named test and an associated public certificate.
-
Encrypt the keystore password for each host machine.
If you use the keystore.jks file mentioned in step 1 and created during OpenSSO Enterprise deployment, the cert alias test is already encoded. You can use test for both security and encoding purposes. For example, for spscertalias, specertalias, idpscertalias, and idpecertalias.
-
Generate Service Provider and Identity Provider metadata.
In each of the following substeps, save the standard and extended metadata in their respective files.
-
Generate the Service Provider metadata, and upload these local metadata into its console.
-
Generate the Identity Provider metadata, and upload these local metadata into its console.
-
Generate the Identity Provider Proxy metadata, and upload these local metadata into its console.
-
-
Import the Service Provider and Identity Provider metadata.
-
In each of the extended meta XML files, in the EntityConfig element to be imported, change hosted=1 to hosted=0. The value 0 means “remote.”
-
Import the Service Provider metadata to the Identity Provider Proxy.
-
Import the Identity Provider metadata to the Identity Provider Proxy.
-
Import the Service Provider portion of the Identity Provider proxy metadata to the Identity Provider.
-
Import the Identity Provider portion of the Identity Provider Proxy metadata to the Service Provider.
-
-
Create a circle of trust on each of the systems.
-
Import the metadata and create the provider entity.
Specify the name of the circle of trust into where you would like to import the metadata.
-
Enable the Identity Provider Proxy.
You can use the OpenSSO Enterprise console in both the Service Provider and Identity Provider Proxy, or you can modify the SAMLv2 extended configuration metadata.
To Use the OpenSSO Enterprise Console:
-
Click on SP URL under Entity Providers, then click the Advanced tab.
- IDP Proxy
-
Mark the Enabled box.
- Proxy Count
-
Enter 1 or more.
- IDP Proxy List
-
Enter the Identity Provider Proxy URL as a new value.
-
Click Add.
-
Click on Proxy IDP URL under Entity Providers, then click the Advance tab for SP.
- IDP Proxy
-
Mark the Enabled box.
- Proxy Count
-
Enter 1 or more.
- IDP Proxy List
-
Enter the actual Identity Provider Proxy URL as a new value.
To modify the SAMLv2 extended configuration metadata
Edit the following entries for the Service Provider on the Service Provider host, and also on the Service Provider portion of the Identity Provider Proxy on the Identity Provider Proxy host:
- EnabledIDProxy:
-
The key to turn the SAMLv2 IDP proxy feature on or off.
- IdpProxyList:
-
The Identity Providers trusted by the requester (the Service Provider) to authenticate the presenter (the user).
- IdpProxyCount:
-
The number of proxies permissible between the Identity Provider that receives this <AuthnRequest> and the actual Identity Provider that ultimately authenticates the principals. A count of zero means no proxying.
- UseIntroductionForIDPProxy:
-
When this key is on, the SAMLv2 Introduction Cookie picks a preferred IDP instead of going through the Identity Provider Proxy list.
-
-
After all the configuration steps are done, restart the web containers of all the servers on the Service Provider, Identity Provider Proxy, and the actual Identity Provider.
-
As a verification step, on the Service Provider host, log in to the OpenSSO Enterprise administration console and click the Federation tab.
You should see the profiles for both Service Provider and Identity Provider Proxy.
Perform the SAMLv2 test cases for single sign-on and single logout through a proxy.
Configuring the SAMLv2 Identity Provider Proxy with the Introduction Cookie
You can use the OpenSSO Enterprise administration console or the ssoadmin command-line interface to generate and import metadata (steps 5 through 8).
-
Deploy the Identity Provider Discovery Service.
Follow the steps 1 through 5 in Chapter 10, Deploying the Identity Provider (IDP) Discovery Service, in Sun OpenSSO Enterprise 8.0 Installation and Configuration Guide. Do not complete steps 6 through 11 in the section “Configuring the IDP Discovery Service.”
-
Once the Identity Provider Discovery Service WAR file is generated and deployed, make the following changes on its Configurator page.
When http(s)://idpdiscoveryhost.example.com:8080/idpdiscovery is loaded, where idpdiscoveryhost usually refers to the Identity Provider Proxy host name, specify the following:
- Debug Directory:
-
Name of the debug directory.
- Debug Level:
-
Options are error (default), warning, message, or off.
- Cookie Type:
-
PERSISTENT (default) or SESSION. Use PERSISTENT for the purpose of SAMLv2 Identity Proxying using the Introduction Cookie.
- Cookie Domain:
-
Name of the cookie domain.
- Secure Cookie:
-
True or False (default)
- Encode Cookie:
-
True (default) or False
Click Configure.
-
Create your own keystore using keytool.
You can also use the keystore.jks file created during deployment of OpenSSO Enterprise instance. The keystore.jks file is located in the opensso/opensso directory. The keystore.jks file contains a private key named test and an associated public certificate.
-
Encrypt the keystore password for each host machine.
If you use the keystore.jks file mentioned in step 1 and created during OpenSSO Enterprise deployment, the cert alias test is already encoded. You can use test for both security and encoding purposes. For example, for spscertalias, specertalias, idpscertalias, and idpecertalias.
-
Generate Service Provider and Identity Provider metadata.
In each of the following substeps, save the standard and extended metadata in their respective files.
-
Generate the Service Provider metadata, and upload these local metadata into its console.
-
Generate the Identity Provider metadata, and upload these local metadata into its console.
-
Generate the Identity Provider Proxy metadata, and upload these local metadata into its console.
-
-
Import the Service Provider and Identity Provider metadata.
-
In each of the extended meta XML files, in the EntityConfig element to be imported, change hosted=1 to hosted=0. The value 0 means “remote.”
-
Import the Service Provider metadata to the Identity Provider Proxy.
-
Import the Identity Provider metadata to the Identity Provider Proxy.
-
Import the Service Provider portion of the Identity Provider proxy metadata to the Identity Provider.
-
Import the Identity Provider portion of the Identity Provider Proxy metadata to the Service Provider.
-
-
Create a circle of trust on each of the systems.
-
Import the metadata and create the provider entity.
Specify the name of the circle of trust into where you would like to import the metadata.
-
On both the Identity Provider Proxy console and the actual Identity Provider console, add the Identity Provider Discovery Service URL for the SAML2 Reader and Writer Service URLs for the Circle of Trust.
-
On the Identity Provider Proxy console and on each actual Identity Provider host console, click the Circle of Trust.
-
Enter the values for the SAML2 Reader and Writer URLs as the Identity Provider Proxy host name, and idpdiscovery as the URI, with the SAML2 Reader and Writer appended. Examples:
http(s)://idp-proxy-server-host-name:port/idpdiscovery/saml2writer
http(s)://idp-proxy-server-host-name:port/idpdiscovery/saml2reader
-
-
On the Identity Provider Proxy console and on the actual Identity Provider console, under Entity Providers, click the Identity Provider Proxy URL link. Then click the Advanced tab for the Service Provider.
- IDP Proxy
-
Mark the Enabled box.
- Introduction
-
Mark the Enabled box.
- Proxy Count.
-
Enter 1 or more.
- IDP Proxy List
-
Leave this blank.
-
After all the configuration steps are done, restart the web containers of all the servers on the Service Provider, Identity Provider Proxy, and the actual Identity Provider.
-
As a verification step, on the Service Provider host, log in to the OpenSSO Enterprise administration console and click the Federation tab.
You should see the profiles for both Service Provider and Identity Provider Proxy.
Perform the SAMLv2 test cases for single sign-on and single logout through a proxy.
Evaluating Benefits and Tradeoffs
The following may help you determine whether SAMLv2 Identity Provider Proxy is suitable for your environment.
Benefits
-
The Identity provider can proxy authentication requests from Service Provider to various Identity Providers to which the user has authenticated.
-
Users are granted seamless access to all the available service providers as long as proper trust relationships are established among those Service Providers, Identity Provider Proxies, and the actual Identity Provider.
-
Using the SPI implementation, administrators can customize how the preferred Identity Provider is determined.
-
End-users can turn off Identity Provider proxying per each connection request.
Tradeoffs
-
There is a potential for increased performance overhead.
Adding intermediaries such as Identity Provider Proxies increase the likelihood of negative impact on overall system performance.
-
Using SAMLv2 and non-SAML protocols in the same environment is not currently supported. This can pose a limitation if non-SAML protocols are already in place. However, support for Identity Provider Proxy using multiple protocols is planned for a future release of OpenSSO Enterprise.
- © 2010, Oracle Corporation and/or its affiliates
