Part II Determining Which Features to Deploy
The chapters in Part II of this manual are designed to help you determine which OpenSSO Enterprise features are suitable for your enterprise. Each chapter contains a brief overview of an OpenSSO Enterprise feature, a deployment architecture diagram, a process flow diagram, and high-level configuration requirements. Each chapter also describes dependencies, constraints, benefits, tradeoffs, and typical business use cases to further help you plan various solutions to meet your business needs.
Part II of this book contains the following chapters.
-
Chapter 4, Using a Policy Agent and the Client SDK to Integrate Applications with OpenSSO Enterprise
-
Chapter 5, Using the OpenSSO Enterprise Fedlet to Enable Identity Federation
-
Chapter 6, Implementing a Virtual Federation Proxy (Secure Attributes Exchange)
-
Chapter 10, Securing Web Services Using ID-WSF (Liberty Alliance Specifications)
-
Chapter 11, Securing Web Services Using the Security Token Service (WS-* Specifications)
-
Chapter 12, Enabling Single Sign-On Between Sun Identity Manager and OpenSSO Enterprise
-
Chapter 13, Enabling Single Sign-On Using CA SiteMinder and OpenSSO Enterprise
-
Chapter 14, Enabling Single Sign-On Using Oracle Access Manager and OpenSSO Enterprise
-
Chapter 15, Using the Embedded Configuration Data Store for OpenSSO Enterprise
-
Chapter 16, Implementing Cross-Domain Single Sign-On with Cookie Hijacking Prevention
-
Chapter 17, Configuring System Failover and Session Failover for High Availability
-
Chapter 19, Accessing OpenSSO from Outside a Secure Intranet
Chapter 4 Using a Policy Agent and the Client SDK to Integrate Applications with OpenSSO Enterprise
This chapter provides a quick overview of the various ways in which new and existing applications can be integrated with an existing OpenSSO Enterprise deployment for Authentication, Authorization, Auditing and Single Sign-On (AAA) services, Federation, Web Services, Web Services Security and Identity Services.
The following topics are contained in this chapter:
About the OpenSSO Enterprise Client SDK
The OpenSSO Enterprise Client SDK is the core software component that enables you to integrate OpenSSO Enterprise with other applications. The Client SDK is supplied by OpenSSO Enterprise and provides APIs you can use to access each service hosted by the OpenSSO Enterprise server. The following are common ways of using the Client SDK :
-
Embedded directly in the business logic of a standalone application.
-
Embedded directly in a container-hosted application such as a .Net or a J2EE application server.
-
Embedded in the container either directly or using a container-provided security plug-in mechanism.
-
Embedded in a proxy server installed in front of the protected application.
OpenSSO Enterprise Policy Agents are prepackaged client software that implement options 3 and 4 above.
About the Centralized Policy Agent Configuration
The Centralized Policy Agent Configuration is new in OpenSSO Enterprise 8.0. This feature provides a policy agent interface for managing multiple policy agent configurations from a single, centralized place. The policy agent configurations are stored in the OpenSSO Enterprise data store. A policy agent administrator can use either the OpenSSO Enterprise command-line interface (CLI), or the administration console to manage stored data.
Most policy agent configuration changes are conveyed to the participating policy agents without requiring the policy agents to be restarted. The policy agents respond to the changes based on the nature of the updated properties.
In the Centralized Policy Agent Configuration, policy agent configurations are separated into two sets. One set contains a few policy agent properties that are absolutely required for the policy agent start and to initialize itself properly. A file that contains these properties remains at the local host on which the policy agent is installed. This properties file acts as bootstrapping file for the policy agent.
The other set of policy agent configurations contains all remaining agent configuration properties. These configuration properties are stored either at the local policy agent host, or at a centralized data store managed by the OpenSSO Enterprisebased on the agent configuration repository type.
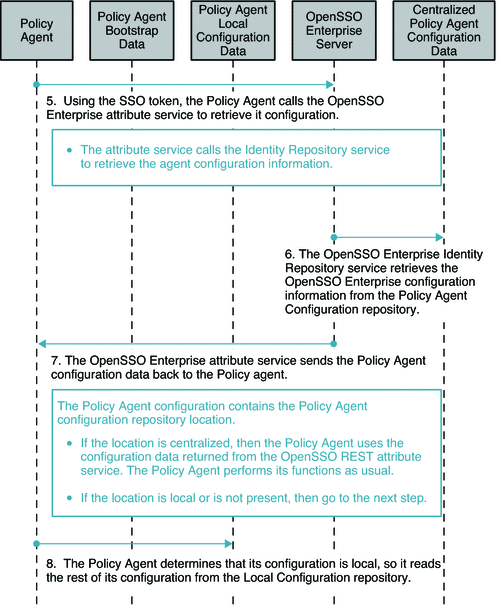
You can configure OpenSSO Enterprise to store policy agent configurations in a local repository or in a remote repository. A local policy agent configuration repository is a property file that contains all the policy agent configuration data. This option is supported for backward compatibility with legacy deployments. A remote policy agent configuration repository is the newer, more efficient option. When the policy agent configuration is stored in a remote, centralized data store managed by the OpenSSO Enterprise server, during server startup, the policy agent reads the bootstrapping file first to initialize itself. Then the policy agent makes an attribute service request to the OpenSSO Enterprise server to retrieve the policy agent configuration. The policy agent configuration returned by the OpenSSO Enterprise server contains a property that determines the location of the policy agent configuration.
If the property value is centralized, the policy agent uses the configuration just returned. If the property value is local, then the policy agent retrieves the remaining configuration properties from the local policy agent configuration repository and performs its functions accordingly.
The policy agent configuration must be totally stored in either a remote repository or a local repository. Mixed configurations are not supported.
Analyzing the Deployment
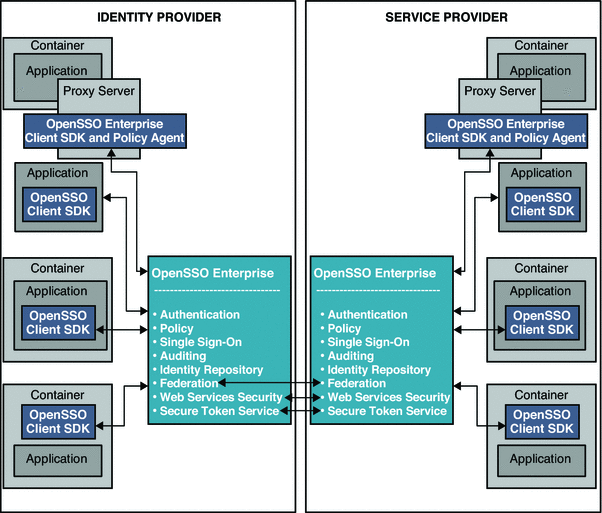
The following figure illustrates the deployment architecture for standards-based federated single sign-on using federated web services among independent, trusted partners. The OpenSSO Enterprise Client SDK pictured here includes advanced APIs to enable applications to directly invoke federation features. These APIs are available in the OpenSSO Enterprise Fedlet, a streamlined federation tool. For more information on the OpenSSO Enterprise Fedlet, see Chapter 5, Using the OpenSSO Enterprise Fedlet to Enable Identity Federation.
Figure 4–1 Deployment Architecture for the Client SDK in Federated Single Sign-On
The following figures illustrate the process flow among the OpenSSO Enterprise server, the OpenSSO Enterprise policy agent, and the Centralized Policy Agent Configuration components.
Figure 4–2 Process flow for Centralized Policy Agent Configuration
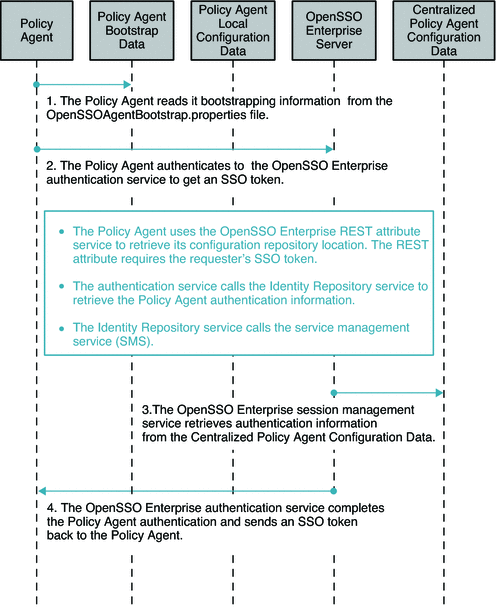
Figure 4–3 Process flow for Centralized Policy Agent Configuration (continued)
Considering Assumptions, Dependencies, and Constraints
You must use the OpenSSO Enterprise administration console or the OpenSSO Enterprise command—line tools to create, delete, and manage the policy agent configurations.
Understanding Typical Business Use Cases
The following are typical use cases for using Policy Agents and the Client SDK to integrate OpenSSO Enterprise with applications in an existing deployment:
-
Using Non-Intrusive, Policy Agent-Based Approaches to Web Resources
-
Leveraging Fat Clients, Custom Web Applications, and Enterprise JavaBeans
Using Non-Intrusive, Policy Agent-Based Approaches to Web Resources
The following are examples of capabilities that can be leveraged by using the Policy Agents to integrate OpenSSO Enterprise with other applications:
-
Pure J2EE applications
Pure J2EE applications are deployed as WARs installed on J2EE compliant application servers. The resources to be protected include servlets, JavaServer Pages and Enterprise JavaBeans.
-
Apache or Sun Web Server-based web applications
These applications can be HTML pages, multimedia content, and CGIs such as PHP, Perl, JSP, and servlets hosted on the web server.
-
.Net /IIS server-based web applications
These include .Net/ASP or ASPX applications such as Visual Basic and C#, HTML pages and content accessible via the HTTP protocol.
-
Enterprise applications
These include SAP, Siebel, Domino, PeopleSoft, and Portal middleware.
-
Proxied applications
This use case can include all web applications deployed with a reverse proxy server in front of it. No policy agents or added software are required be deployed on the application and its container. A proxy is installed separately from the application, and the policy agent installation also stays separate. Multiple applications can be proxied by the same proxy server, enabling a single agent to protect them all.
Leveraging Fat Clients, Custom Web Applications, and Enterprise JavaBeans
The following are examples of capabilities that can be leveraged by using the Client SDK to integrate OpenSSO Enterprise with other applications:
-
Java or C /C++
Applications can be enabled to directly invoke the Client SDK for authentication, authorization, and auditing services.
-
Password Replay
This use case is for legacy applications that require the user to submit credentials directly to the application before access to services is allowed.
-
Application-initiated Authentication
In this use case, the authentication authority is the application itself. Once the user is authenticated, the remaining security services such as single sign-on, policy evaluation, and identity federation are provided by OpenSSO Enterprise.
Complementing Policy Agent Functionality
In this use case, an OpenSSO Enterprise policy agent is deployed and the Client SDK is embedded in the application or its container. The following are ways in which this configuration helps to complement policy agent functionality:
-
Custom service-based access control is automatically in place.
-
Policy agents can handle only URL—based policy. The Client SDK can handle various non-URL based policies.
-
The Client SDK provides more finely-grained security control that is not possible with policy agents alone.
Enabling Identity Federation
Companies integrate applications with OpenSSO Enterprise to implement identity federation in various ways.
-
OpenSSO Enterprise passes attributes from an Identity Provider application to a Service Provider. In this use case, the Identity Provider passes user attribute value pairs to the Service Provider so the Service Provider can provide services to the user based on those attributes.
-
OpenSSO Enterprise receives Identity Provider-asserted attributes in a Service Provider application. In this use case the Service Provider verifies the authenticity of the attributes asserted by the Identity Provider. The Service Provider then updates its session with those attributes.
-
The OpenSSO Enterprise Fedlet quickly enables federation without having to install a full-featured OpenSSO Enterprise sever at the Service Provider. In this use case, the Service Provider can participate in Federation with an Identity Provider that does have the full-featured OpenSSO Enterprise server installed on it.
Enabling Web Services Security
Companies integrate applications with OpenSSO Enterprise to take advantage of the following OpenSSO Enterprise Web Services Security measures:
-
Protecting a web services provider endpoint
-
Protecting a web services client invocation
Enabling Identity Services
Applications integrated with OpenSSO Enterprise are able to consume simple OpenSSO Enterprise services in both the SOAP/WSDL style and the REST style. OpenSSO Enterprise may include one or more of the following:
-
Authentication
-
Authorization of an authenticated identity to access a resource
-
Retrieval of an authenticated identity's attributes
-
Logging
Coexisting with Non-Sun Deployments
Companies typically integrate OpenSSO Enterprise with non-Sun identity services for two purposes:
-
To maintain backward compatibility with legacy applications in an existing environment
In this use case, legacy non-Sun applications for authentication, authorization, and auditing have already been deployed and will continue to be used in the environment. OpenSSO Enterprise is used primarily to execute federation among both legacy and future applications. OpenSSO Enterprise may also be used for identity services when new applications are added to the environment.
-
To facilitate complete migration from the non-Sun identity services to OpenSSO Enterprise
In this use case, legacy non-Sun applications for authentication, authorization. and auditing have already been deployed. These applications must be maintained until OpenSSO Enterprise can be deployed and tested. Once OpenSSO Enterprise is successfully deployed, the legacy non-Sun identity services are phased out of the environment.
Setting Up and Configuring the Integrated Environment
Before you can integrate other applications with OpenSSO Enterprise, you must resolve the following issues:
Deployment Planning
The following steps form a very general and high-level guide to determine what approach is best for you.
-
Determine if an OpenSSO Enterprise Policy Agent is available for the container or application you want to use.
-
Determine if the proxy OpenSSO Enterprise Policy Agent is usable in front of the application.
-
Determine if the application or container plug-ins that externalizes security (independent of the application business logic) are available and pluggable. Consider using the Client SDK to implement these plug-ins. This is how an OpenSSO Enterprise policy agent typically starts out.
-
Determine if a signed and encrypted query, post, or XML API is applicable.
-
Determine if you need to embed the Client SDK in your application or container. The obvious example is when “no” is the answer in the all of the four previous steps. You may still need to use this approach if certain functionality is not supplied by an available policy agent. An example is when you must use fine-grained, application-specific policies.
-
Consider using Server SPIs to customize the OpenSSO Enterprise server behavior to your needs.
Required Hardware and Software
The following software components are required to integrate OpenSSO Enterprise with other applications:
-
Sun OpenSSO Enterprise 8.0
-
Sun OpenSSO Enterprise 8.0 Client SDK
-
Sun OpenSSO Enterprise Policy Agent 3.0
Some programming effort using the OpenSSO Enterprise Client SDK is required to implement the following business use cases:
Installing and configuring an OpenSSO Enterprise Policy Agent is required to implement the following business use cases:
In OpenSSO Enterprise Policy Agent 3.0 the Centralized Agent Configuration feature enables centralized Policy Agent management. In earlier versions, the Policy Agent configuration is local to the server being protected.
Downloading the Client SDK
Download the OpenSSO Enterprise Client SDK from the following URL:
https://opensso.dev.java.net/public/use/index.html
The OpenSSO Enterprise Client SDK is part of the opensso_enterprise_80.zip distribution, and is present in the samples/opensso-client.zip file within that distribution. See the README files inside the opensso-client.zip file for instructions on installing the OpenSSO Enterprise SDK. The OpenSSO Enterprise API Javadoc is available in the docs/opensso-public-javadocs.jar file.
Downloading the OpenSSO Enterprise Policy Agent 3.0
For download and installation information, go to the OpenSSO Enterprise Policy Agent 3.0 website at the following URL: .
You will also find other useful articles about Policy Agent troubleshooting.
The OpenSSO Enterprise command-line interface tool ssoadmin supports the following Policy Agent operations through it sub-commands:
-
Create a Policy Agent configuration
-
Delete a Policy Agent configuration
-
Update a Policy Agent configuration
-
List Policy Agent configurations
-
Display a Policy Agent configuration
-
Create a Policy Agent group
-
Delete a Policy Agent group
-
List agent groups
-
List Policy Agent group members
-
Add a Policy Agent to a group
-
Remove a Policy Agent from a group
The OpenSSO Enterprise administration console supports all of the above operations. The table below summarizes the compatibility between the various versions of OpenSSO Enterprise and the OpenSSO Enterprise Policy Agent.
Table 4–1 OpenSSO Enterprise Server Compatibility with OpenSSO Enterprise Policy Agents|
OpenSSO Enterprise |
Policy Agent |
|---|---|
|
OpenSSO Enterprise 8.0 (OpenSSO v1) |
Policy Agent 3.0, 2.2 |
|
Access Manager 7.0, 7.1 |
Policy Agent 3.0, 2.2 |
|
Access Manager 6.3 |
Policy Agent 2.2 |
Evaluating Benefits and Tradeoffs
The following lists may help you determine whether using the Client SDK or using a policy agent is suitable in your environment:
Benefits of Using the Client SDK
-
Using the Client SDK at the container or proxy server is a non-intrusive technique.
-
Using the proxy-based approach is the least intrusive of all options presented in this chapter. The proxy-based technique does not require interaction with the application container or machine at all. It also has the added advantage of proxying multiple applications with the same proxy server.
Tradeoffs Using the Client SDK
-
Embedding the Client SDK directly in a standalone application's business logic is an intrusive technique.
-
Embedding the Client SDK directly in a container-hosted application is an intrusive technique.
Benefits of Using a Policy Agent
The Centralized Policy Agent Configuration moves most of the Policy Agent configuration to the OpenSSO Enterprise data repository. Using the Centralized Policy Agent Configuration results in the following benefits:
-
Using Policy Agents is a less intrusive approach to application integration than embedding the OpenSSO Enterprise Client SDK in the application.
-
Using the proxy-based approach the least intrusive of all options presented in this chapter. The proxy-based approach does not require interaction with the application container or host machine at all. It also has the added advantage of proxying multiple applications with the same proxy server.
-
The Centralized Policy Agent Configuration supports all existing Policy Agent functionality including Policy Agent installation and uninstallation options. Using this feature allows separation between agent initialization data and agent configuration data.
-
An agent administrator can manage multiple Policy Agent configurations from one central location, and can use either the OpenSSO Enterprise administration console or the command-line interface to do this.
-
Any Policy Agent configuration changes are automatically conveyed to the affected agents, and the agents react to changes accordingly based on the nature of the updated properties. The administrator is not required to access the agent server to make this happen.
-
Most of the Policy Agent configuration properties are hot-swappable. This means that when any Policy Agent configuration properties are changed in the centralized agent configuration, the affected agent will use the changed property values without having to restart itself. The Policy Agent makes calls to the OpenSSO Enterprise attribute service periodically to retrieve its configuration data.
-
Centralized Policy Agent Configuration significantly reduces the time and resources spent on Policy Agent configuration management and Policy Agent patching.
Finding More Information
-
Policy Agents 3.0
-
OpenSSO Enterprise Wiki Home
-
Download OpenSSO Software
-
"Representational State Transfer" (REST)
By Roy Fielding, who introduced the concept in 2000
http://www.ics.uci.edu/~fielding/pubs/dissertation/rest_arch_style.htm
Chapter 5 Using the OpenSSO Enterprise Fedlet to Enable Identity Federation
The OpenSSO Enterprise Fedlet is a streamlined Service Provider implementation of SAMLv2 single sign-on (SSO) protocols. The OpenSSO Enterprise Fedlet is designed to be used by Service Providers when a full-featured federation solution is not required, and when the primary goals are to achieve single sign-on with an Identity Provider while also retrieving some user attributes from the Identity Provider.
The following topics are contained in this chapter:
About the OpenSSO Enterprise Fedlet
The OpenSSO Enterprise Fedlet is compliant with SAMLv2 standards so you can embed the Fedlet in a J2EE web application. You can embed the Fedlet SDK into a Service Provider application, and enable the application to accept SAML POSTs from an Identity Provider. The application can then use the Fedlet SDK to pull user attributes into the Service Provider application. The user attributes become part of the SAML Response from the Identity Provider. After the user has successfully authenticated to the Identity Provider, the Identity Provider sends the SAML Response to the Fedlet .
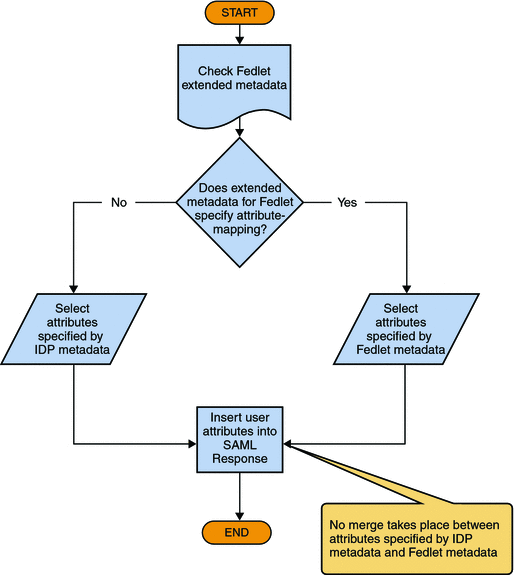
The following figures illustrates how OpenSSO Enterprise, as the Identity Provider, determines which user attributes to include in the SAMLv2 Response to the Service Provider.
Figure 5–1 OpenSSO Enterprise Determines Which User Attributes to Include in the SAML Response
Using The Fedlet with Multiple Identity Providers
You can install multiple Fedlet instances at the Service Provider so that each Fedlet instance talks to a different Identity Provider. Or you can deploy a single OpenSSO Enterprise instance at the Service Provider.
If you want to install multiple Fedlet instances so that each Fedlet instance talks to a different Identity Provider, use caution with this approach. Consider the following example. A ringtone provider acts as a Service Provider and conducts business with multiple telecommunications companies. Each telecommunications company acts as its own Identity Provider. The Service Provider might have to deploy multiple instances of its Ringtone Application, each with its own Fedlet instance. Each Fedlet instance would communicate with a different telecommunications company Identity Provider. The result is that each Identity Provider would be using a different instance of the Ringtone Application.
Consider another example. The Fedlet is deployed on Sun Application Server, and the Fedlet home-directory is configured in the Application Server domain configuration file, domain.xml. So for each new Fedlet instance, a new Application Server domain must be set up, and an instance of the Ringtone Application must be deployed on this new Application Server domain. Now the Service Provider has to maintain two Application Server domains for the same Ringtone Application. This presents two possibilities. One possibility is that the same Ringtone Application is run on different ports for different Identity Providers. The second possibility is that the same Ringtone Application is run on the same port on different machines. This could also translate into different Ringtone Application URLs that each Identity Provider will use with the Service Provider. Or the Service Provider would have to implement some logic to route to the correct Ringtone Application based on the particular Identity Provider requesting it.
Using an Identity Provider Discovery Service with Multiple Identity Providers
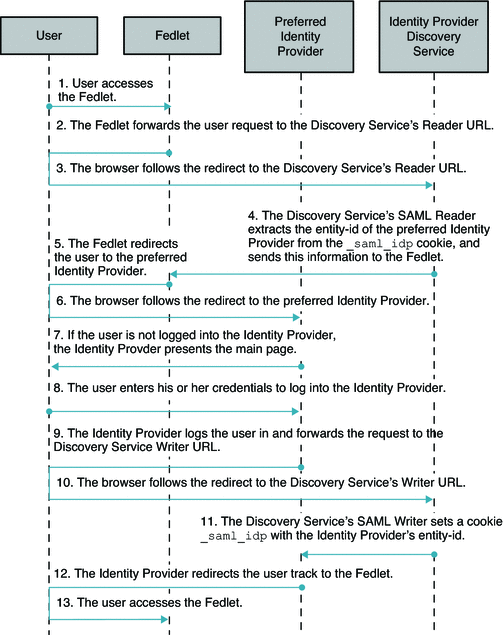
The Fedlet supports multiple Identity Providers. Additionally, the Fedlet supports the use of a separate Identity Provider Discovery Service to allow the user to select a preferred Identity Provider to authenticate against. When configured this way, the Identity Provider Discovery Service will remember the user's preferred Identity Provider, and communicate this to the Fedlet. The Fedlet will then be able to determine which Identity Provider to have the user authenticate to. You can deploy an OpenSSO Enterprise instance as an Identity Provider Discovery Service. However, the Fedlet can work with any Identity Provider Discovery Service. The figure below illustrates the process flow in a Fedlet deployment when the Identity Provider Discovery Service is used to set the user's preferred Identity Provider.
Figure 5–2 Identity Provider Discover Services is Set to User's Preferred Identity Provider
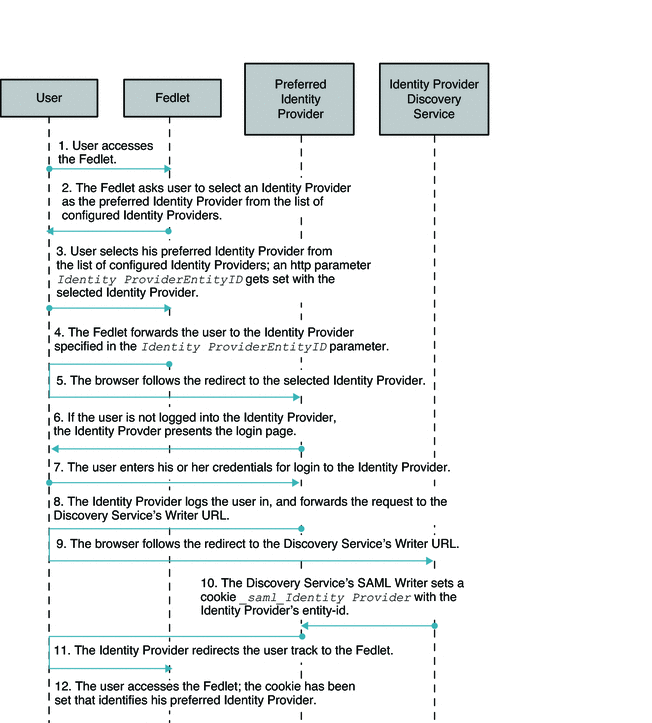
The following figure illustrates the process flow in a Fedlet deployment when the Identity Provider Discovery Service is used to retrieve the user's preferred Identity Provider.
Figure 5–3 Identity Provider Discovery Service Retrieves the User's Preferred Identity Provider
Analyzing the Deployment Architecture
The main components of the circle of trust described in this chapter are the telecommunications company which acts as and Identity Provider, and a ringtone Service Provider. The following two use cases are supported by the Fedlet:
The following table provides a simple comparison of the two use cases.
Table 5–1 Comparison of Fedlet Use Cases|
Identity Provider-Initiated Single Sign-On |
Service Provider-Initiated Single Sign-On |
|---|---|
|
1. Mobile phone user authenticates with Telecommunications Company. |
1. Mobile phone user attempts to access the ringtone Service Provider portal. |
|
2. Upon authentication, mobile phone user accesses the ringtone Service Provider portal. |
2. Ringtone Service Provider detects whether or not the mobile phone user has been authenticated by the Telecommunications Company. If not, then the ringtone Service Provider redirects the mobile phone user to the Telecommunications Identity Provider. |
|
3. Telecommunications Company challenges mobile phone user's credentials. Mobile user presents credentials. |
|
|
4. Upon authentication, mobile phone user accesses the ringtone Service Provider portal. |
Identity Provider-Initiated Single Sign-On
The following illustrates the flow of communication in a federation scenario between a telecommunications company acting as the Identity Provider, and a ringtone provider company acting as the Service Provider.
Figure 5–4 Process Flow for the Fedlet in Identity Provider-initiated Single Sign-On
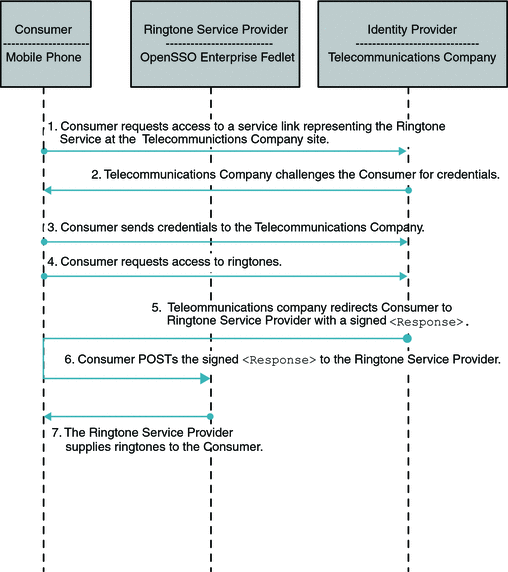
In an Identity Provider-initiated single sign-on scenario, the Identity Provider is configured with specialized links to specific Service Providers. These links actually refer to the local Identity Provider single sign-on service and pass parameters to the service identifying the remote Service Provider. So instead of directly visiting the Service Provider, the user goes to the Identity Provider site and clicks on one of the links to gain access to the remote Service Provider. This triggers the creation of a SAML assertion that is subsequently transported to the Service Provider.
Fedlet Service Provider-Initiated Single Sign-On
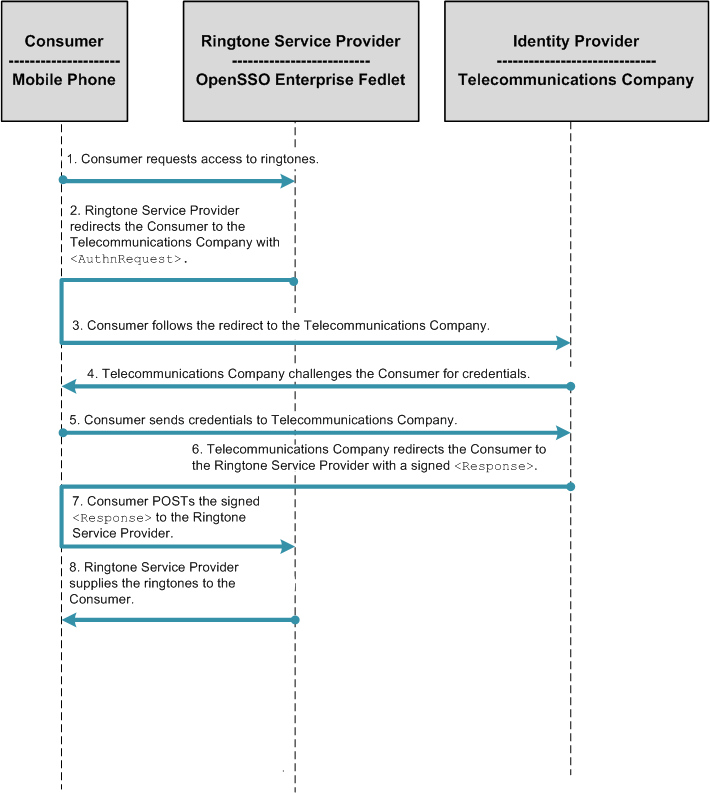
In a Service Provider-initiated single sign-on scenario, the user attempts to access a resource on the Service Provider. However the user does not have a current logon session on this site, and the user's federated identity is managed by the Identity Provider. The user is sent to the Identity Provider to log on. The Identity Provider creates a SAML assertion for the user's federated identity and sends it back to the Service Provider. The following figure illustrates the process flow.
Figure 5–5 Process Flow for Fedlet Service Provider-initiated Single Sign-On
Considering Deployment Assumptions, Dependencies, and Constraints
As you plan your deployment, consider the following assumptions, dependencies, and constraints to determine if your environment is appropriate for using the Fedlet.
Assumptions and Dependencies
-
The configuration file and the metadata for the Fedlet is stored in a flat-file repository at the Service Provider.
-
This solution uses the HTTP POST bindings for transport between the Identity Provider and the Service Provider.
-
The Fedlet supports the verification of the XML signature carried in the SAML Assertion from Identity Provider. XML signature verification is done using the Identity Provider public certificate included in the Identity Provider metadata XML file. If the Identity Provider signing certificate is changed, the Identity Provider metadata in the Fedlet configuration directory must be updated to include the new signing certificate information. Otherwise XML signature verification will fail on the Fedlet side. At this time, the Fedlet does not support XML encryption, XML decryption, or XML signing such as signing the AuthnRequest on the Fedlet side.
Constraints
-
The Fedlet supports Identity Provider-initiated single sign-on using only HTTP POST bindings.
-
The Fedlet supports Fedlet Service Provider-initiated single sign-on using only HTTP POST bindings.
-
In this deployment, no keystore exists to store certificates used for encrypting and signing SAMLv2 message elements. The Fedlet does not support the encryption and signing of SAMLv2 message elements. This capability may be implemented in a future release of OpenSSO Enterprise. This constraint has implications about ensuring the confidentiality and integrity of messages. Until the Fedlet can support the encryption and signing of SAMLv2 message elements, you are encouraged to use SSL/TLS at the message transport layer to secure exchanges between browser and server. The ensures that exchanges are secured at least while the SAML messages are in-transit. The Fedlet does support the verification of XML signature in the SAMLv2 Response from Identity Provider.
Understanding Typical Business Use Cases
The following use cases illustrate why companies might choose to use the Fedlet in their environment.
Saving Time and Reducing Overhead
In this use case, the Service Provider needs to single sign-on with an Identity Provider that has OpenSSO Enterprise installed in the Identity Provider environment. But the Service Provider does not want to install the full-featured OpenSSO Enterprise just to enable federation. The Service Provider cites one or more of the following reasons for not installing OpenSSO Enterprise:
-
The Service Provider is small company that provides one application as only part of their service.
-
The Service Provider wants identity federation at minimum cost.
-
Installing OpenSSO Enterprise would require investments in hardware, services, and human resources that the Service Provider does not want to make.
-
Installing OpenSSO Enterprise would require the Service Provider system administrators to be proficient in implementing identity federation protocols in order to configure and maintain the OpenSSO Enterprise federation deployment.
-
The Service Provider wants to quickly enable federation in their environment in a very short timeframe.
-
The Service Provider wants only to implement single sign-on with the Identity Provider and retrieve some user attributes for customizing the service to the user. The Service Provider does not want to install a full-featured federation solution and just to use two features.
Customizing Content Based on User Attributes
In this use case, a telecommunications company acts as an Identity Provider. The telecommunications company subscribers use the custom telecommunications company user portal to receive personalized content. The content is received by the telecommunications company from its business partners such as StockService.com, Weather.com, and so forth. OnCast, a new partner of the telecommunications company, uses Fedlets for its portal user single sign-on. Through the Fedlets, OnCast retrieves specific user attributes over SAML from the telecommunications company. OnCast then uses the user attribute data to customize its content deliver.
Figure 5–6 Fedlet Service Provider Customizes Content Based on User Attributes
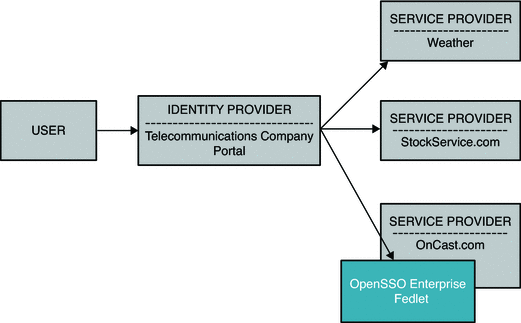
See the demonstration of this business use case at http://blogs.sun.com/sid/resource/fedlet.html .
Setting Up and Configuring the Fedlet
This section describes the high-level tasks to setup the Fedlet at the Service Provider. For more detailed instructions, see the README file contained in the Fedlet.zip and Fedlet-unconfigured.zip files.
Technical Requirements
-
Any J2EE-complaint server on which to deploy the Fedlet
-
JDK 1.5 or higher
Obtaining and Deploying the OpenSSO Fedlet Bundle
You can choose one of two methods for obtaining and deploying the Fedlet Bundle.
If OpenSSO is deployed as an Identity Provider, then use the OpenSSO Enterprise console to create the Fedlet bundle. In this scenario, using the console is the faster and easier method because the Identity Provider follows the same workflow to integrate with any Service Provider.
If multiple Identity Providers exist in the Service Provider circle of trust, and not all Identity Providers use OpenSSO Enterprise, then use the Fedlet Demo. The Fedlet Demo contains a sample JSP is packaged in the fedlet.war. The fedlet.war file emulates the Service Provider web application. Using the fedlet.war file makes it easy to demonstrate a simple JSP receiving the SAMLv2 POST from the Identity Provider.
To Use the OpenSSO Enterprise Console to Create the Fedlet bundle
In the OpenSSO Enterprise console, navigate through a taskflow and provide the following:
-
Name of the Service Provider
-
Destination URL of the Service Provider that will include the Fedlet
-
The circle of trust in which to place the Service Provider
At the end of the taskflow, a Fedlet.zip bundle is automatically created. The bundle consists of the fedlet.war file and a README file that contains instructions for deploying the Fedlet. Follow the instructions to deploy the Fedlet.
To Use the Pre-Built Fedlet
As the Service Provider, download the opensso_enterprise_80.zip file. Then follow the instructions in the README file contained in the Fedlet-unconfigured.zip file to deploy and configure the Fedlet. The Fedlet-unconfigured.zip file is bundled into the opensso_enterprise_80.zip.
 To Set Up the Workflow-based Fedlet
-
Install and Configure OpenSSO Enterprise on the Identity Provider.
-
On the Identity Provider, navigate through the Workflow on the OpenSSO Enterprise console to create the Fedlet.zip file.
The Fedlet.zip file contains:
-
README.txt: A text file that contains instructions for deploying the fedlet.war and for integrating the Fedlet into an existing application.
-
fedlet.war: The Fedlet ready-to-deploy WAR file.
-
-
Send the Fedlet.zip file to the Service Provider.
-
Deploy and configure the fedlet.war file, on the Service Provider.
-
Verify that the Fedlet was successfully installed.
-
Access the index.jsp file on the Fedlet deployment.
-
Click the link to create the Fedlet configuration automatically.
-
Follow the two links in the page to test the following use-cases :
-
(Fedlet) Service Provider-initiated single sign-on
-
Identity Provider-initiated single sign-on through the hyperlinks present on the page.
-
 To Use the Pre-Built Fedlet
-
Download the Fedlet-unconfigured.zip.
Fedlet-unconfigured.zip is contained in the opensso_enterprise_80.zip distribution. The Fedlet-unconfigured.zip file contains:
-
fedlet.war
The Fedlet ready-to-deploy WAR file
-
conf
A directory containing the Fedlet metadata template, circle of trust template, and various configuration files
-
README.txt
A text file that provides instructions for using the \conf files to configure the Fedlet
-
-
Extract the Fedlet-unconfigured.zip file.
Follow the instructions in the README file to set local configuration files for the Fedlet.
-
Send tag-swapped Service Provider metadata files to the Identity Provider, and request the Identity Provider metadata files from the Identity Provider.
-
Verify that the Fedlet is successfully installed.
Access the index.jsp file on the Fedlet deployment, and test the following use-cases : Fedlet (SP)-initiated SSO IDP-initiated SSO through the hyperlinks present on the page.
-
(Fedlet) Service Provider-initiated single sign-on
-
Identity Provider-initiated single sign-on through the hyperlinks present on the page
-
 To Use the Fedlet with Multiple Identity Providers
-
The Service Provider installs and configures the Fedlet and sets up the Fedlet with one Identity Provider.
Install and configure the Fedlet using instructions in either To Set Up the Workflow-based Fedlet or To Use the Pre-Built Fedlet.
-
To use a second Identity Provider with the Fedlet, the Service Provider requests the Identity Provider metadata files from the second Identity Provider.
-
Update the Fedlet configuration directory with the Identity Provider metadata files, and update the Fedlet's configuration with the Identity Provider entity ID.
-
The second Identity Provider registers the Fedlet in its configuration.
-
To add more Identity Providers to the Fedlet, repeat steps 2 through 4.
-
Access the index.jsp file on the Fedlet deployment where you are presented a list of registered multiple Identity Providers. Choose an Identity Provider.
-
For the selected Identity Provider, you are presented the option to test the following use cases through the hyperlinks on the page:
-
Fedlet Service Provider-initiated single sign-on
-
Identity Provider-initiated single sign-on
-
-
The README file included in the Fedlet.zipand the Fedlet-unconfigured.zip contains instructions for setting up the Fedlet with multiple Identity Providers.
 To Use the Fedlet with an Identity Discovery
Service
-
The Service Provider configures the Fedlet with multiple Identity Providers.
See “Using the Fedlet with Multiple Identity Providers.”
-
Deploy and configure an Identity Provider Discovery Service.
-
Set the SAML2 Reader and Writer Service URLs on each of the configured Identity Providers.
-
Set the SAML2 Reader and Writer Service URLs in the Fedlet configuration.
-
Access the index.jsp file on the Fedlet deployment where you will be presented with a list of the registered multiple Identity Providers. Choose your preferred Identity Provider.
-
You will be directed to your selected Identity Provider for login.
A cookie _saml_idp that identifies your preferred Identity Provider will be written by your browser.
-
From this point on, you can elect to use the Identity Provider Discovery service after you access the index.jsp on the Fedlet deployment.
-
The Identity provider Discovery Service will remember your preferred Identity Provider and will automatically redirect you to that Identity Provider for login.
-
The README file included in the Fedlet.zip and the Fedlet-unconfigured.zip contains instructions on how to set up the Fedlet with an Identity Provider Discovery Service.
Embedding the Fedlet into Service Provider Applications
The README file contained in the Fedlet.zip and the Fedlet-unconfigured.zip files provides instructions for integrating the Fedlet demo into the Service Provider application. You need to embed all the properties/jars/JSPs/images and so forth in the demo fedlet.war into your existing application WAR. Merge the fedlet.war with your existing application WAR. The Fedlet provides a default Assertion Consumer endpoint named fedletSampleApp.jsp to process the SAMLv2 Assertion from the Identity Provider.
Use one of the following approaches to embed the Fedlet into the Service Provider applications:
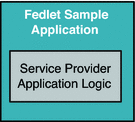
-
Use fedletSampleApp.jsp as the endpoint on Fedlet side, and modify fedletSampleApp.jsp to add the Service Provider application logic.
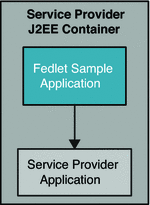
-
Use fedletSampleApp.jsp as the endpoint on Fedlet side, and modify fedletSampleApp.jsp to forward the request to the Service Provider application URL.
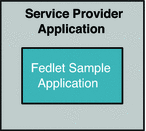
-
Create a new endpoint, for example servlet.jsp URL, on the Fedlet side to replace the fedletSampleApp.jsp or to embed the Fedlet into the Service Provider application. You can copy some of the code in the fedletSampleApp.jsp to the new endpoint code. Details of the actual code you can transfer are described in the README file.
Evaluating Benefits and Tradeoffs
As you design your deployment architecture, be sure to consider the benefits, tradeoffs. The following lists may help you determine if the Fedlet is appropriate to meet your business needs.
Benefits
-
The Fedlet does not require additional hardware, thus reducing the cost to the Service Provider and increasing the return on investment on existing hardware.
-
The Fedlet is easy to deploy and to embed into the Service Provider application. Configuration on the Fedlet, if needed at all, requires modifying only three to four parameters. This enables you to go live with the application much more quickly than deploying a full-featured federation solution.
-
The Fedlet enables the Service Provider to quickly enable federation into their applications, resulting in shorter time-to-market for their applications with the Identity Provider.
-
The Fedlet does not require the Service Provider to install any full-featured federation software. This reduces the amount of training required, thus reducing training costs for the Service Provider.
-
The Fedlet is ideal for a Service Provider that wants only to achieve single sign-on with an Identity Provider, and to be able to retrieve user attributes from the Identity Provider.
-
The Fedlet is compliant with SAMLv2 standards.
-
A single instance of the Fedlet can be set up to work with more than one Identity Provider.
-
The Fedlet can be configured to use an Identity Provider Discovery Service to set and find the user's preferred Identity Provider.
Tradeoffs
-
The Fedlet will not perform session management on the Service Provider. The application or container must perform session management.
-
The Fedlet supports single sign-on using the SAMLv2 protocol only. Other federation protocols such as Liberty ID-FF, WS-Federation, and SAML 1.x, are not supported.
-
The Fedlet solution enables only single sign-on with an IDP and retrieval of user attributes. Advanced features, typically available in a full-featured federation product such as OpenSSO Enterprise, are not available in the Fedlet:
-
IDP Proxying
-
Single Logout
-
Auto Federation
-
Account Linking Auto-creation of users on the SP
-
Declarative policy integration with roles asserted from the IDP
-
Finding More Information
-
OpenSSO Homepage
-
SAML v2.0 Technical Overview
http://www.oasis-open.org/committees/download.php/27819/sstc-saml-tech-overview-2.0-cd-02.pdf
-
Identity Provider Discovery Service Protocol and Profile
http://docs.oasis-open.org/security/saml/Post2.0/sstc-saml-idp-discovery.pdf
Chapter 6 Implementing a Virtual Federation Proxy (Secure Attributes Exchange)
Secure Attributes Exchange, also known as Virtual Federation Proxy, is a new feature in Sun OpenSSO Enterprise 8.0. Secure Attributes Exchange provides the means for an application to securely transfer identity information to another application located in a different domain. Secure Attributes Exchange enables legacy applications to leverage standards-based federation to communicate with other existing applications and services without having to set up and configure federation protocols and processes for each application.
This chapter provides information to help you determine whether Secure Attributes Exchange is appropriate for your environment. The following topics are contained in this chapter:
About Virtual Federation Proxy (Secure Attributes Exchange)
Multiple authentication systems often exist in typical legacy environments. Although these authentication systems would work more efficiently if they were federated, implementing single sign-on often requires deploying one federation software instance for each of the authentication systems in the environment (see the following figure). The complexities of such deployments usually impose additional constraints in selecting federation solutions, and impede any progress toward enabling federation among the many authentication systems.
Figure 6–1 Multiple Authentication Systems in a Legacy Environment
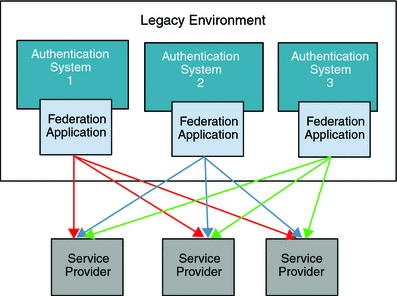
SAMLv2 and other federation protocols may provide quick, standards-based federation enablement. But legacy identity systems on the enterprise end and existing Identity Provider applications cannot pass user authentication, user profile, and other transaction related data to the local Identity Provider instance. Similarly, the existing framework also limits the ways in which Service Provider applications consume user authentication, profile, and transaction information.
The Secure Attributes Exchange feature introduced in OpenSSO Enterprise 8.0 is designed to meet these business needs. OpenSSO Enterprise enables an OpenSSO Enterprise instance in either the Identity Provider role or in the Service Provider role to act like a pure SAMLv2 protocol gateway. Simple, default security mechanisms are implemented to allow a loose coupling between the existing applications and OpenSSO Enterprise instances. The following figure illustrates how a streamlined solution enables federation among multiple legacy authorization systems with a centralized configuration.
Figure 6–2 Multiple Authentication Systems Using Secure Attributes Exchange
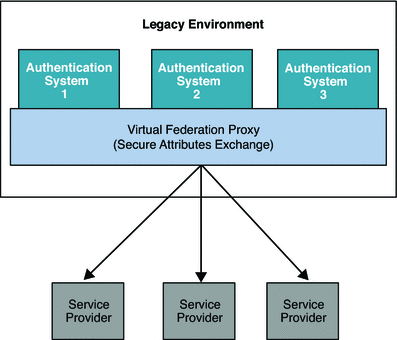
A Secure Attributes Exchange interaction enables the following:
-
Identity Provider applications push user authentication, user profile, and transaction information to a local instance of OpenSSO Enterprise. The local instance of OpenSSO Enterprise, using federation protocols, passes the data to a remote instance of OpenSSO Enterprise at the Service Provider.
-
Service Provider applications consume the received information in a secure manner.
In this first offering of Secure Attributes Exchange, only OASIS SAMLv2 protocol is supported. However, the solution can be extended in the future to be completely protocol-neutral so that other single sign-on protocols such as Liberty ID-FF and WS-Federation can also be supported.
Analyzing the Deployment
Secure Attributes Exchange uses the SAMLv2 protocol to transfer identity data between the communicating entities. The Secure Attributes Exchange client APIs, including both Java and .NET interfaces, run independently of the OpenSSO Enterprise instance. The Secure Attributes Exchange client APIs enable existing applications to handle the SAMLv2 interactions.
The following figure illustrates the deployment architecture for Secure Attributes Exchange.
Figure 6–3 Deployment Architecture for Secure Attributes Exchange
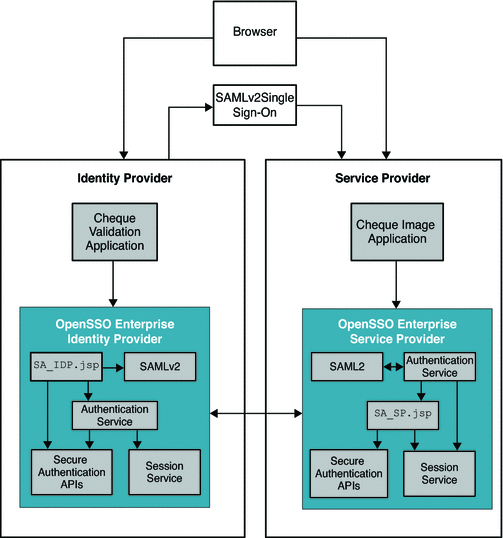
In this Secure Attributes Exchange example:
-
Secure Attributes Exchange acts as a pure SAMLv2 protocol gateway, relying entirely on the existing applications for user authentication and retrieval of the user profile attributes.
-
From the perspective of Identity Provider applications and Service Provider applications, Secure Attributes Exchange implements a push-model solution to securely transfer authentication and attributes data.
-
Secure Attributes Exchange uses simple HTTP GET/POST and data signing and encryption to securely transfer authentication and attributes data from and to legacy applications.
-
Secure Attributes Exchange supports both symmetric-key and asymmetric-key based cryptography to secure authentication and attributes data
-
Secure Attributes Exchange supports application-initiated single sign-on and single logout.
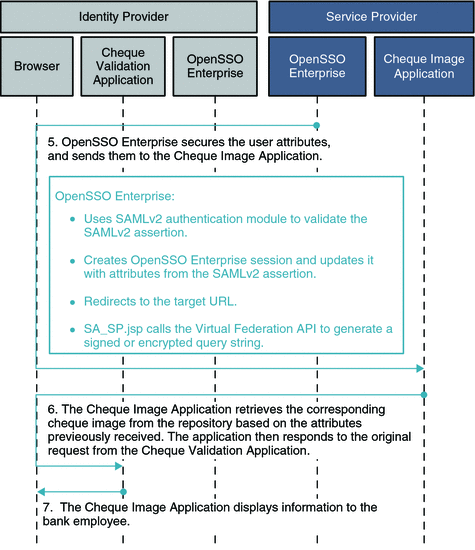
The figures Figure 6–4 and Figure 6–5 illustrate the process flow in a typical Secure Attributes Exchange interaction. In this example, bank employees each have a user account in a bank's employee identity system. Employees routinely access an internal application that validates bank customers' personal checks. The bank employees are required to authenticate themselves before accessing the Cheque Validation application. Validating checks involves retrieving the check images which are stored and processed by the Cheque Image application. The Cheque Image application which is hosted by a business partner at a remote site. User identity and attribute data must be supplied by the local Cheque Validation application and passed to the remote Cheque Image application in a secure manner.
Figure 6–4 Process Flow for Secure Attributes Exchange (Continued on next page)
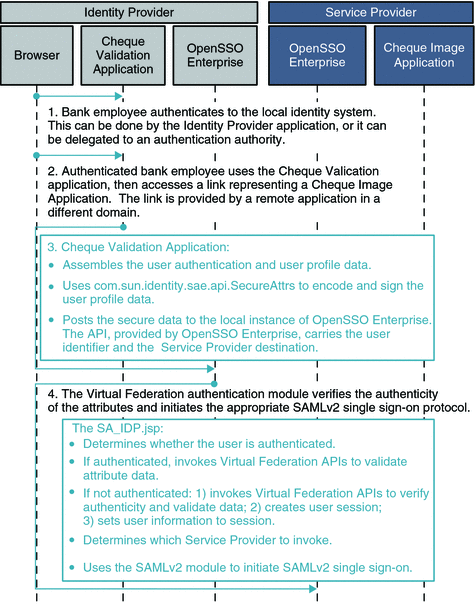
Figure 6–5 Process Flow for Secure Attributes Exchange (Continued)
Considering Assumptions, Dependencies, and Constraints
Before you can implement Secure Attributes Exchange, you must consider the following assumptions and constraints.
Assumptions
-
The implementation will automatically use the authn=Force functionality to allow Identity Provider applications to repeatedly invoke the secure attribute transfer feature.
-
The mappings between the Service Provider application URL prefix to the Service Provider id have been explicitly defined in the product configuration.
-
Local Service Provider single logout functionality relies on OpenSSO Enterprise be able to redirect to an external URL during SAMLv2 single logout processing, and then resume the original SAMLv2 single logout when redirected back.
-
Cryptography APIs are assumed to be available on all targeted platforms and programming languages.
Constraints
-
The scope of the current OpenSSO Enterprise implementation is limited to SAMLv2–based single sign-on only. However, it is possible for you to extend this to other single sign-on protocols such as the Liberty Identity Federation Framework (ID-FF) and Web Service Federation (WS-F) specifications.
-
The existing implementation supports only simple HTTP GET and POST based mechanisms. However, you should be able to use the same APIs to do XML-based attribute transfer as well.
-
Integration with specific proprietary application server technologies such as WebSphere LTPA and WebLogic for single sign-on as well as single logout are not addressed in this document.
-
Limited single logout functionality is implemented. Logout from multiple Identity Provider applications and multiple Service Provider applications is not directly addressed in this document. The Identity Provider and Service Provider must implement logout appropriately to meet their own needs.
Secure Attributes Exchange Client APIs
The Secure Attributes Exchange feature provides a set of client APIs in both Java and .NET interfaces. the client APIs are used to enable following:
-
Identity Provider applications push user authentication, user profile, and transaction related information to the local OpenSSO Enterprise instance. The information is then passed over to the Service Provider side using the federation protocols,
-
Service Provider applications consume the same user profile and transaction information.
The details of Secure Attributes Exchange client APIs are described in detail in the Sun OpenSSO Enterprise 8.0 Java API Reference .
Understanding Typical Business Use Cases
Secure Attributes Exchange is used by three types of users:
-
Developers
As application owners, developers use the Secure Attributes Exchange client APIs to connect to a local OpenSSO Enterprise instance.
-
Administrators
Administrators are responsible for configuring Secure Attributes Exchange, setting up and maintaining provision keys, configuring authorization of each application, and so forth.
-
End users
End users access the deployed applications.
The figures Figure 6–4 and Figure 6–5 illustrate a typical process flow for Secure Attributes Exchange.
The process flow can be described as the sum of four separate uses cases:
It is not absolutely required for service providers to implement the Secure Attributes Exchange functionality. This is certainly a valid business use case as long as the receiving end is a SAMLv2 compliant Service Provider that is capable of using the information originating from the Identity Provider application and sent by the Identity Provider.
Authentication at Identity Provider
When a user is already authenticated in an enterprise, the legacy identity provider application sends a secure HTTP GET/POST message to OpenSSO Enterprise asserting the identity of the user. OpenSSO Enterprise then verifies the authenticity of the message and establishes a session for the authenticated user. Secure Attributes Exchange can be used to transfer the user's authentication information to the local instance of OpenSSO Enterprise in order to create a new session.
Secure Attribute Exchange at the Identity Provider
When a user is already authenticated by, and attempts access to, a legacy identity provider application, the legacy application sends a secure HTTP POST message to the local instance ofOpenSSO Enterprise. The HTTP POST message asserts the user's identity and contains a set of attribute-value pairs related to the user. For example, the attribute-value pairs may contain data from the persistent store, and the data may represent certain transactional states in the application. OpenSSO Enterprise verifies the authenticity of the message, establishes a session for the authenticated user, and then populates the session with the user attributes.
Secure Attribute Exchange at the Service Provider
When a user is already authenticated by the instance of OpenSSO Enterprise at the Identity Provider, and OpenSSO Enterprise invokes an Identity Provider application that calls for redirection to a Service Provider, the Identity Provider invokes secure attribute exchange at either the Service Provider or Identity Provider as described above. OpenSSO Enterprise encodes a SAMLv2 single sign-on URL as a part of the request. The Identity Provider instance of OpenSSO Enterprise then initiates SAMLv2 single sign-on with the instance of OpenSSO Enterprise at the Service Provider. The Service Provider instance of OpenSSO Enterprise then verifies the SAMLv2 assertion and the included attributes, and redirects to the Service Provider application. The user attributes are securely transferred using a secure HTTP POST message. The Service Provider application consumes the attributes, establishes a session, and then offers the service to the user.
Global Single Logout
Global single logout can be implemented in various ways. In this example, a user is already authenticated and has established single sign-on with the Service Provider instance of OpenSSO Enterprise. The user clicks on a Global Logout link. The Identity Provider will then invalidate its local session, if it's already created, and trigger SAMLv2 single logout by invoking a provided OpenSSO Enterprise URL. The OpenSSO Enterprise Identity Provider executes the SAMLv2 single logout, terminating the session on both Identity Provider and Service Provider instances of OpenSSO Enterprise.
Setting Up and Configuring Secure Attributes Exchange
Before configuring and using the Secure Attributes Exchange, administrators must make some decisions regarding security-related settings such as cryptography type, applicable keys, and application identifiers. Administrators must be familiar with basic SAMLv2 concepts and the SAMLv2 samples bundled with OpenSSO Enterprise.
This section provides a high-level summary you need to resolve before configuring Secure Attributes Exchange.
About Cryptography Type
Secure Attributes Exchange provides symmetric and asymmetric cryptography types to secure identity attributes between an instance of OpenSSO Enterprise and an application.
-
Symmetric cryptography
Involves the use of a shared secret key known only to the participants in the communication. The key is agreed upon beforehand and is used to encrypt and decrypt the message.
-
Asymmetric cryptography
Uses two separate keys for encryption and the corresponding decryption - one public key and one private key. The information is encrypted with a public key known to all, and then decrypted by the recipient only, using a private key to which no one else has access.
This process is known as a public key infrastructure (PKI). On the Identity Provider side, the public key must be added to the OpenSSO Enterprise keystore. The private key must be stored in a protected keystore such as a Hardware Security Module (HSM) for access by the Identity Provider application. On the Service Provider side, the private key must be added to the OpenSSO Enterprise keystore, and the public key stored in a keystore that is local to the Service Provider application.
Overview of Setup Steps
-
Establish trust among the application or multiple applications and the instance of OpenSSO Enterprise on the Identity Provider. This includes the configuring the cryptography type, applicable keys, and application identifiers.
-
Establish trust among the application or multiple applications and the instance of OpenSSO Enterprise on the Service Provider side. This includes configuring the cryptography type, applicable keys, and application identifiers.
-
(Optional) The following steps are specific to using SAMLv2 with auto-federation.
-
Determine which identity attributes you want transferred as part of the SAMLv2 single sign-on interaction.
-
Determine which attribute you will use to identify the user on the Service Provider side.
-
-
Determine which URL on the Service Provider will be responsible for handling logout requests from the Identity Provider.
Configuring Secure Attributes Exchange
Secure Attributes Exchange configuration involves modifying two different OpenSSO Enterprise installations: one OpenSSO Enterprise instance on the Identity Provider side, and one OpenSSO Enterprise instance on the Service Provider side. Before proceeding with the instructions in this chapter, you must download and deploy the OpenSSO Enterprise WAR file to a supported web container.
A SAMLv2 provider with Secure Attributes Exchange can be configured by using one of the following alternatives:
-
In the administration console, use the OpenSSO Enterprise Common Tasks interface to configure SAML configuration and to configure Secure Attribute Exchange.
-
Import the metadata using the command-line interface.
About the Software Binaries
The software binaries for Secure Attributes Exchange in OpenSSO Enterprise are included in the following components. Locations are relative within the opensso_enterprise_80.zip file.
-
Deployable opensso.war
The OpenSSO Enterprise server
-
libraries/jars/openssoclientsdk.jar
For client applications using Java APIs
-
libraries/dll/famsae.dll
For client applications using .NET APIs
High-level Configuration Steps
For detailed instructions for configuring Secure Attributes Exchange, see the Administration Guide. For deployment planning purposes, the following provides a high-level overview of steps to configure Secure Attributes Exchange:
-
Configure the instance of OpenSSO Enterprise on the Identity Provider side for the hosted Identity Provider.
-
Set up trust between the Identity Provider application and the OpenSSO Enterprise Identity Provider instance.
Determine and configure the cryptography type, applicable keys, and application identifiers.
-
Determine the Identity Provider application name.
-
Determine the Identity Provider Secure Attributes Exchange handler URL.
-
Set up attribute mapping.
-
-
Configure the instance of OpenSSO Enterprise on the Identity Provider side for the remote Service Provider.
-
Set up the attribute mapping.
-
Determine the Service Provider Virtual Federation handler URL.
-
-
Configure the instance of OpenSSO Enterprise on the Service Provider side for the hosted Service Provider.
-
Set up trust between Service Provider application and OpenSSO Enterprise Service Provider instance.
Determine and configure the cryptography type, applicable keys, and application identifiers.
-
Turn on auto-federation and specify the attribute that will identify the user's identity
-
Determine the Service Provider Application URL.
-
Set up attribute mapping.
-
Determine the Service Provider logout URL.
-
Evaluating Benefits and Tradeoffs
Most enterprises today have to deal with various legacy applications and identity systems. It is challenging to make any major infrastructure change simply to accommodate identity federation.
Benefits
-
Secure Attributes Exchange allows businesses to quickly implement standards-based federation without having to invest in expensive tooling to bridge incompatibilities.
-
The Secure Attributes Exchange feature provides a very simple mechanism that enables an application to communicate identity information with a partner application in two different domains. Communication can take place within a circle of trust using the SAMLv2 protocol. This functionality can be extended to support other federation specifications as well.
-
The Secure Attributes Exchange is a major step forward in the direction of identity federation enabling the legacy systems. Secure Attributes Exchange provides integration points, adapters and deployment guidance that can help facilitate the adoption of federation solutions.
Tradeoffs
Although the Secure Attributes Exchange feature in OpenSSO Enterprise makes it easier to implement identity federation among legacy applications, a SAMLv2–compliant Service Provider must already be in place. The Service Provider can be OpenSSO Enterprise or any other vendor solution. But even a small Service Provider requires an identity federation-aware software infrastructure in order to make use of Secure Attributes Exchange.
An alternative to Secure Attributes Exchange is to enable identity federation using the OpenSSO Enterprise Fedlet. The Fedlet is a streamlined Service Provider implementation used to quickly and simply enable identity federation. The Fedlet does not require the installation of any other identity federation software components such as the OpenSSO Enterprise server. For more information about the Fedlet, see Chapter 5, Using the OpenSSO Enterprise Fedlet to Enable Identity Federation
Chapter 7 Implementing a SAMLv2 Identity Provider Proxy
A SAMLv2 Identity Provider Proxy acts as a conduit connecting federated identity providers with federated services providers. In OpenSSO Enterprise, Identity Provider Proxy enables an Identity Provider to proxy authentication requests from federated Service Providers to various Identity Providers to which the user has previously authenticated.
This chapter provides information to help you determine if Identity Provider Proxy is suitable for your environment. The following topics are contained in this chapter:
About the SAMLv2 Identity Provider Proxy Specification
The OpenSSO Enterprise Identity Provider Proxy is based on the SAMLv2 specification which states the following:
If an identity provider that receives an <AuthnRequest> has not yet authenticated the presenter or cannot directly authenticate the presenter, but believes that the presenter has already authenticated to another identity provider or a non-SAML equivalent, it may respond to the request by issuing a new <AuthnRequest> on its own behalf to be presented to the other identity provider, or a request in whatever non-SAML format the entity recognizes. The original identity provider is termed the proxying identity provider.
Upon the successful return of a <Response> (or non-SAML equivalent) to the proxying provider, the enclosed assertion or non-SAML equivalent MAY be used to authenticate the presenter so that the proxying provider can issue an assertion of its own in response to the original <AuthnRequest>, completing the overall message exchange.
See the complete SAMLv2 specifications at http://saml.xml.org/saml-specifications.
About the OpenSSO Enterprise Identity Provider Proxy
The OpenSSO Enterprise Identity Provider Proxy is designed to enable the following:
-
Identity Providers can proxy an authentication request from a Service Provider to a different Identity Provider that has already authenticated the user.
-
Multiple Identity Provider Proxies can be configured between the Service Provider and the actual Identity Provider.
-
Existing SAMLv2 single sign-on and single logout process flows are seamlessly integrated.
-
Users can turn off identity proxying per each connection request. This is done by specifying a special URL parameter idpproxy=false.
-
Administrators can use customized SPI plug-ins with the Identity Provider Proxy to determine the user's preferred Identity Provider.
OpenSSO Enterprise provides the SPI com.sun.identity.SAMLv2.profile.SAMLv2IDPProxy and SPI which enables an administrator to customize the plug-in used to find a preferred identity provider. If the Introduction Cookie is enabled, the Identity Provider Proxy relies on the plug-in to determine the user's preferred Identity Provider. The default implementation of this plug-in interface in OpenSSO Enterprise is based on the Identity Provider Discovery Service. The Identity Provider Discovery Service can help retrieve information about the preferred Identity Provider. The details of this SPI are described in the Sun OpenSSO Enterprise 8.0 Java API Reference.
In this first offering of Identity Provider Proxy, the same protocol (for example OASIS SAMLv2 or Liberty ID-FF) must be used for all communications between the participating entities. Participating entities may include service providers, intermediate identity provider proxies, and the actual Identity Provider. However, Identity Provider Proxy is planned to be extended in the future to support heterogeneous environments with multiple identity federation protocols. For example, in the future, Identity Provider Proxy may be used in an environment using SAMLv2 between Service Provider and Identity Provider Proxy. In the same environment, Liberty ID-FF might be used between the Identity Provider Proxy and the actual Identity Provider.
Analyzing the Deployment Architecture
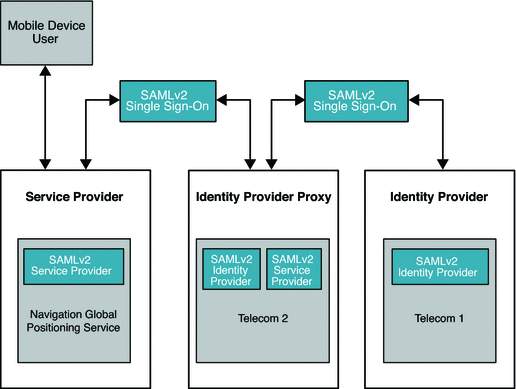
Identity Provider Proxy uses the SAMLv2 protocol to transfer identity data among the communicating entities. The following figure illustrates the major components in a typical deployment using Identity Provider Proxy.
In this deployment, the mobile device user is from France and has an account with Telecom1. The mobile device user travels to the United States and wants to access the global positioning service (GPS) provided by Telecom2 . Telecom2 is a United States service provider . The Telecom2 Identity Provider is the sole identity provider with which Telecom2 has a business affiliation.
Telecom2 receives and processes the authentication requests coming from Telecom2 Global Positioning Service, and responds with the required authentication information. Telecom2, like so many other wireless phone service providers in the world, always maintains the trust relationship with other carriers in different countries. Telecom1 is one such trusted partner which provides roaming services to their customers based on bilateral agreements. In this illustration, because of an established business relationship, Telecom2 doesn't need to know the mobile user at all. Telecom2 can process the authentication request from Telecom2 Global Positioning Service on behalf of Telecom1 based on the following trust relationships:
-
Telecom2 Global Positioning Service trusts Telecom2 for user authentication.
-
Telecom2 and Telecom1 trust each other for authentication and for the roaming services.
Figure 7–1 Deployment Architecture of Identity Provider Proxy
Considering Assumptions, Dependencies, and Constraints
Assumptions and Dependencies
-
Both Service Provider and Identity Provider can set up the trust base.
-
Service Provider and Identity Provider both achieve single sign-on using the SAMLv2 protocol (persistent and transient).
-
Service Provider and Identity Provider must achieve single logout using SAMLv2 protocol.
-
The extended configuration metadata define the attributes needed for this feature.
-
Required APIs are provided to access the attributes defined in the extended configuration metadata.
Constraints
One protocol such as OASIS SAMLv2 or Liberty ID-FF must be used across all the communications between the participating entities. Participating entities can include Service Provider, intermediate Identity Provider Proxies, and the actual Identity Provider. Currently there is no support for a heterogeneous environment that includes both SAMLv2–compliant systems and non-SAMLv2 equivalents.
Understanding Typical Business Cases
The Identity Provider Proxy feature is designed to be used by two types of users. Administrators configure the SAMLv2 Identity Provider Proxy. End–users access the services provided by service providers that initiate the single sign-on process across different circles of trust.
The following are typical business cases:
-
Single Sign-On, Introduction Cookie not enabled
-
Single Sign-On, Introduction Cookie enabled
-
Single Logout
Single Sign-On, Introduction Cookie is Not Enabled
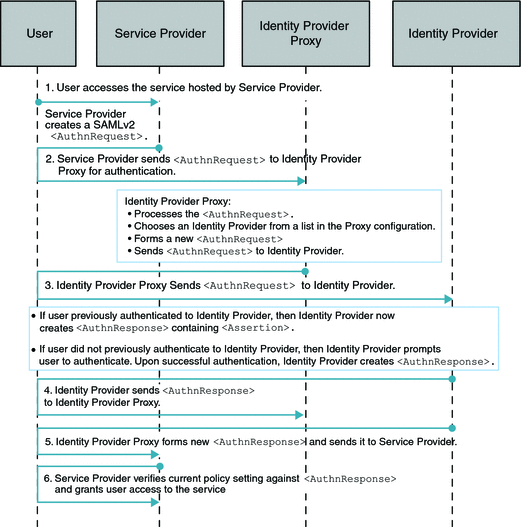
How the Identity Provider Proxy obtains the information about the actual Identity Provider is determined by whether or not the Introduction Cookie is enabled. Introduction Cookie is turned off, the Identity Provider Proxy retrieves an Identity Provider name from a list of pre-configured Identity Providers specified in the configuration.
The following figure illustrates the process for this use case. In this example, persistent federation is in place. In the transient federation mode, the Identity Provider Proxy does not contain any user information. The Identity Provider Proxy is used for proxying. The user information is only stored in the actual Identity Provider. The following figure illustrates the process flow for this use case.
Figure 7–2 Process Flow for Single Sign-On When Introduction Cookie is Not Enabled
Single Sign-On (SSO) with Introduction Cookie Enabled
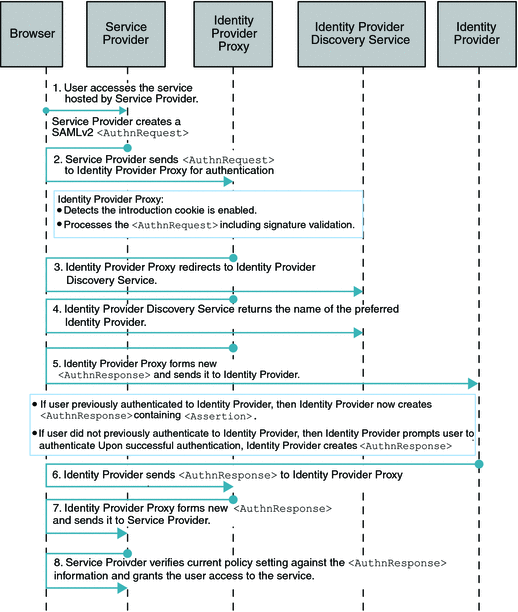
When the Introduction Cookie is enabled at the Service Provider, the Identity Provider Proxy relies on the com.sun.identity.SAMLv2.profile.SAMLv2IDPProxy plug-in to determine the preferred Identity Provider to proxy the authentication request to. The default implementation of this plug-in interface in OpenSSO Enterprise 8.0 is to consult the Identity Provider Discovery Service to get the information about the preferred Identity Provider . The following figure illustrates the process flow for this use case.
Figure 7–3 Process Flow for Single Sign-On (SSO) with Introduction Cookie Enabled
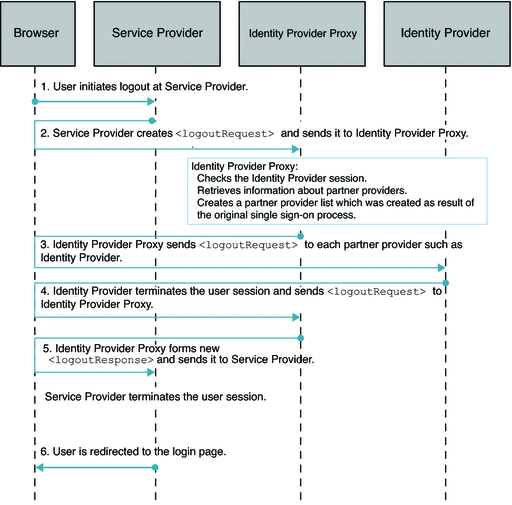
Single SAMLv2 Identity Provider Proxy Logout
The following figure illustrates the process for this use case.
Figure 7–4 Process Flow for Single Logout
Setting Up and Configuring SAMLv2 Identity Provider Proxy
The following provides a high-level description of setup and configuration steps. For more detailed instructions, see the Sun OpenSSO Enterprise 8.0 Administration Guide.
There is no other software component is required to implement a SAMLv2 Identity Provider Proxy. Everything you need is contained in the OpenSSO Enterprise fam.war file.
Setting Up a SAMLv2 Identity Provider Proxy
Install OpenSSO Enterprise instances on three separate host computers, preferably in different domains:
-
One OpenSSO Enterprise instance to act as the Service Provider
-
At least one OpenSSO Enterprise instance to act as the Identity Provider Proxy.
-
One OpenSSO Enterprise instance to act as the actual Identity Provider.
Configuring the SAMLv2 Identity Provider Proxy with No Introduction Cookie
This is the default configuration. You can use the OpenSSO Enterprise administration console or the ssoadmin command-line interface to generate and import metadata (steps 3 through 6).
-
Create your own keystore using keytool.
You can also use the keystore.jks file created during deployment of OpenSSO Enterprise instance. The keystore.jks file is located in the opensso/opensso directory. The keystore.jks file contains a private key named test and an associated public certificate.
-
Encrypt the keystore password for each host machine.
If you use the keystore.jks file mentioned in step 1 and created during OpenSSO Enterprise deployment, the cert alias test is already encoded. You can use test for both security and encoding purposes. For example, for spscertalias, specertalias, idpscertalias, and idpecertalias.
-
Generate Service Provider and Identity Provider metadata.
In each of the following substeps, save the standard and extended metadata in their respective files.
-
Generate the Service Provider metadata, and upload these local metadata into its console.
-
Generate the Identity Provider metadata, and upload these local metadata into its console.
-
Generate the Identity Provider Proxy metadata, and upload these local metadata into its console.
-
-
Import the Service Provider and Identity Provider metadata.
-
In each of the extended meta XML files, in the EntityConfig element to be imported, change hosted=1 to hosted=0. The value 0 means “remote.”
-
Import the Service Provider metadata to the Identity Provider Proxy.
-
Import the Identity Provider metadata to the Identity Provider Proxy.
-
Import the Service Provider portion of the Identity Provider proxy metadata to the Identity Provider.
-
Import the Identity Provider portion of the Identity Provider Proxy metadata to the Service Provider.
-
-
Create a circle of trust on each of the systems.
-
Import the metadata and create the provider entity.
Specify the name of the circle of trust into where you would like to import the metadata.
-
Enable the Identity Provider Proxy.
You can use the OpenSSO Enterprise console in both the Service Provider and Identity Provider Proxy, or you can modify the SAMLv2 extended configuration metadata.
To Use the OpenSSO Enterprise Console:
-
Click on SP URL under Entity Providers, then click the Advanced tab.
- IDP Proxy
-
Mark the Enabled box.
- Proxy Count
-
Enter 1 or more.
- IDP Proxy List
-
Enter the Identity Provider Proxy URL as a new value.
-
Click Add.
-
Click on Proxy IDP URL under Entity Providers, then click the Advance tab for SP.
- IDP Proxy
-
Mark the Enabled box.
- Proxy Count
-
Enter 1 or more.
- IDP Proxy List
-
Enter the actual Identity Provider Proxy URL as a new value.
To modify the SAMLv2 extended configuration metadata
Edit the following entries for the Service Provider on the Service Provider host, and also on the Service Provider portion of the Identity Provider Proxy on the Identity Provider Proxy host:
- EnabledIDProxy:
-
The key to turn the SAMLv2 IDP proxy feature on or off.
- IdpProxyList:
-
The Identity Providers trusted by the requester (the Service Provider) to authenticate the presenter (the user).
- IdpProxyCount:
-
The number of proxies permissible between the Identity Provider that receives this <AuthnRequest> and the actual Identity Provider that ultimately authenticates the principals. A count of zero means no proxying.
- UseIntroductionForIDPProxy:
-
When this key is on, the SAMLv2 Introduction Cookie picks a preferred IDP instead of going through the Identity Provider Proxy list.
-
-
After all the configuration steps are done, restart the web containers of all the servers on the Service Provider, Identity Provider Proxy, and the actual Identity Provider.
-
As a verification step, on the Service Provider host, log in to the OpenSSO Enterprise administration console and click the Federation tab.
You should see the profiles for both Service Provider and Identity Provider Proxy.
Perform the SAMLv2 test cases for single sign-on and single logout through a proxy.
Configuring the SAMLv2 Identity Provider Proxy with the Introduction Cookie
You can use the OpenSSO Enterprise administration console or the ssoadmin command-line interface to generate and import metadata (steps 5 through 8).
-
Deploy the Identity Provider Discovery Service.
Follow the steps 1 through 5 in Chapter 10, Deploying the Identity Provider (IDP) Discovery Service, in Sun OpenSSO Enterprise 8.0 Installation and Configuration Guide. Do not complete steps 6 through 11 in the section “Configuring the IDP Discovery Service.”
-
Once the Identity Provider Discovery Service WAR file is generated and deployed, make the following changes on its Configurator page.
When http(s)://idpdiscoveryhost.example.com:8080/idpdiscovery is loaded, where idpdiscoveryhost usually refers to the Identity Provider Proxy host name, specify the following:
- Debug Directory:
-
Name of the debug directory.
- Debug Level:
-
Options are error (default), warning, message, or off.
- Cookie Type:
-
PERSISTENT (default) or SESSION. Use PERSISTENT for the purpose of SAMLv2 Identity Proxying using the Introduction Cookie.
- Cookie Domain:
-
Name of the cookie domain.
- Secure Cookie:
-
True or False (default)
- Encode Cookie:
-
True (default) or False
Click Configure.
-
Create your own keystore using keytool.
You can also use the keystore.jks file created during deployment of OpenSSO Enterprise instance. The keystore.jks file is located in the opensso/opensso directory. The keystore.jks file contains a private key named test and an associated public certificate.
-
Encrypt the keystore password for each host machine.
If you use the keystore.jks file mentioned in step 1 and created during OpenSSO Enterprise deployment, the cert alias test is already encoded. You can use test for both security and encoding purposes. For example, for spscertalias, specertalias, idpscertalias, and idpecertalias.
-
Generate Service Provider and Identity Provider metadata.
In each of the following substeps, save the standard and extended metadata in their respective files.
-
Generate the Service Provider metadata, and upload these local metadata into its console.
-
Generate the Identity Provider metadata, and upload these local metadata into its console.
-
Generate the Identity Provider Proxy metadata, and upload these local metadata into its console.
-
-
Import the Service Provider and Identity Provider metadata.
-
In each of the extended meta XML files, in the EntityConfig element to be imported, change hosted=1 to hosted=0. The value 0 means “remote.”
-
Import the Service Provider metadata to the Identity Provider Proxy.
-
Import the Identity Provider metadata to the Identity Provider Proxy.
-
Import the Service Provider portion of the Identity Provider proxy metadata to the Identity Provider.
-
Import the Identity Provider portion of the Identity Provider Proxy metadata to the Service Provider.
-
-
Create a circle of trust on each of the systems.
-
Import the metadata and create the provider entity.
Specify the name of the circle of trust into where you would like to import the metadata.
-
On both the Identity Provider Proxy console and the actual Identity Provider console, add the Identity Provider Discovery Service URL for the SAML2 Reader and Writer Service URLs for the Circle of Trust.
-
On the Identity Provider Proxy console and on each actual Identity Provider host console, click the Circle of Trust.
-
Enter the values for the SAML2 Reader and Writer URLs as the Identity Provider Proxy host name, and idpdiscovery as the URI, with the SAML2 Reader and Writer appended. Examples:
http(s)://idp-proxy-server-host-name:port/idpdiscovery/saml2writer
http(s)://idp-proxy-server-host-name:port/idpdiscovery/saml2reader
-
-
On the Identity Provider Proxy console and on the actual Identity Provider console, under Entity Providers, click the Identity Provider Proxy URL link. Then click the Advanced tab for the Service Provider.
- IDP Proxy
-
Mark the Enabled box.
- Introduction
-
Mark the Enabled box.
- Proxy Count.
-
Enter 1 or more.
- IDP Proxy List
-
Leave this blank.
-
After all the configuration steps are done, restart the web containers of all the servers on the Service Provider, Identity Provider Proxy, and the actual Identity Provider.
-
As a verification step, on the Service Provider host, log in to the OpenSSO Enterprise administration console and click the Federation tab.
You should see the profiles for both Service Provider and Identity Provider Proxy.
Perform the SAMLv2 test cases for single sign-on and single logout through a proxy.
Evaluating Benefits and Tradeoffs
The following may help you determine whether SAMLv2 Identity Provider Proxy is suitable for your environment.
Benefits
-
The Identity provider can proxy authentication requests from Service Provider to various Identity Providers to which the user has authenticated.
-
Users are granted seamless access to all the available service providers as long as proper trust relationships are established among those Service Providers, Identity Provider Proxies, and the actual Identity Provider.
-
Using the SPI implementation, administrators can customize how the preferred Identity Provider is determined.
-
End-users can turn off Identity Provider proxying per each connection request.
Tradeoffs
-
There is a potential for increased performance overhead.
Adding intermediaries such as Identity Provider Proxies increase the likelihood of negative impact on overall system performance.
-
Using SAMLv2 and non-SAML protocols in the same environment is not currently supported. This can pose a limitation if non-SAML protocols are already in place. However, support for Identity Provider Proxy using multiple protocols is planned for a future release of OpenSSO Enterprise.
Chapter 8 Using a Multi-Federation Protocol Hub
The Multi-Federation Protocol Hub enables you to use multiple single sign-on protocols such as SAMLv2, IDFF1.2, or WS-Fed together within a circle of trust. In OpenSSO Enterprise 8.0, the Multi-Federation Protocol Hub is supported only at the Identity Provider. The Identity Provider can be configured to support multiple Service Providers, with each Service Provider using a different federation protocol. The session is shared across these heterogeneous protocols, providing single sign-on and single logout within the circle of trust.
The following topics are included in this chapter:
About Identity and Web Services Federation Protocols
Sun OpenSSO identity federation is based on the Liberty Alliance specification which includes the Identity Federation Framework (ID-FF) and SAMLv2 protocols. Microsoft Active Directory Federation Service (ADFS) is based on the Web Services Architecture specification which uses the Microsoft Web Browser Federated Sign-On (MS-MWBF) and Web Services Federation (WS-Federation) protocols. OpenSSO Enterprise provides support for MS-MWBF so that single sign-on can work among OpenSSO and ADFS-based environments. For more information about identity and web service federation protocols, see the Sun OpenSSO Enterprise 8.0 Technical Overview.
Analyzing the Deployment
The typical configuration for Multi-Federation Protocol Hub requires one OpenSSO Enterprise instance as an Identity Provider, and two or more OpenSSO Enterprise instances as Service Providers. In this deployment example, the Multi-Federation Protocol Hub is configured with three different Service Providers. Each Service Provider uses a different federation protocol to connect to a single OpenSSO Enterprise instance. Single Logout occurs through a browser redirect when the HTTP post profile is used. If the SOAP binding is used, then a direct SOAP request is sent from the Identity Provider to the Service Provider.
The following illustration illustrates the major components that are involved in the Multi-Federation Protocol Hub.
Figure 8–1 Deployment Architecture for the Multi-Federation Protocol Hub
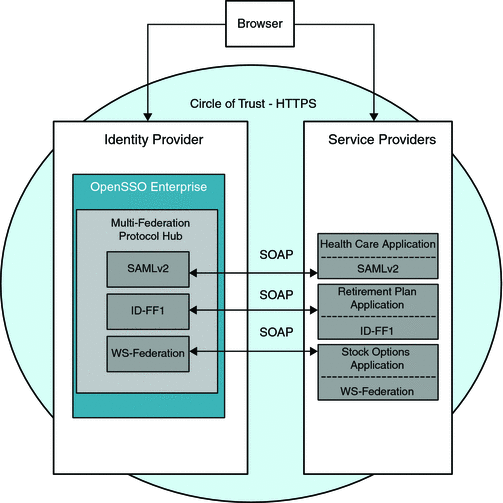
Considering Assumptions, Dependencies, and Constraints
The following are issues you must resolve before choosing to use the Multi-Federation Protocol Hub.
Constraints
The Multi-federation Protocol Hub in OpenSSO Enterprise can be configured with only the following federation protocols:
-
SAMLv2
-
Liberty ID-FF1
-
WS-Federation
The Multi-Federation Protocol Hub in Open SSO Enterprise 8.0 is only supported on the Identity Provider configuration.
Assumptions and Dependencies
-
Single Logout over HTTP post profile must be supported by the Service Providers running HTTP.
-
Single Logout over SOAP must be supported by the Service Providers running SOAP.
Understanding Typical Business Use Cases
A company uses the following services and federation protocols to manage employee benefits:
-
Health Care Administration (SAMLv2)
-
Retirement Plan Administration (ID-FF1)
-
Stock Plan Administration (WS-Federation)
The company itself acts as an Identity Provider, managing employee information in its corporate user database. The Identity Provider enables employees to access any of the three Service Providers through an employee portal. The Health Care Service Provider uses the SAMLv2 federation protocol. The Retirement Plan Service Provider uses ID-FF1, and the Stock Plan Service Provider uses WS-Federation. The Identity Provider is configured as a Multi-Federation Protocol Hub and provides single sign-on and single logout across all these services.
The following figures illustrates a typical Multi-Federation Protocol Hub process flow.
Figure 8–2 Process Flow for Single Sign-On Using a Multi-Federation Protocol Hub
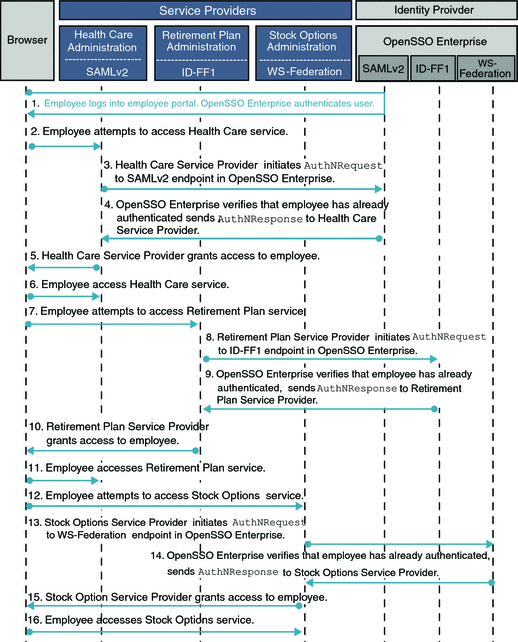
The following figure illustrates the process flow for Single Logout using the Multi-Federation Protocol Hub.
Figure 8–3 Process Flow for Single Logout Using the Multi-Federation Protocol Hub
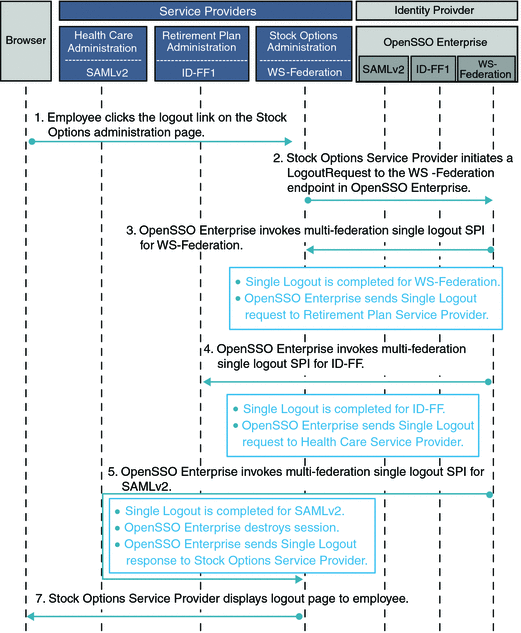
Setting Up and Configuring a Multi-Federation Protocol Hub
The following information provides a high-level overview of setup and configuration instructions. Before you can begin, OpenSSO Enterprise must be deployed on a supported web container. You can configure the Multi-Federation Protocol Hub by importing the metadata using either the OpenSSO Enterprise administration console, or using the ssoadmin command-line interface. For detailed configuration steps, see the Sun OpenSSO Enterprise 8.0 Administration Guide. A code JSP file is contained in theopensso.war file. The sample JSP demonstrates how to configure a Multi-Federation Protocol Hub.
Using the Sample JSP
-
Install and deploy OpenSSO Enterprise instances on four separate host computers, one instance in each domain.
-
Locate the sample JSP on the Open SSO instance.
http://FQDN/opensso/samples/multiprotocol/index.html
-
Configure OpenSSO Enterprise instance 1 as a SAMLv2 Service Provider named SP1.
Run the sample JSP to create one hosted SAMLv2 Service Provider and one remote SAMLv2 Identity Provider in the same circle of trust.
-
Configure OpenSSO Enterprise instance 2 as an ID-FF Service Provider named Service Provider 2.
Run the sample JSP to create one host ID-FF Service Provider and one remote ID-FF Identity Provider in the same circle of trust.
-
Configure OpenSSO Enterprise instance 3 as a WS-Federation Service Provider named Service Provider 3.
Run the sample JSP to created one hosted WS-Federation Service Provider and one remote WS-Federation Identity Provider in one circle of trust.
-
Configure OpenSSO Enterprise instance 4 as an Identity Provider using the following protocols: IDP, referred as IDP1, IDP2 and IDP3 respectively.
-
SAMLv2 (Identity Provider 1)
-
ID-FF (Identity Provider 2)
-
WS-Federation (Identity Provider 3)
Run the sample JSP to create three hosted Identity Providers (one each for SAMLv2, ID-FF and WS-Federation), and three remote Service Providers (one each for SAMLv2, ID-FF and WS-Federation) the same circle of trust.
-
-
Run single sign-on from Service Provider 1 to Identity Provider 2, then from Service Provider 2 to Identity Provider 2 without logging in again, then Service Provider 3 to Identity Provider 3 without logging in.
-
Run single logout from Service Provider 1.
All sessions on Service Provider 2, Service Provider 3, and on all Identity Providers are destroyed.
-
Run single sign-on again, and then run single Logout from Identity Provider 1.
All sessions on Service Provider 1, Service Provider 2, Service Provider 3, and on Identity Providers are destroyed.
Evaluating Benefits and Tradeoffs
The Multi-Federation Protocol Hub feature in OpenSSO Enterprise enables the Identity Provider to integrate with any existing or future service provider or service partner. The Multi-Federation Protocol Hub achieves single sign-on and single Logout regardless of which federation protocol the service provider or partner uses. Without this feature, the Identity Provider has to force the Service Providers to use a single federation protocol.
With the Multi-Federation Protocol Hub only one circle-of-trust is required when using heterogeneous Service Providers and Identity Providers in the same circle of trust. Without this feature, you must set up and configure multiple circles of trust, one for each federation protocol used. The Identity Provider could require multiple OpenSSO Enterprise instances. Each OpenSSO Enterprise would have to act as an Identity Provider, and each OpenSSO Enterprise instance would require a different protocol. To achieve single sign-on and single Logout, you would have to install some kind of intelligent proxy in front of the Identity Provider. The proxy would have to be able to recognize the incoming protocol from the Service Provider, and route the request to the correct Identity Provider instance accordingly.
The Multi-Federation Protocol Hub configuration steps are simple. The only configuration required is one extra metadata file for each protocol to be supported by the Identity Provider.
Chapter 9 Enabling Web Services Federation Between Active Directory Federation Service and OpenSSO Enterprise
Sun OpenSSO identity federation is based on the Liberty Alliance specification which includes uses the Identity Federation Framework (ID-FF) and SAMLv2 protocols. Microsoft Active Directory Federation Service (ADFS) is based on the Web Services Architecture specification which uses the Microsoft Web Browser Federated Sign-On (MS-MWBF) and Web Services Federation (WS-Federation) protocols.
OpenSSO Enterprise provides support for MS-MWBF so that single sign-on can work among OpenSSO and ADFS-based environments. This interoperability is achieved by creating trust relationships between different security realms, and exchanging security tokens using the Web Services Federation protocol.
This chapter provides information about enabling web services federation between ADFS-based and OpenSSO Enterprise. The following topics are contained in this chapter:
Analyzing the Deployment Architecture
This deployment consists of two different environments:
-
An ADFS-based environment
-
A load-balanced, multi-server OpenSSO Enterprise environment
This deployment illustrates the interoperability between both environments, and also illustrates the added constraints of a multi-server OpenSSO Enterprise solution.
The ADFS environment is derived entirely from Step-by-Step Guide for Active Directory Federation Services. In this deployment, a web browser (client) interacts with a web resource to request a security token from a requestor Identity Provider or Security Token Service. The request is communicated through a resource partner such as an Identity Provider or Security Token Service.
OpenSSO Enterprise can play the role of either resource (Service Provider) or requestor (Identity Provider). The following figure illustrates OpenSSO Enterprise acting as a Service Provider, known in the MS-MWBF specification as a Resource Identity Provider/Security Token Service (Resource IP/STS). The business use case for this architecture is described in OpenSSO Enterprise Acts as Service Provider.
Figure 9–1 Deployment Architecture for ADFS Integration with OpenSSO Enterprise Acting as Service Provider
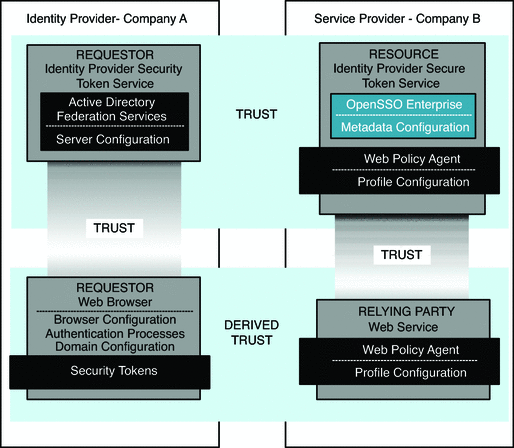
The following figure illustrates OpenSSO Enterprise acting as an Identity Provider, known in the MS-MWBF specification as a Requestor Identity Provider/Security Token Service (Requestor IP/STS). The business use case for this architecture is described in OpenSSO Enterprise Acts as Identity Provider.
Figure 9–2 Deployment Architecture for ADFS Integration with OpenSSO Enterprise Acting as Identity Provider
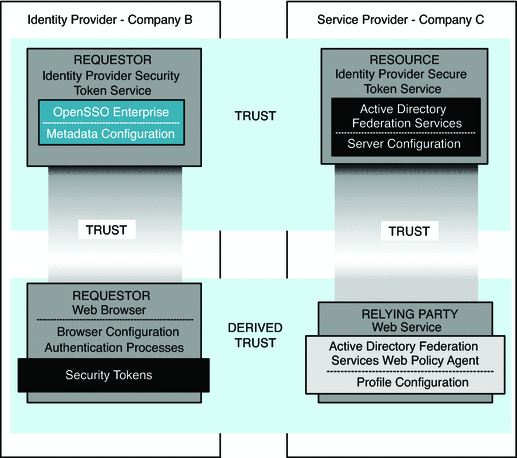
Considering Assumptions, Dependencies, and Constraints
The following are issues you must resolve before you can enable Web Service Federation among ADFS and OpenSSO Enterprise.
Assumptions and Dependencies
-
The ADFS-based environment is already set up and running.
This chapter is based on the assumption that you are proficient in setting up and ADFS-based environment as described in
-
OpenSSO Enterprise is already deployed.
This is a prerequisite for configuring OpenSSO Enterprise to act as an Identity Provider or Service Provider in a circle of trust.
Constraints
-
The configuration requirements documented in this chapter include tools and procedures that are not appropriate for a production deployment.
Examples are: the use of self-signed certificates, the modification of host files, local time synchronization, and so forth. These are described for illustration purposes only. For production deployments, you must use different solutions suitable for your environment.
-
OpenSSO Enterprise supports WS-Federation as it relates to its support within the ADFS boundaries. Parts of the WS-Federation specification not required by ADFS may not be supported in this release.
Understanding Typical Business Use Cases
This chapter describes two typical business use cases:
OpenSSO Enterprise Acts as Service Provider
In this use case, Company A is acquired by Company B. The intranets for both companies have been merged, but much of the network infrastructure remains as though they were still two separate entities. Company A maintains an Active Directory domain, and Company B maintains an OpenSSO Enterprise single sign-on infrastructure in its own domain.
In order for Company A employees to access some internal applications available to Company B employees, a trust relationship is created between the Company A domain and the Company B domain. The trust relationship is created using the Web Services Federation protocol. Company A employees, signed on to their Microsoft Windows computers, can now navigate to the Company B paycheck application by using a Web Services Federation secure token.
OpenSSO Enterprise Acts as Identity Provider
In this use case, Company B wants to offer its employees a new online collaborative environment based on Microsoft SharePoint Services. The collaboration solutions is an outsourced model where Company C provides dedicated SharePoint Services to its customers. In order to provide single sign-on to the Company B employees, Company C leverages the federation services provided by ADFS. A trust relationship is created between created between the Company B OpenSSO Enterprise Identity Provider and the Company C Resource Identity Provider /Security Token Service.
Setting up and Configuring Single Sign-On Among OpenSSO Enterprise and ADFS Environments
This chapter provides high-level deployment information for setting up and configuring single sign-on among OpenSSO Enterprise and ADFS environments. For detailed information, see the Microsoft Administering Active Directory Federation Services Guidehttp://technet.microsoft.com/en-us/library/cc736337.aspx for instructions on configuring Resource and Account Partners. See the Sun OpenSSO Enterprise 8.0 Administration Guide for information about using the ssoadmin command or administration console to generate metadata, create a circle of trust and import entities.
Enabling WS-Federation between an ADFS environment and an OpenSSO Enterprise environment involves exchanging metadata to enable a trust relationship. Prior to this, the following requirements must be met:
-
All communications between WS-Federation components must be made over SSL.
ADFS does not perform an HTTP POST of a WS-Federation RSTR to a non-HTTPS URL.
-
Name resolution is based on host files. Therefore, host files must be appropriately updated with host names and IP addresses.
-
The ADFS environment can rely on DNS.
-
All servers must be time-synchronized.
This is essential to proper token validation.
-
Token signing certificates must be created and imported for both ADFS and OpenSSO Enterprise endpoints.
This process is automated in ADFS, but requires the use of the keytool command for OpenSSO Enterprise.
The creation of a trust relationship relies on the exchange of metadata between the parties involved. Importing this information is straightforward and can be done through the GUI on the ADFS side. On the OpenSSO Enterprise side, to import the information you can use the ssoadmin command-line utility or the ssoadmin.jsp.
Configuring OpenSSO Enterprise to Act as a Service Provider
This use case requires that the ADFS server in the Company B domain be configured to recognize the Company A OpenSSO Enterprise endpoint as a Resource Partner. The Company B ADFS server must be recognized as a valid Identity Provider in a circle of trust that includes the Company A OpenSSO Enterprise server as a Service Provider.
In the OpenSSO Enterprise environment:
Use the ADFS snap-in to create a new Resource Partner. The new Resource Partner must be defined using the proper name and endpoint URL.
In the ADFS-based environment:
-
Create metatdata and extended metadata files to define the Company B ADFS server as the Identity Provider, and the Company A OpenSSO Enterprise server as the Service Provider in a WS-Federation protocol paradigm.
-
Create a new circle of trust and import each Identity Provider and Service Provider to belong to this circle of trust.
This configuration currently works only if a user account with the same UPN is created in both the ADFS domain and the OpenSSO Enterprise server. This is a major constraint.
Configuring OpenSSO Enterprise to Act as an Identity Provider
This use case requires that the ADFS server in the Company C domain to be configured to recognize the Company A server as an Account Partner. The Company A server must be configured to recognize the Company C ADFS server as a Service Provider in a circle of trust.
In the OpenSSO Enterprise environment:
-
Configure a new keystore for the token signing certificate, or leverage the one provided by the container.
-
Create metadata and extended metadata files to define the Company A OpenSSO Enterprise server as the Identity Provider.
-
Create metadata and extended metadata files to define the Company B ADFS server as the Identity Provider, and the Company C ADFS server as the Resource Provider in a WS-Federation protocol paradigm.
-
Create a new circle of trust, and import each Identity Provider and Service Provider to belong to this new circle of trust.
In the ADFS environment:
-
Create a new Account Partner using the ADFS snap-in.
The proper name and endpoint URL must be defined.
-
Import the OpenSSO Enterprise token signing certificate (DER format). For detailed information, see the .Sun OpenSSO Enterprise 8.0 Administration Guide
Evaluating Benefits and Tradeoffs
The following information helps you decide whether enabling Web Services Federation between ADFS and OpenSSO Enterprise is suitable for your needs.
Benefits
Using OpenSSO Enterprise as Service Provider
You are likely to leverage WS-Federation in a mixed environment involving Windows domains and heterogeneous web service environments. In such cases, using WS-Federation eliminates the need to complete the complicated setups involved with Desktop SSO (IWA, Kerberos, etc.). This simplifies the integration of web services in the ADFS-based environments.
Using OpenSSO Enterprise as Identity Provider
The immediate benefit is the single sign-on to SharePoint Services from non-ADFs environments. This can be extended to pure claims-based applications residing inside the Resource Partner's domain.
Tradeoffs
The main drawback to using WS-Federation is that currently only limited support or configuration help is offered for ADFS claims within OpenSSO Enterprise. For example, the Microsoft Administering Active Directory Federation Services Guidehttp://technet.microsoft.com/en-us/library/cc736337.aspx depicts the use of group claims and their mapping between realms. The use of group claims eliminates the need to map user principals information from one realm to the next in a federated environment. These claims, based on group memberships, have not been tested in this deployment example configuration.
Finding More Information
Specifications
-
Microsoft Web Browser Federated Sign-on Protocol Specification
-
Web Services Federation Language
http://specs.xmlsoap.org/ws/2006/12/federation/ws-federation.pdf
Guides and Overviews
-
Understanding WS-Federation
-
Overview of ADFS
-
Microsoft Administering Active Directory Federation Services Guide
Case Study
OpenSSO, WS-Federation & IBM DataPower by Joachim Andre
https://opensso.dev.java.net/files/documents/3676/79106/OpenSSO-WS-Fed-DataPower-FederationPoC.pdf
Chapter 10 Securing Web Services Using ID-WSF (Liberty Alliance Specifications)
This chapter provides information about developing identity-based web services using the Identity Web Services Framework (ID-WSF) developed in OpenSSO Enterprise. OpenSSO Enterprise provides an implementation for the Liberty Personal Profile Service and typically uses the default OpenSSO Enterprise configuration store for the Personal Profile Service configuration. However, this chapter describes a new use case. With OpenSSO Enterprise 8.0, you can develop a custom, identity-based web service using the OpenSSO Enterprise infrastructure instead of using the Personal Profile Service as a data service.
The following topics are contained in this chapter:
About the Identity Web Services Framework
Identity Web Services Framework (ID-WSF) is a set of specifications created by the Liberty Alliance to promote secure web services. ID-WSF is part of Liberty's Phase 2 specifications which augment the initial Identity Federation Framework (ID-FF) specifications. The ID-FF focuses on federating the user's authentication and single sign-on. The ID-WSF defines specifications for web services in a federated environment. The federated environment establishes a trust between all the participating entities without revealing the end user's identity. The following diagram illustrates the relationship between entities in such an environment, known as a circle of trust.
Figure 10–1 Major Components in a Circle of Trust
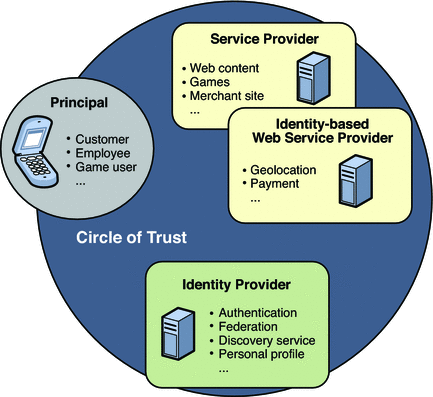
The ID-WSF defines specifications for the following Liberty components:
-
Discovery Service
-
SOAP Binding
-
Authentication Service
-
Security Mechanisms
-
Interaction Service
-
PAOS Binding
-
Data Service Template
The ID-WSF defines a concrete trust authority called the Liberty Discovery Service. The framework is built around the Liberty Discovery Service. The Liberty Discovery Service not only enables a web service to register, but also helps in generating security credentials for web service clients that may be doing lookups for a specific service type.
The Liberty Interaction Service allows the user to interact during web services communication for any authorization. Liberty Authentication Service allows the web services clients to authenticate the principal in non-browsed based environments. As part of the Phase 2 specifications, Liberty Alliance also defined specifications for additional identity services such as Liberty Personal Profile Service, Liberty Employee Personal Profile Service and others. These Phase 2 specifications form the Liberty Service Instance Specifications (SIS) Specifications.
OpenSSO Enterprise fully implements ID-WSF1.x specifications and exposes the ID-WSF as a pluggable framework which the user can leverage for increased security. OpenSSO Enterprise is a self-contained, single WAR file built to industry standard specifications. The Identity Web Services Framework in OpenSSO Enterprise enables developers to focus on the business logic of their service while leaving the security aspect to OpenSSO Enterprise.
The following diagram represents the OpenSSO Enterprise ID-WSF framework from an implementation point of view.
Figure 10–2 OpenSSO Enterprise Identity Web Service Framework Implementation
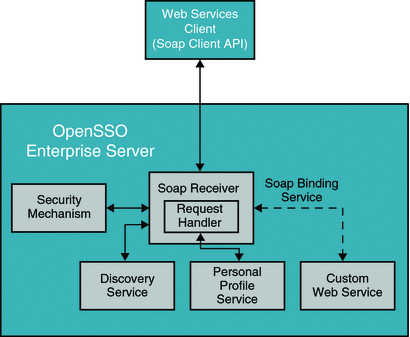
The OpenSSO Enterprise ID-WSF uses a simple servlet-based extension framework that any identity based web service can plug into. OpenSSO Enterprise provides tools and APIs for two distinct classes of developers: Identity Web Service Implementors (WSPs), and application developers (WSCs) who use these web services . OpenSSO Enterprise also provides the hooks required to quickly integrate the existing infrastructure with Liberty-enabled infrastructure.
Any custom web service that is developed using the OpenSSO Enterprise ID-WSF must register with the SOAP Binding Service. The SOAP Binding Service provides the validation of SOAP message with respect to security such as XML Digital Signature and Encryption and other Liberty processing rules. The Soap Binding Service then generates the OpenSSO Enterprise single sign-on token for further authorization of the client by the web service.
Analyzing the Deployments
The Identity Web Services Framework can be used in either browser-based mode or desktop mode. The browser-based client uses SAMLv2 or ID-FF protocols to find the Liberty Discovery Service Resource Offering of an authenticated user, or bootstrap, into the ID-WSF framework. The desktop clients can leverage the Liberty Authentication Service to bootstrap into the ID-WSF. OpenSSO Enterprise supports ID-WSF boot strapping through the SAMLv2, ID-FF, or ID-WSF -based authentication service, depending upon the client needs. This chapter describes deployments for both browser-based clients and desktop clients
Browser-based ID-WSF Deployment
The following diagram represents the deployment architecture for ID-WSF using OpenSSO Enterprise for browsed-based clients.
Figure 10–3 Deployment Architecture for Browser-based Identity Web Services
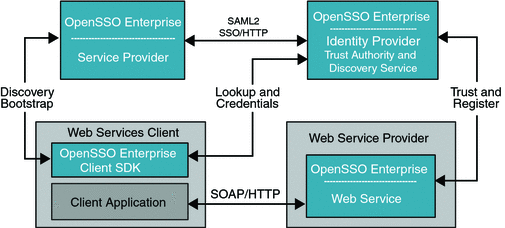
Both Service Provider and Identity Provider are used for authenticating the user's identity using SAMLv2 protocols. OpenSSO Enterprise can be an Identity Provider or a Service Provider or a hosting web service in this deployment. The Service Provider and Web Services Client are in the same domain in this deployment. The Web Service Provider registers its service resource offering with the Discovery Service before it offers services to various clients. The registration can be done through either the Discovery Service protocol or out of band. The OpenSSO Enterprise can be deployed in various roles for this deployment as illustrated in the deployment architecture diagram. The following figures shows the process flow among various entities in the browser-based identity web services deployment.
Figure 10–4 Process Flow for Browser-based Identity Web Services
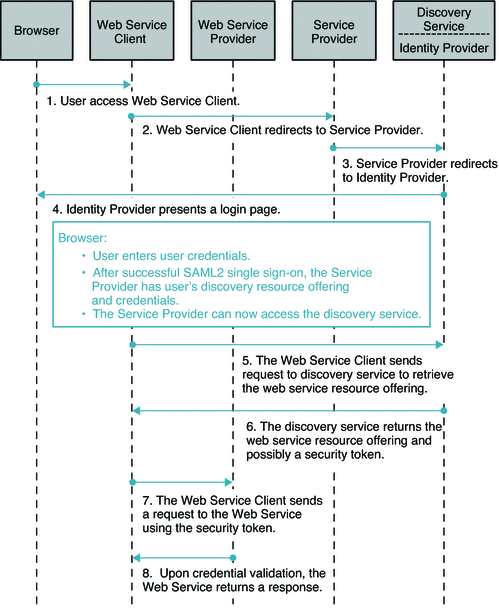
Desktop ID-WSF Deployment
The desktop mode ID-WSF deployment supports desktop mode clients, so they do not require an application container. Desktop ID-WSF is useful for standalone Web Service Clients. The custom Web Service Clients can leverage the OpenSSO Enterprise Client SDK to enable a secure connection for a given payload. The Web Services Client bundles the OpenSSO Enterprise Client SDK that accesses the local OpenSSO Enterprise instance to secure web service requests.
Figure 10–5 Desktop ID-WSF Deployment
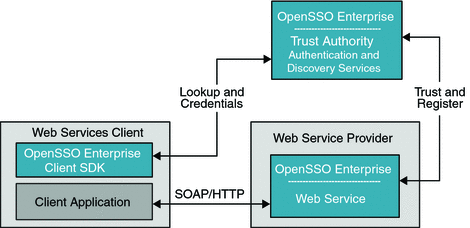
The Web Services package is contained in the OpenSSO Enterprise WAR file and must be deployed along with the OpenSSO Enterprise server to leverage the ID-WSF security framework. The configuration and user data is not required to be same data store as that of OpenSSO Enterprise. The trust authority for ID-WSF is the Discovery Service. The Discovery Service end point is exposed the same way as any data web service, and can fully leverage OpenSSO Enterprise infrastructure components such as authentication, policies, and so forth to serve web service clients and as well as web services. OpenSSO Enterprise is independent in all these roles and can be deployed appropriately based on the customer or application requirements. The following figure illustrates the process flow for desktop ID-WSF.
Figure 10–6 Process Flow for Desktop Identity Web Services
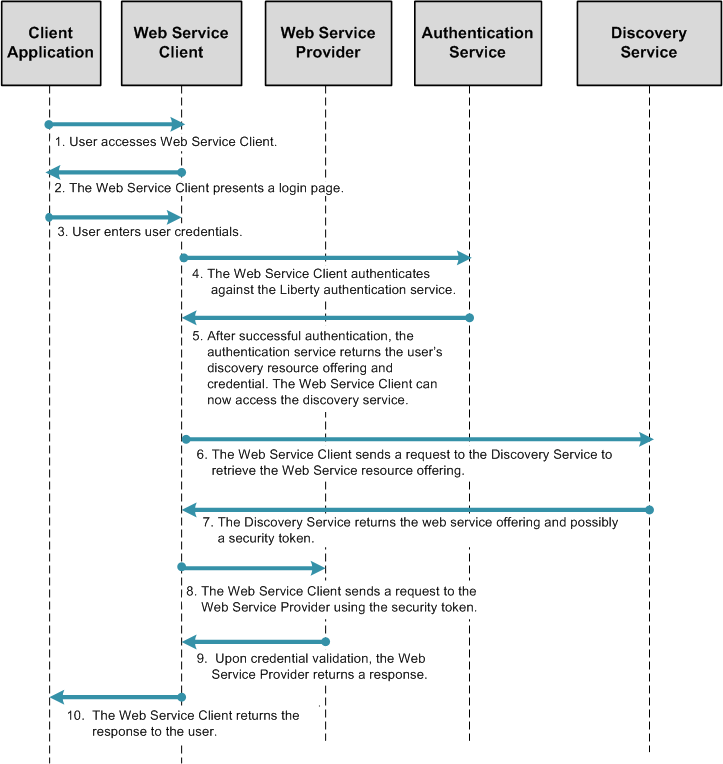
Considering Assumptions, Dependencies and Constraints
As you plan your deployment, consider the following assumptions, dependencies, and constraints to determine if your environment is appropriate for using the ID-WSF.
Assumptions and Dependencies
The fundamental difference between ID-WSF and generic web services is that the ID-WSF defines a security framework around user identity. The ID-WSF allows an end user to register his service offerings with their trusted trust authorities. Generic web services advertise their offerings through either a Web Service Description Language (WSDL) file or by the Enterprise Universal Description, Discovery, and Integration (UDDI) registry. These use cases are driven through Liberty ID-WSF and thus have a dependency on other Liberty protocols such as ID-FF and SAMLv2.
Constraints
The majority of identity web services are deployed in the Mobile Communications industry. For server-side web service providers OpenSSO Enterprise provides a comprehensive solution for ID-WSF. However, solutions for Liberty enabled clients do not provide the same degree of coverage. For example, the Client SDK is not J2ME-compatible and will not work with mobile devices that typically use Midlets to invoke Identity Web Services. Also, the OpenSSO Enterprise ID-WSF does not implement all profiles for the Liberty-enabled user agent or device (LUAD) clients.
Understanding Typical Business Use Cases
The adoption of identity web services is widespread especially in mobile communications-based businesses. Many of the telecommunication industries in Europe have invested heavily in ID-WSF based architectures, although the adoption in US is relatively smaller.
The following figure illustrates a simple E-commerce deployment using OpenSSO Enterprise.
Figure 10–7 Identity Web Services Business Use Case
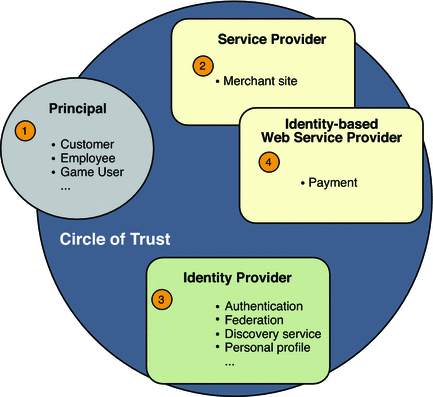
-
The customer is browsing the merchant site and initiates a purchase of some item.
-
The merchant who needs to authenticate the customer can request authentication through one of the trusted Identity Providers. The authentication happens here through ID-FF or SAMLv2, masking the real identity of the customer. This helps preserve the customer's privacy.
-
The merchant requests the payment service to guarantee the transaction. First the merchant site discovers the customer payment service through the Discovery Service. Then the merchant site requests the payment services on behalf of the principal. This step leverages the fact that the Liberty discovery mechanism is per principal-oriented, allowing merchants to request payments without having to know the real customer identity.
-
The payment service validates the transaction. Before charging the customer, the payment service may take a user consent. The payment service uses the Liberty Interaction Service for doing this. With successful purchase, the merchant returns the confirmation of purchase and delivers the service.
Setting Up and Configuring ID-WSF
For demonstration purposes, this section describes the high-level setup of a simple web-based service which was used as the basis for this chapter. OpenSSO Enterprise plays various roles in this environment depending:
-
OpenSSO Enterprise is installed in the Web Services Client Domain.
-
OpenSSO Enterprise is installed in the Web Services Provider Domain.
-
OpenSSO Enterprise acts as a Trust Authority Service.
For browser-based deployment, the Liberty Personal Profile Web Service that is shipped with OpenSSO Enterprise is used. The user profile information is stored in the LDAP user data store.
For desktop based deployment, a simple weather service web service is developed to demonstrate the developer aspect.
Evaluating Benefits and Tradeoffs
The following lists are useful in helping you determine whether ID-WSF is suitable for your environment.
Benefits
-
OpenSSO Enterprise provides an extensive, customizable framework for ID-WSF.
-
ID-WSF consumers can leverage not only use Identity Web Services security, but can also leverage the OpenSSO Enterprise policy and access control features.
-
Processing a custom web service payload can totally be independent of the OpenSSO Enterprise infrastructure.
Tradeoffs
-
Developers must develop and deploy their web services along with OpenSSO Enterprise.
-
If web services already exist in the environment, the developers must integrate them with OpenSSO Enterprise.
OpenSSO Enterprise ID-WSF framework is tested in interoperable environments and certified by the Liberty Alliance. So the web services are almost certain to work in multi-vendor environments as long as the remote party is also a certified implementation.
-
The lack of mobile client support with the OpenSSO Enterprise Client SDK may be a limitation. However, the primary use for OpenSSO Enterprise is in enterprise web service deployments.
Finding More Information
-
Liberty ID-WSF Specifications
Chapter 11 Securing Web Services Using the Security Token Service (WS-* Specifications)
A web service is an application that exposes some type of business or infrastructure functionality though a callable interface that is both language-neutral and platform-independent. A company's web-based phonebook is an example of such an application. This document provides information about how you can use OpenSSO Enterprise to protect your web-base applications and services from unauthorized use or attack.
The following topics are included in this chapter:
About Web Services Security Models
A web service exposes its functionality using the Web Services Framework (WSF). The Web Services Framework defines its interface using Web Service Description Language (WSDL), and communicates using Simple Object Access Protocol (SOAP) and Extensible Markup Language (XML) messages. Although web services enable open, flexible, and adaptive interfaces, this openness create security risks. Without proper security measures in place, a web service can expose vulnerabilities that could allow unauthorized entities access to the enterprise. You can ensure the integrity, confidentiality and security of web services by using a comprehensive security model. In a good security model, web services are secured either point-to-point as provided by SSL/TLS, or end-to-end as specified by the Web Services Security (WS-Security) Framework.
The WS-Security Framework was developed by the OASIS Security committee along with other WS-* specifications such as WS-Trust and WSPolicy. Transport-layer or point-to-point transport mechanisms transmit information over the wire between clients and providers. Transport-layer security relies on secure HTTP transport (HTTPS) using Secure Sockets Layer (SSL). Transport security can be used for authentication, message integrity, and confidentiality. When running over an SSL-protected session, the server and client can authenticate one another and negotiate an encryption algorithm and cryptographic keys before the application protocol transmits or receives its first byte of data. Security is enabled from the time data leaves the consumer until the data arrives at the provider, or from the time the data leaves the provider until the data arrives at the consumer. Sometimes security data transfer can transpire even across intermediaries.
The following figure illustrates a security model that uses point-to-point security.
Figure 11–1 Secure Communication Channel Providing Point-to-Point Security
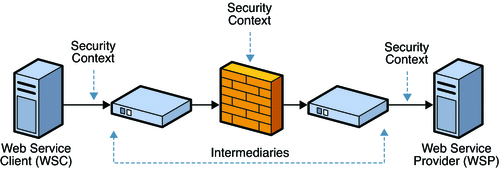
A drawback to using point-to-point security is that the message is not protected once it gets to its destination. One solution is to encrypt the message before sending using application security.
Using application-layer or end-to-end security, the message is secure even when the message is not in transit. Additionally, in application-layer security, the security information is contained within the SOAP message and the message attachment. This allows security information to travel along with the message or attachment. For example, a portion of the message may be signed by a sender and encrypted for a particular receiver. When the message is sent from the initial sender, it may pass through intermediate nodes before reaching its intended receiver. When this happens, the encrypted portions continue to be opaque to any intermediate nodes, and can only be decrypted by the intended receiver. Message security can be used to decouple message protection from message transport so that the message remains protected after transmission. For this reason, application-layer security is also sometimes referred to as end-to-end security .
The following figure illustrates a security model that uses end-to-end security.
Figure 11–2 Secure Communication Channel Providing End-to-End Security
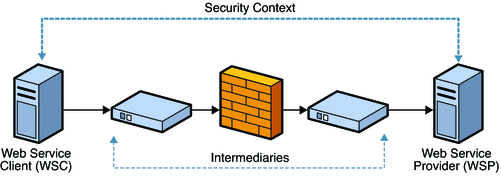
Application-layer security provides the following: Confidentiality, by encrypting message parts, integrity, by digital signatures , and authentication, by requiring username or X.509 tokens.
About OpenSSO Enterprise Web Services Security
You can configure OpenSSO Enterprise to act as a security token service, or as a web service security provider. When you use OpenSSO Enterprise to act as a web service security provider, you must configure both the web service client and at the web service provider.
Security Token Service
When configured as a security token service, OpenSSO Enterprise acts as a generic web service that does the following:
-
Issues, renews, cancels, and validates security tokens.
-
Enables customers to write custom security token providers by extending the framework.
-
Provides standards-based APIs for clients and applications to access the security token service.
-
Provides mechanisms to support additional security token types such as Kerberos and others.
Web Service Security Provider
OpenSSO Enterprise 8.0 provides web service security support for client applications which are based on Java API for XML Web Services (JAX-WS) or SOAP with Attachments API for Java (SAAJ). For JAX-WS based clients, web services security can be enforced at either the web or JavaEE container level using container-provided security authentication and authorization plug-ins, or using JAX-WS Handlers. The JSR 196 specification is one of the well known authentication and authorization security SPIs, currently supported by the Sun Application Server. Handlers are interceptors that can be easily plugged into the Java API for XML-Based Web Services (JAX-WS) 2.0 runtime environment to do additional processing of inbound and outbound messages.
For non-JAX-WS based client applications such as SAAJ-based, you can use the OpenSSO Enterprise client SDK can to programmatically, explicitly secure and validate both outbound and inbound messages between the web service client and web service provider.
Analyzing the Deployment Architecture
In this deployment example, messages are exchanged using the SOAP protocol to transfer security tokens between the communicating web service client and web service provider entities. The web service security providers can work independently of the OpenSSO Enterprise instance which is deployed as security token service. Web service security providers can secure the SOAP message by obtaining the security tokens from a vendor-neutral security token service.
The following are the major components in this deployment example:
-
OpenSSO Enterprise configured as a security token service
-
OpenSSO Enterprise configured as a web service security provider on a web service client
-
OpenSSO Enterprise configured as a web service security provider on a web service provider
-
Browser
The following figure illustrates the deployment architecture for using OpenSSO Enterprise to secure a web-based calendar service.
Figure 11–3 Deployment Architecture for Web Service Security Using Secure Token Service
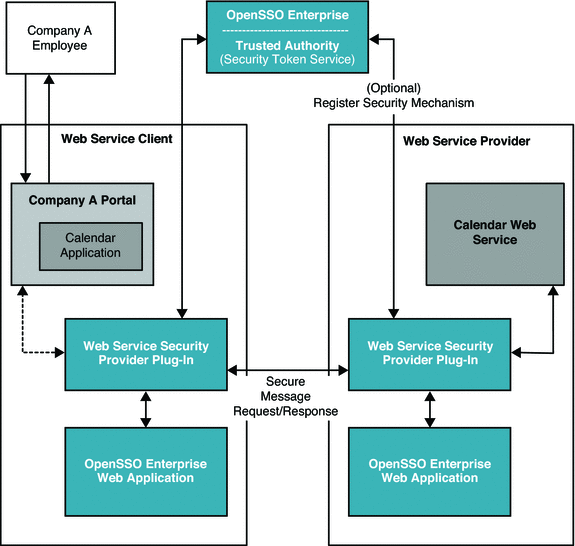
In this deployment example, a company employee has a user account in the Example Company identity system. The employee wants to access an internal calendar application to view a calendar service. The calendar application is part of the Example Company portal. All Example Company employees are required to authenticate themselves before accessing this internal portal. Additionally, the individual employee's credentials, such as role or group membership, must be validated before the employee can access the calendar application service.
The calendar application, on the employee's behalf, securely supplies the employee's credentials to the remote calendar web service.
The following two figures illustrate the process flow for a Web Service Security using Secure token Service.
Figure 11–4 Process Flow for Web Service Security Using Secure Token Service (Continued on next page)
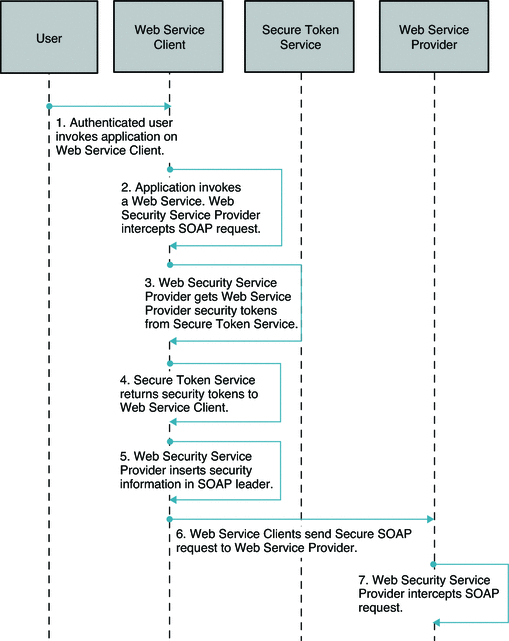
Figure 11–5 Process Flow for Web Service Security Using Secure Token Service (Continued)
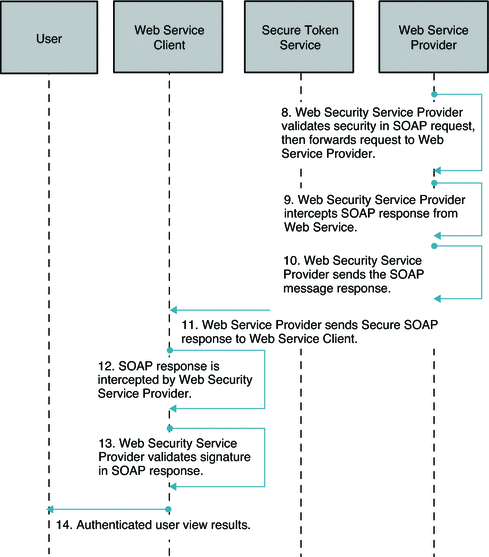
Understanding Typical Business Use Cases
The following are the types of users involved in transactions using Web Services Security and Secure Token Service:
-
Developers
Developers are typically application owners who use the OpenSSO Enterprise Client SDK APIs to communicate with a local security token service instance, or with web service security providers, to secure the applications making web services calls.
-
System administrators
Administrators are responsible for the configuring the OpenSSO Enterprise secure token service.
-
End users
End users such as company employees are exposed to OpenSSO Enterprise when they access the published web services.
Use Case 1
The following figure illustrates the process flow for a secured stock quotes web service using a Kerberos security token.
Figure 11–6 Process Flow for a Stock Quote Web Service Using Kerberos Security Token
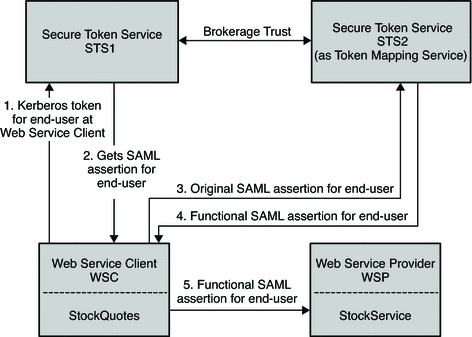
-
The Web Service Client authenticates to STS1 instance with the end user's Kerberos token .
The end user logs in to the Desktop at the Web Service Client. This can be viewed as a Kerberos token for the Web Service Client, too.
-
The Web Service Client gets the SAML token for the end user (Web Service Client).
-
The Web Service Client then talks to the STS2 (Token Mapping Service) .
-
The Web Service Client converts the end user's (Web Service Client) SAML token to a functional SAML token.
This is called an organizational SAML token, and used as an authentication token of the Web Service Client to STS2. Here the functional SAML token has the same identity or owner as the original SAML token, but with more attributes and privileges.
-
The Web Service Client then secures the web services request to the Web Service Provider with the functional SAML token.
The following are configuration suggestions for this use case:
-
STS client agent - profile name is STS1
- Security Mechanism:
-
Kerberos
- STS End Point:
-
of STS1 service
- STS Max End Point:
-
of STS1 service
-
STS client agent - profile name is STS2
- Security Mechanism:
-
STSSecurity
- STS config:
-
STS1
- STS End Point:
-
of STS2 service
- STS Max End Point:
-
of STS2 service
-
WSC agent - profile name is StockService or WSC
- Security Mechanism:
-
STSSecurity
- STS config:
-
STS2
- WSP End Point:
-
Default
Use Case 2
The following figure illustrates the process flow for a bank loan web service using a SAML 1 security token.
Figure 11–7 Process Flow for a Bank Loan Web Service Using SAML1 Security Token
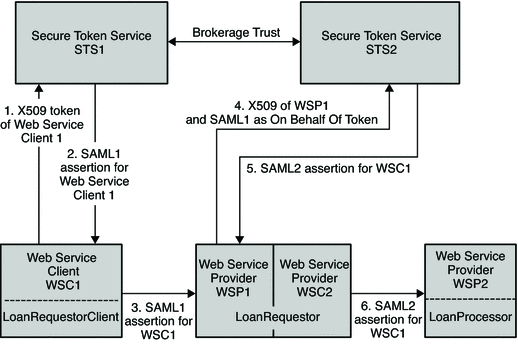
-
WSC1 authenticates to STS1 with its X509 token.
-
WSC1 gets to SAML1 token (owner is WSC1).
-
WSC1 secures web service to WSP1 with its SAML1 token.
-
WSP1 then authenticates to STS2 with its X509 token, and sends the SAML1 token of WSC1.
-
The SAML1 token is sent on behalf of the X509 token in order to convert it to SAML2 token for WSC1.
-
WSC2 just passes through this SAML2 token of WSC1 to WSP2.
WSC2 secures the web service to WSP2 with the SAML2 token of WSC1.
The following are configuration suggestions for the Bank Loan use case:
-
WSC agent - profile name is LoanRequestorService for WSC1
- Security Mechanism:
-
STSSecurity
- STS config:
-
SecurityTokenService
-
WSP agent - profile name is wsp for WSP1
- WSP End Point:
-
Default
- Authentication Chain:
-
ldapService
- Token Conversion Type:
-
SAML2 token
-
WSC agent - profile name is LoanProcessorService for WSC2
- Use Pass Through Security Token
-
Enabled
Use Case 3
The following figure illustrates the process flow for a bank loan web service using a X509 security token.
Figure 11–8 Process Flow for a Bank Loan Web Service Using an X509 Security Token
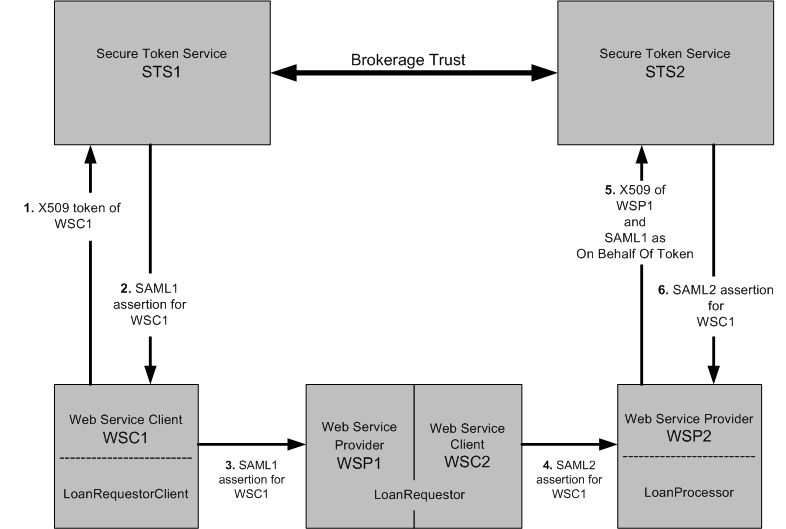
-
WSC1 authenticates to STS1 with its X509 token.
-
WSC1 gets the SAML1 token (owner is WSC1).
-
WSC1 secures web service to WSP1 with its SAML1 token.
-
WSP1/WSC2 passes through just this SAML1 token of WSC1 to WSP2.
Secures web service to WSP2 with SAML1 token of WSC1.
-
WSP2 then authenticates to STS2 with its X509 token.
Sends SAML1 token of WSC1 as On Behalf Of token in order to convert it to SAML2 token for WSC1.
-
STS2 sends back to WSP2 the converted SAML token for WSC1.
The following are suggested configurations:
-
Web Service Client agent - profile name is LoanRequestorService for WSC1
- Security Mechanism:
-
STSSecurity
- STS Configuration:
-
SecurityTokenService
-
Web Service Provider agent - profile name is wsp for WSP2
- Web Service Provider End Point:
-
Default
- Authentication Chain:
-
ldapService
- Token Conversion Type:
-
SAML2 token
-
WSC agent - profile name is LoanProcessorService for WSC2
- Use Pass Through Security Token:
-
Enabled
Considering Assumptions, Dependencies, and Constraints
Before using OpenSSO Enterprise to secure web services, you must resolve the following issues:
Assumptions and Dependencies
-
Metadata exchange (MEX) between individual components has already been completed.
-
Users are authenticated to an Identity Provider.
Constraints
-
The scope of the current Web Service Security provider plug-ins is limited to JSR 196 SPI implementation, and is only supported on Sun Application Server version 9.0 and above.
-
Clients using JAX-WS based applications on web or J2EE containers that do not support JSR 196 specifications must use handlers.
-
Clients using SAAJ based applications need to secure the messages programmatically using the OpenSSO Enterprise Client SDK.
Setting Up and Configuring Web Services Security Using Security Token Service
OpenSSO Enterprise ships with the StockQuoteClient and StockService sample applications. These sample applications show you how the Web Service Client, Web Service Provider, and Secure Token Service interact together in a demonstration environment. The sample applications are available in the wssagents/openssowssproviders.zip on the OpenSSO Enterprise download site.
To configure and deploy the sample applications, see the README files in the zipped archive. The following steps describe the high-level tasks for setting up the deployment illustrated in section Use Case 1. This deployment uses the StockQuoteClient (Web Service Client) and StockService (Web Service Provider) applications, from the OpenSSO Enterprise samples.
-
Create and configure a Secure Token Service instance, STS-1.
-
Install the STS-1 instance.
-
Configure a policy agent profile for the Web Service Provider.
-
Select security mechanisms.
-
-
Create and configure a second Secure Token Service instance, STS-2 instance.
-
Install the STS-2 instance.
-
Configure an policy agent profile for the STS-1 instance.
-
-
Create and configure the Configuration Instance for the Web Service Client and Web Service Provider.
-
Install the WSC-WSP Configuration Instance.
-
Create And Configure a policy agent profile for the STS-2 instance.
-
Configure a policy agent profile for the STS-1 instance.
-
Configure a policy agent profile for the Web Service Client.
-
Configure a policy agent profile for the Web Service Provider.
-
-
Create and configure the Web Service Client instance.
-
Create and configure the Web Service Provider instance.
-
Install the Web Service Provider instance.
-
The Web Service Provider as an OpenSSO Enterprise client.
-
Configure the Web Service Provider GlassFish instance.
-
-
Build and deploy the Web Service Client application.
-
Build and deploy the Web Service Provider application.
-
Test to verify that the Web Service Security works as designed.
Evaluating Benefits and Tradeoffs
The following lists are designed to help you determine whether using OpenSSO Enterprise to secure web services is suitable in your environment.
Benefits
-
Based on standards specification as developed by OASIS, Liberty Alliance Project, Web Services Interoperability Organization, World Wide Web Consortium.
-
Secures the message over all hops and after the message arrives at its destination.
-
Security is fine-grained and can selectively be applied to different portions of a message (and to attachments if using XWSS).
-
Can be used in conjunction with intermediaries over multiple hops.
-
Is independent of the application environment or transport protocol.
-
Securing web services interactions is transparent to the client applications when web service security providers are configured in web or J2EE containers.
Tradeoff
The drawback to using message-level security is that it is relatively complex and adds some overhead to processing.
Chapter 12 Enabling Single Sign-On Between Sun Identity Manager and OpenSSO Enterprise
This chapter provides information about integrating Sun OpenSSO Enterprise 8.0 with Sun Identity Manager 8.0. This information is useful when you want to enable single sign-on between the two products, or when you want to use Identity Manager to provision users to OpenSSO Enterprise.
The following topics are contained in this chapter:
-
Considering the Deployment Assumptions, Dependencies, and Constraints
-
Setting Up and Configuring Single Sign-On Between Identity Manager and OpenSSO Enterprise
About Sun Identity Manager
Sun Identity Manager enables you to securely and efficiently manage and audit access to accounts and resources, and to distribute access management overhead. By mapping Identity Manager objects to the entities you manage such as users and resources, you significantly increase the efficiency of your operations. The Identity Manager solution enables you to:
-
Manage account access to a large variety of systems and resources.
-
Securely manage dynamic account information for each user's array of accounts.
-
Set up delegated rights to create and manage user account data.
-
Handle large numbers of enterprise resources, as well as an increasingly large number of extranet customers and partners.
-
Securely authorize user access to enterprise information systems.
Grant, manage, and revoke access privileges across internal and external organizations.
-
Keep data in sync by not keeping data.
Analyzing the Deployment Architecture
This deployment requires an OpenSSO Enterprise server, an Identity Manager server, and a Sun Policy Agent installed on the Identity Manager web container. The OpenSSO Enterprise server is configured with two data stores: the OpenSSO configuration data store, and the Sun Directory Server user data store. The user data store is configured in the OpenSSO Enterprise subrealm. The Identity Manager server is configured to use a MySQL server for both Identity Manager configuration and Identity Manager user data.
The following figure illustrates the main components of the deployment.
Figure 12–1 Deployment Architecture for Enabling Single Sign-On Between OpenSSO Enterprise and Identity Manager
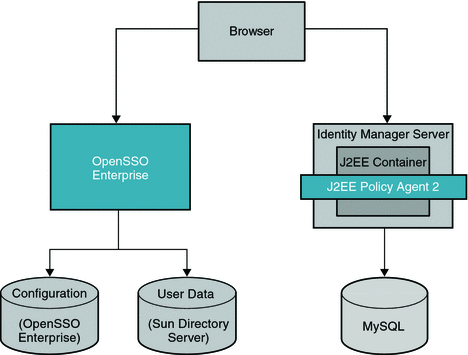
The Sun Policy Agent plays an important role in the single sign-on between OpenSSO Enterprise and Identity Manager. In addition to protecting the Identity Manager content pages, it helps map the OpenSSO Enterprise user ID to the Identity Manager user ID.
The following two figures illustrate a typical process flow.
Figure 12–2 Process Flow for Single Sign-On Between OpenSSO Enterprise and Identity Manager (Continued on next page)
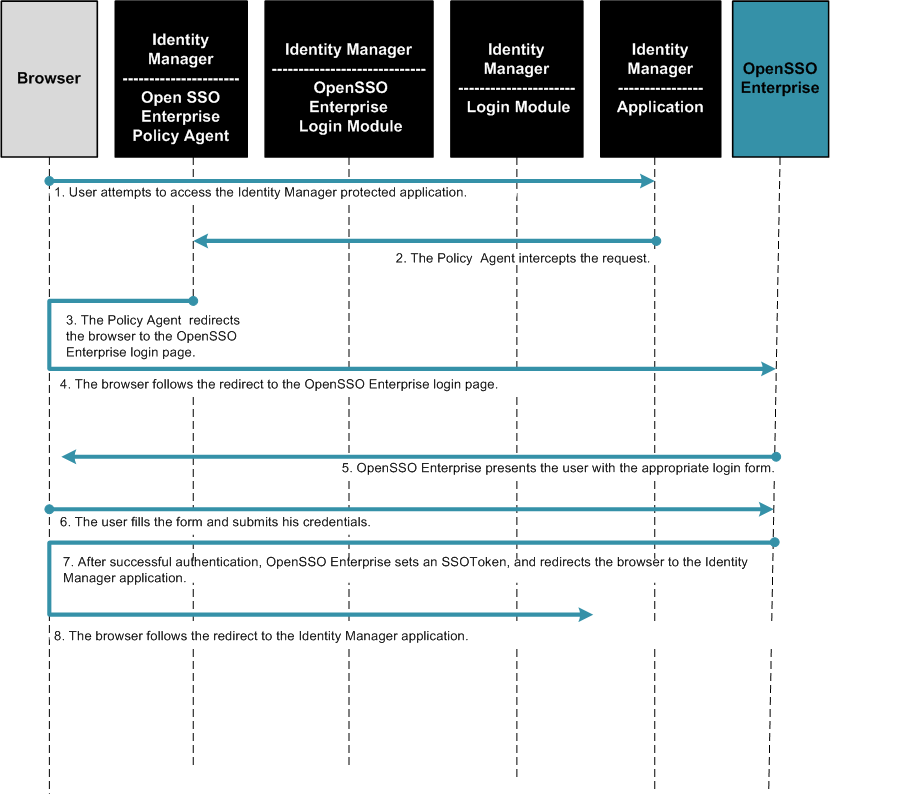
Figure 12–3 Process Flow for Single Sign-On Between OpenSSO Enterprise and Identity Manager (Continued)
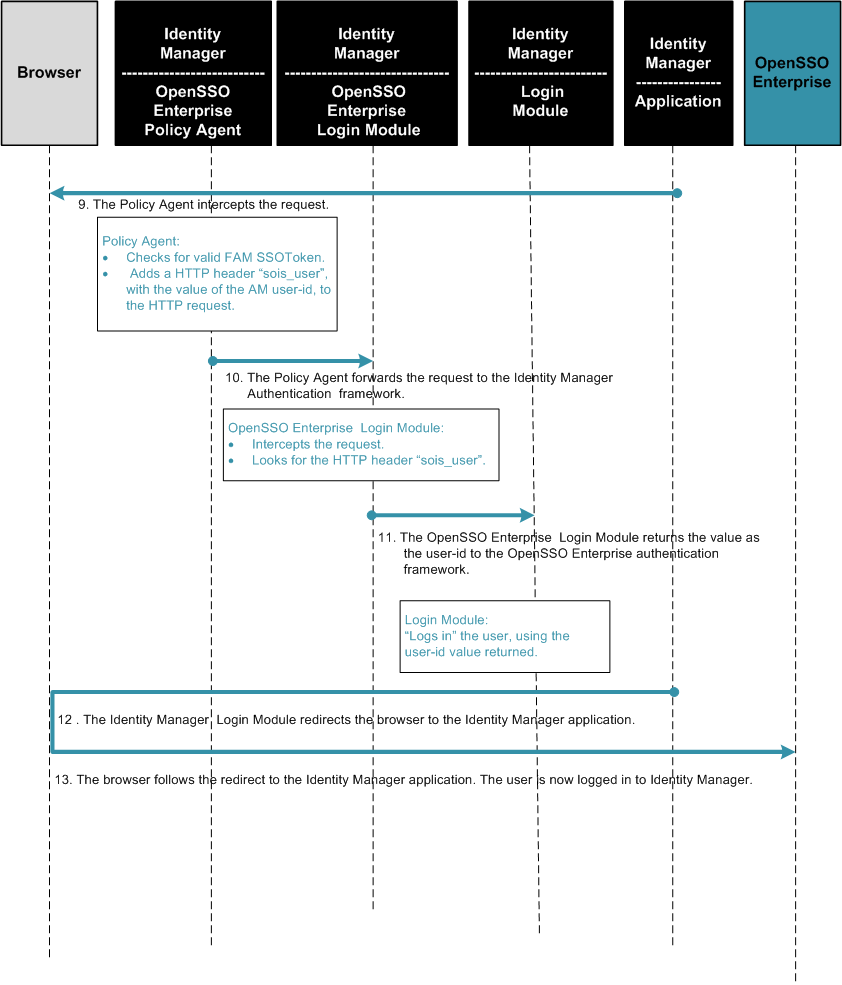
The following UML use case diagram illustrates the provisioning and retrieval of objects in Identity Manager.
Figure 12–4 Provisioning and Retrieving Objects in Identity Manager
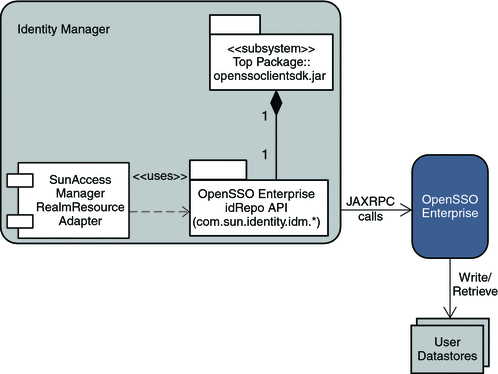
Considering the Deployment Assumptions, Dependencies, and Constraints
Before you can enable single sign-on between OpenSSO Enterprise and Identity Manager, you must resolve the following issues.
Assumptions
-
OpenSSO Enterprise must already be installed.
-
OpenSSO Enterprise must be installed in the Realm mode of operation.
-
OpenSSO Enterprise must be configured with Sun OpenDS as the embedded configuration data store.
-
OpenSSO Enterprise must contain a sub-realm named idm configured with Sun Directory Server user data store.
-
The Directory Server user data store must also have the OpenSSO Enterprise schema loaded in it.
Dependencies
-
If you require roles to be provisioned on Identity Manager to OpenSSO Enterprise, and you are using the Sun Access Manager Resource Adapter, then the OpenSSO Enterprise user data store must have the OpenSSO Enterprise schema loaded in it.
If the OpenSSO Enterprise data store plug-in for a generic LDAPv3 data store has no OpenSSO Enterprise schema in it, the data store plug-in does not support the management of either managed roles or filtered roles through it. The OpenSSO Enterprise data store plug-in is designed to work this way. It is important to note here that you do not have to provision roles in order to achieve single sign-on.
-
Because OpenSSO Enterprise is installed in the Realm mode of operation, the Identity Manager resource adapter for Realm mode, SunAccessManagerRealmResourceAdapter, must be configured on Identity Manager.
In earlier versions of OpenSSO Enterprise, previously known as Access Manager, the product was installed in the Legacy mode of operation. In Legacy mode, a different Identity Manager resource adapter, SunAccessManagerResourceAdapter, must be configured on Identity Manager. Both types of adapters have the same functionality with one difference. The SunAccessManagerResourceAdapter uses the legacy Access Manager AMSDK API, while the SunAccessManagerRealmResourceAdapter uses the OpenSSO Enterprise idRepo API. The idrepo APIs are the next-generation OpenSSO client APIs, and will eventually replace the legacy AMSDKAPI.
Constraints
When testing the Sun Access Manager Resource Adapter, before the Policy Agent has been installed, the client-side AMConfig.properties file must be configured with amadmin or a user that has privileges to read the OpenSSO Enterprise configuration data, for the property com.sun.identity.agents.app.username. If a different type of user is used in this configuration, the configuration of the Sun Access Manager Resource Adapter fails. This change is required only until the Policy Agent is installed. After the Policy Agent has been installed, the AMConfig.properties file is not required and can be deleted from the filesystem.
Although this document describes the use case where Identity Manager and OpenSSO Enterprise are configured for both single sign-on and provisioning, it is possible to configure the deployment for either single sign-on or provisioning only. If single sign-on between OpenSSO Enterprise and Identity Manager is not required, then the OpenSSO Enterprise Policy Agent does not need to be installed and configured. You can ignore the steps that involve configuring the OpenSSO Enterprise Policy Agent.
Understanding Typical Business Use Cases
The most common use case for this deployment is when a company uses OpenSSO Enterprise with OpenSSO Enterprise Policy Agents to protect business applications, including Identity Manager applications. The main objective is to streamline the login process for end-users who are already logged in to OpenSSO Enterprise. For example, if a user is already logged in to OpenSSO Enterprise, the user should experience a seamless transition into any Identity Manager application without having to log in to Identity Manager. A secondary objective is to provide a measure of controlled access to all Identity Manager applications.
Another typical use case for this deployment is provisioning. The company uses Identity Manager to provision users into various business systems such as human resources or accounting systems. This can also include provisioning users into the company's business systems that are protected by OpenSSO Enterprise.
Setting Up and Configuring Single Sign-On Between Identity Manager and OpenSSO Enterprise
The following components are used in this deployment:
-
Sun Solaris Operating System 10
-
Sun OpenSSO Enterprise 8.0
-
Sun Java Identity Manager 8.0
-
Sun Java Web Server 7.0
-
Sun Java Application Server 9.1
-
Sun Java Directory Server 6.1
-
MySQL 5.1
-
MySQL Connector 5.0
-
Sun Java AM Policy Agent 3.0 (for Sun Java Application Server 9.1) (Optional)
-
Netbeans IDE 6.0.1
See the Chapter 1, Integrating Sun Identity Manager , in Sun OpenSSO Enterprise 8.0 Integration Guide for detailed installation steps. The following is a summary of high-level procedures you must complete to enable single sign-on between OpenSSO Enterprise and Identity Manager:
-
Installing And Configuring MYSQL
-
Install MySQL.
-
Complete post-installation tasks.
-
-
Installing And Configuring Identity Manager Application Server
-
Install Application Server.
-
Install Identity Manager on Application Server.
-
Complete post-installation configuration on Application Server.
-
-
Create an OpenSSO Enterprise Realm Administrator in OpenSSO Enterprise.
-
Create an OpenSSO Enterprise Realm Resource Object in Identity Manager.
-
Provision identities from Identity Manager to OpenSSO Enterprise.
-
Provision a test user from Identity Manager into OpenSSO Enterprise.
-
Provision a test role from Identity Manager into OpenSSO Enterprise.
-
Provision an Admin-User from Identity Manager into OpenSSO Enterprise
-
Provision an Admin-Role from Identity Manager into OpenSSO Enterprise.
-
-
Install and Configure the OpenSSO Enterprise Policy Agent on Identity Manager.
-
Complete pre-installation tasks for the OpenSSO Enterprise Policy Agent.
-
Install the OpenSSO Enterprise Policy Agent on the Identity Manager server.
-
Configure the OpenSSO Enterprise Policy Agent on the OpenSSO Enterprise Server.
-
Disable OpenSSO Enterprise Policy Agent protection of the Identity Manager server.
-
Configure the OpenSSO Enterprise Policy Agent on the Identity Manager server.
-
-
Configure Identity Manager for single sign-on.
-
Configure Identity Manager Login Module Groups.
-
Configure the Identity Manager User Login Interface.
-
Configure the Identity Manager Admin Login Interface.
-
-
Test single sign-on from OpenSSO Enterprise to Identity Manager.
-
Re-Enable OpenSSO Enterprise Policy Agent protection of the Identity Manager server.
-
Test end-user single sign-on between OpenSSO Enterprise and Identity Manager.
-
Test Admin-User single sign between OpenSSO Enterprise and Identity Manager.
-
Evaluating Benefits and Tradeoffs
As you design your deployment architecture, be sure to consider the benefits, tradeoffs. The following lists may help you determine if enabling single sign-on between Identity Manager and OpenSSO Enterprise is appropriate to meet your business needs.
Benefits
-
If you use an OpenSSO Enterprise user store that has the OpenSSO Enterprise schema loaded into it, you can provision managed-roles or filtered-roles into OpenSSO Enterprise.
-
If you configure OpenSSO Enterprise with a generic LDAP user datastore that does not have the OpenSSO Enterprise schema loaded into it, then you could configure an LDAP Resource Adapter instance instead of the Sun Access Manager Resource Adapter on Identity Manager. The LDAP Resource Adapter on Identity Manager is a generic adapter that can be used to provision or manage objects in any LDAP resource. This would potentially reduce the number of different types of Resource Adapters, that an Identity Manager administrator would have to maintain.
Tradeoffs
If the OpenSSO Enterprise user store does not have the OpenSSO Enterprise schema loaded into it, OpenSSO Enterprise would use the generic LDAPv3 plug-in for this datastore. The creation of managed-roles and filtered-roles is not supported on such a datastore.
Finding More Information
-
Sun Identity Manager 8.0 product documentation
Chapter 13 Enabling Single Sign-On Using CA SiteMinder and OpenSSO Enterprise
This chapter describes options for co-locating CA SiteMinder with Sun OpenSSO Enterprise in the same environment. For more detailed information about configuring end-to-end SiteMinder single sign-on using OpenSSO, see the Sun OpenSSO Enterprise 8.0 Integration Guide.
The following topics are contained in this chapter:
About CA SiteMinder
Computer Associates (CA) SiteMinder, formerly Netegrity SiteMinder, is an enterprise infrastructure product that enables centralized, secure Web access management. Its features include user authentication and single sign-on, policy-based authorization, and identity federation. One of the first single sign-on products to arrive on the market, legacy SiteMinder installations still exist to protect enterprise applications in many company networks.
Analyzing the Deployment Architecture Options
This chapter describes single sign-On between OpenSSO Enterprise and SiteMinder in both intranet and federated extranet environments. The examples in this chapter describe single sign-on, but do not include authorization.
SiteMinder and OpenSSO Enterprise typically co-exist in the following use cases:
-
Simple Single Sign-On
Major components are OpenSSO Enterprise, an OpenSSO Enterprise Policy Agent, a custom OpenSSO Enterprise authentication module, SiteMinder, and a SiteMinder Policy Agent.
-
Federated Single Sign-On in an Identity Provider Environment
Major components are OpenSSO Enterprise, an OpenSSO Enterprise Policy Agent, a custom OpenSSO Enterprise authentication module, SiteMinder, and a SiteMinder Policy Agent.
-
Federated Single Sign-On in a Service Provider Environment
Major components are OpenSSO Enterprise, a custom OpenSSO Enterprise authentication module, SiteMinder, a custom SiteMinder plug-in, and SiteMinder Policy Agent.
Single logout for any these of these use cases can be implemented in many ways.
Logical architecture diagrams and process flow diagrams for these deployment options are described in the following section “Understanding the Business Use Cases.”
Considering Assumptions, Dependencies, and Constraints
This chapter describes the conceptual integration between the two access management products. However, in real deployments the use cases will vary. In all the deployment architecture examples, the common data store is shared between two products when they are co-located. This document focuses on mutual validation of user sessions. However, mutual validation can be extended to attributes and other state information. The sessions are managed independently, and managing session timeouts are outside the scope of this document. Also, this document assumes the logout is relatively simple and involves invalidating both sessions as POST Logout process. For federation single sign-on, this document assumes SAMLv2 protocols. However, similar functionality can be achieved using other federation protocols such as ID-FF, WS-Federation, and SAML1.
Understanding Typical Business Use Cases
The following use cases focus on single sign-on enablement and do not describe authorization options:
Simple Single Sign-On
In a simple single sign-on example, the SiteMinder instance is already deployed and configured to protect some of the enterprise applications in a company intranet. In the architecture figure below, the legacy application is contained in the Protected Resource . The company wants to continue leveraging the legacy SiteMinder deployment as the authentication authority. The company also wants to add OpenSSO Enterprise to the environment to leverage its advanced features such as identity federation, XACML policies, web services, and so on. An OpenSSO Enterprise policy agent protects the Protected Resource, while OpenSSO Enterprise itself is protected by a SiteMinder policy agent. The following figure illustrates the deployment architecture for single sign-on using both SiteMinder and OpenSSO Enterprise.
Figure 13–1 Deployment Architecture for Simple Single Sign-On with SiteMinder
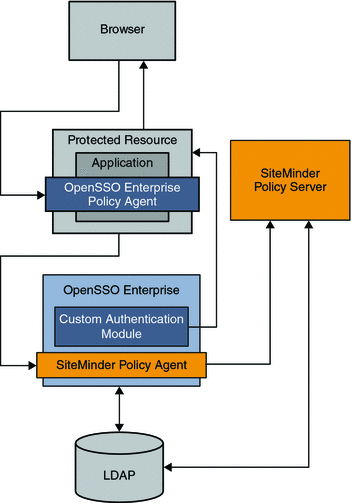
The following figure illustrates the process flow in this deployment.
Figure 13–2 Process Flow for Simple Single Sign-On with SiteMinder
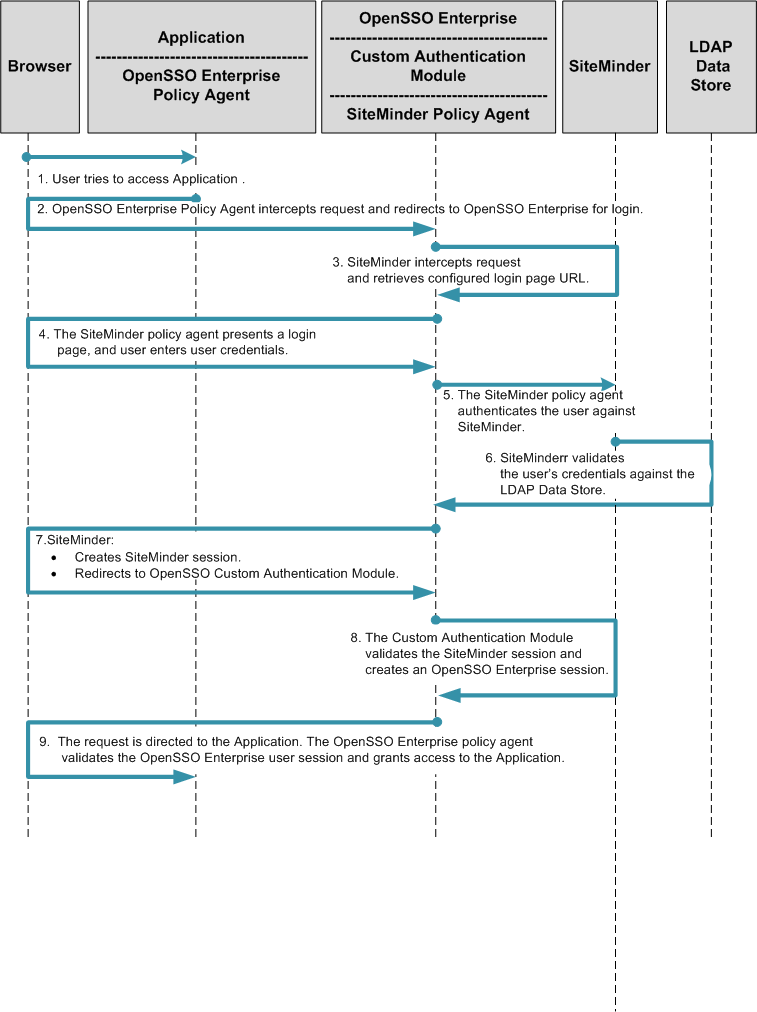
Federated Single Sign-On
The SAML, ID-FF, and WS-Federation protocols provide cross-domain single sign-on among multiple trusted business entities. These protocols are also used in Identity Federation. Identity Federation involves an Identity Provider, also known as an authentication provider, and a Service Provider where the user authentication session at the Identity provider is consumed. The following are common use cases in which SiteMinder is enabled for federation protocols:
-
Enabling SiteMinder for federation protocols in a Service Provider environment
-
Enabling SiteMinder for federation protocols in an Identity Provider environment
Federated Single Sign-On in an Identity Provider Environment
This is the most common of the deployments. This is a good approach when you want to use OpenSSO Enterprise for establishing partner relations and still leverage the SiteMinder authentication framework.
For example, as a company partners with external companies, the company deploys OpenSSO in the Service Provider environment to leverage the SAMLv2 Federation protocols. The following figure illustrates how SiteMinder can be enabled in an Identity Provider environment using OpenSSO Enterprise for federation protocols.
Figure 13–3 Deployment Architecture for Federated Single Sign-On in an Identity Provider Environment
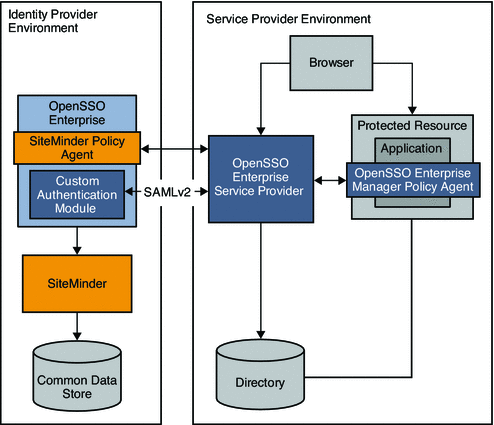
In this example, OpenSSO Enterprise provides federated single sign-on among enterprise applications in partner environments, while SiteMinder continues to provide authentication. The following two figures illustrates a typical transaction flow.
Figure 13–4 Process Flow for Federated Single Sign-On in an Identity Provider Environment
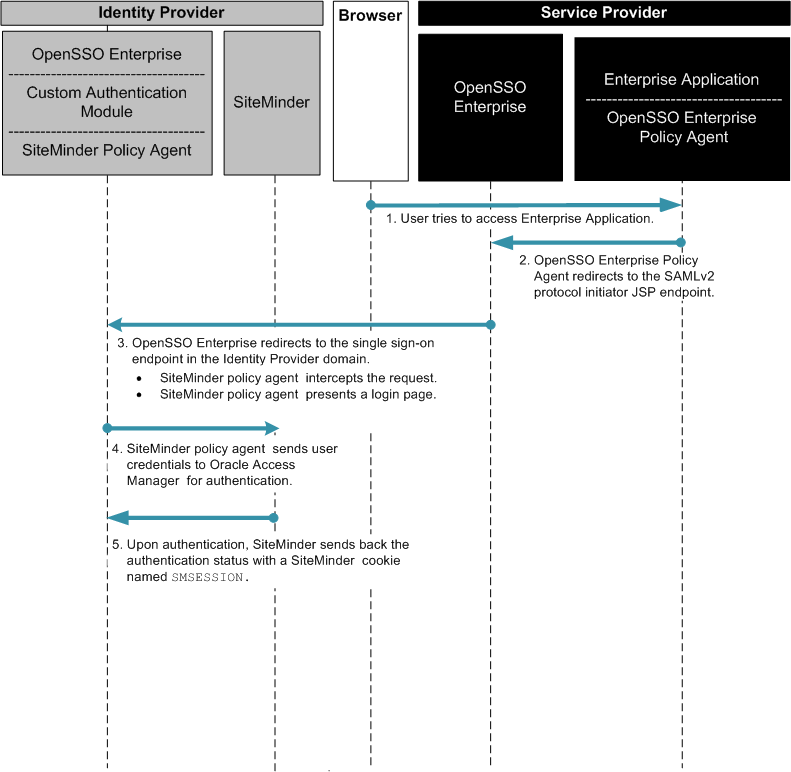
Figure 13–5 Process Flow for Federated Single Sign-On in an Identity Provider Environment (Continued)
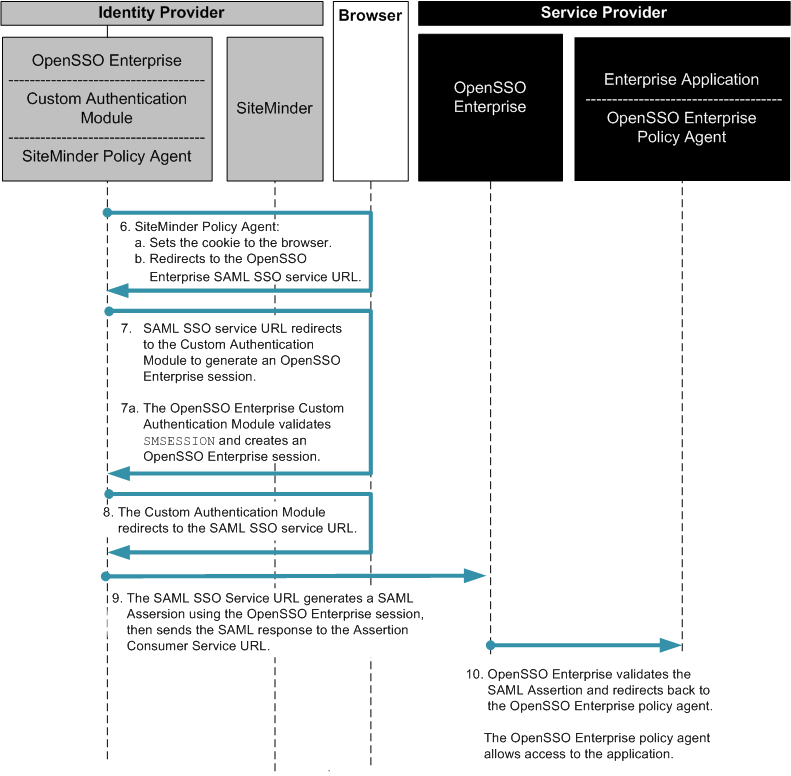
Federated Single Sign-On Use Case in the Service Provider Environment
In this example, the company uses SiteMinder in the Service Provider environment to protect legacy applications. OpenSSO Enterprise is installed solely to invoke Federation protocols. This deployment quickly enables partners (Service Providers) to establish federation environments with their trusted Identity Providers where the authenticates must be delegated.
Figure 13–6 Deployment Architecture for Federated Single Sign-On In the Service Provider Environment
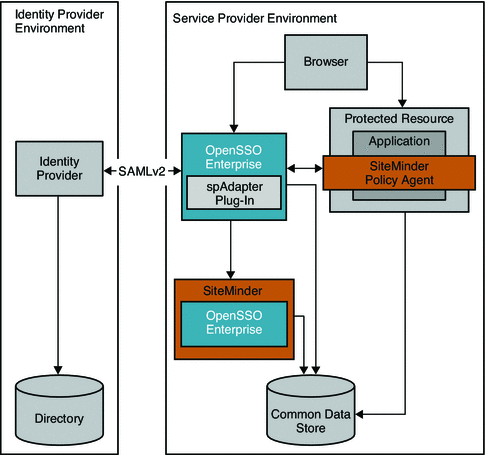
The following two figures illustrate the steps in the single sign-on flow:
Figure 13–7 Process Flow for SiteMinder Federation in the Service Provider Environment
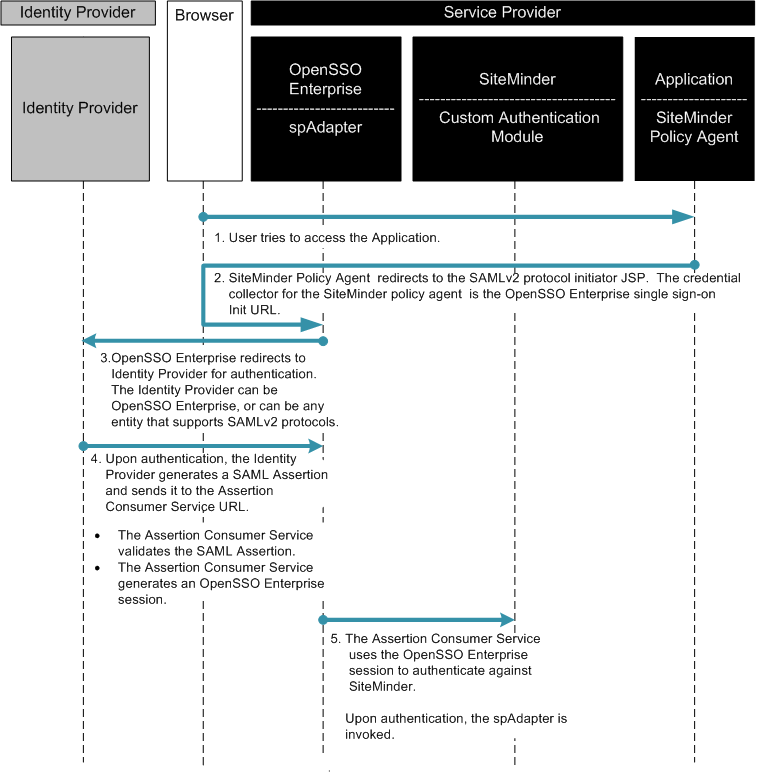
Figure 13–8 Process Flow for SiteMinder Federation in the Service Provider Environment (continued)
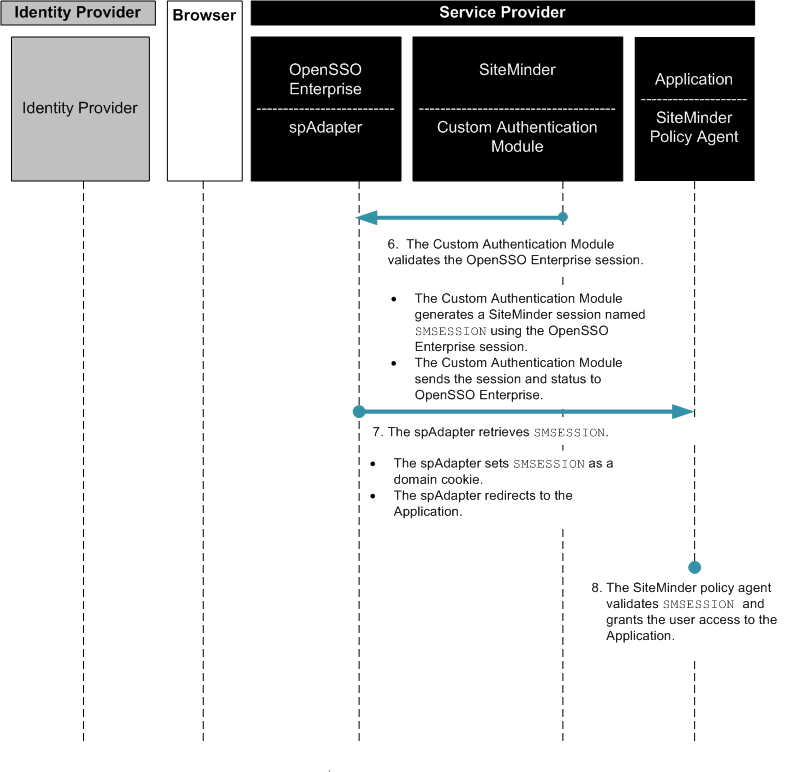
Setting Up and Configuring Single Sign-On with SiteMinder and OpenSSO Enterprise
To co-locate both SiteMinder and OpenSSO Enterprise in the same federation environment, you must install the OpenSSO Enterprise server and OpenSSO Enterprise policy agents. The setup requires OpenSSO Enterprise 8.0 and the corresponding Policy Agents. OpenSSO Enterprise is supported on various containers, however, you must choose a container where both OpenSSO Enterprise and SiteMinder Policy Agents are supported.
The SiteMinder software is not available online, and you must have an account with Computer Associates to obtain the software. To validate this document, the following components were deployed in a lab environment:
-
Sun OpenSSO Enterprise 8.0
-
Sun Web Server 6.1 SP5
-
Sun Directory Server 5.2 SP2
-
CA SiteMinder Server 6.0 SP5
-
CA SiteMinder Agent 6.0 for iPlanet Web Server 6.1
-
CA SiteMinder SDK 6.0 SP5
-
Custom codes (Bundled in the OpenSSO Enterprise zip)
The OpenSSO Enterprise bundle ships integration bits contained in the OpenSSO Enterprise WAR file. Instructions for configuring the authentication modules are described in corresponding README files. For more detailed steps for complete integration see the Chapter 2, Integrating CA SiteMinder, in Sun OpenSSO Enterprise 8.0 Integration Guide.
Evaluating Benefits and Tradeoffs
As you design your deployment architecture, be sure to consider the benefits, tradeoffs. The following lists may help you determine if enabling federation using SiteMinder and OpenSSO Enterprise is appropriate to meet your business needs.
Benefits
-
OpenSSO Enterprise allows you to continue using an existing SiteMinder deployment for authentication while leveraging the more advanced features of Federation Access Manager.
-
OpenSSO Enterprise quickly enables federation protocols for SiteMinder without few changes to the existing infrastructure.
-
OpenSSO Enterprise supports a variety of industry standard protocols such as SAMLv2 , ID-FF, ID-WSF, WS-Federation, XACML, WS-*, and others.
-
OpenSSO Enterprise supports any generic LDAP repository for users, and can work with the existing SiteMinder database.
-
OpenSSO Enterprise leverages its own configuration data store, which minimizes the need to migrate data from a different data store.
Tradeoffs
In general, when integrating any two access management products, you must consider the increased costs in resources and maintenance.
-
When co-locating SiteMinder and OpenSSO, session management for both the products must be synchronized.
-
Full integration requires you to set up session synchronization, possibly by using notification mechanisms effectively
-
Administrators must be trained and proficient in the use of both products.
Finding More Information
See the Chapter 2, Integrating CA SiteMinder, in Sun OpenSSO Enterprise 8.0 Integration Guide for detailed information about implementing single sign-on using CA SiteMinder and OpenSSO Enterprise.
Chapter 14 Enabling Single Sign-On Using Oracle Access Manager and OpenSSO Enterprise
This chapter describes options for co-locating Oracle Access Manager with Sun OpenSSO Enterprise in the same environment. For more detailed information about configuring end-to-end Oracle Access Manager single sign-on using OpenSSO, see the Sun OpenSSO Enterprise 8.0 Integration Guide.
The following topics are contained in this chapter:
About Oracle Access Manager
Oracle Access Manager (previously known as Oblix NetPoint and Oracle COREid) is an enterprise single sign-on product with many of the same features as Sun OpenSSO Enterprise and CA SiteMinder (previously known as Netegrity SiteMinder). Many companies have Oracle Access Manager already deployed and want to keep existing functionality even after installing OpenSSO Enterprise.
Analyzing the Deployment Architecture Options
Oracle has two solutions for web-based single sign-on. One solution is to use the legacy Oracle Access Manager single sign-on product, previously known as Oblix Access, which is integrated in the Oracle Application Server. This chapter focuses on this first solution.
Another solution is to use the Oracle Access Manager product with OpenSSO Enterprise. Oracle Access Manager is usually used for both single sign-on and delegated administration. This second solution is out of the scope of this document.
Oracle Access Manager and OpenSSO Enterprise typically co-exist in the following use cases:
-
Simple Single Sign-On
Major components are OpenSSO Enterprise, an OpenSSO Enterprise Policy Agent, a custom OpenSSO Enterprise authentication module, Oracle Access Manager, and Oracle WebGate.
-
Federated Single Sign-On in an Identity Provider Environment
Major components are OpenSSO Enterprise, an OpenSSO Enterprise Policy Agent, a custom OpenSSO Enterprise authentication module, Oracle Access Manager, and Oracle WebGate.
-
Federated Single Sign-On in a Service Provider Environment
Major components are OpenSSO Enterprise, a custom OpenSSO Enterprise authentication module, Oracle Access Manager, a custom Oblix plug-in, and Oracle WebGate.
Single logout for any these of these use cases can be implemented in many ways.
Logical architecture diagrams and process flow diagrams for these deployment options are described in the following section “Understanding the Business Use Cases.”
Considering Assumptions, Dependencies, and Constraints
This chapter describes the conceptual integration between the two products, OpenSSO Enterprise and Oracle Access Manager. In real deployments the use cases vary widely. In the deployment architecture diagrams below (see Understanding Typical Business Use Cases), the common data store is used between two products when they are co-located. The examples in this chapter focus primarily on mutual validation of user sessions. However, the same model can be extended to attribute exchange and other state information. For example, sessions can be managed independently. But and managing session timeouts are outside the scope of this document.
In the deployment examples in this chapter, the logout is assumed to be relatively simple and involves validating both OpenSSO Enterprise and Oracle Access Manager sessions as POST Logout processes.
For federated single sign-on, the examples in this chapter use SAMLv2 protocols. Similar functionality can be achieved using other federation protocols such as ID-FF, WS-Federation, SAML1 and so forth.
Understanding Typical Business Use Cases
The following use cases focus on single sign-on enablement and do not describe authorization options:
Simple Single Sign-On Use Case
Simple single sign-on integration is useful when an Oracle Access Manager instance is already deployed and configured to protect intranet enterprise applications. Additionally, OpenSSO Enterprise is deployed to protect the same intranet applications by honoring the user session obtained by Oracle Access Manager. In the following illustration, both OpenSSO Enterprise and Oracle Access Manager share the same user repository for user profile verification. OpenSSO Enterprise can also be configured to use the Ignore Profile option if it relies on the Oracle Access Manager session for attributes.
The following figure illustrates architecture in the simple single sign-on use case.
Figure 14–1 Simple Oracle Access Manager Single Sign-On
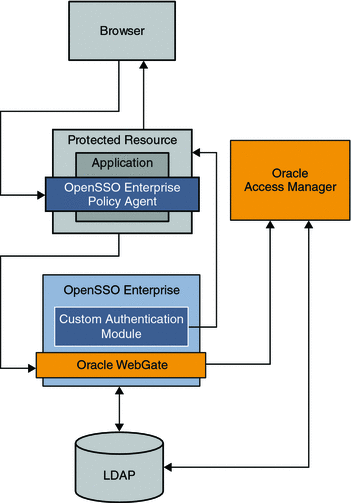
The following figure illustrates the process flow among components in the Identity Provider environment and Service Provider environment.
Figure 14–2 Process Flow for Simple Oracle Access Manager Single Sign-On
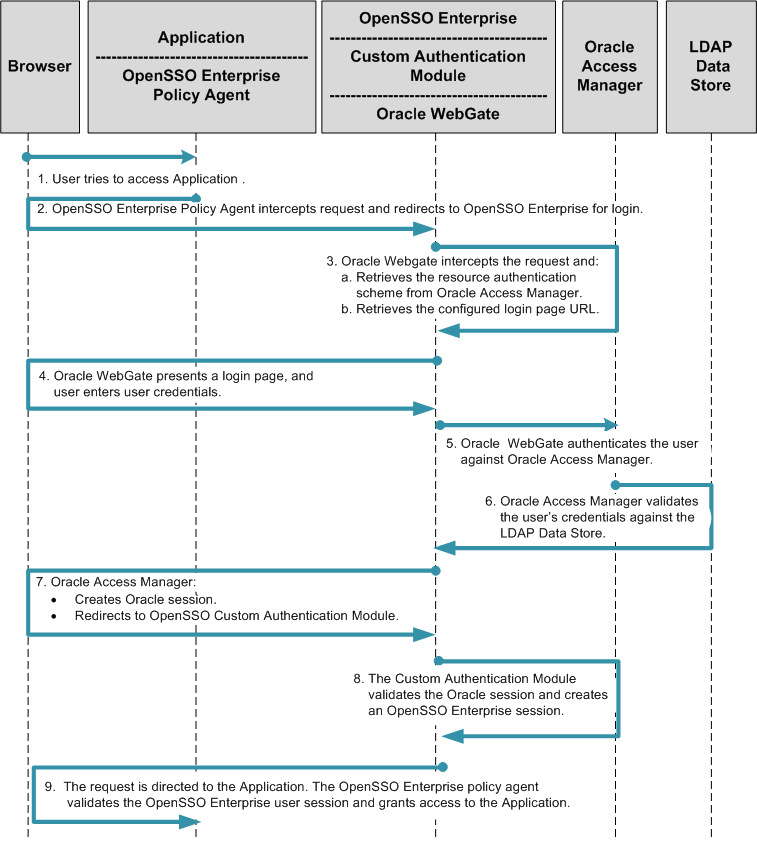
Federated Single Sign-On Use Cases
The SAML, ID-FF, and WS-Federation protocols provide cross-domain single sign-on among multiple trusted business entities. These protocols are also used in Identity Federation. Identity Federation involves an Identity Provider, also known as an authentication provider, and a Service Provider where the user authentication session at the Identity Provider is consumed. The following are common use cases in which Oracle Access Manager is enabled for federation protocols:
-
Enabling Oracle Access Manager for federation protocols in a Service Provider environment
-
Enabling Oracle Access Manager for federation protocols in an Identity Provider environment
Using OpenSSO Enterprise to Enable Oracle Federation in an Identity Provider Environment
In this example, Oracle Access Manager is the authentication provider in an Identity Provider environment and protects some of the intranet applications. OpenSSO Enterprise in this deployment resolves the single sign-on issues among enterprise applications in partner environments while Oracle Access Manager provides authentication.
Figure 14–3 Oracle Access Manager Federation in an Identity Provider Environment
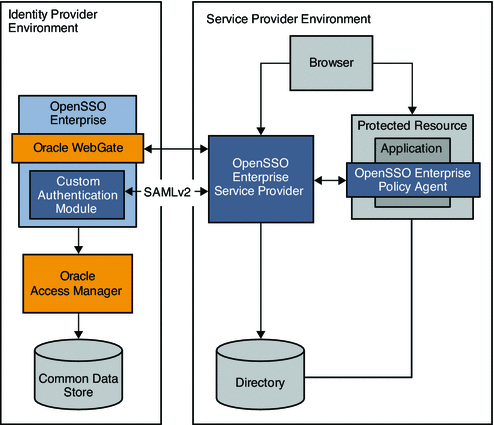
The following two figures illustrate the process flow among components in the Identity Provider environment and Service Provider environment.
Figure 14–4 Process flow for Oracle Access Manager Federation in an Identity Provider Environment
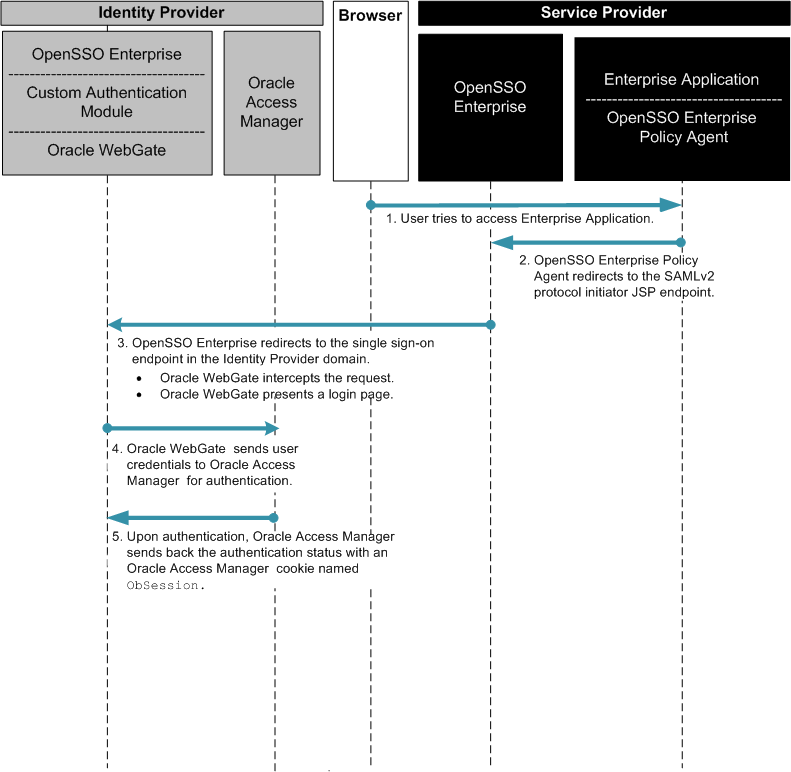
Figure 14–5 Process flow for Oracle Access Manager Federation in an Identity Provider Environment (continued)
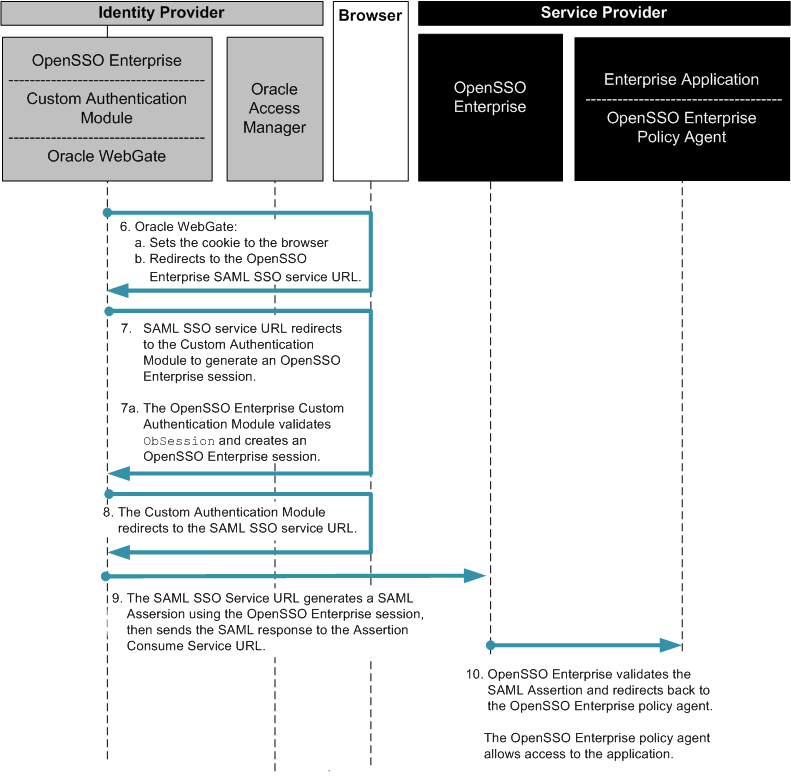
Using OpenSSO Enterprise to Enable Oracle Federation in a Service Provider Environment
In this deployment, Oracle Access Manager is installed and configured in Service Provider Environment to protect legacy applications.
Figure 14–6 Oracle Access Manager Federation in a Service Provider Environment
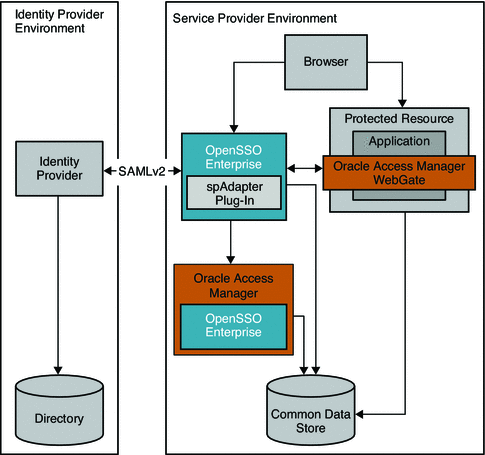
The following two figures illustrate the process flow among components in the Identity Provider environment and Service Provider environment.
Figure 14–7 Process Flow for Oracle Access Manager Federation in a Service Provider Environment
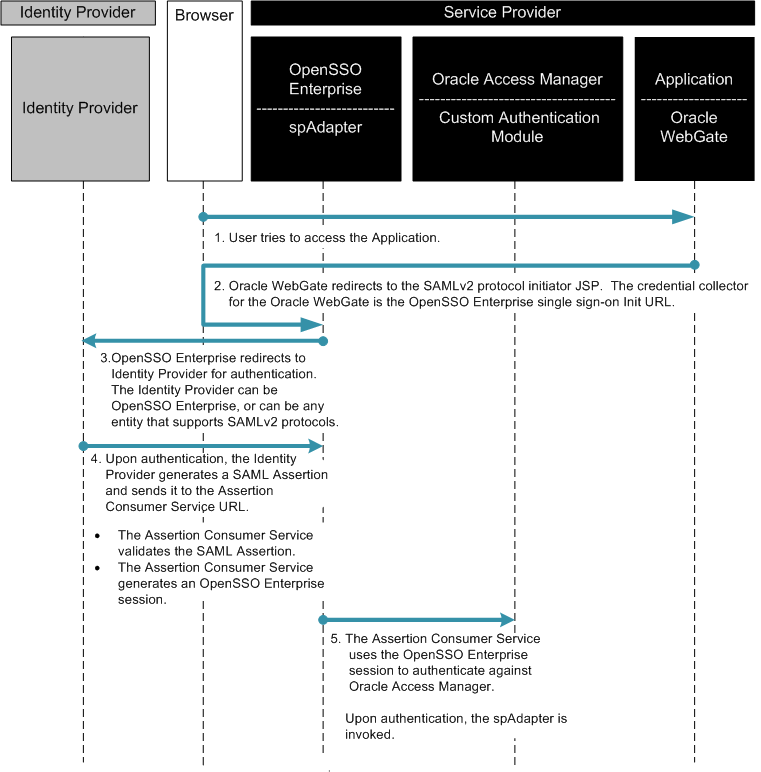
Figure 14–8 Process Flow for Oracle Access Manager Federation in a Service Provider Environment (continued)
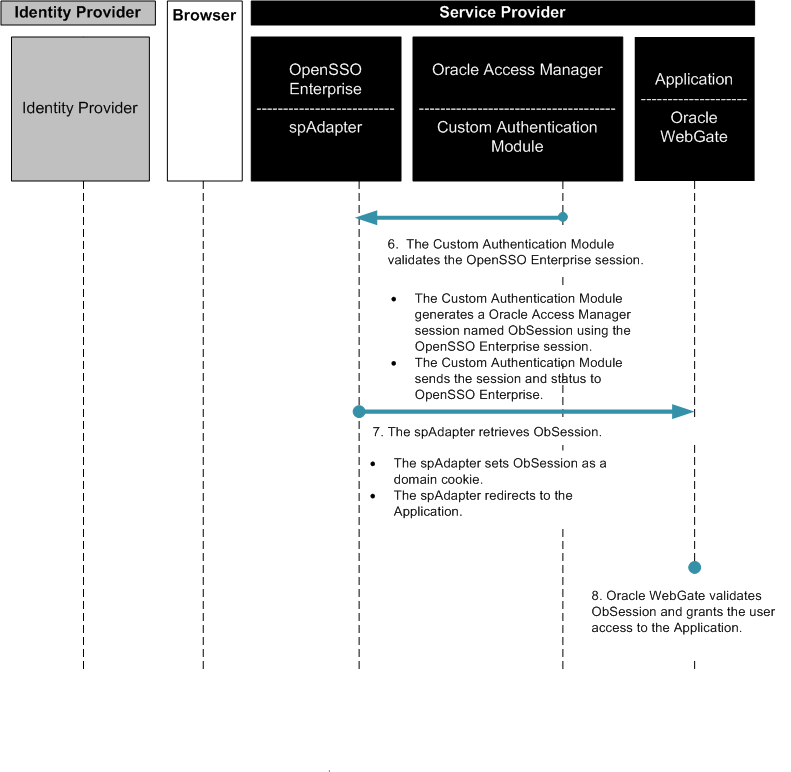
Setting Up and Configuring Single Sign-On Using Oracle Access Manager and OpenSSO Enterprise
The setup requires OpenSSO Enterprise 8.0 and the corresponding Policy Agents. OpenSSO Enterprise is supported on various containers. But you have to choose a container that supports both OpenSSO Enterprise and Oracle Access Manager Web Gate. The Oracle Access Manager Software is available online for temporary evaluation. For validation, this document used following software:
-
Sun OpenSSO Enterprise 8.0
-
Sun Web Server 6.1 SP5 Sun Directory Server 5.2 SP2
-
Oracle Access Manager 10g (10.1.4.0.1)
-
Oracle Access Manager Agents (Web Gate) 10g (10.1.4.0.1)
-
Oracle Access Manager SDK 10g (10.1.4.0.1)
-
Custom codes (Bundled in the OpenSSO Enterprise zip)
The OpenSSO Enterprise bundle ships integration bits along with OpenSSO Enterprise WAR file. The instructions on configuring the authentication modules are contained in the corresponding README files.
Evaluating Benefits and Tradeoffs
As you design your deployment architecture, be sure to consider the benefits, tradeoffs. The following lists may help you determine if enabling federation using Oracle Access Manager and OpenSSO Enterprise is appropriate to meet your business needs.
Benefits
-
OpenSSO Enterprise allows you to continue using an existing Oracle Access Manager deployment for authentication while leveraging the more advanced features of OpenSSO Enterprise.
-
OpenSSO Enterprise quickly enables federation protocols for Oracle Access Manager with few changes to the existing infrastructure.
-
OpenSSO Enterprise supports a variety of industry standard protocols such as SAMLv2 , ID-FF, ID-WSF, WS-Federation, XACML, WS-*, and others.
-
OpenSSO Enterprise supports any generic LDAP repository for users, and can work with the existing Oracle Access Manager database.
-
OpenSSO Enterprise leverages its own configuration data store, which minimizes the need to migrate data from a different data store.
Tradeoffs
In general, when integrating any two access management products, you must consider the increased costs in resources and maintenance.
-
When co-locating Oracle Access Manager and OpenSSO Enterprise, session management for both the products must be synchronized.
-
Full integration requires you to set up session synchronization, possibly by using notification mechanisms effectively.
-
Administrators must be trained and proficient in the use of both products.
Chapter 15 Using the Embedded Configuration Data Store for OpenSSO Enterprise
OpenSSO Enterprise uses an embedded configuration data store that stores information in a hierarchical form. Clients can communicate with the embedded configuration data store using the LDAP and DSML network protocols to retrieve and update information in a variety of ways.
The embedded configuration data store is run in embedded mode with OpenSSO under J2EE-compliant web containers. The embedded configuration data store works as the default configuration storage directory service. It also can be used as the user data storage directory service for non-production purposes.
The following topics are contained in this chapter:
Analyzing the Deployment Architecture
Using the OpenSSO Enterprise embedded configuration data store can lower response time and ensure service availability when machine failure occurs. You can deploy multiple OpenSSO instances to serve as a single system, and their corresponding embedded configuration data store instances will be automatically configured in data replication mode. Each embedded configuration data store instance in the system will contain the same set of data. Any update request in a single instance will be replayed in all other instances in the system. By using the simplest architecture, the embedded configuration data store replication model uses multi-master (peer-to- peer) network structure.
Single-Server and Multiple-Servers Modes
The following figure illustrates OpenSSO Enterprise deployed with the embedded configuration data store in single-server mode.
Figure 15–1 Single-Server Mode
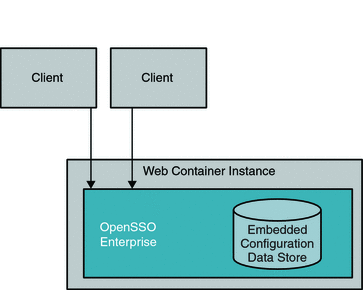
Under multiple-servers mode, every OpenSSO Enterprise instance works with its own embedded configuration data store instance under the same memory space in the web container. The embedded configuration data store replication mechanism uses the custom replication protocol to maintain the data consistency between directory service instances.
The following figure illustrates OpenSSO Enterprise deployed with the embedded configuration data store in multiple-servers mode.
Figure 15–2 Multiple-Servers Mode
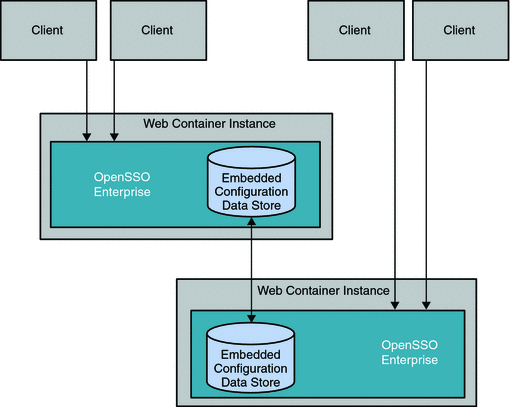
Replication Structure
Replication is entirely handled by OpenSSO Enterprise. The OpenSSO Enterprise embedded configuration data store replication model supports multi-master network architecture. The embedded configuration data store separates actual data from replication metadata. In this model, the server that stores the configuration data is called the directory server. The server that stores the replication metadata is called the replication server.
Even the smallest deployment must include two replication server instances, to ensure availability when the replication server instances fails. Replication servers perform the following functions:
-
Manage connections from directory servers
-
Connect to other replication servers
-
Listen for connections from other replication servers
-
Receive changes from directory servers
-
Forward changes to directory servers and to other replication servers
-
Save changes to stable storage and trimming older operations
Each replication server contains a list of all the other replication servers in the replication topology. Replication servers are also responsible for providing other servers information with information about the replication topology.
Directory servers perform the following functions:
-
Receiving read and write requests from client applications
-
Forwarding changes to specific replication servers
Each directory server contains a list of the suffix DNs to be synchronized. For each suffix DN to be synchronized, each directory server contains a list of replication servers to connect to. When a change is made on a directory server, that directory server forwards the change to the local replication server. The replication server then relays the change to other replication servers in the topology, which in turn relay the change to all other directory servers in the topology.
Applications should typically perform reads and writes on the same directory server instance. This reduces the likelihood of consistency problems due to replication.
Every replication server instance maintains a message queue which is used to store pending changes. When one of the directory servers is down, all the changes applied to other servers will be stored in the corresponding message queue in the server instance which receives the requests. Once the directory server instance is back online, the replication servers relay all the changes to maintain data consistency. However, the size of the message queue and purge delay time are limited. By default, the size of the message queue is 10000 changes. The purge delay time is 24 hours. If one of the servers is down longer than the purge delay time, or if the changes applied to a particular directory server exceeds the size of message queue, the replication system will lose synchronization.
You can change the value of the purge delay and the size of message queue by adding the entries ds-cfg-replication-purge-delay and ds-cfg-queue-size attributes to the file config.ldif. The config.ldif file is under the directory OpenSSO base directory/opends/config directory. The unit of ds-cfg-replication-purge-delay is seconds, and the unit of ds-cfg-queue-size is integer. Once the embedded configuration data store instance loses synchronization, the only way to bring the system back to synchronization is to reconfigure OpenSSO Enterprise with the embedded configuration data.
To determine whether embedded configuration data store instances are synchronized, OpenSSO Enterprise CLI tools ssoadm provides a command embedded-status to check the status of embedded configuration data store instances. SeeChapter 1, ssoadm Command Line Interface Reference, in Sun OpenSSO Enterprise 8.0 Administration Reference Alternatively, you can check the embedded configuration data store logs when you suspect a problem with configuration data store inconsistencies. The logs are under the directory OpenSSO base directory/opends/logs. Current OpenSSO Enterprise embedded configuration data store replication implementation is recommended for use with the server instances located within the same geographical region.
Summary of Actual Replication Test Results
Replication tests were run using up to four instances of the OpenSSO Enterprise embedded configuration data store with Tomcat and GlassFish. The results show that replication was successful among the four instances using 8000 policies. The following is a summary of the test results:
-
When all four instances are online, the delay of synchronization of replication is generally less than one second, which is negligible.
-
The time required to load the same amount of data in an embedded configuration data store instance is longer when replication is enabled whether or not all instances are online.
-
The time required to load the data is incremental. The time required to load the second 1000 entries is longer that the time required to load the first 1000 entries.
-
Data loading time can be significantly reduced by breaking up the data and loading data at the same time using multiple instances.
-
With the same amount of memory heap size (2GB), Tomcat performs better than GlassFish v2 for smaller settings (one or two instances). GlassFish performs better in larger settings (four instances).
Understanding Typical Business Use Cases
OpenSSO Enterprise customers usually want to use multiple instances of OpenSSO Enterprise with embedded configuration data storage as a single system at their local site for the following reasons:
-
They don't want to pay the extra cost of maintaining a separate configuration data store.
-
They need a fully tested solution for the configuration data store to avoid incompatibility problems.
-
They want to deploy and use the system within a short timeframe.
Considering Assumptions, Dependencies, and Constraints
Assumptions
- Software Requirements:
-
-
J2EE-compliant web container
-
Java Virtual Machine version 5 or newer
-
- Hardware Requirement:
-
1GB of system memory (on top of other running applications)
Dependencies and Constraints
OpenSSO Enterprise supports the use of the embedded OpenDS server in multi-master network structure. In multi-master network structure, each embedded configuration data store instance in the environment has its own replication server, and replication servers have direct communication with each other. The following figure illustrates a multi-master network structure
Figure 15–3 Directory Servers and Replications Servers in a Multi-Master Network Structure
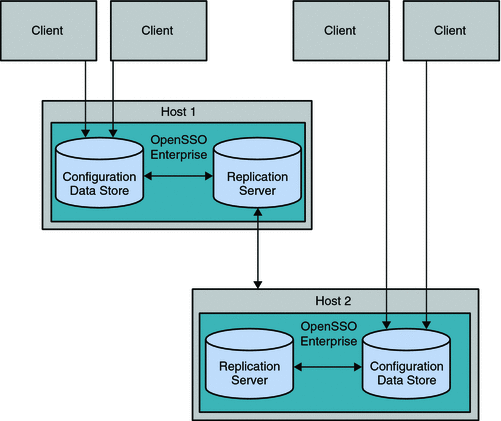
For more information about replication topologies, see the OpenDS Wiki home page.
Configuring the Embedded Configuration Data Store for OpenSSO Enterprise
Use the OpenSSO Enterprise Configurator to configure the embedded configuration data store.
-
In a web browser, go to the following URL:
https://hostname.example.com:1081/opensso
-
On the Configurator page, under Custom Configuration, choose Create New Configuration.
-
On the Step 1: General page, provide your user name and password. Then click Next.
-
On the Step 2: Server Settings page, provide the following, then click Next.
Server URL
Cookie Domain
Platform Locale
Configuration Directory
-
On the Step 3: Configuration and Data Store Settings page, choose “Add to Existing Deployment.”
Provide the configuration data store server URL. Additional configuration data store settings, including replication server settings, are displayed.
-
On the same page, after reviewing the configuration data store settings, click Finish.
For a detailed example of configuring the embedded configuration data store, see To Configure OpenSSO Enterprise 1 in Deployment Example: Single Sign-On, Load Balancing and Failover Using Sun OpenSSO Enterprise 8.0.
Evaluating Benefits and Tradeoffs
Benefits
-
Service response time is improved.
-
Access load can be reduced in a single machine.
-
Replication provides horizontal read scalability.
-
Ensures availability of data and service in the event of machine failure.
Tradeoffs
-
More storage and system resources are required for data redundancy.
-
More network bandwidth is required for communication between servers.
Finding More Information
-
OpenDS Wiki
-
OpenDS Replication Information
Chapter 16 Implementing Cross-Domain Single Sign-On with Cookie Hijacking Prevention
This chapter provides high-level instructions for deploying OpenSSO Enterprise in a cross-domain single sign-on (CDSSO) environment and configuring the OpenSSO Enterprise server and policy agents to prevent cookie highjacking. Topics include:
About Cross-Domain Single Sign-On
CDSSO extends single sign-on beyond a single domain. Basic single sign-on uses HTTP cookies within a single DNS domain. In basic single sign-on, the OpenSSO Enterprise server and all policy agent-protected resources reside in the same DNS domain. When a user successfully authenticates to an OpenSSO Enterprise server, an SSO token, represented by an HTTP cookie, is set to the user's browser with the OpenSSO Enterprise DNS domain as the cookie domain. From this point until the session terminates or expires, the browser always presents the SSO token to any server or policy agent in the same DNS domain based on the HTTP protocol. This allows OpenSSO Enterprise and the policy agents to reexamine the validity of the user session and identity, and then enforce security policies without re-authentication. But basic single sign-on cannot be used in environments where OpenSSO Enterprise and its policy agents reside in different DNS domains.
For example, OpenSSO Enterprise and some policy agents may reside in www.domain1.com while some other policy agents reside in www.domain2.com. During authentication to OpenSSO Enterprise, the SSO token is set to the browser with domain1.com as the cookie domain. However, when the browser accesses the resources protected by policy agents in domain2.com, the browser does not present the SSO token to the policy agents. For the policy agents, no SSO token means the user is not authenticated. The policy agents force the user to authenticate. The OpenSSO Enterprise in the appropriate DNS domain sees that the browser does have a valid session SSO token. OpenSSO Enterprise redirects the browser back to the original requested resource in www.domain2.com creating a redirection loop.
To overcome this problem, you can configure the CDSSO feature in the OpenSSO Enterprise server in its policy agents. CDSSO is a mechanism for passing SSO tokens to policy agents protecting resources present in different DNS domains. CDSSO makes it possible for users to authenticate once against OpenSSO Enterprise server in a primary DNS domain, and then access resources protected by the policy agents present in other DNS domains without having to re-authenticate. CDSSO is an OpenSSO Enterprise proprietary mechanism to support single sign-on across multiple domains. Alternatively, you can use standards-based Federation protocols to achieve single sign-on across multiple domains.
Figure 16–1 Single Sign-On Failure When Policy Agents Reside in Different DNS Domains
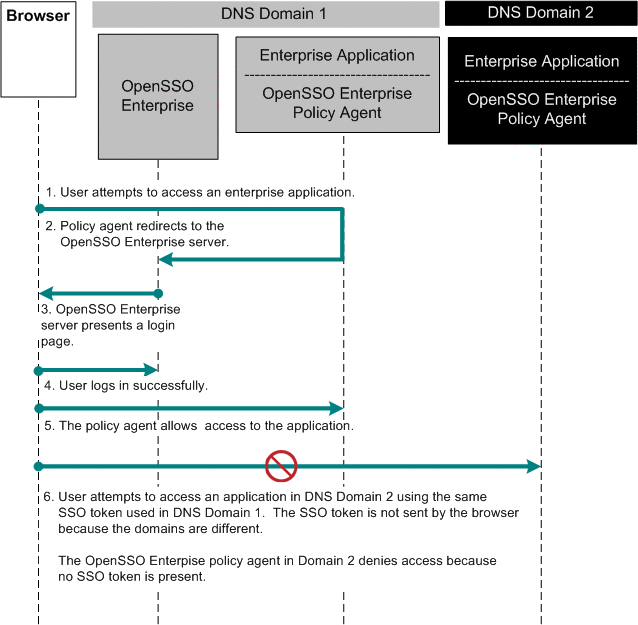
The Policy Agent's Role in CDSSO
The Java EE Policy Agent's Role
Based upon the appropriate HTTP protocols, an SSO token is presented to servers in the DNS domain that is set in the cookie. A server may only set a cookie within their own domain. So despite having a valid SSO token cookie in one domain, policy agent-protected servers in other domains are never presented with this cookie.
CDSSO overcomes the problem with coordinated work between two components:
-
Cross-Domain Controller (CDC) servlet on the OpenSSO Enterprise server: http(s)://opensso_host:port/opensso/cdcserlvet
-
CDSSO Redirect Servlet on the Java EE policy agent
http(s)://agent_host:port/agentapp/sunwCDSSORedirectURI
The CDSSO Redirect Servlet extracts the SSO Token sent by the CDC Servlet, and then sets the same SSO Token cookie again. This time the SSO Token is set with the policy agent's fully qualified host name as the cookie domain. This process essentially replicates the SSO Token in the policy agent DNS domain from the OpenSSO Enterprise DNS domain. The following figure illustrates the CDC servlet and CDSSO Redirect Servlet process flows.
Figure 16–2 Process flow for CDC Servlet and CDSSO Redirect Servlet
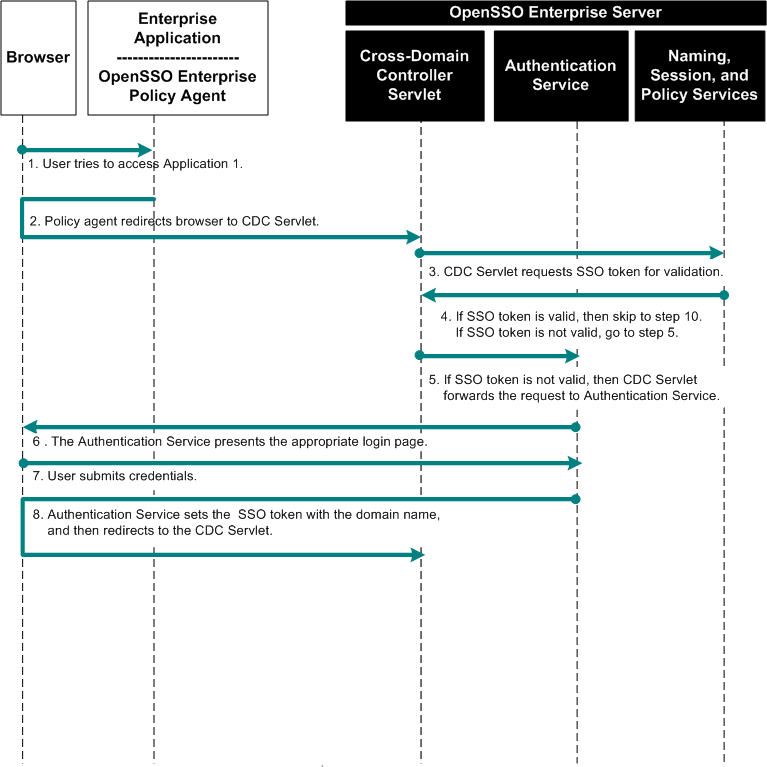
Figure 16–3 Process flow for CDC Servlet and CDSSO Redirect Servlet (continued)
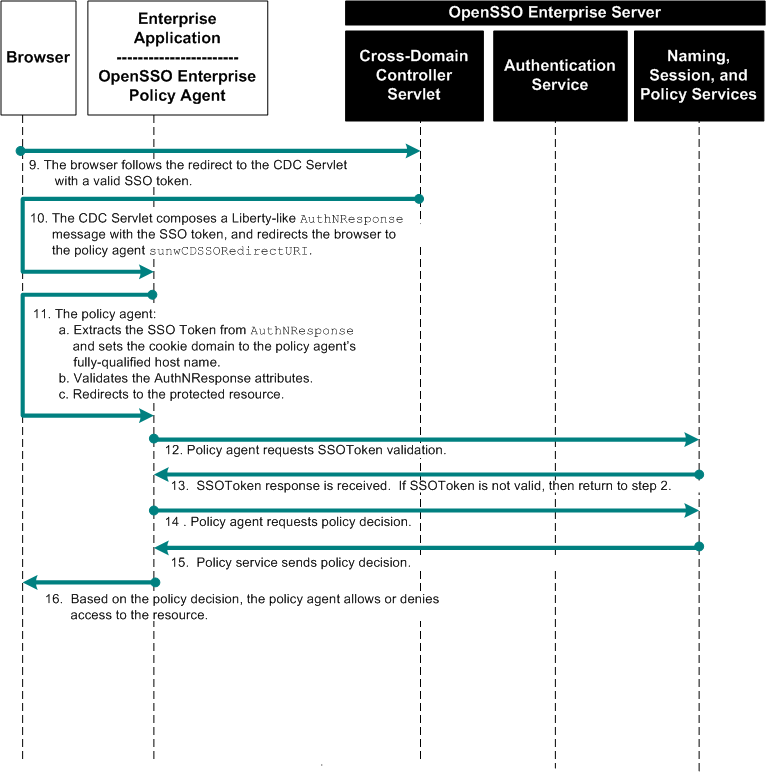
The Web Policy Agent's Role in CDSSO
The Web Policy Agent works similarly as the Java EE Policy Agent except for a slight variance. No CDSSO Redirect Servlet exists on the web policy agent because the agent is an NSAPI plug-in. As a result, the web policy agent combines the above steps 11 through 13 into a single step with no redirection.
About Cookie Hijacking Prevention
A common concern for administrators who want to restrict access to web-based applications in an OpenSSO Enterprise deployment is that hackers might use rogue or untrusted applications to steal, or hijack, session cookies. The way OpenSSO Enterprise is configured influences the way it sets the session cookies. By default OpenSSO Enterprise sets session cookies for the entire domain. All applications hosted on the domain share the same session cookies. This scenario could enable an untrusted application to intervene and gain access to the session cookies, which in turn poses a security threat. To guard against potential threats posed by cookie hijacking, configure CDSSO with cookie hijacking prevention. As a best practice, configure CDSSO with cookie hijacking prevention even in the deployments where all OpenSSO Enterprise components are in same domain. Having CDSSO and cookie hijacking prevention enabled when the deployment involves a single domain may seem unnecessary. But ultimately security is increased by taking advantage of both features.
Key Cookie Hijacking Security Issues and Solutions
The term “cookie hijacking” refers to a situation where an impostor gains unauthorized access to cookies. The imposter could be a hacker using an untrusted application. Cookie hijacking, by itself, does not refer to unauthorized access to protected web resources. When the cookies being hijacked are session cookies, then cookie hijacking potentially increases the threat of unauthorized access to protected web resources, depending upon how the system is configured.
Shared Session Cookies Security Issue
All applications share the same HTTP or HTTPS session cookie. This shared session-cookie scenario enables hackers to intervene by using an untrusted application to hijack the session cookie. With the hijacked session cookie, the untrusted application can impersonate the user and access protected web resources.
OpenSSO Enterprise Solution
Unique SSO token is issued to each application or policy agent after the user has been authenticated. The unique SSO token is referred to as a "restricted token." The restricted token is inextricably connected to the application and to the policy agent. Since each user's SSO token is unique for each application or policy agent, the increased security provided by this scenario prevents an untrusted application, impersonating the user, from accessing other applications. More specifically, the restricted SSO token assigned to a user as a part of the user's session is associated with the policy agent that initiated the original redirection for authentication. So all subsequent requests are checked to verify that they are coming from the same policy agent. If a hacker tries to use the same restricted token to access another application, a security violation is thrown.
What makes the restricted token “restricted” is not related to the syntax of the token. The syntax of a restricted token is the same as that of a regular SSO token. Instead, a specific constraint (IP or DN) is associated with the restricted token. OpenSSO Enterprise server checks the validity of the IP or DN before performing any operation using this restricted token. From OpenSSO Enterprise 8.0 Update 1 onwards, you can configure the DN only restriction. The DN only restriction is suitable if the agents are behind the firewall. This constraint is what ensures that the restricted token is only used for an application that a given policy agent protects.
Access to User Profile Attributes Security Issue
The untrusted application can use the session cookie to obtain and possibly modify the profile attributes of the user. If the user has administrative privileges, the application could do much more damage.
OpenSSO Enterprise Solution
By issuing a restricted SSO token, the set of Session Service operations that can be performed are limited using these tokens. This functionality enables OpenSSO Enterprise to prevent applications from modifying profile attributes of the user. The following figure illustrates a typical OpenSSO Enterprise deployment within an enterprise. While the figure illustrates security issues related to cookie hijacking, the figure also illustrates the solution.
Figure 16–4 Process Flow for Cookie Hijacking Prevention
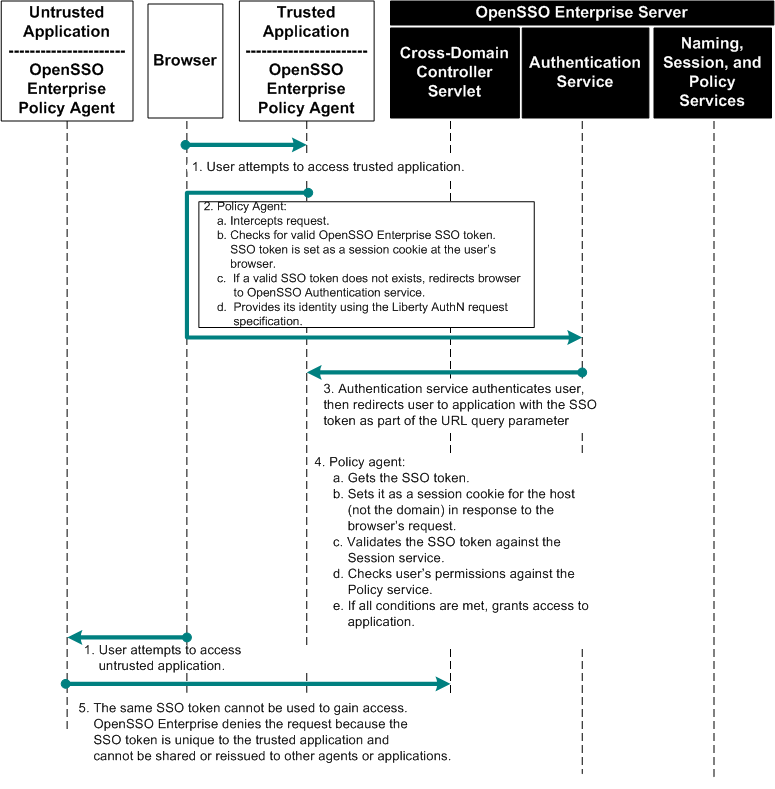
OpenSSO Enterprise Session Cookies Involved in Issuing Unique SSO Tokens
When OpenSSO Enterprise is configured to issue unique SSO tokens for each application or policy agent, the following cookies are involved:
Table 16–1 Session Cookies in Unique SSO Tokens|
Cookie Name |
Place Holder Cookie Value |
Domain |
|---|---|---|
|
iPlanetDirectoryPro |
SSO-token The actual cookie value is the value of the token. |
The domain is set to the host name of the OpenSSO Enterprise instance where the user was authenticated. Example: OpenssoHost.example.com |
|
iPlanetDirectoryPro |
restricted-SSO-token The actual cookie value is the value of the token. |
The domain is set to the host name of the policy agent instance for which the restricted token is issued. Example: agentHost.example.com |
|
sunIdentityServerAuthNServer |
https://OpenssoHost.examplecom:8080 The cookie value is the URL of the OpenSSO Enterprise instance where the user was authenticated. In this example, the protocol is HTTPS. |
The domain must be set to cover all instances of OpenSSO Enterprise installed on the network. Example: .example.com |
Analyzing the Deployment Architecture
The following figure illustrates a typical CDSSO deployment architecture.
Figure 16–5 Deployment Architecture
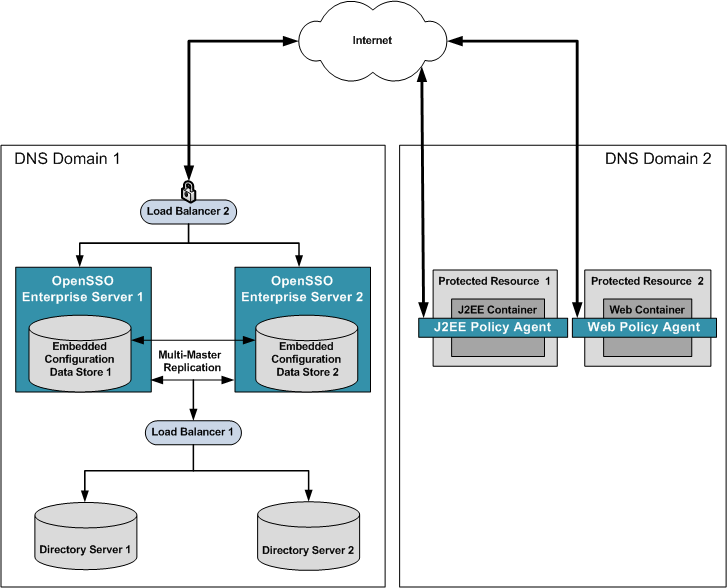
Considering Assumptions, Dependencies, and Constraints
Assumptions and Dependencies
-
All the components in the deployment have the same GMT time stamp.
-
CDSSO must be enabled before configuring Cookie Hijacking Prevention.
-
The Cookie Hijacking Prevention configuration doesn't prevent cookies being viewed or hijacked by hackers using network snooping applications. The only way to prevent this is by using a secure communication protocol such as SSL.
-
All the agents in the deployment have a unique agent profile in the OpenSSO Enterprise server.
Constraints
-
CDSSO and Cookie Hijacking Prevention can be used only if OpenSSO Enterprise and policy agents are involved.
-
Policy agents must be configured to use the same OpenSSO Enterprise infrastructure where multiple OpenSSO Enterprise instances can exist.
-
Multiple OpenSSO Enterprise instances configured for high-availability must all reside in a single DNS domain. Only policy agents can reside in different DNS domains.
Understanding Typical Business Use Cases
This section describes actual protocol exchanges in four business use cases:
-
Java EE Policy Agent Use Case 1: Accessing a Protected Resource in the Primary Domain First
-
Java EE Policy Agent Use Case 2: Accessing a Protected Resource in a Non-Primary Domain First
-
Web Policy Agent Use Case 1: Accessing a Protected Resource in the Primary Domain First
-
Web Policy Agent Use Case 2: Accessing a Protected Resource in the Non-Primary Domain First
All use cases are based on the same configuration:
-
The primary domain, DNS Domain 1, is where OpenSSO Enterprise resides. The non-primary domain is DNS Domain 2.
-
In the primary domain, two OpenSSO Enterprise instances exist. Both are behind a load balancer.
-
In the primary domain, Policy Agent 1 resides in host1.Domain1.com:7001 with CDSSO disabled.
-
In the non-primary domain, Policy Agent 2 resides in host2.Domain2.com:80 with CDSSO enabled.
-
A protected resource /app1/test1.html is deployed in host1.Domain1.com:7001.
-
A protected resource /app2/test2.html is deployed in host2.Domain2.com:80.
The following figure illustrates the configuration used for all four business use cases.
Figure 16–6 Configuration for Business Use Cases
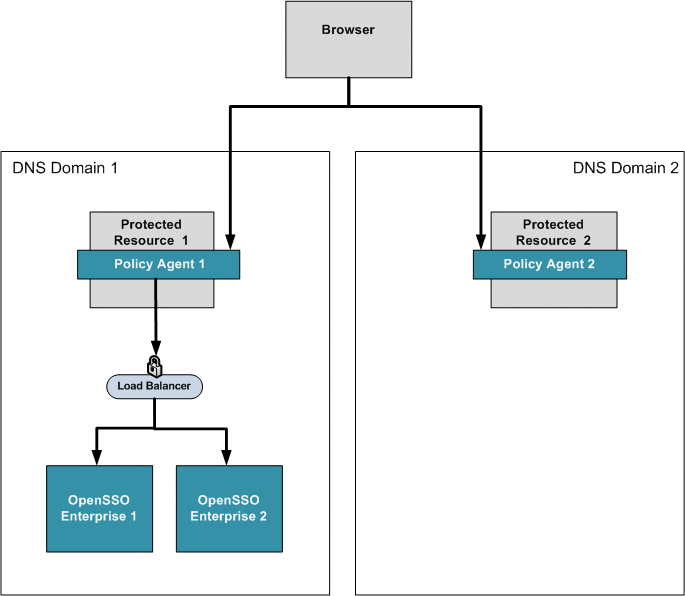
Java EE Policy Agent Use Case 1: Accessing a Protected Resource in the Primary Domain First
In this use case, an unauthenticated user first accesses a resource under Policy Agent 1 in the DNS Domain 1, the primary domain. After the authentication, the OpenSSO Enterprise sets an SSO token in Domain 1. Then the user accesses another resource under Policy Agent 2 in DNS Domain 2, a non-primary domain. The CDSSO sequence is invoked and access is allowed without re-authentication.
-
An unauthenticated user attempts to access http://Host1.Domain1.com:7001/app1/test1.html, a resource in Domain 1.
The Java EE policy agent intercepts the request and redirects to the OpenSSO Enterprise server login page.
-
The browser follows the redirection to access the OpenSSO Enterprise login page.
-
The user provides the credentials and clicks Submit.
A login form is posted to OpenSSO Enterprise server.
-
If the user is not authenticated successfully, the server responds by displaying an “Access Denied” message.
-
If the user authenticates successfully, the server responds by setting an SSO token (represented by the iPlanetDirectoryPro cookie) in Domain 1. The response includes a redirect to the original requested resource.
-
-
The browser follows the redirection to access http://Host1.Domain1.com:7001/app1/test1.html.
-
The SSO token is sent in the HTTP request to the server.
-
The policy agent validates the SSO token and evaluates policies by interacting with the OpenSSO Enterprise server in the background. If access is denied, the policy agent displays an “Access Denied” message. If access is allowed, the policy agent allows the web container to serve the requested protected resource.
-
-
The user tries to access another resource http://Host2.Domain2.com:80/app2/test2.html in Domain 2.
-
The SSO token is not sent in the HTTP request because the server Host2.Domain2.com does not match the cookie domain Domain1.com.
-
The policy agent, receiving no SSO token, responds by redirecting the browser to the CDC servlet URL https://serverHost.Domain1.com:8443/opensso/cdcservlet.
-
The policy agent sets a cookie amFilterCDSSORequest to save the following:
-
The user-requested URL
-
Cookie access type, such as GET or POST
-
The value of the RequestID query parameter (AuthnRequestID)
This cookie is set before redirecting to the OpenSSO Enterprise CDC servlet.
-
Later, after getting the AuthnResponse from the CDC Servlet, the policy agent retrieves the information from the amFilterCDSSORequest cookie to continue with the user's originally requested URL. The redirection URL contains some parameters to be carried to the CDC servlet. Some of these parameters are:
- goto
-
The URL to which CDC servlet will forward AuthNResponse.
- MajorVersion
-
The Liberty Federation Protocol major version. Set to 1 by default.
- MinorVersion
-
The Liberty Federation Protocol minor version. Set to 1 by default.
- RequestID
-
An AuthnRequestID.
This is a uniquely generated ID. It uses the form:
s<20-digit hexadecimal string>.
The AuthnRequestID is sent to the CDC Servlet so that the its AuthnResponse later can contain this unique identifier. The RequestID is used to tie the response coming back. The RequestID is verified when the response comes back from the CDC servlet
- ProviderID
-
Identifies the provider, which is the policy agent. The value will be of the form: http://agent-host:port/?Realm=<RealmName> where RealmName is what is configured for the property com.sun.identity.agents.config.organization.name in the policy agent profile.
- IssueInstant
-
The time at which the AuthnRequest was created (being sent) in UTC format.
-
-
The browser follows the redirection to access the CDC servlet.
-
The SSO token is sent in the HTTP request because the server DNS domain matches the cookie domain.
-
The CDC servlet validates the SSO token and responds with an HTML page.
The page contains an HTML FORM which will be automatically posted to CDSSO Redirect URL on the policy agent. Example: http://Host2.Domain2.com:80/agentapp/sunwCDSSORedirectURI, based on the goto parameter earlier. The form's hidden field LARES is an encoded Liberty-like AuthnResponse that contains the existing SSO Token in Domain1.com.
-
-
The browser automatically posts the form with LARES to http://Host2.Domain2.com:80/agentapp/sunwCDSSORedirectURI without user interaction.
-
The policy agent responds by setting a new SSO token with the cookie domain value set as the policy agent's fully qualified host name. Also note the cookie value is exactly the same as the one set in Step 3 response by OpenSSO Enterprise server.
-
The HTTP response also redirects the browser to the original requested resource http://Host2.Domain2.com:80/app2/test2.html.
-
In responding to this request, the policy agent goes through the following steps to validate the received AuthnResponse:
-
First the requestID, saved in the amFilterCDSSORequest cookie, is verified against the responseID of the AuthnResponse.
-
The status code of the AuthnResponse is verified to see if it is successful.
-
The assertion is extracted from the AuthnResponse. There should be only one AuthnResponse.
-
From the Assertion, the issuer is extracted and is verified against the policy agent list of trusted ID providers.
If the issuer is not in the policy agent trusted list, then user request is blocked. These trusted ID providers are governed by the property com.sun.identity.agents.config.cdsso.trusted.id.provider[x]. See Configuring CDSSO and Cookie Hijacking Prevention. These IDs should contain URLs of the actual OpenSSO Enterprise instances, and should not contain the URL of the load balancer.
-
The conditions that are in the assertion are also validated.
The main condition is the date validity condition. The date validity attributes (NotBefore and NotOnOrAfter) are verified to be sure the assertion has not expired. So time synchronization between the OpenSSO Enterprise server and the policy agent is essential. The skew factor provided in the policy agent profile com.sun.identity.agents.config.cdsso.clock.skew also helps to overcome any network latencies.
-
In the response, cookie amFilterCDSSORequest is removed by setting the expiration date in the past.
-
-
-
The browser follows the redirection to access the protected resource again at http://Host2.Domain2.com:80/app2/test.html.
-
The new SSO token is sent to the policy agent.
-
The policy agent validates the SSO token and evaluates the policies.
-
The policy agent, upon successful validation, responds with the content of the protected resource.
-
Java EE Policy Agent Use Case 2: Accessing a Protected Resource in a Non-Primary Domain First
In this use case, an unauthenticated user first accesses a protected resource in the DNS Domain 2, the non-primary domain. The user then accesses a protected resource in the primary domain, DNS Domain1.
-
An unauthenticated user attempts to access a resource in Domain 2. Example: http://Host2.Domain2.com:80/app2/test2.html.
-
The policy agent intercepts the request and receives no SSO Token.
Because CDSSO is enabled, the policy agent responds with a redirection to the OpenSSO Enterprise CDC servlet URL https://serverHost1.Domain1.com:8443/opensso/cdcservlet.
-
The browser follows the redirection to access the CDC servlet without any SSO token. The CDC servlet responds with a login page.
-
The user types his credentials on the login page and clicks Submit.
A login form is posted to the OpenSSO Enterprise server.
-
If the user authenticates successfully, the OpenSSO Enterprise responds by setting an SSO token in Domain1.com.
-
The response also redirects the browser back to the CDC servlet https://serverHost1.Domain1.com:8443/opensso/cdcservlet.
-
-
The browser follows the redirection to access the CDC servlet again.
This time the SSO token is sent in the HTTP request because the OpenSSO Enterprise server DNS domain matches the cookie domain.
-
The CDC servlet validates the SSO Token and responds with an HTML page.
The page contains an HTML form which is automatically posted to CDSSO Redirect URL on the policy agent http://Host2.Domain2.com:80/agentapp/sunwCDSSORedirectURI. The form's hidden field LARES is an encoded Liberty-like AuthnResponse that contains the existing SSO Token in Domain1.
-
The browser automatically posts the form with LARES to http://Host2.Domain2.com:80/agentapp/sunwCDSSORedirectURI with no user interaction.
-
The policy agent responds by setting a second SSO Token. The second SSO token domain is the policy agent's fully-qualified host name. The cookie value is identical to the cookie value set by the OpenSSO Enterprise server in step 4. The HTTP response also redirects the browser to the original requested resource http://Host2.Domain2.com:80/app2/test2.html.
-
The browser follows the redirection to access the protected resource again at http://Host2.Domain2.com:80/app2/test2.html.
-
The second SSO Token is sent to the policy agent.
-
The policy agent validates the SSO token, and evaluates the policies.
-
The policy agent, upon successful validation, responds with the content of the protected resource.
-
-
The user now attempts to access a resource in the primary domain, Domain 1. Example: http://Host1.Domain1.com:7001/app1/test1.html.
An SSO Token is sent with the HTTP request. The browser now has two SSO Tokens, one for each domain. The sent token was obtained in Step 4.
-
The policy agent intercepts the request and receives the SSO Token.
The policy agent validates the token and permits the server to serve the content of the protected page.
Web Policy Agent Use Case 1: Accessing a Protected Resource in the Primary Domain First
In this use case, an unauthenticated user first accesses a resource under Policy Agent 1 in the DNS Domain 1, the primary domain. After the authentication, the OpenSSO Enterprise sets an SSO token in Domain 1. Then the user accesses another resource under Policy Agent 2 in DNS Domain 2, a non-primary domain. The CDSSO sequence is invoked and access is allowed without re-authentication.
-
An unauthenticated user attempts to access a resource in Domain 1. Example: http://Host1.Domain1.com:7001/app1/test1.html.
-
The Web policy agent intercepts the request and receives no SSO Token. The policy agent responds with a redirection to the OpenSSO Enterprise login page.
-
The browser follows the redirection to access the OpenSSO Enterprise login page.
-
The user provides the credentials and clicks Submit.
A login form posted to the OpenSSO Enterprise server.
-
If the user is not authenticated successfully, the server responds by displaying an “Access Denied” message.
-
If the user authenticates successfully, the server responds by setting an SSO token (represented by the iPlanetDirectoryPro cookie) in Domain 1. The response also includes a redirect to the original requested resource http://Host1.Domain1.com:7001/app1/test1.html.
-
-
The browser follows the redirection to access http://Host1.Domain1.com:7001/app1/test1.html.
-
The SSO token is sent in the HTTP request to the server.
-
The policy agent validates the SSO token and evaluates policies by interacting with the OpenSSO Enterprise server in the background. If access is denied, the policy agent displays an “Access Denied” message. If access is allowed, the server responds with the content of the protected resource.
-
-
The user tries to access another resource in the non-primary domain, Domain 2. Example: http://Host2.Domain2.com:80/app2/test2.html.
-
The SSO token is not sent in the HTTP request because the policy agent domain Domain2.com does not match the cookie domain Domain1.com.
-
The policy agent, receiving no SSO token, responds by redirecting the browser to the CDC servlet URL https://serverHost.Domain1.com:8443/opensso/cdcservlet.
The redirection URL contains some parameters to be carried to the CDC servlet. Some of these parameters are:
- goto
-
The URL to which CDC servlet will forward AuthNResponse.
This is the originally requested URL with the parameter sunwmethod=GET appended to it.
- MajorVersion
-
The Liberty Federation Protocol major version. Set to 1 by default.
- MinorVersion
-
The Liberty Federation Protocol minor version. Set to 1 by default.
- RequestID
-
An AuthnRequestID.
This is a uniquely generated ID. It uses the following form:
s<20-digit hexadecimal string>.
The AuthnRequestID is sent to the CDC Servlet so that its AuthnResponse later can contain this unique identifier. The RequestID is used to tie the response coming back. The RequestID is verified when the response comes back from the CDC servlet.
- ProviderID
-
Identifies the provider, which is the policy agent. The value will be of the form: http(s)://agent-host:port/amagent?Realm=<RealmName> where RealmName is what is configured for the property com.sun.identity.agents.config.organization.name in the policy agent profile.
- IssueInstant
-
The time at which the AuthnRequest was created in UTC format.
-
-
The browser follows the redirection to access the CDC servlet.
-
The SSO token is sent in the HTTP request because the OpenSSO Enterprise server domain matches the cookie domain.
-
The CDC servlet validates the SSO token and responds with an HTML page.
The page contains an HTML FORM which will be automatically posted to the policy agent with no user interaction. Example: http://Host2.Domain2.com:80/app2/test2.html?sunwmethod=GET based on the goto parameter.
-
-
The browser automatically posts the form with LARES to http://Host2.Domain2.com:80/app2/test2.html?sunwmethod=Get with no user interaction.
-
The policy agent responds by setting a second SSO Token. The second SSO token domain is the policy agent's fully-qualified host name. The cookie value is identical to the cookie value set by the OpenSSO Enterprise server in step 4.
-
The assertions are extracted from the AuthnResponse. There should only be one AuthnResponse.
-
The policy agent also performs necessary session validation and policy evaluation. If the session is validated, and the policy evaluation succeeds, then the user is allowed access and the protected page is served in response.
-
Web Policy Agent Use Case 2: Accessing a Protected Resource in the Non-Primary Domain First
In this use case, an unauthenticated user first accesses a protected resource in the DNS Domain 2, the non-primary domain. The user then accesses a protected resource in the primary domain DNS Domain1.
-
An unauthenticated user attempts to access a resource in the non-primary domain, Domain 2. Example: http://Host2.Domain2.com:80/app2/test2.html.
-
The policy agent intercepts the request and receives no SSO Token.
Because CDSSO is enabled, the policy agent responds with a redirection to the OpenSSO Enterprise CDC servlet URL https://serverHost1.Domain1.com:8443/opensso/cdcservlet.
-
The browser follows the redirection to access the CDC servlet without any SSO token. The CDC servlet responds with a login page.
-
The user types his credentials on the login page and clicks Submit.
A login form is posted to the OpenSSO Enterprise server.
-
If the user authenticates successfully, the OpenSSO Enterprise server responds by setting an SSO token in Domain1.com.
-
The response also redirects the browser back to the CDC servlet https://serverHost1.Domain1.com:8443/opensso/cdcservlet.
-
-
The browser follows the redirection to access the CDC servlet again.
This time the SSO token is sent in the HTTP request because the server DNS domain matches the cookie domain.
-
The CDC servlet validates the SSO Token and responds with an HTML page.
The page contains a HTML form which is automatically posted to the policy agent http://Host2.Domain2.com:80/app2/test2.html?sunwMethod=GET.
This is derived from the goto and target parameters. The form's hidden field LARES is an encoded Liberty-like AuthnResponse that contains the existing SSO Token in Domain1.
-
The browser automatically posts the form with LARES to http://Host2.Domain2.com:80/app2/test2.html?sunwMethod=GET with no user interaction.
-
The policy agent validates the AuthNResponse, and responds by setting a second SSO Token. The second SSO token domain is the policy agent's fully-qualified host name. The cookie value is identical to the cookie value set by the OpenSSO Enterprise server in step 4.
-
The policy agent performs necessary session validation and policy evaluation. If the session is validated, and the policy evaluation succeeds, then the user is allowed access and the protected page is served in response.
-
The user now attempts to access a resource in the primary domain, Domain 1. Example: http://Host1.Domain1.com:7001/app1/test1.html.
An SSO Token is sent with the HTTP request. The browser now has two SSO Tokens, one for each domain. The sent token was obtained in Step 4.
-
The policy agent intercepts the request and receives the SSO Token.
The policy agent validates the token and permits the server to serve the content of the protected page.
Configuring CDSSO and Cookie Hijacking Prevention
-
To Enable CDSSO and Cookie Hijacking Prevention in Java EE Policy Agent
-
To Enable CDSSO and Cookie Hijacking Prevention in the Web Policy Agent
The configuration instructions in this section use the following mapping based on Figure 16–5:
Table 16–2 Mapping Fig 16–5 to Server Names|
Figure Label |
Server Name Example |
|---|---|
|
Load Balancer 1 |
lb1_server.hostname |
|
Load Balancer 2 |
lb2_server.hostname |
|
OpenSSO Enterprise Server 1 |
server1.hostname |
|
OpenSSO Enterprise Server 2 |
server2.hostname |
 To Enable CDSSO and Cookie Hijacking Prevention
in Java EE Policy Agent
-
Enable CDSSO for the Centralized Mode policy agent profile.
-
Log in to the OpenSSO Enterprise server as an administrator.
-
In the OpenSSO Enterprise administration console, go to Realm > Agents > J2EE Agents > Agent_Name > SSO.
-
Enable the property Cross Domain SSO
-
Set the value for the CDSSO Redirect URI.
Example: /agentapp/sunwCDSSORedirectURI
-
Set the value for the CDSSO Servlet URL.
Example:
lb2_server_protocol://lb2_server.hostname:lb2_server.port/server-deployment-uri/cdcservlet
-
Set the CDSSO Clock Skew to 0.
-
Add the CDSSO Trusted ID Provider.
Example:
server1_protocol://server1.hostname:server1.port/server1-deployment-uri/cdcservlet
server2_protocol://server2.hostname:server2.port/server2-deployment-uri/cdcservlet
-
-
Enable CDSSO for the Local Mode policy agent profile:
Edit OpenSSOAgentConfiguration.properties and set CDSSO related parameters. Example:
com.sun.identity.agents.config.cdsso.enable = true
com.sun.identity.agents.config.cdsso.redirect.uri=/agentapp/sunwCDSSORedirectURI
com.sun.identity.agents.config.cdsso.cdcservlet.url[0] =
  <lb2_server_protocol>://<lb2_server.hostname>:
  <lb2_server.port>/<server-deployment-uri>/cdcservlet
com.sun.identity.agents.config.cdsso.clock.skew = 0
com.sun.identity.agents.config.cdsso.trusted.id.provider[0]=
  <server1_protocol>://<srver1.hostname>:
  <server1.port>/<server1-deployment-uri>/cdcservlet
com.sun.identity.agents.config.cdsso.trusted.id.provider[1] =
  <server2_protocol>://<server2.hostname>:
  <server2.port>/<server2-deployment-uri>/cdcservlet
-
Enable Cookie Hijacking Prevention in the OpenSSO Enterprise server.
-
Log in OpenSSO Enterprise server as an administrator.
-
In the OpenSSO Enterprise administration console, go to Configuration >Sites and Server >Default server settings > Advanced and set the following properties:
com.sun.identity.enableUniqueSSOTokenCookie=true
com.sun.identity.authentication.uniqueCookieName=sunIdentityServerAuthNServer
com.sun.identity.authentication.uniqueCookieDomain=server domain
-
Go to Configuration > System > Platform .
Remove server domain and add the OpenSSO Enterprise server host name.
 Caution –
 If OpenSSO Enterprise is deployed behind a load balancer, then in step 3c, do not use the OpenSSO server host name. Instead, be sure to use the load balancer host name.
-
Enable a unique SSO token cookie in the agent profile.
Do one of the following:
-
For the Centralized Mode policy agent, go to RootRealm > Agents> J2EE Agents > AgentName > Advanced > Custom Properties, and add the following property: com.sun.identity.enableUniqueSSOTokenCookie=true.
-
For the Local Mode policy agent, in the OpenSSOAgentConfiguration.properties file, add the following property: com.sun.identity.enableUniqueSSOTokenCookie=true.
-
-
 To Enable CDSSO and Cookie Hijacking Prevention
in the Web Policy Agent
-
Enable CDSSO for the Centralized Mode policy agent profile.
-
Log in to the OpenSSO Enterprise server as an administrator.
-
In the OpenSSO Enterprise administration console, go to Realm > Agents > Web Agents > Agent_Name > SSO.
-
Enable the property Cross Domain SSO.
-
Set the value for the CDSSO Servlet URL.
Example:
lb2_server_protocol://lb2_server.hostname:lb2_server.port/server-deployment-uri/cdservlet
-
-
Enable CDSSO for the Local Mode policy agent profile:
Edit OpenSSOAgentConfiguration.properties and set CDSSO related parameters. Example:
com.sun.identity.agents.config.cdsso.enable = true
com.sun.identity.agents.config.cdsso.cdcservlet.url[0] =
  lb2_server_protocol://lb2_server.hostname:
  lb2_server.port/server-deployment-uri/cdcservlet
-
Enable Cookie Hijacking Prevention in the OpenSSO Enterprise server.
-
Log in OpenSSO Enterprise server as an administrator.
-
In the OpenSSO Enterprise administration console, go to Configuration >Sites and Server >Default server settings > Advanced and set the following properties:
com.sun.identity.enableUniqueSSOTokenCookie=true
com.sun.identity.authentication.uniqueCookieName=sunIdentityServerAuthNServer
com.sun.identity.authentication.uniqueCookieDomain= server domain
-
Go to Configuration > System > Platform .
Remove server domain and add the server host name.
 Caution –
 If OpenSSO Enterprise is deployed behind a load balancer, then in step 3c, do not use the OpenSSO server host name. Instead, be sure to use the load balancer host name.
-
Evaluating Benefits and Trade-offs
The benefit of using CDSSO with Cookie Hijacking Prevention is that resources are protected among multiple domains. Security is significantly increased. The trade-off is that the CDSSO solution is proprietary to OpenSSO Enterprise. Integrating the CDSSO solution with other single sign-on products is not possible.
Chapter 17 Configuring System Failover and Session Failover for High Availability
This chapter provides information to help you architect your OpenSSO Enterprise deployment to achieve the highest levels of system and session availability. High availability ensures continuous service for your end-users, protects against loss of data due to interrupted user sessions, and increases transaction throughput for optimized system performance.
This chapter includes the following topics:
About High Availability
Two key high-availability elements in an OpenSSO Enterprise deployment are system failover and session failover. These two features help to ensure that no single point of failure exists in the deployment, and that OpenSSO Enterprise service is always available to end-users. You can also configure OpenSSO Enterprise sites to meet more complex business requirements.
System Failover
In this chapter, system failure refers to a hardware or process failure at the OpenSSO Enterprise server, at the Policy Agent, or at a load balancer. Hardware fails due to a mechanical problem or power outage. A web container application crashes causing OpenSSO Enterprise to become inaccessible. These are examples of system failure. Whenever possible, you should install redundant OpenSSO Enterprise servers, OpenSSO Policy Agents, and load balancers to serve as backups, or to fail over to, in the event of a system failure. This helps to ensure that no single point of failure exists in your deployment. Load balancers distribute the workload among OpenSSO Enterprise servers. If a Policy Agent fails, requests are redirected to another Policy Agent. If server hardware fails, requests are routed to other server hardware. Without system failover, a single hardware failure or process failure can cause OpenSSO Enterprise downtime.
Session Failover
Session failover ensures that session data remains accessible to OpenSSO Enterprise servers and OpenSSO Enterprise Policy Agents. Service requests are routed to a failover server, the user's session continues uninterrupted, and no user data is lost. The OpenSSO Enterprise Session Service maintains authenticated session states and continues processing new client requests subsequent to the failure. In most cases, without session failover, after system failure and subsequent service recovery, the user would have to re-authenticate.
Session failover is critical when end-users' transactions involve financial data or other sensitive information that is difficult to recover when a system failure occurs. With session failover, when a system failover occurs, the user's transaction can proceed uninterrupted. Session failover is less important if end-users are, for example, reading but not writing data.
OpenSSO Enterprise Sites
The most basic OpenSSO Enterprise site consists of two or more OpenSSO Enterprise servers and one or more load balancers. When you configure all the components in the site to work under a single site identifier, or name, all components in the site act as one unit. The load balancers in the site are associated with a site identifier. When a component such as a Policy Agent accesses a site, it communicates through the load balancer associated with that site, instead of directly accessing individual OpenSSO Enterprise servers in the site. All the client requests are passed through the load balancer to the OpenSSO Enterprise servers located behind a firewall. Individual OpenSSO Enterprise servers are never directly exposed to entities outside the firewall. The only client that can access the OpenSSO Enterprise servers is a load balancer.
Single-Site Configuration
A single site configuration usually includes two or more OpenSSO servers which are centrally managed and configured under a single site identifier. The single-site configuration is typically used when the OpenSSO Enterprise servers are managed as a single operational unit such as in a LAN environment.
Multiple-Site configuration
In a multiple-site configuration, two or more OpenSSO Enterprise servers are configured in each site. A multiple-site configuration is useful when you need to centrally manage OpenSSO Enterprise servers located in distant geographical locations. Multiple-site configuration is usually used in WAN environments, or where sites are managed as separate operational units within a LAN environment. Each site can have one or more load balancers.
While system failover can be configured among all sites in the deployment, session failover is possible only within each site. WAN environments are subject to speed, network latency, firewall, and bandwidth issues. For these reasons, OpenSSO Enterprise session failover is not supported across multiple sites within a LAN or WAN environment.
The following are typical reasons to use a multiple-site configuration:
-
Close proximity of OpenSSO Enterprise servers in a LAN environment
-
Underlying network infrastructure limitations exist.
-
Operational domains are managed as independent units.
-
OpenSSO Enterprise servers span across network boundaries as in the case of a WAN environment.
Analyzing the Deployment Architecture
Figure 17–1 illustrates the components you need for basic system failover and session failover in an OpenSSO Enterprise deployment. Key components in this high availability deployment are:
-
Multiple OpenSSO Enterprise Policy Agents serve as backups when system failure occurs.
-
A single load balancer distributes the workload among multiple OpenSSO Enterprise Policy Agents. This increases transaction throughput, and ensures failover when a system failure occurs.
-
Multiple OpenSSO Enterprise servers with respective embedded Directory Servers act as backups when system failure occurs. Embedded Directory Servers ensure that replicated configuration data is always available even during system failure.
-
Multiple load balancers distribute the workload among multiple OpenSSO Enterprise servers. This increases transaction throughput, and ensures failover when system failure occurs. Additionally, the Policy Agents can be configured to failover among OpenSSO Enterprise server load balancers when system failure occurs.
-
When OpenSSO Enterprise is configured for session failover, a Java Message Queue Broker Cluster replicates session data and stores it in the Berkeley Database. When a system failure occurs, the replicated session data is made available to Policy Agents so that the end-user does not lose data and does not have to re-authenticate after system recovery.
-
Multiple Berkeley Databases are used to store session data, and are configured for session failover. If one Berkeley Database fails, the working Berkeley Database can provide session data to the OpenSSO Enterprise servers for session validation.
In all examples in this chapter, load balancers represent the only access points to OpenSSO Enterprise servers. An access point can be any hardware or software that acts as a load balancer, and is associated with a site, that is installed in front of OpenSSO Enterprise servers. Policy Agents interact with OpenSSO Enterprise servers through these access points.
The following figure illustrates the components required for basic system failover and session failover in a single-site deployment.
Figure 17–1 Basic OpenSSO Enterprise High Availability Deployment Architecture
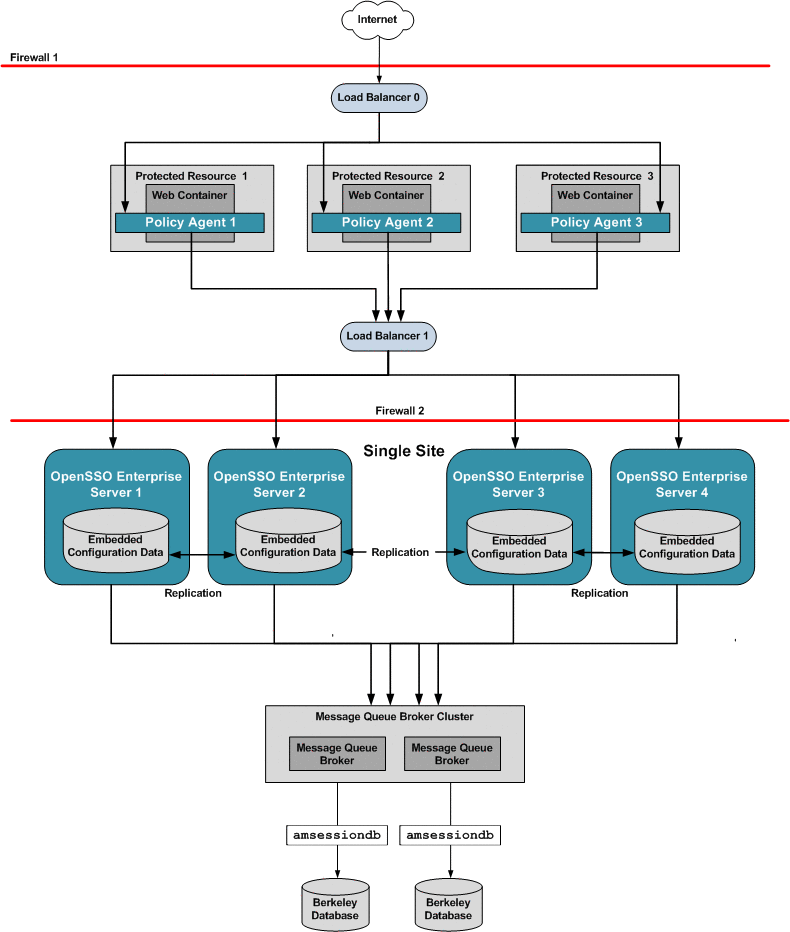
Understanding a Typical High-Availability Transaction
In any transaction, OpenSSO Enterprise must determine three things:
-
Is a valid user session token present?
-
Is the user authenticated?
-
Is the user authorized?
At any time during the transaction, if the OpenSSO Enterprise server or the OpenSSO Enterprise Policy Agent is unable to access the information required to determine these three things, then system failover or session failover may occur.
Figure 17–2 illustrates the first part of a typical high-availability process flow. In the figure, a user attempts to access a protected resource and is successfully authenticated. No system failover or session failover occurs in this first transaction.
The second part of the process flow describes how sessions are handled during subsequent requests by the same user. This second part of the process flow is influenced by two factors:
-
How OpenSSO Enterprise is configured for high availability
-
Availability of load balancers and servers
The following figure illustrates a user's first request in a typical high-availability transaction. Process flows for subsequent requests by the same user are presented in detail, and discussed along with their respective configuration examples, in the following sections.
Figure 17–2 Process Flow for High Availability (part 1)
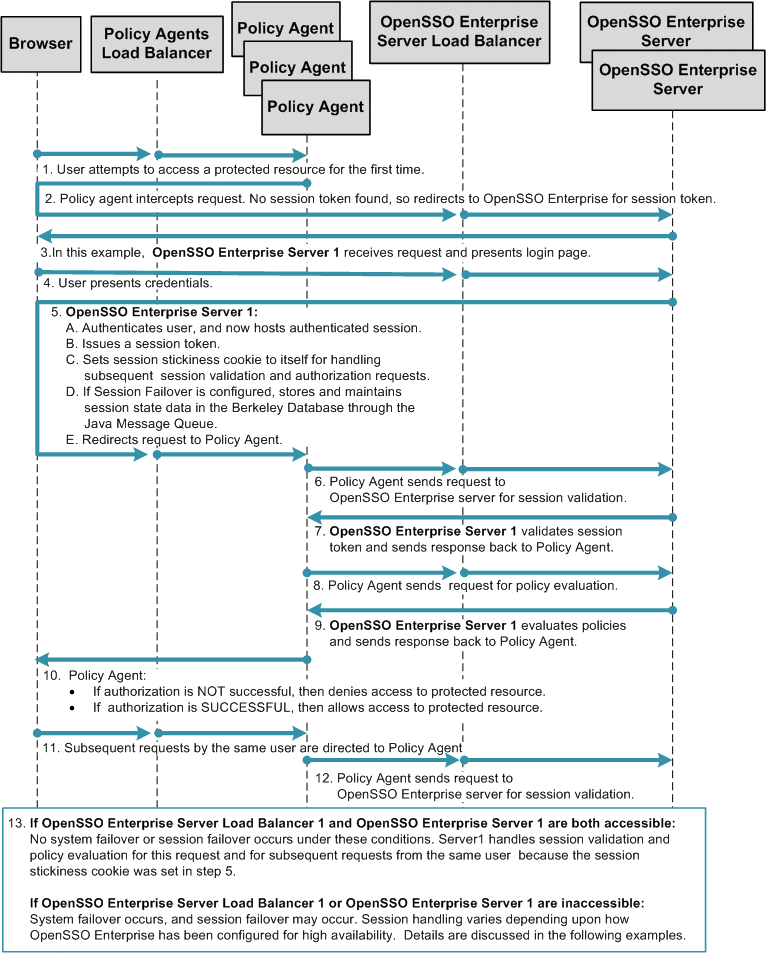
Understanding High Availability Configuration Examples
Businesses use various combinations of single or multiple OpenSSO Enterprise servers and load balancers, in single or multiple sites, to achieve system failover and session failover. The following examples illustrate typical high-availability configurations and their respective process flows:
-
Single OpenSSO Enterprise Server Load Balancer in Single Site, No Session Failover
-
Multiple OpenSSO Enterprise Server Load Balancers in a Single Site, No Session Failover
-
Multiple OpenSSO Enterprise Server Load Balancers in Multiple Sites, No Session Failover
-
Single OpenSSO Enterprise Server Load Balancer in a Single Site with Session Failover
-
Multiple OpenSSO Enterprise Server Load Balancers in a Single Site with Session Failover
-
Multiple OpenSSO Enterprise Server Load Balancers in Multiple Sites with Session Failover
The following table summarizes the OpenSSO Enterprise features associated with each configuration example.
Figure 17–3 Comparison of High Availability Configuration Examples
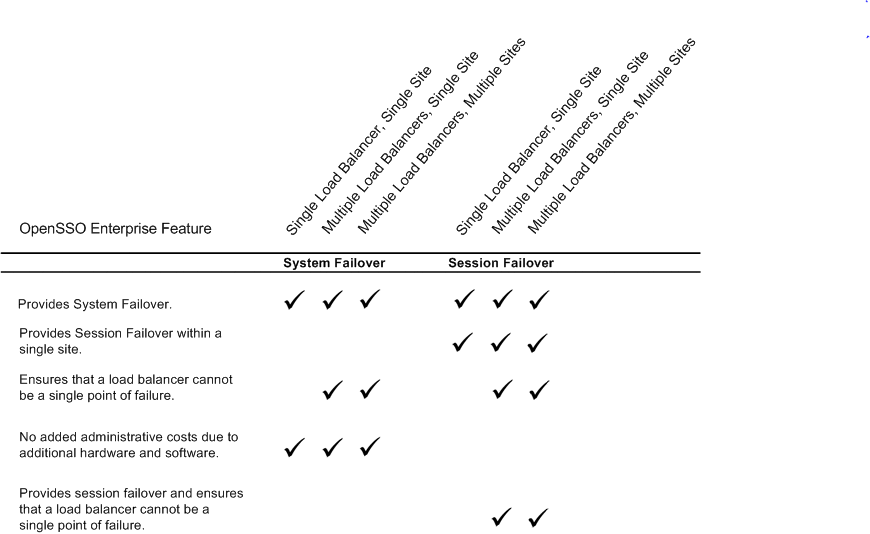
Single OpenSSO Enterprise Server Load Balancer in Single Site, No Session Failover
This is the most basic high-availability configuration. The single OpenSSO Enterprise server load balancer increases transaction throughput. When one OpenSSO Enterprise server is inaccessible, requests are automatically routed to other servers. However, the single load balancer can be a single point of failure. When this load balancer is inaccessible, no OpenSSO Enterprise services or session data are available to the Policy Agents.
Figure 17–4 Single OpenSSO Enterprise Server Load Balancer in a Single Site Configuration
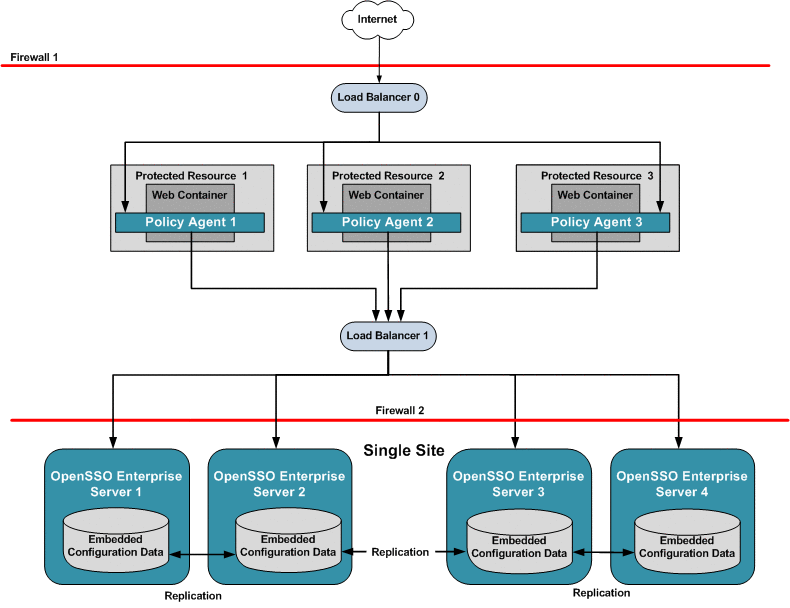
The following figure illustrates the session handling part of the process flow. See Figure 17–2 for a detailed illustration of steps 1 through 13.
Figure 17–5 Process Flow for Single OpenSSO Enterprise Server Load Balancer in a Single Site, No Session Failover
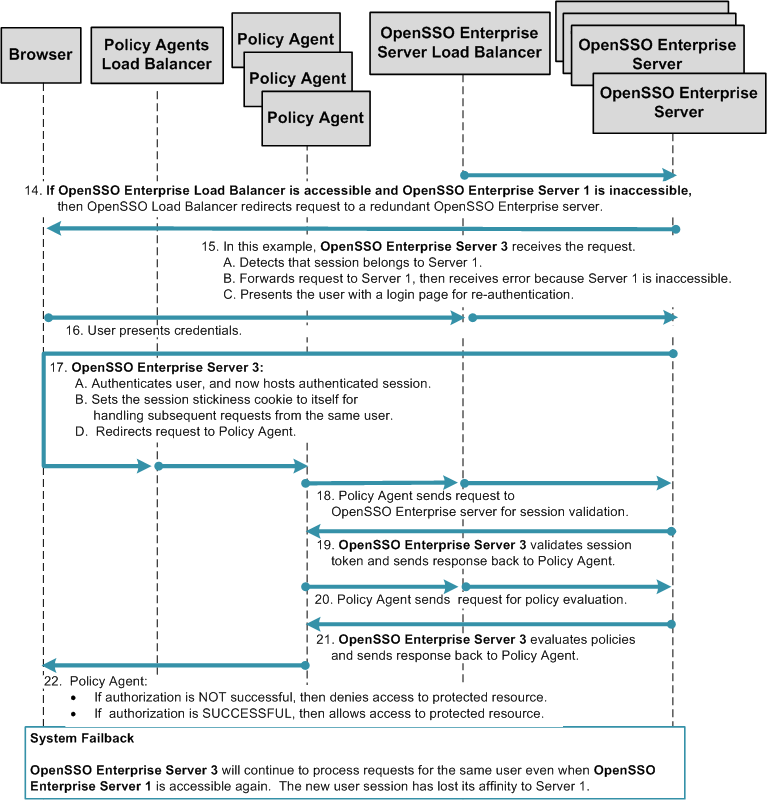
Multiple OpenSSO Enterprise Server Load Balancers in a Single Site, No Session Failover
The following figure illustrates a deployment with multiple OpenSSO Enterprise server load balancers in front of redundant OpenSSO Enterprise servers. In this example, both OpenSSO Enterprise server load balancers are specified in each Policy Agent bootstrap configuration. The load balancers are also configured as login URL's in each Policy Agent configuration. Policy Agent configuration can reside on the same host as the Policy Agent, or can reside in the OpenSSO Enterprise embedded configuration data store. Regardless of where the configuration is hosted, when one OpenSSO Enterprise server load balancer is inaccessible, all requests are automatically routed to the other load balancer.
Figure 17–6 Multiple OpenSSO Enterprise Server Load Balancers in a Single Site, No Session Failover
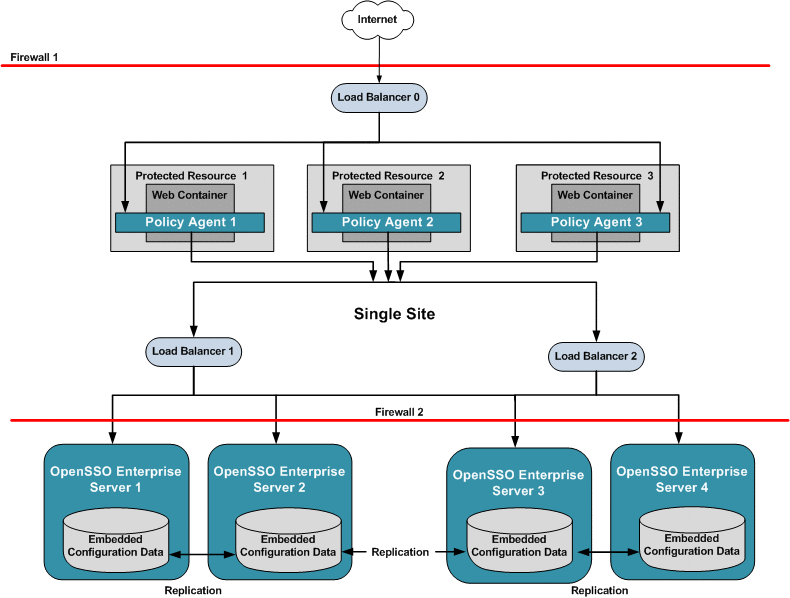
The following figure illustrates the session handling part of the process flow. See Figure 17–2 for a detailed illustration of steps 1 through 13.
Figure 17–7 Process Flow for Multiple OpenSSO Enterprise Server Load Balancers in a Single Site, No Session Failover
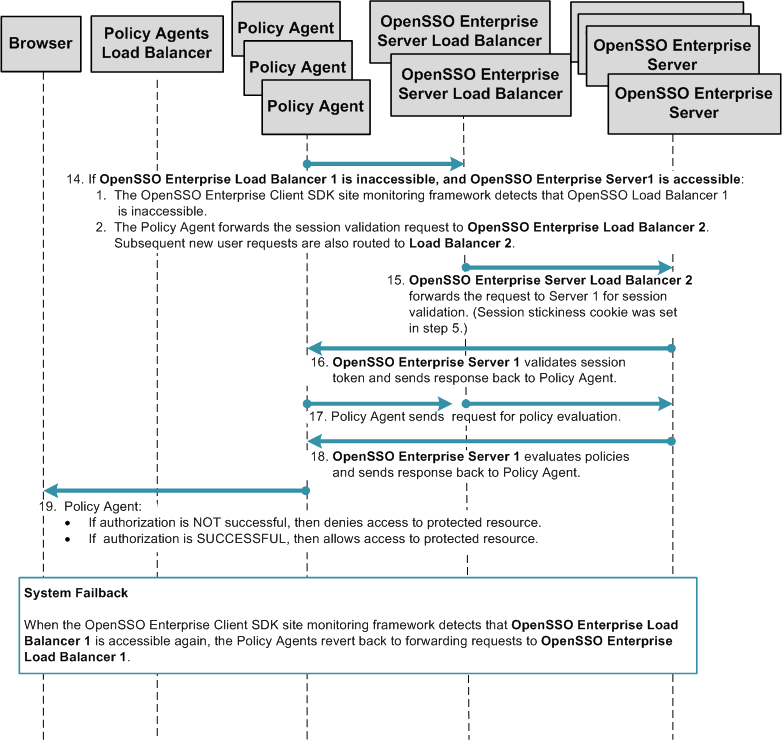
Multiple OpenSSO Enterprise Server Load Balancers in Multiple Sites, No Session Failover
This deployment is useful if you want to logically group redundant OpenSSO Enterprise servers in a LAN or WAN environment. For example, you can configure redundant OpenSSO Enterprise servers to work as a single unit under a single site identifier. The redundant OpenSSO Enterprise servers provide one level of system failover. When you deploy multiple sites this way, the OpenSSO Enterprise servers in one site are logically isolated from the OpenSSO Enterprise servers in other sites.
In this example, both OpenSSO Enterprise server load balancers are specified in each Policy Agent bootstrap configuration. The load balancers are also configured as login URL's in each Policy Agent configuration. Policy Agent configuration can reside on the same host as the Policy Agent, or can reside in the OpenSSO Enterprise embedded configuration data store. When system failure occurs at the load balancer, one site fails over to another site.
The following figure illustrates minimum components required for a multiple-site configuration.
Figure 17–8 Multiple OpenSSO Enterprise Load Balancers in Multiple Sites, No Session Failover
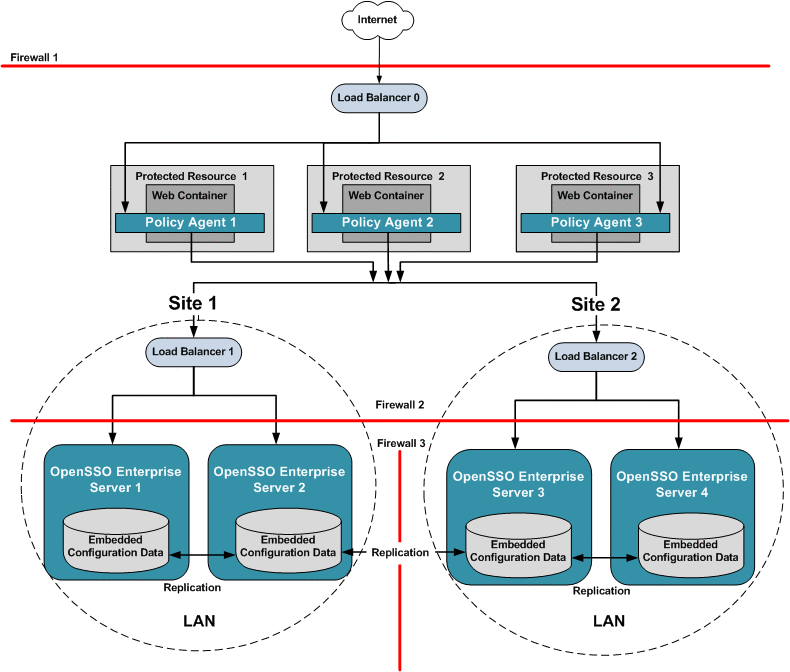
The following figure illustrates the session handling part of the process flow. See Figure 17–2 for a detailed illustration of steps 1 through 13.
Figure 17–9 Process Flow for Multiple OpenSSO Enterprise Server Load Balancers in Multiple Sites, No Session Failover
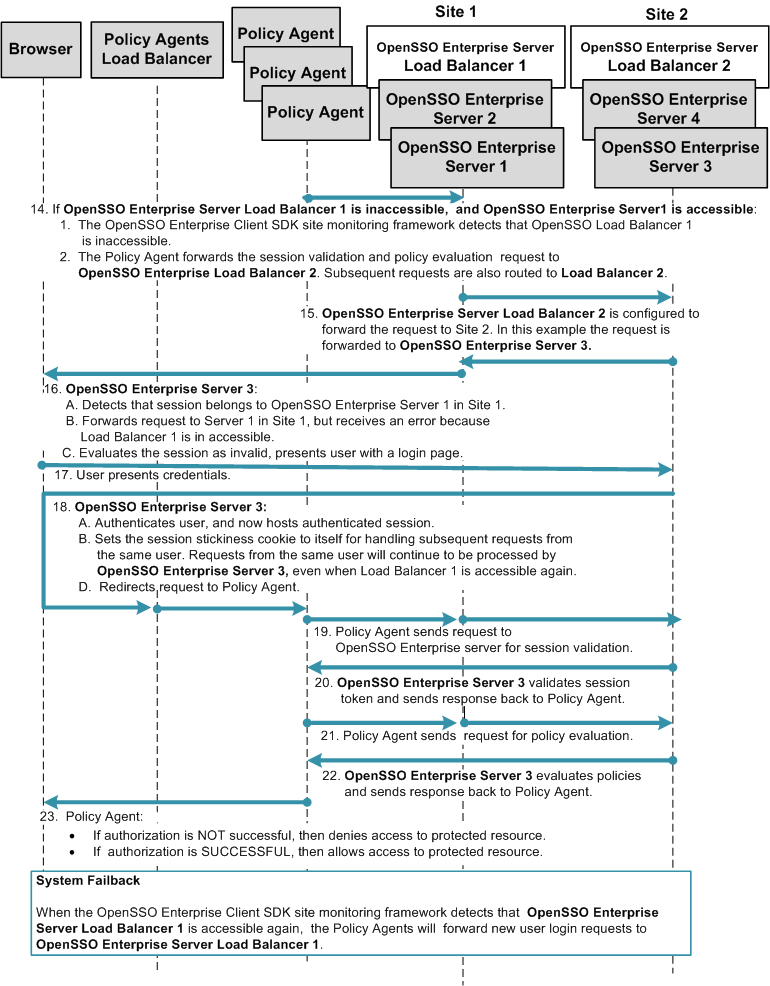
Single OpenSSO Enterprise Server Load Balancer in a Single Site with Session Failover
When you configure OpenSSO Enterprise for session failover, the user's authenticated session state is stored in the Berkeley Database in the event of a single hardware or software failure. In session failover deployments, you configure the OpenSSO Enterprise servers to communicate with Message Queue brokers which manage session state persistence in the Berkeley Database. This configuration enables the users session to fail over to a backup OpenSSO Enterprise server without losing any session state information. The user does not have to login again. The backup OpenSSO Enterprise server is determined among the available servers in the configuration list by an internal algorithm.
This type of deployment ensures the state availability even if one of the OpenSSO Enterprise servers is inaccessible due to scheduled maintenance, hardware failure, or software failure. However, the single load balancer can be a single point of failure. When this load balancer is inaccessible, no OpenSSO Enterprise services or session data are available to the Policy Agents.
The following figure illustrates the components in a basic OpenSSO Enterprise deployment using session failover.
Figure 17–10 Single OpenSSO Enterprise Server Load Balancer in a Single Site with Session Failover

The following figure illustrates the session handling part of the process flow. See Figure 17–2 for a detailed illustration of steps 1 through 13.
Figure 17–11 Single OpenSSO Enterprise Server Load Balancer in a Single Site with Session Failover
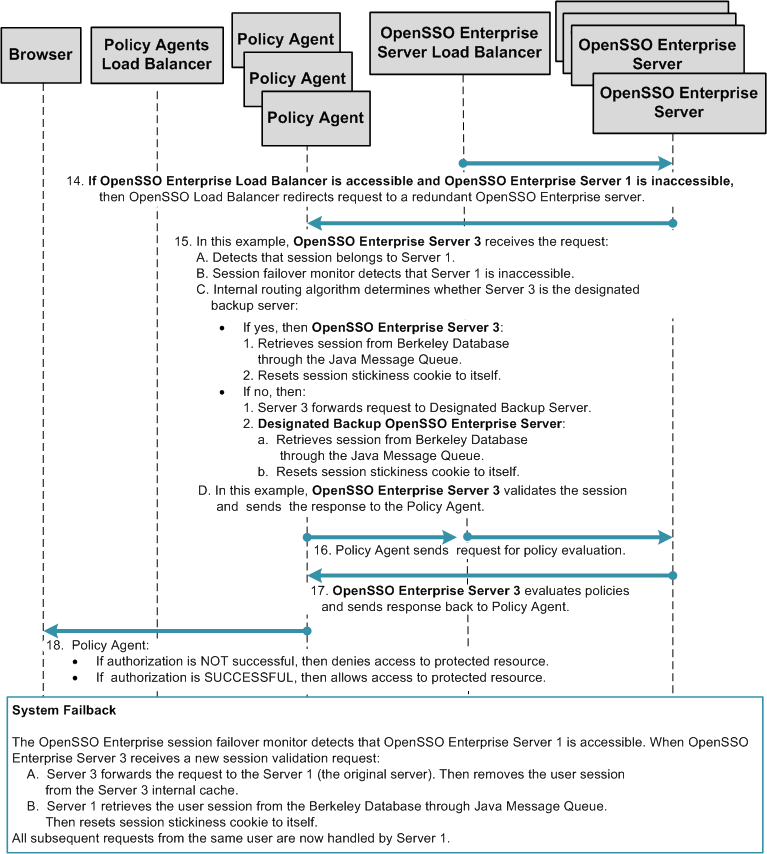
Multiple OpenSSO Enterprise Server Load Balancers in a Single Site with Session Failover
This deployment is very similar to Single OpenSSO Enterprise Server Load Balancer in a Single Site with Session Failover , but with two important differences. In this deployment multiple OpenSSO Enterprise server load balancers exist. Additionally, the OpenSSO Enterprise server load balancers are specified in each Policy Agent bootstrap configuration. This deployment provides load balancer failover to ensure continuous service when system failure occurs. When system failure occurs at the load balancer, one site fails over to another site.
The load balancers are also configured as login URL's in each Policy Agent configuration. Policy Agent configuration can reside on the same host as the Policy Agent, or can reside in the OpenSSO Enterprise embedded configuration data store.
The following figure illustrates a deployment with multiple OpenSSO Enterprise server load balancers with session failover.
Figure 17–12 Multiple OpenSSO Enterprise Server Load Balancers in a Single Site with Session Failover
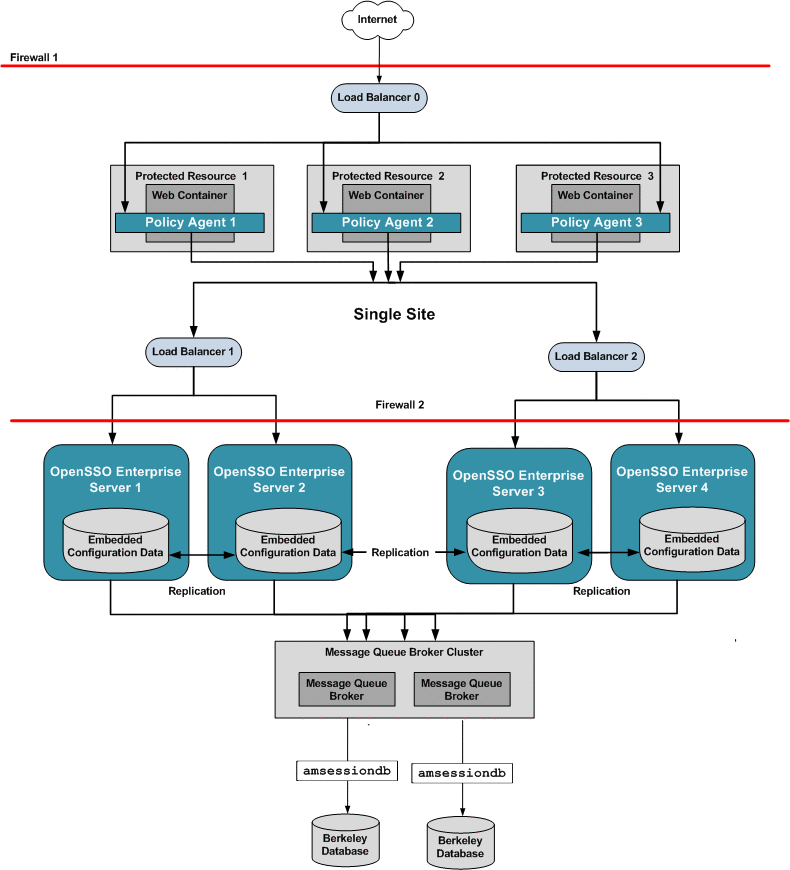
The following figure illustrates the session handling part of the process flow. See Figure 17–2 for a detailed illustration of steps 1 through 13.
Figure 17–13 Multiple OpenSSO Enterprise Server Load Balancers in a Single Site with Session Failover
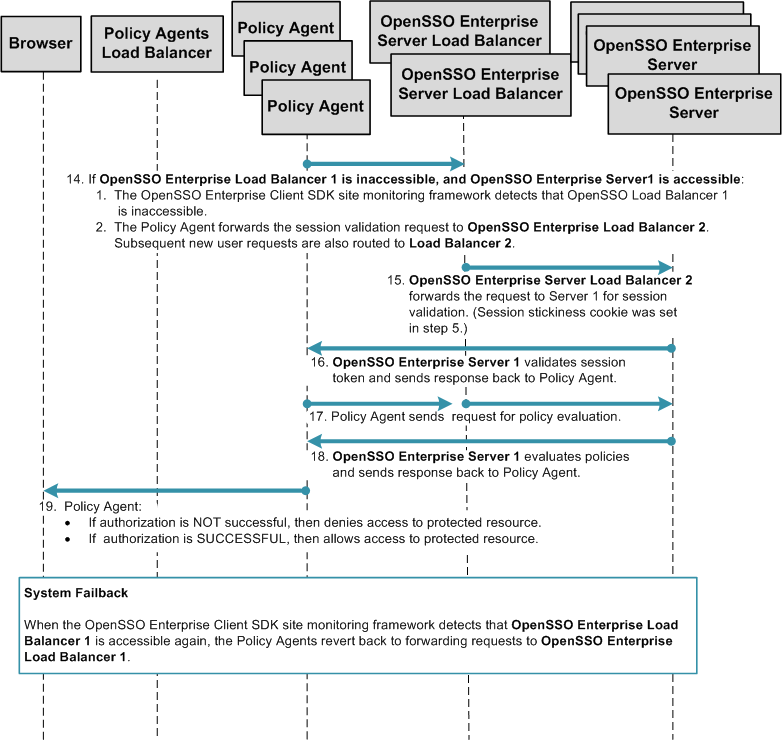
Multiple OpenSSO Enterprise Server Load Balancers in Multiple Sites with Session Failover
This deployment is useful if you want to logically group redundant OpenSSO Enterprise servers in a LAN or WAN environment. For example, you can configure redundant OpenSSO Enterprise servers to work as a single unit under a single site identifier. Redundant OpenSSO Enterprise servers provide one level of system failover. When you deploy multiple sites this way, the OpenSSO Enterprise servers in one site are logically isolated from the OpenSSO Enterprise servers in other sites.
For an added level of system failover, you can configure one site to fail over to another site. In this example, both OpenSSO Enterprise server load balancers are specified in each Policy Agent bootstrap configuration. The load balancers are also configured as login URL's in each Policy Agent configuration. Policy Agent configuration can reside on the same host as the Policy Agent, or can reside in the OpenSSO Enterprise embedded configuration data store. When system failure occurs at the load balancer, one site fails over to another site.
This deployment ensures both system failover and session failover if one of the OpenSSO Enterprise load balancers or one of the OpenSSO Enterprise servers is inaccessible for any reason. The following issues are addressed in this deployment:
-
Logical grouping of OpenSSO servers can be achieved across distant geographic locations within a WAN environment or locally within a LAN environment.
-
The Message Queue broker and Berkeley Database provide the means for session failover.
-
Session failover is not supported among multiple sites.
-
The user's authenticated session state is maintained in the event of a single hardware or software failure. This allows the user session to fail over to a backup OpenSSO Enterprise server without losing session information. If system failure occurs within the site, the user does not have to log in again.
-
The backup OpenSSO Enterprise server is determined by an internal algorithm. The internal algorithm selects from the server configuration list one of the available servers from same site.
-
System failover works among OpenSSO Enterprise servers in different sites.
The following figure illustrates a complex high availability deployment using both system failover and session failover in multiple sites.
Figure 17–14 Multiple OpenSSO Enterprise Server Load Balancer in Multiple Sites with Session Failover
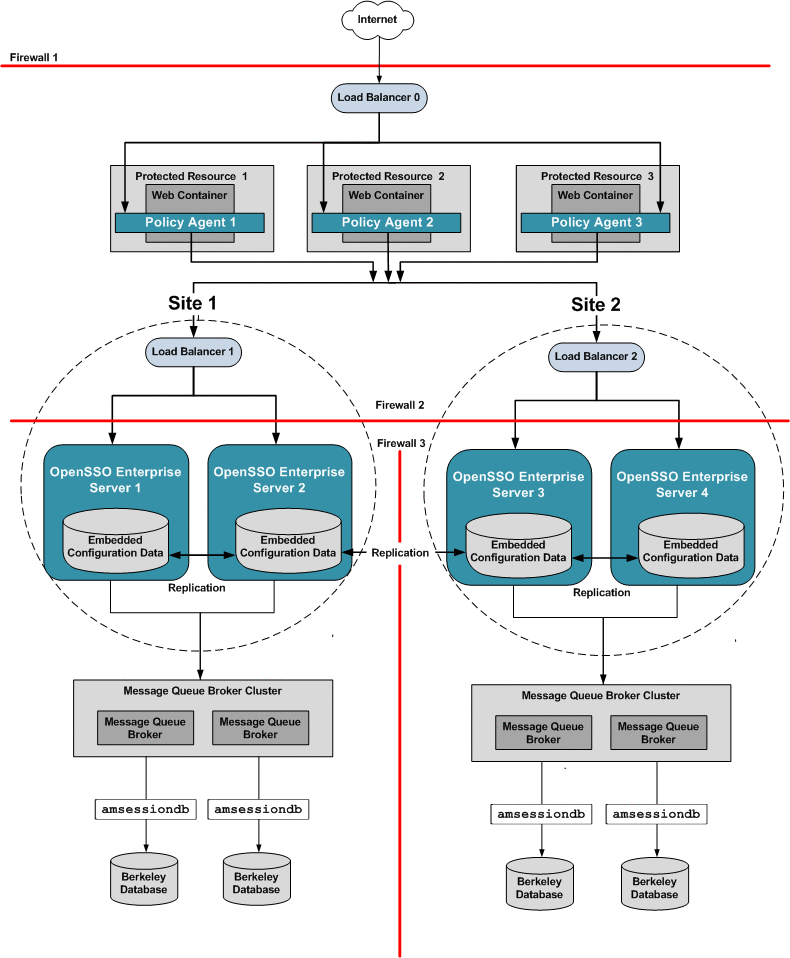
The following figure illustrates the session handling part of the process flow. See Figure 17–2 for a detailed illustration of steps 1 through 13.
Figure 17–15 Multiple OpenSSO Enterprise Server Load Balancers with Session Failover in Each Site
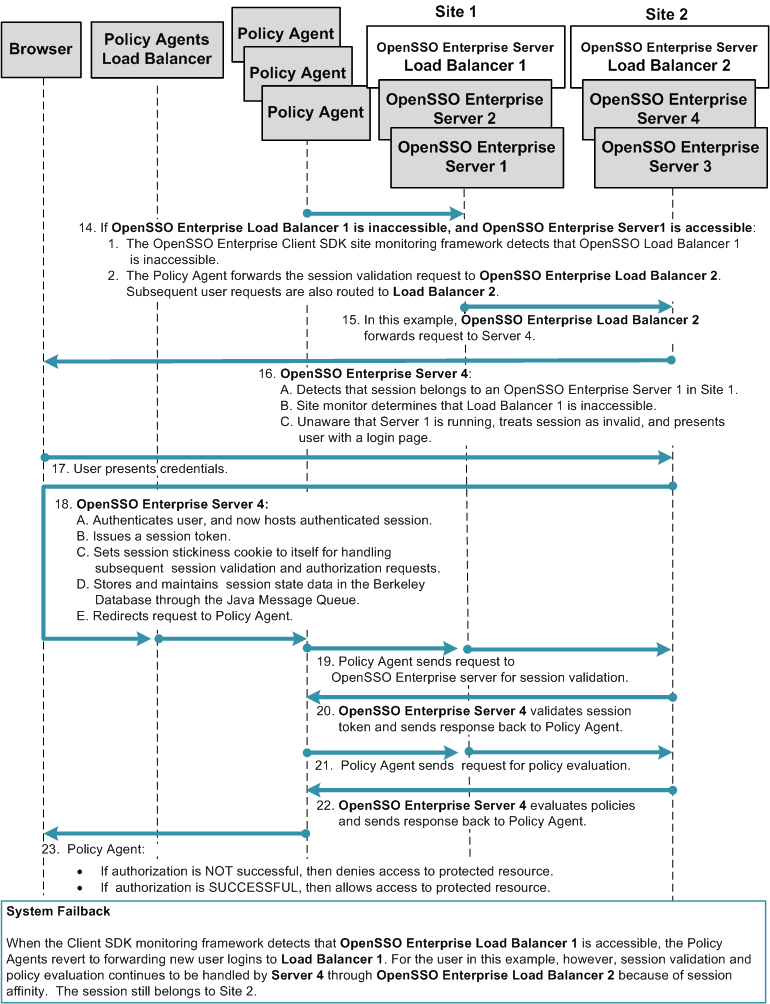
Considering Assumptions and Dependencies
As you plan your deployment, consider the following assumptions to determine if your environment is appropriate for using system failover and session failover.
Assumptions
-
Redundant OpenSSO Enterprise servers and Policy Agents are installed for basic load-balancing. Additionally, you must manually configure each instance for system failover and session failover.
-
All OpenSSO Enterprise servers must share the same configuration data. This can be achieved by setting up configuration data replication among multiple instances of OpenDS, or by configuring each OpenSSO Enterprise server to point to the same instance of Sun Directory Server.
-
You can configure system failover at either the OpenSSO Enterprise Policy Agent or at the OpenSSO Enterprise Client SDK.
-
When configuring session failover, you must deploy Java Message Queue and the Berkeley Database on a machine other than the one hosting the OpenSSO Enterprise servers. You can configure a single Message Queue with a single Berkeley Database, or you can configure multiple instance of both.
Using Java Message Queue Broker and Berkeley Database for Session Failover
If you configure a single instance of Java Message Queue Broker and as single instance of Berkeley Database to provide session failover for your deployment, no session data replication is possible. If either Message Queue Broker or Berkeley Database fails, then all the stored user sessions are lost. The OpenSSO Enterprise server would operate as if session failover was not configured.
A good practice is to use two instances of Message Queue Broker configured with two instances of Berkeley Database. User sessions are replicated among the Berkeley Database instances. This dual-host configuration is for failover purposes and not for load sharing. Adding more Message Queue Broker instances and Berkeley Database instances does not increase processing capacity. Adding more instances actually reduces the overall session failover processing capacity due to the extra data replication overhead.
-
The Java Message Queue Broker and Berkeley Database pair should be configured in an active-standby mode so that at any given time only one of the pair is up and running.
-
The Java Message Queue Broker and Berkeley Database pair on the backup host is be used only for failover purposes.
-
When the primary Java Message Queue Broker and Berkeley Database pair fail, other pair on the backup host can be started to provide uninterrupted session service.
Configuring OpenSSO Enterprise for High Availability
A good source of high-availability configuration information is the manual Deployment Example: Single Sign-On, Load Balancing and Failover Using Sun OpenSSO Enterprise 8.0. In particular, the following chapters provide examples with detailed step-by-step instructions for configuring load balancers, OpenSSO Enterprise sites, and OpenSSO Enterprise for system failover and session failover.
The following are additional resources for configuring system failover and session failover:
Evaluating Benefits and Trade-Offs
Benefits
-
System failover provides continuous OpenSSO Enterprise service when hardware or software fails.
-
Session failover ensures uninterrupted transactions and no user data loss during system failure.
-
In most cases, user does not have to re-authenticate after system recovery.
-
Increased transaction throughput through load sharing.
-
Increased security because Policy Agents never interact directly with OpenSSO Enterprise servers.
Trade-Offs
-
Slight impact to performance when OpenSSO Enterprise is configured for session failover.
-
Firewall must be open between OpenSSO Enterprise communicating components.
Chapter 18 Using the Windows Desktop Single Sign-On Authentication Module
The OpenSSO Enterprise Windows Desktop SSO Authentication module is a Kerberos-based plug-in you can use with a Windows domain controller to achieve single sign-on (SSO). The plug-in enables a Windows client user, who has already authenticated to a Kerberos Distribution Center (KDC), to authenticate to OpenSSO Enterprise without re-submiting user credentials.
This chapter provides high-level instructions for configuring the OpenSSO Enterprise Windows Desktop SSO Authentication module, the Kerberos domain controller, and Windows Active Directory to achieve single sign-on using the Simple and Protected GSS-API Negotiation Mechanism (SPNEGO) protocol. The following topics are included in this chapter:
About Kerberos Authentication and the SPNEGO Protocol
Kerberos is an authentication protocol developed by the Massachusetts Institute of Technology. The Key Distribution Center (KDC) is the component of Kerberos that is responsible for issuing credentials. A credential is a packet of information that includes a ticket-granting ticket (TGT) and a matching session key. A ticket is an information packet that is used to securely pass the identity of a user to a server or service. After a ticket has been issued, it can be reused until the ticket expires. The session key contains information that is specific to the user and the service that is being accessed. The session key is shared between the client and service to secure transactions between them. The credential is encrypted with the requesting principal's key. For more information about Kerberos authentication, see Kerberos V5 Administrator's Guide.
The SPNEGO protocol is described in the abstract IETF RFC 2478. The SPNEGO protocol is intended to be used in environments where multiple GSS-API mechanisms are available to the client or server, and neither side knows what mechanisms are supported by the other.
About the OpenSSO Windows Desktop SSO Authentication Module
The Windows Desktop SSO Authentication Module enables OpenSSO Enterprise to work with Kerberos tokens. The user presents the Kerberos token, previously issued by a Kerberos Distribution Center, to OpenSSO Enterprise using the SPNEGO protocol. The client browser sends back a SPNEGO token embedded with a Kerberos token. The OpenSSO Windows Desktop SSO Authentication module retrieves the Kerberos token and authenticates the user using the Java GSS API. If authentication is successful, the OpenSSO Windows Desktop SSO Authentication module returns an SSOToken to the client.
Analyzing the Deployment Architecture
The following figure illustrates a basic deployment architecture that includes the OpenSSO Windows Desktop SSO Authentication module.
Figure 18–1 Deployment Architecture for OpenSSO Windows Desktop SSO Authentication Module
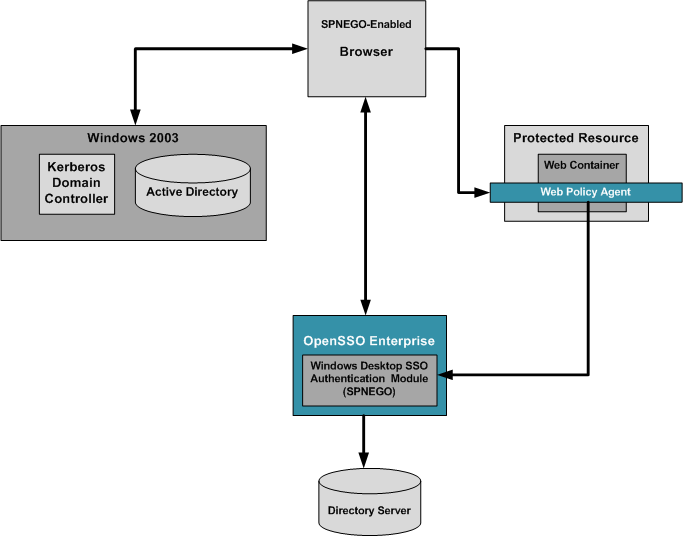
An OpenSSO Windows Desktop SSO Authentication deployment includes the following components:
- Windows 2003 Server with Domain Controller
-
The Windows Domain Controller contains configuration information for the Windows XP workstation and the workstation users. If the configured domain-user authenticates to the domain with proper user principal and credentials, the Windows Domain Controller generates a TGT Kerberos ticket and sends the ticket to the authenticated user account.
- Windows XP with SPNEGO-supported Browser
-
When the user accesses a resource that is protected with an authentication, an Authenticate:Negotiate response is sent to the browser. The browser obtains the Keberos Service ticket with the TGT that was generated in authentication time. This Service Kerberos ticket can be validated by the OpenSSO Enterprise server.
- Sun Directory Server 6.3
-
Contains user profile information.
- OpenSSO Windows Desktop SSO Authentication Module
-
The OpenSSO Windows Desktop SSO Authentication module is a server-side SPNEGO implementation that uses the Java GSS-API to process a Kerberos token sent by a SPNEGO-supported browser.
The following figure illustrates a typical process flow for Kerberos authentication using the Windows Desktop SSO Authentication module.
Figure 18–2 Process Flow for Windows Desktop SSO Authentication
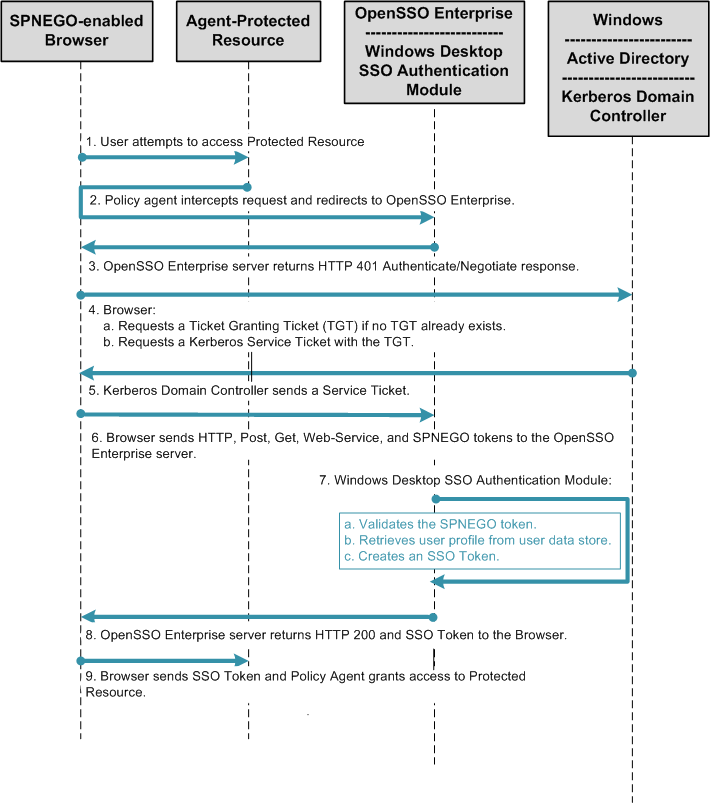
Considering Dependencies and Constraints
In order to perform Kerberos-based single sign-on to OpenSSO Enterprise, the user client must support the SPNEGO protocol. Any client that supports the SPNEGO protocol should be compatible with the OpenSSO Windows Desktop SSO Authentication module. For example, Microsoft Internet Explorer (5.01 or later) running on Windows 2000 (or later) currently supports the SPNEGO protocol. Additionally, Mozilla 1.5 (or later) and Safari 2.0 (or later) also support SPNEGO.
The current implementation of the Windows Desktop SSO Authentication module supports only Kerberos tokens using on the SPNEGO protocol, and does not support the Windows Challenge/Response (NTLM) token at all. If the user's browser submits an NTLM token instead of a Kerberos token, the Windows Desktop SSO Authentication module returns a 401 error back to the browser.
Understanding Typical Business Use Cases
You can use the OpenSSO Enterprise Windows Desktop SSO Authentication module in any environment where end-users are using Windows clients, such as desktop or laptop computers, with SPNEGO-enabled browsers. The most common use of this authentication module is to implement single sign-on within an intranet for Windows client users. Once the user has successfully authenticated against OpenSSO Enterprise, the user can keep the intranet session open all day without having to re-authenticate.
A second business use case is to implement cross-domain single sign-on (CDSSO) or internet single sign-on. CDSSO is not possible with Kerberos authentication alone. But by using the OpenSSO Enterprise SSO Token with the SPNEGO protocol, the SSO Token can be passed to multiple domains without the user having to re-authenticate. This enables a user to enjoy the benefit of single sign-on among trusted domains within an extranet.
Evaluating Benefits and Tradeoffs
The main benefits in using the OpenSSO Enterprise Windows Desktop SSO Authentication module are described in the Understanding Typical Business Use Cases above. There is no alternative that enables you to integrate Kerberos authentication for Windows users with OpenSSO Enterprise.
Configuring Basic Windows Desktop SSO Authentication
The following is an overview of steps you must complete to achieve single sign-on using the OpenSSO Enterprise Windows Desktop SSO Authentication module:
-
Synchronize OpenSSO Enterprise and the Kerberos Domain Controller Clocks.
-
Configure the OpenSSO Enterprise Windows Desktop SSO Authentication Module.
The basic configuration instructions described in this document are based on the components described in the following table.
Table 18–1 Components Used in the Configuration and Setup Examples|
Component |
Product Name |
Platform |
Host Name |
|---|---|---|---|
|
OpenSSO server |
Sun OpenSSO Enterprise 8.0 |
Solaris 10 SPARC |
opensso.example.com |
|
Windows Domain Controller |
Windows 2003 Domain Controller |
Windows 2003 |
domaincontroller.example.com |
|
Kerberos Domain Controller (KDC) |
Not applicable |
Solaris 10 SPARC |
kerberos.example.com |
|
Windows XP client |
Windows XP SP3 |
Windows XP |
winXP.example.com |
Configuring a Kerberos Domain Controller on Windows or UNIX
The Kerberos Key Distribution Center issues security keys, also called tickets, for authentication. A Kerberos domain controller recognizes the tickets issued by the Key Distribution Center, and extends Kerberos authentication to multiple resources within an intranet. A Kerberos domain controller must be running on a UNIX system, or on a Windows 2000 or Windows 2003 system that supports the Kerberos Domain Controller within the intranet. Microsoft Windows Active Directory and a Windows Domain Controller together form the Windows equivalent of the UNIX Kerberos domain controller. An administrator can use the Active Directory Domain Controller wizard to create a domain controller realm on a Windows server host. Once the administrator completes creates a working Kerberos realm, both Windows and Unix computer systems can participate as clients in the single sign-on environment. The following instructions are included in this document:
For detailed information about installing and configuring Kerberos components, see the Kerberos V5 Installation Guide and the Kerberos V5 Administrator's Guide .
 To Configure a UNIX Kerberos Domain Controller
Edit the krb5.conf and kdc.conf files to specify where and how the Kerberos Domain Controller is running.
-
Modify the krb5.conf file.
For detailed information about the krb5.conf, see the Kerberos V5 Administrator's Guide.
Example:
[logging] default = FILE:/var/log/krb5libs.log kdc = FILE:/var/log/krb5kdc.log admin_server = FILE:/var/log/kadmind.log [libdefaults] dns_lookup_realm = false dns_lookup_kdc = false default_keytab_name = /etc/krb5/krb5.keytab default_realm = DEMO.IDENTITY.COM default_tkt_enctypes = des-cbc-md5 default_tgs_enctypes = des-cbc-md5 default_checksum = rsa-md5 kdc_timesync = 0 kdc_default_options = 0x40000010 clockskew = 300 check_delegate = 0 ccache_type = 3 kdc_timeout = 60000 [realms] DEMO.IDENTITY.COM = { kdc = demo1.identity.com:88 admin_server = demo1.identity.com:749 default_domain = identity.com } [domain_realm] .identity.com = DEMO.IDENTITY.COM identity.com = DEMO.IDENTITY.COM [appdefaults] pam = { debug = true ticket_lifetime = 36000 renew_lifetime = 36000d forwardable = true krb4_convert = false } -
Modify the kdc.conf file.
For detailed information about the kdc.conf file, see the Kerberos V5 Administrator's Guide.
Example:
[kdcdefaults] acl_file = /var/kerberos/krb5kdc/kadm5.acl dict_file = /usr/share/dict/words admin_keytab = /var/kerberos/krb5kdc/kadm5.keytab v4_mode = nopreauth [realms] DEMO.IDENTITY.COM = { master_key_type = des-cbc-crc supported_enctypes = arcfour-hmac:normal arcfour-hmac:norealm arcfourhmac: onlyrealm des3-hmac-sha1:normal des-hmac-sha1:normal des-cbcmd5: normal des-cbc-crc:normal des-cbc-crc:v4 des-cbc-crc:afs3 } -
Create the Kerberos Domain Controller database using the kdb5_util command.
This database will store information about all the principals and associated secrets contained in the realm.
Example:
/etc/krb5/% kdb5_util create -s
Initializing database '/var/krb5/principal' for realm 'DEMO.IDENTITY.COM',
master key name 'K/M@DEMO.IDENTITY.COM'
You will be prompted for the database Master Password.
It is important that you NOT FORGET this password.
Enter KDC database master key:
Re-enter KDC database master key to verify:
-
Create a new user account.
-
Add a user principal with kadmin.localcommand.
# kadmin.local
Authenticating as principal admin/admin@DEMO.IDENTITY.COM with password.
kadmin.local: addprinc demouser1
WARNING: no policy specified for demouser1@ DEMO.IDENTITY.COM;
defaulting to no policy
Enter password for principal "demouser1@ DEMO.IDENTITY.COM ":
Re-enter password for principal "demouser1@ DEMO.IDENTITY.COM ":
Principal "demouser1@ DEMO.IDENTITY.COM " created.
-
Verify that the user account is added correctly to the database.
Authenticate the user to the Kerberos domain. Example:
# kinit demouser1
Password for demouser1@ DEMO.IDENTITY.COM:
-
Validate the user's Kerberos ticket in the ticket cache.
# klist
Ticket cache: FILE:/tmp/krb5cc_0
Default principal: demouser1@ DEMO.IDENTITY.COM
Valid starting Expires Service principal
06/22/07 11:10:16 06/23/07 11:10:16 krbtgt/ DEMO.IDENTITY.COM @
DEMO.IDENTITY.COMM
-
-
Create a new user account for the Kerberos service user.
-
Add a service principal for OpenSSO Enterprise.
Example:
# kadmin.local: addprinc -randkey HTTP/amserver.identity.com
WARNING: no policy specified for HTTP/amserver.identity.com@DEMO.IDENTITY.COM;
defaulting to no policy Principal
"HTTP/amserver.identity.com@ DEMO.IDENTITY.COM" created.
-
Generate a keytab file for OpenSSO Enterprise.
 # kadmin.local: ktadd -k amserver1.HTTP.keytab HTTP/amserver.identity.com
Entry for principal HTTP/amserver.identity.com with kvno 4,
encryption type ArcFour with HMAC/md5 added to keytab
WRFILE:amserver1.HTTP.keytab.
Entry for principal HTTP/amserver.identity.com with kvno 4,
encryption type Triple DES cbc mode with HMAC/sha1 added to
keytab WRFILE:amserver1.HTTP.keytab.
Entry for principal HTTP/amserver.identity.com with kvno 4,
encryption type DES with HMAC/sha1 added to
keytab WRFILE:amserver1.HTTP.keytab.
Entry for principal HTTP/amserver.identity.com with kvno 4,
encryption type DES cbc mode with RSA-MD5 added to keytab
WRFILE:amserver1.HTTP.keytab.
-
Verify that the Kerberos service account is added correctly to the database.
Use the kinit and klist commands to validate the Kerberos service account. Authenticate the service principal to the Kerberos domain with the keytab file. Example:
- # kinit ?k ?t amserver1.HTTP.keytab HTTP/amserver.identity.com
-
Validate the keytab file for the Kerberos service principal.
Example:
 # klist -k amserver1.HTTP.keytab
Keytab name: FILE:amserver1.HTTP.keytab
KVNO Principal
------------------------------------------------
4 HTTP/amserver.identity.com@DEMO.IDENTITY.COM
4 HTTP/amserver.identity.com@DEMO.IDENTITY.COM
4 HTTP/amserver.identity.com@DEMO.IDENTITY.COM
4 HTTP/amserver.identity.com@DEMO.IDENTITY.COM
-
 To Configure Windows Active Directory and
Domain Controller
-
Log in as an administrator to the Windows 2000 or 2003 server host.
-
From the Start menu, go to Administrative Tools > Manage Your Server.
-
On the Manage Your Server wizard, choose Adding Roles to Your Sever.
-
In the Server Role window, choose Domain Controller (Active Directory).
-
Accept the default values by clicking Next.
-
Continue to accept the default values and clicking Next until the Report DNS Issue window is displayed.
-
This window is displayed when no properly configured DNS exists for Active Directory. Choose “Install and Configure DNS” to proceed to the next window.
-
Continue to accept the default values and clicking Next until the Summary window is displayed, then click Next.
The Active Directory Installation wizard is invoked.
-
-
Install the Active Directory Domain Controller.
For detailed instructions, see Install Active Directory Domain Services on the Windows Server 2008-Based Member Server
-
Install Windows Support Tools.
Windows Support Tools contains the ktpass Kerberos tool you need to map a service principal with an Active Directory account. For information about ktpass, see the Ktpass Overview. For detailed instructions on installing Windows Support Tools, see How to install the Windows 2000 Support Tools to a Windows 2000 Server-based computer.
-
Create a new user account.
-
From the Start menu, go to Programs > Administration Tools.
-
Choose “Active Directory Users and Computers.”
-
Enter a user name and password for the new user, and create the user.
-
Verify that the Kerberos ticket is returned by the Kerberos Authentication Server properly.
Log into the new domain account from any Windows XP workstation belonging to the domain. You can use the Windows Support Tools to verify that the Kerberos ticket is returned by the Kerberos Authentication Server and cached into the ticket cache. For information about Windows Support Tools, see Windows Support Tools.
-
-
Create a user account to map to the Kerberos service.
-
From the Start menu, go to Programs > Administration Tools.
-
Choose “Active Directory Users and Computers.”
-
Crete a new user with a name that is meaningful to you.
In this example, the name is openSSOhost.
-
Use the ktpass command to associate this user account with a service principal.
Example:
C:\Documents and Settings\Administrator>ktpass /pass password /mapuser openSSOhost
/princ HTTP/openSSOhost.identity.com@OPENSSOHOST.EXAMPLE.COM +DesOnly /ptype
KRB5_NT _PRINCIPAL /Target OPENSSOHOST.EXAMPLE.COM
Using legacy password setting method
Successfully mapped HTTP/openSSOhost.example.com to openSSOhost.
Key created.
Account openSSOhost has been set for DES-only encryption.
If OpenSSO Enterprise is configured with Java version 1.5_ 08 or higher, you don't need to specify the +DesOnly parameter here.
-
Export the keytab file and copy it to the system where OpenSSO Enterprise is installed.
Example:
C:\Documents and Settings\Administrator>ktpass /out demo1.HTTP.keytab /princ
HTTP/demo1.identity.com@DEMO.IDENTITY.COM /ptype KRB5_NT_PRINCIPAL /crypto
DES-CBC-CRC /Target DEMO.IDENTITY.COM
NOTE: creating a keytab but not mapping principal to any user.
For the account to work within a Windows domain, the
principal must be mapped to an account, either at the
domain level (with /mapuser) or locally (using ksetup)
If you intend to map HTTP/demo1.identity.com@DEMO.IDENTITY.COM
to an account through other means or don't need to map the user,
this message can safely be ignored.
Key created.
Output keytab to demo1.HTTP.keytab:
Keytab version: 0x502
keysize 70 HTTP/demo1.identity.com@DEMO.IDENTITY.COM ptype 1
(KRB5_NT_PRINCIPAL) vno 1 etype 0x1 (DES-CBC-CRC) keylength 8
(0xa1c4e6203e3b0d34)
If OpenSSO Enterprise is configured with Java version 1.5 or higher, you don't need to specify the /crypto DES-CBC-CRC parameter here.
You can test if this keytab file will work for OpenSSO Enterprise by using the Windows Support Tools, and specifying the /crypto DES-CBC-CRC parameter.
-
To Synchronize the OpenSSO Enterprise and Kerberos Domain Controller Clocks
Set the clocks on the OpenSSO Enterprise host and on the Kerberos Domain Controller host so that they both display the same time. Without time synchronization, the OpenSSO Enterprise Windows Desktop SSO Authentication module may fail to authenticate to the Kerberos domain.
Configuring the Domain Controller
Depending upon the domain controller you are using, do one of the following:
Configuring DNS Mapping on the Windows Domain Controller
-
Configure valid forward and reverse DNS mapping for the computer systems in your domain.
For example OpenSSO Enterprise and the Kerberos Domain Controller must have proper A (IP-Name lookup) and PTR (Reverse IP-Address lookup) records in the DNS database.
-
If you use the /etc/hosts file instead of using DNS, all host names point to real, network-accessible IP addresses.
For example, if the IP address for host1.example.org is 15.168.120.15, then the /etc/hosts file should contain the following entries:
127.0.0.1	 localhost	 openSSOhost
15.168.120.15 	openSSOhost.example.com 	openSSOhost
Configuring a Windows XP Workstation to Join the Kerberos Domain Controller Realm
A Window XP workstation must be configured to work with a UNIX Kerberos Domain Controller or Windows 2003 Domain Controller. You can add the workstation to the Kerberos or Windows Domain Controller when installing Windows XP, or when modifying the network configuration that already exists on the Window XP workstation.
 To Configure an Windows XP Workstation to
Join an Active Directory Domain Controller During Installation
-
Follow the instructions in How to install or upgrade to Windows XP to start the Windows XP Setup wizard.
-
Follow the onscreen instructions in the Windows XP Setup wizard until you get to the “Workgroup or Computer Domain” window.
-
Enter the Active Directory domain you want the Windows XP workstation to join, then click Next.
-
If the Windows XP Setup wizard cannot find the domain controller for this domain, enter the IP address of the domain controller in the Internet Protocol (TCP/IP) Properties window.
-
From the Start menu, choose Control Panel. Go to Network and Internet Connections > Network Connections.
-
Right-click the local area connection that you want to modify, and then click Properties.
-
On the General tab, in the “This connection uses the following items list,” click Internet Protocol (TCP/IP), and then click Properties.
-
For more information, see How to troubleshoot TCP/IP connectivity with Windows XP.
-
-
Continue to follow the onscreen instructions in the Windows XP Setup wizard until all steps are completed.
To Create the Windows XP User's Local Account
Before you begin, be sure the user has already been added to the Active Directory domain.
Follow the instructions for creating the user's local account in How to create and configure user accounts in Windows XP.
To Configure an Existing Windows XP Workstation to Join an Active Directory Controller
Follow the instructions in
 To Configure an Existing Window XP Workstation
to Join a UNIX Kerberos Domain
Once the host account is added successfully, you can change the network configuration for the Window XP workstation. You must be logged into Windows XP as an administrator to run the following commands.
-
Run the kadmin.local command to add the host account for Window XP workstation first on the UNIX side.
Example:
kadmin.local addprinc -pw password -policy hosts -e
  des-cbc-crc:normal host/demoxp. openSSOhost.example.com
-
Run the ksetup command.
ksetup /SetRealm OPENSSOHOST.EXAMPLE.COM
ksetup /AddKDC openSSOhost.example.com
-
Set the local computer system password.
This password must match the password you specified when you ran kadmin.local in step 1.
ksetup /SetComputerPassword password
-
Set up user mapping.
Example:
ksetup /mapuser * *
Configuring the Browser
Any client browser used in the intranet must be configured to work with the Kerberos Domain Controller.
To Configure Microsoft Internet Explorer
-
In the Tool menu, go to Internet Options > Security.
-
Choose Local Intranet, and then click Site.
-
Mark the “Automatically detect intra network” checkbox, and then click Advanced.
-
Add the OpenSSO Enterprise URL to the Websites list if the URL is not already on the list.
Example: http:/openSSOhost.example.com
For pre-6.0 Internet Explorer versions, be sure the Identity Server is in the browser's intranet zone and that native Windows Authentication is enabled. For more information, see Enabling Windows Authentication.
To Configure Mozilla or FireFox
-
Open the Firefox browser, and enter about:config in the address bar.
This will display a large number of configuration entries, called Preference Names, for Firefox .
-
Double-click the Preference Name network.negotiate-auth.trusted-uris.
-
Enter http://, https://.
To Configure Apple Safari
Safari has built-in native support for Kerberos single sign on and no configuration is needed.
 To Configure the OpenSSO Enterprise Windows
Desktop SSO Authentication Module
-
Copy the keytab files you created in the sectionTo Configure a UNIX Kerberos Domain Controller or the section To Configure Windows Active Directory and Domain Controller.
Place the copied files in the OpenSSO Enterprise host, in a directory such as /etc/opt/SUNWam/config.
-
Log into the OpenSSO Enterprise administration console as amadmin.
-
Go to Access Control > Default Realm > Authentication.
-
In the Module Instances page, click New.
-
Enter a name for the new login module, and then select Windows Desktop SSO. Click OK.
-
In the Module Instances page, click the name of the new login module and provide the following information:
- Service Principal
-
HTTP/ openSSOhost.example.com@EXAMPLE.COM
- Keytab File Name
-
/etc/opt/SUNWam/config/openSSOhost.HTTP.keytab
- Kerberos Realm
-
OPENSSOHOST.EXAMPLE.COM
- Kerberos Server Name
-
Kerberos.example.com
If multiple Kerberos Domain Controllers exist for failover purposes, all Kerberos Domain Controllers can be set using a colon (:) as the separator.
- Return Principal with Domain Name
-
False
- Authentication Level
-
0
-
Restart the OpenSSO Enterprise server.
-
If OpenSSO Enterprise is deployed on IBM Websphere, then Keytab File Name has to be specified in FILE:// format. Example: FILE:///etc/opt/SUNWam/config/openSSOhost.HTTP.keytab.
-
If OpenSSO Enterprise is deployed on IBM Websphere, the keytab file has to use the DES-CBC-MD5 crypto option. After restarting the server, the administrator can access the module with a browser pointing to this URL: http://openSSOhost.example.com/amserver/UI/Login?module=WinSSO.The browser should no longer prompt the user for userid and password.
-
Complex Configurations
Once you've set up and verified that basic Windows Desktop SSO Authentication works, you can deploy the module in more complex configurations:
-
To Use the Windows Desktop SSO Authentication Module with a Load Balancer
-
Using the Windows Desktop SSO Authentication Module with Multiple Kerberos Domain Controllers
Chaining Multiple Authentication Modules
You can use the administration console to chain multiple authentication modules to work together as single a authentication service . When multiple authentication modules are chained together, the end-user must authenticate at least one of authentication modules in defined in the authentication group. Or the user may be required to authenticate to all of the modules, depending upon on how authentication chaining is configured.
The following instructions demonstrate chaining the DataStore Authentication module and Windows Desktop SSO Authentication module to work together as an authentication service. Using this configuration, an end-user can access OpenSSO Enterprise using the authentication service name. Example: http://openSSO.example.com/amserver/UI/Login?service=WinSSOService.
 To Configure Authentication Chaining
-
Log in to the OpenSSO Enterprise admnistration console as amadmin.
-
Go to Access Control > Default Realm > Authentication.
-
Define a new instance of the Windows Desktop SSO Authentication module.
-
Go to Access Control? > Default Realm > Authentication.
-
Define new instance of Authentication Chaining.
-
Click the New button for Authentication Chaining.
Provide a name for this chain, and then click OK. Example name: WinSSOService.
-
Click Add, and then choose the first authentication module to be executed in this chain.
In this example, Windows Desktop SSO is the first module to be executed.
-
For Criteria, choose Sufficient.
-
Click Add, and then choose the next authentication module in the chain to be executed.
In this example, Data Store is the next module to be executed.
-
For Criteria, choose Sufficient.
-
-
Go to Access Control > Default Realm> Authentication, and save this new chaining configuration.
 To Test Authentication Chaining
-
Log in to a Windows XP Domain Controller and start any browser that is enabled for the SPNEGO protocol.
-
Go to the OpenSSO Enterprise URL configured with the authentication service name.
Example : http://am.demo.identity.com/amserver/UI/Login?service=WinSSOService.
If a user can log into Windows XP Domain Controller successfully, the browser sends a Kerberos ticket to the OpenSSO Enterprise server, and the user is successfully authenticated using the Windows Desktop SSO Authentication module. .
If the user cannot authenticate to the first authentication module, then OpenSSO Enterprise prompts for user name and password and tries to authenticate using the Data Store Authentication module. If authentication fails, then the administrator should troubleshoot the authentication failure. For a short list of solutions for the most common error messages related to Windows Desktop SSO Authentication, see Troubleshooting Windows Desktop SSO Authentication Issues.
 To Use the Windows Desktop SSO Authentication
Module with a Load Balancer
All OpenSSO Enterprise authentication modules, including the Windows Desktop SSO Authentication module, can be accessed through a load balancer. The Windows Desktop SSO Authentication module requires some special configuration.
-
Create an Active Directory domain account in Windows 2003 or in the Kerberos service principal.
-
When you generate the keytab file for he Windows Desktop SSO Authentication, you have to specify the load balancer FQDN.
Example: HTTP://opensso-lb.example.com. If you don't specify the fully-qualified domain name, authentication will fail.
-
Copy the keytab file to all OpenSSO Enterprise servers, and put place in under the same directory in each server.
Example location: /etc/ SUNWam/config.
-
Create a new Windows Desktop SSO Authentication module and Configure it with the newly copied keytab file.
-
Restart all the OpenSSO Enterprise servers and test the new module through the load balancer.
Using the Windows Desktop SSO Authentication Module with Multiple Kerberos Domain Controllers
You can configure the Windows Desktop SSO authentication module to work with multiple Kerberos Domain Controllers. This is useful for deploying a failover Kerberos server.
When you configure the Windows Desktop SSO authentication module with a keytab file from one of the trusted domain controllers, any user belonging to any of the trusted domains can authenticate through the Windows Desktop SSO authentication module. Administrators can configure and manage trust relationships in environments containing multiple Active Directories.
To make the Windows domain controller a part of the trusted nodes, and to make the Windows domain controller work with the Windows Desktop SSO authentication module, the following conditions must be met:
-
You must use Windows 2003 or a later version.
-
The domain controller functional level must be set at Windows Server 2003.
-
Trust must be configured.
Trust configuration is beyond the scope of this document. The following links provide useful related information:
-
Configuring KDC Servers in System Administration Guide: Security Services
-
Configuring Cross-Realm Authentication in System Administration Guide: Security Services
The following procedures will help you navigate to the configuration areas of the Windows domain controller:
 To Locate the Trust Configuration Window
-
From the Windows Start menu, choose Administrative Tools > Active Directory Domains and Trusts.
-
In the Active Directory Domains and Trusts window, right-click the domain name and click Properties.
-
Click the Trusts tab.
-
Click New.
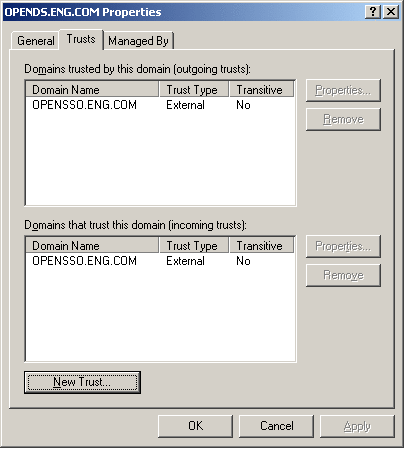
 To Promote the Domain Controller Functional
Level
-
From the Windows Start menu, go to Administrative Tools > Active Directory Domains and Trusts.
-
In the Active Directory Domains and Trusts window, right-click the domain name, and choose the Raise Domain Functional Level menu.
-
Choose windows Server 2003 as the new functional level.
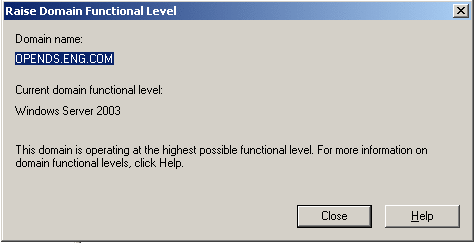
Using the Debugging Tools
After you configure the UNIX Kerberos Domain Controller or the and Windows 2003 Active Directory Domain Contoller are configured, you can test them with various tools to validate that they are configured properly.
Network Identity Manager
Network Identity Manager is a graphical tool designed by MIT to simplify the management of network identities and their credentials. When Network Identity Manger is used with Kerberos v5, each network identity is a unique Kerberos principal name, and the credentials are Kerberos version 5 tickets. Network Identity Manger enables you to manage any Kerberos ticket returned from a Kerberos Domain Controller. For detailed information, see the Network Identity Manager 1.3.1 User Documentation.
kinit
An administrator can obtain an initial Kerberos ticket for a specified principal using the kinit command, and then cache the initial ticket into the ticket cache. Once kinit is executed successfully, any existing tickets for the principal are overwritten. You can use the kinit command to verify that a generated keytab file is working with the Kerberos and Active Directory Domain Controllers. Usage:
kinit [-5] [-4] [-V] [-l lifetime] [-s start_time] [-r renewable_life][-f | -F] [-p | -P] [-A] [-v] [-R] [-k [-t keytab_file]] [-c cachename] [-S service_name] [principal] |
|
Option |
Description |
Kerberos Version |
|---|---|---|
|
-5 |
Use Kerberos 5 |
By default, Kerberos version 5 is used. |
|
-4 |
Use Kerberos 4 |
4, if available |
|
-V |
Verbose |
4, 5 |
|
-l |
Lifetime |
4, 5 |
|
-s |
Start time |
5 |
|
-r |
Renewable lifetime |
5 |
|
-f |
Forwardable |
5 |
|
-F |
Not forwardable |
5 |
|
-p |
Can be proxied |
5 |
|
-P |
Cannot be proxied |
5 |
|
-A |
Do not include addresses |
5 |
|
-v |
Validate |
5 |
|
-R |
Renew |
5, or both 5 and 4 |
|
-k |
Use keytab |
5, or both 5 and 4 |
|
-t |
Filename of keytab to use |
5, or both 5 and 4 |
|
-c |
Kerberos 5 cache name |
5 |
|
-S |
Service |
5, or both 5 and 4 5.3 |
klist
Theklist command displays the contents of a Kerberos credentials cache or key table. You can use the klist command to verifty that the generated keytab file has the right principal for OpenSSO Enterprise. Usage:
klist [-5] [-4] [-e] [[-c] [-f] [-s] [-a [-n]]] [-k [-t] [-K]] [name] -5 |
ktpass
You can use the ktpass command to configure services running on UNIX systems to work with with service instance accounts in Active Directory. You can also use the ktpass command to generate Kerberos keytab files for services. Before you map an Active Directory user account with OpenSSO Enterprise, first check the Java version that is configured for OpenSSO. If the Java version is 1.5_08 or higher, you can generate the Kerberos keytab file using all default values for account encryption and cryptosystem. Java versions 1.5_08 or higher support the RC4-HMAC crypto system that is default for the Windows Kerberos Domain Controller. If the Java version is lower than 1.5_08, you have must use the DesOnly option. Options:
Table 18–4 ktpass Command Options
ksetup
Use these commands to create the configuration entries in the Windows host's registry for the Kerberos realm. The registry entries function similarly to the krb5.conf file used by Unix Kerberos to define the Kerberos Domain Controller information for Kerberos realms.
Table 18–5 ksetup Options|
Option |
Description |
|---|---|
|
/SetRealm DnsDomainName |
Makes this computer a member of an RFC1510 Kerberos Realmp |
|
/MapUser Principal [Account] |
Maps a Kerberos Principal ('*' = any principal) to an account ('*' = an account by same name); If account name is omitted, mapping is deleted for the specified principal. |
|
/AddKdc RealmName [KdcName] |
Defines a Kerberos Domain Controller entry for the given realm. If KdcName omitted, DNS mapping may be used to locate Kerberos Domain Controllers. |
|
/DelKdc RealmName [KdcName] |
Deletes a Kerberos Domain Controller entry from the realm. If KdcName omitted, the realm entry itself is deleted. |
|
/AddKpasswd Realmname KpasswdName |
Add Kpasswd server address for a realm |
|
/DelKpasswd Realmname KpasswdName |
Delete Kpasswd server address for a realm |
|
/Server Servername |
Specifies name of a Windows machine to target the changes |
|
/SetComputerPassword Password |
Sets the password for the computer's domain account or host principal |
|
/RemoveRealm RealmName |
Deletes all information for this realm from the registry |
|
/Domain [DomainName] |
Uses this domain (if DomainName is unspecified, detects domain) |
|
/ChangePassword OldPasswd NewPasswd |
Use Kpasswd to change the logged-on user's password. Use '*' to be prompted for passwords. |
|
/ListRealmFlags (no args) |
Lists the available Realm flags that ksetup knows |
|
/SetRealmFlags <realm> <flag> [flag] [flag] [...] |
Sets RealmFlagsfor a specific realm |
|
/AddRealmFlags realm flag [flag] [flag] [...] |
Adds additional RealmFlags to a realm |
|
/DelRealmFlags realm flag [flag] [flag] [...] |
Deletes RealmFlags from a realm |
|
/DumpState (no arguments) |
Analyze the Kerberos configuration on the given machine |
Troubleshooting Windows Desktop SSO Authentication Issues
If you have trouble accessing the Windows Desktop SSO Authentication module, first inspect the debug log files amAuthWindowsDesktopSSO or amAuth file. Errors or exceptions that users may encounter when Windows Desktop SSO Authentication doesn't work properly include the following:
Error Message: Unauthorized Access
The problem occurs when you try to access Windows Desktop SSO Authentication module directly. Example URL: http://openSSOhost.domain/UI/Login?module=WinSSO. An “Unauthorized Access” message is displayed. The message may also indicate that “The Kerberos token is not valid.” The following is displayed in the server-side debug log amAuthWindowsDesktopSSO:
06/20/2007 11:06:03:974 AM PDT: Thread[WebContainer : 1,5,main] WindowsDesktopSSO params: principal: HTTP/veet.red.iplanet.com@RED.IPLANET.COM keytab file:///tmp/keytab/veet.HTTP.keytab realm : RED.IPLANET.COM kdc server: cerberus.red.iplanet.com domain principal: false auth level: 0 06/20/2007 11:06:03:977 AM PDT: Thread[WebContainer : 1,5,main] Retrieved config params from cache. 06/20/2007 11:06:04:000 AM PDT: Thread[WebContainer : 1,5,main] SPNEGO token: 4e 54 4c 4d 53 53 50 00 01 00 00 00 07 82 08 a2 00 00 00 00 00 00 00 00 00 00 00 00 00 00 00 00 05 01 28 0a 00 00 00 0f 06/20/2007 11:06:04:000 AM PDT: Thread[WebContainer : 1,5,main] token tag:4e 06/20/2007 11:06:04:006 AM PDT: Thread[WebContainer : 1,5,main] kerberos token is not valid. |
-
Be sure that the browser is configured correctly.
-
Be sure that your XP domain login has the Kerberos ticket from the Kerberos Domain Controller.
Error Message: Service Login Error
When attempting the log in, the message “LoginException: Unable to obtain password from user” is displayed. The following is displayed in the server-side debug log amAuthWindowsDesktopSSO:
06/20/2007 01:08:08:614 PM PDT: Thread[service-j2ee,5,main] ERROR: Service Login Error: 06/20/2007 01:08:08:614 PM PDT: Thread[service-j2ee,5,main] Stack trace: javax.security.auth.login.LoginException: Unable to obtain password from user at com.sun.security.auth.module. Krb5LoginModule.promptForPass(Krb5LoginM odule.java:745) at com.sun.security.auth.module.Krb5LoginModule.attemptAuthentication (Kr b5LoginModule.java:624) at com.sun.security.auth.module. Krb5LoginModule.login(Krb5LoginModule.ja va:512) at sun.reflect.NativeMethodAccessorImpl.invoke0(Native Method) ..... |
-
Be sure the appropriate cryptosystem is being used for generating the keytab file.
-
Be sure the appropriate version of Java is configured for the OpenSSO Enterprise server.
-
Be sure the configured service principal is identical to the principal in the keytab file. You can use klist command view the keytab file information.
LoginException: Clock skew too great
The following is displayed in the server-side debug log amAuthWindowsDesktopSSO :
ERROR: Service Login Error: 06/20/2007 02:04:33:181 PM PDT: Thread[service-j2ee,5,main] Stack trace: javax.security.auth.login.LoginException: Clock skew too great (37) at com.sun.security.auth.module.Krb5LoginModule.attemptAuthentication (Kr b5LoginModule.java:696) at com.sun.security.auth.module.Krb5LoginModule.login(Krb5LoginModule.ja va:542) at sun.reflect.NativeMethodAccessorImpl.invoke0(Native Method) at sun.reflect.NativeMethodAccessorImpl.invoke(NativeMethodAccessorImpl. java:39) at sun.reflect.DelegatingMethodAccessorImpl.invoke (DelegatingMethodAcces sorImpl.java:25) at java.lang.reflect.Method.invoke(Method.java:585) at javax.security.auth.login.LoginContext.invoke(LoginContext.java:769) at javax.security.auth.login.LoginContext.access$000(LoginContext.java:1 86) |
Be sure that the clocks of OpenSSO Enterprise server host and the Kerberos or Active Directory Domain Controller host are synchronized properly.
LoginException: kdc.example.com
The following will be display in the server-side debug log amAuthWindowsDesktopSSO :
ERROR: Service Login Error: 06/20/2007 04:42:16:265 PM PDT: Thread[service-j2ee,5,main]Stack trace: javax.security.auth.login.LoginException: kdc.red.iplanet.com: kdc.red.iplanet.com at com.sun.security.auth.module.Krb5LoginModule.attemptAuthentication (Krb5LoginModule.java:700) at com.sun.security.auth.module.Krb5LoginModule.login(Krb5LoginModule.java:542) |
Be sure the Kerberos Server Name is configured using the FQDN for the Kerberos Domain Controller host. Use the ping command to verify that the Kerberos Domain Controller host is accessible from the OpenSSO host.
LoginException: Client not found in Kerberos database
The following will be displayed in the server-side debug log amAuthWindowsDesktopSSO :
ERROR: Service Login Error: 02/24/2009 11:17:37:212 PM JST: Thread[service-j2ee-1,5,main] Stack trace: javax.security.auth.login.LoginException: Client not found in Kerberos database (6) at com.sun.security.auth.module.Krb5LoginModule.attemptAuthentication(Krb5LoginModule.jav a:696) at com.sun.security.auth.module.Krb5LoginModule.login(Krb5LoginModule.java:542) at sun.reflect.NativeMethodAccessorImpl.invoke0(Native Method) at sun.reflect.NativeMethodAccessorImpl.invoke(NativeMethodAccessorImpl.java:39) at sun.reflect.DelegatingMethodAccessorImpl.invoke(DelegatingMethodAccessorImpl.java:25) at java.lang.reflect.Method.invoke(Method.java:585) |
Test the keytab file with kinit command. The keytab file may have been generated or mapped improperly.
GSSException: Failure unspecified at GSS-API level
The following is displayed in the server-side debug log amAuth:
09/14/2005 05:41:58:182 PM SGT: Thread[service-j2ee-3,5,main]Exception com.sun.identity.authentication.spi.AuthLoginException(1):null com.sun.identity.authentication.spi.AuthLoginException(2):null java.security.PrivilegedActionException(3):null java.security.PrivilegedActionException: GSSException: Failure unspecified at GSS-API level (Mechanism level: Integrity check on decrypted field failed(31)) at java.security.AccessController.doPrivileged(NativeMethod) at javax.security.auth.Subject.doAs(Subject.java:396) at com.sun.identity.authentication.modules.windowsdesktopsso.WindowsDesktopSSO.process (WindowsDesktopSSO.java:156) at com.sun.identity.authentication.spi.AMLoginModule.wrapProcess (AMLoginModule.java:723) at com.sun.identity.authentication.spi.AMLoginModule.login(AMLoginModule.java:871) at sun.reflect.NativeMethodAccessorImpl.invoke0(NativeMethod) at sun.reflect.NativeMethodAccessorImpl.invoke(NativeMethodAccessorImpl.java:39) at sun.reflect.DelegatingMethodAccessorImpl.invoke (DelegatingMethodAccessorImpl.java:25) at java.lang.reflect.Method.invoke(Method.java:585) at com.sun.identity.authentication.jaas.LoginContext.invoke(LoginContext.java:215) |
JDK1.5_08 and higher support RC4-HMAC, and earlier JDK versions support 3DES and DES enctypes only. Be sure to select +DesOnly encryption for mapping the account with the service principal in the Windows Kerberos Domain Controller. Also, be sure to use DES-CBC-CRC or DES-CBC-MD5 for cryptosystem when generating the service principal keytab file
Be sure the appropriate crypto system is used for generating keytab file. Be sure the appropriate version of Java is configured for OpenSSO Server.
Exception: Pre-authentication information was invalid
Java may not be handling the Kerberospre-auth correctly. This can occur if the principal name does not match what is stored in Active Directory, and what the principal name was when the password was last changed. This mismatch is not a problem for Active Directory, but it is a problem for Kerberos or a renamed account where the password has not been changed. Java 1.6 is reported to have a fix for this problem. The fix will accept the pre-authentication hint from the Kerberos Domain Controller as to what "salt" to use when doing the string to key function. The "salt" is derived from the principal name at the time the password was changed. Older Java versions assumed they know the salt and tried to skip the first step in the pre-authentication.
Error Message: Cannot establish context
See the information at the end of the procedure To Configure the OpenSSO Enterprise Windows Desktop SSO Authentication Module about using IBM WebSphere.
Error Message: Authentication failed
The following message is displayed in the server-side debug log amAuthWindowsDesktopSSO :
06/20/2007 03:49:20:704 PM PDT: Thread[service-j2ee,5,main] WindowsDesktopSSO params: principal: HTTP/am-v1280-01.red.iplanet.com@RED.IPLANET.COM keytab file: /tmp/keytab/wsso.HTTP.keytab realm : RED.IPLANET.COM kdc server: cerberus.red.iplanet.com domain principal: false auth level: 0 06/20/2007 03:49:20:704 PM PDT: Thread[service-j2ee,5,main] Init WindowsDesktopSSO. |
This should not happen often. Be sure the keytab file uses the same filename and directory as specified in the user account.
Error Message: User has no profile in this organization
Kerberos Authentication is successful, but OpenSSO Enterprise cannot find the user profile. This is a configuration issue. Be sure the user exists in the user repository.
Authentication Doesn't Work with Load Balancer
The Windows Desktop SSO Authentication module worked fine. Then it stopped working after the OpenSSO Enterprise server was configured as a server in a site configuration with a load balancer. .
The following message trace is displayed in the server-side debug log amAuthWindowsDesktopSSO:
...... 02 a6 ff 1d 1c 3c e2 dc d4 89 66 b0 70 dd 6b b0 c1 a4 69 bd 29 29 54 05 04 e8 75 06/25/2007 09:13:56:559 AM PDT: Thread[service-j2ee,5,main] In authenticationToken ... 06/25/2007 09:13:56:561 AM PDT: Thread[service-j2ee,5,main] Context created. 06/25/2007 09:13:56:565 AM PDT: Thread[service-j2ee,5,main] Authentication failed with GSSException. |
You will also see a bigger Kerberos token than a normal token. Be sure the defined principal for the OpenSSO Enterprise server has load balancer fully-qualified domain name (FQDN). Example: HTTP/amlb. openSSOhost.example.com.
Chapter 19 Accessing OpenSSO from Outside a Secure Intranet
One of the major decisions in deployment planning is how to set up access to OpenSSO Enterprise from outside a secure intranet. This chapter discusses two options: using a reverse proxy or using the Distributed Authentication User Interface (DAUI). Both options allow Authentication Service pages to be served to users over a firewall (for example) thus preventing direct access to OpenSSO Enterprise by unauthorized users.
This chapter includes the following topics:
Using OpenSSO Distributed Authentication User Interface
OpenSSO Enterprise provides an authentication interface that can be deployed between the outer internet firewall and the inner intranet firewall - in the DMZ - to enable secure authentication communications to the OpenSSO Enterprise server. Deploying the Distributed Authentication User Interface (DAUI) to one or more web containers within a non-secure layer eliminates the exposure of service URLs to the end user, and prevents direct access to the OpenSSO configuration and user data stores by unauthorized users. The following diagram illustrates the deployment.
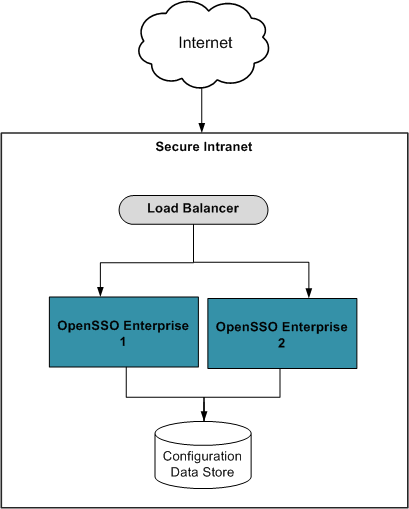
The DAUI is best used when various authentication modules/chains are configured and thus customized content needs to be presented to different user clients and/or agents. The DAUI is a flexible option for customizing content in the DMZ. The OpenSSO server is completely hidden from the external clients because all communication is mediated by the OpenSSO Client SDK calls. Benefits of the DAUI include:
-
Eliminate direct client/server traffic The DAUI receives all client authentication requests and, in turn, sends them to the back-end OpenSSO server, even eliminating encrypted traffic between the external clients and the OpenSSO Enterprise server.
-
Authentication Service support All authentication modules are supported via the DAUI.
-
Dynamic customization of pages Each incoming request can be routed to different DAUI pages, dependent on the authentication chain or module being used. These DAUI pages are customized in the DMZ so access to the back-end OpenSSO Enterprise server is not necessary.
See Chapter 7, Installing and Configuring the Distributed Authentication User Interface, in Deployment Example: Single Sign-On, Load Balancing and Failover Using Sun OpenSSO Enterprise 8.0 for more information.
Note –
The DAUI WAR cannot be used for federation communications between the client SDK in the DMZ and the back-end OpenSSO server. All federation API calls (including SAMLv2, Liberty ID-FF, and Web Services Security) must communicate directly with OpenSSO.
Using a Reverse Proxy
As an application proxy does, a reverse proxy acts as a gateway between a protected HTTP server and requests to the HTTP server that originate from outside the secure intranet. A reverse proxy is installed between the outer internet firewall and the inner intranet firewall - referred to as the demilitarized zone (DMZ) - to prevent direct access to the OpenSSO configuration and user data stores by unauthorized users. A reverse proxy can be implemented as Sun Web Proxy Server 4.0.9 or as Sun Web Server 7.0 Update 3 or later with the reverse proxy plugin. It requires an SSL-enabled port for communication between the external client and the back-end OpenSSO Enterprise server. The following diagram illustrates the deployment.
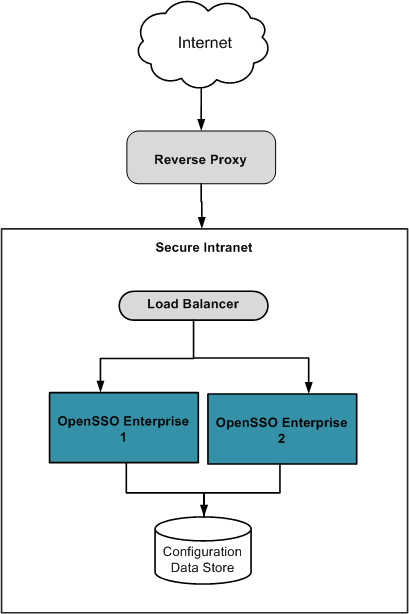
A reverse proxy is best used when the content to be presented is uniform. This is generally the case when there is only one authentication module or authentication chain configured thus only one user interface page is served and that page is hardly changed. Taking advantage of the caching and compression capabilities of the reverse proxy, the page can be served very quickly. Also using a reverse proxy can be an acceptable and efficient way of distributing the load among web servers. Benefits of reverse proxy servers include:
-
Caching for improved performance When static content is cached, the reverse proxy would not forward a request for the content to OpenSSO Enterprise; it would respond to the request by serving the content itself. This could lower the request load, thereby improving performance of the server and potentially lower response times to the client.
-
Additional layer of security By introducing an additional layer of security, access to the OpenSSO Enterprise server is further limited. This additional layer offers the opportunity to monitor traffic, to perform a wider set of checks (for example, malformed URL strings can be stopped at the proxy), and to react to attacks sooner.
-
Persistent load balancing Configure the name of a sticky cookie or sticky URI parameter (in the reverse proxy configuration) to allow subsequent requests to stick to the same OpenSSO server that responded to the first request. Stickiness affects OpenSSO Enterprise performance positively.
-
Compression for speedy load times Outgoing traffic can be transparently compressed thus lowering total bandwidth requirements. A reverse proxy supports various compression levels and fragment sizes, allowing the administrator to select a level of compromise between speed and compression.
-
Spoon feeding dynamic content Dynamically generated content can be returned from the back end server a little at a time.
Note –
As most reverse proxies have limited load balancing capabilities, thought should be put into whether you would use a reverse proxy or a reverse proxy capable load balancer. For example, reverse proxy software would require additional hardware whereas load balancers are fairly common.
See Sun Java System Web Proxy Server 4.0.12 Installation and Migration Guide and chapters 3 and 4 in Using the Java System Web Server as a Reverse Proxy for Improved Security for more information.
Using Policy Agents with Reverse Proxy
If your OpenSSO deployment architecture includes a reverse proxy server (as described in Using a Reverse Proxy), you have the option of protecting the content servers by installing a policy agent on the proxy itself, or installing multiple policy agents on the content servers behind the reverse proxy server. The choice is dependent on the relative uniformity or variability of the hosted/protected content and the access-denied URLs. The following sections have more information.
A reverse proxy server or a load balancer with a reverse proxy feature is usually installed between the outer firewall and the inner firewall - in the DMZ between the internet and the secure intranet. See Chapter 8, Configuring the Protected Resource Host Machines, in Deployment Example: Single Sign-On, Load Balancing and Failover Using Sun OpenSSO Enterprise 8.0, Chapter 9, Setting Up Load Balancers for the Policy Agents, in Deployment Example: Single Sign-On, Load Balancing and Failover Using Sun OpenSSO Enterprise 8.0 and Sun OpenSSO Enterprise Policy Agent 3.0 Guide for Sun Java System Web Proxy Server 4.0.x for installation and configuration information.
Using a Single Policy Agent
When there is a uniformity in the configuration of the content servers in the back end (including access denied URLs, application logout URLs, profile, session and response attributes, and the web container type), a single policy agent for the reverse proxy server would be the efficient way of protecting the content. The following diagram illustrates this.
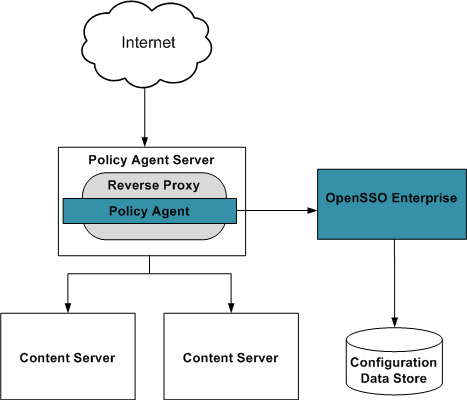
Regardless of the number of content servers being fronted by the reverse proxy, only one agent is installed on the reverse proxy machine. The footprint of this configuration is less cost (fewer agents to maintain) and less memory (a single agent requires less memory to cache). With one agent no communication will occur between the content servers and the OpenSSO server. The policy agent will have back channel communications with the OpenSSO load balancer to update cache entries, perform session validation, and make policy requests but, since the agent is installed on the reverse proxy server and not on the content servers, only the reverse proxy server would communicate with the OpenSSO load balancer. This effectively reduces the number of communication channels which would result in fewer firewall rules, tighter control over server-to-server communications, and a higher level of security. On the other hand, one agent does not allow identification of content servers which may impact application usage reports. One agent also uses the same session identifier introducing the risk of cookie hijacking.
Using Multiple Policy Agents
When a number of content servers use different types of web containers or each content server has different access denied URLs, agent profiles, session and response attributes, and application logout URLs, the only choice is to install multiple policy agents. Each agent will have its own customized agent profile. The following diagram illustrates this.
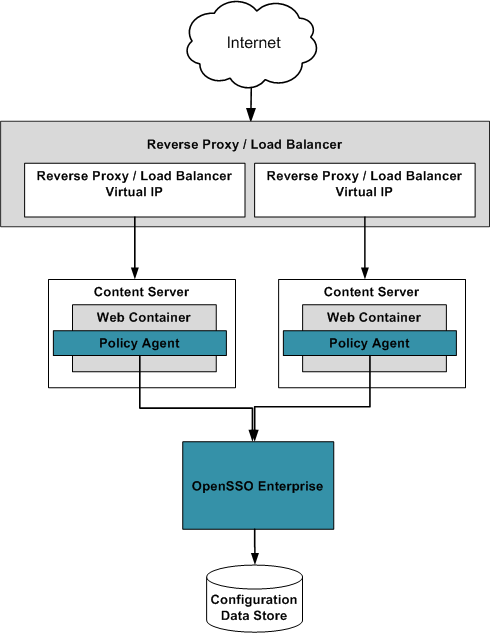
Unlike in the case of the single reverse proxy server policy agent where the same session identifier is used to access many applications protected by the agent, multiple policy agents do not use the same session identifier (when the agents are configured in cookie hijacking prevention mode). With multiple agents, it is now easy to customize agent properties per content server; for example, customize profile attributes to be fetched, session attributes to be fetched, response attributes to be added to the header, URL of the access denied page, customized application error pages, and application logout URLs. By customizing each application's logout URL, it is possible to perform cleanup tasks — such as destroying the user's session or resetting cookies — per application. (Customizing certain agent properties with only one policy agent might create a security risk.)
- © 2010, Oracle Corporation and/or its affiliates
