| Building Web Services |
| Building Web Services |
| C H A P T E R 5 |
|
Developing XML Operations (Deprecated) |
XML operations provide an efficient way to create a web service interface for existing business components that were not designed for web service access.
For example, suppose you are creating a web service to enable a customer to place an order, but the business component has methods to check inventory, check customer credit, ship an order, and process billing information. You can combine those methods into a single XML operation to place an order.
This chapter provides a conceptual overview, a description of the tools, and an explanation of how to create and edit XML operations.
The IDE enables you to create complex applications based on existing J2EE components without additional coding. You can:
EJB components are often designed to be used by smart clients that understand and can manage the internal logic of the components. The methods might be too low-level to be directly exposed in a web service, or several method calls on different components might be necessary to return a desired object in the desired form.
A new business component that is designed with a web service model in mind might have methods that provide just the right high-level features. However, an existing business component, or a component not specifically designed as the basis for a web service, might not have the necessary higher-level methods.
The IDE solves this problem by providing the XML operation, which plays an intermediary role. An XML operation can chain together multiple EJB methods into a single, higher-level business function suitable for a web service. You define an XML operation using a codeless editor, described later in this chapter.
An XML operation can encapsulate a number of business methods. To an external client, the operation looks like a single RPC call into the web service.
The XML operation is a logical entity that specifies how a particular web service request is processed. You create all the XML operations and add them to the web service along with business methods of other components. Then you generate the web service's runtime classes in the IDE. This action creates an EJB session bean and one class for each XML operation. When a client sends a request to the web service, the request is transformed into a method call on the session bean. The request is processed either as a single direct call to a business method or as a more complex set of method calls defined by an XML operation.
All the methods in a single XML operation have the same state and can share data for the duration of the operation.
The XML operations feature has these major benefits, compared with trying to accomplish the same purpose by manual coding:
A Sun web service provides two kinds of external functionality, which you can think of as simple and complex: direct method calls to business components and XML operations. From the standpoint of a client using the web service, they look alike, since an XML operation encapsulates a number of method calls. Each XML operation defines a response to a particular client request message. The web service developer defines and generates the XML operations from existing components.
When a web service receives a client request, it forwards the request in the form of an XML document (the XML input document) to the appropriate XML operation. The XML operation calls one or more methods on business components, transforms the return values of these method calls into an XML document (the XML output document), and returns the document to the client.
When an XML operation is executed, the web service:
1. Parses the XML input document, mapping the document's elements to the parameters of the methods that the XML operation is defined to call.
2. Calls the methods defined in the XML operation, in their specified order.
3. Formats return values of the methods into an XML output document according to the definition of the XML operation.
4. Returns the XML output document.
For example, FIGURE 5-1 shows an XML operation named ProductName that calls methods on three different objects.
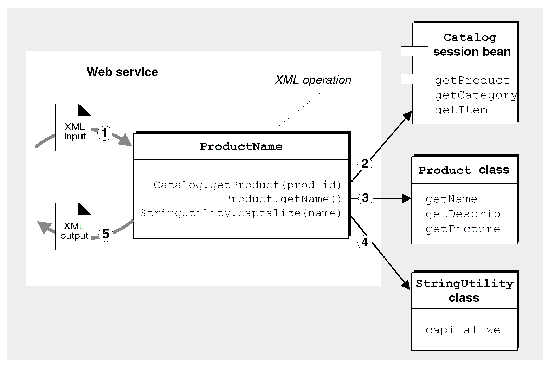
The ProductName XML operation takes the product ID as a request parameter and returns the capitalized name of the corresponding product. When executed, the operation:
1. Parses the XML input document, using the value of the document's prod_id element as the input parameter to the Catalog.getProduct method.
2. Calls the Catalog.getProduct method, which returns an instance of the Product class.
3. Calls the getName method on the Product object, which returns a String object that contains the product name.
4. Calls the static method StringUtility.capitalize, passing the String object that contains the product name as a parameter. This method returns a String object containing the product name formatted with initial capital letters.
5. Formats the String object containing the capitalized product name as an XML document and returns it.
The tools you use to develop XML operations are available to you from the Explorer and Source Editor.
You perform the initial step of creating an XML operation definition in the Explorer by selecting a node to indicate where you want the operation created. You right-click the node and choose the New From Template wizard. This procedure is the same as the procedure for creating a class or any other object in the Explorer. (See Creating an XML Operation for explanation of how to do this.)
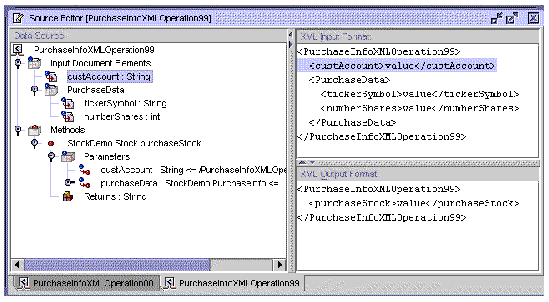
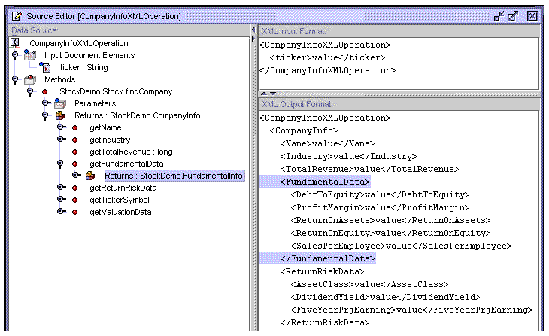
To further develop your XML operation, you access tools from either the Explorer or the Source Editor. The same commands are available from either window. The Source Editor is generally more convenient to use because it lets you issue commands and view results of the commands in the same window. FIGURE 5-2 and FIGURE 5-3 show XML operations displayed in the Source Editor.
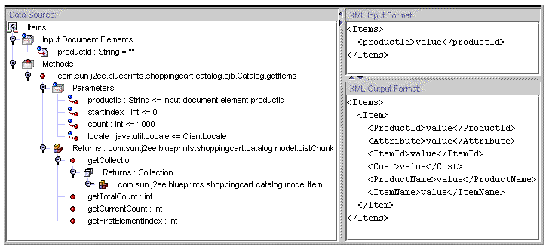
The Source Editor displays an XML operation in three panes:
The Data Source pane displays an XML operation in a tree view. The nodes of the structure represent XML input document elements, methods called by the XML operation, parameters to these methods, return values of the methods, and organizational nodes. Each type of node has its own commands and properties.
You can edit an XML operation by:
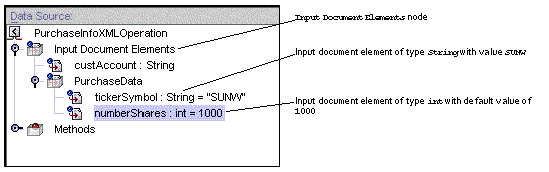
At the top level, the Data Source pane contains two organizational nodes: the Input Document Elements node and the Methods node.
The XML input document contains the data that specifies the client request. This document is represented as the Input Document Elements node. By expanding this node, you can browse and edit the XML input document elements. These elements are represented as subnodes. FIGURE 5-4 shows a cropped view of the Source Editor with the Input Document Elements node expanded.
 [ D ]
[ D ]
From these nodes, you can perform the following types of editing operations on the XML input document:
From the Methods node, you can:
XML operations execute methods on other runtime objects. You specify which methods your XML operation executes by adding method calls to the Methods node. By adding method calls, you can program your XML operation to return data or perform other types of processing.
You can also delete and rearrange the order in which methods are called. The XML operation executes the methods in order from top to bottom.
Adding, reordering, or deleting methods affects the XML output document by adding, reordering, and deleting the elements corresponding to the return values. Such changes are displayed in the XML output pane as you make them. For more information on these topics, see Adding a Method to an XML Operation, Reordering a Method or Input Document Element, and Deleting a Method or Input Document Element.
If a method takes parameters, the parameters are listed under the Parameters node for that method. By default, the XML operation obtains a value for each parameter by mapping elements of the XML input document to like-named parameters.
You can, however, remap XML input elements to method parameters in any way you want. You might need to do this if two methods in your XML operation take like-named parameters. In such a situation, the XML operation by default maps both parameters to the same XML input element. If this is not appropriate, you can create a new input element and remap one of your parameters to it.
You can also map parameters to types of sources other than input elements. For example, you can map a parameter to:
For a description of how to map a method parameter to a source, see Mapping a Method Parameter to a Source. For information on target objects, see Instantiating Objects and Resolving References. For information on system shared objects, see System Shared Objects.
If you add a method call that returns an object (or an array or collection of objects), the object's class type is shown as a subnode to the method. If this class contains methods that begin with the string get, the methods are shown as subnodes to the class. By default, an object returned by any of these "getter" methods is also shown as a class node, but without subnodes representing its methods.
You can, however, choose to expand such a class node. Expanding the class node adds nodes for all of the getter methods in the class and likewise adds elements corresponding to the return values of these methods to the XML output.
Conversely, you can collapse a class so that its getter methods are not displayed in the Data Source pane. You can also individually delete methods. In both of these cases, the methods are not called when the XML operation is executed. The elements of the XML output corresponding to these methods are automatically removed.
Whenever you expand or collapse a class, corresponding changes to the XML output are displayed in the XML Output Format pane as you make them. For more information on this topic, see Expanding a Class.
You might find that a returned class provides some data that you don't want to include in the XML output. For example, a customer account class might have an account ID field and a corresponding getter method that is used only for internal purposes. In such a situation, you can selectively choose to exclude the element corresponding to this method from the XML output.
Excluding an element from the XML output does not affect the methods called by the XML operation or the data set returned by these methods to the XML operation. The exclusion affects only the data set returned to the client by way of the XML output document. By excluding unnecessary elements, the data passed between application containers is minimized, optimizing performance. For more information on this topic, see Excluding an Element From the XML Output.
The following steps outline the work flow for developing an XML operation.
This procedure results in an XML operation that has:
2. (Optional) Edit the XML operation by performing some or all of these procedures:
3. Include the XML operation in a web service.
If you don't already have a web service, you must create one. For more information, see and .
4. Test the XML operation in the web service.
For more information on this topic, see .
5. Edit the XML operation, regenerate the web service's runtime classes, and test until satisfied.
You can create XML operations individually or generate a group of XML operations based on an enterprise bean.
1. In the Explorer, right-click the folder in which you want to create the XML operation and choose New  Web Services XML Operation.
The New from Template XML Operation dialog box is displayed, as illustrated in FIGURE 5-5.
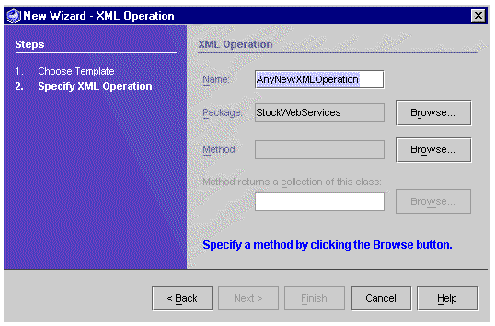
2. In the Name field, type a name for the XML operation.
3. Ensure that the Package field specifies the correct location in which to create the XML operation.
4. Click the Browse button next to the Method field.
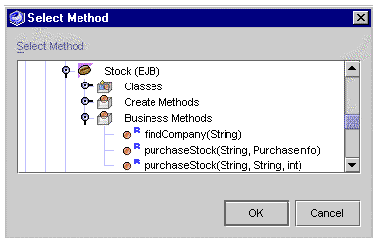
The Select Method dialog box is displayed, as illustrated in FIGURE 5-6.
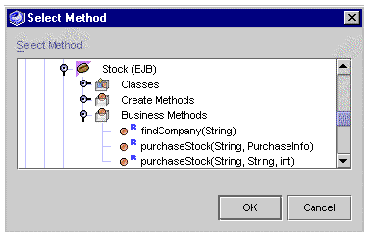
5. Navigate to a method you want to include in the XML operation and click OK.
You can add methods from a class, a bean, an interface, or an EJB component.
You can include methods defined in an EJB's home and remote interfaces, but not methods defined only in the EJB local interface.
If you are adding an EJB method, be sure to browse to the logical EJB node (the node with the bean icon  ), not the node that represents the EJB bean class or the home or remote interface. By adding the method from the logical EJB node, you provide the runtime information needed to call the method. When you create an XML operation, you include one method in it. If your XML operation requires additional methods, you can add them later. For information on adding additional methods to an XML operation, see Adding a Method to an XML Operation.
6. If the method you have selected returns an array or collection, select the class, parent class, or interface of the objects contained in it.
a. Click the Browse button in the New XML Operation dialog box, next to the field labeled Method Returns a Collection of This Class.
b. Use the file chooser to select the class or interface.
The XML operation is created and displayed in the Source Editor ready for editing (as shown in FIGURE 5-3). For information on editing your XML operation, see Editing an XML Operation.
As an alternative to creating XML operations individually, you can generate a group of XML operations based on an enterprise bean, an EJB module, or a package containing one or more enterprise beans. Doing so generates one XML operation for each method on the home interface and remote interface of each enterprise bean. References to the generated XML operations are automatically added to your web service.
To generate XML operations from enterprise beans, you must have already created a web service. For information on creating a new web service, see .
To generate XML operations from an enterprise bean:
1. Right-click your web service and choose Generate Operations from EJB.
2. Browse to an enterprise bean, an EJB module, or package containing an enterprise bean and click OK.
4. Specify the class, parent class, or interface of objects contained in any array or collection returned by methods in the enterprise beans.
If any method returns an array or collection, the Collection of What? dialog box is displayed, as illustrated in FIGURE 5-7.
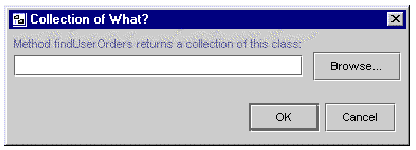
The name of the method that returns the collection is indicated in the dialog box.
b. Navigate to the class, parent class, or interface of objects contained in the array or collection and click OK.
|
Note - This dialog box is automatically displayed once for each method that returns an array or collection. |
The XML operations are generated and references to them are added to your web service. You can now delete the XML operations you don't need and edit the others according to your requirements.
This section describes the ways you can edit an XML operation.
To add a method to an XML operation:
1. Open your XML operation in the Source Editor.
2. In the Data Source pane, right-click the Methods node and choose Add Method.
The Add Method dialog box is displayed, as illustrated in FIGURE 5-8.
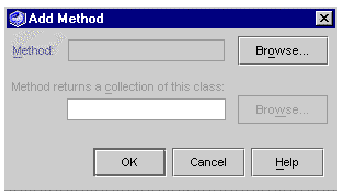
3. Click Browse to select a method.
The Select Method dialog box is displayed, as illustrated in FIGURE 5-9.
4. Navigate to a method you want to include in the XML operation and click OK.
You can add methods from a class, a bean, an interface, or an EJB component.
You can include methods defined in an EJB's home and remote interfaces, but not methods defined only in the EJB local interface.
If you are adding an EJB method, be sure to browse to the logical EJB node (the node with the bean icon  ), not the node that represents the EJB bean class or the home or remote interface. By adding the method from the logical EJB node, you provide the runtime information needed to call the method.
5. If the method you have selected returns an array or collection, select the class, parent class, or interface of the objects contained in it.
a. Click the Browse button in the Add Method dialog box, next to the field labeled Method Returns a Collection of This Class.
b. Use the file chooser to select the class or interface.
This action results in the following:
To add an input document element:
1. Open your XML operation in the Source Editor.
2. In the Data Source pane, right-click the Input Document Elements node and choose Add Input Document Element.
The Add Input Document Element dialog box is displayed, as illustrated in FIGURE 5-10.
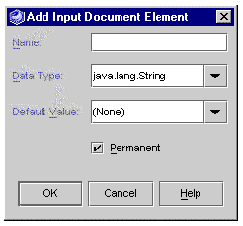
3. Type a name for the element in the Name field.
4. Click the Data Type combo box and select a data type for the element.
If you intend to use this input document element as a parameter for instantiating a target object, you must choose a class (such as String) as a data type. Primitives (such as int or double) do not work.
5. (Optional) Specify a default value for the element.
If you want to specify a default value for the element, type it in the Default Value field.
This value is used if the client request does not provide this element.
6. If you want this element automatically deleted when it is no longer mapped to a method parameter, deselect the Permanent checkbox.
Whenever you remap a method parameter's source, input elements that are not currently mapped to a method parameter are deleted.
The new input element is added to the Input Document Elements node in the Data Source pane. The XML Input Format pane displays the updated XML input document.
To rename an input document element:
1. Select the input document element, and open the Properties window, as illustrated in FIGURE 5-11.
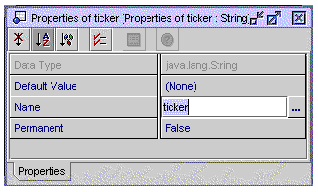
3. Type a name for the input document element and press Enter.
The input document element is now renamed. The new name is displayed both on the node inside the Input Document Elements folder and in the XML Input Format pane.
Each element in the XML output document is, by default, named after the method that returns the element's value. For example, adding a call to a method named append adds an element to the XML output document named append. Adding a call to a method named getName adds an element named Name. You can rename these elements by changing the value of the method call's TagName property.
To rename an output document element:
1. In the methods folder, select the method that returns the value for the element, select the Returns node of the method, and open the Properties window, as illustrated in FIGURE 5-12.
2. Click the Tag Name property.
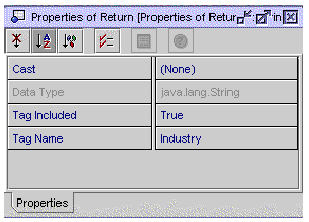
3. Type a name for the element and press Enter.
The output document element is now renamed. The new name is displayed in the XML Output Format pane.
To specify a default value for an input document element:
1. Open the property sheet for the input document element, as illustrated in FIGURE 5-13.
2. Click the Default Value property.
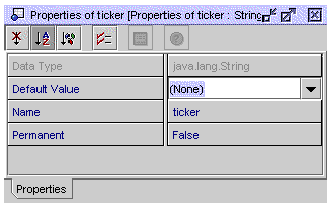
3. Type a value or, to specify a value of null, select (None).
This value is used if the client request does not provide this element.
The IDE automatically deletes any input document element that is not mapped to a method parameter unless the Permanent property of the input document element is enabled.
For example, if you add a method that takes a parameter to your XML operation, the IDE automatically adds an input document element and maps it to the method parameter. If you then remap the method parameter to a different source (for example, to the return value of another method), the IDE deletes the input document element because it is no longer mapped to a method parameter.
To prevent an input document element from being automatically deleted if it is not mapped, enable its Permanent property.
To enable an input document's Permanent property:
1. Open the property sheet for the input document element, as illustrated in FIGURE 5-13.
2. Click the Permanent property.
3. Select True in the combo box and press Enter.
The input document element is now permanent.
You can reorder the input document elements and methods in an XML operation.
Reordering methods changes the order in which the methods are called and changes the order of the elements in the XML output document. Methods are called in the order they are listed in the Source Editor, from top to bottom.
The return value of one method in an XML operation can be used as a parameter to another method in the XML operation (see Mapping a Method Parameter to a Source for information on this topic). If you have such a dependency in your XML operation, you must ensure that the method supplying the parameter is called before the method that requires the parameter.
The ability to reorder input document elements is a development convenience. At runtime the order of input document elements has no significance to the web service.
To reorder a method or input document element:
1. Open your XML operation in the Source Editor and locate the method or input document element you want to reorder.
2. Right-click the method or input document element and choose Move Up or Move Down.
You can delete input document elements and methods from an XML operation. When you delete a method, it means that the method is not called when the XML operation is executed. The method's corresponding XML output elements are also removed.
To delete a method or input document element:
1. Open your XML operation in the Source Editor and locate the method or input document element you want to delete.
2. Right-click the method or input document element and choose Delete.
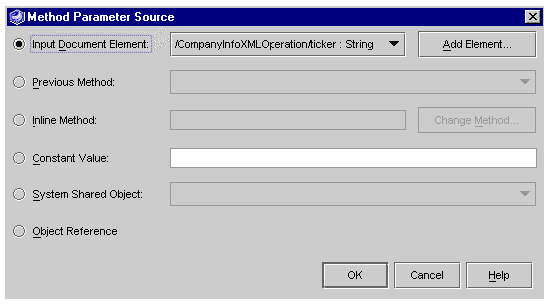
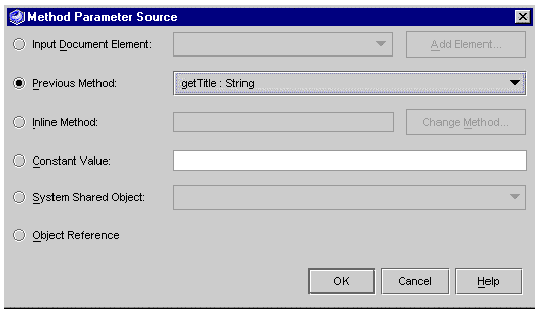
To map a method parameter to a source:
1. Open your XML operation in the Source Editor and locate the method parameter you want to map.
2. Right-click the parameter and choose Change Source.
The Method Parameter Source dialog box is displayed, as illustrated in FIGURE 5-14.
 [ D ]
[ D ]
The following table describes the available source types.
|
Select this radio button if you want to map the parameter to an element in the XML input document. |
|
|
Select this radio button if you want to map the parameter to the return value of a previous method call in this XML operation. |
|
|
Select this radio button if you want to map the parameter to the return value of an inline method call. Click Change Method to select the desired method. |
|
|
Select this radio button if you want to map the parameter to a constant value. |
|
|
Select this radio button if you want to map the parameter to one of these data types. A web service maintains system shared objects at runtime containing data about web browser clients that access the web service. System shared objects are instantiated by the web service and populated with data obtained from the HTTP request and J2EE security mechanism. System shared objects maintain data about the user name. The data is provided as both a String object and a java.security.Principal object. |
|
|
Select this radio button if you want to map the parameter to a target object defined in your web service. This option is available only if the parameter's type is a class (which includes String). Selecting this radio button adds a default object reference in your web service that maps the parameter to a new object of the required class. You can reconfigure this reference to resolve to an object of your choice. For more information on this topic, see Instantiating Objects and Resolving References. |
4. Specify the source of the parameter's value.
If the source type is set to Input Document Element, Returned by Method, Constant Value, or System Shared Object, use the enabled field to specify a source. The following table describes the action to perform depending on the specified source type.
To cast a method return value:
1. Open your XML operation in the Source Editor and locate the method Returns node.
2. Right-click the node and choose Properties.
One of the properties is Cast, with a default of (None). Another property is Data Type. You can change the value of Cast to any type consistent with Java rules.
1. Open your XML operation in the Source Editor and locate the method Returns node.
Alternatively, you can locate the Returns node in the Explorer.
2. Right-click the node and choose Expand.
The Expand window is displayed, with Getter methods automatically selected.
3. Select the Show Inherited Methods checkbox.
Inherited methods are displayed.
4. Select the desired methods and click OK.
The selected methods are displayed in the Explorer and in the Data Source pane.
To exclude an element from the XML output document:
1. Open your XML operation in the Source Editor.
2. Open the Methods node located in the Data Source pane.
3. Identify the node in the Data Source pane that corresponds to the element you want to exclude.
When you select a node in the Data Source pane, its corresponding element is highlighted in the XML Output Format pane. For example, FIGURE 5-15 shows a class node selected in the Data Source pane and its corresponding element highlighted in the XML Output Format pane.
4. Right-click the node and choose Exclude Tag from Output.
The corresponding element is removed from the XML Output Format pane.
By default, all return values of your XML operation's method calls are included in the XML output document. If you exclude any of the elements representing these returned values, you can add them back to the XML output document.
To include an element in the XML output document:
1. Open your XML operation in the Source Editor.
2. Open the Methods node located in the Data Source pane.
3. Identify the node that corresponds to the element you want to include.
The types of nodes you can include are those that represent an array or collection, a class, or a method that returns a primitive.
4. Right-click the node and choose Include Tag in Output.
An element corresponding to the selected node is added to the XML Output Format pane.
1. Open your XML operation in the Source Editor.
2. Open the Methods node located in the Data Source pane.
3. Right-click the class and choose Expand.
All getter methods on the class are added as subnodes to the class node. Elements corresponding to the class and to the return value of the getter methods are added to the XML Output Format pane.
1. Open your XML operation in the Source Editor.
2. Open the Methods node located in the Data Source pane.
3. Right-click the class and choose Collapse.
The nodes representing the getter methods of the class are deleted from the Data Source pane. Their corresponding elements, as well as the element corresponding to the class, are deleted from the XML Output Format pane.
A web service maintains system shared objects at runtime containing data about web browser clients that access the web service. System shared objects are instantiated by the web service and populated with data obtained from the HTTP request and J2EE security mechanism. For information about how to use a system shared object, see Mapping a Method Parameter to a Source and FIGURE 5-14.
System shared objects are limited to user name, which is obtained from the J2EE security mechanism and provided as both a String object and java.security.Principal object.
For a parameter of type java.security.Principal, the System Shared Object selection in the Method Parameter Source dialog box lists one object, UserPrincipal.
For a parameter of type java.lang.String, the System Shared Object selection lists one object, UserName.
Data returned by a business method might require some type of processing before being displayed on a web page. For example, an EJB method might return a value of type double, but you would like to display the value in a monetary format. You can best accomplish processing of this sort by writing or reusing static utility methods rather than by adding new methods to your business components.
For ease of use, organize static utility methods that you write into a small number of classes in the IDE.
Place the utility classes that are specific to the web service under development in a service-specific location, for example, in the package containing your web service. Place general purpose utility classes in a package that can be easily reused in other services and by other web service developers.
To use a static utility method in an XML operation:
1. Mount the static utility class in the Explorer.
2. Open your XML operation in the Source Editor.
3. Add a call to the utility method to your XML operation.
See Adding a Method to an XML Operation for information on how to do this.
The utility method call must be positioned after the method call that returns the data to be processed. To reposition the method, right-click it and choose Move Up or Move Down.
When you add the utility method, the IDE adds an element to the XML output document corresponding to the return value of the method. This element is displayed in the XML Output Format pane.
The IDE also adds a new input document element corresponding to the method's input parameter. You can ignore this input document element; the IDE will delete it for you after you remap the method parameter source in the next step.
4. Map your utility method's input parameter to the value returned by the method call on the data component.
The method call on the data component returns the value that you want to process with the utility method. So, you must map the output from the data component to the input of your utility method.
a. Expand the utility method node and then the Parameters node.
b. Right-click the parameter and choose Change Source.
The Method Parameter Source dialog box is displayed, as illustrated in FIGURE 5-16.
 [ D ]
[ D ]
d. In the enabled combo box, select the method that returns the data from the data component and click OK.
See FIGURE 5-14 and Mapping a Method Parameter to a Source for more information on mapping parameters.
5. To exclude the return value of the data-component method call from the XML output document, right-click the method that calls the data component and choose Exclude Tag from Output.
The element is removed from the XML Output Format pane. Your client needs the processed data, but in most cases not the raw data returned by the data component.
6. (Optional) Set the utility method's Tag Name property to a more appropriate name.
7. (Optional) Rename the output document element.
When you added the utility method to the XML operation, the IDE added a corresponding element to the XML output document. By default, this element is named after the method (for example, formatAsDollars). In most cases, some other name would be more appropriate (for example, Price). To rename the element, change the value of the utility method's Tag Name property. See Renaming an Output Document Element for information on how to do this.
When developing an XML operation, you specify which methods the XML operation calls. To call these methods at runtime, the web service requires certain objects. For each method call, it locates or instantiates:
To perform this task, the web service maintains a reference to each of these target objects and a definition of how to instantiate an object of the appropriate class should the target object not exist. As you add method calls to an XML operation, default object references and target object definitions are automatically added to the web service. These defaults are usually appropriate and do not need editing.
However, you can manually specify the target of an object reference, and you can edit and create new target object definitions to suit your requirements. You might need to manually resolve object references to enterprise beans that were created outside of the IDE.
This section provides instructions that explain how to:
To specify the target of an object reference:
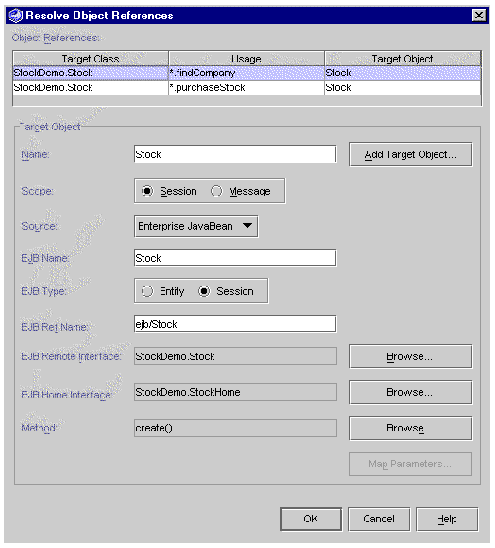
1. Open the Resolve Object References dialog box.
In the Explorer, right-click your web service and choose Resolve Object References. The Resolve Object References dialog box (see FIGURE 5-17) is displayed.
 [ D ]
[ D ]
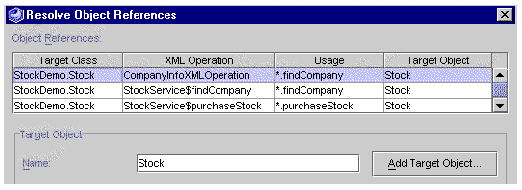
If your web service has references to XML operations, the table in the dialog box has an additional column displaying XML operation names, as illustrated in FIGURE 5-18.
2. Locate the object reference you want to edit.
Object references are listed at the top of the dialog box in table format. Each row represents one reference. The following table describes the columns.
3. Select an object to resolve your reference.
In the row representing the object reference you are editing, click in the Target Object column and select an object from the list that drops down. This list displays all available objects of the required class, which includes target objects already defined in this dialog box.
If none of the target objects already defined is appropriate for your object reference, you can define a new target object.
To define a new target object:
1. Open the Resolve Object References dialog box.
In the Explorer, right-click your web service and choose Resolve Object References. The Resolve Object References dialog box is displayed (see FIGURE 5-17).
2. Select the reference for which you want to define a new target object.
The dialog box displays the definition for the current target object.
The New Target Object dialog box is displayed.
4. Type a name for the target object in the Target Object Name field.
The dialog box automatically resolves your reference to the newly defined target object. Your new target object uses the same definition as the previous one. Only the name by which it is referenced is changed. For instructions on editing the definition, see Editing a Target Object Definition.
The target object definition specifies how the web service:
A web service can have multiple references that resolve to the same target object. For example, the same session bean might be used in many XML operations in the web service. In such a scenario, editing the target object definition affects each of these references because they all resolve to the same object. If this behavior is inappropriate for your application, you might need to create a new target object definition for one or more of your references. For instructions on creating a new definition, see Defining a New Target Object.
To edit a target object definition:
1. Open the Resolve Object References dialog box.
In the Explorer, right-click your web service and choose Resolve Object References. The Resolve Object References dialog box is displayed (see FIGURE 5-17).
2. Edit the Name field, if necessary.
This field specifies the name by which the target object can be referenced. The target object's value is also displayed in the Target Object column in the list of object references at the top of the dialog box. This field is required.
3. Edit the Scope field, if necessary.
This required field defines the scope within which the target object can be referenced. Options are:
|
Note - Your choice of scope has no effect on the runtime characteristics of a web service that you create in the current release of the Sun ONE Studio 5, Standard Edition IDE. |
4. Edit the Source field, if necessary.
This field specifies the type of mechanism by which the target object is obtained or instantiated. Options are:
5. Edit the remaining fields, if necessary.
The Source field affects which other fields in the dialog box are displayed and enabled for input. Edit the remaining fields in the dialog box by referring to the descriptions in whichever of the following tables is appropriate for your target object's source.
If the source is an enterprise bean, refer to TABLE 5-1.
If the source is a constructor, refer to TABLE 5-2.
If the source is a static method, refer to TABLE 5-3.
6. Map method parameters to sources, if necessary.
If the Map Parameters button is enabled, follow these steps to provide values for parameters of the method specified in the Method, Constructor, or Static Method field.
The Map Parameters dialog box is displayed.
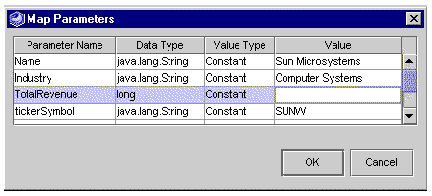
b. Locate the row that represents the parameter you want to map.
Each row represents one method parameter. If your method takes multiple parameters, use the Parameter Name column to identify the parameters. This column gives the names of the parameters if the method is provided as source code. If the method is provided in a JAR file, the Parameter Name column indicates the order in which the method requires the parameters by displaying names such as param1, param2, and so on.
c. Specify a value type for your parameter.
Click in the Value Type column and select an option from the list. The following table describes the options.
|
Maps the parameter to the value specified in the Value field. |
|
|
Maps the parameter to the value of the environment entry specified in the Value field. For information on setting environment entries, see . |
|
|
Maps the parameter to the object specified in the Value field. The object can be a target object defined in the web service's Resolve Object References dialog box. |
|
|
Maps the parameter to the input document element specified in the Value field. The data type of the input document element must be an object (for example, String); it cannot be a primitive (for example, it cannot be int). For information on declaring the data type of an input document element, see Adding an Input Document Element. |
d. Specify a value for your parameter in the Value field.
The following table explains how to specify a value depending on your parameter's value type.
|
Click the Value field and select an object from the list. The list includes all target objects of the class specified in the Data Type field that are defined in the web service. |
|
|
Click the Value field and select an input document element from the list. The list includes input document elements that are both: The second requirement ensures that the parameter you are mapping has a source for its value in all circumstances. For example, two XML operations could reference the same target object, but you might not know which XML operation will be executed first. Therefore, each of these XML operations must provide a value for the parameter so that no matter which is executed first, a parameter value is available. For more information on input document elements, see Input Document Elements Node. |
| Building Web Services | 817-2324-10 |
Copyright © 2003, Sun Microsystems, Inc. All rights reserved.