| Building Web Services |
| Building Web Services |
| A P P E N D I X A |
|
Securing a Web Service |
This appendix explains how to secure a web service. The explanation assumes that you have general familiarity with the IDE and that you have read the earlier parts of this book, especially and Chapter 3, which explain how to create web services and web service clients.
The procedures in this appendix assume that you have correctly installed and started the Sun ONE Application Server 7 server, and made it the default application server for your IDE. If you are using a different supported application server, modify the instructions accordingly.
JAX-RPC and the IDE support HTTP Basic Authentication and HTTPS/SSL Authentication and Encryption. This appendix provides an overview of the security technologies and describes how to use the IDE to implement the two kinds of security.
|
Note - SSL, an acronym for Secure Sockets Layer, was originally developed for the Netscape web browser, and is now a de facto industry standard. |
In basic authentication, the web server authenticates a client user (also called a principal) using the user name and password obtained from the web client, as illustrated in FIGURE A-1. Passwords are not protected against interception over the network. To overcome this limitation, you can run basic authentication in an SSL-protected session, described later in this chapter, which ensures that all message content is encrypted.
To implement HTTP basic authentication, you carry out these tasks:
The procedures for carrying out these tasks are described in Using HTTP Basic Authentication.
This security mechanism applies to the entire web service and all its methods.
Secure Sockets Layer (SSL) provides data encryption, server authentication, message integrity, and optional client authentication. SSL and the associated technologies solve two fundamental problems of security for networked applications:
SSL uses the technology of public key encryption. In this technology, a server or client is in possession of a two-part key: a public key and a private key. The private key is kept secret, while the public key is made known to all interested parties. The two parts of a key are related mathematically and have the following properties:
The mathematics of public key encryption are beyond the scope of this book, but the information is readily available on the internet.
If I encrypt my message with your public key and send it to you over a network, only you can decrypt the message. Third parties who might intercept my message over the network can't read it. They also can't fool you by changing my message in mid-stream, because the changed message will be garbled when you decrypt it. In this way, public key encryption supports both data encryption and message integrity.
Public key encryption supports the use of digital signatures. If I encrypt a message with my private key, I have effectively signed it, because any recipient with my public key can verify that I'm the only one who could have done the encryption. The implementation of digital signatures is more complex, but the specifics are beyond the scope of this book.
Although public keys can be distributed over a network, there still must be a way for you to know that a public key advertised in my name is really mine. Another person could distribute a public key claiming it is mine. You need a way to verify that claim. This can be done with public key certificates issued by trusted certificate authorities.
A server and client authenticate each other by exchanging public key certificates. A public key certificate is the digital equivalent of an identity card. It is issued by a trusted organization, called a certificate authority (CA).
A certificate specifies the name of the owner and attests that the public key, included in the certificate, belongs to that owner. A certificate also includes an expiration date, the name of the CA that issued the certificate, and the digital signature of the issuing CA. SSL technology includes software that a client or server can use to validate a certificate and its contents based on the digital signature.
An SSL-enabled client or server has a database (or simple file) called a trust store, maintained by an administrator and containing trusted certificates. At runtime the client or server accepts an incoming certificate if it is signed by one of the owners of a certificate in the trust store. SSL uses the public key of the trusted certificate to decrypt the digital signature of the incoming certificate.
Certificates conform to the X.509 Public Key Infrastructure (PKI) standard. You can find further information about PKI standards and technologies at the folowing web sites:
Internet Engineering Task Force (IETF)--
http://www.ietf.org/html.charters/pkix-charter.html
Sun Microsystems:--
http://docs.sun.com/source/816-6156-10/index.html
Some commercial organizations issue certificates for a fee, and serve as certificate authorities. A commercial CA might offer several categories of certificates. The CA does more background checks on the owner of a more expensive certificate.
A company or public institution can act as a CA for its own applications, using certificate server software to issue certificates. In this case the certificates might not be trusted outside the domain of the issuing company or its business partners.
The following Sun web site contains documentation and download information for Sun Microsystem's certificate server software:
Sun ONE Certificate Server 4.7--
http://docs.sun.com/db/prod/sunone#hic
The following document explains how to manage certificates in the Sun ONE Application Server:
Administrator's Guide to Security: Sun ONE Application Server, Version 7--
http://docs.sun.com/db/doc/816-7158-10
Consider what happens when your browser accesses a web site secured with SSL. If the target URL begins with HTTPS instead of HTTP, the browser attempts to connect to the server at a secure port. In general, when a client initiates an SSL session with a server, the connection is made at a port associated with an SSL listener.
Suppose that the server has a valid certificate and the browser does not have a certificate. This is a common scenario when consumers use their browsers to access a secure server and make purchases over the internet. In simple terms, the client authenticates the server. If the client also has a certificate, the server can authenticate the client. This scenario is known as SSL mutual authentication.
Assuming that the server is configured for SSL, a handshaking process begins. The following steps describe a simplified overview of the handshaking process.
1. The client sends an initial packet to the server containing information such as encryption algorithms that it can use.
2. The server sends a packet to the client containing information such as encryption algorithms that it can use and a copy of its certificate.
3. The client validates the server certificate.
4. The client generates a random session key and encrypts the session key with the server's public key, obtained from the server's certificate.
5. The client sends the encrypted session key to the server.
This technique solves two problems:
This explanation assumes that you have created and generated a web service in the IDE. The following tasks are required to secure your web service:
When you execute the application, the browser welcome screen will provide a link to a web page on which you can enter a user name and password.
To assign HTTP basic authentication roles to your web service:
1. Right click the web service node and choose Properties.
2. Set the Authentication property to HTTP Basic Authentication.
The Authentication dialog box appears, as illustratedin FIGURE A-2.
3. Select the radio button for HTTP Basic Authentication.
The Add and Remove buttons become active.
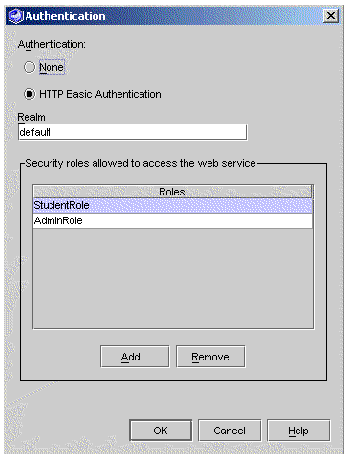
The Add Role dialog box is displayed, as illustrated in FIGURE A-3.
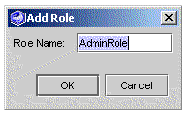
5. Enter a value for Role Name and click OK.
The new role name is displayed in the Authentication dialog box.
Map role names to group names and user names. You can do the mapping at the level of the web service or at the level of the J2EE application containing the web service.
To map role names to group names and user names at the level of the web service:
1. Right click the web service node and choose Properties.
The Mapped Security Roles property shows the number of roles that you have assigned to your web service, as illustrated in FIGURE A-4.
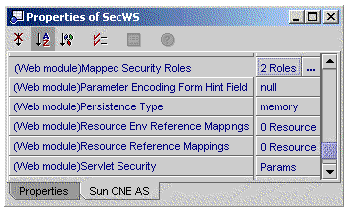
3. Click the Mapped Security Roles property.
An ellipsis (...) button is displayed.
The Mapped Security Roles dialog box appears, as illustrated in FIGURE A-5.
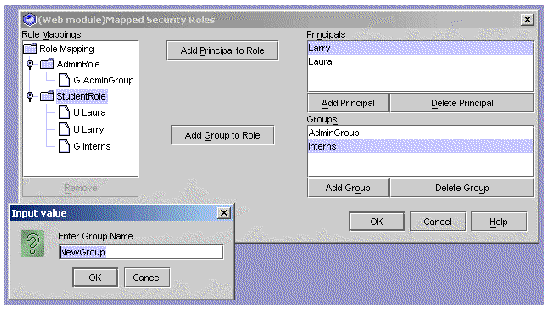
The Mapped Security Roles dialog box displays principals, groups, roles, and their mappings. You can:
a. To add a principal or group, click Add Principal or Add Group.
The Input Value dialog box appears, as illustrated in FIGURE A-5.
i. Enter a value for the name.
b. To map a principal or a group to a role:
i. Select a principal or a group.
Use ctrl-click to select more than one principal or more than one group.
The Add Principal to Role button or the Add Group to Role button becomes active, depending on whether you selected principals or roles.
iii. Click Add Principal to Role or Add Group to Role.
The selected principals or groups are mapped and displayed under the selected role.
Suppose that your web service is deployed in a J2EE application. Suppose also that the web service's Authentication property is HTTP Basic Authentication and you have assigned the desired roles to the web service. You can map role names to group names and user names at the level of the J2EE application.
1. Create a J2EE application for the web service (see ).
2. Right click the application node and choose Properties.
The Mapped Security Roles property shows the number of roles that you have assigned to your web service.
4. Click the Mapped Security Roles property.
An ellipsis (...) button is displayed.
The Mapped Security Roles dialog box appears, as illustrated in FIGURE A-5.
The remaining steps are the same as previously described (see Mapping Roles at the Level of the Web Service).
HTTP basic authentication applies to a web service as a whole. Technically, the authentication applies to the JAXRPC servlet that implements the web service. All the roles of a given web service have the same purpose: to allow or deny access to the web service and its methods.
You might ask, therefore, what is the use of having more than one role? You could assign a single role to a web service and map all the authorized users and user groups to that role.
Consider an environment with several web services running in a single production application server and accessed by people working in a complex organizational structure. The mapping of users and user groups to web services for security purposes can be quite elaborate. The ability to assign multiple role names to a web service and, conversely, to assign a given role name to multiple web services can simplify the setup and maintenance of complex security relationships.
Another, forward-looking reason for supporting multiple roles is that method-level security is one of the directions for the evolution of web services technology. The ability to map users to different roles within a web service is one of the building blocks of method-level security.
If you map roles to principals and groups at the level of the web service, and you also map roles at the level of the J2EE application, the mappings at the web service level take priority.
The mapping of role names to users and user groups is done by the IDE, and the mappings are stored in the application server. If you deploy your web service to another application server, you must redo the mapping using the administrative tools provided by the application server. In a production environment the mapping might be done by an application server administrator.
|
Note - The procedures described in this appendix use the Sun ONE Application Server that is bundled with your IDE. |
Under certain circumstances, the role names associated with your web service might not work for your application server. For example, the role names might conflict with your shop's production naming conventions, or they might conflict with other role names already in use. If you have a web service purchased from a third party or shared by multiple applications, it might be inconvenient to change the role names directly.
To address this issue, the IDE provides a facility for redirecting role names at the level of the J2EE application. A role name defined to the J2EE application can be linked to a different role name to be used in the application server.
1. Right click the application node and choose Properties.
The Properties tab displays the Security Roles property, showing the number of assigned roles.
2. Click the Security Roles property.
An ellipsis (...) button is displayed.
The Security Roles dialog box appears, as illustrated in FIGURE A-6.
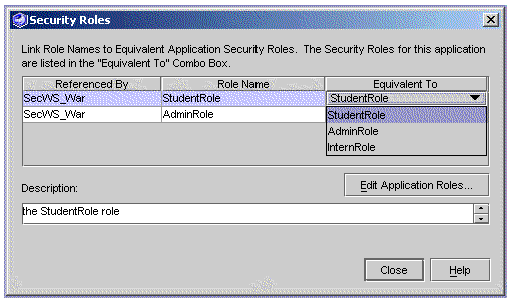
The Security Roles dialog box displays War files, role names, and linked role names. The column headed "Equivalent To" shows the linked target role names, with default values equal to the role names.
To link a role name to a target role name:
a. Click the value in the Equivalent To column.
A list appears with the available target role names.
b. Select the desired target role name.
The new name appears in the Equivalent To column.
The Security Roles dialog box enables you to add or delete entries and their descriptions from the list of available target role names.
1. Click Edit Application Roles
The Edit Application Roles dialog box appears, as illustrated in FIGURE A-7.
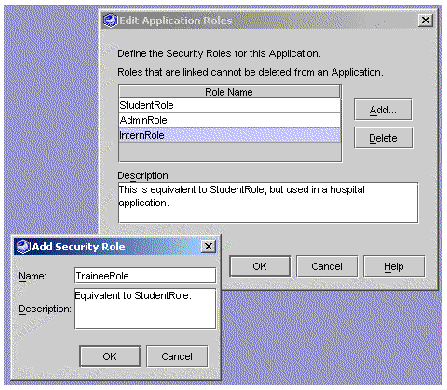
You can add a role name with a description. You can also delete a role name, if it is not currently linked.
The Add Security Role dialog box appears.
3. Enter a name and description, and click OK.
The new name is displayed in the list of available roles when you click a value in the Equivalent To column.
The explanation in this section assumes that you have created a client and made it the default test client for your web service. See for the procedures to create and use a test client.
In order to test HTTP basic authetication, you must define a test user in your application server, using the administrative tool provided by the server. See your application server's documentation for the procedure. The following example illustrates how to get started if you are using Sun ONE Application Server 7.
To start the application server administration tool:
1. Right-click your application server instance in the IDE's runtime tab, and choose Launch Sun ONE Admin GUI.
The IDE opens your default web browser and displays the administrative tool, as illustrated in FIGURE A-8.
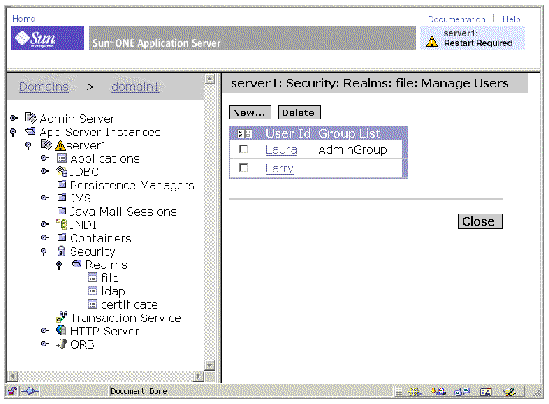
2. Navigate to server1 : Security : Realms : file : Manage Users.
The Manage Users feature of the administrative tool enables you to add a new user with a password, associate a user with a group, and delete a user.
The remainder of this section assumes that you have defined a test user in your application server and mapped the user to a role associated with your web service, as described in Mapping Roles to Users and Groups.
To test the security of your web service:
See for the procedure to execute your application with the test client. There are two different procedures, depending on whether your web service has the multitier architecture or the web-centric architecture.
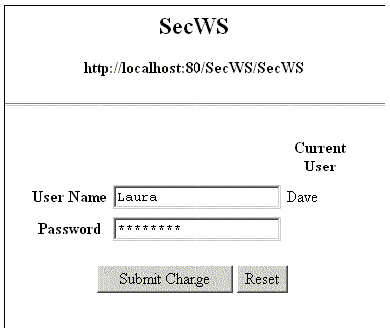
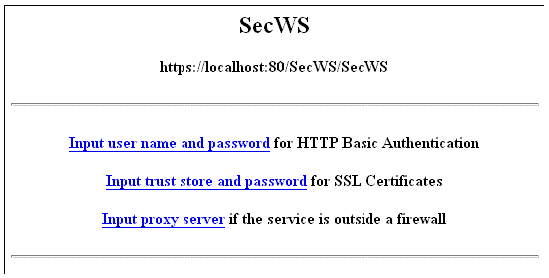
The test client displays the application's welcome page in your browser. Near the top of the page is an authentication link: Input user name and password for HTTP Basic Authentication. The rest of the page contains buttons and input fields for using your web service's business methods.
2. Click the authentication link.
The browser displays the login page, as illustrated in FIGURE A-1.
3. Enter an invalid user or password, and click Submit Change.
The browser returns you to the welcome page.
4. Enter any required data and click one of the application's business method buttons.
Your browser displays an error message.
5. Click the authentication link.
The browser displays the login page.
6. Enter a valid user and password, and click Submit Change.
The browser returns you to the welcome page.
7. Enter any required data and click one of the application's business method buttons.
The application performs as designed for an authorized user.
The WSDL standard does not provide for authentication. Therefore, if you generate a client from a UDDI registry or from WSDL, the client's HTTP Basic Authentication property will be set to the default value, False. If you know that the web service supports HTTP basic authentication, you can manually set the client's property to True.
By default, when you publish a web service to a UDDI registry, the IDE specifies a WSDL URL that accesses the WSDL file through the web service. If your web service is protected by HTTP basic authentication, this might prevent a client developer from downloading the WSDL file to create a client. The IDE solves this problem as follows:
If you publish a web service whose Authentication property is HTTP Basic Authentication, the IDE packages an extra copy of the WSDL in the top directory of the WAR file. As the publisher of the web service, it is your responsibility during the publication process to manually provide a static WSDL URL that points to the copy of the WSDL file without calling the web service.
For the complete sequence of steps to publish a web service to a UDDI registry, see . For the wizard page in which you must manually edit the WSDL URL, see . The wizard page is titled, Publish Service and WSDL or Service only?
 Change the WSDL File URL in the wizard as follows:
http://<hostname>:<portnumber>/<wsname>/<wsname>?WSDL
http://<hostname>:<portnumber>/<wsname>/<wsname>.wsdl
In a production environment, the management of SSL security and certificates involves an application server administrator and secure procedures. In a development environment, you might have to take on the role of the application server administrator or consult with someone who has those skills. It might be helpful to have one person on a development team who handles the certificate management for the team.
The procedures in this section assume that you are working in a development environment and deploying a web service to the Sun ONE application server bundled with your IDE.
The term trust store in this section refers to a database (or a simple file) where certificates are kept. The location and format of a trust store, and the tools for managing a trust store, depend on your environment and application server.
|
Note - The terms trust store and key store are used interchangeably in this document. In common security terminology, trust store refers to a database where an entity keeps trusted certificates of other entities, and key store refers to a database where an entity keeps its own keys or certificates. However, the two databases can be the same and the IDE does not make the distinction. FIGURE A-10 shows the IDE option, SSL Trust Store, which serves both purposes. |
The following tasks must be completed in order to configure your web service, test client, and application server for SSL authentication and encryption.
To configure your web service for HTTPS/SSL authentication:
1. Right click the web service node and choose Properties.
2. Set the Use HTTPS property to True.
When you create a test client, the IDE sets its Use HTTPS property to match the corresponding property of the web service. For an existing test client:
1. Right click the client node and choose Properties.
2. Set the Use HTTPS property to match the Use HTTPS property of the web service.
You must first create the trust store. This section describes how to create the trust store using the keytool utility that is provided with Java 2 Software Development Kit, Standard Edition, 1.4 or 1.4.1 (J2SE SDK).
|
Note - In a production environment, the trust store is typically set up by a security administrator in a secure location. |
To create the trust store on a UNIX system:
Make the target directory current and enter the following command:
$JAVA_HOME/bin/keytool -genkey -alias localhost -dname "CN=<client name>, OU=<organizational unit>, O=<organization>, L=<locality>, S=<state>, C=<country code>", -keyalg RSA - keypass changeit -storepass changeit -keystore client.keystore
To create the trust store on a Windows system:
Make the target directory current and enter the following command:
%JAVA_HOME%\bin\keytool -genkey -alias localhost -keyalg RSA -keypass changeit -storepass changeit -keystore client.keystore
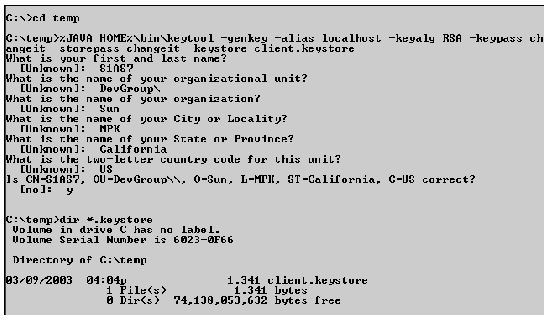
The keytool utility prompts you to enter the client's server name, organizational unit, organization, locality, state, and country code. You must enter the server name in response to the first prompt, which asks for first and last names.
FIGURE A-9 illustrates the creation of a trust store in a Windows environment.
To make the location of the client trust store known to the IDE:
1. Choose Tools  Options Distributed Application Support Web Service Settings from the IDE's main window.
The Options dialog box is displayed, as illustrated in FIGURE A-10.
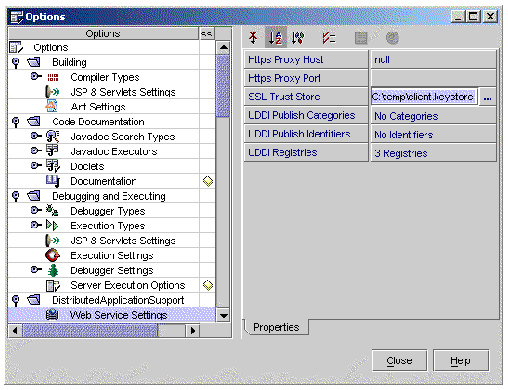
2. Click the SSL Trust Store option, then click the ellipsis (...) button.
3. Select the trust store file and click OK.
The server administrator must first export the certificate to a file, using the server administration tool. If you are doing this yourself in a development environment, see your application server's documentation for the procedure. The following example, based on Sun ONE Application Server 7, is for illustration only.
To start the application server administration tool:
1. Right-click your application server instance in the IDE's runtime tab, and choose Launch Sun ONE Admin GUI.
The IDE opens your default web browser and displays the administrative tool.
2. Navigate to server1 : Security, click the Certificate Management tab, and choose Manage from the menu.
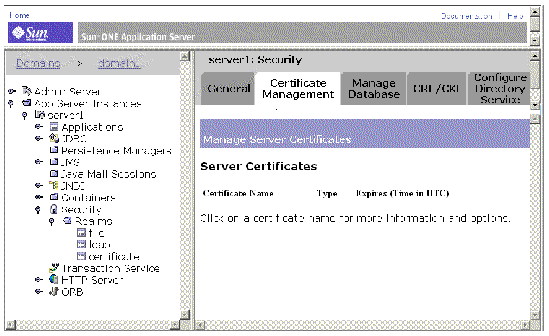
3. Export the server certificate to a file.
You can now use the keytool utility to import the server certificate into your client trust store. The keytool command is the same for UNIX and Windows, except for path naming conventions. The following sample command assumes that the server certificate has been exported to a file, and that server.cer is the name of the file.
To import the server certificate into the client trust store:
$JAVA_HOME/bin/keytool -import -v trustcacerts -alias localhost -file server.cer -keystore client.keystore -keypass changeit -storepass changeit
A client trust store can contain more than one trusted certificate.
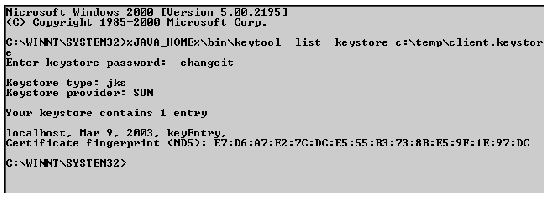
To list the contents of a client trust store:
$JAVA_HOME/bin/keytool -list -keystore client.keystore
The keytool utility prompts you to enter your trust store's password.
FIGURE A-12 illustrates the listing of a trust store in a Windows environment.
The server administrator must create an SSL listener for the port used by your web service. If you have to do this yourself in a development environment, see your application server's documentation for the procedure. The following example, based on Sun ONE Application Server 7, is for illustration only.
To start the application server administration tool:
1. Right-click your application server instance in the IDE's runtime tab, and choose Launch Sun ONE Admin GUI.
The IDE opens your default web browser and displays the administrative tool.
2. Navigate to server1 : HTTP Server : HTTP Listeners.
This page, illustrated in FIGURE A-13, lists the existing HTTP listeners and enables you to delete a listener or add a new listener.
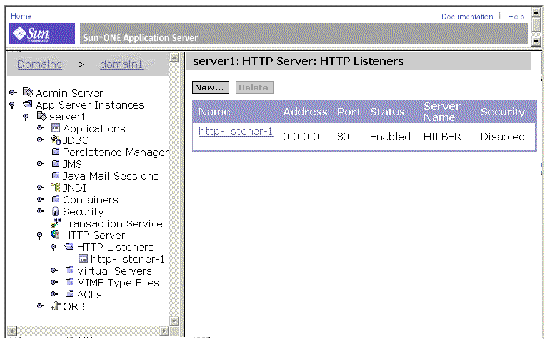
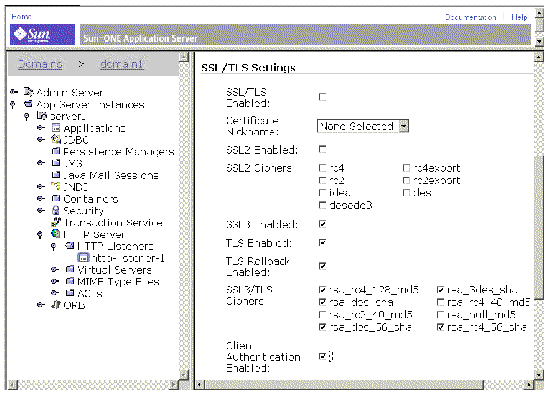
3. Navigate to an existing HTTP listener to display or change its properties, as illustrated in FIGURE A-14.
|
Note - To set up the server for mutual (two-way) authentication, check the Client Authentication Enabled checkbox for the listener associated with the port used by your web service. |
To test the security of your web service with SSL server authentication:
See for the procedure to execute your application with the test client. There are two different procedures, depending on whether your web service has the multitier architecture or the web-centric architecture.
The test client displays the application's welcome page in your browser. Near the top of the page is a link: Input trust store and password for SSL Certificates, as illustrated in FIGURE A-15. The rest of the page contains buttons and input fields for using your web service's business methods.
2. Click the SSL Certificates link.
The browser displays a page in which you can enter the location of the client's trust store, as illustrated in FIGURE A-16.
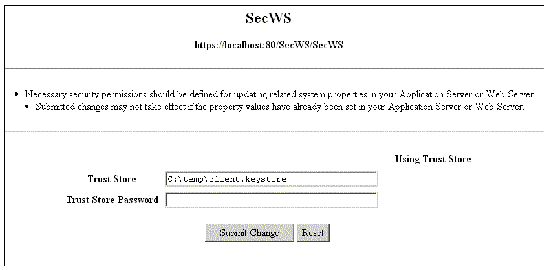
A client generated by the IDE provides this page as a convenience for testing in a development environment. The trust store location that you set in this page is used by the server in which the client is running. In a production environment, the trust store location is typically set by a security administrator, not by a client.
3. Enter the client's trust store location and password, and click Submit Change.
The browser returns you to the welcome page.
4. Enter any required data and click one of the application's business method buttons.
The application performs as designed for an authorized user.
| Building Web Services | 817-2324-10 |
Copyright © 2003, Sun Microsystems, Inc. All rights reserved.