| Building Web Services |
| Building Web Services |
| C H A P T E R 2 |
|
Building a Web Service |
This chapter describes the tools and procedures that you can use to develop a web service. There are two approaches to developing a web service:
Both approaches are covered in this chapter.
The following tasks are interdependent but not strictly sequential. For example, you can add a method reference while creating a web service or afterward. Web service development is an iterative process.
This chapter includes the following tasks:
This technique can be thought of as a bottom-up model for creating a web service. The starting point is an existing business component, and the web service is built to implement remote calls to business methods.
To create a new web service from Java methods:
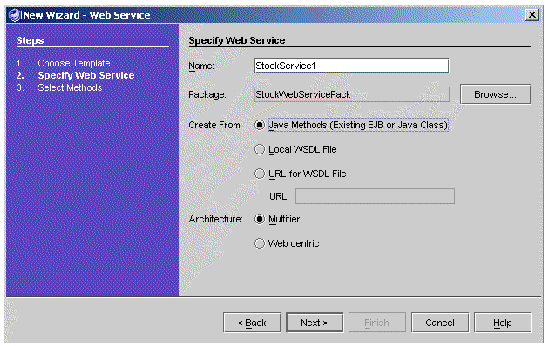
1. To open the New Web Service wizard, go to the Explorer, right-click the Java package in which you want to create the web service, and choose New  All Templates Web Services Web Service.
You can also navigate to the same wizard by choosing File New Web Services Web Service from the IDE's main window.
The New Web Service wizard is illustrated in FIGURE 2-1.
|
Note - The wizard has radio buttons that enable you to select the web service architecture: Multitier (the default) or Web centric. The distinction between these architectures is explained in Web Services Architectures. If your application uses only EJB business components, both architectures work. Multitier is preferred because it puts the generated support structure in the same EJB container as the business components. |
2. Ensure that the Create From Java Methods radio button is selected.
The alternatives, Create From Local WSDL File and Create From URL for WSDL File, are explained in Creating a JAX-RPC Web Service From WSDL Source.
3. Ensure that the Package field specifies the correct location in which to create the web service.
If a Java package is currently selected in the Explorer when you open the New Web Service wizard, the name of the package appears in the Package field of the wizard. You can click Browse in the wizard to find and select a package of your choice.
|
Note - Since the IDE will generate many files to implement your web service, it is good practice to place the web service in a package of its own. |
4. In the Name field, type a name for the web service.
If you enter the name of a web service that already exists in the package designated in the wizard, the IDE displays a highlighted message: A web service with this name already exists in package.
5. Click Finish to create the web service, or click Next to add method references.
If you click Finish, your new web service is displayed in the Explorer. It appears under the designated package as a node with a blue sphere icon ( ).
).
If you click Next, the IDE displays a Methods chooser. Select one or more methods and click Finish in the chooser to add method references to your web service. Then click Finish to create the web service.
You can also add method references after creating a web service (see Adding Operations to a Web Service).
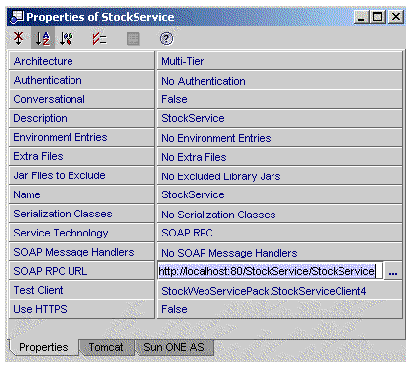
6. In the Explorer, right-click the web service and choose Properties.
The SOAP RPC URL property has the following default form:
http://hostname:portnum/webserviceName/webserviceName
Set the values of hostname and portnum to match your server installation. The first instance of webserviceName in the URL is called the context root or web context. You can change it to any value of your choice, but it must match the web context property of the J2EE application WAR node that you create in a later step (see Assembling the J2EE Application).
|
Note - If you have more than one web service, make sure that each of the SOAP RPC URLs is unique. |
FIGURE 2-2 shows the properties of a web service with the SOAP RPC URL highlighted.
The XML operation is a means of combining multiple business method calls into a higher-level method call for the web service. You do not need XML operations if your web service simply exposes individual methods of a business component.
For information about how to develop XML operations, see Chapter 5.
You must have available in the IDE an enterprise bean or other business component whose methods you want to expose in the web service. Adding an operation to your web service causes the IDE to generate code that issues a remote method call. The logical term, operation, refers to the generated mechanism that implements the method call.
|
Note - Web service operations are created from EJB and Java class methods, or from XML operations (deprecated). |
To add an operation to a web service:
1. In the Explorer, right-click the web service and choose New Operation.
2. Select the desired business method (or XML operation) and click OK.
You can select more than one item by holding down the Control key while clicking.
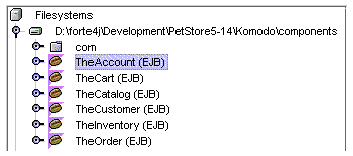
Be sure to select EJB methods from the logical EJB node (the node with the bean icon  ), not from the nodes that represent the EJB bean class or the home or remote interfaces. By adding a method from the logical EJB node, you provide the runtime information needed to call the method. FIGURE 2-3 shows examples of logical EJB nodes.
Operations added to a web service are displayed in subnodes of the web service, as illustrated in FIGURE 2-4.
Operations and XML operations are organized as follows:
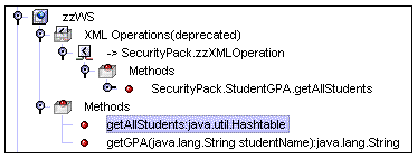
The IDE prefixes references with the names of the packages containing the referenced objects. The IDE adds the arrow symbol (->) before the names of the XML operation references.
You can direct the IDE to add external directories or files to a web service. This feature supports the use of attachments, property files and other resources, such as .gif, .jpg, xml, .property, and .jar files.
To add external directories or files:
1. Right click the web service node in the Explorer and choose Properties.
2. Click the External Files property value, illustrated in FIGURE 2-2, and click the ellipsis (...) button.
The IDE displays the External files dialog box.
4. Select the desired directories or files in the chooser, click OK, and click OK in the External files dialog box.
1. In the Explorer, select the operation you want to delete.
2. Right-click the operation and choose Delete.
For information on this task, see Instantiating Objects and Resolving References. This step is necessary only if you are using XML operations and the default references are not satisfactory.
Environment entries are data that you store in your web service's EJB module deployment descriptor. Environment entries are available to your web service for use as parameters to the methods that create or find target objects.
If a method specified in the Method, Constructor, or Static Method fields of the Resolve Objects dialog box takes a parameter, you can map that parameter's value to an environment entry. Because environment entries are stored in the deployment descriptor, they can be configured at deployment time to values appropriate for the runtime environment.
1. Right-click your web service node and choose Properties.
The IDE displays the web service properties, as illustrated in FIGURE 2-2.
2. Click the Environment Entries property value, and click the ellipsis (...) button.
The Environment Entries dialog box is displayed, as illustrated in FIGURE 2-5.
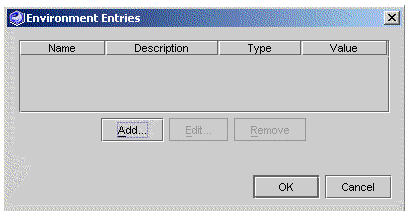
The Add Environment Entry dialog box is displayed, as illustrated in FIGURE 2-6.
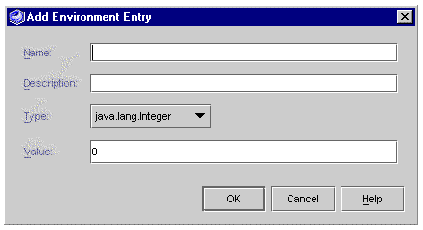
4. Fill out the fields in the Add Environment Entry dialog box.
The environment entry is created. The next time you generate runtime classes for your web service, the environment entry will be propagated to the web service's EJB module deployment descriptor.
This technique can be thought of as a top-down model for creating a web service. The starting point is a WSDL file that describes the external interfaces of the web service. The IDE creates the web service and the stub of an EJB session bean with dummy business methods that match the specifications in the WSDL. You must provide code to implement the business methods in the EJB session bean.
The top-down model enables developers to create web services with different implementations of a common standard. The top-down model can be used by a company that deals with many suppliers, each of which might have its own computerized order and inventory systems. For example, an auto manufacturer might develop an application based on web services, in which each parts supplier has an implementation that works for its business.
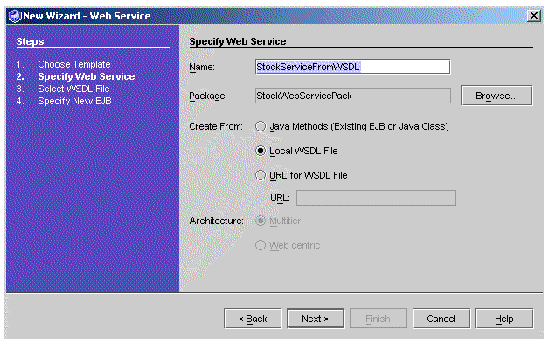
To create a new web service from WSDL:
1. To open the New Web Service wizard, go to the Explorer, right-click the Java package in which you want to create the web service, and choose New All Templates Web Services Web Service.
You can also navigate to the same wizard by choosing File New Web Services Web Service from the IDE's main window.
The New Web Service wizard is illustrated in FIGURE 2-7.
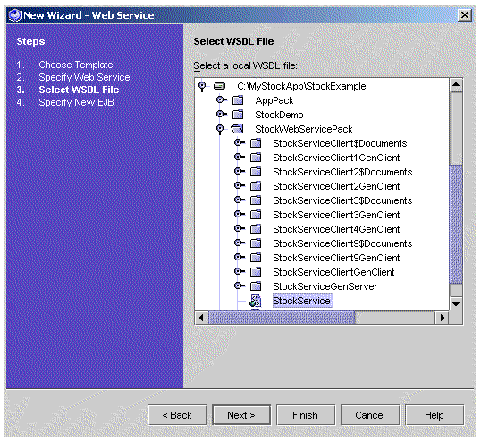
2. Select the radio button for Create From Local WSDL File, click Next, and select the desired WSDL file from the chooser, as illustrated in FIGURE 2-8.
Alternatively, select the radio button for Create From URL for WSDL File, enter a URL, and click Next.
The IDE displays the Specify New EJB window, as illustrated in FIGURE 2-9.
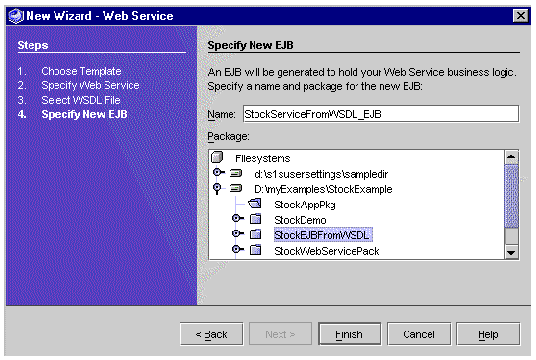
3. Enter the desired EJB name, select the target package, and click Finish.
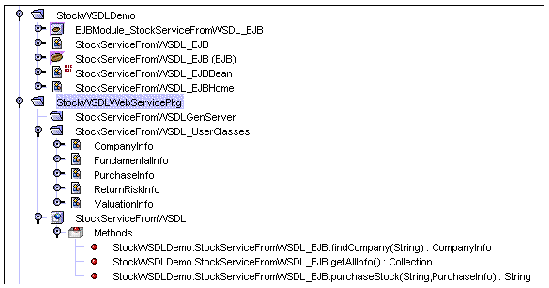
The IDE creates the new web service and the new EJB component, placing each in the package that you designated in the wizard. See FIGURE 2-10 for an Explorer view of a web service and EJB component created from a WSDL file.
|
Note - Since the IDE will generate many files to implement your web service, it is good practice to place the EJB session bean and web service in different packages. |
The new web service and EJB session bean have the methods designated in the WSDL. The web service references those methods in the generated session bean.
|
Note - The WSDL does not contain the web service business logic. Therefore, the generated EJB session bean is not complete. You have to code the business methods and then compile the EJB classes. |
Before you can assemble your web service as a J2EE application and deploy it for testing, the IDE must generate your web service's runtime classes.
The IDE places the generated runtime classes in the same package as the web service, under a node named xxxGenServer, where xxx is the name of the web service. The generated classes differ depending on whether the architecture is multitier or web-centric. For example, in the multitier case, some of the runtime classes are for the generated EJB component.
The IDE generates one additional class for each XML operation, if any. For more information about XML operations, see Chapter 5.
To generate a web service's runtime classes:
1. Select your web service in the Explorer.
2. Right-click and choose Generate Web Service Files.
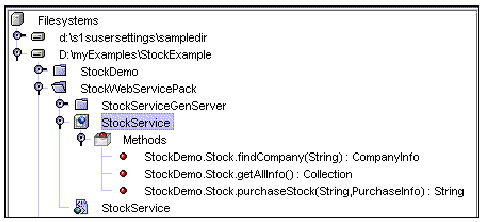
Your web service's runtime classes are generated and compiled. The resulting Explorer display is illustrated in FIGURE 2-11.
A WSDL node appears in the Explorer hierarchy, at the same level as the web service node and in the same package. The WSDL node has the same name as your web service, but it is distinguished by a different icon, with a green sphere ( ).
).
You can also generate the WSDL file and node manually by selecting the Generate WSDL menu item from the web service node. For further information about using WSDL files, see Generating WSDL.
The explanation in this section assumes that any EJB modules needed by your web service are available to the IDE, and that you have generated the runtime classes of your web service.
The deployment steps are described for Sun ONE Application Server 7. Deployment should be similar for other application servers, but you might need to consult the person responsible for your application server for information such as host name, port number, and any special requirements.
The assembly and deployment procedure is simplified if your web service has the web-centric architecture and does not reference EJB business methods. The following explanation starts with the simpler web-centric case and then presents the procedure for a web service that is assembled and deployed as a J2EE application.
If your web service has the web-centric architecture, the IDE creates only a WAR file. In this case, you do not have to create a J2EE application.
If a web service has the web-centric architecture and does not reference an EJB component, the web service node has the Deploy and Execute menu items enabled in the Explorer.
 Right-click the web service node and choose Deploy.
The IDE assembles and deploys the WAR file to the IDE's default web tier application server. See Testing a Web Service for information about testing your web service.
You might need to edit the WAR file to override the default configuration, for example, to change the Context Root property to match the SOAP RPC URL property of your web service. You might need to provide the WAR file to someone else to do the deployment, for example, in a controlled production environment. In these situations, you can use the following procedure (modified as necessary to match your situation):
1. Right-click the web service node and choose Export WAR File.
The IDE creates a WAR file in the same package as your web service and displays the WAR node in the Explorer.
2. Right-click the WAR file node and choose Unpack as Web Module.
The IDE unpacks the WAR file into the directory of your choice and mounts the directory to the IDE filesystem.
3. Navigate to the unpacked web module in the Explorer, right-click the WEB-INF node, and choose Properties.
4. Change the Context Root property to match the SOAP RPC URL property of your web service (see FIGURE 2-2).
The context root value appears in the SOAP RPC URL, which has the following form: http://hostname:portnum/contextRoot/webservicename.
|
Note - You must give the Context Root property value of WEB-INF a leading slash (/), as follows: /contextRoot. |
5. Deploy the web module to a web server.
See Building Web Components in the Sun ONE Studio 5 Programming series for instructions on how to do this.
The following sections apply to a web service that is assembled and deployed as a J2EE application.
The procedure in this section applies to web services that use EJB business components.
To create a J2EE application containing your web service and its referenced components:
1. Right-click the package in which you want to create the J2EE application and choose New All Templates J2EE Application.
The New Application wizard is displayed.
2. Type a name for the application in the Name field and click Finish.
A J2EE application node is added to the package.
3. Right-click the application node and choose Add Module.
The Add Module to Application dialog box is displayed.
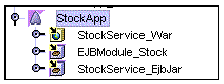
4. Select the web service and all EJB modules referenced by it, and click OK.
FIGURE 2-12 shows a J2EE application node with subordinate nodes:
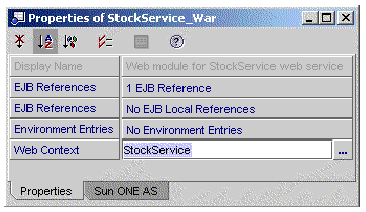
5. Edit the Web Context property of the web service WAR node, if necessary.
In most cases this step is not necessary because the IDE sets a default Web Context property (the name of the web service) for the web service WAR file and the web service. The value of this property is part of the URL used to access your web service. The WAR file value must match the context root value embedded in the SOAP RPC URL property of your web service (see FIGURE 2-2).
a. Right-click the web service WAR node and choose Properties.
b. Click the Web Context property, type a new value, and press Enter.
FIGURE 2-13 shows the properties of a web service WAR file in which the Web Context value is StockService, matching the context root value in the SOAP RPC URL property of the web service.
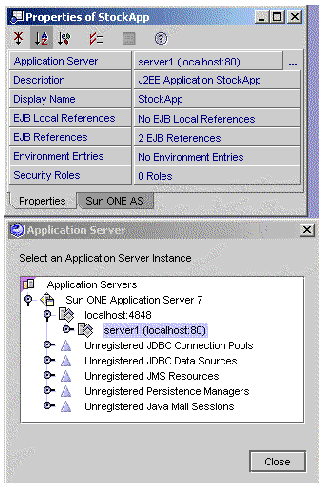
6. Edit the Application Server property of the J2EE application, if necessary.
This property should specify the desired application server instance for deployment. The property defaults to the default application server of the IDE, which you can set in the Explorer window's Runtime tab.
a. Right-click the J2EE application node and choose Properties.
b. Click the Application Server property value, and click the ellipsis (...) button.
The IDE displays a dialog box, as illustrated in FIGURE 2-14.
c. Select any available application server instance.
To deploy your web service application to the application server:
1. Right-click the J2EE application node and choose Deploy.
This action starts the packaging process. When the IDE has finished packaging the application, it deploys the application to the server.
2. Watch for packaging and deployment status messages.
The process might take a few minutes. The IDE status line displays messages indicating the packaging progress.
When deployment has completed, your web service is ready to be tested.
The IDE provides comprehensive support, fully described in Chapter 3, for creating web service clients from any of the following sources:
See Creating a Client From a Local Web Service for the procedure. An important special case involves testing your web service with a default test client.
When you use the IDE to generate a client from your web service, the New Client dialog box displays a checkbox that enables you to make that client the default test client for the service.
To change the default test client:
|
Note - The IDE automatically packages the default test client in the web service WAR file when the web service is assembled into a J2EE application. |
You can use a default test client to test your web service. There are two procedures, depending on the architecture of your web service.
If your web service has a multitier architecture or has a web-centric architecture and uses EJB business methods:
1. Generate a client and make it the default test client for your web service.
2. Assemble your web service into a J2EE application.
See Assembling the J2EE Application for the procedure.
3. Right-click the application node and choose Execute. Alternatively, right-click the test client node and choose Execute.
The IDE deploys the web service application, runs it in the J2EE application server that is specified in the J2EE application, and executes the default test client. If your web service is assembled without a default test client, the IDE asks if you want to create a test client.
Alternatively, you can first deploy the web service application, and then right-click the test client node and choose Execute. The IDE assembles the test client, deploys its WAR file to the IDE's default web container, and executes the client.
If your web service has a web-centric architecture and does not use any EJB business methods, there is no J2EE application. In this case, you can:
1. Generate a client and make that client the default test client for your web service.
2. Make sure the SOAP RPC URL property of the web service refers to the port of the web server.
3. Right-click the web service node and choose Deploy.
The IDE assembles a WAR file, deploys it to the default web server, and runs the web service.
4. Right-click the web service node and choose Execute.
The IDE starts the default test client and displays its welcome page in a browser.
Testing is an iterative process. Edit your web service, regenerate the runtime classes and client, and test until satisfied.
The IDE enables you to create an application in which a stateful web service maintains a session with a stateful client, and within the session a series of conversations can take place.
A conversation is a set of web service operations that are executed within a single session. A conversation is begun when a method marked as a conversation initiator is executed. A conversation ends when a conversation terminator method is executed. Other methods executed within the bounds of the conversation are members of the session and share session data.
Conversational components must be designed so that the initiator method must be executed before any other methods. An initiator method can also be used to create resources for a session. A terminator method should release any resources not previously released in a session, to prevent resource leakage.
Multiple requests from the same client to a stateful web service are routed to the same instance of the business component. A client can make multiple calls to web service methods and data is preserved through the session.
For a web service with the multitier architecture, the business component is a stateful EJB session bean. For a web service with the web-centric architecture, the business component can be a Java object.
The procedure in this section assumes that your business component is a stateful EJB session bean.
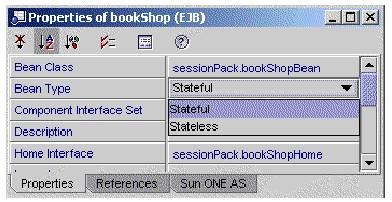
You can make a session bean stateful in two ways.
Click the Stateful radio button in the wizard, as illustrated in FIGURE 2-15.

1. Right-click the logical EJB node and choose Properties.
2. Set the Bean Type property to Stateful, as illustrated in FIGURE 2-16.
You must designate business methods on the session bean that the web service client can use to start and stop a conversation. It is good design to have a method that creates resources needed for the conversation and starts the conversation, and another method that destroys resources which are no longer needed and stops the conversation.
|
Note - The method names are arbitrary. The example in this section uses method names startOrder and submitOrder. |
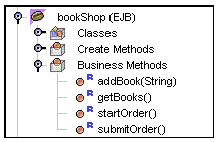
The following procedure creates two methods that start and stop a conversation:
Modify the session bean class to add methods named startOrder and submitOrder.
1. Expand the logical EJB node in the Explorer, as illustrated in FIGURE 2-17.
2. Right click the Business Methods node and choose Add Business Method.
The Add New Business Method dialog box opens, as illustrated in FIGURE 2-18.
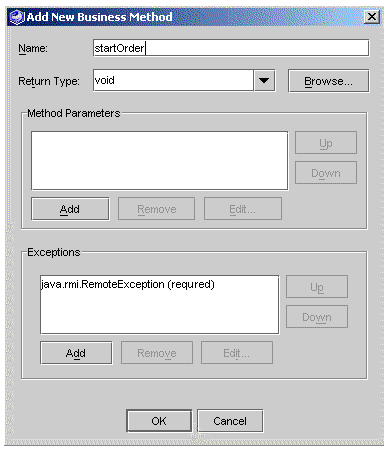
3. Type a value for Name and click OK to add a method with default properties.
The method names in this section are for illustration only. You can use whatever method names you prefer.
When you complete this procedure, the session bean has two new methods:
public void startOrder() {}
public void submitOrder() {}
Suppose that the purpose of each conversation is to create and submit an order for one or more books. The startOrder method can initialize a shopping cart object with customer information (including credit card) and a Vector to contain book objects. The submitOrder method can submit a purchase request, passing customer information and the books to be ordered, and release the shopping cart object before terminating the conversation.
Suppose that you have created your web service and added business methods, including the conversation initiator and terminator methods. If your method names are different, modify the procedure accordingly.
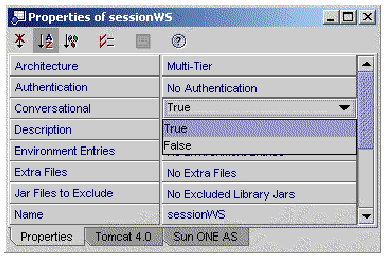
To make the web service conversational, you must set properties for the web service and for the methods that initiate and terminate conversations:
1. Right-click the web service node and choose Properties.
2. Set the value of the Conversational property to True, as illustrated in FIGURE 2-19.
Set properties for the methods that initiate and terminate conversations.
1. Expand the web services node in the Explorer , expand the Methods node, right-click the startOrder method, and choose Properties.
2. Set the Conversation Initiator property to True (see FIGURE 2-20).

Note that the Conversation Terminator property value should be False (the default).
3. Expand the web services node in the Explorer , expand the Methods node, right-click the submitOrder method, and choose Properties.
4. Set the Conversation Terminator property to True.
Note that the Conversation Initiator property value should be False (the default).
At this point you can generate the web service and create a test client, as described in Testing a Web Service.
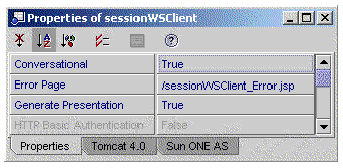
The IDE creates the test client with the same Conversational property value as the web service. If you are using an existing test client, make sure its Conversational property value is True.
To set the Conversational property:
1. Right-click the test client node and choose Properties.
2. Set the value of the Conversational property to True, as illustrated in FIGURE 2-21.
When you generate the test client, the IDE creates:
To see the HTML welcome page and JSP nodes:
1. Expand the test client node in the Explorer, and expand the Generated Documents node.
2. Right-click a node and choose Open.
For more information about the test clients generated by the IDE, see Chapter 3.
Suppose that you have generated your web service and test client, and that you have assembled and deployed your application. (See Assembling and Deploying a Web Service and Testing a Web Service.)
See Testing a Web Service for the procedure to execute your application with the test client.
When you execute your application, the welcome screen appears. You should see Invoke buttons for your web service's business methods, including the conversation initiator and terminator methods, as illustrated in FIGURE 2-22.
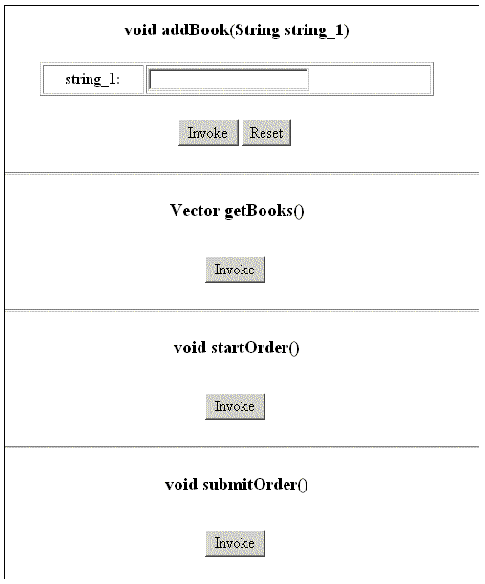
The exact sequence of steps to test the statefulness of your application depends on what the business methods do. For the example illustrated in FIGURE 2-22, you can test statefulness as follows:
1. Click Invoke for the startOrder method.
2. Use the addBook method to add several books, and use the getBooks method after each add to see if each new book is appended to the Vector.
3. Click Invoke for the submitOrder method.
Now try the same procedure but without using the startOrder method. You should find that the added books are not displayed.
This section explains how to use the IDE to make your web service available to other developers through a UDDI registry. Before you can publish your web service to a UDDI registry, you must complete the following tasks:
This section covers the following topics:
|
Note - Client development is described in Chapter 3. See Creating a Client From a UDDI Registry for information about how to find a web service in a UDDI registry and how to generate a client that can access the web service. |
When you generate the runtime classes for your web service, the IDE automatically creates a WSDL file and displays it as a node in the Explorer. You can also generate and view a WSDL file as follows:
1. Right-click your web service node in the Explorer and select Generate WSDL.
A WSDL node appears in the Explorer hierarchy, at the same level as the web service node and in the same package. The WSDL node has the same name as your web service, but it is distinguished by a different icon, with a green sphere ( ).
).
2. Right-click your WSDL node in the Explorer and select Open.
The Source Editor window is displayed in read-only mode. You can read and copy the WSDL, which is an XML document. You can also find the WSDL file in your directory hierarchy, under the directory of your web service package. The file is webserviceName.wsdl.
If you use the IDE to generate and deploy your web service, and to publish the web service to a UDDI registry, the IDE manages the WSDL for you automatically.
|
Note - You can share WSDL files with other developers without necessarily using a UDDI registry. WSDL files can be put on a shared drive or sent as email attachments. For information about how to generate a client from WSDL (without a UDDI registry), see Creating a Client From a WSDL File. |
The IDE stores a list of known UDDI registries and information (such as URLs, userid, and password) needed to access each registry. The IDE also stores default information (such as business, categories, and identifiers) that is used when you create a web service client or publish a web service to a registry.
|
Note - Set default values for registry information before you use the IDE wizards to access UDDI registries. By setting defaults, you avoid repetitive entry of values in the wizards. |
To manage UDDI registry options:
Options Distributed Application Support Web Service Settings UDDI Registries from the IDE's main window.
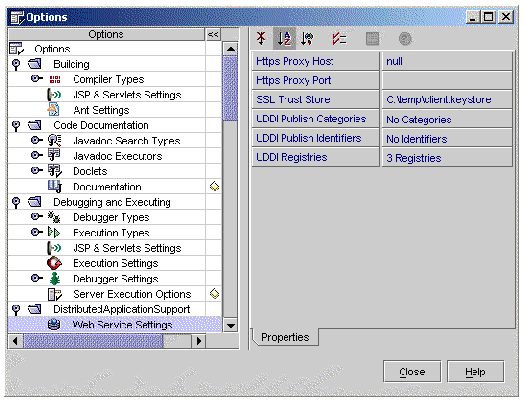
The Options dialog box is displayed, as illustrated in FIGURE 2-23.
The publish categories and publish identifiers associated with your web service are saved in a UDDI registry when you publish the web service.
An identifier is a data element that is unique to a business or technical model (tModel). A category is a data element that classifies a business, service, or tModel. Categories or identifiers can be specified in user queries to locate a business, service, or tModel in a registry.
To set default publish categories:
1. Click the Publish Categories value in the UDDI registries Options dialog box (see FIGURE 2-23).
2. Click the ellipsis (...) button that appears.
The Publish Categories dialog box appears, as illustrated in FIGURE 2-24.
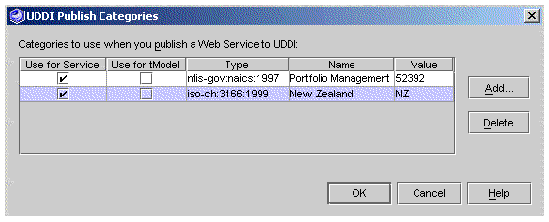
You can edit default publish categories as follows:
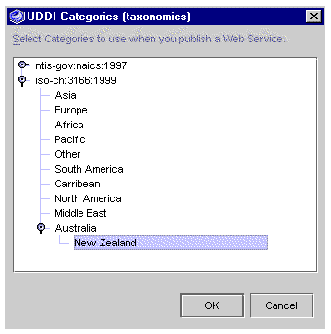
The UDDI Categories (taxonomies) chooser appears, as illustrated in FIGURE 2-25. The categories are industry standards.
The selected categories appear in the Publish Categories dialog box.
To set default publish identifiers:
1. Click the Publish Identifiers value in the UDDI registries Options dialog box (see FIGURE 2-23).
2. Click the ellipsis (...) button that appears.
The Publish Identifiers dialog box appears, as illustrated in FIGURE 2-26.
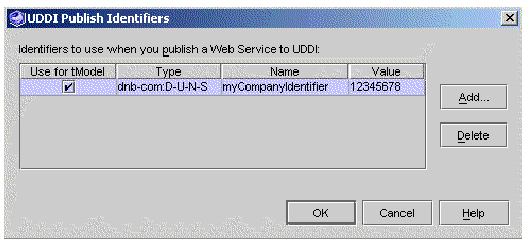
You can edit default publish identifiers as follows:
The UDDI Add Identifier dialog box appears, as illustrated in FIGURE 2-27. The identifier types and tModel UUIDs are industry standards.
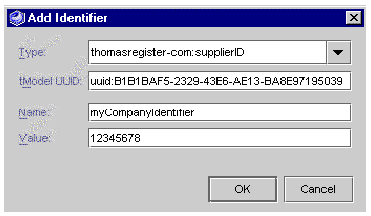
1. Select one of the standard choices for Type.
The IDE displays the tModel UUID for the selected type. Alternatively, you can enter the name and Model UUID (the registry key) of a user-defined type.
2. Enter Name and Value, and click OK.
The IDE returns you to the Publish Identifiers dialog box.
The IDE returns you to the UDDI Set Categories and Identifiers dialog box.
To edit information about registries known to the IDE, click the ellipsis (...) button of the Registries property in the UDDI registries Options dialog box (see FIGURE 2-23). The Property Editor dialog box is displayed, as illustrated in FIGURE 2-28.
The property editor displays known registries and detail information for the selected registry. The top portion of the screen is a table of known registries. Click a registry name to display its detail information in the bottom portion of the screen.
You can edit registry information as follows:
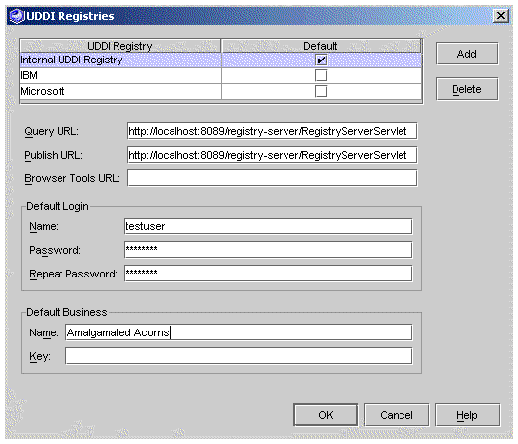
You can also set a business for the IDE to use as a default in its UDDI wizards. To set a default business, enter values for Name and Key.
You can edit UDDI registry properties while you are publishing a web service or searching the registry for the purpose of generating a client. See Creating a Client--Procedure.
To access a UDDI registry, you must provide the IDE with certain information (see Editing Registries Information in the IDE).
To search a registry and generate a web service client, you need the Query URL. To publish a web service to a registry, you need the Publish URL. Get this information from the registry operator, the organization managing the registry.
Security can vary from one registry to another. You might need a login name and password to publish to a registry. Get this from the registry operator. Some public registries provide tools that you can run from a web browser to set up your own account.
This section begins by explaining publication tasks and terminology, and then describes the publication procedure.
A web service entry in a UDDI registry is associated with a business entry, a technical model (tModel) entry, and optional categories and identifiers. When you publish a web service to a UDDI registry, the IDE wizards help you to carry out the following tasks:
The business is the organizational entity that owns the web service. Each business entry in the registry has a unique key, which is automatically generated when you add the entry to the registry.
The tModel is a registry entry that contains a URL (called the overviewURL) that points to your WSDL file. The WSDL file describes the external interfaces of your web service. This information is used by the IDE or other developer software to create clients that can call methods on your web service at runtime.
The web service entry in a UDDI registry specifies an entry point, also called the endpoint URL or service URL. The URL is used by a client to find a runtime instance of your web service. During publication, the IDE sets this URL by default to the value of the SOAP RPC URL property of the web service. You can edit the value.
Standard industry categories and identifiers can be associated with your web service entries and tModel entries in a UDDI registry to facilitate subsequent searches. For more information about UDDI registry searches, see Creating a Client From a UDDI Registry.
A business can publish many different services to a UDDI registry, where each service is described structurally by WSDL associated with a tModel entry. Many service entries can reference the same tModel. For example, as a service provider you might support one instance of a service for use within your enterprise, another instance for business partners, and another instance for the general public. The various instances have the same external interface, as described in the WSDL referenced by the tModel, but they might have different performance or availability characteristics.
When you publish a web service, the IDE automatically includes a reference to its tModel.
Before starting this procedure, you must deploy your web service application. The IDE places a copy of the service's WSDL file with the deployed service. When you publish the service, the tModel refers to this WSDL file.
To publish a web service to a UDDI registry:
1. Right-click your web service node in the Explorer and choose Publish to UDDI.
The Publish New Web Service to UDDI dialog box is displayed, as illustrated in FIGURE 2-29.
a. Enter the Service Name in the UDDI registry.
b. Select http (the default) or https for the Network Access Point Type.
c. Edit the Network Access Point Address URL, which defaults to the value of the SOAP RPC URL property of your web service.
d. (Optional) Enter text for the Service Description.
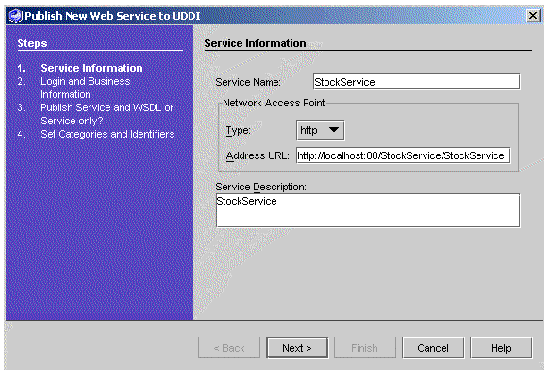
|
Note - The host name in Address URL defaults to localhost. Change this to the network machine name of the host and make sure that the port number is correct. |
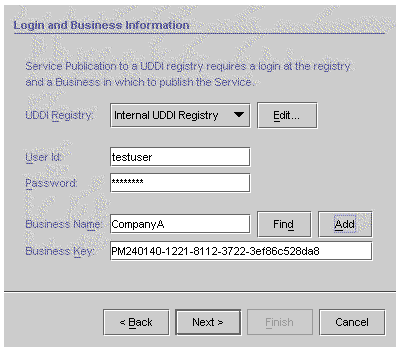
2. Click Next to display the Login and Business Information dialog box, as illustrated in FIGURE 2-30.
If you previously set default values for userid, password, and business for the selected UDDI registry, the default values are displayed. You can override a default value by entering a different value in each field.
a. Select the target UDDI registry for the publication.
b. Enter a userid and password that entitles you to publish to the selected registry.
c. Enter a value for Business Name.
The Find and Add buttons become active.
You can specify a business that already has an entry in the registry, or you can add a new business to the registry and associate that business with your web service.
To use an existing business, click Find. The IDE displays the existing value of Business Key. If more than one business in the registry matches the value of Business Name, the IDE displays the first Business Key value returned by the registry server.
To use a new business, click Add. The IDE adds a business entry to the UDDI registry and displays the generated value of Business Key. A business added this way has no associated categories or identifiers.
You can also change registry default values from the Login and Business Information dialog box.
|
Note - To change registry default values during the publication process, click Edit. The IDE displays the UDDI Registries Property Editor. For further information, see Editing Registries Information in the IDE. |
 [ D ]
[ D ]
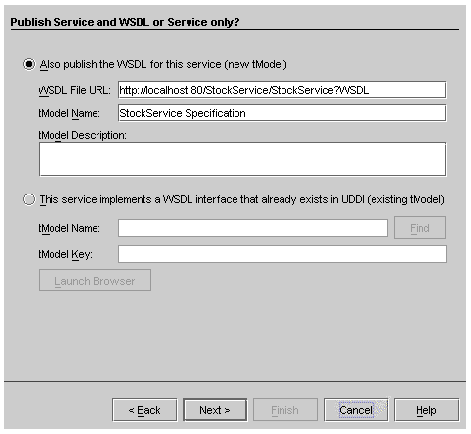
The IDE displays the tModel selection dialog box, as illustrated in FIGURE 2-31.
3. Enter information about your web service in the tModel selection dialog box.
Specify what you want to publish and provide details.
You can associate a new or existing tModel with your web service. The dialog box enables you to:
If you create a new tModel, the IDE attempts to derive the WSDL File URL from the Address URL of your deployed web service (see FIGURE 2-29), based on IDE naming conventions. If you changed the Address URL, or if you deployed your web service outside the IDE, the IDE leaves the WSDL File URL value blank.
The WSDL File URL is used in creating a client from a UDDI registry entry. The default URL, illustrated in FIGURE 2-31, causes the running web service to deliver its WSDL file for download when you create a client from the UDDI registry. You might prefer to keep the WSDL file in another location. You might want to provide a static URL for the WSDL file--a URL that does not depend on the web service being available when a client is created.
|
Note - If you are publishing a web service whose Authentication property is HTTP Basic Authentication, you might have to change the WSDL File URL. For more information, see Basic Authentication and UDDI Publication |
 [ D ]
[ D ]
To use an existing tModel in the UDDI, enter the tModel Name and click Find.The IDE will display the tModel Key. If more than one tModel in the registry matches the value of tModel Name, the IDE displays the first tModel Key value returned by the registry server. If you already have the key value, enter it in the tModel Key field.
|
Note - If you are publishing your web service to a UDDI registry that provides browser tools, you can use those tools to search for the tModel key. Click Launch Browser. The IDE opens your default web browser at the web page specified by the Browser Tools URL of the UDDI registry (see FIGURE 2-28). |
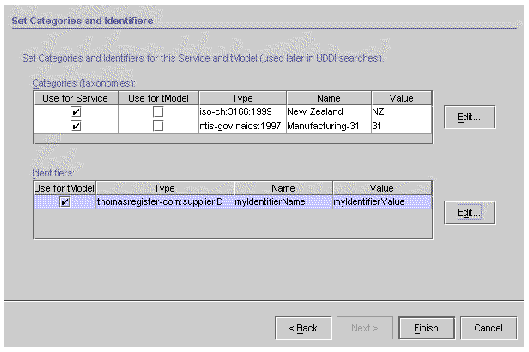
The IDE displays the UDDI Set Categories and Identifiers dialog box, as illustrated in FIGURE 2-32. The dialog box shows your default categories and identifiers.
Click Edit to add or delete categories or identifiers. For a detailed description of the edit procedure, see Setting Default Publish Categories and Identifiers.
 [ D ]
[ D ]
The IDE publishes your web service to the UDDI registry. This can take several minutes. A success message is written to the IDE's top window status line.
The UDDI registry server from Sun's Java Web Services Developer Pack (Java WSDP) is integrated with the IDE as a single-user, internal UDDI registry. The internal registry is provided as a convenience for end-to-end testing of your development process. The UDDI registry consists of a servlet that runs in a dedicated web server (different from the server instance used for web application development) and uses an XML database for persistent storage. The IDE automatically starts and stops the dedicated web server and the database server when you start and stop the registry server.
|
Note - The internal UDDI registry is preconfigured with a single user. The name is testuser and the password is testuser. |
To start the internal UDDI registry server:
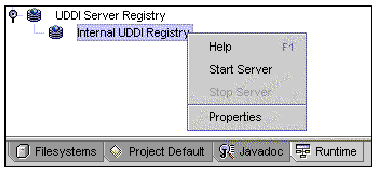
1. Expand the UDDI Server Registry node in the Explorer Runtime tabbed pane.
You see the Internal UDDI Registry node.
2. Right-click the Internal UDDI Registry node and choose Start Server, as shown in FIGURE 2-33.
The IDE output window displays server startup messages. You might also see messages stating that the IDE is stopping a previous server process.
If the internal UDDI registry server is already running, the Start Server menu item is inactive.
To stop the internal UDDI registry server:
1. Expand the UDDI Server Registry node in the Explorer Runtime tabbed pane.
You see the Internal UDDI Registry node.
2. Right-click the Internal UDDI Registry node and select Stop Server.
The IDE output window displays server startup messages. You might also see messages stating that the IDE is stopping a previous server process.
If the internal UDDI registry server is not running, the Stop Server menu item is inactive.
The Java WSDP provides a sample registry browser, which can be used to perform several UDDI maintenance tasks that are not provided by the IDE's UDDI wizards.
The sample registry browser enables you to delete a service from the internal registry, to add business information beyond name and key, and other actions not provided in the IDE wizards. However, as its name suggests, the sample registry browser is not a complete, full-function tool. For example, it does not enable you to view or delete tModels.
Java WSDP software and sample programs are in the jwsdp directory under your IDE home directory. Sample program source is in the wsdp/samples directory.
For further information and a downloadable tutorial, see the Java WSDP web site at http://java.sun.com/webservices/webservicespack.html.
The purpose of this section is to help you get started setting up and using the sample registry browser, not to describe all of its features.
Before starting the sample registry browser, use the IDE to start the internal UDDI registry, as explained in Starting and Stopping the Internal UDDI Registry Server.
To start the sample registry browser:
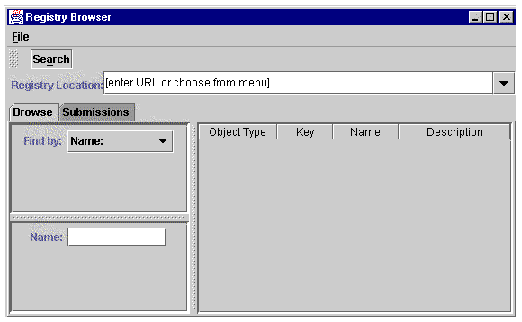
1. Open a command window and change your current directory to s1studio-install-directory/jwsdp/bin.
2. Type the following command:
The Registry Browser window is displayed, as illustrated in FIGURE 2-34.
To configure the sample registry browser for your internal registry:
1. Select the last URL in the Registry Location list, as illustrated in FIGURE 2-35.
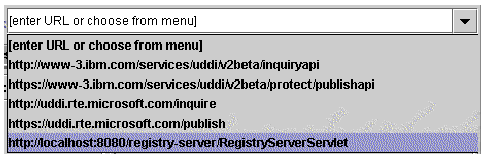
2. Change the port number in the URL from 8080 to the correct port number for the dedicated registry web server, as illustrated in FIGURE 2-36.
The IDE is configured with 8089 as the default port number for this server.
a. Expand UDDI Server Registry Node in the Explorer's runtime tab.
The Internal UDDI Registry Node is displayed.
b. Right-click the Internal UDDI Registry Node and choose Properties.
The Server URL property value contains the port number.
The port number is also displayed in the UDDI Registries Property Editor, in the Query URL and Publish URL, as illustrated in FIGURE 2-28.
 [ D ]
[ D ]
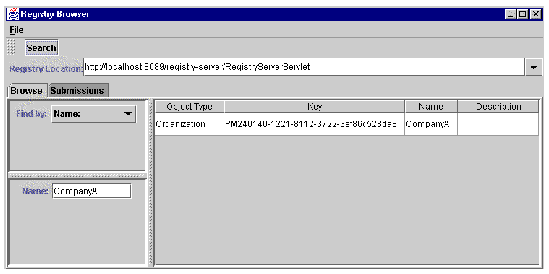
An example showing the result of a search by company name is illustrated in FIGURE 2-37.
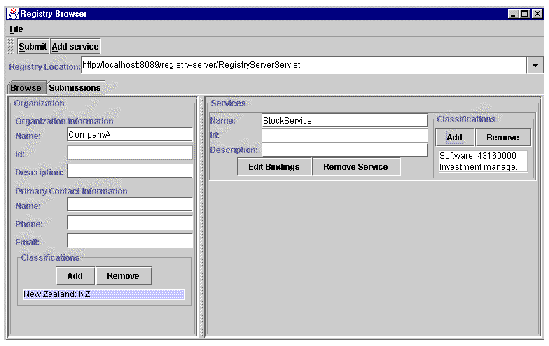
An example using the Submissions tabbed pane is illustrated in FIGURE 2-38.
You can explore additional features of the sample registry browser on your own, or download and work through the tutorial provided at the Java WSDP web site: http://java.sun.com/webservices/webservicespack.html.
This section summarizes the support for input and output data of types Array and Collection. For further information on this subject, see Chapter 5.
The IDE supports arrays as follows:
A collection is a Java class that implements java.util.Collection. The IDE supports collections as follows:
A collection might contain objects of types defined by user classes that are not otherwise referenced in the web service. For user-defined objects, you must provide the serialization classes and add the serialization data type to the JAX-RPC type registry, so that it is handled properly by the JAX-RPC runtime. The IDE provides a web service property for adding serialization classes.
1. Right-click the web service node, choose Properties, and click the value of the Serialization Classes property. Then click the ellipsis (...) button.
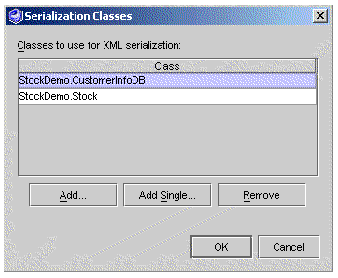
The IDE displays any existing serialization classes and provides Add and Remove buttons, as illustrated in FIGURE 2-39.
The IDE opens a chooser in which you can select one or more classes from any mounted packages. The selected classes should be JavaBeans components.
Alternatively, you can click Add Single. The IDE opens the Add Single Class dialog box in which you can enter a serialization class (such as Java.lang.String) by name.
3. Select the desired classes, using Ctrl-click to select more than one, and click OK.
The IDE displays the serialization classes.
For information about using attachments with web services and clients, see Attachments.
For information about using SOAP message handlers with web services and clients, see Chapter 4.
For information about implementing security for web services and clients, see Appendix A.
When you generate runtime classes for your web service, a web module and EJB module deployment descriptor are also generated. When you assemble your web service J2EE application, these deployment descriptors are included in the application. The deployment descriptors are XML files used to configure runtime properties of the application. The J2EE specification defines the format of these descriptors.
You can view a web service's deployment descriptors in the Source Editor at any time during development. You can also edit the deployment descriptors as a final step at the end of the development process. For information about how to view or edit deployment descriptors, see Appendix B.
| Building Web Services | 817-2324-10 |
Copyright © 2003, Sun Microsystems, Inc. All rights reserved.