| Building J2EE Applications |
| Building J2EE Applications |
| C H A P T E R 2 |
|
Scenario: A Web Module |
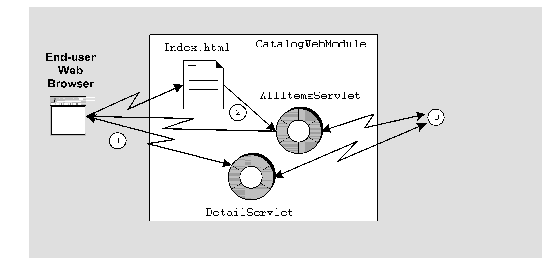
FIGURE 2-1 shows a web module and the interactions in which it participates. This module is part of a J2EE application, and the interactions shown in the figure are typical for web modules in J2EE applications. The web module interacts with users over HTTP connections (represented in the figure by the arrows labeled #1) and with middle-tier services provided by EJB modules (represented by the arrows labeled #3). Inside the web module, the web components interact with each other (represented by the arrows labeled #2). This chapter describes this web module and explains how to program the interactions shown in FIGURE 2-1.
 [ D ]
[ D ]This scenario describes one possible use of the web module and interactions that are illustrated in FIGURE 2-1. In this scenario, the module is the front end for a J2EE application that supports a retail web site. The web module contains the web pages that are displayed to online shoppers who visit the site. The module also processes shopper input on those pages. Displaying pages and processing input are typical tasks for a web module in a J2EE application.
From the shopper's point of view this application is a series of web pages. Shoppers use web browsers to view the application's home page. Shoppers also provide input with the text fields, buttons, and other controls that appear on the web pages. From the developer's point of view, the application is a set of web components that receive HTTP requests and return HTTP and responses.
The web module in this scenario contains only a few components and processes only two different requests. Although simple, these components and requests show you how web components provide the necessary interaction between users, web module, and EJB module. The specific interactions that are covered in this scenario are outlined in the following list:
1. An online shopper opens a connection to the application by starting a web browser and opening the application's root URL. This action opens the application's home page. A real-world shopping site's home page would display a number of options, including requests for displaying items by category, requests for keyword search, requests for information about live customer service, and so on. In this simple example, the home page shows only one option, which is a link to another page that displays the entire catalog.
2. The shopper clicks the link. This action generates a request that is processed by the servlet that is named in the request, the AllItemsServlet. The AllItemsServlet processes the request by calling a business method of an EJB module, the getAllItems method, which returns the data.
3. AllItemsServlet prepares the data that is returned from the EJB module for display in the shopper's browser. The servlet combines the individual field values that are returned from the EJB module with HTML tags that format the field values. The AllItemsServlet writes this combination of field values and HTML tags to an output stream that is returned to the user's web browser. The shopper's web browser processes the HTML output and displays the catalog. In the catalog display, each item name is displayed as an HTML link to detailed information about the item.
4. The shopper browses the displayed catalog and clicks one of the links. This request is processed by another servlet, DetailServlet. DetailServlet calls another business method of the EJB module, getOneItemDetail, for the item detail.
5. DetailServlet processes the data returned from the EJB module for display in the shopper's web browser. Like AllItemsServlet, DetailServlet prepares an output stream that combines field values and HTML tags. The shopper's web browser processes this output stream and displays it as another web page.
The HTML outputs that are written by AllItemsServlet and DetailServlet contain only text. Although simple, these examples show you how web components can process HTTP requests by making remote methods calls to obtain data from an EJB module and then writing the data into an HTML output stream. An experienced web designer or web programmer can use this type of operation to write much more complex output.
The interaction between the web module and the EJB module is implemented by Java RMI method calls. Java RMI is required by the design of the EJB module. For more information about the design of the EJB module, see The Interactions in This Module.
For instructions on creating the web components, writing enterprise business logic in web components, and similar tasks, see Building Web Components.
TABLE 2-1 summarizes the programming that is required to create the web module that is described in the preceding section and is illustrated in FIGURE 2-1.
|
Create the welcome page, index.html. This page includes an HTML link that executes the servlet AllItemsServlet. Create two servlets, AllItemsServlet and ItemDetailServlet. Code the processRequest methods that process HTTP requests and generate HTTP responses. These processRequest methods:
The HTML page output by AllItemsServlet contains an HTML link to ItemDetailServlet. |
|
|
For instruction on adding a web module to a J2EE application, see Chapter 4. |
The sections that follow show you how to perform many of these programming tasks. The method signatures specify the inputs and outputs of each interaction. The procedure sections show you how to connect these inputs and outputs to other components and other modules. Instructions for creating a web module or adding the web components to the module are not included. To learn about these tasks, see the online help or Building Web Components.
The design for the retail web site calls for shoppers to begin their interaction with the site at a home page. The home page, a typical web site feature, provides an entry point for users that identifies the site and presents the options that are available to them. Shoppers view the home page and choose the features they want to use.
The shopper's first action is to start a browser and open the URL for the shopping site. Inside the web module, this URL has been mapped to the application's context root. If you want the application to display the home page whenever users open the site's URL, identify the home page as the welcome page.
In the Explorer window's hierarchy of nodes, the HTML file for the welcome page must be at the same level as the web module's WEB_INF node. For an example, see FIGURE 1-2.
To create an HTML file at the correct level:
1. Right-click the node for the filesystem that contains the green WEB-INF node, and choose New  All Templates.
The New wizard's Choose Template page opens.
2. Choose the HTML File template.
a. In the Select a Template field, expand the JSPs & Servlets node and select the HTML File node.
The New wizard's New Object Name page opens.
3. In the name field, type index. Click Finish.
The IDE creates the new HTML file and represents it in the Explorer with a new node named index. The Source Editor opens with the cursor in the new file.
4. Type the HTML code for your welcome page.
CODE EXAMPLE 2-1 shows the HTML code for the simple welcome page that is used in this scenario.
This welcome page presents only one option to users, which is a text link named Display the Catalog. This link uses a URL pattern to specify one of the servlets in the module, the AllItemsServlet. When a user clicks this link, the browser sends another request to the web module. The request is processed by executing the AllItemsServlet. The next page the user sees is the page that is output by AllItemsServlet. To see the page that is output by the AllItemsServlet, refer to CODE EXAMPLE 2-2.
The welcome page for a real-world web site includes many links to different functions, but each link follows the principle that is demonstrated in this example. Pages that are displayed to the user contain links or actions that generate HTTP requests. Each request is processed by some component in the web module, and the web module responds by writing out another page for the user to see.
In this example, the link specifies a servlet, but not a method of the servlet. When a request specifies only a servlet name, the default action is to execute the servlet's doGet method. You can also write links that specify one of the servlet's other methods, such as doPost. For more information on servlet methods, see Building Web Components.
When you create a web module in the IDE, the module has a Welcome Files property that lists the default names for the welcome page files. FIGURE 2-2 shows the Welcome Files property editor with the default names. When a user accesses the root URL for the application, the application server searches the module directory for files with these names. The first file found is displayed as the welcome page.
The easiest way to create a welcome file for a module is to create a file with one of these default names. In this scenario, for example, you created a file named index.html.
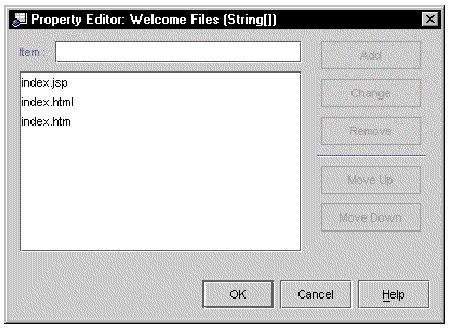
If you want to use a file with a different name for the module's welcome page, open the editor for the Welcome Files property and add the name of the file you want to use.
The servlets in this scenario obtain data from the EJB module by calling enterprise bean methods. There are two programming tasks for these method calls: coding the calling method and setting up a reference declaration, in the calling servlet, for the called enterprise bean. Coding the method body code is covered first.
CODE EXAMPLE 2-2 shows the implementation of the processRequest method in the AllItemsServlet. This method executes when a user clicks the Display the Catalog link that appears on the welcome page.
The URL pattern on the welcome page names the servlet AllItemsServlet, but the URL pattern does not specify a method. In this case the application server performs the default action and executes the servlet's doGet method. The doGet method calls the processRequest method.
CODE EXAMPLE 2-2 shows you how the AllItemsServlet obtains the catalog data from the EJB module and displays it to the user. There are three steps:
1. The AllItemsServlet uses a JNDI lookup to obtain a remote reference to a session enterprise bean in the CatalogData EJB module. For more information about the CatalogData module, see Chapter 3.
2. The AllItemsServlet calls the getAllItems method, a business method of the session bean.
3. The servlet writes the data that is returned by the remote method call into the HTML output stream. The outlet stream is returned to the user's browser window.
The lookup statement specifies the CatalogManagerBean, but this string is actually the name of the reference, not the enterprise bean that is referenced. The enterprise bean's name is often used as the reference name to make it easier to remember which bean is meant. The referenced enterprise bean is actually specified in the reference declaration, which is covered in the next section.
A web component, like the AllItemsServlet, that calls methods of an enterprise bean in an EJB module does so by means of EJB references. The two parts of an EJB reference are listed below:
In this scenario, the lookup code is in the processRequest method of the AllItemsServlet. (See CODE EXAMPLE 2-2.) You can compile this code, but without the reference declaration it cannot return a reference at runtime. The reference declaration maps the reference name that is used in the lookup statement to the actual name of an enterprise bean.
To set up an EJB reference declaration for a web module:
1. Right-click the web module's web node and choose Properties References tab EJB References ellipsis (...) button.
The EJB references property editor opens.
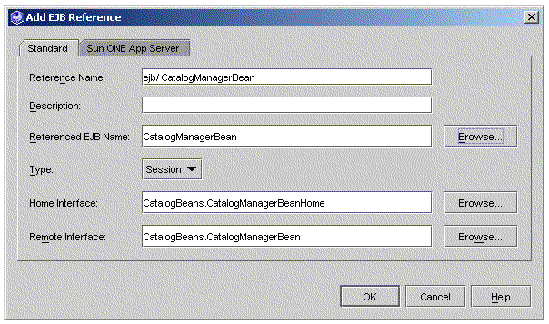
The Add EJB Reference dialog opens. Use this dialog to set up the reference declaration.
3. To set up the reference declaration, type the reference name that is used in the lookup statement and the names of the home and remote interfaces that are used in the method calls.
FIGURE 2-3 shows the Add EJB Reference dialog box with these values in the fields. For the reference to work at runtime, for the JNDI lookup to return a remote reference to an enterprise bean, the reference must be linked to a specific enterprise bean in the same application. The reference must linked before you deploy and execute the application, but it need not be done now.
At this point in development, you can leave the reference unlinked and link it later, after you assemble the web module into a J2EE application. In some circumstances, you might choose to resolve the reference at this stage of development. The conditions you should consider are listed below:
 [ D ]
[ D ]
 [ D ]
[ D ]
Even if the called enterprise bean is available, you might choose not to link the reference now. There are a number of reasons to wait. For example, if there is any chance that your web component will be used in more than one application, you do not want to link the reference on the web module's property sheet. A developer who reuses the web module can relink the reference to some other enterprise bean that implements the same interfaces. Relinking the reference changes the value in the web.xml deployment descriptor file, and affects every use of the source code.
In this scenario the reference is left unlinked, as shown in FIGURE 2-3. The reference is linked after the J2EE application is created, on the application node's property sheet. See Linking the EJB Reference.
The link you set up on the welcome page is formatted with the following HTML tag:
<a href="allItems">Display the Catalog</a>
When a shopper clicks this link, the application server appends the URL pattern in the HTML tag to a URL path and executes the resulting URL. For the link to work properly, the URL that is generated by the application server must map to the servlet that you want to execute. The next section explains how URLs are mapped to servlets.
In a deployed web module, the URLs for servlets and other web resources in the web module are the result of appending names to a URL path. For modules that are deployed to the Sun ONE Application Server 7, the URL path has this general form:
http://hostname:port/web-context/URL-pattern
The elements in this path are determined as follows:
In other words, the URL patterns that you assign in your web module are relative to a web context that you will assign later when you add the module to a J2EE application. The URLs in this scenario use a format that makes them relative to the web context. Whatever web context you supply when you assemble the application, these links will work properly when the application executes. For information on setting the web context, see Setting the Web Context for the Web Module.
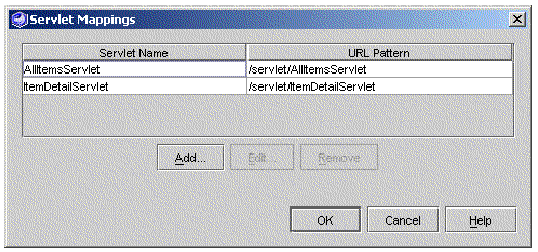
When you create a servlet, by default, the Servlet wizard uses the class name that you supply on the first page of the Servlet wizard for the servlet name and maps the servlet name to a URL pattern that includes the servlet name. FIGURE 2-5 shows the Servlet Mappings property editor for the web module with the default settings for the AllItemsServlet.
 [ D ]
[ D ]
If you deploy the web module with this servlet mapping, AllItemsServlet is mapped to the following URL:
http://hostname:port/web-context/servlet/AllItemsServlet
If you want to map a different URL to the servlet, use the servlet mappings property editor to edit the mapping. In this scenario you change the URL pattern from the default value to a more meaningful value.
1. Right-click the web module's web node and choose Properties Servlet Mappings ellipsis (...) button.
The Servlet Mappings property editor opens. The Servlet Mappings property editor lists all servlets in the module and any mappings that are set up for them.
2. Select the current mapping for the allItemsServlet and click the Edit button.
The Edit Servlet Mapping dialog box opens.
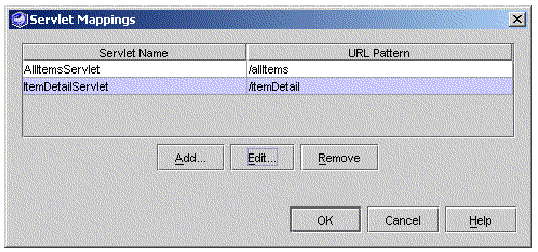
3. In the URL Pattern field, type /allItems and Click OK.
FIGURE 2-6 shows the Servlet Mappings property editor with new mappings for the AllItemsServlet and the DetailServlet.
 [ D ]
[ D ]
After you edit the servlet mappings, the AllItemsServlet can be executed with the following URL:
http://hostname:port/web-context/allItems
Notice that the new URL pattern is the string you used in the HTML tag that creates the link on the welcome page (see CODE EXAMPLE 2-1). Clicking the link now executes the AllItemsServlet.
The preceding sections cover the assembly tasks that are required to assemble the CatalogWebModule. This section covers web module assembly tasks that are not required by the CatalogWebModule scenario.
Your web modules may require you to perform some of these other assembly tasks. This section covers several web module assembly tasks that you are likely to perform.
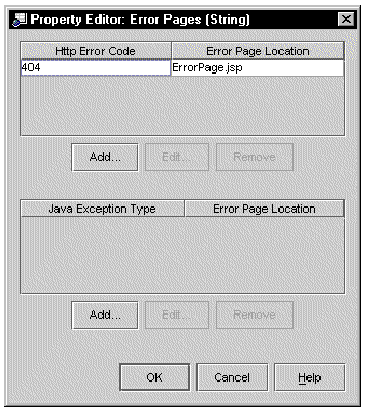
If you want to specify error pages for a web module, you need to identify the error pages in the module's deployment descriptor. You do this in the Error Pages property editor.
To set up error pages for your web module:
1. Right-click the web node and choose Properties Deployment Tab Error Pages ellipsis (...) button.
The Error Pages property editor opens.
2. Identify an error by HTTP error code or Java exception class and map it to a specific error page.
You can identify errors either by an HTTP error code or a Java exception class. Notice that the editor has two Add buttons, one for each category of error. For either type, you specify the error and map it to a page. FIGURE 2-7 shows the property editor after HTTP error code 404 has been mapped to a specific error page.
If the web module you are assembling contains JSP page components, you have several ways to execute those components. If you create a new JSP page named myJsp, you can execute it in any of the following ways.
If you want to execute a JSP page from an HTML link, set up the link like the following example:
<a href="myJsp.jsp">Execute myJsp</a>
If you create a JSP page with the IDE, no deployment descriptor entry is created for it. If your business logic accesses the JSP page programmatically, you do not need the deployment descriptor entry. For example, the following code is from a servlet that executes myJsp. Notice that the code identifies the JSP page to be executed by supplying its actual file name (myJsp.jsp).
The preceding examples execute a JSP page by specifying its actual file name, myJsp.jsp. You can also map a URL pattern to a JSP page and then execute the page by referring to its URL pattern. This is a two step process. You first set up a servlet name for the JSP file.
To set up a URL mapping for a JSP page:
1. Right-click the web node and choose Properties Deployment tab JSP Files ellipsis (...) button.
The JSP Files property editor opens.
The Add JSP File dialog box opens.
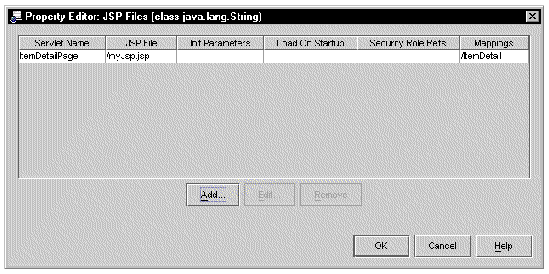
a. In the JSP File field, type the file name of the JSP file you are setting up.
b. In the Servlet Name field, type the servlet name you are mapping to the JSP file.
c. Click OK. The Add JSP File dialog box closes.
FIGURE 2-8 shows the JSP Files property editor after the servlet name itemDetailPage has been mapped to the file myJsp.jsp.
 [ D ]
[ D ]
3. Click OK again to close the JSP Files property editor and return to the property sheet.
4. Still in the property sheet, right-click the Servlet Mappings property and click the ellipsis (...) button.
The Servlet Mappings property editor opens.
The Add Servlet Mapping dialog box opens.
6. In the Add Servlet Mapping dialog box, map a URL pattern to the new servlet name.
a. In the Servlet Name field, type the servlet name you mapped to the JSP file.
b. In the URL Pattern field, type the URL pattern you are mapping to the servlet name and, ultimately, to the JSP file.
c. Click OK. The Add Servlet Mapping dialog box closes.
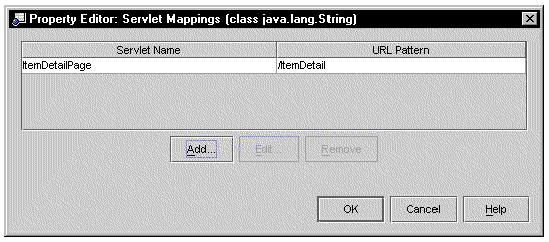
FIGURE 2-9 shows the Servlet Mappings Property Editor with the URL pattern ItemDetail mapped to the servlet name ItemDetailPage. The servlet name ItemDetailPage is already mapped to the JSP file myJsp.jsp.
 [ D ]
[ D ]
d. Click OK again to close the Servlet Mappings property editor.
After this mapping, the JSP page that is defined by the file myJSP.jsp can be executed with the following URL:
http://hostname:port/web-context/ItemDetail
There are two parts to an environment entry:
A web component that uses the value of an environment entry needs lookup code like the code in CODE EXAMPLE 2-4.
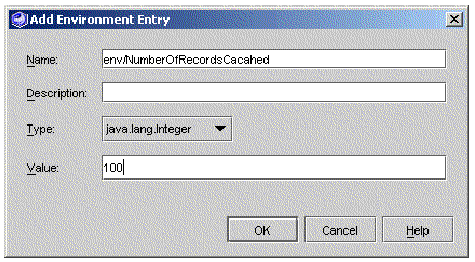
4. Click OK to close the dialog and process your environment entry definition.
| Building J2EE Applications | 817-2327-10 |
Copyright © 2003, Sun Microsystems, Inc. All rights reserved.