| Building J2EE Applications |
| Building J2EE Applications |
| C H A P T E R 4 |
|
Scenario: Web Module and EJB Module |
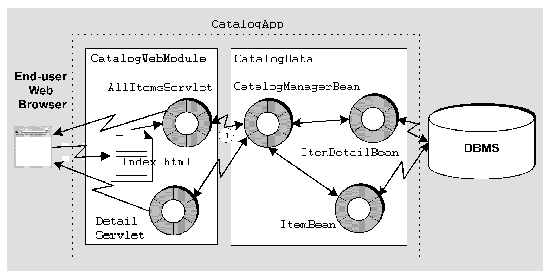
FIGURE 4-1 shows a web module and an EJB module assembled into a J2EE application. Most of the interactions that appear in the figure are covered in and Chapter 3. For example, the HTTP requests and responses between the user's web browser and the web module are covered in . The interaction between the modules, which is represented in the figure by the arrows labeled #1, is new.
 [ D ]
[ D ]This scenario describes one possible use of the J2EE application and the interactions that are illustrated in FIGURE 4-1. This scenario continues the online shopping application that was described in and Chapter 3. The programming required for the HTTP interactions with users is already complete in the web module. The programming required for the interactions with the database is already complete in the EJB module. This scenario explains how you combine the two modules into a J2EE application that performs end-to-end interactions.
There is one interaction between the modules that requires assembly work. This interaction is the remote method call from the web module to the EJB module. Most of the code needed for this interaction is already in the web module or the EJB module. The code already in the modules is summarized below:
The procedures in this chapter show you how to assemble the two modules into a J2EE application and configure the interaction between the modules. After the application is assembled you can deploy and execute the application.
TABLE 4-1 summarizes the programming required to create and assemble the J2EE application that is described in this scenario.
|
See Chapter 2. |
|
|
See Chapter 3. |
|
|
Create the CatalogApp J2EE application. This creates a J2EE application node in the Sun ONE Studio 5 Explorer. Add the web module and the EJB module to the application. Specify the web context for the web module. Make sure the web module's EJB references are correctly linked to enterprise beans in the EJB module. |
The sections that follow demonstrate these programming tasks.
There are two ways to create a J2EE application in the IDE. Both procedures create an application node in the location that you specify.
Your J2EE application node represents the deployment descriptor for your application. Modules you add to the application appear as subnodes of the application, but the IDE does not copy the source files for the modules to the directory that holds the application node. Keep this in mind when you decide where to put your J2EE application node.
To create a J2EE application from a module node:
1. Right-click an EJB module node and choose New Application.
The New Application dialog opens.
2. Name the J2EE application and select a location in the filesystem for it.
a. In the name field, type the new application's name.
In this scenario, the new J2EE application is named CatalogApp.
b. In the Select a package location for the new Application field, choose the filesystem, directory, or package where you want to create the new application.
A node representing the new application is created under the filesystem, directory, or node you selected. The module you right-clicked in Step 1 is automatically included in the new application.
You can add more modules to the application. For the procedures, see Adding Modules to the J2EE Application.
To create an EJB module from a filesystem, package, or directory node:
1. Right-click any Explorer window node and choose New  All Templates.
The New wizard's Choose Template page opens.
2. Select the J2EE Application template.
a. In the Select a Template field, expand the J2EE node and select the Application node.
The New Object Name page opens.
3. Define the new J2EE application.
a. In the Name field, type the new application's name.
In this scenario the application is named CatalogApp.
The IDE creates the application and represents it in the Explorer with an J2EE application node under the filesystem, package, or directory you selected in Step 1.
Both of these procedures create an application node in the location you chose. Keep in mind that the IDE stores deployment descriptor information about the application in this directory, but the source code for the components in the application's modules is not copied into this directory.
Once you have created a J2EE application you can add modules to it. To add a module to an application:
1. Right-click the application and choose Add Module.
The Add Module to Application dialog box opens.
2. Select one or more modules.
a. In the Select the Module(s) to add to this Application field, select the modules you are adding to the application.
The IDE adds the selected modules to the J2EE application. In the Explorer, the IDE adds nodes representing the selected modules under the J2EE application node.
When you add a module to a J2EE application, the IDE notes any dependencies of the module on other kinds of resources (Java classes, image files, and so on) and automatically includes those resources in the application.
When you deploy a J2EE application to a J2EE application server, URLs are mapped to the web resources in the web module. URLs are mapped by appending URL patterns to a URL path. For the Sun ONE application server, the URL path has this general form:
http://hostname:port/web-context/URL-pattern
The elements in this path are determined as follows:
In other words, the URL patterns that you assigned in the web module property sheet are relative to the web context that you assign in this procedure.
1. Right-click the included web module node (this is the web module node under the J2EE application node) and choose Properties.
2. Click the Web Context property and type in the string you want to use.
FIGURE 4-2 shows the property sheet for the CatalogWebModule described in this scenario. The web context property is set to catalog.

When the web context property is set to catalog, URLs for web resources in the CatalogApp J2EE application will have this general form:
http://hostname:port/catalog/URL-pattern
If you do not supply a web context, it defaults to blank. If you let the web context for CatalogApp J2EE application default to blank, the URLs for web resources in the application would have this general form:
http://hostname:port/URL-pattern
The CatalogWebModule contains JNDI lookup code and an EJB reference declaration. The CatalogWebModule code and the deployment descriptor specify interfaces of type CatalogManagerBeanHome and CatalogManagerBean. For information on how the lookup code and the reference declaration are set up, see .
The CatalogData EJB module contains remote interfaces of type CatalogManagerBeanHome and CatalogManagerBean, and a bean class named CatalogManagerBeanBean that implements the interfaces. For information on creating the interfaces, see Creating Remote Interfaces for the Session Enterprise Bean.
Before executing the CatalogApp J2EE application you must link the EJB reference in the web module to the enterprise bean in the EJB module.
In some circumstances you link the reference on the web module's property sheet before creating the application. The reference in the CatalogWebModule was not linked in the web module property sheet. In this scenario, the reference is linked on the CatalogApp property sheet.
To link an EJB reference on the application node property sheet:
1. Right-click the application node and choose Properties EJB References ellipsis (...) button.
The EJB References property editor opens.
2. Check the status of the EJB references.
This editor shows you all of the references that have been declared in the application. The references are identified by module and reference name.
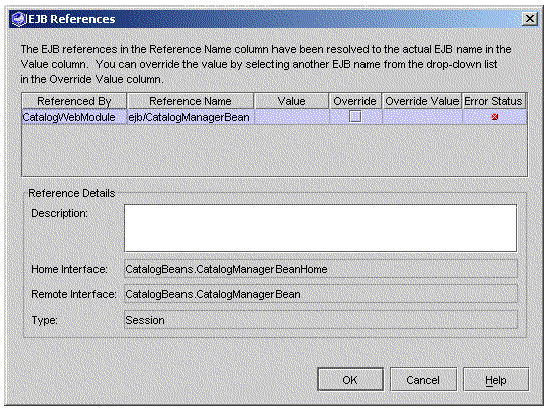
FIGURE 4-3 shows the EJB References property editor for the CatalogApp J2EE application. There is one EJB reference, which is declared in the CatalogWebModule. The reference is named ejb/CatalogManagerBean, and it is not resolved.
 [ D ]
[ D ]
If a reference is not resolved, the Value field is empty and the Error Status field displays an icon that represents an error.
3. Link any unresolved references.
To do this, click the Override Value field. The field displays a list of the enterprise beans in the application that implement the interfaces that are specified in the reference. Select one of these enterprise beans.
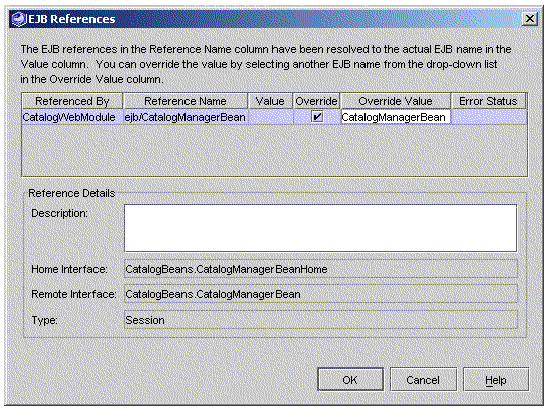
FIGURE 4-4 shows the same EJB reference as FIGURE 4-3, but the reference has been linked with an override. When the application executes, the method calls coded in CatalogWebModule will call the enterprise bean specified in the Override Value field. In FIGURE 4-4, the Override Value field specifies an enterprise bean in the CatalogData EJB module, named CatalogBeans.CatalogManagerBean.
 [ D ]
[ D ]
When a reference is resolved, the Override Value field displays the name of the linked enterprise bean, and the Error Status field is empty.
The preceding sections cover the assembly tasks that are required to assemble the CatalogApp J2EE application. This section covers other J2EE application assembly tasks that are not required by the CatalogApp scenario.
Your J2EE applications may require you to some of these other assembly tasks. This section covers an application assembly task that you are likely to perform.
If an application contains environment entries, you may need to override the values that were set for them on the module property sheets. You do this on the application's Environment Entries property editor.
To override an environment entry value:
1. Right-click the application node and choose Properties Environment Entries ellipsis (...) button.
The Environment Entries property editor opens. This editor shows you all of the environment entries that have been declared in the application. The environment entries are identified by reference name and module.
2. Study the environment entries in the application.
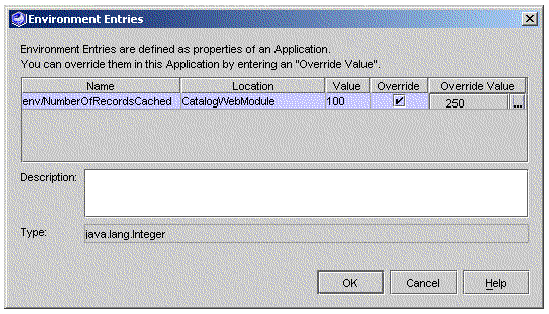
FIGURE 4-5 shows the Environment Entries property editor for the CatalogApp application. The property editor displays an environment entry that was declared in the web module. (To see how this environment entry was declared in the web module, see .)
The Value field displays 100, which is the initial value that was set on the web module's property sheet.
 [ D ]
[ D ]
3. When the initial values are not appropriate for the assembled application, override them.
a. For the environment entry you are overriding, click the Override Value field and the ellipsis (...) button.
The Override Value dialog box opens.
b. In the Value field, type the override value. Click OK to close the dialog box and return to the property editor.
FIGURE 4-6 shows the Environment Entries property editor with a value in the override field.
 [ D ]
[ D ]
If you have the web module source files in your development environment you can change the environment entry's value on the web module property sheet. But, if there is any chance that the web module will be used in more than one application, it is better to override this value on the application property sheet. If another developer reuses the web module in another application and changes the value of the environment entry on the web module property sheet, it would change the value in your application when you redeployed.
In general, you should control the contents of deployment descriptors by working with module and application property sheets. By setting properties, you control the contents of the deployment descriptor. The IDE does allow you to view the actual XML deployment descriptors for modules and applicatons.
You can view deployment descriptors for J2EE applications, included web modules and included EJB modules. To view a deployment descriptor:
 Right-click a J2EE application node, included EJB module node (an EJB module node underneath a J2EE application node), or an included web module, and choose View Deployment Descriptor.
The IDE opens the deployment descriptor in the Source Editor, in read-only mode.
To edit an EJB module deployment descriptor:
Right-click an EJB module node and choose Deployment Descriptor Final Edit.
The IDE opens the deployment descriptor in the Source Editor.
To edit a web module deployment descriptor:
Right-click the web module's web node and choose Edit.
The IDE opens the deployment descriptor in the Source Editor.
| Building J2EE Applications | 817-2327-10 |
Copyright © 2003, Sun Microsystems, Inc. All rights reserved.