| Building J2EE Applications |
| Building J2EE Applications |
| C H A P T E R 5 |
|
Scenario: Web Module and Queue-mode Message-driven Bean |
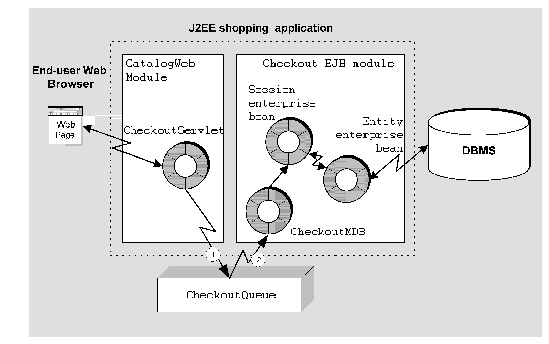
FIGURE 5-1 shows a web module and an EJB module assembled into a J2EE application. The interaction between the modules is asynchronous messaging. The web module sends a message to a queue and a message-driven enterprise bean in the EJB module reads the message from the queue. Sending the message to the queue is represented in the figure by the arrow labeled #1. Reading the message from the queue is represented by the arrow labeled #2. The message-driven bean reads the message and then initiates processing by calling methods of other enterprise beans in the module.
 [ D ]
[ D ]This scenario describes one possible use of the J2EE application and the interactions illustrated in FIGURE 5-1. This scenario continues the retail web site application, but it explores a different kind of interaction, which is implemented in a different EJB module.
In this scenario a shopper checks out. Before checking out, the shopper interacts with web pages that are defined in the web module. The shopper selects items and adds them to a shopping cart. Some of the shopper's actions invoke the business methods of an EJB module in order to select data. The application processes these actions synchronously--the shopper requests some information and then waits for the application to respond before continuing. Chapter 2, Chapter 3, and Chapter 4, show you how to implement this kind of logic in a J2EE application.
Eventually the shopper is ready to check out. The shopper reviews the contents of the shopping cart, selects a shipping method, approves the total amount, and provides a credit card number. The shopper reviews and approves the order, and leaves the site. Sometime later the application processes the order and notifies the shopper by email. The specific interactions in this checkout scenario are outlined in the following list:
1. The web module displays a page that shows the items ordered, the delivery address, the shipping method, and the payment method. The shopper approves the order and leaves the site. The details of the order are saved in a database.
2. When the shopper approves the order, the web module sends a message to a message queue. The message identifies the order to be processed.
3. The message queue is outside the application. It is maintained by the application server.
4. The queue delivers the message to a message-driven enterprise bean in an EJB module that performs order processing. The queue delivers the message by calling the message-driven bean's onMessage method, passing the message as a parameter.
5. The message-driven bean does not contain the business logic for processing the order. It only examines the message and initiates order completion processing. The message-driven bean initiates order completion processing by calling business methods of other enterprise beans in the module. This is a typical way of using a message-driven bean.
6. When the order is processed, the application sends an email message to notify the shopper.
The procedures in this chapter show you how to set up a message queue and a queue connection factory, and how to configure the sending module and the receiving module to use the queue.
TABLE 5-1 summarizes the programming required to implement the message-driven interaction described in this scenario and illustrated in FIGURE 5-1.
The sections that follow show you how to perform these programming tasks.
Other programming tasks are required to program the complete application. These tasks include creating the web components and the web module, creating the session and entity enterprise beans, and creating the EJB module. These tasks are covered in other chapters that focus on those issues. This chapter focuses on the message-driven interaction.
The design for the checkout interaction calls for the web module to send messages to a queue and for the EJB module to read the messages from the queue and then process the orders identified in the messages. This interaction requires a queue and a queue connection factory. The queue and queue connection factory are resources of the application server that are created outside the IDE.
Before you can complete the procedures in this section, you need to have an application server and an IDE application server plugin installed. You also need an application server instance create. The application server plugin and the server instance are represented by nodes that appear in the Explorer's runtime tab. For more information on the application server plugin and application server instance nodes, see The Server Product Nodes.
This section explains how to set up a message queue for the Sun ONE application server. Procedures for other application servers should be similar.
To add a queue to the Sun ONE application server:
1. Click the Explorer's Runtime tab.
2. Expand the Sun ONE Application Server 7 node.
3. Right-click the Unregistered JMS Resources node and choose Add New JMS Resource.
The New wizard's JMS Resources page opens.
a. In the JNDI Name field, type jms/CheckoutQueue.
b. Make sure that the Resource Type field is set to javax.jms.Queue.
The New wizard's Properties page opens.
5. Define an imqDestinationName property.
The first property line is activated.
b. In the Name field, select imqDestinationName.
c. In the Value field, type Checkout.
Checkout is the name for the physical queue that you are creating. Your J2EE application will use the JNDI name that you assigned, CheckoutQueue, to access the queue named Checkout.
The Do you want to continue with registration dialog box opens.
The Java Mail Session Registration dialog box opens.
b. In the Server Instance field, select the application server instance you are registering the queue with.
Select the application server to which you will deploy you J2EE application.
A message that reads Resource Registered Successfully is displayed.
This section explains how to set up a queue connection factory for the Sun ONE application server. Procedures for other application servers should be similar.
To add a queue connection factory to the Sun ONE application server:
1. Right-click the Unregistered JMS Resources node and choose Add New JMS Resource.
The New wizard's JMS Resources page opens.
2. Define the queue connection factory:
a. In the JNDI Name field, type jms/CheckoutQCF.
b. Make sure that the Resource Type field is set to javax.jms.QueueConnectionFactory.
The Do you want to continue with registration dialog box opens.
3. Register the queue connection factory:
The Java Mail Session Registration dialog box opens.
b. In the Server Instance field, select the application server instance you want to register the queue connection factory with.
Select the application server instance you selected when you created the queue.
A message that reads Resource Registered Successfully is displayed.
In this scenario, the CheckoutServlet sends a message that requests final processing of an order. The message identifies the order to be processed. To send a message, the CheckoutServlet calls methods of the queue connection factory and the queue.
To call queue and queue connection factory methods, the CheckoutServlet needs references to the queue and queue connection factory. CheckoutServlet uses JNDI lookups to obtain queue and queue connection factory references from the application server environment.
Like most J2EE reference lookups, the queue and queue connection factory reference lookups have two parts:
The queue and queue connection factory are named resources of the application server. You application components use JNDI names to obtain the references. To see how JNDI names are assigned to the queue and queue connection factory, see Setting up the Application Server.
CODE EXAMPLE 5-1 shows the processRequest method of the CheckoutServlet. The processRequest method performs the JNDI lookups. After obtaining queue and queue connection factory references, processRequest calls methods of the queue and queue connection factory to create and send message. The code example contains comments that identify these operations.
CODE EXAMPLE 5-1 is from a servlet, but any type of J2EE component can use similar code to send a message. You can reuse this code in an application client or in an enterprise bean that acts as a message sender.
For more information on creating and sending messages, see Building Enterprise JavaBeans Components.
Reference declarations appear in the module's deployment descriptor. A reference declaration maps the reference name used in the lookup statement to a JNDI name in the application server environment.
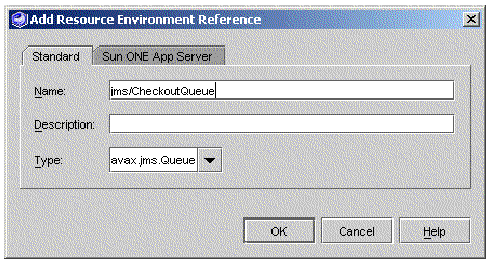
To set up a reference declaration for a queue:
1. Right-click the web module's web node and choose Properties  References tab Resource Environment References ellipsis (...) button.
The Resource Environment Reference property editor opens.
The Add Resource Environment Reference dialog box opens.
3. Declare the Resource Environment Reference.
a. In the Name field, type the reference name that appears in the lookup statement.
FIGURE 5-1 shows the value jms/CheckoutQueue in the Name field. This is the reference name used in CODE EXAMPLE 5-1.
b. In the Type field, select javax.jms.Queue.
 [ D ]
[ D ]
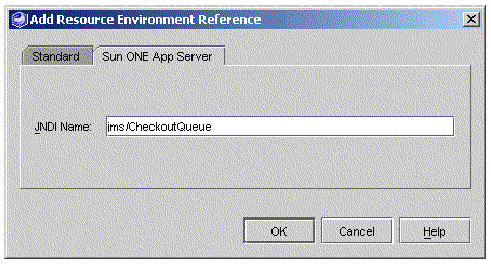
4. Map the reference name to a JNDI name.
a. Click the Add dialog's Sun ONE App Server tab.
b. In the JNDI Name field, type the JNDI name of the queue.
FIGURE 5-3 shows the value jms/CheckoutQueue in the JNDI Name field. This value maps the reference name on the Standard tab to the queue named CheckoutQueue. To see how the queue was named, see Setting up the Application Server.
To set up a reference declaration for a queue connection factory:
1. Right-click the web module's web node and choose Properties References tab Resource References ellipsis (...) button.
The Resource Reference property editor opens.
The Add Resource References dialog box opens.
3. Declare the resource reference.
a. In the Name field, type the reference name that appears in the lookup statement.
FIGURE 5-4 shows the value jms/CheckoutQCF in the Name field. This is the reference name used in CODE EXAMPLE 5-1.
b. In the Type field, select javax.jms.QueueConnectionFactory.
 [ D ]
[ D ]
4. Map the reference name to a JNDI name.
a. Click the Add dialog's Sun ONE App Server tab.
b. In the JNDI Name field, type the JNDI name of the queue connection factory.
FIGURE 5-5 shows the value jms/CheckoutQCF in the JNDI Name field. This value maps the reference name on the Standard tab to the queue connection factory named CheckoutQCF. To see how the queue connection factory was named, see Setting up the Application Server.
For information on the other authorization types, see the coverage of message-driven beans in Building Enterprise JavaBeans Components.
 [ D ]
[ D ]In this checkout scenario, the business logic for processing a shopper's checkout request is in the Checkout EJB module. Programming the Web Module shows how the web module looks up a queue reference and a queue connection factory reference and sends a message. To complete this interaction, a message-driven bean in the EJB module needs to receive the message from the queue.
A message-driven bean does not use programmatic references. The message-driven bean does not need JNDI lookup code. You use the message-driven bean's property sheet to specify the queue and queue connection factory that should be used. Setting these properties sets up tags in the deployment descriptor. The properties that you set to configure a message-driven bean are listed below:
When the application is deployed, the application server automatically uses the queue connection factory specified in the deployment descriptor to open a connection from the message-driven bean to the queue that is specified in the deployment descriptor.
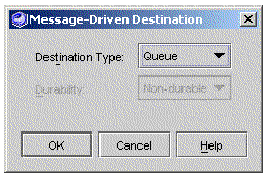
Before you specify the queue and queue connection factory, you need to configure the message-driven bean as a queue consumer.
To configure a message-driven bean as a queue consumer:
1. Right-click the message-driven bean's logical node and choose Properties Message-Driven Destination ellipsis (...) button.
The Message-Driven Destination property editor opens.
2. Identify the message driven bean as a queue consumer.
a. In the Destination Type field, select Queue.
To configure a message-driven bean for a queue connection factory:
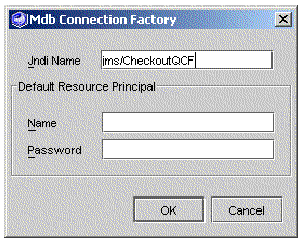
1. Right-click the message-driven bean's logical node and choose Properties Sun ONE AS tab Mdb Connection Factory ellipsis (...) button.
The Mdb Connection Factory property editor opens.
2. Specify the queue connection factory.
a. In the Jndi Name field, type the queue connection factory's JNDI name.
FIGURE 5-7 shows the value jms/CheckoutQCF in the Jndi Name field. jms/CheckoutQCF is the queue connection factory that was specified in the sending web module.
b. If a user name and password are needed, type them in the Name and Password fields.
 [ D ]
[ D ]
To configure a message-driven bean for a queue:
1. Right-click the message-driven bean's local node and choose Properties Sun ONE AS tab JNDI Name ellipsis (...) button.
The JNDI Name property editor opens.
In this scenario, use jms/CheckoutQueue. jms/CheckoutQueue is the queue that was specified in the sending web module.
The application server delivers messages to the message-driven bean by calling the bean's onMessage method. The message is delivered as a parameter of the onMessage method. CODE EXAMPLE 5-2 shows the onMessage method. You can see the message passed as a parameter and where you add your message-handling code.
public void onMessage(javax.jms.Message aMessage) { // Process the message here. } |
In this scenario, as shown in FIGURE 5-1, the message-driven bean immediately calls a business method of a session bean in the same EJB module. The session bean controls the processing of the order. This is typical onMessage behavior. For more information about writing onMessage methods, see Building Enterprise JavaBeans Components.
The message-driven bean calls the session bean using an EJB local reference. For information about how you implement method calls using EJB local references, see JNDI Lookup Code for Local EJB References and Reference Declarations for Local EJB References.
Figure FIGURE 5-1 shows a web module that sends messages and an EJB module that receives messages assembled into a J2EE application. The modules are programmed as described in this chapter. The application is created and the two modules are added to the application. Both modules have been configured to use the CheckoutQueue and CheckoutQCF. For the message-driven interaction, there is no need to open the J2EE application property sheet and perform any additional assembly work.
For information about creating an application and adding modules, see Creating the J2EE Application.
| Building J2EE Applications | 817-2327-10 |
Copyright © 2003, Sun Microsystems, Inc. All rights reserved.