| Building J2EE Applications |
| Building J2EE Applications |
| C H A P T E R 8 |
|
Deploying and Executing J2EE Modules and Applications |
The IDE's deployment and execution feature supports the iterative development of enterprise applications. You can develop and assemble an application, deploy the application, and execute the application, all without leaving the IDE.
After you execute your application, you can modify the source code or the properties, redeploy the application, and execute it again. You do not need to reassemble before you redeploy, unless your testing uncovers a problem with the assembly.
This chapter describes the basics of deploying and executing assembled applications from within the IDE.
To deploy an application to an application server you need to interact with the application server. To simplify your interaction with the application server, the IDE represents application servers as nodes in the Explorer window.
Like other Explorer window nodes, the application server nodes have property sheets and menu commands. You use these property sheets and menu commands to deploy and execute your applications from inside the IDE. Depending on the application server product you are working with, you may also be able to administer the application server.
This section identifies and describes the server nodes. It also describes some basic tasks you perform with these nodes.
FIGURE 8-1 shows the Explorer's Runtime tab with the nodes you use for server configuration, deployment, and execution. The top level node is the Server Registry node. This node groups the other server-related nodes. It has no commands or properties of its own.

The Server Registry in FIGURE 8-1 is from an installation of the IDE on the Microsoft Windows platform. This particular installation is a standalone installation by a user with administrative, or superuser, privileges. When the IDE is installed by a system administrator for a user who does not have administrative privileges, the hostnames and port numbers displayed by the nodes are different. The host names and port numbers will also be different for multiuser installations.
For a complete description of the different installation options, see Sun ONE Studio 5, Standard Edition Getting Started Guide.
The Installed Servers node groups the server product nodes. It has no commands or properties of its own. In FIGURE 8-1 the Installed Servers node has subnodes for two server products that are included in most installations of the IDE, the Sun ONE Application Server and the Tomcat web server.
Below the Installed Servers node are nodes for specific web and application server products. Each of these server product nodes represents an installed IDE server plugin.
The server product nodes have contextual menus and property sheets. The capabilities of each sever product node are determined by the server product and the plugin module.
Procedures vary with server product, but, in general, to use an application server you configure the appropriate server product node to recognize a specific installation of the server product. You may also use the server product node to create a server instance.
In FIGURE 8-1 the Installed Servers node has subnodes for the two plugins that are included in most installations of the IDE, the Sun ONE Application Server plugin and the Tomcat web server plugin. The next section describes the Sun ONE Application Server 7 node and its subnodes.
For information on setting up other application server products with the IDE, see the Sun ONE Studio 4, Enterprise Edition for Java Getting Started Guide.
This section identifies and describes the nodes that represent the Sun ONE Application Server in the Explorer.
The Sun ONE Application 7 server node is for administering the application server.
Installing the IDE creates an application server domain. It also creates an admin server instance that administers the application server domain. In most cases you can do all of your work in the installed application server domain and admin server.
The Server Registry shown in FIGURE 8-1 contains the application server domain and admin server that were created by installing the IDE. The admin server instance is represented by the node just below the Sun ONE Application Server 7 node that is labeled localhost:4848. You can view the application server domain name by opening the admin server node's property sheet.
If you need to, and if you have root or administrative privileges, you can use the Sun ONE Application Server 7 node to create additional application server domains and admin servers.
Below the Sun ONE Application Server 7 node is an admin server node. In FIGURE 8-1, the admin server node is labeled localhost:4848. Admin server nodes represent instances of the Sun ONE Application Server's admin server. Each admin server instance administers an application server domain.
Application server domains and admin server instances are created by installing the IDE with the Sun ONE Application Server and administering the Sun ONE Application Server. The type of installation you work with determines how the application server domain and server instance are created. Some of the possibilities are described in the following list:
The hostname displayed with the admin server node is the name of the machine on which the application server is running. FIGURE 8-1 shows a stand-alone, single-user installation, and the application server domain is running on the local host. In a multi-user installation, the application server may be running on another machine.
The port number that is displayed with the admin server is the port number for communicating with the admin server. This port number is set when the application server domain and admin server instance are created. FIGURE 8-1 shows the default port number for a single-user installation on the Microsoft Windows platform.
Some of the tasks you perform with the admin server node are starting and stopping server instances in the server domain that is controlled by the admin server.
To start up the admin server and server instance:
1. Right-click the Admin Server node and choose Start.
A progress monitor window opens. When the admin server starts, the progress monitor closes. The IDE displays a server instance node below the admin server node.
2. Right-click server instance node and choose Status.
The Status dialog box opens. The Status field displays the status of the server instance, which is Stopped.
The Status dialog box displays a message to tell you that it is starting the application server instance. When the server instance starts, the Status field displays Running.
The server instance is ready for use.
The contextual menu lists the other tasks you can perform with the admin server node.
Below the admin server node is an application server instance node. In FIGURE 8-1 the application server instance node is labeled server1(localhost:81). The application server instance node represents a server instance.
When you deploy a module or an application, you deploy to a specific server instance. You must have a server instance node and the instance it represents must be running before you can deploy and execute.
FIGURE 8-1 shows a server instance that was created by installing the IDE. You can also create server instances by administering you application server domain.
Below the server instance node is a set of nodes that represent the named resources available to applications running in the server instance. FIGURE 8-1 shows nodes for the resources that are used in and created by the scenarios in this book:
Underneath the registered resource nodes is a set of nodes that represent modules and applications deployed to the server instance. FIGURE 8-1 shows a node for an application named CatalogApp. The scenarios in this manual cover programming and deploying CatalogApp. For the procedure that deploys CatalogApp, see Creating the J2EE Application.
Below the deployed application nodes is a set of nodes that represent unregistered server resources. These nodes are subnodes of the admin server node, and they represent resources that are not yet registered with a server instance.
These nodes have menu commands for creating and registering new resources. A scenario in this book uses the Unregistered JMS Resources node to create a queue and queue connection factory. For the procedure that creates resources, see Setting up the Application Server.
These nodes identify the server instances that are currently designated as the default server instances. When you deploy an application, it is deployed to the default server instance unless you specify otherwise on the application's property sheet.
In FIGURE 8-1, the default nodes show that the default server for J2EE applications is Sun ONE application server.
To make a server instance the default server:
 Right-click the server instance node and then choose Make Default.
The modules and applications that you work with have property sheets. You use the property sheets to identify the services your modules and applications need from the application server.
Many property sheets have server-specific tabs. The server-specific tabs list the properties defined for specific server products.
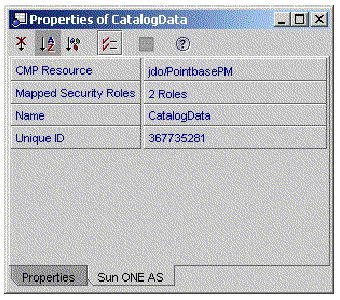
For example, FIGURE 8-2 shows the property sheet for the CatalogData EJB module. The Sun ONE AS tab is selected. This tab has a CMP resource property, and you use this property to identify the datasource for the CMP entity beans in the CatalogData module. Notice that the datasource named in FIGURE 8-2, jdo/PointbasePM, appears in FIGURE 8-1 as Registered Persistence Manager of the Sun ONE Application Server instance.
This section outlines the procedures for deploying and executing a J2EE application from within the IDE.
To deploy and execute an application:
1. Begin with an assembled J2EE application. Review the application for completeness of assembly.
2. Choose an application server instance.
The application node has an Application Server property. The initial setting of the Application Server property is Default Application Server. If you proceed with this setting, the IDE will deploy your application to the server instance that is currently specified as the default server for J2EE applications.
You can also open the property editor for this property and choose a server instance by name. The property editor is a browser dialog that lets you review all server instances in the server registry and select one.
3. Deploy and execute the application by right-clicking the application node and choosing the Execute command.
This will begin the deployment process. Monitor the process on the output window. When deployment is complete, the IDE will execute the application in the application server's environment. What you see depends on the application. For example, if the application contains a web module, the application server will start a web browser and open the application's welcome page.
4. You can also deploy and execute in separate steps. Right-click the application and choose the Deploy command. When deployment is complete, execute the application yourself.
For example, if the application contains a web module, you can start a web browser outside the IDE and open the application's welcome page.
| Building J2EE Applications | 817-2327-10 |
Copyright © 2003, Sun Microsystems, Inc. All rights reserved.