| Building J2EE Applications |
| Building J2EE Applications |
| C H A P T E R 7 |
|
Security |
Securing an application limits access to its features and functions. Limiting access to its features and functions limits access to the data that the application manages.
J2EE applications are secured by working with application resources and user roles. The two concepts are defined in the following list:
J2EE applications are secured by mapping resource to roles. When a resource is called, the caller must supply a role name that is authorized to access the resource. If the caller cannot supply an authorized role, the call is rejected. In J2EE applications, the application server verifies the caller's role before allowing the caller to execute the resource.
The authorized combinations of roles and resources are declared in deployment descriptors. The application server reads them from the deployment descriptors and applies them. This is known as declarative security.
The tasks that you perform to secure a J2EE application are described in the following list:
For example, suppose you are developing a web module that works with human resources data. The specification for the module tells you which web resources are available to all employees for maintenance of their personal information and which web resources are available only to human resources clerical roles, to human resources supervisory roles, to auditing roles, and so on. You declare security roles that represent these types of users and map the resources in your web module to these roles.
Securing an EJB module is similar. The specification for the module identifies different types of users and tells you which types of user are allowed to access the data that is returned by the enterprise bean methods. You declare security roles that represent these groups of users and map the EJB methods in the module to the appropriate roles.
In general you set up J2EE security on module property sheets. You declare a set of roles for the module. You map the module's resource to the set of roles declared in the module.
When modules are assembled into an application and deployed, you map the roles declared in the modules to the actual user names and group names in the application server environment. You map the roles to users and groups on the J2EE application's property sheet. You perform this mapping when the application is deployed into an environment, like a production environment, that has declared users and groups.
The sections that follow show you how to use the IDE to set up security for web modules, for EJB modules, and how to merge several sets of security declarations when you assemble modules into an J2EE application.
Web modules have several property editors and dialogs for declaring security roles and mapping security roles to web resources. This section covers these property editors and dialog boxes in two separate tasks:
Each task is covered in its own section.
To declare web module security roles:
1. Right-click the web module's web node and choose Properties  Security Tab Security Roles ellipsis (...) button.
The Security Roles property editor opens.
The Add Security Role dialog box opens.
3. Define a new security role.
a. In the Role Name field, type a name for the new security role.
b. In the Description field, type a brief description of the role.
A description is very useful when you merge the security roles of several modules that are assembled into an application. It is also useful when you map security roles to the users and groups that are in an application server environment.
c. Click OK to close the dialog box.
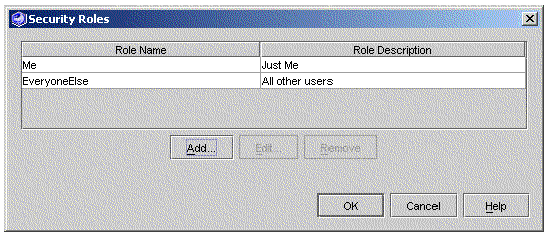
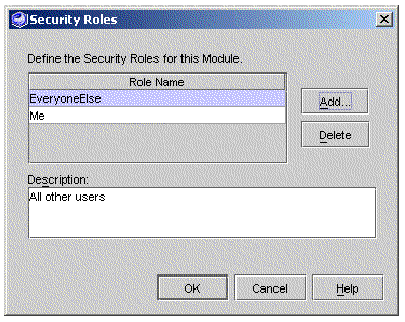
FIGURE 7-1 shows the Security Roles Property editor after two roles have been declared, Me and EveryoneElse.
 [ D ]
[ D ]
4. Click OK again to close the property editor.
To define a web resource and secure it:
1. Right-click the module's web node and choose Properties Security Tab Security Constraints ellipsis (...) button.
The Security Constraints property editor opens.
The Add Security Constraint dialog box opens.
3. Click the Add button on the Add Security Constraint dialog.
The Add Web Resource Collection dialog box opens.
a. In the Resource Name field, type a name for the resource.
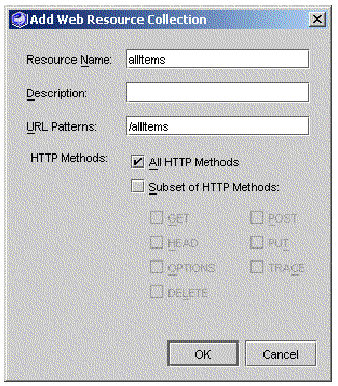
b. In the URL patterns field, type a URL pattern.
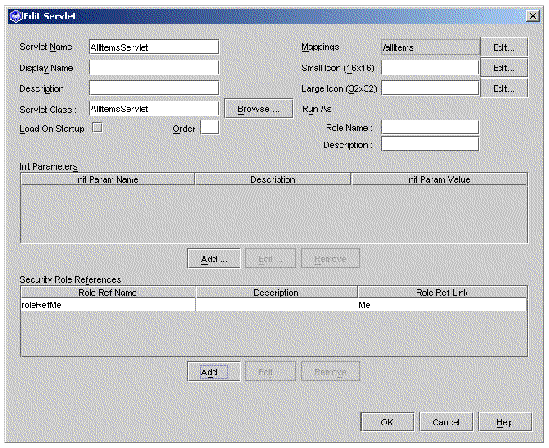
The URL pattern must already be defined in the module. FIGURE 7-2 shows field values that define the URL pattern /allItems as a web resource. This URL pattern is already mapped to the servlet AllItemsServlet. The values in FIGURE 7-2 set up a web resource for executing the AllItemsServlet. To see how the URL pattern /allItems is mapped to the servlet AllItemsServlet, see and .
 [ D ]
[ D ]
Notice that you can define the web resource to apply to all of the HTTP methods associated with the URL pattern or just a subset of them.
c. Click OK to close this dialog and return to the Add Security Constraint dialog.
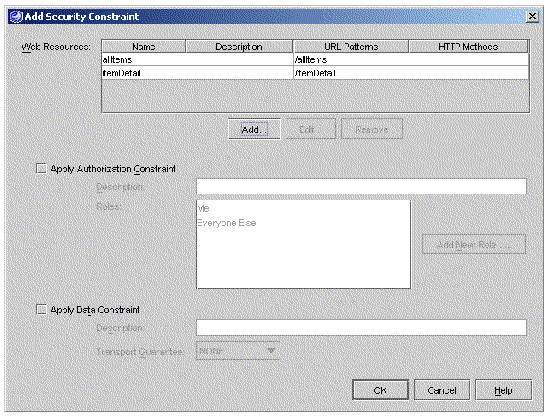
FIGURE 7-3 shows the Add Security Constraint dialog after two web resources are set up, under the names AllItems and ItemDetail.
 [ D ]
[ D ]
5. Secure the resource by specifying any constraints on access to the resource.
a. Click a resource to select it.
b. Use the fields on the Add Security Constraints dialog box to describe the constraints on accessing the resource.
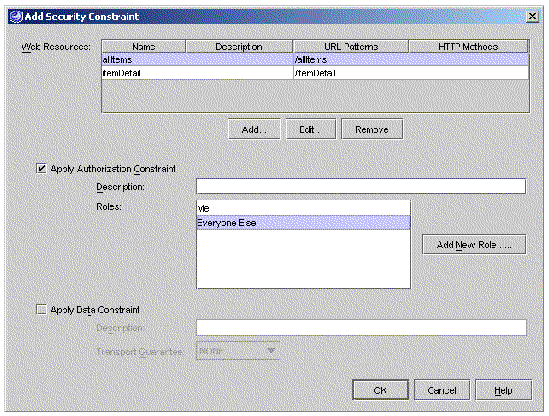
c. To use security roles as constraints, click the Apply Authorization Constraint check box, and then select one or more of the roles in the Roles field.
In FIGURE 7-4 the allItems resource is selected. The EveryoneElse role is also selected. These selection specify that the allItems resource must be called with the EveryoneElse role. Callers with other roles will be rejected.
 [ D ]
[ D ]
d. Click OK to save the constraints you have specified and return to the Security Constraints property editor.
6. Click OK again to save your work and return to the property sheet.
If any of the web components in your module use programmatic security, you need to map the security role references used in the method code to security roles declared on the module property sheet.
Web components that use the programmatic security feature contain code that accesses the caller's credential directly and performs verification beyond the verification that is performed by the application server's declarative security mechanism. CODE EXAMPLE 7-1 shows a few lines of method code. This code uses a security role reference name roleRefMe.
 [ D ]
[ D ]
When the method code executes, it will map the role reference to the role Me, and test the caller's credential for the role named Me. Security roles must be declared on the module property sheet before you can perform this type of mapping.
EJB modules have several property editors and dialogs for declaring security roles and mapping security roles to enterprise bean methods. This section covers these property editors and dialog boxes in two separate tasks:
Each task is covered in its own section.
To declare security roles for an EJB module:
1. Right-click the EJB module node and choose Properties Security Roles ellipsis (...) button.
The Security Roles Property Editor opens.
The Add Security Role dialog box opens.
3. Type in the values that define a role.
a. In the Name field, type a name for the role.
b. In the Description Field, type a description of the role.
A description is very useful when you merge the security roles of several modules that are assembled into an application. It is also useful when you map security roles to the users and groups that are in a deployment environment.
The add dialog box closes and you return to the Security Roles property editor. FIGURE 7-6 shows the Security Roles property editor after two roles have been declared, Me and EveryoneElse.
After declaring security roles for the module, you use the roles to limit access to the enterprise bean methods in the module.
|
Note - To map security roles you work with included EJB nodes. These are the subnodes of an EJB module that represent enterprise beans in the module. |
To map security roles to method permissions:
 Right-click an included EJB node and choose Properties Method Permissions ellipsis (...) button.
This Method Permissions property editor opens.
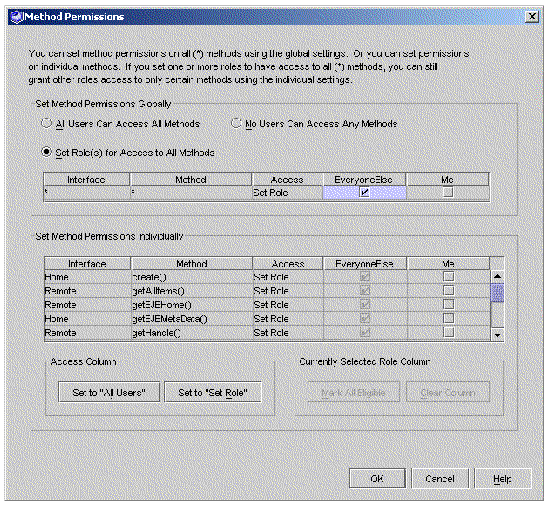
The Method Permissions property editor is a table, with a row for each of the enterprise bean's methods and a column for each security role that has been declared for the module. FIGURE 7-7 shows how the property editor for the CatalogManagerBean. The two security roles declared in the CatalogData EJB module, EveryoneElse and Me, are represented by columns.
 [ D ]
[ D ]
There are a number of ways to use the Method Permissions property editor.
This buttons below this table provide several shortcuts for editing in the table.
If any of the enterprise beans in your module use programmatic security, you need to map the security references used in the method code to the security roles declared in the EJB module's property sheet.
Enterprise beans that use the programmatic security feature contain method code that accesses the caller's credential directly and performs verification beyond the verification that is performed by the application server's declarative security mechanism. CODE EXAMPLE 7-2 shows a few lines of method code. This code uses a security role reference name everyOne.

In this scenario, the everyOne security role reference is linked in the EJB module's Security Roles Property Editor. You perform this mapping when the enterprise bean is assembled into an EJB module.
To link a security role reference in the EJB module's Security Role References property editor:
1. Right-click an EJB module node and choose Properties Security Role References ellipsis (...) button.
The Security Role References property editor opens.
2. Evaluate the references in the module.
The EJB module Security Role References property editor shows all of the security role references in the module and indicates whether they are linked or unlinked. In FIGURE 7-9 the everyOne reference is unlinked.
 [ D ]
[ D ]
a. Click a reference to select it.
b. In the Security Role Link field, select the appropriate security role.
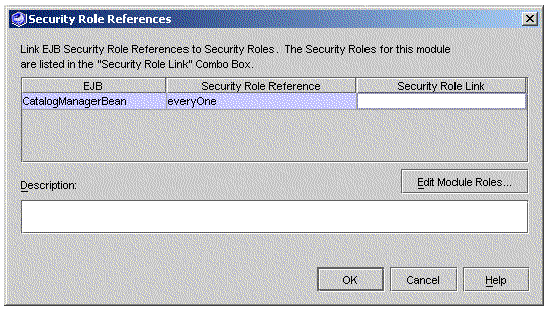
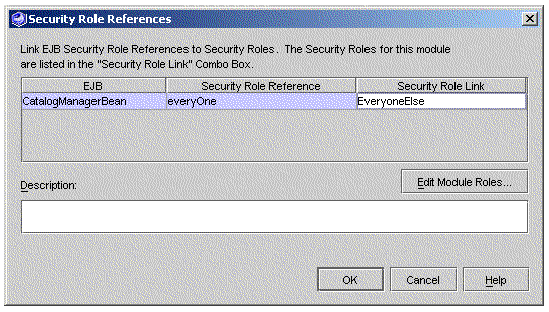
FIGURE 7-10 shows the EJB module Security Role References property editor. The security role reference named everyOne link has been mapped to the security role named EveryoneElse.
 [ D ]
[ D ]When you assemble a J2EE application you should determine whether it has been secured. Look for the following conditions:
To map security roles at the J2EE application level:
Right-click the application node and choose Properties Security Roles ellipsis (...) button.
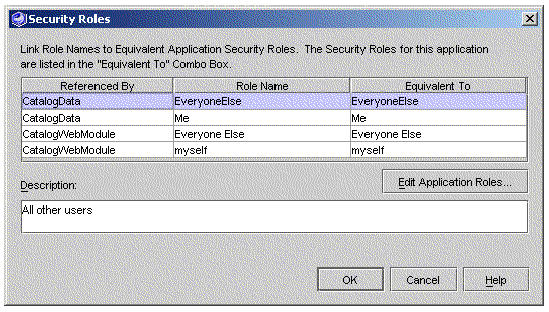
The J2EE application's Security Roles property editor opens. FIGURE 7-11 shows this editor with the security roles that are defined in the modules.
 [ D ]
[ D ]
The security roles that are declared in the modules are displayed in the first two columns. Each role is identified by its module and role name. Each module-level security role is mapped to a default application-level role. The application-level roles have the same names as the module-level role. The application-level roles are displayed in the Equivalent To column.
For example, the first security role displayed in the editor is EveryoneElse from the CatalogData module. This role is mapped to an application level role that is named EveryoneElse.
FIGURE 7-11 shows a discrepancy in the security role mapping. CatalogWebModule has a role named myself and the CatalogData module has a role named Me. These roles are equivalent, and you would prefer to have only one application-level role.
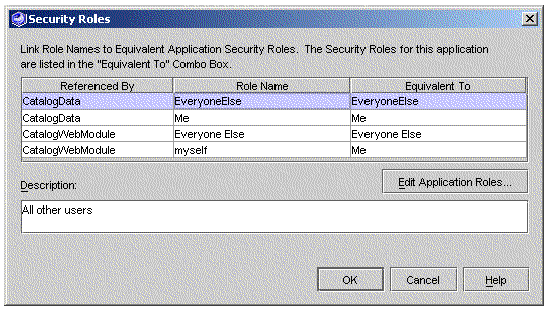
In the FIGURE 7-12 this discrepancy is resolved by remapping the role myself to the role Me.
 [ D ]
[ D ]
Both module-level roles, Me and myself, are now mapped to the same application-level role, Me.
You can also create an entirely new role at the application level and map several module-level roles to it. Suppose one of the modules in your applications has a role named sa, and the other has a role named sadmin. You decide to resolve this discrepancy by creating a new application-level role named sysadmin. To do this click Edit Application Roles and declare a new application-level role named sysadmin.
After declaring the sysadmin role, you return to the Security Roles property editor. Remap both of the module-level roles by clicking in their "Equivalent To" column. This will display the application-level roles. Select the sysadmin role.
| Building J2EE Applications | 817-2327-10 |
Copyright © 2003, Sun Microsystems, Inc. All rights reserved.