| Sun Java Studio Enterprise 6 Installation Guide |
| Sun Java Studio Enterprise 6 Installation Guide |
| C H A P T E R 14 |
|
Using Java Studio Enterprise Servers |
After installation, you can use the procedures in this chapter to validate correct installation and configuration of your Java Studio Enterprise servers. This chapter describes:
This section contains an overview of the general validation process, the suggested server startup sequence and information on how to find port numbers. Perform the procedures in the appropriate platform-specific section to verify that component products are operational on your machine. See TABLE 14-1 for a list of these procedures.
(Microsoft Windows) To start and stop a component product server, you must log in as a user who has administrative rights.
(Solaris OS) To start and stop the component product servers, you must have root privileges. If you created a non-root instance of Application Server or Web Server, you can use those instances with the non-root user account that was associated with creating that instance.
The basic process for starting most Java Studio Enterprise servers has three steps:
1. Start the admin server process.
2. Log in to the administrative tool.
Most of the servers have browser-based interfaces to the administrative tool.
(Solaris OS) As long as you know the proper user name and password, you can access these browser-based interfaces as a non-root user.
3. Start your server instance using the administrative interface.
Most of the servers also have command-line interfaces. See the documentation for the component products for additional information.
Sun Java System Application Server 7 Standard Edition, Update 1 and Sun Java System Web Server 6.1, Service Pack 1 can also be started and stopped from the Java Studio Enterprise IDE via their respective plug-ins.
TABLE 14-1 lists the procedures to use for validating your server installation.
If you are using only Application Server or Web Server, then there is no startup sequence requirement.
The startup sequence is important when using Identity Server and Portal Server. Identity Server and Portal Server are deployed as web applications running on Web Server. Identity Server and Portal Server also rely on Directory Server. Therefore, before attempting to access either Identity Server or Portal Server, you must start both Directory Server and Web Server. To shut down the servers, reverse the sequence.
Before accessing Identity Server and Portal Server, start the servers in this sequence:
Start both the admin server and the server instance.
Start both the admin server and the server instance.
To perform the server validation procedures you need to know the port numbers, instance names, and other configuration data for the servers that you installed. You can review the configuration data for each server in the following ways:
On Microsoft Windows systems, you can start the servers from the Start Menu or the command line. For command line information, please see Appendix C. This section describes using the Start Menu entries for starting and stopping the servers.
Verify server configuration information such as actual port number assigned or instance name, by reviewing the configuration data used by the installer. See Finding Port Numbers for details on viewing this information.
|
Note - These instructions assume that you are logged in as a user with administrative privileges. |
If you installed using Typical Installation or you installed all of the Java Studio Enterprise servers, the quickest way to verify the server installations is to use the Start Menu option to start all the servers and then verify access to the administrative tool for each one. See To Start and Validate All Servers.
1. Choose Start > Programs > Sun Microsystems > Java Studio Enterprise 6 2004Q1 > Start Servers > All Servers.
This starts all the installed servers in the proper order.
2. (Optional) Access the Computer Management Services dialog to verify that the servers started properly by following these steps:
a. Open the Computer Management dialog.
b. Double-click Services and Applications.
d. Scroll down the list of services to see the following Java Studio Enterprise server entries. Verify that the Status column for each server entry shows the value Started:
3. Access the administrative console for the servers as follows:
a. For Directory Server, follow steps 2-5 of the procedure To Validate Directory Server Installation.
b. For Web Server, follow steps 2-5 of the procedure To Validate Web Server Installation.
c. For Application Server, follow steps 2-3 of the procedure Validating Application Server Installation.
d. For Identity Server, use the procedure Validating Identity Server Installation.
e. For Portal Server, use the procedure To Validate Portal Server Installation.
 Choose Start > Programs > Sun Microsystems > Java Studio Enterprise 6 2004Q1 > Stop Servers > All Servers.
Use the following sections to start and validate individual servers.
Verify server configuration information such as actual port number assigned or instance name, by reviewing the configuration data used by the installer. See Finding Port Numbers for details.
If you installed the Java Studio Enterprise IDE, see Chapter 9 for information on confirming your default application server from within the IDE. If you did not install the IDE, follow this procedure.
1. Choose Start > Programs > Sun Microsystems > Java Studio Enterprise 6 2004Q1 > Start Server > Application Server.
This starts the Application Server admin process and the default Application Server instance.
2. Choose Start > Programs > Sun Microsystems > Java Studio Enterprise 6 2004Q1 > Administration Consoles > Application Server.
The Application Server Administration login prompt appears.
3. Type your User Name and Password and Click OK.
User Name is the Administrator User ID that you used on the Configuration page during installation. The Sun ONE Application Server Console appears.
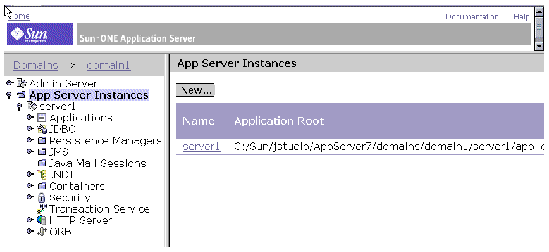 Sun ONE Application Server Console showing server1 node.
4. Click the Server1 node in the left frame and check that the status of the server instance (displayed on the right frame) is running.
1. Choose Start > Programs > Sun Microsystems > Java Studio Enterprise 6 2004Q1 > Start Servers > Directory Server.
This starts Directory Server's admin process and Directory Server's server instance.
2. Choose Start > Programs > Sun Microsystems > Java Studio Enterprise 6 2004Q1 > Administration Consoles > Directory Server.
The Sun ONE Server Console Login dialog appears. The User ID and Administration URL display the values used during installation and configuration.
3. Type your Password and Click OK.
This is the password that you used on the Configuration page during installation. The Sun ONE Server Console appears.
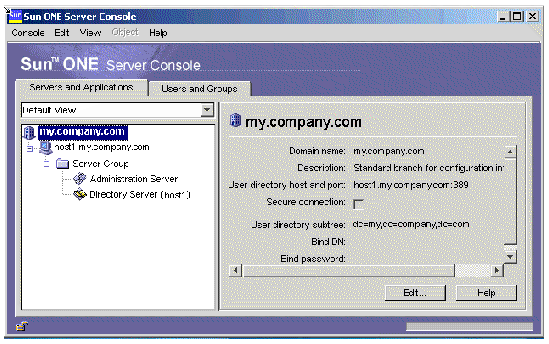
4. On the Servers and Applications tab, expand your server host node, then expand the Server Group node.
You see an entry for the Administration Server and entry for your server of the form Directory Server (hostname).
5. Double-click on the Directory Server node.
The Sun ONE Directory Server Console for your server instance appears.
From this console, you can perform administrative tasks.
You can start Web Server from the Start Menu or from inside the Java Studio Enterprise IDE. This procedure describes using the Start Menu.
1. Choose Start > Programs > Sun Microsystems > Java Studio Enterprise 6 2004Q1 > Start Servers > Web Server.
This starts the Web Server Administration service.
2. Choose Start > Programs > Sun Microsystems > Java Studio Enterprise 6 2004Q1 > Administration Consoles > Web Server.
The Web Server Administration login prompt appears.
3. Type your User Name and Password and click OK.
These are the values you provided on the Configuration page during installation. The Sun ONE Web Server Console appears in your browser window.
4. Select your server instance and click Manage.
The Sun ONE Web Server Manager showing your server instance appears.
If you see this JavaScript Application popup dialog:
Click OK and use the `Apply button as described to Apply Changes.
5. Confirm that your server instance is running by clicking Server On if your server instance is off.
Use one of these methods to validate the Identity Server is installed and configured correctly:
To successfully access the Identity Server Admin Console, you must have started Directory Server, Web Server, and Web Server admin server.
1. Type the Identity Server URL in your browser to access the Admin Console.
The URL is of the form http://hostname.domainname:port-number/amconsole. For example, http://host.my.company.com:80/amconsole. The Sun ONE Identity Server Admin Console login dialog appears in the browser window.
2. Type your User Name and Password and click Log In.
The Sun ONE Identity Server Console appears in your browser window.
|
Note - Remember User Name is amadmin. Password is the value you used during installation on the installer Configuration page. |
|
|
If you have already started Directory Server and Web Server, then skip to Step 2.
1. Choose Start > Programs > Sun Microsystems > Java Studio Enterprise 6 2004Q1 > Start Servers > Identity Server.
This starts Directory Server and Web Server.
2. Choose Start > Programs > Sun Microsystems > Java Studio Enterprise 6 2004Q1 > Administration Consoles > Identity Server.
The Sun ONE Identity Server Admin Console login dialog appears.
3. Type your User Name and Password and click Log In.
The Identity Server Console appears.
Identity Server uses the amldapuser as the bind user to search for users in the directory during authentication. This user by default has read access to the directory. The bind password for this user is prereconfigured by the installer by appending a `1' to the Administrator Password that is used during installation. For example, if you type admin123 as the Administrator Password on the installer's Configuration page, the assigned amldapuser password is admin1231.
After successfully following all the prior procedures to validate Directory Server, Web Server and Identity Server, perform these additional steps.
1. Log out from Identity Server Console or start a new browser instance.
2. Type the Portal Server URL in your web browser.
The URL is of the form: http://webserverhost.domainname:port-number/portal/dt. For example, http://host1.my.company.com:80/portal/dt.
The Sun ONE Portal Server Desktop page appears in the browser window. Display of the sample Desktop confirms successful deployment of Portal Server on your Web Server instance.
This section contains procedures for verifying proper installation of the Java Studio Enterprise servers on the Solaris OS.
Verify server configuration information such as actual port number assigned or instance name, by reviewing the configuration data used by the installer. See Finding Port Numbers.
If you did a Typical Installation or installed all servers, the quickest way to start and stop all the servers is to use the provided scripts.
1. Change to the directory containing the scripts. For example, if you accepted the default installation directory, type:
2. Invoke the start server script.
If you created non-root instances of Application Server and Web Server during installation, running this script as root does not start the non-root instances. You can start those instances from the IDE or from the command line as the non-root user.
3. Access the administrative console for the servers as follows:
a. For Application Server, follow steps 4-5 of the procedure To Start and Validate Application Server as Root.
b. For Directory Server, follow steps 6-9 of the procedure To Start and Validate Directory Server Installation.
c. For Web Server, follow steps 5-6 of the procedure To Start and Validate Web Server Installation.
d. For Identity Server, use the procedure To Validate Identity Server Installation.
e. For Portal Server, use the procedure To Validate Portal Server.
1. Change to the directory containing the script. For example, if you accepted the default installation directory, type:
2. Invoke the stop server script.
Use the following sections to start and validate individual servers.
To verify Application Server, start the server instance, invoke the graphical administration interface and log in. Application Server depends on Message Queue. Starting Application Server automatically starts Message Queue. You can also start Application Server from inside the IDE. See Chapter 9 for details. If you have not yet started the Java Studio Enterprise IDE, see Chapter 8 for information on the IDE setup process, then review the information in Chapter 9.
If you did not install the IDE, follow the procedure To Start and Validate Application Server as Root to validate your Application Server installation.
Perform this procedure when your default domain and application server instance are owned by root. If you created a non-root instance during installation, then log in as the non-root user and start Application Server from the IDE. See Using Sun Java System Application Server for details.
2. Change to the directory containing Application Server executable utilities.
3. Start the Application Server instances. For example:
You see output similar to the following:
4. (Optional) Verify that Application Server is running.
5. Access the Application Server Graphical Interface by typing the URL in your browser.
Use the format http://hostname.domainname:admin-port-number. For example, assume that hostname is host1 and domainname is my.company.com, and the default port number 4848 was assigned by the installer, type:
Your login to Application Server confirms successful installation.
2. Change to java-studio-install-dir/AppServer7/bin. For example, type:
3. Stop the Application Server instances.
You see output similar to the following:
4. (Optional) Verify that Application Server is no longer running.
2. Change to the directory containing the start script for your server instance. The directory name is of the form slapd-hostname, where hostname is the name of the machine. For example, if host1 is your machine name:
4. Verify that Directory Server is running.
You see output similar to the following:
# root 1297 1 0 Jul 01 ? 2:27 ./ns-slapd -D /opt/SUNWdirserver/slapd-host1 -i /opt/SUNWdirserver/slapd-host1 |
5. Start the Directory Server Admin Server.
6. Start the Sun ONE Server Console.
The Sun ONE Server Console login dialog appears.
7. Type your User ID and Password and click OK.
Your login to Sun ONE Server Console confirms successful installation.
8. (Optional) On the Servers and Applications tab, expand your server host node, then expand the Server Group node.
You see an entry for the Administration Server and an entry for your server of form Directory Server (hostname).
9. Double-click on the Directory Server (host-name) node.
The Sun ONE Directory Server for your server instance appears. From this console, you can start, stop, and restart your server instance.
2. Change to the directory containing the stop script for your server instance. The directory name is of the form slapd-instancename, where instancename is usually the host name of the machine. For example, if host1 is your machine name. For example:
4. Stop Directory Server admin server.
5. Verify that Directory Server instances are no longer running.
If you installed Web Server, the default Web Server instance belongs to root. If you installed either Identity Server or Portal Server, the root instance of Web Server is configured as the web container running these applications.
If you selected the non-root option during installation (see Product Usage by Non-root User), then the installer created a second Web Server instance belonging to the non-root user. To verify proper installation and configuration, start the Web Server Admin Server and access the Web Server Console from your browser.
2. Change to the installation directory for Web Server Admin Server.
3. Start the Web Server admin process.
4. (Optional) Exit from superuser privileges.
You can access Web Server Admin Console as a non-root user as long as you know the User Name (Administrator User ID) and Password (Administrator Password) that were specified during installation.
5. Type the URL for your Web Server in your browser. Use the http://hostname.domainname:admin-port-number format to access the administration server. For example:
The Web Server administration console login prompt displays.
6. Type your User Name and Password.
Your login to Web Server confirms successful installation. You can also start the instances from the command line.
1. Log in as root, if you haven't already done so.
1. Change to the installation directory for Web Server. The directory name is of the form https-hostname.domainname. For example, where host1 is your machine name and my.company.com is the domain name:
2. Start the Web Server instance.
3. Verify that Web Server processes are running.
|
|
You can also start and stop the non-root Web Server instance from the IDE. See Using Sun Java System Web Server for details.
1. Log in as the non-root user that was specified during installation.
2. Change to the installation directory for the non-root instance of Web Server. The directory name is https-jstudio.
3. Start the Web Server instance.
4. Verify that Web Server processes are running.
2. Change to the installation directory for Web Server Admin Server. For example:
3. Stop the Web Server admin process.
4. Change to the installation directory for your Web Server instance. For example:
5. Stop the Web Server instance.
6. Verify that Web Server is no longer running.
Identity Server is a web application hosted on Web Server. Start the Web Server instance first, see To Start the Web Server Root Instance From the Command Line.
Identity Server also depends on Directory Server. Start Directory Server before starting Identity Server. See To Start and Validate Directory Server Installation.
1. Verify that Web Server and Directory Server processes are running.
2. Access Identity Server Console through your web browser by typing Identity Server's URL in your browser to access the console.
The URL is of the format: http://webserverhost:port-number/amconsole. Use the web server HTTP port number. The Identity Server Console Login prompt appears.
3. Type your User Name and Password to log in.
Your login to Identity Server confirms successful deployment of Identity Server on Web Server. Remember that the User Name for Identity Server is amadmin. The Password (Administrator Password) is the one you used on the Configuration page during installation.
The Portal Server startup and shutdown mechanisms are part of the startup and shutdown mechanisms for Web Server. Portal Server also depends on Directory Server.
1. Log out from Identity Server Console or start a new browser instance.
2. Verify that Web Server and Directory Server processes are running.
3. In a new browser window, use a URL of the following format to display the sample Desktop:
http://webserverhost.domainname:port-number/portal/dt
Display of the sample Desktop confirms successful deployment of Portal Server on Web Server.
You can find documentation at docs.sun.com. The following tables list some of the available documentation titles. For an explanation of the product names, see Product Names.
TABLE 14-2 lists some examples of the available Application Server documentation.
|
Sun ONE Application Server 7 Standard Edition Installation Guide |
Installation Guide for stand-alone Application Server installer |
TABLE 14-3 lists some examples of the available Directory Server documentation.
|
Details the data structures and functions of the DS plug-in API. |
|||
|
Details configuration parameters, commands, files, error messages, and schema. |
|||
TABLE 14-4 lists some examples of the Web Server documentation.
TABLE 14-5 lists some examples of the Identity Server documentation.
TABLE 14-5 lists some examples of the Portal Server documentation.
The Java Studio Enterprise servers have specific dependencies and need to be started in the proper startup sequence. Refer to Suggested Startup Sequence for more information. This section lists some of the more common errors you might see.
1. Trying to access Identity Server Console from your web browser results in the following error:
Reason: Identity Server relies on other Java Studio Enterprise servers, such as Directory Server and Web Server. The servers may not all be running.
Solution: Start the servers in the proper sequence. See Suggested Startup Sequence for details.
2. (Solaris) Trying to start the Identity Server from the command line, you see the following error:
Reason: Identity Server relies on other Java Studio Enterprise servers, such as Directory Server and Web Server. The servers may not all be running.
Solution: Start the servers in the proper sequence. See Suggested Startup Sequence for details.
3. After starting all the servers, trying to access the amconsole by using an URL of the form http://localhost/amconsole gives you a Page Not Found error.
Reason: You may have an incorrect proxy server setting. IS may be trying to resolve the URL by using the proxy server if one is set.
Solution: Set the Web browser proxy setting to direct connection or to not use a proxy server.
4. (Microsoft Windows) You see this error message in the console window trying to start Identity Server from the Start Menu:
Reason: Directory Server is already started and can not be started again.
Solution: You can ignore this message. You should be able to access Identity Server as both Directory Server and Web Server are already running.
5. Installing Java Studio Enterprise results in either a failed installation or failed configuration of Identity Server:
Reason. Your system DNS Suffix may not be set correctly.
Solution. See Verifying the DNS Suffix.
6. Trying to access Portal Server Desktop, you see this error in the browser window:
|
A serious error has occurred in the Desktop. This may have been caused by a mis-configuration on the server. Report this problem to you administrator. |
Reason: You have not logged out of Identity Server Console before trying to access Portal Server Desktop.
Solution: Either logout of Identity Server Console and try again or start a new instance of your browser and try again.
| Sun Java Studio Enterprise 6 Installation Guide | 817-4662-10 |
Copyright © 2004, Sun Microsystems, Inc. All rights reserved.
 To Start and Validate All Servers