| C H A P T E R 3 |
|
Managing the Service Processor |
This chapter describes ILOM properties available on Sun Blade T6340 server modules that augment the properties common to ILOM on other platforms. In particular, this chapter covers properties in the /SP namespace.
ILOM enables you to store information (for purposes such as inventory control or site resource management) on the SP and FRU PROMs. You can change customer FRU data and system identification information using the CLI or the web interface.
|
Use the /SP customer_frudata property to store information in FRU PROMs.
 At the -> prompt, type the following command:
| Note - The data string ("data") must be enclosed in quote marks. |
|
Use the /SP system_identifier property to store customer identification information.
 At the -> prompt, type the following command:
| Note - The data string ("data") must be enclosed in quote marks. |
|
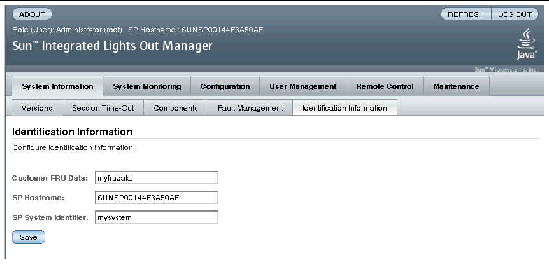
ILOM enables you to store information on FRUs and the SP.
1. Log into the ILOM web interface as Administrator (root) to open the web interface.
2. Select System Information --> Identification Information.
3. Edit the Customer FRU data field, if desired.
4. Edit the SP Hostname, if desired.
5. Edit the SP System Identifier field, if desired.
You can reset the service processor setting to factory defaults using the CLI or the web interface. For information about setting the root password back to the factory default, refer to Resetting the Password to the Factory Default.
|
Use the set reset_to_defaults command to set all ILOM configuration properties back to their factory default values. The all option sets the ILOM configuration and all user information back to the factory default values.
1. At the -> prompt, type the following command:
where value can be one of the following:
2. Reset the service processor so that the new property value can take effect.
|
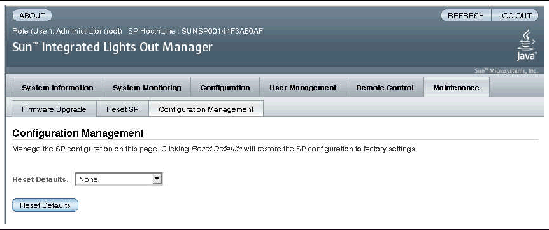
1. Log in to the ILOM web interface as Administrator (root) to open the web interface.
2. Select Maintenance --> Configuration Management.
3. Select a Reset Defaults value:
This section describes displaying the host server console output buffer.
|
The host console buffer can contain up to 1 Mbyte of buffered host console output. The host will send console output when powering on and running the host Power-On Self-Test (POST) diagnostics. The host can also send console output during the OpenBoot and Solaris boot phase; however, this output can also be directed to the Remote Console (remote KVMS). See Chapter 5 for more information about configuring OpenBoot to send boot output to the Remote Console.
If ILOM senses a host server reset, it writes boot information and initialization data into the console buffer until ILOM is notified by the server that the Solaris OS is up and running.
| Note - You must have Administrator level user permission to use this command. |
 At the -> prompt, type the following commands:
where property can be one of the following:
|
Use the /SP/console escapechars property to change the escape character sequence to switch from a system console session back to ILOM.
 At the -> prompt, type the following command:
where xx are any printable characters.
The sequence is limited to two characters. The default value is #. (Hash-Period). The sequence can be customized.
| Note - Changing the escape character does not take effect in a currently active console session. |
|
The /SP/policy BACKUP_USER_DATA property specifies whether the local user database on ILOM (that is, user, password, and permission information) should be backed up. When this property is set to enabled, this data is backed up on the removable system configuration card (SCC PROM) on the system.
 At the -> prompt, type the following command:
where value can be one of the following:
For example, if you want the local user database on ILOM to be backed up, type the following command:
|
Use the /SP/policy HOST_LAST_POWER_STATE property to control the behavior of the server module after an unexpected power outage. When external power is restored, the ILOM service processor starts to run automatically. Normally, the host power is not turned on until you use ILOM to turn it on.
ILOM records the current power state of the server in non-volatile storage. If the HOST_LAST_POWER_STATE policy is enabled, ILOM can restore the host to the previous power state. This policy is useful in the event of a power failure, or if you physically move the server to a different location.
For example, if the host server is running when power is lost and the /SP/policy HOST_LAST_POWER_STATE property is set to disabled, the host server remains off when power is restored. If the /SP/policy HOST_LAST_POWER_STATE property is set to enabled, the host server restarts when the power is restored.
 At the -> prompt, type the following command:
Where value can be one of the following:
The default value is disabled.
If you enable this property, you should also configure
/SP/policy HOST_POWER_ON_DELAY. For further information, see To Disable or Re-Enable Power-On Delay Using the CLI.
You can use /SP/policy HOST_AUTO_POWER_ON to power on the host automatically when the service processor has been booted. If this policy is set to enabled, the service processor sets HOST_LAST_POWER_STATE to disabled. Refer to To Disable or Re-Enable Automatic Host Power-On Using the CLI for more information.
|
Use the /SP/policy HOST_POWER_ON_DELAY property to cause the server module to wait for a short time before powering on automatically. The delay is a random interval of one to five seconds. Delaying the powering on of the server helps minimize current surges on the main power source. This delay of powering on the server is important when multiple servers in racks power on after a power outage.
This property takes effect only if /SP/policy HOST_LAST_POWER_STATE is set to enabled. Refer to To Disable or Re-Enable Powering On the Host Server Using the CLI for more information.
 At the -> prompt, type the following command:
The default value is disabled.
|
Use the /SP/policy HOST_AUTO_POWER_ON property to set whether the server module powers on automatically when power is applied.
 At the -> prompt, type the following command:
The default value is disabled.
|
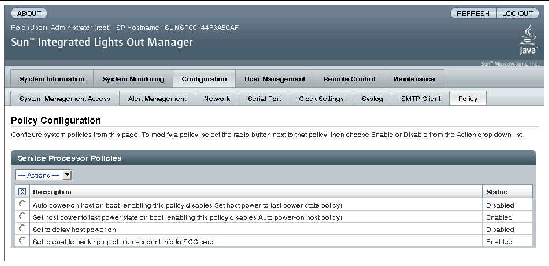
1. Log into the ILOM web interface as Administrator (root) to open the web interface.
2. Select Configuration --> Policy.
3. Click the Policy radio button of the policy you want to change.
4. Select an Action value to apply the Action (enable or disable) you have chosen.
This section describes how to use power management interfaces to manage power usage and to monitor power consumption.
Power management interfaces enable you to configure and display the power management policy of the system. You use power management policies to manage power usage based on user requirements. Power policies enable you to optimize power usage to match system requirements.
| Note - An SNMP MIB (PM-ILOM-MIB) is available to support power management software. |
TABLE 3-1 defines the terminology used in power management.
|
 At the -> prompt, type the following command:
|
The value of /SYS/VPS is equivalent to the value of the following command: show /SP/powermgmt actual_power
The /SP/powermgt actual_power property is the same as /SYS/VPS in that /SYS/VPS is a sensor that has a threshold and actual_power is just the value returned by the sensor.
 At the -> prompt, type the following command:
|
This interface enables you to view available power.
The system contains one property, available_power. The property supports the show command and returns the value <input available power in watts>.
 Type the show command to display the available power.
This interface enables you to view permitted power consumption. The permitted power consumption is the maximum input power the server guarantees it will consume at any instant. This value cannot be changed directly, but can change based on the power policy and budget, and chassis available power.
The system contains one property, permitted_power. This property supports the show command and returns the value <maximum permitted power consumption in watts>.
 Type the show command to display the permitted power consumption.
The following section describes how to monitor and control available power and set power consumption configuration parameters.
This interface enables you to set and monitor the power policy of the system. The Power Policy setting is saved across reboots.
The system contains one property, policy. This property supports the show and set commands. Two power policies are supported, performance and elastic. (Regulated and Siesta policies are not supported currently.) For a description of each of these values, see the definition of Power Policy in TABLE 3-1.
 Type the set command to set the power policy:
For example, set the power policy to performance:
 Type the show command to display the power policy:
|
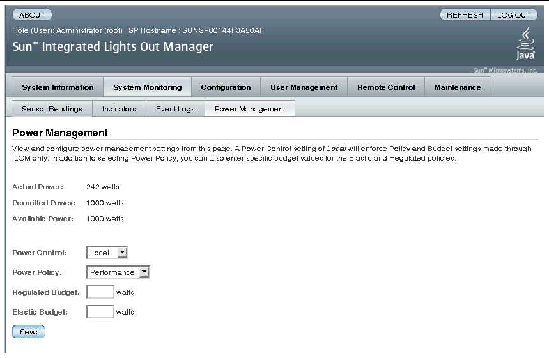
1. Log in to the ILOM web interface as Administrator (root) to open the web interface.
2. Select System Monitoring -> Power Management.
3. View the Actual Power consumption.
4. View the Permitted Power consumption.
| Note - Elastic and Regulated policy values are not supported currently. |
|
Use the /SP/network state property to enable or disable the service processor’s network interface.
 At the -> prompt, type the following command:
|
To display the IP address of the DHCP server that provided the dynamic IP address requested by the service processor, view the dhcp_server_ip property. To see the dhcp_server_ip property, use the following procedure.
|
Use the set /SP/services/ssh generate_new_key_type command to change the type of Secure Shell (SSH) host keys generated on your server. After changing the type, you must use the command set /SP/services/ssh generate_new_key_action to generate a new set of keys of the new type.
 At the -> prompt, type the following command:
where value can be rsa or dsa.
|
Use the set /SP/services/ssh generate_new_key_action command to generate a new set of Secure Shell (SSH) host keys.
 At the -> prompt, type the following command:
|
Use the set /SP/services/ssh restart_sshd_action command to restart the SSH server after you have generated new host keys using the set /SP/services/ssh generate_new_key_action command. This reloads the keys into the server’s dedicated data structure in memory.
 At the -> prompt, type the following command:
|
Use the /SP/services/ssh state property with the set command to enable or disable the SSH service. If the SSH service has been disabled, you can re-enable it through the serial management port (SER MGT) using the ILOM web interface.
 At the -> prompt, type the following command:
|
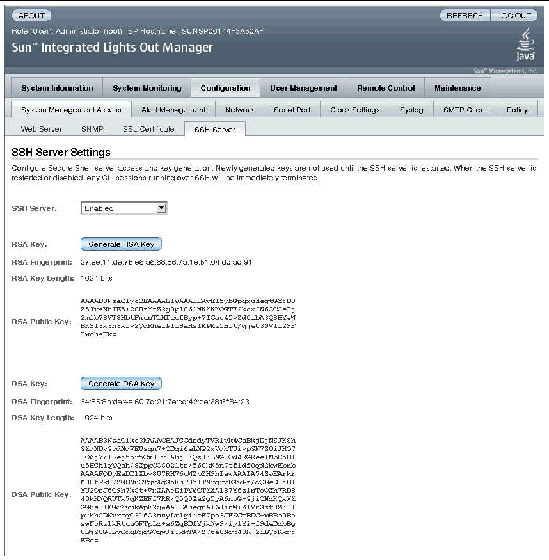
1. Log in to the ILOM web interface as Administrator (root) to open the web interface.
2. Select Configuration --> SSH Server Settings.
3. Select an action from the SSH Server pulldown menu:
4. Click Generate RSA Key or click Generate DSA Key to generate a new key type and a new key.
If you have generated a new key, you must restart the SSH server for the new key to take effect.
| Note - When the SSH server is restarted or disabled, any CLI sessions running over SSH will be terminated immediately. |
|
 At the ILOM CLI prompt (->), type the show faulty command.
The show faulty command is a shortcut for the following ILOM command string:
The shortcut produces the same output as the longer command string, displaying all active faults in the system in a concise, tabular format. Sample output:
Copyright © 2008 Sun Microsystems, Inc. All Rights Reserved.