| Skip Navigation Links | |
| Exit Print View | |

|
Sun Blade 6000 Modular System Service Manual |
Monitoring Faults Using Fault LEDs
Monitoring Faults Using Oracle ILOM
Viewing System Component Status
Monitor Faults With the Oracle ILOM CLI Event Log
Identifying Component Types and Service Classifications
Identifying Chassis Models and Replacement Components
Identifying the Chassis Model Using the Midplane Part Number
Identifying Chassis Replacement Components
Identifying the CMM Using the CMM Product Part Number
Powering Off the System and Components
Power Off the Server Modules and Storage Modules
Removing the Chassis From the Rack
Prepare the Chassis for Removal
Remove the Chassis From the Rack
Replacing Customer-Replaceable Units
Replacing a Server or Storage Module
Remove a Server or Storage Module
Install a Server or Storage Module
Replacing Field-Replaceable Units
Replacing an Internal Power Cable
Remove an Internal Power Cable
Install an Internal Power Cable
Returning the Modular System to Operation
Reinstalling the Chassis Into a Rack
Reinstall Cables on the Components
Apply Power to the Modular System
Update FRU Information After Replacing the Midplane
Before You Begin
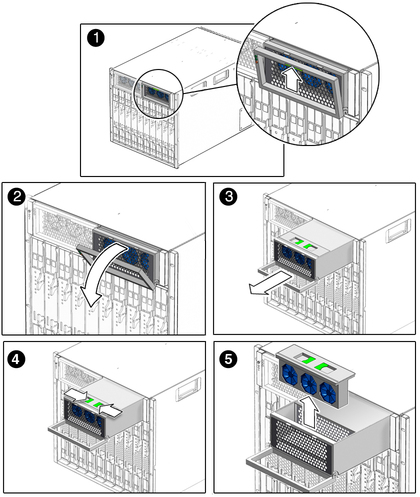
A front fan tray is located inside each of the power supplies. You must remove the power supply to replace the fan tray.
 | Caution - Do not leave a power supply slot empty. Power supplies have integrated fans that continue to supply cooling air even when the power supply is off. |
Follow the instructions in Remove a Power Supply.
Pull the power supply out of the system just far enough to access the fan. You do not need to remove the power supply completely from the system.
 | Caution - The fan continues spinning for a moment after the power supply is disconnected. Be careful not to insert a finger or other object into the fan while the fan is still spinning. |

 | Caution - You must power off the chassis or replace the power supply within one minute in order to ensure proper system cooling and operation. |