| Skip Navigation Links | |
| Exit Print View | |

|
Sun Netra 6000 Modular System HTML Document Collection |
Preparing Your Site Before the System Arrives
Location Restrictions for DC Models
Determining DC Power Requirements
Weight and Size Specifications for Moving and Lifting
Preparing to Install the Modular System
Gather Required Tools and Equipment
Installing the Chassis Into Your Rack
Mounting the Chassis in a Rack
Connecting To and Powering On the Modular System
Role of Oracle ILOM During Installation
Connecting Data and Management Cables
Cable NEM and PCI EM Modular Options
Powering On the Modular System
Power On the Modular System (AC)
DC Power Cable Wiring Reference
Log Into the CMM Through the SER MGT Port
Configure the CMM NET MGT Port With a Static IP Address
Configure the IP Addresses Using Your DHCP Server
Identify the IP and MAC Addresses
Log Into the CMM Through the NET MGT Port
Change the CMM ILOM root Account Password
Installing Shipping Brackets on a Sun Rack 1000
Understanding Oracle ILOM on the Modular System
Oracle ILOM 3.0 Features Specific to the Modular System
Logging Into and Out of CMM ILOM
Performing Common CMM ILOM Configuration Tasks
Viewing and Configuring IP and MAC Addresses
Administering the Modular System (CMM ILOM)
Managing the Chassis Using the CLI
Accessing Server Modules (CMM ILOM)
Identifying SNMP Trap and PET Event Messages
Understanding Fault Management
Monitoring Faults (Oracle ILOM)
Component Types and Service Classifications
Differences Between Chassis Models and Their Replacement Components
Determine if a Chassis Is A90-B or A90-D (CLI)
Determine if a Chassis Is A90-B or A90-D (Web Interface)
Power Off the Server Modules and Storage Modules
Power Off Components in the Chassis
Removing Power From the Chassis
Removing the Chassis From the Rack
Replacing a Front Fan Module (AC)
Replacing a Server or Storage Module
Replacing an Internal Power Cable (AC)
Returning the Modular System to Operation
Reinstalling the Chassis Into a Rack
This topic describes how to build the DC power cables and apply power to the DC model.
The DC model applies standby power to the installed components when two or more of the power supplies have input power connected. If the CMM is installed and functioning, main power will be controlled by the CMM settings. If the CMM is not installed or is not functioning, main power will be automatically activated after a 3 minute delay.
 | Caution - The DC power source must be located in the same premises as the DC model of the modular system. The power source cannot be in one building with the modular system in another building. This restriction minimizes the possibility of transient energy appearing on the main DC input to the modular system. |
 | Caution - A power disconnect device is not incorporated with the equipment. You must incorporate an external, readily accessible disconnect device to the equipment. |
 | Caution - This product does not provide branch circuit overcurrent protection as defined by the US NEC (United States National Electrical Code), Article 100. Installations of this product in compliance with the US NEC must be on branch circuits with overcurrent protection as defined by Article 480.3 of the US NEC. Product power inputs with current ratings 16A or less must have a branch circuit or supplementary overcurrent protection device rated at no more than 20A. Product power inputs with current ratings of more than 16A must have a branch circuit or supplementary overcurrent protection device rated at no more than 160% of the product input current rating. Other national and/or local electrical codes might apply to the installation of this product. |
Note - You can change the setting for the CMM ILOM auto-power-on parameter so that when power is applied, the CMM supplies only standby power to the modular system instead of main power. For details, refer to Modular System Remote Management (ILOM).
Note - Many components such as modular servers, NEMs, and PCI EMs are hot-pluggable, meaning that you can install the components while the chassis is powered up. Refer to the component documentation to find out if a component is hot-pluggable.
 | Caution - To prevent electrical shock, ensure that no power is present on the circuits to which you are connecting. |
Do not remove the supplies completely. Pull them forward by approximately 1 inch (25 mm).
|
Use a crimping tool or approved equivalent to secure the lugs onto the cables.
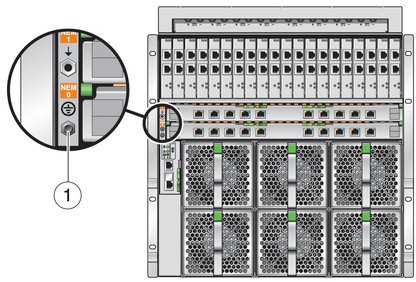
Note - This 6 mm electrical grounding stud is a safety earth bonding point.

|
 | Caution - The Netra 6000 DC system enclosure must be reliably connected to earth ground. The Netra 6000 DC system enclosure has a safety earth bonding point. This bonding point can be used to meet the central office requirements for enclosure or shelf grounding in GR1089-CORE. The grounding point is for connection of an electrical conductor between the system enclosure metal and a nearby point on the central office ground system. The use of this bonding point connection is optional if the system chassis mounting meets the requirements for a reliable chassis ground connection. |
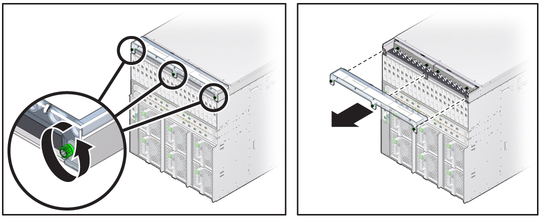
Use a screwdriver to loosen the green captive screws.

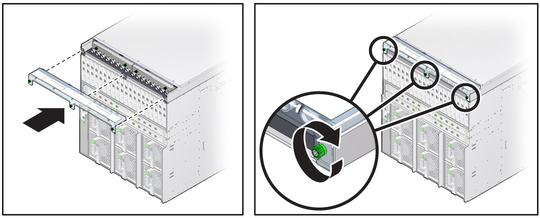
Use a screwdriver to tighten the green captive screws.

 | Caution - To prevent electrical shock, ensure that no power is present on the circuits to which you are connecting. |
See Install the Power Supplies (DC).
Main power is automatically distributed to the modular system.
Green OK LEDs – Illuminate a solid green light, indicating successful initialization.
Amber fault LED – Illuminates if a fault is detected. If the amber fault LED is illuminated, check for other fault indicators on modular components, unplug the chassis, and take corrective actions.
