
Make sure you have read the Preface for the safety precautions and Chapter 1
for pre-installation procedures and requirements before proceeding with this
chapter.
Complete the procedures in the following sections to prepare your system for
installing or replacing a 10 Gbyte 8 mm tape drive.
3.1.1
Powering Off the System
Power off the SPARCserver 1000 system.
Refer to the SPARCserver 1000 System Installation Manual (P/N 801-2893-xx)
for instructions on safely powering off the cabinet.
3.1.2
Removing the Front Cover
1. Remove the key from the keyswitch.
2. Unlock the latch that secures the cover to the server. See Figure 3-1.
With your fingers, push in the latch located on the bottom of the cover.
3. Lift and raise the cover upward so it can disengage from the keepers at
the top of the chassis.
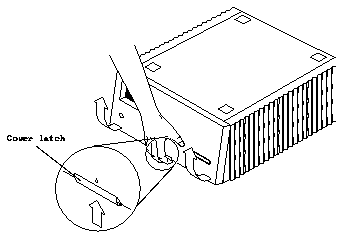
Figure 3-1
Removing the Front Cover
3.1.3
Removing the Electro-Magnetic Interference (EMI) Shield
1. Loosen the six captive screws of the shield.
2. Move the shield forward, toward you, to disengage it from the chassis.
See Figure 3-2.

Figure 3-2
Removing the EMI Shield
3.1.4
Removing the SCSI Tray
1. Loosen the four captive screws that secure the SCSI Tray to the
SPARCserver 1000 system.
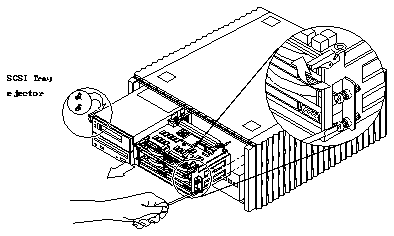
Figure 3-3
Removing the SCSI Tray
2. Release the SCSI Tray from the SPARCserver 1000 system.
See Figure 3-3.
a. Rotate the ejectors towards you until you feel the SCSI Tray connector
disconnect from the backplane connector.
b. Place your hands under the SCSI Tray, and slide it out carefully.
Warning -

The SCSI Tray is heavy. Get a good grip on the tray before removing
it from the SPARCserver 1000 system card cage.
3. Place the SCSI Tray on the ESD mat.
The SCSI Tray supports up to six SCSI devices. The 10 Gbyte 8 mm tape drive
can be installed in only one location: the upper left part of the tray. See
Figure 3-4.
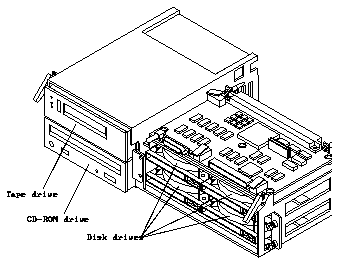
Figure 3-4
SCSI Tray in the SPARCserver 1000 System
Make sure the jumpers on the SCSI ID connector on the rear of the drive
are set correctly. See Figure 1-5.
The SCSI ID for the tape drive in the SCSI Tray is 5.
If you are replacing an existing drive, continue to the next section, Section 3.3,
"Removing an Existing Tape Drive." If you are installing a new tape drive in
the system, go to Section 3.4, "Installing the 10 Gbyte 8 mm Tape Drive."
1. Disconnect the power cable and the SCSI data cable from the rear of the
existing tape drive.
2. Remove the 5 1/4 inch device mounting bracket from the SCSI Tray:
a. Remove the two screws (at the bottom rear of the SCSI Tray) securing
the mounting bracket to the tray. See Figure 3-5.
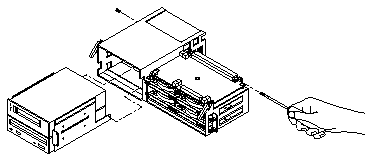
Figure 3-5
Removing the Mounting Bracket from the SCSI Tray
b. Slide the mounting bracket (with the devices attached) out from the
front of the tray.
3. Remove the four screws that hold the existing tape drive in the mounting
bracket, and lift the drive out of the bracket. (See Figure 3-6.)
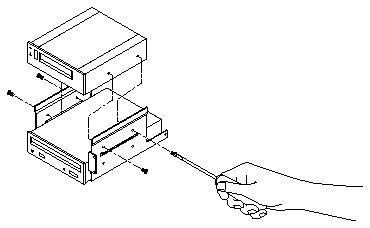
Figure 3-6
Removing the Existing Tape Drive from the Mounting Bracket
Note -
If you have just removed an existing tape drive, go to Step 2.
1. Remove the 5 1/4 inch device mounting bracket from the SCSI Tray:
a. Remove the two screws (at the bottom rear of the SCSI Tray) securing
the mounting bracket to the tray. See Figure 3-5.
b. Slide the mounting bracket (with the devices attached) out from the
front of the tray.
2. Place the new tape drive in the mounting bracket, and use the four
6-32x1/4-inch screws to secure the drive to the bracket. See Figure 3-6.
3. Slide the device mounting bracket back into the SCSI Tray, from the front
of the tray.
4. Install the two retaining screws (at the bottom rear of the tray), which
secure the bracket to the tray.
5. Connect the power and data cables to the rear of the tape drive.
Caution -

Do not force the cable connectors into the connectors on the drive -
you may damage them.
Reassemble your system as follows.
3.5.1
Installing the SCSI Tray
1. Grasp the tray on either side, lift it, and place it in the opening to the
SPARCserver 1000 system.
2. Slide the SCSI Tray into the SPARCserver 1000 system.
Keep the ejector tabs up until their hooks slide into place. See Figure 3-3.
3. Place your thumbs on the ejector tabs and use equal pressure when you
close the ejector tabs
You will feel a slight resistance as the backplane connector seats in the SCSI
Tray connector.
Caution -

Do not force the SCSI Tray into the backplane - you may damage the
backplane connectors.
4. Tighten the four captive screws to secure the SCSI Tray to the
SPARCserver 1000 system.
3.5.2
Checking Connections
1. Verify that the extraction levers for the SCSI Tray are fully closed.
2. Check that all cables are connected and secure.
Cables you did not install or change may have come loose during the
installation.
3.5.3
Attaching the EMI Shield
1. Line up the EMI Shield with the housing. See Figure 3-2.
2. Slip the EMI Shield on, tighten each screw one full turn, then tighten
them fully.
Caution -

Replace the EMI panel before using the system. Sun Microsystems is
not responsible for regulatory compliance for a SPARCserver 1000 system
which is operated with the EMI panel removed.
3.5.4
Attaching the Front Cover
1. Place the cover on the front of the SPARCserver 1000 system.
Place the top of the cover on the front of the system and swing the bottom
into place while pressing the release latch. See Figure 3-1.
2. Return the key to the keyswitch.
To make sure your system recognizes the newly-installed tape drive, use the
procedures in Appendix A, "Probing for SCSI Devices."
