Finishing Up
Closing and Installing Panels
-
If you installed or replaced a tape drive, go to "Closing the Upper Front Panel".
-
If you installed or replaced a bay disk drive, go to "Closing the Lower Front Panel".
-
If you installed or replaced an SBus card or a DSIMM, go to "Replacing Foam Piece 1 and the Left Panels".
Closing the Upper Front Panel
-
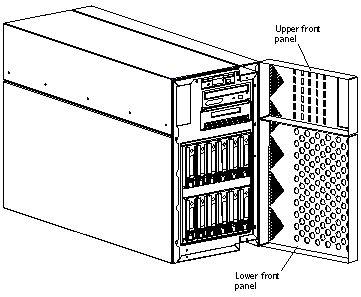
Swing the upper front panel closed and press against the left side to snap the panel into place.
Figure 2-24 Closing the Upper and Lower Front Panels
Closing the Lower Front Panel
-
Swing the lower front panel closed and press against the left side to snap the panel into place (Figure 2-24).
Replacing Foam Piece 1 and the Left Panels
-
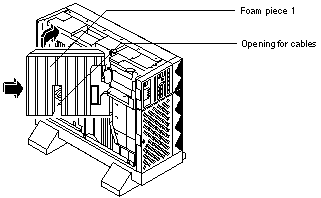
Insert the right side of Foam Piece 1 into its proper location (Figure 2-25).
Fit Foam Piece 1 behind the system disk connectors. Be careful not to dislodge the connectors.
Figure 2-25 Replacing Foam Piece 1
-
Rotate the left side of the foam piece into place in the server.
Be careful not to disturb the surrounding assemblies and cables.
-
If necessary, fit the power cables in the opening located in the center of Foam Piece 1 (Figure 2-25).
-
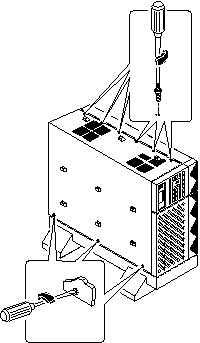
Slide the bottom of the left inner panel into the groove at the top of the Netra 150 server and tilt the panel inward onto the chassis.
-
With the Phillips #1 screwdriver, tighten the eight Phillips-head captive screws at the side and top of the left inner panel (Figure 2-26).
The screw at the top front portion of the panel does not attach to anything.
Figure 2-26 Installing the Left Inner Panel
-
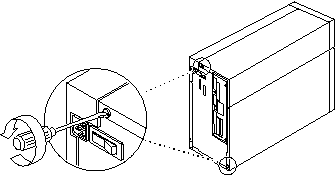
Press the left outer panel against the left side of the Netra 150 server and slide the panel forward until it stops.
-
Tighten the two Phillips-head captive screws at the rear of the Netra 150 server (Figure 2-27).
Figure 2-27 Installing the Left Outer Panel
Powering On the System
-
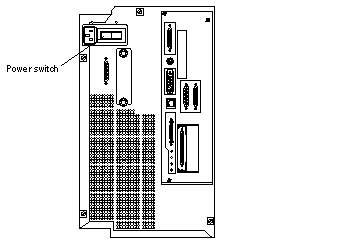
Locate the power switch at the rear of the Netra 150 server (Figure 2-28).
Figure 2-28 Location of the Power Switch
-
Turn the power switch to the ON ([boxv ]) position.
 Caution -
 Never move the Netra 150 server when system power is on. Excessive movement can cause catastrophic disk drive failure. Always power the system OFF before moving it.
-
If you have a monitor or terminal attached to the Netra 150 server, watch the screen for any POST error messages.
At the conclusion of testing, POST automatically configures the system, omitting any devices that have failed diagnostics. After POST ends, the system will boot using the new configuration.
Note -POST does not test drives or internal parts of SBus cards. To test these devices, run the OpenBoot PROM (OBP) diagnostics manually after the system has booted. Refer to the OpenBoot Command Reference manual for instructions.
- © 2010, Oracle Corporation and/or its affiliates
