Chapter 5 Advanced Array Configuration
This chapter explains how to perform advanced array configuration. The chapter assumes you have completed configuration of your Netra Proxy Cache Array, as described in the Netra Proxy Cache Array Configuration Guide. Consult that document for a description of service network, control network, multicast address, and other array-related concepts.
Viewing and Modifying Advanced Array Configuration Properties
You view or modify advanced array configuration properties in the Advanced Array Configuration page. You reach this page through the Proxy Cache Administration page. See Chapter 3, Loading the Proxy Cache Administration Page," for instructions on loading this page.
To View or Modify Advanced Array Configuration Properties
-
In the Proxy Cache Administration page, click Advanced Array Configuration.
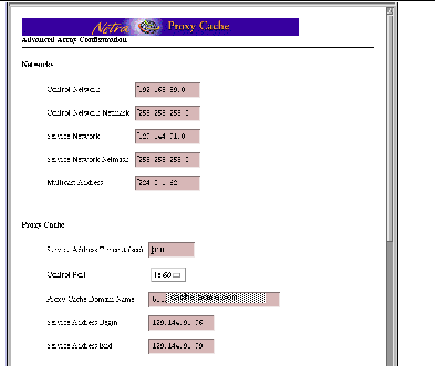
The Advanced Array Configuration page, shown in Figure 5-1, is displayed.
Figure 5-1 Advanced Array Configuration Page (Top)

-
In the page shown in Figure 5-1, view or make changes to the value of a property.
Most properties have editable fields. Two have pulldown menus.
-
At the bottom of the category page, click OK.
A page is displayed indicating the success or failure of your change. If a change fails, the page is redisplayed with the error indicated. Correct the error and click OK again. With some errors a new page, containing an error message, is displayed. If this occurs, click the Back button on your browser to return to the category page.
If you click Reset, the values for the properties on the page revert to what they were when you first loaded the page.
-
After a successful change, click the up-arrow icon to return to the Proxy Cache Administration page.
Alternatively, you can click the home icon to return to the Netra Main Administration page.
-
If you make any changes to advanced array properties, you must use the Install Configuration function to install the changes on all machines in the array. You access this function by clicking the Install Configuration link in the Proxy Cache Administration page.
See the Netra Proxy Cache Array Configuration Guide for instructions on the use of the Install Configuration function.
The remainder of this chapter is a description of the advanced array properties.
Networks
To View or Modify Advanced Array Configuration Properties (Networks Category)
-
Under the Networks heading (see Figure 5-1), enter or accept the values for the following properties:
Control Network
The subnet number of the control network, expressed in dotted-decimal notation. The host portion of the address is expressed in one or more zeroes. We suggest the use of one subnet from 10.0.0.0 or 192.168.89.0, ideally one not used by anyone else in your organization. Keep in mind that the control network is a private network, distinct from the network over which a Netra Proxy Cache server interacts with clients. No packets are forwarded between control and service networks. Such traffic would be disruptive of array operation.
Netmask
The netmask of the control network. It is recommended you use 255.255.255.0.
Service Network
The subnet number of the service network, expressed in dotted-decimal notation. Express the host portion of the address in one or more zeroes. The service network is the network over which the Netra Proxy Cache server interacts with clients. This address is the subnet portion of the IP address you assigned to given Netra Proxy Cache server. An example of a valid Class B subnet address is 129.144.0.0; a Class C example is 195.144.168.0.
Netmask
The netmask of the service network. An example of a netmask for a network that subnets Class B addresses is 255.255.255.0.
Multicast Address
The multicast address used by array software to send heartbeat messages over the control network to all members of the array. The Internet Authority for Network Addresses (IANA) has assigned the multicast address 224.0.1.62 to the Netra Proxy Cache server product. It is recommended that you use this address. If the default address is already in use, you need to select another multicast address. It is suggested that you use snoop (1M) to ensure that an address you choose is not already in use.
Note -
If you have more than one Netra Proxy Cache array on the same subnet, use different multicast addresses for the different arrays. The array software uses the service network for a redundant multicast. Using different multicast addresses to distinguish arrays is less prone to conflict than is using the same multicast address with different port numbers. (See the Control Port property, below.)
Proxy Cache
To View or Modify Advanced Array Configuration Properties (Proxy Cache Category)
-
Under the Networks heading (see Figure 5-1), enter or accept the values for the following properties:
Service Address Timeout (sec)
A Netra Proxy Cache array maintains a proxy cache service at a given service address in the event of host failure(s). However, if the original owner of a service address has not reclaimed its address after some extended period (604800 seconds, or 7 days, by default), the Netra Proxy Cache software assumes that the proxy cache service will no longer be offered at that address and removes the address from the list of service addresses in the Netra Proxy Cache array. The default value cited above is probably appropriate for most installations.
Control Port
The port number the array software uses for multicast messages associated with the proxy cache service. The software uses the combination of the multicast address (mentioned above) and a port number for listening for multicast messages. By default, the software uses a port number of 1860, which has been registered with the IANA for use with the Netra Proxy Cache product. You can select port numbers other than 1860 from the pulldown menu. However, only 1860 has been registered with the IANA.
Service Address Begin and Service Address End (optional)
The array software enables you to specify a range of service addresses that are disabled at startup. Service addresses are then assigned to hosts through normal array activity. By disabling addresses at startup, the Netra Proxy Cache Array starts with a clean slate and prevents the possibility of an incorrect address assignment that might linger following abnormal termination of one or more hosts in the array. Use of this feature requires that your service addresses are in a consecutive range; for example, 129.144.102.1, 129.144.102.2, and 129.144.102.3.
DNS
To View or Modify Advanced Array Configuration Properties (DNS Category)
-
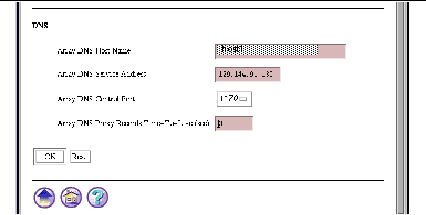
Scroll down the Advanced Array Configuration page, so that the DNS properties come into view, as shown in Figure 5-2.
Figure 5-2 Advanced Array Configuration Page (DNS Properties)

-
Under the DNS heading, enter or accept values for the following properties:
Array DNS Host Name
The host in the array that will act as DNS server for the subdomain formed by the array. The choice of which machine is arbitrary. It is strongly recommended that you use your administrative host as DNS primary host. For the DNS, all of the other hosts in the array act as hot spares for the machine you specify here.
Array DNS Service Address
The service address of the DNS on the DNS primary host. This address must have the same subnet number as a host's IP address (that is, the address associated with a machine's hostname), and its proxy cache service address.
Array DNS Control Port
The port number the array software uses for multicast messages associated with the DNS. See description of Control Port property, above. The default port number, 1870, is registered with the IANA.
Array DNS Proxy Records Time-To-Live (sec)
By default, the array DNS host records host entries with a TTL of 30 seconds. This value is appropriate if the DNS server that clients use to resolve the name of proxy cache subdomain uses round-robin (the recommended configuration). If this DNS server does not use round-robin, the default value of 30 seconds will diminish the effectiveness of the load balancing within the array. In such a case, we recommend a low TTL such as 3 seconds.
- © 2010, Oracle Corporation and/or its affiliates
