|
|
| iPlanet Process Manager, Version 6.5 Process Builder's Guide |
Chapter 2 Introduction to Process Builder
This chapter provides an overview of Process Builder, along with basic instructions for starting and using it.
This chapter contains the following sections:
- "About Processes and Process Builder"
- "About Applications"
- "Configuring Builder for Secure Deployment"
- "Configuring Builder for Deployment Through a Proxy"
- "Configuring Builder for Internationalization Support"
- "Starting Process Builder"
- "Using Process Builder"
About Processes and Process Builder
This section contains the following topics:
- "What is a Process?"
- "What is Process Builder?"
- "Who Should Use Process Builder?"
- "What is a Process Instance?"
What is a Process?
A process is a series of steps that can be completed by one or more end users who participate in the process. For example, your company may have a process for requesting vacation time. The process participants would be an employee who makes the request, the manager who must approve it, and the payroll department that updates the employee's records.
What is Process Builder?
Process Builder is a graphical tool used to create, maintain, and deploy web-based process applications. These applications can handle forms-based processes and can also integrate with external systems.
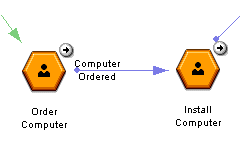
You use Process Builder to design and create a process map. This map defines the tasks involved in the process and specifies the flow of control through the process from one task to another. The figure below shows an example of two activities in a map:
Figure 2-1 Two activities in a process map
Process Builder allows you to define various kinds of activities in a process, including: activities that require human effort, activities that are performed automatically, activities that can run in parallel, and subprocesses, which are tasks that are complete multi-step processes in themselves.
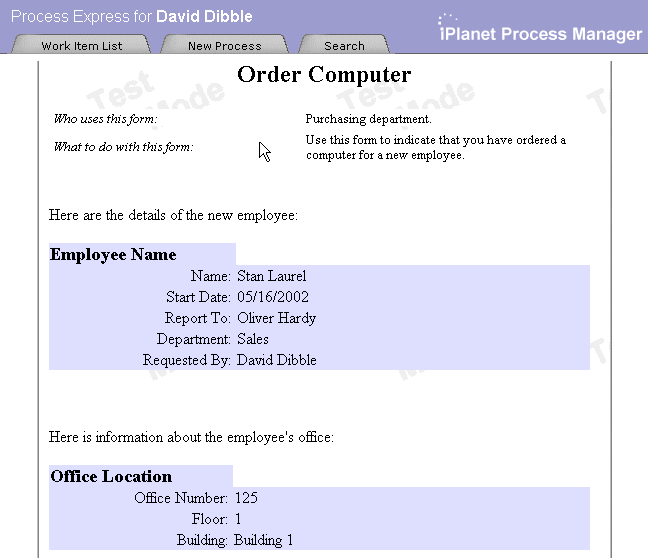
Process Builder is also where you create the forms associated with the various tasks. Figure 2-2 shows the form that is associated with the "Order Computer" task:
Figure 2-2 Order Computer Form
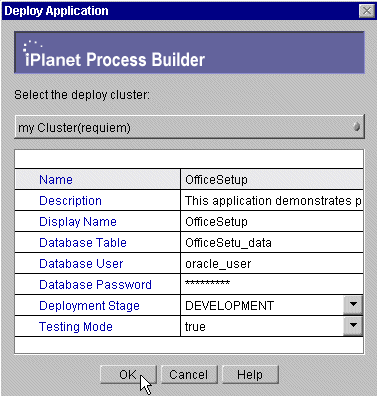
When you have defined a process in the Builder, you deploy it to a server where Process Manager is running. Deployment is very simple, all you need to do is to enter a few details in a dialog box, as shown in Figure 2-3.
Figure 2-3 Deployment Dialog Box
Who Should Use Process Builder?
Process Builder is for people who design and deploy Process Manager applications. We refer to these people as process designers. As a process designer, you need to know JavaScript. In addition, if you want to extend Process Manager applications so that they can access external systems, you need to program in Java.
What is a Process Instance?
You create a separate application for each process. For example, submitting a vacation time-off request and submitting an expense report are two different applications.
When you deploy applications to a cluster, end users can access them. For more information about clusters, see the Process Administrator's and Business Manager's Guide.
When users submit their first request in a Process Manager application, they initiate what is called a process instance. Each user's request generates a unique process instance. The point where a user initiates a process instance is called an entry point. The process instance ends at an exit point.
About Applications
This section contains the following topics:
Creating an Application
To create a process application using Process Builder, you create a graphical view of the steps in the process, from beginning to end. This view is called the process map. You must also define everything that relates to the steps, such as their forms, data fields, scripts, and access to forms.
In summary, you must create the following application elements:
- the process map, which defines the steps in the process
- the data dictionary, which captures process data
- the HTML forms that are displayed at each step
- the scripts that perform functions within an application
- the groups and roles of the people who will be using the application
- the content store, which specifies where files associated with the process are stored
Application elements are represented in a window called the application tree view. This window resembles a typical file system view: it uses folders to represent element categories, and the folders contain the corresponding application elements. Initially, the folders in the application tree view are empty, or they contain default values.
To create the steps in the process, you drag icons from the Palette onto a process map. You connect steps by drawing arrows between them. These connections are called transitions.
As you construct the process map and insert new data fields, forms, and scripts, these items are also added to the application tree view. In this way, the folders are filled with items represented on the process map. Since all application elements are represented in the application tree view, you can easily access and edit any element's properties.
Deploying an Application
Once you have created an application, you can save it to a local folder, or deploy it to a cluster.
When you save the application on your local machine, all your definitions (the process map items, the data dictionary, the forms, etc.) are stored in a local applications folder in the builder folder.
Deployed applications are stored in clusters. When you launch Process Builder, you get a list of all the clusters specified in the preferences.ini file, as well as a list of any applications saved locally in the default directory.
When you deploy the application, you copy all its definitions to the cluster as entries in the configuration directory. There are two deployment stages: development and production. Deploy to development if you are still testing the application and would like to be able to make the fullest possible range of changes. Deploy to production when you are ready to give end-users access to the application.
For information on deploying applications, see Chapter 10, "Deploying an Application."
Sample Applications
Process Builder includes a set of sample applications you can use as models when you create your own applications. For information on using and configuring the sample applications shipped with Builder, see the following chapters:
- Chapter 14 "The Data Sheet Application"
- Chapter 15 "The Office Setup Application"
- Chapter 16 "The Loan Management and Credit History Applications"
- Chapter 17 "The Insurance Claim Processing Application"
Configuring Builder for Secure Deployment
The following sections describe how to set up your development environment to support deployment of process applications using https:
- "About https Deployment Support for Process Builder"
- "Configuring the Server (iWS and iPM)"
- "Enabling Content Store Over https"
About https Deployment Support for Process Builder
Process Manager is automatically configured to enable secure deployment. There are, however, some configuration issues that you must address to ensure that your developers deploy their applications to an iPM cluster securely. This section describes those configuration issues. Process Manager uses the Java Secure Socket Extension (JSSE) libraries and the cacerts database for secure deployment. By default, the JSSE libraries are installed in the <iPM_install_directory>/builder/lib directory.
Process Builder and the Command Line Deploy Tool (pmdeploy) support the deployment of process applications to iPM clusters over a web server that uses the https protocol. The https protocol uses a digital certificate to encrypt and send documents and files securely.
iPlanet Process Manager supports handshake between the server and the client, where the server presents a digital certificate (server certificate) but does not require a certificate (client certificate) from the client.
During the deployment step, the server presents a certificate to the client (Builder/pmdeploy) that the client must accept. This certificate ensures the client deploys to the correct server.
The client consults its certificate store for an acceptable certificate match. If the certificate presented is not in the store, the client does not allow the communication to go through and the application is not deployed. If the certificate presented is in the store, the communication continues and the application is deployed.
Configuring the Server (iWS and iPM)
- Install the server certificate on the web server and turn on security.
This involves setting up a web server instance to run in https mode. See "Securing Your Web Server" in the Web Server Administrator's Guide for instructions on how to do this.
- Install the iAS Web Connector Plug-in on the web server instance and configure it to point toward the iAS instance on which iPM is running.
For more information about the Web Connector Plug-in, see "Configuring the Web-Connector Plug-in" in the iPlanet Application Server Administrator's Guide.
- Create an iPM cluster using this (https) web server instance.
The newly created iPM cluster now uses the https web server instance for future process application deployments.
Enabling Content Store Over https
The Content Store helps iPM users upload and download file attachments. The file attachment Java applet communicates to the server via http and https. (The https protocol works only on Netscape browsers.)
Once a file is uploaded to the web server, the process application may require access to it. In this case, the process application needs to use the https protocol to access the uploaded file if the web server instance is https enabled.
To configure the Application Server environment to make https handshake possible
- Install the JSSE jars as a standard Java extension package.
To do this, copy jnet.jar, jcert.jar, jsse.jar to $JAVA_HOME/jre/lib/ext. The default JAVA_HOME is <ias_install_dir>/ias/usr/java.
You can locate the JSSE jar files in the <iPM_install_directory>/builder/lib directory.
- (NT-specific) Modify Java Args On NT.
Open the iAS Registry using kregedit and locate the Java_Args key:
Application Server\6.5\Java\Java_Args.Add the following Java Arg to the key:
-Djava.protocol.handler.pkgs=com.sun.net.ssl.internal.www.protocol
- (Solaris-specific) Modify Java Args On Solaris.
Open <ias_install_dir>/ias/env/iasenv.ksh.
Locate the JAVA_ARGS variable and add the following Java Arg:
-Djava.protocol.handler.pkgs=com.sun.net.ssl.internal.www.protocol
- Update the JSSE provider (SunJSSE) in the Java installation.
Configuring Builder for Deployment Through a Proxy
If you want to deploy Process Manager applications through a proxy server, you must enable proxy support for Process Builder. Process Manager supports deployment through normal (http) and secure (https) protocols.
To configure Builder for deployment through a proxy server
- Open the preferences.ini file located in the following directory:
<iPM_install_directory>/builder
- Locate the line that references proxy support #Proxy Support
- Uncomment useProxy and set it to true.
- Uncomment proxyHost and set the proxy host you want to use.
- Uncomment proxyPort and set the proxy port you want to use. If you do not specify a proxy port number, Builder uses the default port of 80.
Note You must set the useProxy to true. If you specify a proxy host and proxy port, but fail to set useProxy to true, Builder ignores your host and port settings.
Configuring Builder for Internationalization Support
This section contains the following topics:
- "Enabling Non-ASCII Character Display in Builder"
- "Enabling the InputMethodEditor for Non-ASCII Character Display in Builder"
- "Operating Character Set Changes"
- "Configuring Locale Settings for Applications Using Mulitbyte Characters"
Enabling Non-ASCII Character Display in Builder
To enable non-ASCII character display in Builder, you must modify the preferences.ini file located in the <iPM_install_directory>/builder directory.
To modify the preferences.ini file for non-ASCII character display
- Open the preferences.ini file in a text editor.
- Uncomment the following entries:
#NormalTextFont=sansserif:plain:12
#SmallTextFont=sansserif:plain:10
#NormalBoldTextFont=serif:bold:14
#HeadingTextFont=serif:bold:16
#FixedFont=monospaced:plain:14
#TitleTextFont=sansserif:bold:12
To uncomment entries, remove the `#' from the beginning of each line.
- Save the preferences.ini file.
Enabling the InputMethodEditor for Non-ASCII Character Display in Builder
The InputMethodEditor allows non-ASCII character input and display in three components of the Process Builder:
- Node name editor on Process Maps
- Name and Description fields in the node property editor
- Description and Display Name fields in the application property editor
If Process Builder is running on an OS with the English locale set, the InputMethodEditor is disabled by default. To enable the InputMethodEditor for non-ASCII character display, uncomment the following line in the preferences.ini file:
#useInputMethodEditor=true
If Process Builder is running on an OS with a non-English locale set, the InputMethodEditor is enabled by default. To disable the InputMethodEditor, uncomment the following line in the preferences.ini file:
#useInputMethodEditor=false
Operating Character Set Changes
Process Builder creates forms using a character set of UTF-8. All forms created by Builder include the following meta tag:
<META HTTP-EQUIV="Content-Type" CONTENT="text/html;CHARSET=UTF-8">
Note If you decide to open an html form created in Builder in another editor, make sure the editor you use does not change the character set in the meta tag.
Before you deploy an application, make sure the character encoding of the forms (html files) matches the character set of the OS where the web server is running.
If you develop an application on NT using the Japanese character set and want to deploy it to Solaris Japanese operating in a ja locale, you must convert all html files in the application from Shift_JIS (OS character set of NT Japanese) to EUC-JP (OS character set of Solaris Japanese for ja locale).
Some tool applications support character set conversion of files. The JDK provides the command line tool native2ascii.
To convert a file encoded in Shift_JIS to EUC-JP using native2ascii
- Call the command
native2ascii shiftJIS.html unicode.html
- Call the command
native2ascii -reverse -encoding EUC-JP unicode.html eucJP.html
shiftJIS.html encoded in Shift_JIS becomes eucJP.html encoded in EUC-JP.
To run the iPM application using the new character set, the following items must be set for the iPlanet Application Server, Database Server, and Database Client.
- Set the International key to 1 in the Application Server Registry:
Start kregedit by typing "kregedit" at the command line.
Open the SOFTWARE\iPlanet\Application Server\6.5\NLS\INTERNATIONAL key.
Change the value to 1, then click OK.
Restart the Application Server.
- Set the operating character set for the DataBase Server to UTF-8
- Set the operating character set for the DataBase Client to UTF-8
Configuring Locale Settings for Applications Using Mulitbyte Characters
When forms (html files) contain multibyte characters, the locale for both the development system where Builder is used to develop an application and the target system where the iPlanet Application Server is running must have the same locale setting. The character set used in forms must also match the character set of the locale of the target server system.
The following combinations are valid for a Japanese application:
- Develop on NT Ja, deploy to iAS running on NT Ja
No extra work is involved.
- Develop on NT Ja, deploy to iAS running on Solaris Ja with a ja locale using EUC-JP as the OS charset
Before deployment, you must convert all forms to EUC-JP. You must declare the UTF-8 character set in the meta tag.
- Develop on Solaris Ja with a ja locale, deploy to Solaris Ja with ja locale
No extra work is involved.
- Develop on Solaris Ja, deploy to iAS running on NT Ja
Before deployment, you must convert all forms to Shift_JIS. You must declare the UTF-8 character set in the meta tag.
Starting Process Builder
Before you can use Process Builder, you must install it on your local system. For installation instructions, see the Process Manager Installation Guide.
This section contains the following topics:
- "Editing the preferences.ini File"
- "Starting Process Builder on Windows NT"
- "Starting Process Builder on Solaris"
Editing the preferences.ini File
The preferences.ini file specifies the available clusters and the corporate user directory, as well as some of the folders that appear by default in your initial Process Builder window. The installer puts preferences.ini in the builder folder.
After the administrator creates a cluster, you need to add lines to the file specifying the cluster(s) and the corporate user directory you are accessing. The Process Administrator interface returns and displays these lines when a cluster is created. Copy them from the successful cluster creation screen and paste them in your preferences.ini file. Otherwise, use the examples below to edit your preferences.ini file by hand.
Specifying a Cluster
To access a cluster from Process Builder, add a line to the preferences.ini file in the following format. (Although shown below as multiple lines, be sure to type it as one line in the file, with no space after the @ symbol.)
cluster = ldap://Unrestricted_User:Password@
Configuration_Directory:port/clusterDNFor example:
cluster = ldap://cn=Directory Manager:password@
directory.mozilla.com:389/cn=cluster, o=airius.comSpecifying a Corporate Directory
To access a corporate user directory from Process Builder, add a line to the preferences.ini file in this format:
corp_dir = ldap://corporate_Directory_Server:port/corp_Directory_Suffix
For example:
corp_dir = ldap://directory.mozilla.com:389/o=airius.com
You may want to add a corp_dir line to your preferences.ini file even if you do not know what cluster you will be deploying to. By adding a corp_dir line, the corporate user directory is available to you as you design applications, even without a deployment cluster.
Typically, your corporate directory does not require user authentication. However, if your corporate directory requires authentication, you can add a line in the following format (on one line):
corp_dir = ldap://Unrestricted_User:Password@
corporate_Directory_Server:port/corp_Directory_Suffix
Caution
The preferences.ini file also includes parameters that define the Java Virtual Machine. Do not modify this part of the file.
Adding or Changing Local Application Folders
You can also change some of the default local application folders in preferences.ini. The file ships with the following lines defining folders:
local_folder = Sample Applications; Samples
local_folder = Scratch Folder; Tmp
These two lines define two folders in your builder folder. The Samples folder stores the sample applications that ship with the product, and the scratch folder is a folder you can use for temporary content.
To add additional folders, use the following syntax:
local_folder = name_of_folder; pathname_of_folder
The pathname assumes you start in the builder folder.
Starting Process Builder on Windows NT
When you install Process Builder on your Windows NT machine, you choose a folder to install it in. By default, this folder is IAS_Root/builder, IAS_Root indicates the root directory of your iPlanet Application Server installation.
To start Process Builder, go to the folder where you installed Process Builder and double-click on the PMBuilder.exe file. This file launches Process Builder.
Starting Process Builder on Solaris
When you install Process Builder on your Solaris machine, you choose a folder to install it in. By default, this folder is IAS_Root/builder, where IAS_Root indicates the root directory of your iPlanet Application Server installation.
To start Process Builder, go to the directory where you installed it and type the following at the command prompt:
PMBuilder.sh
Using Process Builder
When you start Process Builder, you see a window like the one shown in Figure 2-4.
Figure 2-4 Select an Application window
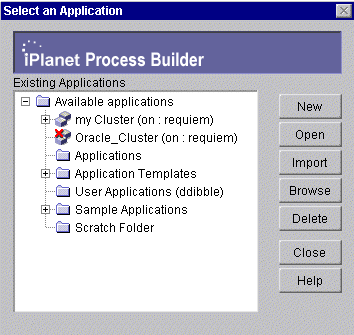
In the left pane, this window lists all clusters, the applications deployed to them, and applications saved locally in the application directories. The applications in the clusters have labels indicating whether they were deployed in the development stage or in the production stage.
Before a cluster appears in this window, the Process Manager administrator must create it, and you must have edited your preferences.ini file to contain the correct cluster information. For more information on clusters in your environment, contact your administrator. Some of the local folders are also defined in the preferences.ini file.
For more information about the preferences.ini file, see "Editing the preferences.ini File".
The following local folders are provided by default:
Applications The main folder for storing applications.
Application Templates The folder where you store applications that you base other applications on. For example, if your applications share many elements in common, you might want to designate a template application, save it to this folder, and use it as a basis for future applications. A sample template application, Default, is included in this folder as an example.
User Applications A folder for applications stored by user. On Unix, this folder is your default user home directory.
Sample Applications A folder that contains all the applications shipped as samples with Process Builder. This folder is defined in your preferences.ini file.
Scratch Folder A folder for storing temporary, or scratch, versions of your applications. This folder is defined in your preferences.ini file.
The right pane contains the following buttons:
New Creates a new application.
Open Opens the application selected in the tree.
Import Use this button to import an existing application into your Process Builder. The application must be a .zip file, for example, an application zipped and sent via email. The import function unzips the application into the selected folder and opens the application for editing.
Browse Navigates through the file system to open applications stored outside your local applications folders. Choose the LDIF file of the application you want to open. (LDIF is a file format for storing directory entries). LDIF files have the same names as the application and the folder the application is stored in.
Delete Deletes the selected application. You cannot delete applications that have been deployed. Deployed applications can only be deleted by the administrator.
Cancel Closes the window, but leaves Process Builder running.
Sometimes a cluster icon has a red "x" in it, as shown in Figure 2-5:
Figure 2-5 Cluster error
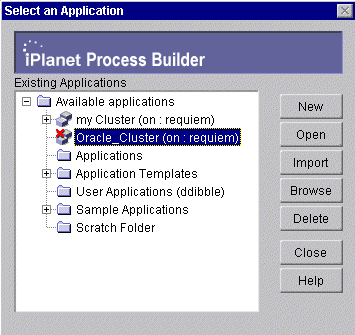
This icon indicates that Process Builder is unable to access a cluster, and appears when Process Builder cannot access the configuration directory. If you see this icon:
- verify that the cluster information in preferences.ini is correct.
- verify that the configuration directory is up and running
Your administrator can also help you solve cluster problems.
Process Builder Applications
Figure 2-6 shows a sample view of Process Builder when you open an existing application (the CreditHistory application in this case).
Figure 2-6 A Process Builder application
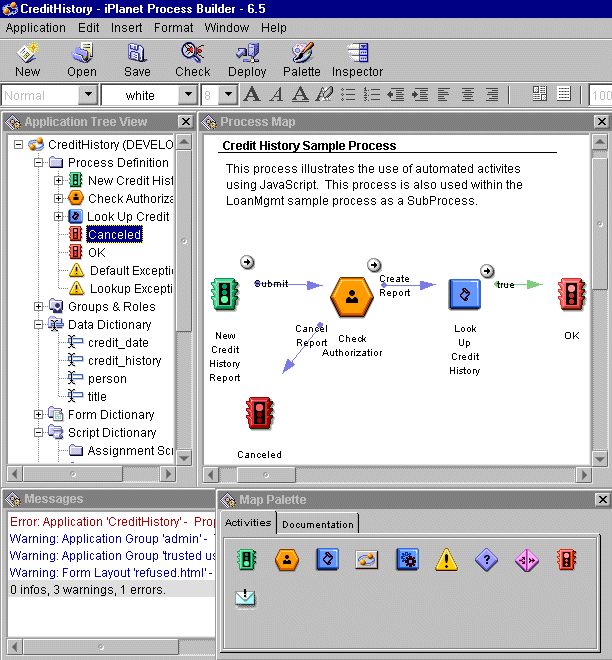
Within each application, Process Builder provides the following views and tools:
- Application Tree View
- Process Map
- Map Palette
- Messages window
- main toolbar
- menu commands
- HTML editor toolbar
You use these views and tools to create and edit applications. In addition, some commands are available by right-clicking on an element in the application tree view or process map.
Application Tree View
The application tree view lists all the elements in an application. Each application has a set of default elements, shown as a set of standard folders and icons. When you create a new application, the element folders are empty or contain defaults. As you construct the process map and insert new data fields, forms, and scripts, the folders fill up with subitems that you can directly access at any time to inspect or customize their properties.
These are the default folders and icons:
Process Definition This folder contains all the items in an application. See "Map Palette" for more information on these items.
Groups and Roles This folder contains the application's groups and user roles. See Chapter 6 "Defining Groups and Roles" for more information.
Data Dictionary This folder contains the data fields created for the application. These fields define data that is to be captured when users run the application. See Chapter 7 "Defining Data Fields" for more information.
Form Dictionary This folder contains the HTML forms created for the application. Forms define how information is presented to a user. See Chapter 8 "Designing Forms" for more information.
Script Dictionary This folder contains the JavaScript scripts available to the application, organized by script type. Scripts are either predefined or created by you. See Chapter 9 "Using Scripts" for more information.
Form Access This icon brings up a window which lets you specify which HTML form is displayed for a specific role during each step. You set up access to forms by dragging forms from the application tree view into the window. See Chapter 8 "Designing Forms" for more information.
Content Store The content store icon brings up a window where you specify the URL on the Enterprise Server where you store attached files, and also the public user that can access these files. When end users attach files to forms as they complete steps in the process, the files are stored in the content store. See Chapter 7 "Defining Data Fields" for more information.
Process Map
The process map provides a visual representation of an application. It shows the steps needed to complete the process, and how they are connected to each other.
When you create a new application, the Process Map window is blank. If you are revising an existing process, the current version of the process appears in the Process Map window. To design a process in the Process Map, you drag activity icons from the Map Palette and connect them with transitions.
Map Palette
Figure 2-7 shows the Map Palette, also called the palette. When you create a new application or when you open an existing one, the palette is open by default. You can also click the Palette button to open it.
Figure 2-7 The Map Palette
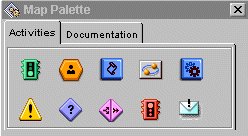
By default, the palette has two tabs: Activities and Documentation. If you use custom activities, you may also have one or more custom tabs on your palette. For more information on adding custom palettes, see "Adding a Custom Palette".
Activities Tab
The Activities tab displays icons that you can drag onto the process map to design a process application. Each of the palette items represents a type of step in the process, a notification, or an error response. Table 2-1 shows the icons on the palette and what they represent.
Documentation Tab
Use this tab (shown in Figure 2-8) to drag documentation notes or graphics to the process map.
Figure 2-8 Documentation Tab on the Map Palette
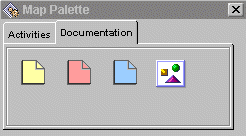
For example, different developers may include notes on a process map coded by color, or the notes could explain features of the process for use when you roll-out the process.
You can also add images to a process map by dragging the image icon to the map and then browsing to the image you want to include.
Messages Window
The Messages window is where error, warning, and information messages are displayed when you check the application syntax using the Check button. The syntax is also checked automatically when you attempt to deploy an application.
The window is blank until the syntax is checked, after that it contains messages, as shown in Figure 2-9.
Figure 2-9 Messages Window
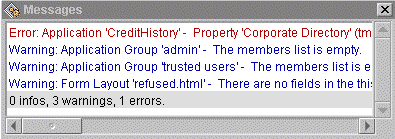
You must fix all errors before you can deploy an application. You can deploy an application that contains warnings, but you may encounter difficulties later when you try to use the application.
The last line of the window summarizes the information found by the syntax check.
If you right-click in the Messages window, a dialog box appears. You can use this dialog box to selectively display different types of messages (for example, errors only or warnings only). You can also clear the Messages window.
Main Toolbar
The main toolbar (see Figure 2-10) contains frequently-used commands.
Figure 2-10 Process Builder main toolbar

The toolbar contains the following buttons:
New Launches the New Application dialog box, where you create a new application which is not based on a previous application.
Open Opens an existing application.
Save Saves the application locally. Use this command to save your work as you are creating or editing an application.
Check Checks the application code and displays errors, warnings, and information messages in a separate window. You need to fix all errors in your application before you can deploy it. You can deploy an application for which you receive warnings, but it may lead to problems in the future. The last line of the window gives you a summary of how many of each type of message the check produced.
Deploy Deploys the application to a cluster.
Inspector Displays the Inspector window for the selected element. This window allows you to set the properties of any element. You can also double-click the element's name in the application tree view to open the Inspector window. Some elements have evaluation order Inspector windows as well as property Inspector windows. Typically, an evaluation order window allows you to reorder conditions or roles into a specific hierarchy or sequence.
Menu Commands
Several menus provide commands for use as you design a Process Manager application. The menus are Application, Edit, Insert, Format, Window, and Help.
Application
New Creates a new application. If you have an application open, this closes the current application after asking if you want to save it first, and launches a new application with a fresh tree view and an empty process map.
Open Takes you to the "Select an Application" dialog box, from which you can open an existing application. If an application is already open, Process Builder closes the application. If the open application has unsaved changes, you are first prompted to save the application.
Import from ZIP Imports an existing zipped application. If you have an application open, this closes the current application after asking if you want to save it first. Browse to the zip file and import it into the current Application folder.
Delete Takes you to the "Select an Application" dialog box, from which you can delete an application. If an application is already open, Process Builder closes the application. If the open application has unsaved changes, you are first prompted to save the application.
Save Saves the currently displayed application to your local machine.
Save As Saves the current application with a different name.
Import File Brings up a dialog box, from which you can copy a file into the application's directory. Enter the path name of the file to import, or use the Browse button to browse to it. Then specify where you want the file copied. The file is automatically copied to a specific location, depending on the file category you select. (See Table 2-2.) If a subdirectory doesn't exist, it will be created.
Check Errors Checks the application code and displays errors, warnings, and information messages in a separate window. You need to fix all errors in your application before you can deploy it. You can deploy an application for which you receive warnings, but it may lead to problems in the future. The last line of the window gives you a summary of how many of each type of message the check produced.
Deploy Deploys the application to a cluster.
Save Process Map Image Saves the process map as an image file. Use this option when you want to show the whole process map outside of Process Builder. For example, by saving the process map as an image, you can print it or insert it into an HTML document. You can choose where to save the image, and you can choose whether to save it in JPEG, PNG or BMP format.
Exit Quits Process Builder. If you have unsaved changes in an application, it gives you the option of saving them.
Edit
Cut Cuts an HTML layout element from a form, or cuts text from a script.
Copy Copies an HTML layout element into a form, or copies text into a script.
Paste Pastes an HTML layout element into a form, or pastes text into a script.
Delete Deletes a single element such as an activity, a data field, or a form from the application tree view. You cannot delete folders from the application tree view, or default item such as predefined scripts and default users and groups. Also, if the application has been deployed in the production stage, you may not be able to delete certain items.
Insert
Group & Role Inserts a new group or role.
Data Field Inserts a new field.
HTML Element Inserts the HTML element that you select from the associated submenu. For more information, see "Insert HTML Element".
Format
These are standard HTML editing commands. Use them to edit HTML forms in the HTML editor.
Size Applies the font size you select to the text.
Style Formats text as bold, italic, underline, or strikethrough.
Remove All Styles Removes size and style formatting from text.
Heading Applies an HTML heading tag to the text.
List Applies an HTML list tag to the text. You can choose either a bulleted list or a numbered list.
Align Aligns text at the left, right, or center of the page.
Decrease Indent Decreases the amount of indenting on the text.
Increase Indent Increases the amount of indenting on the text.
Window
Select one of these menu items to display the window, or, if it is already displayed, bring it to the foreground.
Project Window Displays the application tree view.
Process Map Displays the process map.
Palette Window Displays the palette.
Messages Window Displays the error and informational messages produced when you check the application syntax using the Check button.
In addition, you can reorganize the windows with either of the following menu items:
Auto Arrange Windows Arranges windows to fit side-by-side within the main window. Four windows will be displayed: the application tree view, process map, Messages window, and the palette. The resulting arrangement is not updated when you resize the main Process Builder window.
Always Arrange Windows Similar to Auto Arrange Windows, except that the arrangement is always updated. Whenever you resize the main window, the individual component windows are resized to maintain their side-by-side arrangement.
Help
Help contents Accesses Process Builder full table of contents. Click a link to go to the topic you are interested in, or use the Index to find a topic. If you click the Contents button within the window, you can access the "Other Documentation" link, which gives you access to the Process Manager documentation set.
Custom Help Displays help you have customized for Process Builder at your site. For example, you might use this feature to add links to your Process Express site or to explain site-specific customizations to Process Builder. To add your own help, edit the file custom_help.html, found in the support/html directory of your Process Manager installation.
About Displays the software version information.
HTML Page Editor Toolbar
The HTML Page Editor toolbar allows you to format the HTML forms that you create. Figure 2-11 shows the HTML Page Editor toolbar.
Figure 2-11 HTML Page Editor toolbar

The drop-down lists and the icons assign HTML formatting to the text you select in your HTML forms. See "Using the HTML Page Editor Toolbar" for more information.


Contents