JavaScript is required to for searching.
Skip Navigation Links
Exit Print View
Sun Server X2-4 (formerly Sun Fire X4470 M2)

Installation Guide for Windows Operating System

search filter icon
search icon

Document Information

Using This Documentation

Part I  Windows Server Installations

1.  Assisted OS Installation With Oracle Hardware Installation Assistant

Oracle Hardware Installation Assistant Task Overview

How to Obtain Oracle Hardware Installation Assistant

Oracle Hardware Installation Assistant Documentation Resources

2.  Getting Started

Supported Windows Server Operating Systems

Windows Installation Prerequisites

Windows Server Installation Task Overview

SAS PCIe HBAs Requiring LSI Mass Storage Driver for Windows Server 2008 SP2

3.  Installing Windows Server 2008

Before You Begin

Installing Windows Server Using Local or Remote Media

Windows Server Installation Using a PXE Network Boot

4.  Post Installation of Windows Server 2008

Before You Begin

Installing Critical Device Drivers and Supplemental Software

Installing Supplemental Software

Configuring Support for TPM

Configuring Intel NIC Teaming

5.  Getting Server Firmware and Software

Firmware and Software Updates

Firmware and Software Access Options

Available Software Release Packages

Accessing Firmware and Software

Installing Updates

Part II  Windows Server System Administrator References

A.  Supported Installation Methods

Console Outputs

Installation Boot Media

Installation Targets

B.  Supported Operating Systems

Supported Operating Systems

C.  BIOS Defaults for New Installations

Verification of BIOS Factory Defaults

D.  Incorporating Device Drivers Into Windows Server 2008 WIM Images for Windows Deployment Services

Getting Started

Location of Device Drivers on Tools and Drivers Firmware DVD

Which Device Drivers to Incorporate Into WIM Image(s)

Prerequisites and Task Overview

Procedures for Incorporating Drivers Into WIM Image(s)

Before you Begin

Create an ImageUnattend.xml Setup Script – Windows Server 2008 (SP2 or R2)

Add Device Driver(s) to Boot WIM – Windows Server 2008 SP2 Only

Map ImageUnattend.xml Setup Script to Windows Server 2008 (SP2 or R2) Install Image

Index

Map ImageUnattend.xml Setup Script to Windows Server 2008 (SP2 or R2) Install Image

Follow the steps in this procedure to map the ImageUnattend.xml Setup Script (created in an earlier procedure in this section) to the Windows Server 2008 (SP2 or R2) install.wim.

  1. Insert the Windows Server 2008 SP2 DVD media into the DVD reader of the system that is hosting the Windows Deployment Services.
  2. Perform the following to launch the Windows Deployment Services administration tool and import the Windows Server 2008 SP2 install WIM.
    1. Click Start-->All Programs -->Windows Deployment Services.
    2. Right-click Install Images and select Add Install Image.

      Note that if no image groups exist, create a new image group named Windows Server 2008 SP2 or Windows Server 2008 R2 and click Next.
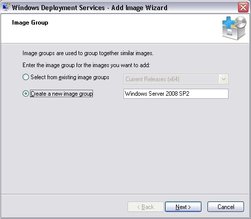
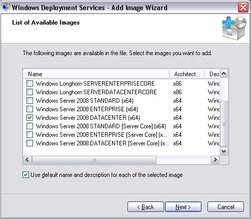
      image:WDS Create New Image Group
    3. Click Browse to select the Windows Server 2008 SP2 Install WIM image located at: DVDDrive:\sources\install.wim; then proceed by clicking Open then Next.
    4. Select the Windows Server 2008 (SP2 or R2) edition (Data Center, Standard, or Enterprise) to import into Windows Deployment Services, then click Next.
      image:WDS Edition Import
    5. To import the specified Windows Server 2008 (SP2 or R2) edition install image, click Next twice, then click Finish.
  3. Launch the Deployment Tools Command Prompt as Administrator.

    For example:

    • Click Start-->All Programs -->Microsoft Windows AIK, then right-click Deployment Tools Command Prompt, and select Run as Administrator.
  4. In the Deployment Tools Command Prompt, perform the following:
    1. Use the cd command to change the directory to the folder containing the Windows Server 2008 SP2 install WIM image.

      For example, the Windows Server 2008 SP2 Datacenter (x64) edition WIM image would be located at:

      cd Drive:\RemoteInstall\images\Windows Server 2008 SP2

    2. Use the mkdir command to create a directory with the exact same spelling and case as the imported Windows Server 2008 (SP2 or R2) WIM image.

      mkdir install


      Note - Selecting the defaults when importing the install image for Windows Server 2008 (SP2 or R2) will create an installation WIM file called install.wim.


    3. Use the cd command to change the directory to the imported Windows Server 2008 (SP2 or R2) folder, then use the mkdir command to create an Unattend directory.

      For example:

      cd install

      mkdir Unattend

    4. Use the cd command to change the directory to the Unattend directory, then use the copy command to copy the ImageUnattend.xml Setup Script (created in an earlier procedure in this appendix) to the Unattend directory.

      For example:

      cd Unattend

      copy C:\Unattend\Drivers\{W2K8|W2k8R2}\Catalogs\ImageUnattend.xml


    image:WAIK Copy Image
  5. Perform the following steps to open the Windows Server 2008 (SP2 or R2) image properties.
    1. Launch the Windows Deployment Services administration tool.

      Click Start-->All Programs-->Windows Deployment Services.

    2. In the Windows Deployment Services (WDS) Administration tool, click and expand the Windows Server 2008 (SP2 or R2) image group.
    3. Right-click Microsoft Windows Server (SP2 or R2) and select Properties.
  6. Perform the following steps to map the ImageUnattend.xml Setup Script to the Windows Server 2008 (SP2 or R2) image.
    1. In the General Tab of the Windows Server 2008 (SP2 or R2) image properties, check Allow image to install in unattended mode and click Select File.
    2. Browse to the following location (specified in Step 4d) then click OK.

      Drive:\RemoteInstall\images\{W2K8|W2K8R2}\install\Unattend\ImageUnattend.xml
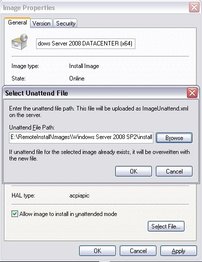

      image:WDS Browse Select Image Unattend
    3. Click OK to map the ImageUnattend.xml Setup Script to the Windows Server 2008 (SP2 or R2) WIM image.

      The Windows Server 2008 (SP2 or R2) WIM image is ready to be installed using the Windows Deployment Services.

    4. Exit the Deployment Tools Command Prompt and the Windows Deployment Services Administration tool.
  7. To deploy the Windows Server 2008 (SP2 or R2), refer to the following procedure:

    Install Windows Server 2008 (SP2 or R2) Using PXE Network Boot.