リリース12
E05659-01
目次
前へ
次へ
| Oracle XML Publisher管理および開発者ガイド リリース12 E05659-01 | 目次 | 前へ | 次へ |
この章では、次のトピックを説明します。
この章は、Application Program Interfaceを介してXMLパブリッシャと対話するプログラムまたはアプリケーションを作成する開発者を対象としています。この情報は、OracleMetaLinkのDocument Note 396179.1『Oracle XML Publisher Documentation Resources, Release 12』から入手できるJavadocをあわせて参照することを前提としています。
XMLパブリッシャは、Java APIのコア層と、APIおよびUIのアプリケーション層の2つの層で構成されています。
コア層には、テンプレートの解析、データのマージ、出力の生成および文書の配信を実行するメイン処理エンジンが含まれています。
アプリケーション層を使用すると、アプリケーション開発者はテンプレート・マネージャとプログラム・レベルで対話できるため、テンプレート・マネージャはコア層とも対話します。
この項は、読者にJavaプログラミング、XMLおよびXSLテクノロジの知識があることを前提としています。アプリケーション層については、テンプレート・マネージャの知識があることを前提としています。
XMLパブリッシャは、次のコアAPIコンポーネントで構成されています。
PDFフォーム処理エンジン
PDFテンプレートをXMLデータ(およびオプションのメタデータ)とマージしてPDF文書出力を作成します。
RTFプロセッサ
FOエンジンに対する入力用にRTFテンプレートをXSLに変換します。
FOエンジン
XSLとXMLをマージして、Excel(HTML)、PDF、RTFまたはHTMLのいずれかの出力形式を作成します。
PDF文書マージ機能
文書のマージ、ページ番号の追加および透かしの設定など、PDFファイルのオプションの後処理機能を提供します。
eTextプロセッサ
RTF eTextテンプレートをXSLに変換し、XSLとXMLをマージしてEDIおよびEFT伝送用のテキスト出力を作成します。
文書プロセッサ(XML API)
テンプレート名、データ・ソース、言語、出力タイプ、出力名および出力先を指定する単一のXMLファイルを渡すことによって、単一のAPIまたは複数のAPIにアクセスするバッチ処理機能を提供します。
次の図は、各コア処理エンジンに対するテンプレート・タイプおよび出力タイプのオプションを示しています。
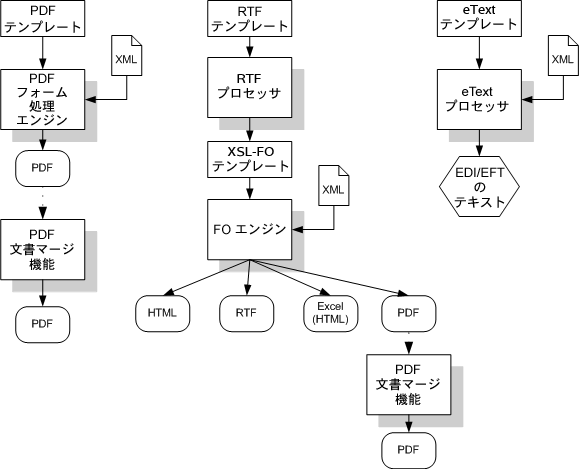
PDFフォーム処理エンジンは、PDFテンプレートとXMLデータ・ファイルをマージしてPDF文書を作成します。これには、ファイル名、ストリームまたはXMLデータ文字列を使用します。
PDF処理エンジンの入力として、XMLベースのテンプレート・メタ情報(.xtm)ファイルを必要に応じて組み込むことができます。このファイルは、オーバーフロー・データの配置を定義する補足テンプレートです。
FO処理エンジンにも、PDFテンプレートに関する情報を提供するユーティリティが組み込まれています。これらのユーティリティでは、次の処理を実行できます。
PDFテンプレートからのフィールド名リストの取得
PDFテンプレートからのXFDFデータの生成
XSLTを使用したXMLデータのXFDFへの変換
XMLデータをPDFテンプレートとマージしてPDF出力文書を作成するには、次の3つの方法があります。
入力/出力ファイル名を使用する方法
入力/出力ストリームを使用する方法
入力XMLデータ文字列を使用する方法
必要に応じて、テンプレート内のオーバーフロー・データの配置を記述するメタデータXMLファイルを組み込むことができます。
入力:
テンプレート・ファイル名(文字列)
XMLファイル名(文字列)
メタデータXMLファイル名(文字列)
出力:
PDFファイル名(文字列)
import oracle.apps.xdo.template.FormProcessor;
.
.
    FormProcessor fProcessor = new FormProcessor();

    fProcessor.setTemplate(args[0]);  // Input File (PDF) name
    fProcessor.setData(args[1]);     // Input XML data file name
    fProcessor.setOutput(args[2]);   // Output File (PDF) name
    fProcessor.setMetaInfo(args[3]);   // Metadata XML File name  You can omit this setting when you do not use Metadata.
    fProcessor.process();
入力:
PDFテンプレート(入力ストリーム)
XMLデータ(入力ストリーム)
メタデータXMLデータ(入力ストリーム)
出力:
PDF(出力ストリーム)
import java.io.*;
import oracle.apps.xdo.template.FormProcessor;
.
.
.
  FormProcessor fProcessor = new FormProcessor();

  FileInputStream fIs = new FileInputStream(originalFilePath); // Input File
  FileInputStream fIs2 = new FileInputStream(dataFilePath); // Input Data
  FileInputStream fIs3 = new FileInputStream(metaData); // Metadata XML Data
  FileOutputStream fOs = new FileOutputStream(newFilePath); // Output File

  fProcessor.setTemplate(fIs);
  fProcessor.setData(fIs2);   // Input Data
  fProcessor.setOutput(fOs);
  fProcessor.setMetaInfo(fIs3);
  fProcessor.process();

  fIs.close();
  fOs.close();
入力:
テンプレート・ファイル名(文字列)
XMLデータ(文字列)
メタデータXMLファイル名(文字列)
出力:
PDFファイル名(文字列)
import oracle.apps.xdo.template.FormProcessor;
.
.
.
FormProcessor fProcessor = new FormProcessor();

fProcessor.setTemplate(originalFilePath);     // Input File (PDF) name
fProcessor.setDataString(xmlContents);       // Input XML string
fProcessor.setOutput(newFilePath);           // Output File (PDF) name
fProcessor.setMetaInfo(metaXml);        // Metadata XML File name    You can omit this setting when you do not use Metadata.
fProcessor.process();
PDFテンプレートからフィールド名を取得するには、FormProcessor.getFieldNames() APIを使用します。このAPIでは、フィールド名が列挙オブジェクトに戻されます。
入力:
PDFテンプレート
出力:
列挙オブジェクト
import java.util.Enumeration;
import oracle.apps.xdo.template.FormProcessor;
.
.
.
FormProcessor fProcessor = new FormProcessor();
fProcessor.setTemplate(filePath);        // Input File (PDF) name
Enumeration enum = fProcessor.getFieldNames();
while(enum.hasMoreElements()) {
  String formName = (String)enum.nextElement();
  System.out.println("name : " + formName + " , value : " + fProcessor.getFieldValue(formName));
}
XML Forms Data Format(XFDF)は、PDF文書内のフォーム・データと注釈を表すための形式です。XFDFは、Forms Data Format(FDF)のXMLバージョンであり、フォーム・データと注釈を表すためのPDFの簡易バージョンです。PDF文書内のフォーム・フィールドには、編集ボックス、ボタンおよびラジオ・ボタンが含まれます。
このクラスを使用してXFDFデータを生成します。このクラスのインスタンスを作成すると、内部XFDFツリーが初期化されます。append()メソッドを使用して、文字列の名前と値のペアを渡すことによって、FIELD要素をXFDFツリーに追加します。データは必要なだけ追加できます。
このクラスでは、appendXML()メソッドをコールしてXMLデータを追加することもできます。appendXML()メソッドをコールする前に、setStyleSheet()メソッドをコールして適切なXSLスタイルシートを設定する必要があることに注意してください。XMLデータは必要なだけ追加できます。
toString()、toReader()、toInputStream()またはtoXMLDocument()のいずれかのメソッドをコールすると、内部XFDF文書をいつでも取得できます。
次に、XFDFデータのサンプルを示します。
<?xml version="1.0" encoding="UTF-8"?>
<xfdf xmlns="http://ns.adobe.com/xfdf/" xml:space="preserve">
<fields>
 <field name="TITLE">
  <value>Purchase Order</value>
  </field>
 <field name="SUPPLIER_TITLE">
   <value>Supplie</value>
 </field>
  ...
 </fields>
次のコード例は、APIの使用方法を示しています。
import oracle.apps.xdo.template.FormProcessor;
import oracle.apps.xdo.template.pdf.xfdf.XFDFObject;
.
.
.
FormProcessor fProcessor = new FormProcessor();
fProcessor.setTemplate(filePath);      // Input File (PDF) name
XFDFObject xfdfObject = new XFDFObject(fProcessor.getFieldInfo());
System.out.println(xfdfObject.toString());
XSLスタイルシートを使用して、標準のXMLをXFDF形式に変換します。次に、サンプルのXMLデータをXFDFに変換する例を示します。
次のように、開始時のXMLはROWSET/ROW形式であるとします。
<ROWSET>
     <ROW num="0">
       <SUPPLIER>Supplier</SUPPLIER>
       <SUPPLIERNUMBER>Supplier Number</SUPPLIERNUMBER>
       <CURRCODE>Currency</CURRCODE>
     </ROW>
...
</ROWSET>
このXMLから次のXFDF形式を生成するとします。
 <fields>
  <field name="SUPPLIER1">
    <value>Supplier</value>
  </field>
  <field name="SUPPLIERNUMBER1">
    <value>Supplier Number</value>
  </field>
  <field name="CURRCODE1">
    <value>Currency</value>
  </field>
...
</fields>
次のXSLTによって変換が実行されます。
<xsl:stylesheet version="1.0" xmlns:xsl="http://www.w3.org/1999/XSL/Transform">
<xsl:template match="/">
<fields>
<xsl:apply-templates/>
</fields>
</xsl:template>
   <!-- Count how many ROWs(rows) are in the source XML file. -->
   <xsl:variable name="cnt" select="count(//row|//ROW)" />
   <!-- Try to match ROW (or row) element.
   <xsl:template match="ROW/*|row/*">
      <field>
         <!-- Set "name" attribute in "field" element. -->
         <xsl:attribute name="name">
            <!-- Set the name of the current element (column name)as a value of the current name attribute. -->
            <xsl:value-of select="name(.)" />
            <!-- Add the number at the end of the name attribute value if more than 1 rows found in the source XML file.-->
            <xsl:if test="$cnt > 1">
               <xsl:number count="ROW|row" level="single" format="1"/>
            </xsl:if>
         </xsl:attribute>
         <value>
            <!--Set the text data set in the current column data as a text of the "value" element. -->
            <xsl:value-of select="." />
         </value>
      </field>
   </xsl:template>
</xsl:stylesheet>
この結果、次のようにXSLTを使用すると、XFDFObjectを使用してXMLをXFDF形式に変換できます。
import java.io.*;
import oracle.apps.xdo.template.pdf.xfdf.XFDFObject;
.
.
.
XFDFObject xfdfObject  = new XFDFObject();

xfdfObject .setStylesheet(new BufferedInputStream(new FileInputStream(xslPath)));   // XSL file name
xfdfObject .appendXML( new File(xmlPath1));   // XML data file name
xfdfObject .appendXML( new File(xmlPath2));   // XML data file name

System.out.print(xfdfObject .toString());
RTFプロセッサ・エンジンは、入力としてRTFテンプレートを使用します。プロセッサは、テンプレートを解析し、XSL-FOテンプレートを作成します。このテンプレートをデータ・ソース(XMLファイル)とともにFOエンジンに渡すと、PDF、HTML、RTFまたはExcel(HTML)の出力を作成できます。
次の例に示すように、入力/出力ファイル名または入力/出力ストリームのいずれかを使用します。
入力:
RTFファイル名(文字列)
出力:
XSLファイル名(文字列)
import oracle.apps.xdo.template.FOProcessor;
.
.
.
  public static void main(String[] args)
  {
RTFProcessor rtfProcessor = new RTFProcessor(args[0]); //input template
rtfProcessor.setOutput(args[1]);  // output file
rtfProcessor.process();
    System.exit(0);
  }
入力:
RTF(入力ストリーム)
出力:
XSL(出力ストリーム)
import oracle.apps.xdo.template.FOProcessor;
.
.
.
  public static void main(String[] args)
  {
    FileInputStream   fIs  = new FileInputStream(args[0]);  //input template
    FileOutputStream  fOs  = new FileOutputStream(args[1]); // output

    RTFProcessor rtfProcessor = new RTFProcessor(fIs);
    rtfProcessor.setOutput(fOs);
    rtfProcessor.process();
    // Closes inputStreams outputStream
    System.exit(0);
  }
FOプロセッサ・エンジンは、W3C XSL-FO標準のXMLパブリッシャによる実装であり、すべてのXSL-FOコンポーネントの完全な実装を表しているわけではありません。サポートされているXSL-FO要素のリストは、『Oracle XML Publisherレポート・デザイナーズ・ガイド』のサポートされているXSL-FO要素に関する項を参照してください。
FOプロセッサは次の2つの入力のいずれかより、出力をPDF、RTF、HTMLまたはExcel(HTML)で生成できます。
テンプレート(XSL)およびデータ(XML)の組合せ
FOオブジェクト
両方の入力タイプをファイル名、ストリームまたは配列で渡すことができます。setOutputFormatメソッドを次のいずれかに設定して出力形式を設定します。
FORMAT_EXCEL
FORMAT_HTML
FORMAT_PDF
FORMAT_RTF
次の入力からXSL-FOを作成するXSL-FOユーティリティも提供されています。
XSLファイルおよびXMLファイル
2つのXMLファイルおよび2つのXSLファイル
2つのXSL-FOファイル(マージ)
XSL-FOユーティリティからのFOオブジェクト出力は、FOプロセッサの入力として使用できます。
XMLパブリッシャでは、BiDiレイアウトに関してUnicode BiDiアルゴリズムを利用します。FOプロセッサでは、プロパティwriting-mode、directionおよびunicode bidiに対する特定の値に基づいてBiDiレイアウトがサポートされます。
writing-modeプロパティでは、テキストにおける行の語順、および行の順序が定義されます。つまり、right-to-left, top-to-bottom(右から左、上から下)またはleft-to-right, top-to-bottom(左から右、上から下)のいずれかを指定します。directionプロパティでは、テキスト文字列の書込み方法が決まります。つまり、right-to-left(右から左)またはleft-to-right(左から右)などの方向を指定します。unicode bidiでは、上書き動作が制御および管理されます。
FOプロセッサでは、2つのレベルのフォント代替メカニズムがサポートされています。このメカニズムでは、指定したフォントまたは絵文字が検出されない場合に使用するデフォルト・フォントが制御されます。XMLパブリッシャでは、適切なデフォルト代替フォントが自動的に提供され、構成は必要ありません。また、使用するデフォルト・フォントを指定するユーザー定義の構成ファイルもサポートされています。絵文字の代替の場合、デフォルト・メカニズムでは絵文字のみが置換され、文字列全体は置換されません。
ヘッダーおよびフッターがテンプレートで定義されているより多くの領域を必要とする場合は、FOプロセッサによって、ページのヘッダーおよびフッターの値と本文領域余白の値との差異に基づいて、ヘッダーおよびフッターの領域が拡張され、本文の領域が縮小されます。
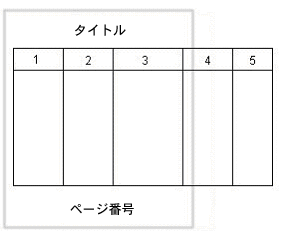
この機能では、Zスタイルの水平方向の表区切りがサポートされます。水平方向の表区切りは列の拡張に影響されないため、拡張された列のセルがページ(または領域の幅)を超えた場合は、FOプロセッサによってセルが分割され、分割セルに対してインテリジェント書式設定は適用されません。
次の図は、幅が広すぎるために1ページに表示できない表を示しています。
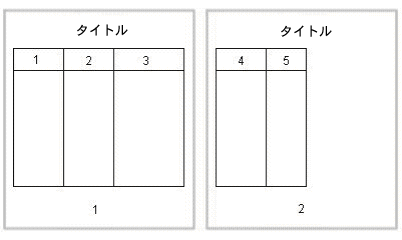
次の図は、幅の広い表を水平方向の表区切りで処理する方法の1つのオプションを示しています。この例では、3列目の後で水平方向の表区切りが行われます。
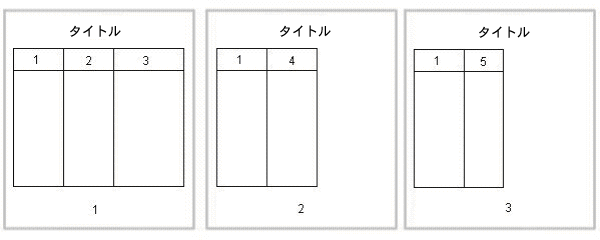
次の図は、別のオプションを示しています。3列目の後で表が区切られますが、新しい各ページに1列目が表示されます。
次の例は、FOプロセッサでファイル名を使用して出力ファイルを作成する方法を示しています。
入力:
XMLファイル名(文字列)
XSLファイル名(文字列)
出力:
出力ファイル名(文字列)
import oracle.apps.xdo.template.FOProcessor;
.
.
.
  public static void main(String[] args)
  {

    FOProcessor processor = new FOProcessor();
    processor.setData(args[0]);     // set XML input file
    processor.setTemplate(args[1]); // set XSL input file
    processor.setOutput(args[2]);  //set output file
    processor.setOutputFormat(FOProcessor.FORMAT_PDF);
    // Start processing
    try
    {
       processor.generate();
    }
    catch (XDOException e)
    {
       e.printStackTrace();
       System.exit(1);
    }

    System.exit(0);
  }
次の例に示すように、入力/出力ストリームを指定してプロセッサを使用することもできます。
入力:
XMLデータ(入力ストリーム)
XSLデータ(入力ストリーム)
出力:
出力ストリーム(出力ストリーム)
import java.io.InputStream;
import java.io.OutputStream;
import oracle.apps.xdo.template.FOProcessor;
.
.
.
  public void runFOProcessor(InputStream xmlInputStream,
                             InputStream xslInputStream,
                             OutputStream pdfOutputStream)
  {

    FOProcessor processor = new FOProcessor();
    processor.setData(xmlInputStream);
    processor.setTemplate(xslInputStream);
    processor.setOutput(pdfOutputStream);
    // Set output format (for PDF generation)
    processor.setOutputFormat(FOProcessor.FORMAT_PDF);
    // Start processing
    try
    {
       processor.generate();
    }
    catch (XDOException e)
    {
       e.printStackTrace();
       System.exit(1);
    }

    System.exit(0);

  }
データとテンプレートの配列の組合せを処理して、複数の入力から1つの出力ファイルを生成できます。入力データ・ソースの数は、データに適用されるテンプレートの数と一致する必要があります。たとえば、File1.xml、File2.xml、File3.xmlとFile1.xsl、File2.xsl、File3.xslの入力から単一のFile1_File2_File3.pdfが作成されます。
入力:
XMLデータ(配列)
XSLデータ(テンプレート)(配列)
出力:
ファイル名(文字列)
import java.io.InputStream;
import java.io.OutputStream;
import oracle.apps.xdo.template.FOProcessor;
.
.
.
   public static void main(String[] args)
  {

    String[] xmlInput = {"first.xml", "second.xml", "third.xml"};
    String[] xslInput = {"first.xsl", "second.xsl", "third.xsl"};


    FOProcessor processor = new FOProcessor();
    processor.setData(xmlInput);
    processor.setTemplate(xslInput);

    processor.setOutput("/tmp/output.pdf);          //set (PDF) output file
    processor.setOutputFormat(FOProcessor.FORMAT_PDF); processor.process();
    // Start processing
    try
    {
       processor.generate();
    }
    catch (XDOException e)
    {
       e.printStackTrace();
       System.exit(1);
    }

  }
入力XMLおよびXSLファイルからXSL-FO出力ファイルを作成するか、または2つのXSL-FOファイルをマージするには、XSL-FOユーティリティを使用します。このユーティリティで作成される出力は、最終出力の生成に使用できます。「FOファイルからの出力の生成」を参照してください。
入力:
XMLファイル
XSLファイル
出力:
XSL-FO(入力ストリーム)
import oracle.apps.xdo.template.fo.util.FOUtility;
.
.
.
  public static void main(String[] args)
  {
    InputStream foStream;

    // creates XSL-FO InputStream from XML(arg[0])
    // and XSL(arg[1]) filepath String
    foStream = FOUtility.createFO(args[0], args[1]);
    if (mergedFOStream == null)
    {
      System.out.println("Merge failed.");
      System.exit(1);
    }

    System.exit(0);
  }
入力:
XMLファイル1
XMLファイル2
XSLファイル1
XSLファイル2
出力:
XSL-FO(入力ストリーム)
import oracle.apps.xdo.template.fo.util.FOUtility;
.
.
.
  public static void main(String[] args)
  {
    InputStream firstFOStream, secondFOStream, mergedFOStream;
    InputStream[] input = InputStream[2];

    // creates XSL-FO from arguments
    firstFOStream = FOUtility.createFO(args[0], args[1]);

    // creates another XSL-FO from arguments
    secondFOStream = FOUtility.createFO(args[2], args[3]);

    // set each InputStream into the InputStream Array
    Array.set(input, 0, firstFOStream);
    Array.set(input, 1, secondFOStream);

    // merges two XSL-FOs
    mergedFOStream = FOUtility.mergeFOs(input);

    if (mergedFOStream == null)
    {
      System.out.println("Merge failed.");
      System.exit(1);
    }
    System.exit(0);
  }
入力:
2つのXSL-FOファイル名(配列)
出力:
1つのXSL-FO(入力ストリーム)
import oracle.apps.xdo.template.fo.util.FOUtility;
.
.
.
  public static void main(String[] args)
  {
    InputStream mergedFOStream;

    // creates Array
    String[] input = {args[0], args[1]};

    // merges two FO files
    mergedFOStream = FOUtility.mergeFOs(input);
    if (mergedFOStream == null)
    {
      System.out.println("Merge failed.");
      System.exit(1);
    }
    System.exit(0);
  }
FOプロセッサは、FOオブジェクトを処理して最終出力を生成するためにも使用できます。FOオブジェクトは、XMLデータにXSL-FOスタイルシートを適用した結果です。これらのオブジェクトは、サード・パーティのアプリケーションから生成でき、FOプロセッサの入力として使用できます。
プロセッサのコール方法は前述の方法と同じですが、書式設定の指示はFOに含まれているため、テンプレートは必要ありません。
入力:
FOファイル名(文字列)
出力:
PDFファイル名(文字列)
import oracle.apps.xdo.template.FOProcessor;
.
.
.
  public static void main(String[] args) {

    FOProcessor processor = new FOProcessor();
    processor.setData(args[0]);     // set XSL-FO input file
    processor.setTemplate((String)null);
    processor.setOutput(args[2]);  //set (PDF) output file
    processor.setOutputFormat(FOProcessor.FORMAT_PDF);
    // Start processing
    try
    {
       processor.generate();
    }
    catch (XDOException e)
    {
       e.printStackTrace();
       System.exit(1);
    }

    System.exit(0);
  }
入力:
FOデータ(入力ストリーム)
出力:
出力(出力ストリーム)
import java.io.InputStream;
import java.io.OutputStream;
import oracle.apps.xdo.template.FOProcessor;
.
.
.
  public void runFOProcessor(InputStream xmlfoInputStream,
                             OutputStream pdfOutputStream)
  {

    FOProcessor processor = new FOProcessor();
    processor.setData(xmlfoInputStream);
    processor.setTemplate((String)null);

    processor.setOutput(pdfOutputStream);
    // Set output format (for PDF generation)
    processor.setOutputFormat(FOProcessor.FORMAT_PDF);
    // Start processing
    try
    {
       processor.generate();
    }
    catch (XDOException e)
    {
       e.printStackTrace();
       System.exit(1);
    }
  }
複数のFO入力を配列として渡して単一の出力ファイルを生成できます。テンプレートは必要でないため、次の例に示すように、テンプレート配列のメンバーはnullに設定します。
入力:
FOデータ(配列)
出力:
出力ファイル名(文字列)
import java.lang.reflect.Array;
import oracle.apps.xdo.template.FOProcessor;
.
.
.
  public static void main(String[] args)
  {

    String[] xmlInput = {"first.fo", "second.fo", "third.fo"};
    String[] xslInput = {null, null, null};   // null needs for xsl-fo input

    FOProcessor processor = new FOProcessor();
    processor.setData(xmlInput);
    processor.setTemplate(xslInput);

    processor.setOutput("/tmp/output.pdf);          //set (PDF) output file
    processor.setOutputFormat(FOProcessor.FORMAT_PDF); processor.process();
    // Start processing
    try
    {
       processor.generate();
    }
    catch (XDOException e)
    {
       e.printStackTrace();
       System.exit(1);
    }

  }
PDF文書マージ機能クラスでは、PDF文書を操作するための一連のユーティリティが提供されます。これらのユーティリティを使用すると、文書のマージ、ページ番号の追加、背景の設定および透かしの追加を実行できます。
多くのビジネス文書が、最終的に1つの文書にマージする必要がある別個の複数の文書で構成されています。PDFDocMergerクラスでは、複数文書をマージして単一のPDF文書を作成する機能がサポートされています。また、作成した文書をさらに操作して、ページ番号、透かしまたはその他の背景イメージを追加できます。
次のコードは、物理ファイルを使用して2つのPDF文書をマージ(連結)して、単一の出力文書を生成する方法を示しています。
入力:
PDF_1ファイル名(文字列)
PDF_2ファイル名(文字列)
出力:
PDFファイル名(文字列)
import java.io.*;
import oracle.apps.xdo.common.pdf.util.PDFDocMerger;
.
.
.
  public static void main(String[] args)
  {
    try
    {
      // Last argument is PDF file name for output
      int inputNumbers = args.length - 1;

      // Initialize inputStreams
      FileInputStream[] inputStreams = new FileInputStream[inputNumbers];
      inputStreams[0] = new FileInputStream(args[0]);
      inputStreams[1] = new FileInputStream(args[1]);

      // Initialize outputStream
      FileOutputStream outputStream = new FileOutputStream(args[2]);

      // Initialize PDFDocMerger
      PDFDocMerger docMerger = new PDFDocMerger(inputStreams, outputStream);

      // Merge PDF Documents and generates new PDF Document
      docMerger.mergePDFDocs();
      docMerger = null;

      // Closes inputStreams and outputStream
    }
    catch(Exception exc)
    {
      exc.printStackTrace();
    }
  }
入力:
PDF文書(入力ストリーム配列)
出力:
PDF文書(出力ストリーム)
import java.io.*;
import oracle.apps.xdo.common.pdf.util.PDFDocMerger;
.
.
.
  public boolean mergeDocs(InputStream[] inputStreams, OutputStream outputStream)
  {
    try
    {
      // Initialize PDFDocMerger
      PDFDocMerger docMerger = new PDFDocMerger(inputStreams, outputStream);

      // Merge PDF Documents and generates new PDF Document
      docMerger.mergePDFDocs();
      docMerger = null;

      return true;
    }
    catch(Exception exc)
    {
      exc.printStackTrace();
      return false;
    }
  }
次のコードは、入力ストリームを使用して2つのPDF文書をマージし、単一のマージ出力ストリームを生成する方法を示しています。
ページ番号を追加する手順は、次のとおりです。
最終出力PDF文書でページ番号を表示する位置にPDFフォーム・フィールドを組み込んだ背景用のPDFテンプレート文書を作成します。
フォーム・フィールドに@pagenum@という名前を設定します。
フィールドに、ページ番号の開始番号を入力します。フィールドに値を入力しない場合、開始ページ番号はデフォルトで1に設定されます。
入力:
PDF文書(入力ストリーム配列)
背景用PDF文書(入力ストリーム)
出力:
PDF文書(出力ストリーム)
import java.io.*;
import oracle.apps.xdo.common.pdf.util.PDFDocMerger;
.
.
.
 public static boolean mergeDocs(InputStream[] inputStreams, InputStream backgroundStream, OutputStream outputStream)

 {
    try
    {
      // Initialize PDFDocMerger
      PDFDocMerger docMerger = new PDFDocMerger(inputStreams, outputStream);

      // Set Background
      docMerger.setBackground(backgroundStream);

      // Merge PDF Documents and generates new PDF Document
      docMerger.mergePDFDocs();
      docMerger = null;

      return true;
    }
    catch(Exception exc)
    {
      exc.printStackTrace();
      return false;
    }
  }
FOプロセッサでは、XSL-FOテンプレートによってページ番号がネイティブでサポートされていますが、複数の文書をマージしている場合、完成した文書に最初から最後まで番号を付けるにはこのクラスを使用する必要があります。
次に示すコード例では、次のメソッドを使用して、ページ上の特定位置へのページ番号配置、番号の書式設定、および開始値の設定が実行されます。
setPageNumberCoordinates (x, y) - ページ番号の位置のxおよびy座標を設定します。次に示す例では、座標は300, 20に設定されます。
setPageNumberFontInfo (font name, size) - ページ番号のフォントとサイズを設定します。このメソッドをコールしない場合は、デフォルトのHelvetica、サイズ8が使用されます。次に示す例では、フォントはCourier、サイズは8に設定されます。
setPageNumberValue (n, n) - 開始番号および番号付けを開始するページを設定します。このメソッドをコールしない場合は、デフォルト値1, 1が使用されます。
入力:
PDF文書(入力ストリーム配列)
出力:
PDF文書(出力ストリーム)
import java.io.*;
import oracle.apps.xdo.common.pdf.util.PDFDocMerger;
.
.
.
  public boolean mergeDocs(InputStream[] inputStreams, OutputStream outputStream)
  {
    try
    {
      // Initialize PDFDocMerger
      PDFDocMerger docMerger = new PDFDocMerger(inputStreams, outputStream);

      // Calls several methods to specify Page Number

      // Calling setPageNumberCoordinates() method is necessary to set Page Numbering
      // Please refer to javadoc for more information
      docMerger.setPageNumberCoordinates(300, 20);


      // If this method is not called, then the default font"(Helvetica, 8)" is used.
      docMerger.setPageNumberFontInfo("Courier", 8);

      // If this method is not called, then the default initial value "(1, 1)" is used.
      docMerger.setPageNumberValue(1, 1);

      // Merge PDF Documents and generates new PDF Document
      docMerger.mergePDFDocs();
      docMerger = null;

      return true;
    }
    catch(Exception exc)
    {
      exc.printStackTrace();
      return false;
    }
  }
草案段階の一部の文書では、文書全体に「DRAFT」という透かしが表示される必要があります。また、文書に背景イメージが必要な場合もあります。次のコード例は、PDFDocMergerクラスを使用して透かしを設定する方法を示しています。
SetTextDefaultWatermark( )メソッドを使用して、次の属性でテキストの透かしを設定します。
テキストの角度(度): 55
色: 明るい灰色(0.9, 0.9, 0.9)
フォント: Helvetica
フォント・サイズ: 100
開始位置は、テキストの長さに基づいて計算されます。
または、SetTextWatermark( )メソッドを使用して、各属性を別々に設定する方法もあります。SetTextWatermark()メソッドを次のように使用します。
SetTextWatermark ("Watermark Text", x, y) - 透かしテキストを宣言し、開始位置のxおよびy座標を設定します。次に示す例では、透かしテキストは「Draft」、座標は200f, 200fです。
setTextWatermarkAngle (n) - 透かしテキストの角度を設定します。このメソッドをコールしない場合は、0(ゼロ)が使用されます。
setTextWatermarkColor (R, G, B) - RGBカラーを設定します。このメソッドをコールしない場合は、明るい灰色(0.9, 0.9, 0.9)が使用されます。
setTextWatermarkFont ("font name", font size) - フォントとサイズを設定します。このメソッドをコールしない場合は、Helvetica, 100が使用されます。
次の例は、これらのプロパティを設定し、PDFDocMergerをコールする方法を示しています。
入力:
PDF文書(入力ストリーム)
出力:
PDF文書(出力ストリーム)
import java.io.*;
import oracle.apps.xdo.common.pdf.util.PDFDocMerger;
.
.
.
  public boolean mergeDocs(InputStream inputStreams, OutputStream outputStream)
  {
    try
    {
      // Initialize PDFDocMerger
      PDFDocMerger docMerger = new PDFDocMerger(inputStreams, outputStream);

      // You can use setTextDefaultWatermark() without these detailed setting
      docMerger.setTextWatermark("DRAFT", 200f, 200f); //set text and place
      docMerger.setTextWatermarkAngle(80);                //set angle
      docMerger.setTextWatermarkColor(1.0f, 0.3f, 0.5f);  // set RGB Color

      // Merge PDF Documents and generates new PDF Document
      docMerger.mergePDFDocs();
      docMerger = null;

      return true;
    }
    catch(Exception exc)
    {
      exc.printStackTrace();
      return false;
    }
  }
イメージの透かしは、文書の背景全体または特定の領域(例: ロゴ表示領域)に表示されるように設定できます。次のように、長方形の座標を使用して、イメージの配置とサイズを指定します。
float[ ] rct = {左下X, 左下Y, 右上X, 右上Y}
次に例を示します。
float[ ] rct = {100f, 100f, 200f, 200f}
イメージは、定義された長方形の領域にあわせてサイズが変更されます。
サイズを変更せずに実際のイメージ・サイズを使用するには、左下Xと左下Yの位置で配置を定義し、右上Xと右上Yの座標は-1fと指定します。次に例を示します。
float[ ] rct = {100f, 100f, -1f, -1f}
入力:
PDF文書(入力ストリーム)
イメージ・ファイル(入力ストリーム)
出力:
PDF文書(出力ストリーム)
import java.io.*;
import oracle.apps.xdo.common.pdf.util.PDFDocMerger;
.
.
.
  public boolean mergeDocs(InputStream inputStreams, OutputStream outputStream, String imageFilePath)
  {
    try
    {
      // Initialize PDFDocMerger
      PDFDocMerger docMerger = new PDFDocMerger(inputStreams, outputStream);

      FileInputStream wmStream = new FileInputStream(imageFilePath);
      float[] rct = {100f, 100f, -1f, -1f};
      pdfMerger.setImageWatermark(wmStream, rct);

      // Merge PDF Documents and generates new PDF Document
      docMerger.mergePDFDocs();
      docMerger = null;

      // Closes inputStreams
      return true;
    }
    catch(Exception exc)
    {
      exc.printStackTrace();
      return false;
    }
  }
PDFBookBinderプロセッサは、複数のPDF文書をマージして、章、項および節の階層構造と目次で構成された単一の文書にする場合に便利です。このプロセッサではPDFスタイルの「しおり」も生成され、アウトライン構造は章および項の階層によって決まります。非常に強力な機能を備えており、組み合された文書を完全に管理することができます。
目次の書式設定とスタイルは、Microsoft Wordで作成されたRTFテンプレートを使用して作成されます。各章は独立したPDFファイル(1つの章、項または節が1つのPDFに対応します)としてプログラムに渡されます。テンプレートは、文書内への動的または静的コンテンツの挿入、ページ番号付けおよびハイパーリンクの配置のために章レベルで指定することもできます。
テンプレートの形式は、RTFまたはPDFのどちらでもかまいません。RTFテンプレートのほうが、XMLパブリッシャの動的コンテンツのサポートを活用できるのでより柔軟性があります。PDFテンプレートは、柔軟性がはるかに低く、ページ番号やその他のタイプの動的コンテンツを挿入したときのテキスト領域の再構成といった必要な効果を得ることが難しくなります。
テンプレートは、(90度単位で)回転したり、透過にすることができます。PDFテンプレートは、ブック・レベルで指定してグローバルなページ番号付けや、その他、背景および透かしなどのコンテンツの指定を可能にすることもできます。標題ページも、各章や項ごとの中扉と同様にパラメータとして渡すことができます。
ブックの章、項および節の構造は、XMLとして表され、コマンドライン・パラメータとして渡すことも、APIレベルで渡すこともできます。章および項のファイルは、すべてのテンプレート・ファイルおよびそのパラメータと同じように、すべてこのXML構造内に指定されます。したがって、必要なパラメータはXMLファイルとPDF出力ファイルの2つのみです。
また、ブック構造内に分冊の区切りを指定することもできます。これにより、内容が別々の出力ファイルに分割され、ファイルおよび印刷の管理が簡単になります。
XML制御ファイルの構造は、次の図に示されています。
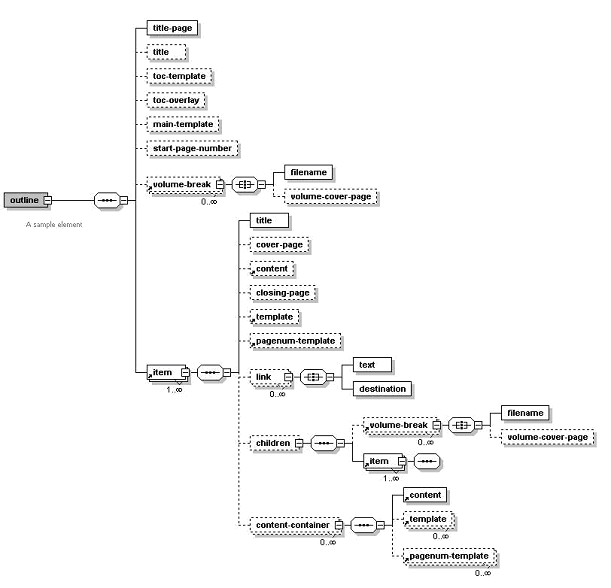
XML構造内でテンプレートおよびコンテンツ・ファイルの位置を指定するには、ローカル・ファイル・システムへの相対パスまたはテンプレートやコンテンツの位置を指すURLを指定できます。Secure HTTPプロトコルの他、次のXMLパブリッシャ・プロトコルもサポートされています。
“blob://” - ユーザー定義の任意のBLOB表にあるデータを指定するために使用されます。
“blob://”プロトコルの書式は、次のとおりです。
blob://[table_name].[blob_column_name]/[pk_datatype]:[pk_name]=[pk_value]/../../..コマンドラインの使用例を次に示します。
java oracle.apps.template.pdf.book.PDFBookBinder [-debug <true or false>] [-tmp <temp dir>] -xml <input xml> -pdf <output pdf>各項目は次のとおりです。
-xml <ファイル>: 目次XML構造を含む入力XMLファイルのファイル名です。
-pdf <ファイル>: 生成される最終のPDF出力ファイルです。
-tmp <ディレクトリ>: メモリー管理を向上させるための一時ディレクトリです(任意指定で、指定しない場合はシステムの環境変数“java.io.tmpdir”が使用されます)。
-log <ファイル>: 出力ログ・ファイルを設定します(任意指定で、デフォルトはSystem.outです)。
-debug <trueまたはfalse>: デバッグをオフまたはオンにします。
次に、APIメソッド・コールの例を示します。
String xmlInputPath = “c:\\tmp\\toc.xml”;
String pdfOutputPath = “c:\\tmp\\final_book.pdf”;
PDFBookBinder bookBinder = new PDFBookBinder(xmlInputPath,
 pdfOutputPath);

bookBinder.setConfig(new Properties());
bookBinder.process();
文書プロセッサ・エンジンは、テンプレート名、データ・ソース、言語、出力タイプ、出力名および出力先を指定する単一のXMLインスタンス文書を渡すことによって、単一のAPIまたは複数のAPIにアクセスするバッチ処理機能を提供します。
このソリューションを使用すると、XMLパブリッシャを使用したバッチ印刷が可能になります。単一のXML文書を使用して、複数の顧客に対する一連の請求書について、顧客ごとの優先出力形式や配信チャネルなども含めて定義できます。XML形式は非常に柔軟性があり、複数文書の作成または単一のマスター文書の作成が可能です。
この項の内容は、次のとおりです。
文書プロセッサXMLファイルの階層と要素の説明
特定の処理オプションの例を示すサンプルXMLファイルの提供
プロセッサを起動するサンプル・コードの提供
文書プロセッサXMLファイルの要素の階層は、次のとおりです。
Requestset
   request
      delivery
         filesystem
         print
         fax
            number
         email
            message
      document
         background
            text
         pagenumber
         template
            data
この階層を図に表すと、次のようになります。
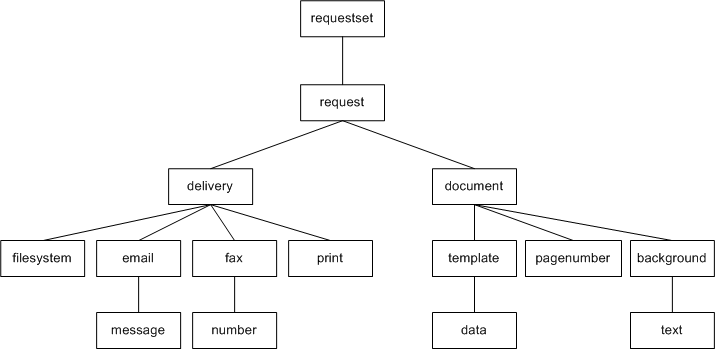
次の表で、各要素を説明します。
| 要素 | 属性 | 説明 |
|---|---|---|
| requestset | xmlns version | ルート要素には、[xmlns:xapi="http://xmlns.oracle.com/oxp/xapi/"]ブロックが含まれている必要があります。 versionは必須ではありませんが、デフォルトで"1.0"に設定されます。 |
| request | N/A | データおよびテンプレート処理定義が含まれる要素。 |
| delivery | N/A | 生成された出力の送信先を定義します。 |
| document | output-type | 出力を1つ指定します。この出力には複数のテンプレート要素を設定できます。output-type属性はオプションです。有効な値は、次のとおりです。 pdf(デフォルト) rtf html excel text |
| filesystem | output | 出力をファイル・システムに保存する場合はこの要素を指定します。output属性にディレクトリ・パスを定義します。 |
| print要素は、1つの文書を複数のプリンタに印刷するために、deliveryの下に複数回記述できます。printer属性をURI(例:"ipp://myprintserver:631/printers/printername")で指定します。 | |
| fax |
| server属性にURIを指定します。例: "ipp://myfaxserver1:631/printers/myfaxmachine"。 |
| number | number要素は、複数のFAX番号をリストするために複数回記述できます。各要素に1つの番号のみ記述する必要があります。 | |
| server属性に送信メール・サーバー(SMTP)を指定します。 port属性にメール・サーバーのポートを指定します。 | |
| message |
| message要素は、email要素の下に複数回配置できます。message要素には文字データを指定できます。 to、ccおよびbcc属性には、複数のEメール・アドレスをカンマで区切って指定できます。 attachmentの値はtrueまたはfalse(デフォルト)です。attachmentがtrueの場合、生成された文書はEメールの送信時に添付されます。 subject属性はオプションです。 |
| background | 各項目は次のとおりです。 | 特定のページに背景テキストが必要な場合は、where値に必要なページ番号を設定します。ページ索引は1から始まります。デフォルト値は0(ゼロ)で、この場合はすべてのページに背景が配置されます。 |
| text |
| titleの値に透かしテキストを指定します。 defaultの値がyesの場合は、スラッシュ付きの透かしが自動的に描画されます。デフォルト値はyesです。 |
| pagenumber |
| initial-page-indexのデフォルト値は0(ゼロ)です。 initial-valueのデフォルト値は1です。 ページ番号のフォントにはHelveticaが使用されます。 x-posは、左下のx位置を示します。 y-posは、左下のy位置を示します。 |
| template |
| テンプレート情報が記述されます。 type属性の有効な値は、次のとおりです。 rtf xsl-fo etext デフォルト値はpdfです。 |
| data | location | location属性を定義して、データの格納場所を指定するか、またはサブ要素を含む実際のXMLデータを添付します。locationのデフォルト値はinlineです。locationがXMLファイルまたはURLのいずれかを指し示す場合、データには正しいエンコーディングのXML宣言が含まれている必要があります。 location属性が指定されない場合は、データ要素に実際のデータのサブ要素が含まれている必要があります。これにはXML宣言を含めないでください。 |
この項では、次の例を示す各サンプルXMLファイルを提供します。
単純なXMLのサンプル
2つのデータ・セットの定義
複数のテンプレートおよびデータの定義
HTTPを介したテンプレートの取得
HTTPを介したデータの取得
複数出力の生成
ページ番号の定義
次のサンプルは、1つのテンプレート(template1.pdf)と1つのデータ・ソース(data1)から、ファイル・システムに送信される1つの出力ファイル(outfile.pdf)を作成する定義を示す単純な例です。
<?xml version="1.0" encoding="UTF-8" ?>
     <xapi:requestset xmlns:xapi="http://xmlns.oracle.com/oxp/xapi">
       <xapi:request>
         <xapi:delivery>
           <xapi:filesystem output="d:\tmp\outfile.pdf" />
         </xapi:delivery>
         <xapi:document output-type="pdf">
           <xapi:template type="pdf" location="d:\mywork\template1.pdf">
             <xapi:data>
               <field1>data1</field1>
             </xapi:data>
           </xapi:template>
         </xapi:document>
      </xapi:request>
</xapi:requestset>次の例は、2つのデータ・ソースを定義して1つのテンプレートとマージし、ファイル・システムに送信される1つの出力ファイルを作成する方法を示しています。
<?xml version="1.0" encoding="UTF-8"?>
<xapi:requestset xmlns:xapi="http://xmlns.oracle.com/oxp/xapi">
  <xapi:request>
    <xapi:delivery>
      <xapi:filesystem output="d:\tmp\outfile.pdf"/>
    </xapi:delivery>

    <xapi:document output-type="pdf">
      <xapi:template type="pdf"
                  location="d:\mywork\template1.pdf">
        <xapi:data>
          <field1>The first set of data</field1>
        </xapi:data>
        <xapi:data>
          <field1>The second set of data</field1>
        </xapi:data>
      </xapi:template>
    </xapi:document>
  </xapi:request>
</xapi:requestset>次の例は、前述の例を基に、2つのデータ・ソースを1つのテンプレートに、さらに2つのデータ・ソースを2番目のテンプレートに適用し、これら2つを1つの出力ファイルにマージする方法を示しています。文書をマージするときは、output-typeが"pdf"であることが必要です。
<?xml version="1.0" encoding="UTF-8"?>
<xapi:requestset xmlns:xapi="http://xmlns.oracle.com/oxp/xapi">
  <xapi:request>
    <xapi:delivery>
      <xapi:filesystem output="d:\tmp\outfile3.pdf"/>
    </xapi:delivery>

    <xapi:document output-type="pdf">
      <xapi:template type="pdf"
                  location="d:\mywork\template1.pdf">
        <xapi:data>
          <field1>The first set of data</field1>
        </xapi:data>
        <xapi:data>
          <field1>The second set of data</field1>
        </xapi:data>
      </xapi:template>

      <xapi:template type="pdf"
                  location="d:\mywork\template2.pdf">
        <xapi:data>
          <field1>The third set of data</field1>
        </xapi:data>
        <xapi:data>
          <field1>The fourth set of data</field1>
        </xapi:data>
      </xapi:template>
    </xapi:document>
  </xapi:request>
</xapi:requestset>このサンプルは、前述の例とほぼ同じですが、2つのテンプレートがHTTPを介して取得されている点が異なります。
<?xml version="1.0" encoding="UTF-8"?>
<xapi:requestset xmlns:xapi="http://xmlns.oracle.com/oxp/xapi">
  <xapi:request>
    <xapi:delivery>
      <xapi:filesystem output="d:\temp\out4.pdf"/>
    </xapi:delivery>

    <xapi:document output-type="pdf">
      <xapi:template type="pdf"
       location="http://your.server:9999/templates/template1.pdf">
        <xapi:data>
          <field1>The first page data</field1>
        </xapi:data>
        <xapi:data>
          <field1>The second page data</field1>
        </xapi:data>
      </xapi:template>
      <xapi:template type="pdf"
       location="http://your.server:9999/templates/template2.pdf">
        <xapi:data>
          <field1>The third page data</field1>
        </xapi:data>
        <xapi:data>
          <field1>The fourth page data</field1>
        </xapi:data>
      </xapi:template>
    </xapi:document>
  </xapi:request>
</xapi:requestset>このサンプルは、前述の例を基に、2つのデータ・ソースを使用する1つのテンプレートを示しています。これらはすべてHTTPを介して取得されます。さらに、HTTPを介して取得される2番目のテンプレートと、XMLに埋め込まれた2つのデータ・ソースが示されています。
<?xml version="1.0" encoding="UTF-8"?>
<xapi:requestset xmlns:xapi="http://xmlns.oracle.com/oxp/xapi">
 <xapi:request>
  <xapi:delivery>
   <xapi:filesystem output="d:\temp\out5.pdf"/>
    </xapi:delivery>

    <xapi:document output-type="pdf">
     <xapi:template type="pdf"
      location="http://your.server:9999/templates/template1.pdf">
      <xapi:data location="http://your.server:9999/data/data_1.xml"/>
      <xapi:data location="http://your.server:9999/data/data_2.xml"/>
      </xapi:template>

      <xapi:template type="pdf"
       location="http://your.server:9999/templates/template2.pdf">
        <xapi:data>
          <field1>The third page data</field1>
        </xapi:data>
        <xapi:data>
          <field1>The fourth page data</field1>
        </xapi:data>
      </xapi:template>
    </xapi:document>
  </xapi:request>
</xapi:requestset>次のサンプルは、2つの出力out_1.pdfとout_2.pdfの生成を示しています。各出力に対してrequest要素が定義されていることに注意してください。
<?xml version="1.0" encoding="UTF-8"?>
<xapi:requestset xmlns:xapi="http://xmlns.oracle.com/oxp/xapi">
  <xapi:request>
    <xapi:delivery>
      <xapi:filesystem output="d:\temp\out_1.pdf"/>
    </xapi:delivery>
    <xapi:document output-type="pdf">
      <xapi:template type="pdf"
                  location="d:\mywork\template1.pdf">
        <xapi:data>
          <field1>The first set of data</field1>
        </xapi:data>
        <xapi:data>
          <field1>The second set of data</field1>
        </xapi:data>
      </xapi:template>
    </xapi:document>
  </xapi:request>

  <xapi:request>
    <xapi:delivery>
      <xapi:filesystem output="d:\temp\out_2.pdf"/>
    </xapi:delivery>
    <xapi:document output-type="pdf">
      <xapi:template type="pdf"
                  location="d:mywork\template2.pdf">
        <xapi:data>
          <field1>The third set of data</field1>
        </xapi:data>
        <xapi:data>
          <field1>The fourth set of data</field1>
        </xapi:data>
      </xapi:template>
    </xapi:document>
  </xapi:request>

</xapi:requestset>次のサンプルは、PDF出力文書にページ番号を定義するpagenumber要素の使用方法を示しています。生成される最初の文書は、初期ページ番号値1で始まります。2番目の出力文書は、初期ページ番号値3で始まります。pagenumber要素は、document要素タグ内の任意の場所に配置できます。
pagenumber要素を使用して適用されるページ番号は、テンプレートで定義されているページ番号を置換しません。
<?xml version="1.0" encoding="UTF-8"?>
<xapi:requestset xmlns:xapi="http://xmlns.oracle.com/oxp/xapi">
  <xapi:request>
    <xapi:delivery>
      <xapi:filesystem output="d:\temp\out7-1.pdf"/>
    </xapi:delivery>
    <xapi:document output-type="pdf">
      <xapi:pagenumber initial-value="1" initial-page-index="1"
       x-pos="300" y-pos="20" />
      <xapi:template type="pdf"
        location="d:\mywork\template1.pdf">
        <xapi:data>
          <field1>The first page data</field1>
        </xapi:data>
        <xapi:data>
          <field1>The second page data</field1>
        </xapi:data>
      </xapi:template>
    </xapi:document>
  </xapi:request>

  <xapi:request>
    <xapi:delivery>
      <xapi:filesystem output="d:\temp\out7-2.pdf"/>
    </xapi:delivery>
    <xapi:document output-type="pdf">
      <xapi:template type="pdf"
           location="d:\mywork\template2.pdf">
        <xapi:data>
          <field1>The third page data</field1>
        </xapi:data>
        <xapi:data>
          <field1>The fourth page data</field1>
        </xapi:data>
      </xapi:template>
      <xapi:pagenumber initial-value="3" initial-page-index="1"
       x-pos="300" y-pos="20" />
    </xapi:document>
  </xapi:request>

</xapi:requestset>次のコード例は、入力ファイル名と入力ストリームを使用して文書プロセッサ・エンジンを起動する方法を示しています。
入力:
データ・ファイル名(文字列)
一時ファイルのディレクトリ(文字列)
import oracle.apps.xdo.batch.DocumentProcessor;
.
.
.
  public static void main(String[] args)
  {
.
.
.
    try
    {
      // dataFile --- File path of the Document Processor XML
      // tempDir  --- Temporary Directory path
      DocumentProcessor  docProcessor = new DocumentProcessor(dataFile, tempDir);
      docProcessor.process();
    }
    catch(Exception e)
    {
        e.printStackTrace();
       System.exit(1);
    }
    System.exit(0);
  }
入力:
データ・ファイル(入力ストリーム)
一時ファイルのディレクトリ(文字列)
import oracle.apps.xdo.batch.DocumentProcessor;
import java.io.InputStream;
.
.
.
  public static void main(String[] args)
  {
.
.
.
    try
    {
      // dataFile --- File path of the Document Processor XML
      // tempDir  --- Temporary Directory path
      FileInputStream fIs = new FileInputStream(dataFile);

      DocumentProcessor  docProcessor = new DocumentProcessor(fIs, tempDir);
      docProcessor.process();
      fIs.close();
    }
    catch(Exception e)
    {
        e.printStackTrace();
       System.exit(1);
    }
    System.exit(0);
  }
XMLパブリッシャのバースト・エンジンは、データ・ストリームを受け入れて、複数の基準を基に分割し、テンプレートに基づいて出力を生成した後、一般的な配信チャネルを経由して個々の文書を配信します。このエンジンには、文書の生成および配信について幅広い選択肢が提供されています。次のような実装例があります。
顧客固有のレイアウトおよび配信設定に基づいた請求書の生成および配信
全コスト・センターのマスター・レポートを生成し、個別のコスト・センター・レポートを該当する管理者にバーストする会計報告処理
1回のデータ抽出を基に電子メールで配信される全従業員の給与明細の生成
バースト・エンジンは文書プロセッサ・エンジンの拡張であり、起動のためにコールする独自のメソッドがあります。文書プロセッサのXML構造が、バースト・エンジンに必要な新しいコンポーネントを処理するために拡張されました。バースト・エンジンは、文書プロセッサがサポートするすべての配信機能を同一の形式を使用してサポートします。また、バーストするXMLデータおよび文書プロセッサXML形式(「文書プロセッサXMLファイルの階層と要素」を参照)の制御ファイルを受け入れます。
制御ファイルは、次に示す2、3の拡張はありますが文書プロセッサXMLと同じ書式をとります。
request要素の下の属性selectを使用して、バーストの対象にするXMLデータ内の要素を指定します。
<xapi:request select="/EMPLOYEES/EMPLOYEE">配信構造の最下位レベルに属性idを使用します(たとえば配信要素emailの場合、id属性はmessage要素に属します)。これにより、後でXMLファイルで参照される配信メソッドにIDが割り当てられます。
<xapi:message id="123" to="jo.smith@company.com"document要素にdelivery属性を使用します。これにより、生成された文書にdelivery要素のid属性で定義された配信メソッドが割り当てられます。カンマ区切りの複数の配信チャネルを指定できます。
<xapi:document output-type="pdf" delivery="123">template要素にfilter属性を使用します。この属性は、XMLデータに対してフィルタに基づいたレイアウト・テンプレートを適用する場合に使用します。
<xapi:template type="rtf" location="/usr/tmp/empGeneric.rtf">
<xapi:template type="rtf" location="usr\tmp\empDet.rtf" filter=".//EMPLOYEE[ENAME='SMITH']"/>
これにより、empDetテンプレートは「SMITH」という名前の従業員にのみ適用されます。その他の従業員にはすべてempGenericテンプレートが適用されます。このフィルタには、任意のXPATH式を使用してテンプレート適用のルールを決めることができます。
データ内の要素を参照して、電子メール・アドレスやFAX番号などの特定の配信属性を導き出すことができます。次の書式で属性の値を入力します。
${ELEMENT}
ELEMENTはXMLデータの要素名で、この要素が属性の値を保持します。
次に例を示します。
<xapi:message id="123" to="${EMAIL}"/>実行時に、属性の値は入力XMLファイルのEMAIL要素の値に設定されます。
属性の値は、Propertiesオブジェクトに入れてパラメータをAPIに渡すことでも設定できます。
XMLデータ内の情報を参照して、配信コンテンツに含めることができます。これには、前述と同じ書式(${ELEMENT})を使用します。
たとえば、電子メール経由で従業員に文書をバーストし、件名の行にその従業員の名前を使用することで電子メールをパーソナライズする必要があるとします。従業員の名前がENAMEという要素に保持されていると仮定すると、次に示すように${ENAME}を使用して制御ファイルで従業員の名前を参照できます。
subject="Employee Details for ${ENAME}"サンプル制御ファイル
次のサンプル制御ファイルは、EMPLOYEE要素を基にしてデータを分割し、各従業員にそれぞれのデータを含んだ電子メールを送信する制御ファイルの例を示したものです。サンプル・ファイルは注釈付きです。
<?xml version="1.0" encoding="UTF-8"?>
<xapi:requestset xmlns:xapi="http://xmlns.oracle.com/oxp/xapi">
<xapi:request select="/EMPLOYEES/EMPLOYEE">
<! -  This sets the bursting element i.e., EMPLOYEE  - >
    <xapi:delivery>
      <xapi:email server="rgmamersmtp.oraclecorp.com" port="25"
       from="xmlpadmin1@oracle.com"  reply-to ="reply@oracle.com">
       <xapi:message id="123"  to="${EMAIL}"  cc="${EMAIL_ALL}"
        attachment="true" subject="Employee Details
        for ${ENAME}"> Mr. ${ENAME}, Please review the
        attached document</xapi:message>
<! - This assigns a delivery id of '123'. It also sets the e-mail
     address of the employee and a cc copy to a parameter value
     EMAIL_ALL; this might be a manager's e-mail. The employee's
     name (ENAME) can also be used in the subject/body
     of the email.  - >
</xapi:email>
   </xapi:delivery>
    <xapi:document output-type="pdf" delivery="123">
     <xapi:template type="rtf" location="/usr/tmp/empGeneric.rtf">
     <xapi:template type="rtf" location="/usr/tmp/empDet.rtf"
      filter=".//EMPLOYEE[ENAME='SMITH']" >
<! -  Employees with the name SMITH will have
      the empDet template applied  - >
      </xapi:template>
    </xapi:document>
  </xapi:request>
</xapi:requestset>バースト・エンジンは、複数のバースト基準および配信オプションをサポートできます。全従業員のデータをそれぞれの管理者情報とともに生成するレポートがある場合、次の動作を行う制御ファイルを作成できます。
従業員データを各従業員にバーストする。
各管理者に、その部下に関する情報を含んだレポートをバーストする。
各バースト・レベルごとに異なるテンプレートを提供できます。したがって、あるテンプレートを基に従業員レポートを生成し、別のテンプレートを基にして要約の管理者用レポートを生成するが、どちらも同じデータ・セットを使用するということが可能です。
このマルチバーストを実現するには、2つ目のrequest要素を制御ファイル構造に追加する必要があります。
マルチバーストの例
次のサンプルは、EMPLOYEEレベルおよびMANAGERレベルでバーストを実行する制御ファイルの作成方法を示したものです。
?xml version="1.0" encoding="UTF-8" ?>
<xapi:requestset xmlns:xapi="http://xmlns.oracle.com/oxp/xapi">
<! -  First request to burst on employee  - >
 <xapi:request select="/EMPLOYEES/EMPLOYEE">
 <xapi:delivery>
 <xapi:email <<server details removed>> />
  <xapi:message id="123" <<message details removed>>
   </xapi:message>
  </xapi:email>
 <xapi:fax server="ipp://mycupsserver:631/printers/fax2">
  <xapi:number id="FAX1">916505069560</xapi:number>
  </xapi:fax>
  <xapi:print id="printer1"
   printer="ipp://mycupsserver:631/printers/printer1"
   copies="2" />
  </xapi:delivery>
 <xapi:document output-type="pdf" delivery="123">
  <xapi:template type="rtf" location="usr\tmp\empDet.rtf" />
  </xapi:document>
 </xapi:request>
<!Second request to burst on department  - >
<xapi:request select="/DATA/DEPT/MANAGER">
 <xapi:delivery>
 <xapi:email server="gmsmtp.oraclecorp.com" port=""
  from="XDOburstingTest@oracle.com" reply-to="reply@oracle.com">
  <xapi:message id="123" to="${MANAGER_EMAIL}"
   cc="${MANAGER_EMAIL}" attachment="true"
   subject="Department Summary for ${DEPTNO}">Please review
   the attached Department Summary for
   department ${DEPTNO}</xapi:message>
  </xapi:email>
  </xapi:delivery>
<xapi:document output-type="rtf" delivery="123">
  <xapi:template type="rtf"
   location="d:\burst_test\deptSummary.rtf" />
  </xapi:document>
  </xapi:request>
</xapi:requestset>バースト・エンジンには、バースト・プロセスの様々な段階をリスニングできるリスニング・インタフェースが提供されています。サポートされている予約可能なモードは、次のとおりです。
beforeProcess() - バースト・プロセスが開始される前。
afterProcess() - バースト・プロセスが完了した後。
beforeProcessRequest(int requestIndex) - バースト要求が開始される前。このインタフェースでは、現行要求に対して要求IDが割り当てられます。
afterProcessRequest(int requestIndex) - バースト要求が完了した後。現行要求の要求IDが提供されます。
beforeProcessDocument(int requestIndex,int documentIndex,String deliveryId) - 文書の生成が開始される前。要求IDおよび文書IDが提供されます。
afterProcessDocument(int requestIndex,int documentIndex,Vector documentOutputs) - 文書の生成が完了した後。要求IDおよび文書IDと、要求内の生成済文書オブジェクトのベクター・リストが提供されます。
beforeDocumentDelivery(int requestIndex,int documentIndex,String deliveryId) - 要求内の文書が配信された後。要求ID、文書IDおよび配信IDが提供されます。
afterDocumentDelivery(int requestIndex,int documentIndex,String deliveryId,Object deliveryObject,Vector attachments) - 文書の配信が完了した後。要求ID、文書IDおよび配信IDと、要求内の配信済文書のベクター・リストが提供されます。
これらのどのインタフェースに対しても、コール側のJavaクラスで予約できます。リスナーは、個々の文書の処理が正常に進んでいるかどうかを判断したり、要求の正常終了に基づいて別のプロセスを開始する場合に役に立ちます。
バーストAPIをコールするには、次のいずれかの書式を使用してDocumentProcessorクラスのインスタンスを作成します。
DocumentProcessor(xmlCtrlInput, xmlDataInput, tmpDir)各項目は次のとおりです。
xmlCtrlInput - バースト・プロセスの制御ファイルです。ファイルへの文字列参照、inputStreamオブジェクトまたはReaderオブジェクトのいずれでもかまいません。
xmlDataInput - バーストするXMLデータです。ファイルへの文字列参照、inputStreamオブジェクトまたはReaderオブジェクトのいずれでもかまいません。
tmpDir - 一時作業ディレクトリです。Stringオブジェクトの書式を使用します。メインのXMLパブリッシャ一時ディレクトリが設定されているかぎり、これはオプションです。
簡単なJavaクラスの例
次に、サンプルJavaクラスを示します。
public class BurstingTest
{
  public BurstingTest()
  {
   try
   {
        DocumentProcessor dp = new DocumentProcessor
        ("\burst\burstCtrl.xml", "\\burst\\empData.xml","\\burst");
         dp.process();
        }
   }
   catch (Exception e)
   { System.out.println(e);

 public static void main(String[] args)
  {
    BurstingTest burst1 = new BurstingTest();
  }

}
リスナーを使用するJavaクラスの例
バースト・リスナーを活用するには、クラス宣言にインタフェースを追加してregisterListenerメソッドを使用します。その後、予約するリスナー用のコードを次のように追加します。
public class BurstingTest implements BurstingListener
{
  public BurstingTest()
  {
   try
   {
        DocumentProcessor dp = new DocumentProcessor
        ("\burst\burstCtrl.xml", "\\burst\\empData.xml","\\burst");
        dp.registerListener(this);
         dp.process();
        }
   }
   catch (Exception e)
   { System.out.println(e);

 public static void main(String[] args)
  {
    BurstingTest burst1 = new BurstingTest();
}

public void beforeProcess(){
  System.out.println("Start of Bursting Process");
  }
public void afterProcess()
  {
  System.out.println("End of Bursting Process");
  }

public void beforeProcessRequest(int requestIndex)
  {
  System.out.println("Start of Process Request ID"+requestIndex);
  }
  public void afterProcessRequest(int requestIndex)
  {
   System.out.println("End of Process Request ID"+requestIndex ");

  }
  public void beforeProcessDocument(int requestIndex,int
   documentIndex)
  {
  System.out.println("Start of Process Document");
  System.out.println("   Request Index "+requestIndex);
  System.out.println("   Document Index " +documentIndex);

  }
  public void afterProcessDocument(int requestIndex,int
   documentIndex,
  Vector documentOutputs)
  {
     System.out.println("   ========End of Process Document");
     System.out.println("   Outputs :"+documentOutputs);
  }
  public void beforeDocumentDelivery(int requestIndex,int
   documentIndex,
  String deliveryId)
  {
  System.out.println("   ========Start of  Delivery");
  System.out.println("   Request Index "+requestIndex);
  System.out.println("   Document Index " +documentIndex);
  System.out.println("   DeliveryId  " +deliveryId);
  }
  public void afterDocumentDelivery(int requestIndex,int documentIndex,
  String deliveryId,Object deliveryObject,Vector attachments)
  {
    System.out.println("   ========End of  Delivery");
    System.out.println("  Attachments : "+attachments);

   }

}
パラメータの渡し方
制御ファイルで配信用に使用する値を保持したパラメータを渡すには、次のコードを追加します。
…
Properties prop= new Properties();
prop.put("user-variable:ADMIN_EMAIL","jo.smith@company.com");
dp.setConfig(prop);
dp.process();
…
この項のすべての例で、次のXMLデータ・ソースが使用されます。
<?xml version="1.0" encoding="UTF-8"?>
<DATA>
<DEPTS>
 <DEPT>
  <DEPTNO>20</DEPTNO>
  <NAME>Accounting</NAME>
  <MANAGER_EMAIL>tdexter@mycomp.com</MANAGER_EMAIL>
  <EMPLOYEES>
   <EMPLOYEE>
    <EMPNO>7369</EMPNO>
    <ENAME>SMITH</ENAME>
    <JOB>CLERK</JOB>
    <MGR>7902</MGR>
    <HIREDATE>1980-12-17T00:00:00.000-08:00</HIREDATE>
    <SAL>800</SAL>
    <DEPTNO>20</DEPTNO>
    <EMAIL>jsmith@mycomp.com</EMAIL>
   </EMPLOYEE>
   <EMPLOYEE>
    <EMPNO>7566</EMPNO>
    <ENAME>JONES</ENAME>
    <JOB>MANAGER</JOB>
    <MGR>7839</MGR>
    <HIREDATE>1981-04-02T00:00:00.000-08:00</HIREDATE>
    <SAL>2975</SAL>
    <DEPTNO>20</DEPTNO>
    <EMAIL>jjones@mycomp.com</EMAIL>
   </EMPLOYEE>
  </EMPLOYEES>
 </DEPT>
 <DEPT>
  <DEPTNO>30</DEPTNO>
  <NAME>Sales</NAME>
  <MANAGER_EMAIL>dsmith@mycomp.com</MANAGER_EMAIL>
  <EMPLOYEES>
   <EMPLOYEE>
    <EMPNO>7788</EMPNO>
    <ENAME>SCOTT</ENAME>
    <JOB>ANALYST</JOB>
    <MGR>7566</MGR>
    <HIREDATE>1982-12-09T00:00:00.000-08:00</HIREDATE>
    <SAL>3000</SAL>
    <DEPTNO>20</DEPTNO>
    <EMAIL>jscott@mycomp.com</EMAIL>
   </EMPLOYEE>
   <EMPLOYEE>
    <EMPNO>7876</EMPNO>
    <ENAME>ADAMS</ENAME>
    <JOB>CLERK</JOB>
    <MGR>7788</MGR>
    <HIREDATE>1983-01-12T00:00:00.000-08:00</HIREDATE>
    <SAL>1100</SAL>
    <EMAIL>jadams@mycomp.com</EMAIL>
   </EMPLOYEE>
  </EMPLOYEES>
 </DEPT>
</DEPTS>
</DATA>
例1 - 従業員データを電子メール経由で従業員にバーストする
次のサンプルでは、各従業員のデータにテンプレート(empDet.rtf)を適用し、PDF文書を生成して、その文書を電子メールで各従業員に配信する方法を示します。
<?xml version="1.0" encoding="UTF-8"?>
<xapi:requestset xmlns:xapi="http://xmlns.oracle.com/oxp/xapi">
<xapi:request select="/DATA/DEPTS/DEPT/EMPLOYEES/EMPLOYEE">
 <! -  Burst on employee element  - >
    <xapi:delivery>
      <xapi:email server="my.smtp.server" port="25"
       from="xmlpadmin@mycomp.com" reply-to ="">
       <xapi:message id="123"  to="${EMAIL}"
<! -  Set the id for the delivery method  - >
<! -  Use the employees EMAIL element to email the document to
      the employee  - >
cc="${ADMIN_EMAIL}"
<! -  Use the ADMIN_EMAIL parameter to CC the document
      to the administrator  - >
 attachment="true" subject="Employee Details for ${ENAME}">
 Mr. ${ENAME}, Please review the attached document</xapi:message>
<! -  Embed the employees name into the email message  - >
</xapi:email>
   </xapi:delivery>
    <xapi:document output-type="pdf" delivery="123">
<!Specify the delivery method id to be used  - >
     <xapi:template type="rtf"
      location="\usr\empDet.rtf"></xapi:template>
    </xapi:document>
  </xapi:request>
</xapi:requestset>
例2 - 従業員データを、複数の配信チャネルを経由して、条件に応じてレイアウト・テンプレートを使用して従業員にバーストする
このサンプルでは、バーストを実行し、従業員名を確認し、テンプレートを使用してPDFを生成する方法を示します。文書はさらに電子メールで送信され印刷されます。
<?xml version="1.0" encoding="UTF-8"?>
<xapi:requestset xmlns:xapi="http://xmlns.oracle.com/oxp/xapi" >
 <xapi:globalData location="stream">
 </xapi:globalData >
  <xapi:request select="/DATA/DEPTS/DEPT/EMPLOYEES/EMPLOYEE">
    <xapi:delivery>
      <xapi:email server="my.smtp.server" port=""
       from="xmlpserver@oracle.com"
       reply-to ="reply@oracle.com">
     <xapi:message id="123"  to="${EMAIL}" cc="" attachment="true"
       subject="Employee Details for ${ENAME}"> Mr. ${ENAME},
       Please review the attached document</xapi:message>
</xapi:email>
<xapi:print id="printer1"
  printer="ipp://ipgpc1:631/printers/printer1" copies="2" />
<! -  Add an id for this delivery method i.e. printer1  - >
     </xapi:delivery>
    <xapi:document output-type="pdf" delivery="printer1,123">
<! -  Deliver to printer and email  - >
     <xapi:template type="rtf" location="/usr/empDetSmith.rtf"
      filter=".//EMPLOYEE[ENAME='SMITH']">
<!- Specify template to be used for employees called SMITH  - >
      </xapi:template>
     <xapi:template type="rtf" location="/usr/empSummary.rtf">
<! -  Default template to be used  - >
      </xapi:template>
    </xapi:document>
  </xapi:request>
</xapi:requestset>
例3 - 従業員データを従業員およびその管理者にバーストする
このサンプルでは、PDFが添付された電子メールをempDetテンプレートを使用して全従業員にバーストする方法を示します。また、従業員の要約PDFを電子メール経由で各部門の管理者にバーストします。
<?xml version="1.0" encoding="UTF-8"?>
<xapi:requestset xmlns:xapi="http://xmlns.oracle.com/oxp/xapi">
  <xapi:request select="/DATA/DEPTS/DEPT/EMPLOYEES/EMPLOYEE">
    <xapi:delivery>
      <xapi:email server="my.smtp.server" port=""
       from="xmlpserver@oracle.com" reply-to ="">
      <xapi:message id="123"  to="${EMAIL}" cc="${EMAIL}"
       attachment="true"
       subject="Employee Details for ${ENAME}"> Mr. ${ENAME},
       Please review the attached document</xapi:message>
</xapi:email>
    </xapi:delivery>
    <xapi:document output-type="pdf" delivery="123">
     <xapi:template type="rtf"
      location="/usr/empDet.rtf"</xapi:template>
    </xapi:document>
  </xapi:request>
<xapi:request select="/DATA/DEPTS/DEPT">
<! -  Second request created to burst the same dataset to the
      manager based on the DEPT element  - >
    <xapi:delivery>
       <xapi:email  server="my.smtp.server" port=""
        from="xmlpserver@oracle.com" reply-to ="">
<xapi:message id="456"  to="${MANAGER_EMAIL}"
 cc="${MANAGER_EMAIL}" attachment="true" subject="Department
 Summary for ${DEPTNO}"> Please review the attached
 Department Summary for department ${DEPTNO}</xapi:message>
</xapi:email>
    </xapi:delivery>
    <xapi:document output-type="rtf" delivery="456">
     <xapi:template type="rtf"
      location="\usr\deptSumm.rtf"></xapi:template>
  </xapi:document>
  </xapi:request>
</xapi:requestset>FOプロセッサでは、最終的な文書に適用可能なPDFセキュリティおよびその他のプロパティがサポートされています。セキュリティ・プロパティには、文書を印刷不可にする機能、および暗号化文書にパスワード・セキュリティを適用する機能があります。
その他のプロパティでは、フォントのサブセット化および埋込みを定義できます。テンプレートで、通常XMLパブリッシャで実行時に使用できないフォントが使用されている場合は、フォント・プロパティを使用してフォントの格納場所を指定できます。XMLパブリッシャは、実行時にフォントを取得し、最終的な文書で使用します。たとえば、このプロパティは、小切手の口座番号と銀行支店コードにMICRフォントを使用している場合に、その小切手の印刷に使用される場合があります。
プロパティの全リストは、「XMLパブリッシャのプロパティ」を参照してください。
プロパティは、次の2つの方法で設定できます。
実行時に、Javaプロパティ・オブジェクトとしてプロパティを指定し、FOプロセッサに渡します。
構成ファイルにプロパティを設定します。
テンプレートにプロパティを設定します(RTFテンプレートのみ)。この方法については、RTFテンプレートの『Oracle XML Publisherレポート・デザイナーズ・ガイド』のプロパティの設定に関する項を参照してください。
プロパティをプロパティ・オブジェクトとして渡すには、FOプロセッサをコールする前にプロパティの名前/値のペアを設定します。次に例を示します。
入力:
XMLファイル名(文字列)
XSLファイル名(文字列)
出力:
PDFファイル名(文字列)
import oracle.apps.xdo.template.FOProcessor;
.
.
.
  public static void main(String[] args)
  {

    FOProcessor processor = new FOProcessor();
    processor.setData(args[0]);     // set XML input file
    processor.setTemplate(args[1]); // set XSL input file
    processor.setOutput(args[2]);  //set (PDF) output file
    processor.setOutputFormat(FOProcessor.FORMAT_PDF);
    Properties prop = new Properties();
    /* PDF Security control: */
    prop.put("pdf-security", "true");
    /* Permissions password: */
    prop.put("pdf-permissions-password", "abc");
    /* Encryption level: */
    prop.put("pdf-encription-level", "0");
    processor.setConfig(prop);
    // Start processing
    try
    {
       processor.generate();
    }
    catch (XDOException e)
    {
       e.printStackTrace();
       System.exit(1);
    }

    System.exit(0);
  }
次のコードは、構成ファイルの格納場所を渡す例を示しています。
入力:
XMLファイル名(文字列)
XSLファイル名(文字列)
出力:
PDFファイル名(文字列)
import oracle.apps.xdo.template.FOProcessor;
.
.
.
  public static void main(String[] args)
  {
    FOProcessor processor = new FOProcessor();
    processor.setData(args[0]);     // set XML input file
                 processor.setTemplate(args[1]); // set XSL input file
    processor.setOutput(args[2]);  //set (PDF) output file
    processor.setOutputFormat(FOProcessor.FORMAT_PDF);
    processor.setConfig(“/tmp/xmlpconfig.xml”);
    // Start processing
    try
    {
       processor.generate();
    }    catch (XDOException e)
    {       e.printStackTrace();
            System.exit(1);
    }
      System.exit(0);
}入力:
データ・ファイル名(文字列)
一時ファイルのディレクトリ(文字列)
出力:
PDFファイル
import oracle.apps.xdo.batch.DocumentProcessor;
.
.
.
  public static void main(String[] args)
  {
.
.
.
    try
    {
      // dataFile --- File path of the Document Processor XML
      // tempDir  --- Temporary Directory path
      DocumentProcessor  docProcessor = new DocumentProcessor(dataFile, tempDir);
      Properties prop = new Properties();
      /* PDF Security control: */
      prop.put("pdf-security", "true");
      /* Permissions password: */
      prop.put("pdf-permissions-password", "abc");
      /* encryption level: */
      prop.put("pdf-encription-level", "0");
      processor.setConfig(prop);
      docProcessor.process();
    }
    catch(Exception e)
    {
        e.printStackTrace();
       System.exit(1);
    }
    System.exit(0);
  }
XMLパブリッシャのアプリケーション層では、「XMLパブリッシャ管理者」職責を使用して、テンプレート・マネージャのユーザー・インタフェースを介してデータ・ソースとテンプレートを格納し、管理できます。また、Application Program Interfaceを介してこれらのオブジェクトにアクセスし、操作することもできます。この項では、プログラマが使用できるAPIを説明します。
データ・ソースとテンプレートはデータベースに格納されます。この中には、オブジェクトについて記述するメタデータおよび物理オブジェクト自体(例: RTFファイル)が含まれます。これらのAPIを使用すると、データ・ソースとテンプレートに関する情報を登録、更新および取得できます。また、XMLパブリッシャをコールし、テンプレートをデータ・ソースに適用して出力文書を(コンカレント・マネージャを経由せずに)直接生成するためにAPIを使用することもできます。
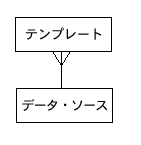
XMLパブリッシャ・スキーマでは、各データ・ソースに複数のテンプレートを割り当てることができます。ただし、テンプレートはデータ・ソースなしに存在することはできません。次の図は、この関係を表しています。
プログラムでデータ定義にアクセスして操作するために、次のAPIが用意されています。
DataSourceクラス
DataSourceHelperクラス
データ・ソースは、テンプレートの登録対象のプレースホルダ・オブジェクトとして機能します。DataSourceクラスは、単一のデータ・ソース定義エントリを表します。このクラスでは、データ・ソースのプロパティの設定およびデータ・ソースからのプロパティの取得を実行するために、次に示すメソッドが提供されます。
このクラスは、テンプレート・マネージャ・リポジトリ内のデータ・ソース定義エントリの管理に使用できるユーティリティ・クラスです。
データ・ソース定義エントリは、テンプレートのデータ・ソースを表す論理単位です。各データ・ソース定義エントリには、XSD(XMLスキーマ定義)形式の1つのデータ定義、およびXMLの1つのサンプル・データ・ファイルを設定できます。また、言語ごとに1つ以上の表示名と摘要を設定できます。ユーザーのセッション言語に基づいて、適切な名称と摘要が抽出され、ユーザーに表示されます。
すべてのメソッドに、アプリケーション・データベースと通信するためのAppsContextインスタンスが必要です。次のいずれかのメソッドを使用して、コードにAppsContextインスタンスを取得してください。
このクラスをOAフレームワークで使用している場合、AppsContextを取得するには次をコールします。
((OADBTransactionImpl)am.getOADBTransaction()).getAppsContext()
amは使用しているOA ApplicationModuleです。
このクラスをJavaコンカレント・プログラムで使用している場合は、CpContextをAppsContextとして渡します。
それ以外の場合は、DBCファイルからAppsContextを作成します。Applicationsでサーブレット/JSPを実行している場合、DBCファイルのフルパスを取得するには次をコールします。
System.getProperty("JTFDBCFILE")またはSystem.getProperty("BNEDBCFILE")
新規データ・ソース定義エントリをテンプレート・マネージャ・リポジトリに追加する手順は、次のとおりです。
DataSource.createInstance()メソッドをコールして、DataSourceクラスのインスタンスを作成します。
インスタンスの属性を設定します。
インスタンスをDataSourceHelper.createDataSource()メソッドに渡します。
// Create an instance
 DataSource d = DataSource.createInstance(ctx, "XDO", "TestDataSource");
 // Set properties
 d.setDescription("This is the test data source entry.");
 d.setStartDate(new java.sql.Date(System.currentTimeMillis()));
 d.setName("Test Data Source !");
 d.setStatus(TypeDefinitions.DATA_SOURCE_STATUS_ENABLED);
 // Call createDataSource() to create an entry into the repository
 DataSourceHelper.createDataSource(ctx, d);
リポジトリのデータ・ソース定義エントリを更新するには、DataSourceHelper.getDataSource()メソッドをコールします。このメソッドでは、DataSourceインスタンスの配列が戻されます。データ・ソースのsetメソッドを使用してこれらのインスタンスを更新します。
 // Get data source definition entries
 DataSource[] d = DataSourceHelper.getDataSource(ctx, "XDO", "%XDO%");

 // Update properties
 d.setDescription("New data source entry.");
 d.setStartDate(new java.sql.Date(System.currentTimeMillis()));
 d.setName("New Data Source name");
 d.setStatus(TypeDefinitions.DATA_SOURCE_STATUS_ENABLED);
 // Call updateDataSource() to commit the update in the repository
 DataSourceHelper.updateDataSource(ctx, d);
データ・ソース定義エントリを削除するには、DataSource.deleteDataSource()メソッドをコールします。この関数では、レコードはリポジトリから実際には削除されず、今後の使用に備えて無効のマークが付けられます。このステータスは、DataSource.updateDataSourceStatus()メソッドをコールしていつでも変更できます。
データ・ソース・スキーマ定義ファイルとサンプルXMLファイルを追加、更新および削除するには、DataSourceHelperクラスに定義されているメソッドをコールします。前述のdeleteDataSource()メソッドとは異なり、これらのメソッドではスキーマ・ファイルとサンプル・レコードがリポジトリから実際に削除されることに注意してください。
 // Add a schema definition file
 DataSourceHelper.addSchemaFile(ctx, "XDO", "TestDataSource",
   "schema.xsd", new FileInputStream("/path/to/schema.xsd"));
 // Add a sample xml data file
 DataSourceHelper.addSampleFile(ctx, "XDO", "TestDataSource",
   "sample.xml", new FileInputStream("/path/to/sample.xml"));

 // Update a schema definition file
 DataSourceHelper.addSchemaFile(ctx, "XDO", "TestDataSource",
   new FileInputStream("/path/to/new_schema.xsd"));
 // Update a sample xml data file
 DataSourceHelper.addSampleFile(ctx, "XDO", "TestDataSource",
   new FileInputStream("/path/to/new_sample.xml"));

 // Delete a schema definition file
 DataSourceHelper.deleteSchemaFile(ctx, "XDO", "TestDataSource");
 // Delete a sample xml data file
 DataSourceHelper.deleteSampleFile(ctx, "XDO", "TestDataSource");
スキーマ・ファイルまたはサンプル・ファイルをリポジトリからダウンロードするには、getSchemaFile()またはgetSampleFile()メソッドをコールします。これらのメソッドでは、戻り値として、ファイルの内容に接続される入力ストリームが戻されます。
コード例は、次のとおりです。
// Download the schema definition file from the repository
 InputStream schemaFile =
   DataSourceHelper.getSchemaFile(ctx, "XDO", "TestDataSource", );

 // Download the XML sample data file from the repository
 InputStream sampleFile =
   DataSourceHelper.getSampleFile(ctx, "XDO", "TestDataSource", );
複数のテンプレート・オブジェクトを単一のデータ・ソースに関連付けることができます。Templateクラスは、単一のテンプレート・インスタンスを表します。TemplateHelperクラスは、テンプレート・マネージャのテンプレート・オブジェクトを作成および更新するために使用されるユーティリティ・クラスです。
Templateクラスは、テンプレート・マネージャ内の単一のテンプレート・オブジェクトを表します。テンプレート・オブジェクトはデータ・ソース・オブジェクトと関連付けられます。このクラスには、テンプレート・オブジェクトを操作するためのgetおよびsetメソッドがいくつかあります。
TemplateHelperクラスは、テンプレート・マネージャ内のテンプレート・エントリを管理するユーティリティ・クラスです。一連の静的なユーティリティ・メソッドで構成されます。
テンプレート・エントリは、単一のテンプレートを表す論理単位です。各テンプレート・エントリには対応するデータ・ソース定義エントリがあり、このテンプレートに対するデータの表示方法が定義されています。また、言語ごとに1つの物理テンプレート・ファイルがあります。ロケール固有のテンプレート・ファイルは別々にアップロードされます。テンプレートに関連付けられている各翻訳済XLIFFについては、XMLパブリッシャによって別々のXSLファイルが作成および格納されます。
各テンプレート・エントリには、言語ごとに1つの表示名と摘要があります。これらの名称は、テンプレート・マネージャのユーザー・インタフェースでテンプレート・エントリ名が表示されるときに抽出され、使用されます。
一部のメソッドには、アプリケーション・データベースと通信するためのAppsContextインスタンスが必要です。次のいずれかのオプションを使用して、コードにAppsContextインスタンスを取得してください。
このクラスをOAフレームワークで使用している場合、AppsContextを取得するには、((OADBTransactionImpl)am.getOADBTransaction()).getAppsContext()をコールします。
amは使用しているOAApplicationModuleです。
このクラスをJavaコンカレント・プログラムで使用している場合は、CpContextをAppsContextとして渡します。
それ以外の場合は、DBCファイルからAppsContextを作成します。Applicationsでサーブレット/JSPを実行している場合、DBCファイルのフルパスを取得するには次をコールします。
System.getProperty("JTFDBCFILE")またはSystem.getProperty("BNEDBCFILE")
一部のメソッドには、アプリケーション・データベースと通信するためのOAApplicationModuleインスタンスが必要です。次の方法で、コードにOAApplicationModuleインスタンスを取得してください。
OAフレームワークでTemplateHelperを使用している場合、OAApplicationModuleインスタンスはすでに取得されています。
AppsContextをすでに取得している場合は、oracle.apps.fnd.framework.server.OAApplicationModuleUtilを使用してOAApplicationModuleインスタンスを作成できます。
最新の開発はAppsContextを使用するAPIに基づいているため、AppsContextを使用してAPIをコールすることをお薦めします。OAApplicationModuleを使用するAPIも使用できますが、内部的にはAppsContextを使用する、対応のAPIがコールされます。
テンプレート・マネージャ・リポジトリに新規テンプレート・エントリを追加する手順は、次のとおりです。
Template.createInstance()メソッドをコールして、Templateクラスのインスタンスを作成します。
インスタンスの属性を設定します。
インスタンスをTemplateHelper.createTemplate()メソッドに渡します。
// Create an instance
 Template t = Template.createInstance(appsContext, "XDO", "TestTemplate",
   TypeDefinitions.TEMPLATE_TYPE_PDF, "XDO", "TestTemplate");

 // Set properties
 t.setDescription("This is the test template entry.");
 t.setStartDate(new java.sql.Date(System.currentTimeMillis()));
 t.setName("Test template !");
 t.setStatus(TypeDefinitions.TEMPLATE_STATUS_ENABLED);
 // Call createTemplate() to create an entry into the repository
 TemplateHelper.createTemplate(am, t);
リポジトリからテンプレート・エントリを取得するには、TemplateHelper.getTemplate()メソッドまたはgetTemplates()メソッドをコールします。これらのインスタンスを使用してエントリ情報を更新します。
// Get active template entries
 Template[] t = TemplateHelper.getTemplates(appsContext, "XDO", "XDO%", true);

 // Update properties
 t[0].setDescription("updated template entry.");
 t[0].setStartDate(new java.sql.Date(System.currentTimeMillis()));
 t[0].setName("updated template entry name");
 t[0].setStatus(TypeDefinitions.TEMPLATE_STATUS_ENABLED);

 // Call updateTemplate() to commit the update in the repository
 TemplateHelper.updateTemplate(appsContext, t[0]);
テンプレート・エントリを削除するには、Template.deleteTemplate()メソッドをコールします。このメソッドでは、レコードはリポジトリから実際には削除されず、今後の使用に備えて無効のマークが付けられます。このステータスは、Template.updateTemplateStatus()メソッドをコールしていつでも変更できます。
テンプレート・ファイルを追加、更新および削除するには、TemplateHelperクラスに定義されているメソッドをコールします。テンプレート・エントリとは異なり、テンプレート・ファイルを削除すると、レコードがリポジトリから実際に削除されることに注意してください。
次のコード例は、テンプレート・ファイルを追加、削除および更新する方法を示しています。
 // Add English template file to the template entry
 TemplateHelper.addTemplateFile(
  appsContext,           // AppsContext
  "XDO",                 // Application short name of the template
  "TestTemplate",        // Template code of the template
  "en",                  // ISO language code of the template
  "US",                  // ISO territory code of the template
  Template.TEMPLATE_TYPE_PDF, // Type of the template file
  "us.pdf",              // Filename of the template file
  new FileInputStream("/path/to/us.pdf")); // Template file

 // Add Japanese template file to the template entry
 TemplateHelper.addTemplateFile(
  appsContext,           // AppsContext
  "XDO",                 // Application short name of the template
  "TestTemplate",        // Template code of the template
  "ja",                  // ISO language code of the template
  "JP",                  // ISO territory code of the template
  Template.TEMPLATE_TYPE_PDF, // Type of the template file
  "ja.pdf",              // Filename of the template file
  new FileInputStream("/path/to/ja.pdf")); // Template file

 // Update English template file to the template entry
 TemplateHelper.updateTemplateFile(
  appsContext,           // AppsContext
  "XDO",                 // Application short name of the template
  "TestTemplate",        // Template code of the template
  "en",                  // ISO language code of the template
  "US",                  // ISO territory code of the template
  Template.TEMPLATE_TYPE_PDF, // Type of the template file
  "us.pdf",              // Filename of the template file
  new FileInputStream("/path/to/new/us.pdf")); // Template file

 // Delete Japanese template file to the template entry
 TemplateHelper.deleteTemplateFile(
  appsContext,           // AppsContext
  "XDO",                 // Application short name of the template
  "TestTemplate",        // Template code of the template
  "ja",                  // ISO language code of the template
  "JP");                 // ISO territory code of the template
テンプレート・ファイルの内容をリポジトリからダウンロードするには、getTemplateFile()メソッドをコールします。これらのメソッドでは、戻り値として、テンプレート・ファイルに接続される入力ストリームが戻されます。
// Download the English template file from the repository
 InputStream in = TemplateHelper.getTemplateFile(
  appsContext,           // AppsContext
  "XDO",                 // Application short name of the template
  "TestTemplate",        // Template code of the template
  "en",                  // ISO language code of the template
  "US");                 // ISO territory code of the template
テンプレート・マネージャに格納されているテンプレートをXMLデータ・ソースに適用するには、いずれかのprocessTemplate()メソッドをコールします。処理された文書の送信先の出力ストリーム・オブジェクトを渡す必要があります。
// Process template
 TemplateHelper.processTemplateFile(
  appsContext,           // AppsContext
  "XDO",                 // Application short name of the template
  "TestTemplate",        // Template code of the template
  "en",                  // ISO language code of the template
  "US",                  // ISO territory code of the template
  dataInputStream,       // XML data for the template
  TemplateHelper.OUTPUT_TYPE_PDF,  // Output type of the procesed document
  properties,            // Properties for the template processing
  docOutputStream)       // OutputStream where the processed document goes.
Propertiesオブジェクトを渡して、テンプレート処理に関するプロパティを渡します。XMLパブリッシャ・プロセッサに渡すプロパティがない場合は、nullを渡します。
RTF/FOテンプレートへのXSLパラメータの受渡し
Propertiesオブジェクトにパラメータ名と値を設定します。
RTF/XSLテンプレートに対するプロパティ名はすべてxsltで始まる必要があります。
パラメータ値は一重引用符で囲む必要があります。
String <parameter_name> = "name";
String <parameter_value> = "value";
Properties props = new Properties();
...
props.put("xslt.<parameter_name>", "'<parameter_value>'");
...
String <parameter_name> = "name";
TemplateHelper.processTemplate()メソッドのコール時にこのプロパティ・オブジェクトを設定します。
TemplateHelper.processTemplate(appsContext, "OKC", "OKCTERMS", "en", "US", pData, props, pOutput);次の構文を使用してRTF/FOテンプレートにXSLパラメータを定義します。
<xsl:param name="parameter_name" select "default_value" xdofo:ctx="begin"/>
設定したプロパティを渡す以外に、TemplateHelperクラスでは、次の場所が検索され、使用可能な場合はシステム・レベルのプロパティが取得されます。
OA_MEDIAの場所など、OA固有のプロパティに対するJavaシステム・プロパティ
{java.home}/lib/xdo.cfgにあるシステム構成ファイル
システム・レベル・プロパティと、渡したユーザー・レベル・プロパティが競合する場合は、ユーザー・レベル・プロパティが優先されます。
TemplateHelperクラスではEFT/EDIテンプレートがサポートされます。Template.TEMPLATE_TYPE_ETEXTテンプレート・タイプでEFT/EDIテンプレート・エントリを作成できます。また、TemplateHelper内のprocessTemplate()メソッドを使用して、EFT/EDIテンプレートを処理することもできます。EFT/EDIテンプレートの処理時にOUTPUT_TYPE_ETEXT出力タイプを割り当てることができます。EFT/EDI処理エンジンにパラメータを渡す必要がある場合は、processTemplate()メソッドのコール時に、これらのパラメータをPropertiesオブジェクトとして渡すことができます。
// Process EFT/EDI template
 TemplateHelper.processTemplateFile(
  appsContext,           // AppsContext
  "XDO",                 // Application short name of the template
  "TestTemplate",        // Template code of the template
  "en",                  // ISO language code of the template
  "US",                  // ISO territory code of the template
  dataInputStream,       // XML data for the template
  TemplateHelper.OUTPUT_TYPE_ETEXT,  // Output type of the procesed document
  properties,            // Properties for the template processing.
                         // All properties will be passed to EFT/EDI engine
  docOutputStream)       // OutputStream where the processed document goes.
EFT/EDIテンプレートの処理をさらに制御する必要がある場合(EFT/EDI処理エンジン用のコンテキスト・パラメータの取得/設定など)は、EFTGeneratorをコールしてテンプレートを処理できます。
import oracle.apps.xdo.template.eft.EFTGenerator;

  …

  // Process EFT/EDI template with EFTGenerator class
  EFTGenerator generator = new EFTGenerator();
  // Get the template file from template manager repository
  // and set it.
  generator.loadXSL(
    TemplateHelper.getTemplateFile(ctx, "XDO", "TestTemplate", "en", "US"));
  // Set the data XML
  generator.loadXML(dataInputStream);
  // Set context param
  generator.setContextParam(PARAM1, PARAM1_VALUE);
  // Process the template
  generator.process(resultOutputStream);
  // Get context param
  String param2 = generator.getContextParam(PARAM2);
getTemplateFile()およびprocessTemplate()メソッドの両方で、言語代替メカニズムがサポートされています。このメカニズムでは、言語基準と一致するテンプレート・ファイルがない場合でも、最も適切な入力ストリームが提供されます。言語代替の優先順位は、次のとおりです。
特定の言語および地域と一致するテンプレート・ファイルを戻します。
特定の言語と一致するテンプレート・ファイルを戻し、地域に依存しません(地域の値が00)。
デフォルト・テンプレートを戻します。デフォルト・テンプレート・ファイルの割当て方法の詳細は、「デフォルト・テンプレート」を参照してください。
たとえば、次の表のようなテンプレートのサンプルがテンプレート・マネージャ・リポジトリにあるとします。
| テンプレート・ファイル | ISO言語コード | ISO地域コード | デフォルト/非デフォルト |
|---|---|---|---|
| A | en | US | 非デフォルト |
| B | en | 00 | 非デフォルト |
| C | fr | FR | デフォルト |
| D | ja | JP | 非デフォルト |
次の表に、特定のISO言語/地域コードの組合せを渡した場合に戻されるテンプレートを示します。
| ISO言語コード | ISO地域コード | 戻されるテンプレート |
|---|---|---|
| en | US | A |
| en | GB | B |
| en | null | B |
| fr | FR | C |
| ja | JP | D |
| de | DE | C |
最も適切なターゲット・テンプレート・ファイルを取得するために、ISO言語コードと地域コードの両方を明示的に渡すことをお薦めします。
getTemplateFile()またはprocessTemplate()をコールすると、デフォルトで、XMLパブリッシャによって、テンプレート・エントリに設定されているSTART_DATE、END_DATEおよびTEMPLATE_STATUSに対して検証ロジックが実行されます。無効なエントリが検出された場合は、その内容に応じて、TemplateExpiredException、TemplateNotYetValidException、StatusDisabledExceptionの各例外が戻されます。これらの例外はoracle.apps.xdo.XDOExceptionのサブクラスであるため、これらの例外をすべて1度に取得する場合はXDOExceptionを取得できます。この検証モードをオフにするには、Javaシステム・プロパティxdo.TemplateValidationをfalseに設定します。デフォルト・モードはtrueに設定されています。
各テンプレート・コードに対して翻訳可能テンプレートを定義できます。getXLIFF()およびuploadXLIFF()メソッドを使用すると、テンプレート・ファイル内のテキストをXLIFF形式で取得して翻訳した後、ファイルにマージしなおすことができます。
getXLIFF() - テンプレートに対する翻訳可能なボイラープレート・テキストをxliff形式でダウンロードします。このテンプレートに対する翻訳可能テンプレート・ファイルが存在している必要があります。存在しない場合、戻り値はnullです。結果の文書のtarget-language属性に、指定したロケールが追加されます。このロケールに対する翻訳が使用できない場合、結果のxliff文書の要素は空になります。
uploadXLIFF() - xliff形式のテンプレートに対する翻訳をアップロードします。xliffファイルには、有効なtarget-language属性が含まれている必要があります。
テンプレートで動作する拡張書式設定では、実行時にデータを書式設定するための適切なメソッドを備えたJavaクラスを用意する必要があります。多くのフォント・ベンダーでは、書式設定を実行するコードをフォントとともに提供しています。これらのコードは、実行時にXMLパブリッシャの書式設定ライブラリで使用可能なクラスに、メソッドとして組み込む必要があります。エンコードに適したメソッドをコールするため、ライブラリのクラスに提供する必要のあるいくつかの特定のインタフェースがあります。
注意: RTFテンプレートで必要な設定については、『Oracle XML Publisherレポート・デザイナーズ・ガイド』の拡張バーコード書式設定に関する項を参照してください。
このクラスでは次の3つのメソッドを実装する必要があります。
/**
 * Return a unique ID for this bacode encoder
 * @return the id as a string
 */
  public String getVendorID();

/**
 * Return true if this encoder support a specific type of barcode
 * @param type the type of the barcode
 * @return true if supported
 */
  public boolean isSupported(String type);

/**
 * Encode a barcode string by given a specific type
 * @param data the original data for the barcode
 * @param type the type of the barcode
 * @return the formatted data
 */
  public String encode(String data, String type);
このクラスを、XMLパブリッシャが実行している中間層JVMのクラスパスに置きます。
注意: E-Business Suiteユーザーの場合、このクラスは、中間層および存在するすべてのコンカレント・ノードのクラスパスに置く必要があります。
register-barcode-vendorコマンドでbarcode_vendor_idが指定されていない場合、XMLパブリッシャはgetVendorID()をコールして、メソッドの結果をベンダーのIDとして使用します。
次に、Code128a、Code128bおよびCode128cエンコードをサポートしているクラスの例を示します。
重要: 次のコード例は、使用しているシステムにコピーおよびペーストして使用できます。発行制約のため、改行を変更し、スマート引用符として表示される引用を削除して簡単な引用に置き換える必要があります。
package oracle.apps.xdo.template.rtf.util.barcoder;

import java.util.Hashtable;
import java.lang.reflect.Method;
import oracle.apps.xdo.template.rtf.util.XDOBarcodeEncoder;
import oracle.apps.xdo.common.log.Logger;
// This class name will be used in the register vendor
// field in the template.

public class BarcodeUtil  implements XDOBarcodeEncoder
// The class implements the XDOBarcodeEncoder interface
{
// This is the barcode vendor id that is used in the
// register vendor field and format-barcode fields
  public static final String BARCODE_VENDOR_ID = "XMLPBarVendor";
// The hashtable is used to store references to
// the encoding methods
  public static final Hashtable ENCODERS = new Hashtable(10);
// The BarcodeUtil class needs to be instantiated
  public static final BarcodeUtil mUtility = new BarcodeUtil();
// This is the main code that is executed in the class,
// it is loading the methods for the encoding into the hashtable.
// In this case we are loading the three code128 encoding
// methods we have created.
  static {
    try {
      Class[] clazz = new Class[] { "".getClass() };

      ENCODERS.put("code128a",mUtility.getClass().getMethod("code128a", clazz));
      ENCODERS.put("code128b",mUtility.getClass().getMethod("code128b", clazz));
      ENCODERS.put("code128c",mUtility.getClass().getMethod("code128c", clazz));
     } catch (Exception e) {
// This is using the XML Publisher logging class to push
// errors to the XMLP log file.
      Logger.log(e,5);
    }
  }
// The getVendorID method is called from the template layer
// at runtime to ensure the correct encoding method are used
public final String getVendorID()
{
return BARCODE_VENDOR_ID;
}
//The isSupported method is called to ensure that the
// encoding method called from the template is actually
// present in this class.
// If not then XMLP will report this in the log.
public final boolean isSupported(String s)
{
if(s != null)
return ENCODERS.containsKey(s.trim().toLowerCase());
else
return false;
}
// The encode method is called to then call the appropriate
// encoding method, in this example the code128a/b/c methods.
public final String encode(String s, String s1)
{
if(s != null && s1 != null)
{
try
{
Method method = (Method)ENCODERS.get(s1.trim().toLowerCase());
if(method != null)
return (String)method.invoke(this, new Object[] {
s
});
else
return s;
}
catch(Exception exception)
{
Logger.log(exception,5);
}
return s;
} else
{
return s;
}
}
/** This is the complete method for Code128a */
public static final String code128a( String DataToEncode )
{
char C128_Start = (char)203;
char C128_Stop = (char)206;
String Printable_string = "";
char CurrentChar;
int CurrentValue=0;
int weightedTotal=0;
int CheckDigitValue=0;
char C128_CheckDigit='w';
DataToEncode = DataToEncode.trim();
weightedTotal = ((int)C128_Start) - 100;
for( int i = 1; i <= DataToEncode.length(); i++ )
{
//get the value of each character
CurrentChar = DataToEncode.charAt(i-1);
if( ((int)CurrentChar) < 135 )
CurrentValue = ((int)CurrentChar) - 32;
if( ((int)CurrentChar) > 134 )
CurrentValue = ((int)CurrentChar) - 100;
CurrentValue = CurrentValue * i;
weightedTotal = weightedTotal + CurrentValue;
}
//divide the WeightedTotal by 103 and get the remainder,
//this is the CheckDigitValue
CheckDigitValue = weightedTotal % 103;
if( (CheckDigitValue < 95) && (CheckDigitValue > 0) )
C128_CheckDigit = (char)(CheckDigitValue + 32);
if( CheckDigitValue > 94 )
C128_CheckDigit = (char)(CheckDigitValue + 100);
if( CheckDigitValue == 0 ){
C128_CheckDigit = (char)194;
}
Printable_string = C128_Start + DataToEncode + C128_CheckDigit + C128_Stop + " ";
return Printable_string;
}/** This is the complete method for Code128b ***/
public static final String code128b( String DataToEncode )
{
char C128_Start = (char)204;
char C128_Stop = (char)206;
String Printable_string = "";
char CurrentChar;
int CurrentValue=0;
int weightedTotal=0;
int CheckDigitValue=0;
char C128_CheckDigit='w';
DataToEncode = DataToEncode.trim();
weightedTotal = ((int)C128_Start) - 100;
for( int i = 1; i <= DataToEncode.length(); i++ )
{
//get the value of each character
CurrentChar = DataToEncode.charAt(i-1);
if( ((int)CurrentChar) < 135 )
CurrentValue = ((int)CurrentChar) - 32;
if( ((int)CurrentChar) > 134 )
CurrentValue = ((int)CurrentChar) - 100;
CurrentValue = CurrentValue * i;
weightedTotal = weightedTotal + CurrentValue;
}
//divide the WeightedTotal by 103 and get the remainder,
//this is the CheckDigitValue
CheckDigitValue = weightedTotal % 103;
if( (CheckDigitValue < 95) && (CheckDigitValue > 0) )
C128_CheckDigit = (char)(CheckDigitValue + 32);
if( CheckDigitValue > 94 )
C128_CheckDigit = (char)(CheckDigitValue + 100);
if( CheckDigitValue == 0 ){
C128_CheckDigit = (char)194;
}
Printable_string = C128_Start + DataToEncode + C128_CheckDigit + C128_Stop + " ";
return Printable_string;
}
/** This is the complete method for Code128c **/
public static final String code128c( String s )
{
char C128_Start = (char)205;
char C128_Stop = (char)206;
String Printable_string = "";
String DataToPrint = "";
String OnlyCorrectData = "";
int i=1;
int CurrentChar=0;
int CurrentValue=0;
int weightedTotal=0;
int CheckDigitValue=0;
char C128_CheckDigit='w';
DataToPrint = "";
s = s.trim();
for(i = 1; i <= s.length(); i++ )
{
//Add only numbers to OnlyCorrectData string
CurrentChar = (int)s.charAt(i-1);
if((CurrentChar < 58) && (CurrentChar > 47))
{
OnlyCorrectData = OnlyCorrectData + (char)s.charAt(i-1);
}
}
s = OnlyCorrectData;
//Check for an even number of digits, add 0 if not even
if( (s.length() % 2) == 1 )
{
s = "0" + s;
}
//<<<< Calculate Modulo 103 Check Digit and generate
// DataToPrint >>>>
//Set WeightedTotal to the Code 128 value of
// the start character
weightedTotal = ((int)C128_Start) - 100;
int WeightValue = 1;
for( i = 1; i <= s.length(); i += 2 )
{
//Get the value of each number pair (ex: 5 and 6 = 5*10+6 =56)
//And assign the ASCII values to DataToPrint
CurrentChar = ((((int)s.charAt(i-1))-48)*10) + (((int)s.charAt(i))-48);
if((CurrentChar < 95) && (CurrentChar > 0))
DataToPrint = DataToPrint + (char)(CurrentChar + 32);
if( CurrentChar > 94 )
DataToPrint = DataToPrint + (char)(CurrentChar + 100);
if( CurrentChar == 0)
DataToPrint = DataToPrint + (char)194;
//multiply by the weighting character
//add the values together to get the weighted total
weightedTotal = weightedTotal + (CurrentChar * WeightValue);
WeightValue = WeightValue + 1;
}
//divide the WeightedTotal by 103 and get the remainder,
//this is the CheckDigitValue
CheckDigitValue = weightedTotal % 103;
if((CheckDigitValue < 95) && (CheckDigitValue > 0))
C128_CheckDigit = (char)(CheckDigitValue + 32);
if( CheckDigitValue > 94 )
C128_CheckDigit = (char)(CheckDigitValue + 100);
if( CheckDigitValue == 0 ){
C128_CheckDigit = (char)194;
}
Printable_string = C128_Start + DataToPrint + C128_CheckDigit + C128_Stop + " ";
Logger.log(Printable_string,5);
return Printable_string;
}
}クラスを作成して正確なクラスパスに置くと、テンプレート作成者はクラスを使用してバーコードのデータを書式設定できるようになります。テンプレートのコマンドに組み込めるよう、次の情報を作成者に渡してください。
クラス名およびパス。
この例では、次のようになります。
oracle.apps.xdo.template.rtf.util.barcoder.BarcodeUtil
作成したバーコード・ベンダーID。
この例では、XMLPBarVendorとなります。
使用できるエンコードのメソッド。
この例では、code128a、code128bおよびcode128cとなります。
この情報を使用することで、データをバーコード出力用に正常にエンコードできます。