Creating the XML Schemas
The next step in the Purchase Order sample project is to create the
XML schemas
The HTTP-SOAP-PO-BPEL sample project includes two XML schema files. In this section, you
create two new XML schema files for your BPEL Module project, inventory.xsd and purchaseOrder.xsd.
Creating the inventory.xsd Schema
The inventory.xsd XML schema enables the BPEL Service Engine to check the current
inventory for a requested item.
Perform the following steps to create the schema:
To create the inventory.xsd schema
- In the Projects window, right-click the HTTP-SOAP-PO-BPEL node and select New ->
Other from the pop-up menu.
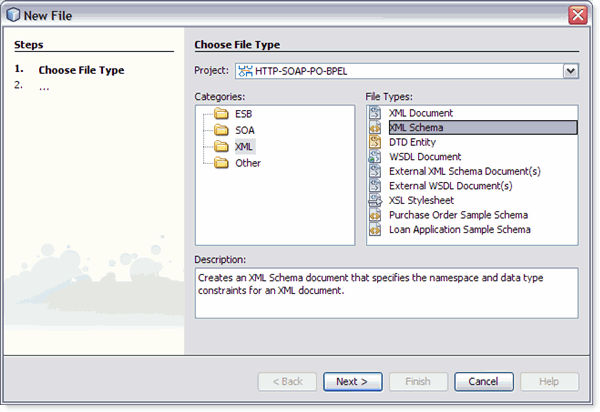
The New File Wizard appears.
- In the Categories field, select XML, and in the File Types field, select
XML Schema.
- Click Next.

- From the second page of the wizard, Name and Location, type inventory as
the File Name.
- Click Finish.
In the Projects window, the Process Files node now contains a subnode named
inventory.xsd. The Source Editor contains a tab for the XML schema file,
inventory.xsd, with the Schema view open.
To add a complex type to the XML Schema
- From the Schema view of the inventory.xsd, right-click the Complex Type node and
select Add Complex Type from the pop-up menu.
- From the Add Complex Type dialog box, click OK. A complex type (newComplexType)
is added to the second pane of the Schema window and a sequence
node is added to the third pane of the Schema window.
Add Local Elements to the XML Schema
- From the Schema window, right-click the sequence node and select Add ->
Element from the pop-up menu.
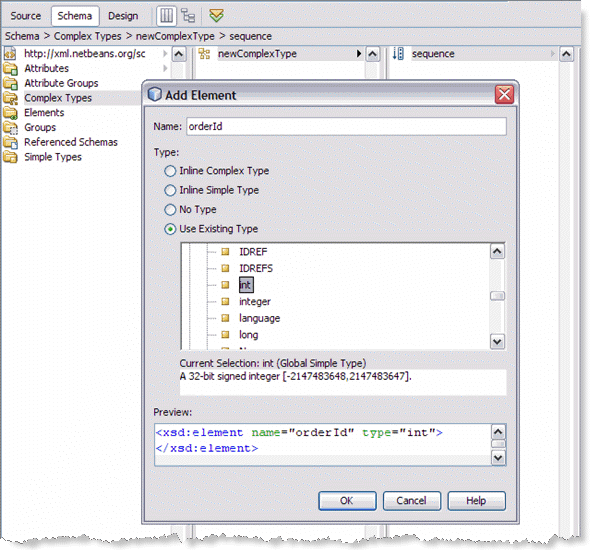
The Add Element dialog box appears.
- From the Add Element dialog box, do the following:
- Enter orderId as the Name.
- For Type, select Use Existing Type and select Built-in Types -> int as the Current Selection.

- Click OK.
- From the Schema window, right-click the sequence node again, and select Add
-> Element from the pop-up menu.
The Add Element dialog box appears.
- From the Add Element dialog box, do the following:
- Type inventoryStatus as the Name.
- For Type, select Use Existing Type and select Built-in Types -> boolean as the Current Selection.
- Click OK.
- From the Schema window, right-click the sequence node again, and select Add
-> Element from the pop-up menu.
- From the Add Element dialog box, do the following:
- Type inventoryStatusMessage as the Name.
- For Type, select Use Existing Type and select Built-in Types -> string as the Current Selection.
- Click OK.
To add a global element
- From the left pane of the Schema window, right-click the Elements node,
and select Add -> Element from the pop-up menu.
- From the Add Element dialog box, do the following:
- Type inventory as the Name.
- For Type, select Use Existing Type and select Complex Type -> newComplexType as the Current Selection.
- Click OK. A complex type (inventory) is added to the second pane
of the Schema window.
To validate the XML Schema
- From the Schema Editor toolbar, click the Validate XML button. Validation begins.
- The Outlook window of the IDE displays the validation status. If any errors
occur, double-click each error message to see the location of the error and
make any necessary corrections. Run validation again to verify corrections.
- If your validation is successful, click File -> Save All() to save your current changes.
Creating the purchaseOrder.xsd Schema
Perform the following steps to create the schema:
To create the purchaseOrder.xsd schema
- In the Projects window, right-click the HTTP-SOAP-PO-BPEL -> Process Files node and select
New -> XML Schema from the pop-up menu.
The XML Schema wizard appears displaying the Name and Location page.
- From the Name and Location page of the wizard, enter purchaseOrder as
the File Name.
- Click Finish. In the Projects window, the Process Files node now contains
a subnode labeled purchaseOrder.xsd . The Source Editor contains a tab for
the XML schema file, purchaseOrder.xsd, with the Schema view open.
To add a complex type to the XML schema
- From the Schema view of the purchaseOrder.xsd, right-click the Complex Type node and
select Add Complex Type from the pop-up menu.
- From the Add Complex Type dialog box, click OK. A complex type (newComplexType)
is added to the second pane of the Schema window and a sequence
node is added to the third pane of the Schema window.
To add local elements to the XML schema
- From the Schema window, right-click the sequence node and select Add ->
Element from the pop-up menu.
The Add Element dialog box appears.
- From the Add Element dialog box, do the following:
- Type orderId as the Name.
- For Type, select Use Existing Type and select Built-in Types -> int as the Current Selection.
- Click OK.
- In the same manner, add three additional elements with the values shown in
the following table:
|
|
|
|
|---|
customerId |
Use Existing Type |
Built-in Type |
int |
orderDescription |
Use Existing Type. |
Built-in Type |
String |
price |
Use Existing
Type. |
Built-in Type |
double |
|
To add a global element
- From the left pane of the Schema window, right-click the Elements node,
and select Add -> Element from the pop-up menu.
- From the Add Element dialog box, do the following:
- Type purchaseOrder as the Name.
- For Type, select Use Existing Type and select Complex Type -> newComplexType as the Current Selection.
- Click OK. A complex type (purchaseOrder) is added to the second pane
of the Schema window.
To validate the XML schema
- From the Schema Editor's toolbar, click the Validate XML button. Validation begins.
- If your validation is successful, click File -> Save All to save your
current changes.


