2 Preinstallation Steps

Preinstallation involves performing procedures such as building the connector bundle, creating, deploying, and testing the SOA composite and so on.

Note:

In this guide, a target system that exposes webservice endpoint has been referred to as the target system. ACME Webservice is used as a sample target system to discuss the configurations and the connector objects.

2.1 Prerequisites

The following are the prerequisites for configuring the SOA composite with the connector webservice client and the target webservice:

  • Knowledge of webservices, WSDLs, SOA composite, and BPEL Process components

    The WSDL should be well-defined for the target webservice, exposing the schema details and the operations.

  • Oracle JDeveloper 11g (11.1.1.9.0) with SOA Composite Editor extension, for configuring and wiring SOA composite with the connector

    Note:

    Ensure the version of JDeveloper you are using is compatible with the SOA server. You can download JDeveloper from:

    http://www.oracle.com/technetwork/developer-tools/jdev/downloads/jdeveloper111190-2538883.html

    In addition, ensure to use the compatible version of Connector Server JDK while using Oracle JDeveloper 11g (11.1.1.9.0).

    For information about downloading and installing the SOA Composite Editor extension, visit:

    http://www.oracle.com/ocom/groups/public/@otn/documents/webcontent/156082.xml#oracle.sca.modeler

  • XSL Transformations, for payload conversions

    The complexity of the wiring depends on the target webservice. For example, Amazon webservice expects every SOAP request to be signed and the signature would change for every request. This signature has to be computed as part of the composite.

2.2 Building the Connector Bundle

The connector package contains a set of templates and a build utility. The build utility is a script that generates Oracle Identity Manager artifacts specific to the target webservice from the set of templates. It also generates SOA composite project that you can use to wire the connector client webservice against the target webservice.

Note:

You can build a connector specific to different target webservices using the build utility. Cloning of this connector is not supported.

To build the connector:

  1. Create a directory for the connector, for example, Webservices-11.1.1.5.0, in the OIM_HOME/server/ConnectorDefaultDirectory directory.
  2. Copy and unzip the contents of the connector installation media directory into directory created in Step 1.

    Table 2-1 lists the files and directories on the installation media, before building the connector.

    Table 2-1 Files and Directories Before Building the Connector

    File in the Installation Media Directory Description

    build-connector.bat

    build-connector.sh

    Batch files for generating the webservice connector package from templates.

    bundle/org.identityconnectors.genericws-1.0.112.jar

    This JAR file is the ICF bundle that the connector is using for the current release.

    configuration

    This folder is empty.

    javadoc

    This directory contains information about the Java APIs used by the connector.

    lib/ConnectorBuildTools.jar

    This JAR file contains class files for generating the webservice connector package from templates.

    Files in the resources directory

    Each of these resource bundles contains language-specific information that is used by the connector.

    During connector deployment, this file is copied to the Oracle Identity Manager database.

    Note: A resource bundle is a file containing localized versions of the text strings that are displayed on the Administrative and User Console. These text strings include GUI element labels and messages.

    Files in the soa/policy directory:

    • Webservices-oim-integration.jar

    • oimcp_WS_CONNECTOR_OUTBOUND

    The directory contains a custom policy JAR that has to be deployed on the SOA server for unmasking password fields before invoking the target webservice.

    The oimcp_WS_CONNECTOR_OUTBOUND file contains SOA policy used for unmasking password entries.

    See Securing the Connector for more information.

    Files in the templates directory

    These files are part of the template project needed to complete the wiring against target system webservices.

    xml

    This folder is empty.

  3. Run one of the following commands.

    On Microsoft Windows:

    build-connector.bat "LONG_CODE" "SHORT_CODE"

    On UNIX:

    sh build-connector.sh "LONG_CODE" "SHORT_CODE"

    where LONG_CODE is the descriptive name of the connector and SHORT_CODE is the concise 4-character name of the target system that will be used in lookup names, adapter names, and so on.

    For example, to build the connector zip file for the ACME Webservice on Linux, run the following command:

    sh build-connector.sh "ACME Web" "ACME"

    Table 2-2 lists the files and directories generated after building the connector.

    Table 2-2 Files and Directories Generated After Building the Connector

    File in the Installation Media Directory Description

    configuration/ACME-CI.xml

    This file contains configuration information that is used during connector installation.

    Files and directories in the soa/project/ACMEWebserviceWSConnector directory:

    • ACMEWebserviceWSConnector.jpr

    • classes

    • composite.xml

    • SCA-INF

    • testsuites

    • WebservicesConnectorServiceWrapper.wsdl

    • SConnector.bpel

    • WSConnector.componentType

    • wsdl

    • xsd

    • xsl

    These files and directories form SOA composite project.

    You can open this project in JDeveloper to wire the templates against the target webservice.

    xml/ACME-ConnectorConfig.xml

    This file contains definitions for the connector components.

    • Resource object

    • Process definition

    • IT resource type

    • Reconciliation rules

    • Scheduled jobs

    • Lookup definitions

2.3 Creating a SOA Composite for the Target Webservice

The connector uses SOA to connect to the target webservice and perform operations on them. The variables in the SOA composite must be mapped to the variables on the target system.

After building the connector as per Building the Connector Bundle, you can open the generated SOA composite project in JDeveloper to wire the templates against the target webservice. After completing the wiring of the SOA composite, you can configure SOA WebSecurity policies in the composite.xml file for authentication by including the specific policy and binding properties.

Note:

As a best practice, you can configure how errors and faults are handled for each operation. See Handling Faults for more information.

This section describes the following procedures:

2.3.1 Configuring the Partner Link

To configure the partner link before configuring the operations:

  1. In JDeveloper, open the SOA composite project file, ACMEWebserviceWSConnector.jpr, located in the following directory:

    OIM_HOME/server/ConnectorDefaultDirectory/Webservices-11.1.1.5.0/soa/project/ACMEWebserviceWSConnector

    Note:

    Ensure the version of JDeveloper you are using is compatible with the SOA server. SOA Composite Editor extension must also be installed. For information about downloading and installing version 11.1.1.9.0 of JDeveloper, visit:

    http://www.oracle.com/technetwork/developer-tools/jdev/downloads/jdeveloper111190-2538883.html

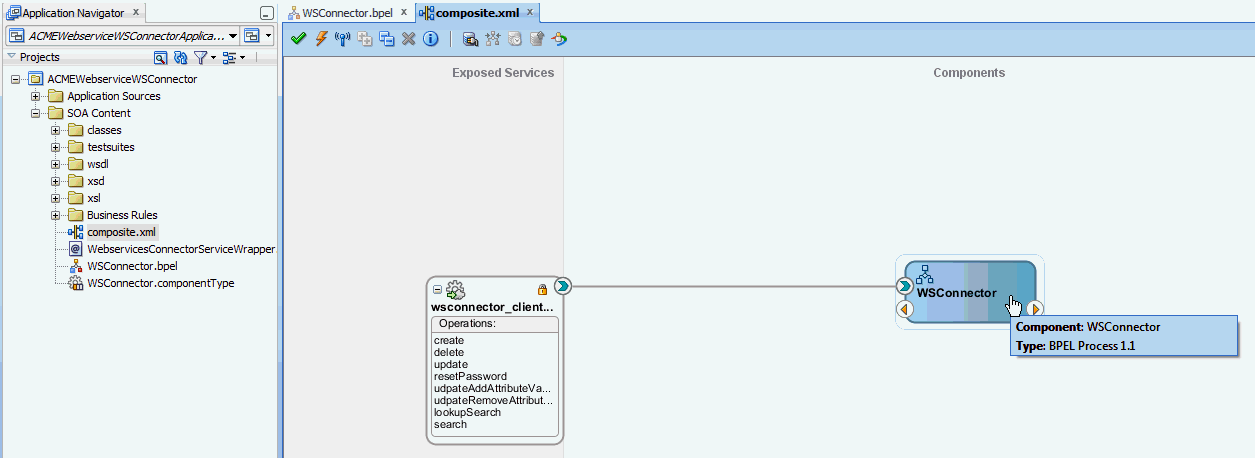
  2. Open the composite.xml file.

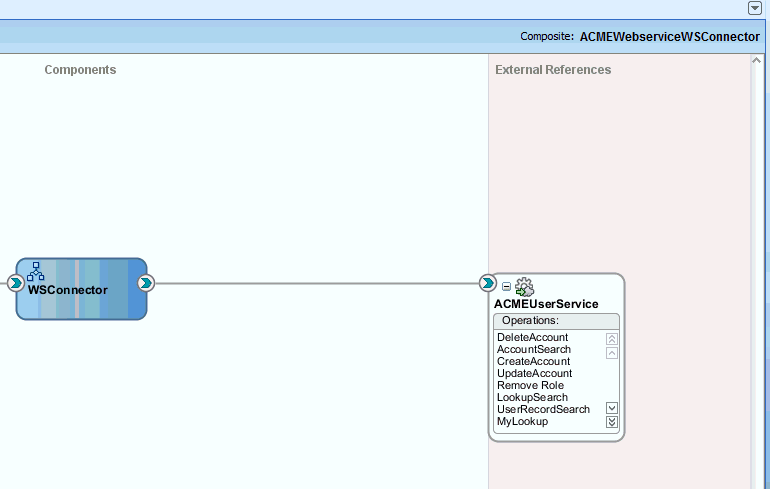
    This configuration file shows the relations of the BPEL Process and partner clients, as shown in the following sample screenshot.

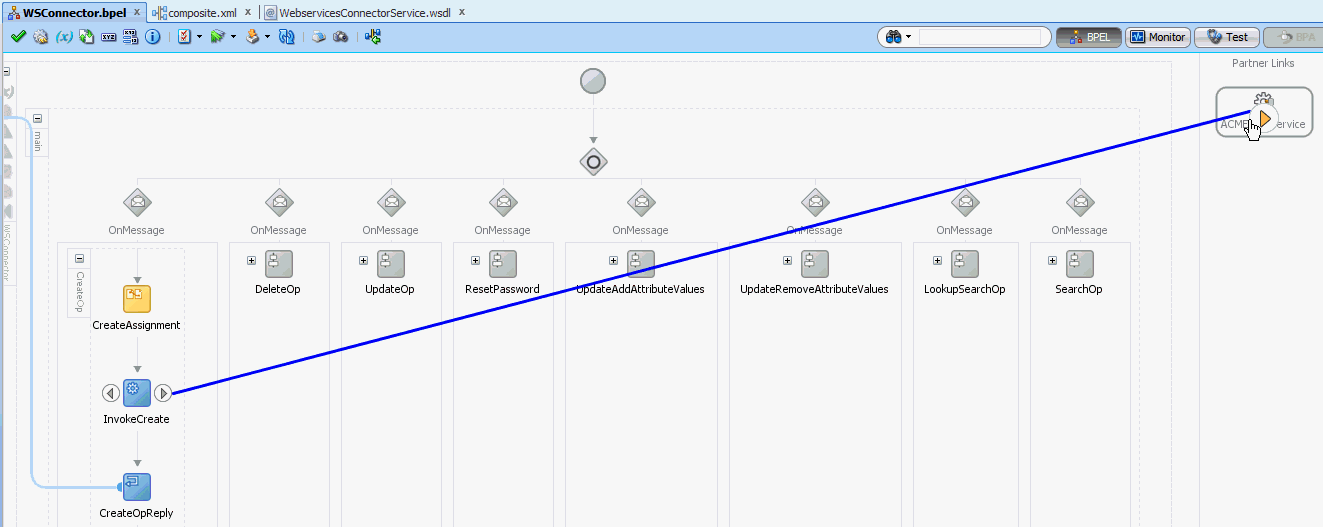
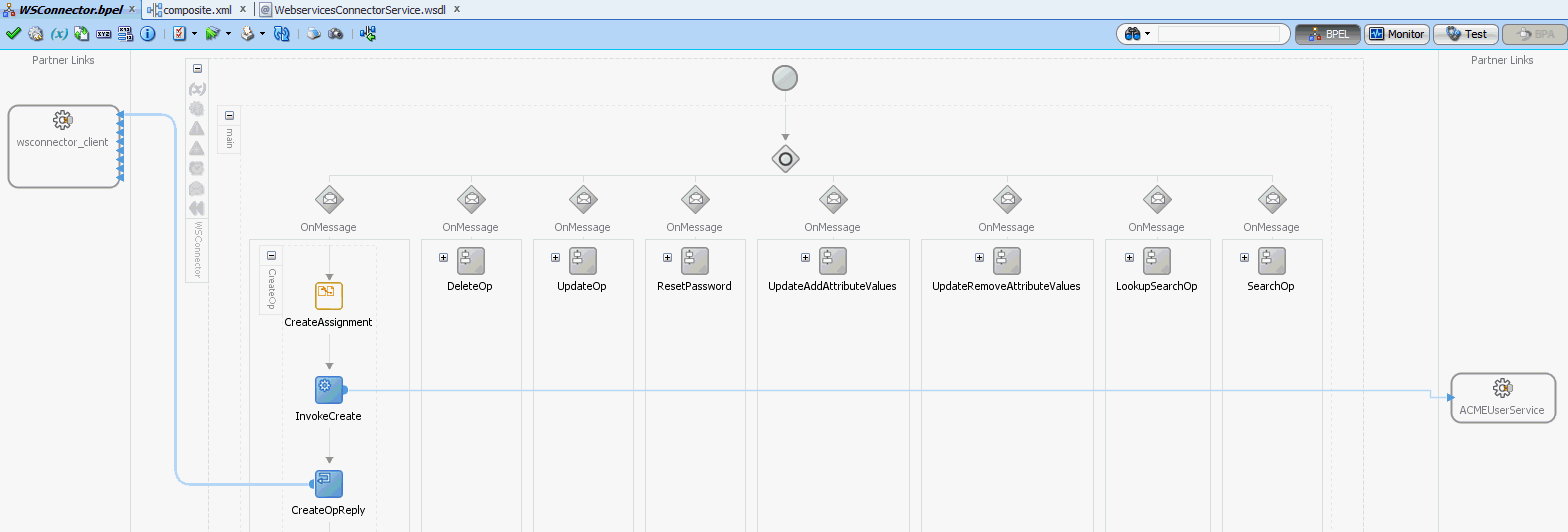
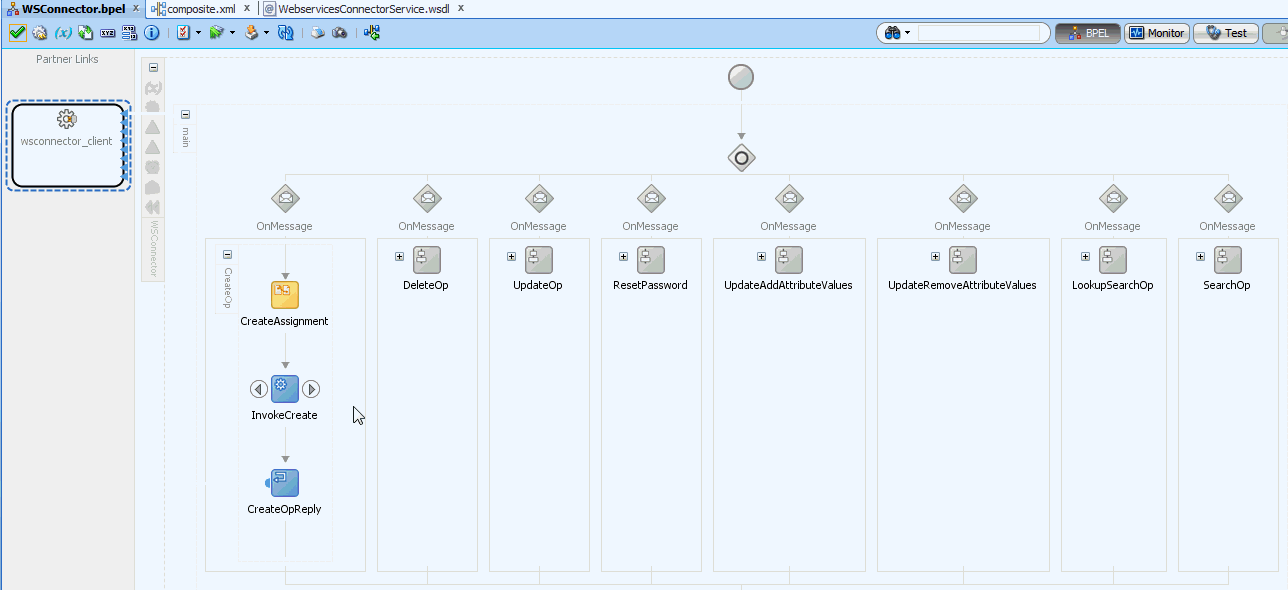
  3. Double-click the BPEL Process component to view the ICF operations.

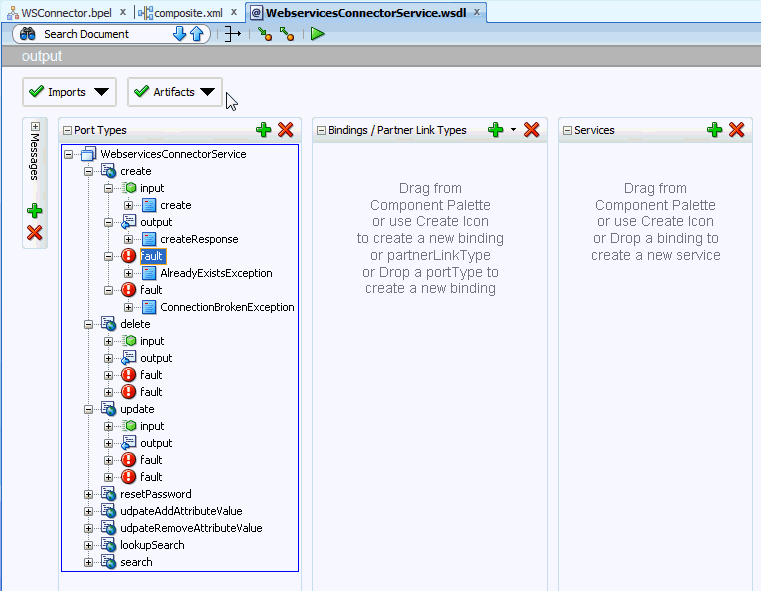
    By default, this BPEL Process is wired to the connector WSDL, wsdl\WebservicesConnectorService.wsdl. If you double-click the WSDL, the connector operations with their input and output schema and the exceptions are displayed.

    Note:

    The WebserviceConnectorService schema (xsd/WebservicesConnectorService.xsd) and wsdl file (wsdl/WebservicesConnectorService.wsdl) in the JDeveloper SOA project should not be modified as this will break the contract with the Connector and it might not work as expected.

    In the BPEL Process, each branch will be invoked based on the webservice connector operation that is called.

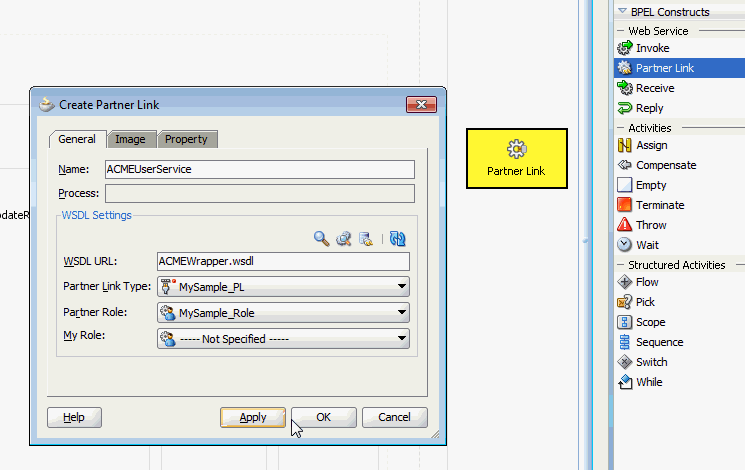
  4. Include a partner link (http://<machine-name>:<port-number>//spml-xsd/SPMLService?WSDL) for an operation, such as Create, by importing and defining the target WSDL.

    Note:

    Ensure that the Target WSDL file points to the correct URL of the Webservice target and rebuild from JDeveloper. For example, <soap:address location="http://host:port/SampleWebservice/My_Service"/>

    In the composite.xml file, the ACMEUserService is listed with all the operations.

  5. Save the project.

2.3.2 Configuring the Create Operation

Deploy your target on SOA server.

After performing the procedure described in Configuring the Partner Link, you can configure the create operation in the SOA composite as follows:

See Also:

Adding Custom Attributes for Provisioning in SOA Composite for information about adding custom attributes for the Create operation

  1. Include a partner link for the create operation by importing and defining the target WSDL.

    In the composite.xml file, the ACMEUserService is listed with all the operations.

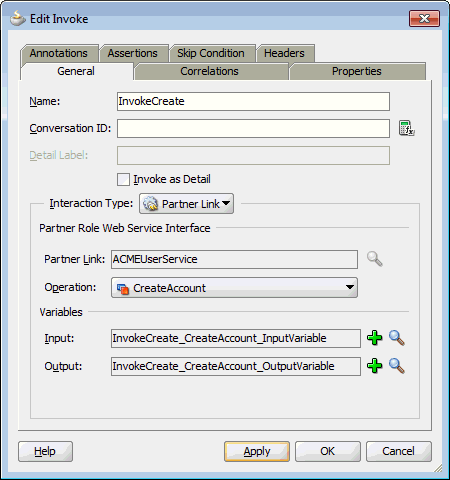
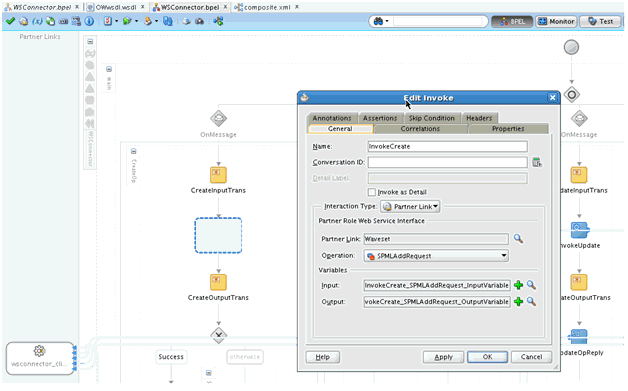
  2. Invoke an operation on the user service by dragging InvokeCreate onto the ACMEUserService partner link.

    For the create operation, you can invoke the CreateAccount operation and specify the input and the output variables.

    Now, InvokeCreate has a call to the target webservice.

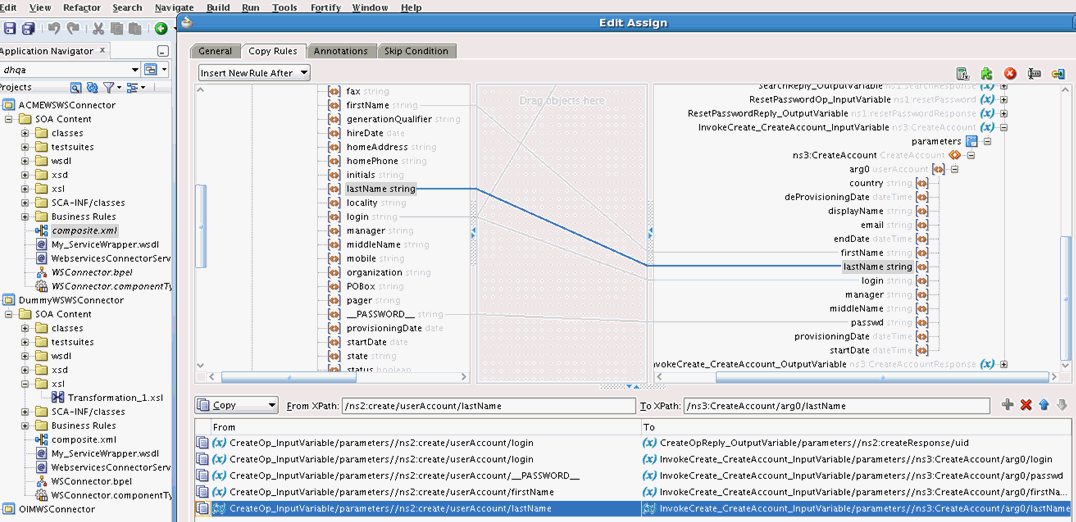
  3. Map the input and the output variables to the target webservice target variables by editing the respective Assign activity, for example CreateAssignment, in the BPEL Process.
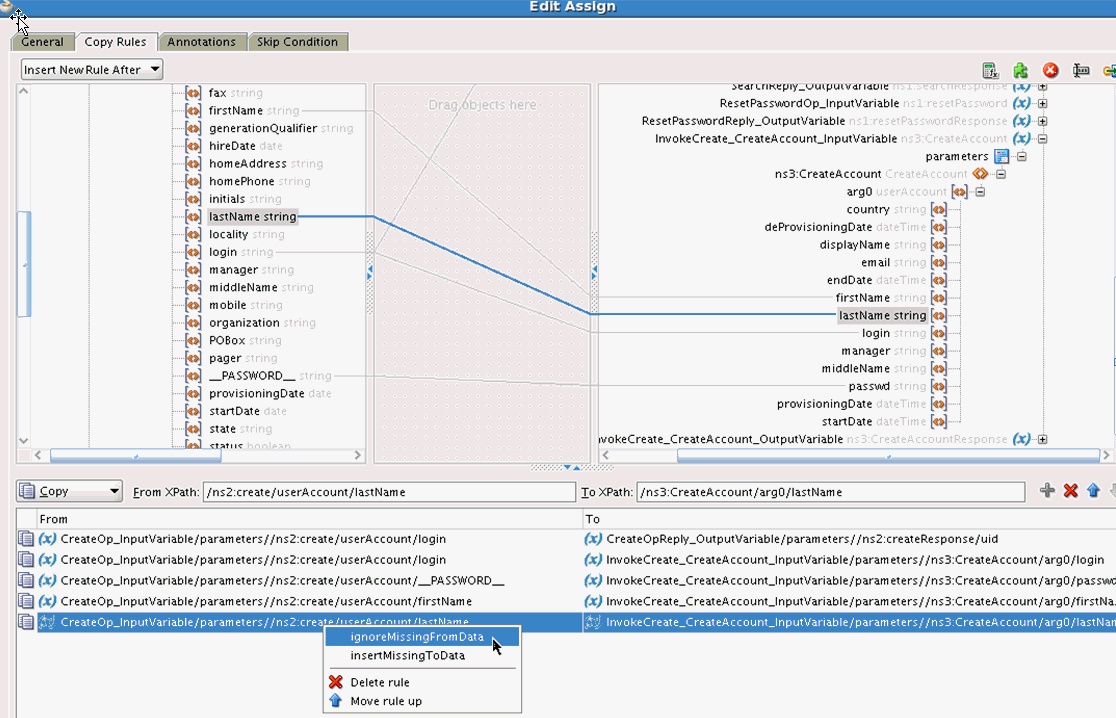
  4. Right-click the mapping and select ignoreMissingFromData for all the non-mandatory fields.
  5. Assign the Unique Id of the account returned by the target webservice to createResponse or Uid field before CreateOpReply activity. The returned value will be considered as the unique identifier of the user or account which is used to refer to the created object. Subsequent updates of this user's attributes will send this value along with the updated attributes to the webservice connector composite.
  6. Save the assignment and the project.
  7. To test the create operation, you can comment all the onMessage lines except the CreateOp line in the BPEL source file in the project.

2.3.3 Configuring the Create Operation for SPML

Service Provisioning Markup Language (SPML) is an XML-based framework based on the concepts of Directory Service Markup Language (DSML) for exchanging user, resource, and service provisioning information between cooperating organizations.

This section discusses the following topics:

2.3.3.1 Prerequisites for Configuring the Create Operation for SPML

Before configuring the create operation for SPML:

  1. Use the SPML and DSML XML Schema Definition (XSD) files depending on the SPML version of the target webservice, for example, ACME Webservice. See Sample XSDs for the SPML and DSML XSDs.
    • To test against SPML, the target is already placed in server/apps/oim.ear and is auto deployed on its first access from oim_server1 of OIM. WSDL path: http://<machine-name>:14000/spml-xsd/SPMLService?WSDL. The operations of SPML are asynchronous, therefore OIM does not wait for the response from target.

    • To test against non-SPML target, use the target as attached. Deploy this target on SOA server.

  2. Modify the XSD files to match the syntax expected by the target webservice.
  3. Use the SPML WSDL to test the operations through a separate webservice testing tool such as SOAP UI. Ensure you can perform the operations using the testing tool.

    If a WSDL is not available by default for the SPML service, you can create your own WSDL using the following link:

    http://<machine-name>:<port-number>/spml-xsd/SPMLService?WSDL

  4. In JDeveloper, create a partner link in the SOA composite using the WSDL, as per the procedure described in Configuring the Partner Link.
  5. Retain the SPML and DSML XSD files in the project and ensure that the imports and references to these files are set up properly.

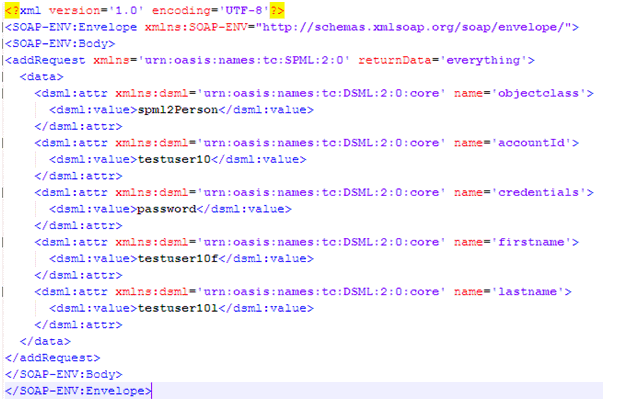
2.3.3.2 Configuring the Create Operation for a Sample CreateUser SPML Request

Consider the following sample CreateUser SPML request:

To configure create operation for the sample CreateUser SPML request:

  1. Edit the Invoke activity to call the CreateUser operation of the target and add the variables.
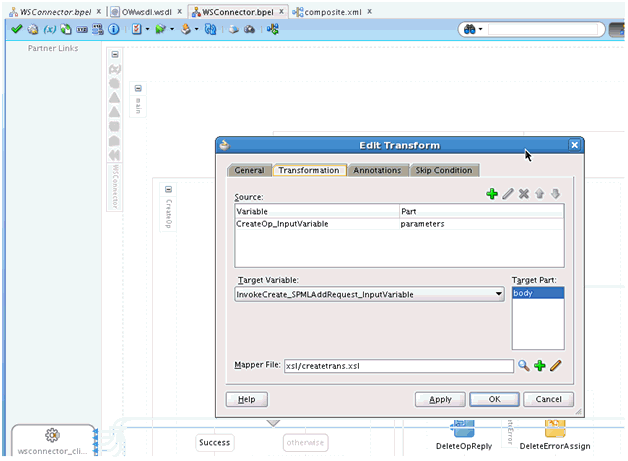
  2. Drop a Transform activity before the Invoke activity.

    Remove unwanted Assign activity, if any. Set the source variable to CreateOp_inputVariable and the target variable to InvokeCreate, which is the Invoke activity input variable created in the previous step.

  3. Provide a mapper file name and click OK. The file is opened for editing.
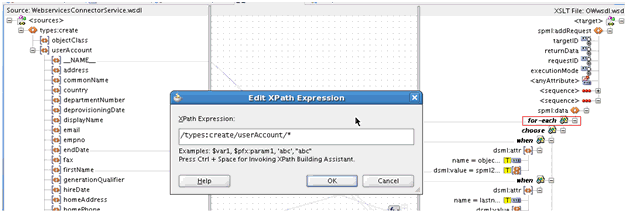
  4. Loop over the userAccount attributes using a for-each construct.
  5. Switch to the Source tab to see the XSL transform code for the attribute. Use choose-when construct to check for the attribute name and assign values.

    The following is a sample code. In this sample, firstName is the attribute name that is received from the connector webservice. The name is transformed to firstname, which is the attribute name used by the SPML target as shown before Step 1 in the sample SPML request.Similarly, the mappings for other attributes such as lastName can be done by adding when nodes.

    <xsl:for-each select="/types:create/userAccount/*">
      <xsl:choose>
        <xsl:when test='(name() = "firstName") and /types:create/userAccount/firstName'>
          <dsml:attr>
            <xsl:attribute name="name">
              <xsl:text disable-output-escaping="no">firstname</xsl:text>
            </xsl:attribute>
            <dsml:value>
              <xsl:value-of select="/types:create/userAccount/firstName"/>
            </dsml:value>
          </dsml:attr>
        </xsl:when>
        <xsl:when test='name() = "lastName" and /types:create/userAccount/lastName'>
        ...
        ...
        ...
        </xsl:when>
      </xsl:choose>
    </xsl:for-each>
    
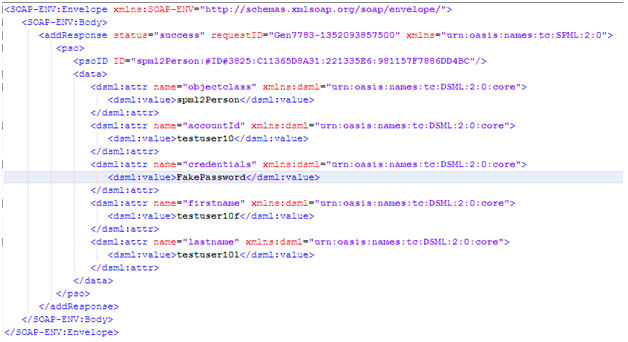
  6. The connector expects the UID of the user created on the target as output Reply. In the example, the following create response is received:
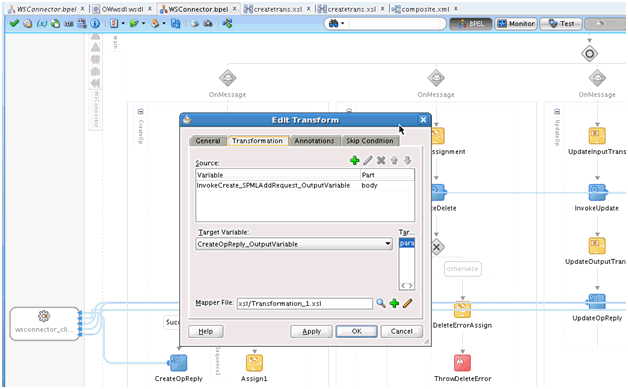
  7. Another transformation is required to read accountId from the response and send it as UID in reply. Drop another Transform activity between the Invoke activity and the CreateOpReply activity.
  8. Set the source variable as the output of Invoke and the target variable as output variable of Reply.
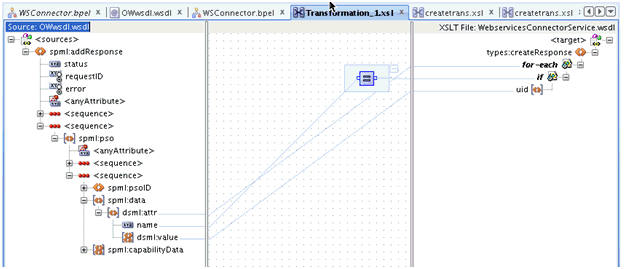
  9. In the Transformation page:
    • Apply for-each loop on the dsml:attr.

    • Drop equals and if lines on the UID and link them, as shown in the following sample screenshot.

    • Assign dsml:value to UID of createResponse.

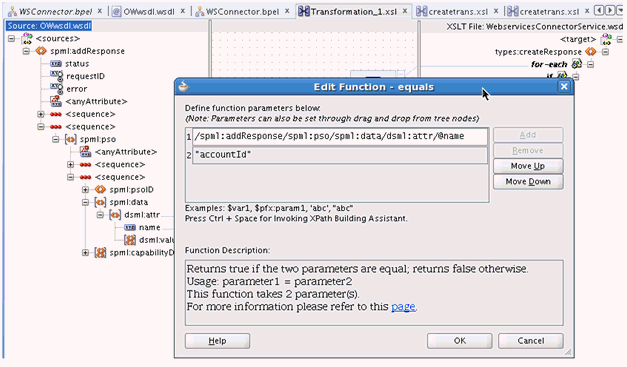
  10. Double-click the equals box to edit it and set the second parameter as accountId.
  11. The source of the transformation file will be as follows:
    <types:createResponse>
      <xsl:for-each select="/spml:addResponse/spml:pso/spml:data/dsml:attr">
        <xsl:if test='@name = "accountId"'>
          <uid>
            <xsl:value-of select="dsml:value"/>
          </uid>
        </xsl:if>
      </xsl:for-each>
    </types:createResponse>
    
  12. Save the assignment and the project.

    You can compile and deploy the project. Test the operation from the Enterprise Manager. See Deploying and Testing the Webservice SOA Composite for more information.

2.3.4 Configuring the Delete Operation

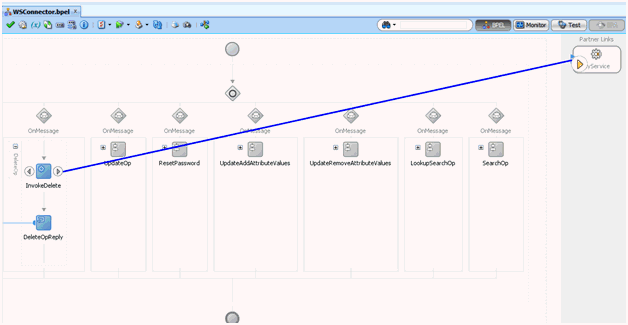
After performing the procedure described in Configuring the Partner Link, you can configure the delete operation in the SOA composite using the following procedure. The UID of the user to be deleted will be the input from Oracle Identity Manager to the SOA composite. This input has to be mapped to the Unique Id of the user to be deleted in the target webservice.

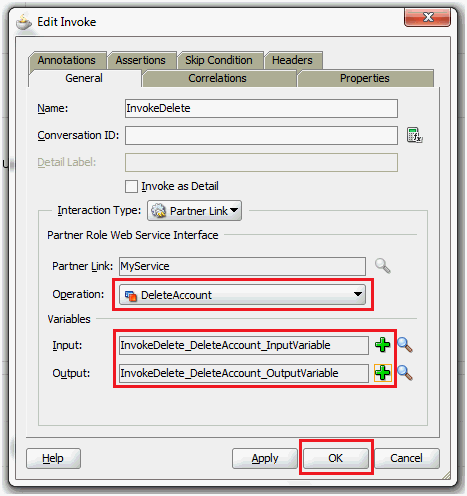
  1. Link the InvokeDelete operation to the appropriate partner link for delete operation.
  2. Specify the operation and the input/output variables for this Invoke activity and click OK.
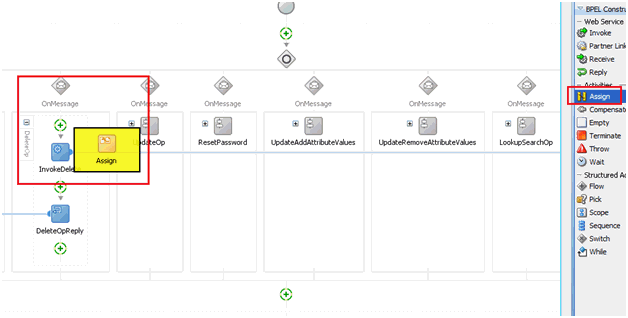
  3. Drag an Assign activity from the component palette before the Invoke activity.
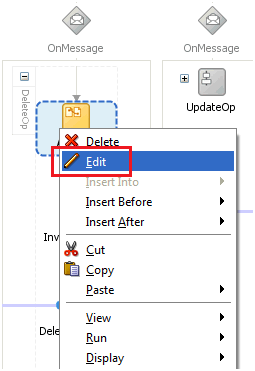
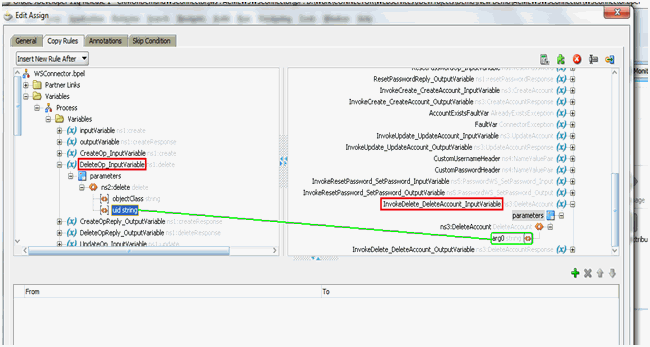
  4. Edit the Assign activity to map the input variables for the delete operation.
  5. In the Edit Assign window, map the fields in DeleteOp_InputVariable to the corresponding fields in Input variable of the target operation.
  6. After the variables are mapped, compile and deploy the project. Test the operation from the Enterprise Manager. See Deploying and Testing the Webservice SOA Composite for more information.

2.3.5 Configuring the Update Operation

Learn how to configure the update operation in the SOA composite.

This section discusses the following topics:

2.3.5.1 Prerequisites for Configuring the Update Operation

Before configuring the update operation in the SOA composite:

  1. Verify if the target webservice supports simultaneous updates of multiple attributes.
  2. If the target webservice supports update of only one attribute at a time, then remove the FORM_NAME Updated process task from the process definition in the Design Console.

    See Removing Bulk Attribute Update Task for more information.

  3. In JDeveloper, create a partner link in the SOA composite using the WSDL, as per the procedure described in Configuring the Partner Link.

2.3.5.2 Configuring the UpdateOperation in the SOA Composite

Assuming that the target webservice supports simultaneous updates of multiple attributes, you can configure the update operation as follows:

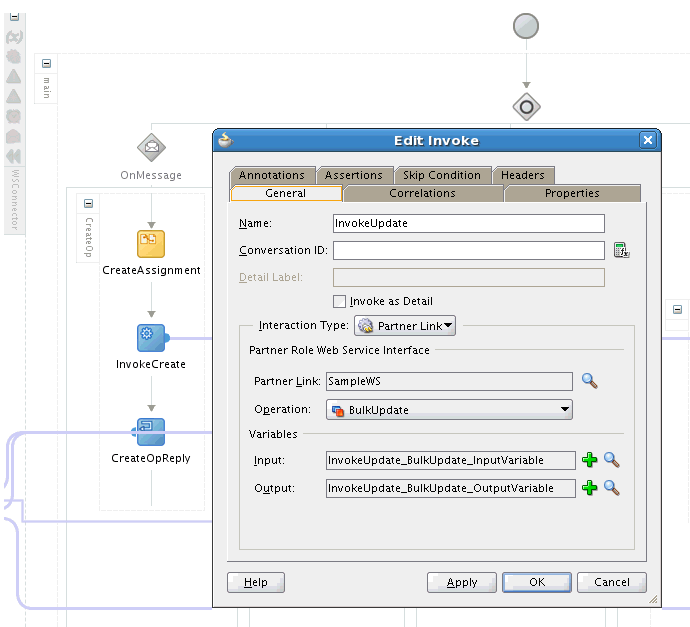
  1. Link the InvokeUpdate operation to the appropriate partner link for update operation.
  2. Specify the operation and the input/output variables for this Invoke activity and click OK.
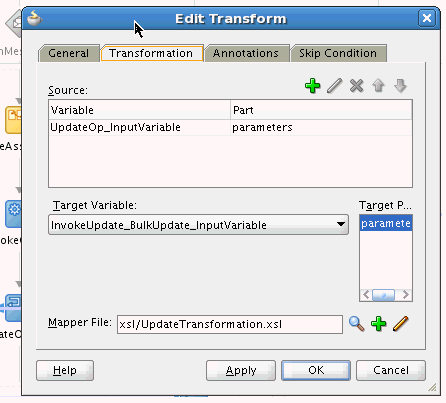
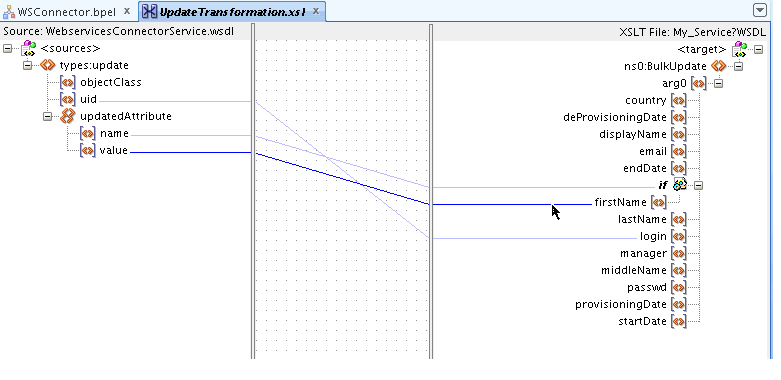
  3. Drop a Transform activity to Invoke. Set the source variable as UpdateOp_InputVariable and the target variable as the input variable of the Invoke activity set in the previous step.
  4. Open the translation mapper file. Drag the if construct to the target variable.
  5. Map the name under udpatedAttribute to the if construct and the value to the target variable.
  6. Switch to source. The following is a sample source:
    <xsl:if test="/types:update/updatedAttribute/name">
      <firstName>
        <xsl:value-of select="/types:update/updatedAttribute/value"/>
      </firstName>
    </xsl:if>
    
  7. Verify the Decode value for the connector field in the Lookup.ACME.UM.ProvAttrMap lookup definition.

    For the example attribute name first name, the Decode value is FirstName.

  8. Modify the source as follows:
    <xsl:if test='/types:update/updatedAttribute/name = "FirstName"'>
      <firstName>
        <xsl:value-of select="/types:update/updatedAttribute/updatedAttribute[name = 'FirstName']/value"/>
      </firstName>
    </xsl:if>
    
  9. Follow Steps 5 to 8 to add other attributes.

    For custom attributes, ensure that the attributes are already included in the Lookup.ACME.UM.ProvAttrMap lookup definition. See Adding Custom Attribute for Update Operation for more information.

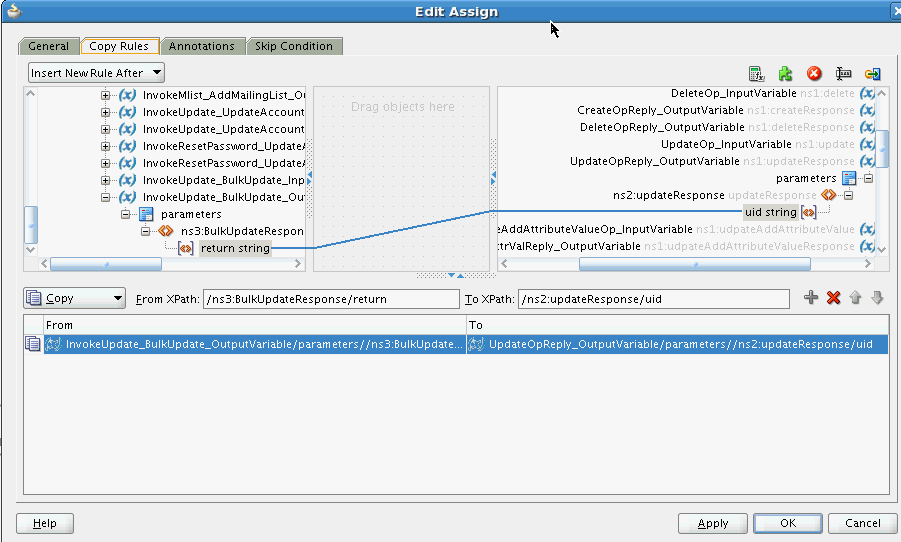
  10. If the target returns the UID of the user updated, drop an Assign activity after Invoke and map the return value to the updateResponse uid. Otherwise, map the uid from updateOp input variable to the updateResponse uid.
  11. Save the project.

    You can compile and deploy the project. Test the operation from the Enterprise Manager.

2.3.6 Configuring the Enable and Disable Operations for Provisioning

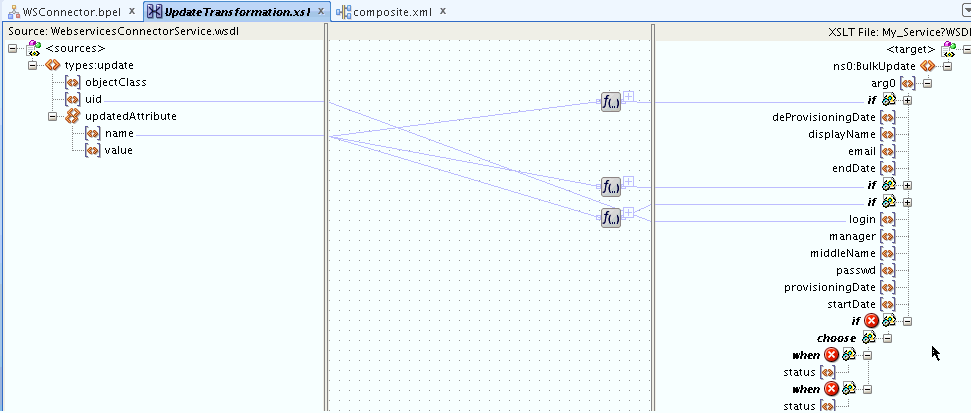
As a prerequisite, configure the update operation and create the transformation XSL file as described in Configuring the Update Operation. Consider the target variable Status that can have a value of Active or Inactive.

To configure the enable or disable operation for provisioning in the SOA composite:

  1. Drop an if, choose, and when constructs on the target variable as shown in the following sample screenshot.
  2. Drag name under updatedAttribute to the if and when constructs.
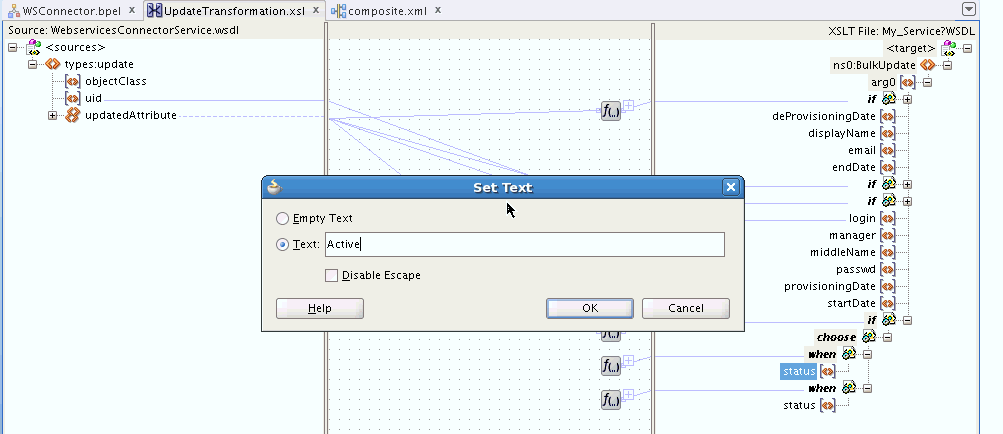
  3. Right-click the target variable, Status, and set two Text values to Active and Inactive.
  4. Switch to the Source tab to see the XSL transform code for the attribute. Update the code as follows:
    <xsl:if test='/types:update/updatedAttribute/name = "__ENABLE__"'>
      <xsl:choose>
        <xsl:when test='/types:update/updatedAttribute[name = "__ENABLE__"]/value = "true"'>
          <status>
            <xsl:text disable-output-escaping="no">Active</xsl:text>
          </status>
        </xsl:when>
        <xsl:when test='/types:update/updatedAttribute[name = "__ENABLE__"]/value = "false"'>
          <status>
            <xsl:text disable-output-escaping="no">Inactive</xsl:text>
          </status>
        </xsl:when>
      </xsl:choose>
    </xsl:if>
    
  5. Save the project.

    You can compile and deploy the project. Test the operation from the Enterprise Manager. See Deploying and Testing the Webservice SOA Composite for more information.

2.3.7 Configuring the Search Operation

The search branch is invoked when a trusted source or target resource user reconciliation scheduled job is run from Oracle Identity Manager. This operation will fetch a list of users and their attributes from the target webservice. The list is converted to a list of userSearchRecords that are returned to Oracle Identity Manager.

See Also:

Adding Custom Attributes for Reconciliation in SOA Composite for information about adding custom attributes for the Search operation

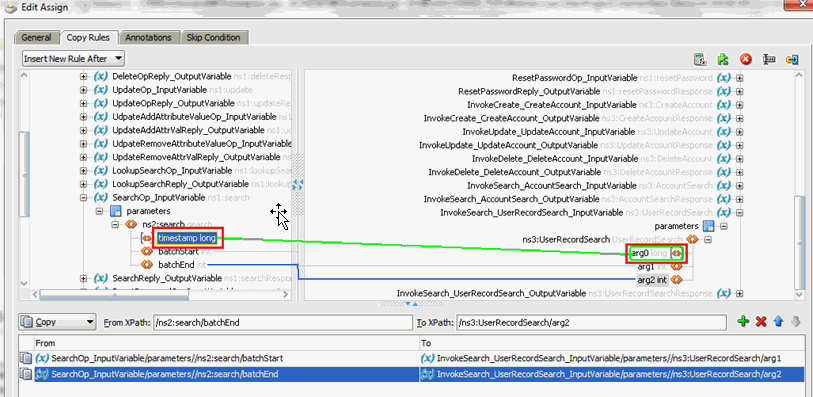
Mapping Timestamp Attribute for information about converting timestamp attribute to long type, which is the type used in the connector

This section discusses the following topics:

2.3.7.1 Configuring the Search Operation in SOA Composite

After performing the procedure described in Configuring the Partner Link, you can configure the search operation as follows:

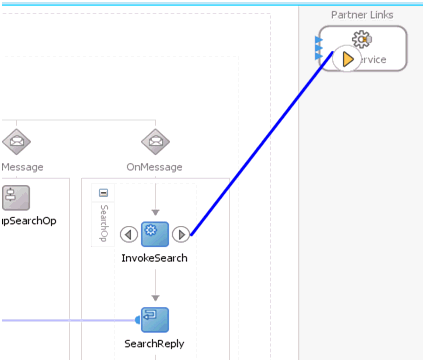
  1. Link the InvokeSearch operation to the appropriate partner link for search operation.
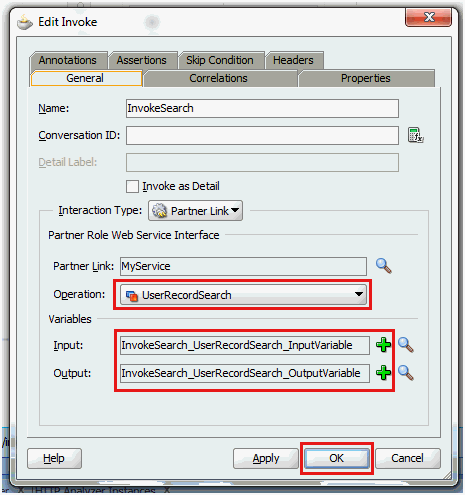
  2. Specify the operation and the input/output variables for this Invoke activity and click OK.
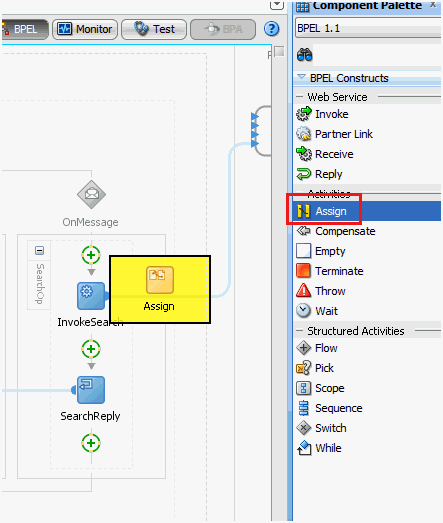
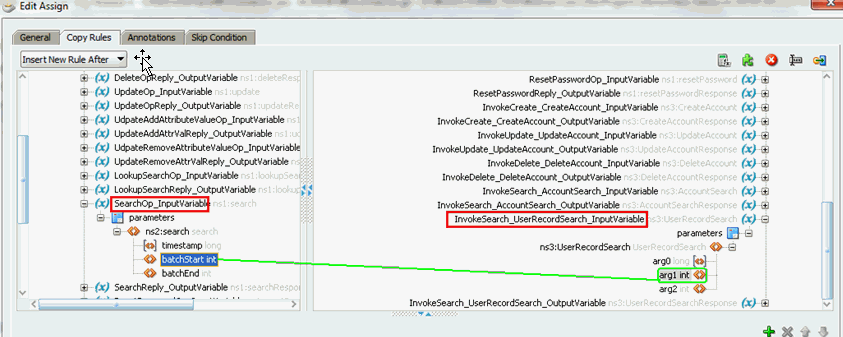
  3. Drag an Assign activity from the component palette before the InvokeSearch activity.
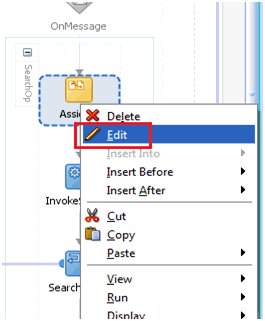
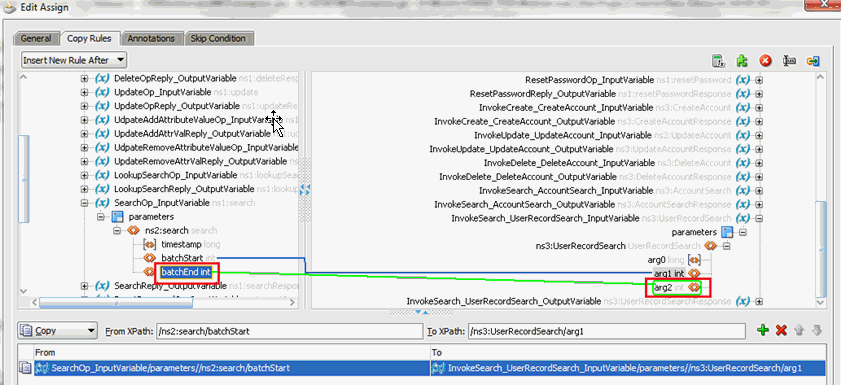
  4. Edit the Assign activity to map the input variables for the search operation.
  5. In the Edit Assign window, map the fields in SearchOp_InputVariable to the corresponding fields in Input variable of the target operation.

    The batchStart and batchEnd parameters can be used to specify the batching/paging parameters that are supported by the target webservice. If the batchStart and batchEnd parameters are not mapped, then batching is disabled. See Performing Batched Reconciliation for more information.

    The timestamp is used for incremental reconciliation. The user records with value of the attribute that is mapped to the timestamp variable and greater than the timestamp value are fetched from the target webservice. For example, if timestamp is mapped to the ModifiedDate attribute on the target webservice, then the search will fetch all the users whose ModifiedDate attribute is greater than the value specified in the timestamp variable.

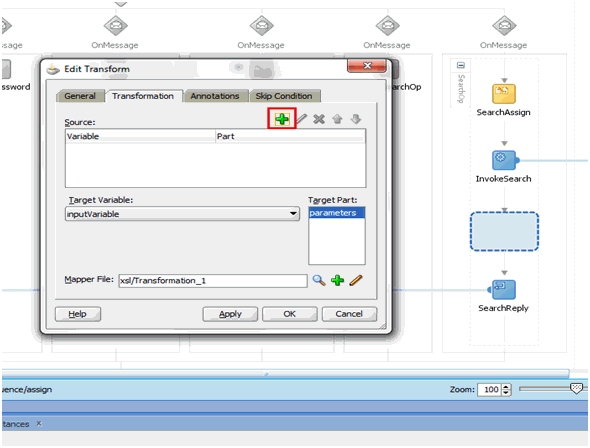
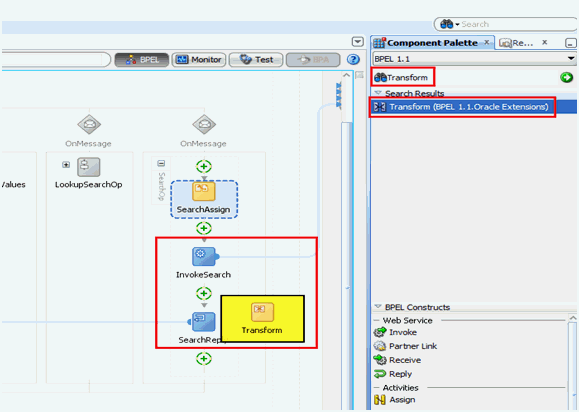
  6. After the variables are mapped, the output received from the target webservice needs to be converted to a convention that the connector understands (list of userSearchRecords). To do so, drag a Transform activity from the component palette and drop it after the SearchInvoke activity.
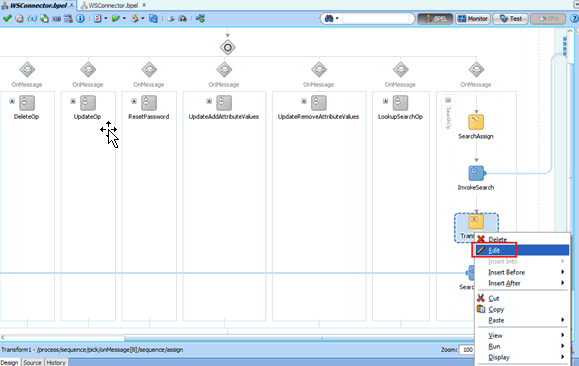
  7. Edit the Transform activity.
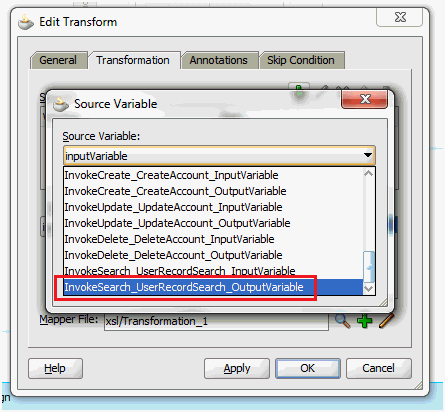
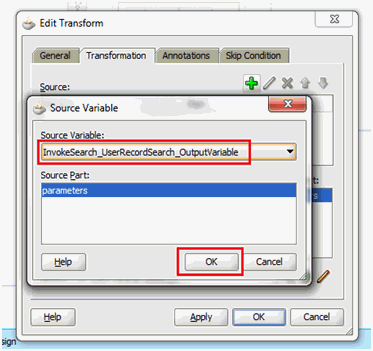
  8. In the Edit Transform window, add the source variable that has to be converted.
  9. Select the source variable. It will be the output variable of the SearchInvoke activity.
  10. Verify the source variable and click OK.
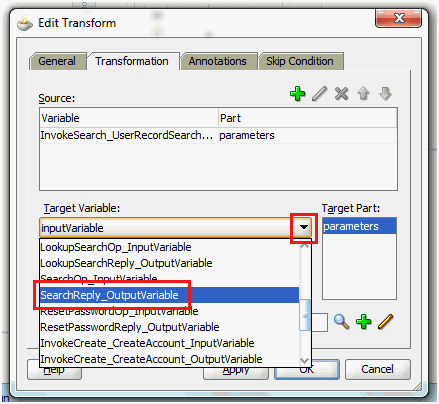
  11. Specify the target variable. The target variable will be SearchReply_OutputVariable.
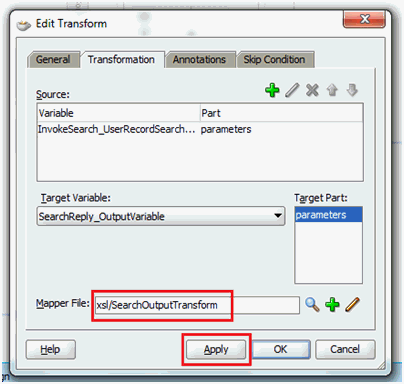
  12. Specify the mapper file name. Click Apply.
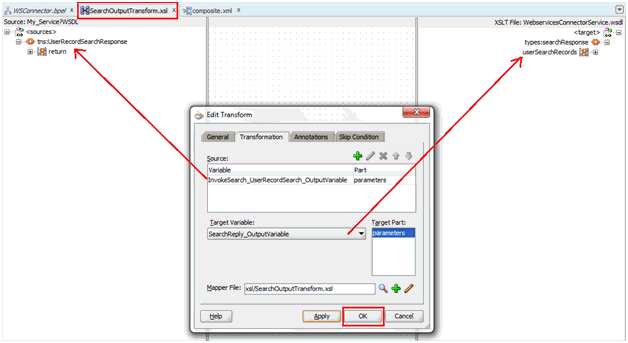
  13. An XSL file with the specified Mapper File name will be created and opened. The input variable will be on the left and the output structure will be on the right. Click OK.
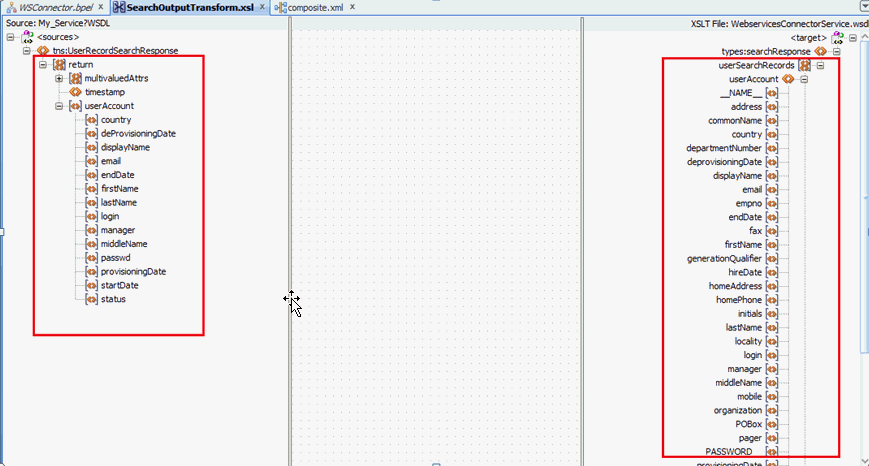
  14. Expand the source and the target variables to verify the structures before mapping.
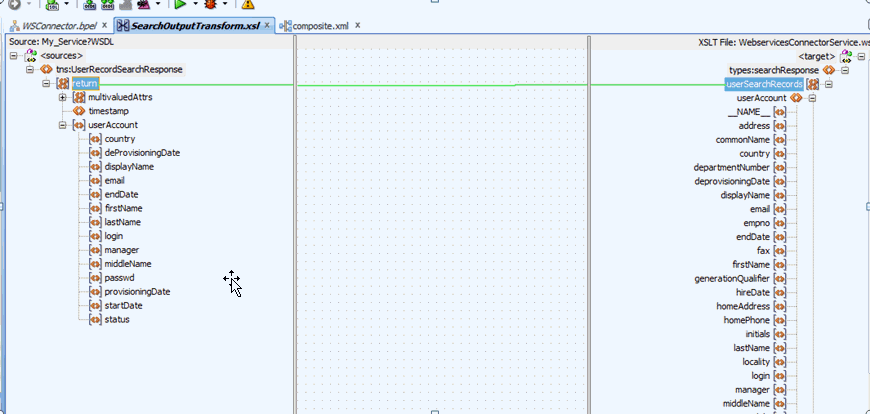
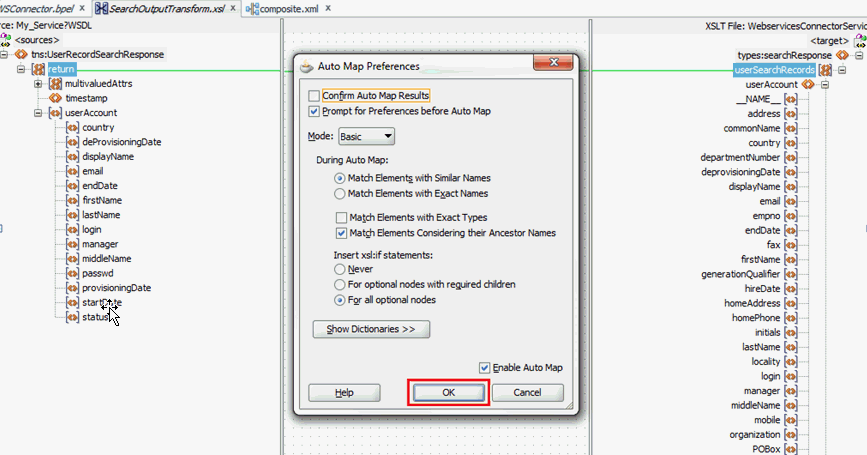
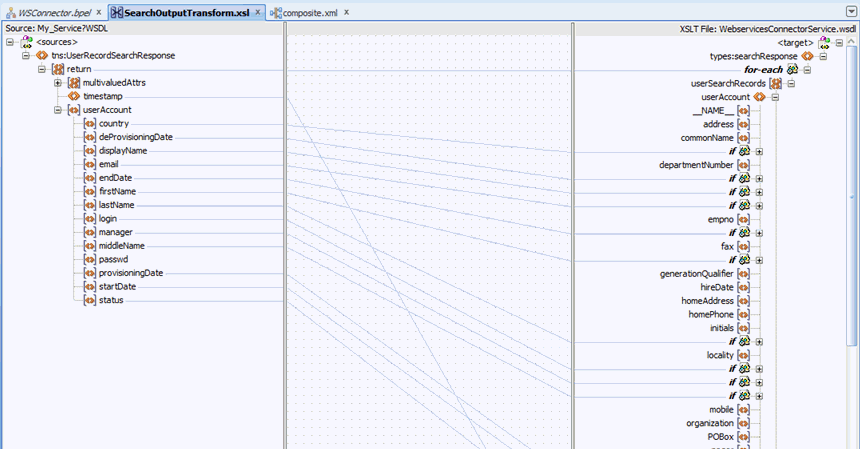
  15. Map the Search Output response appropriately. After the return variable is wired to the userSearchRecords, JDeveloper automatically maps the variables using the AutoMap feature.
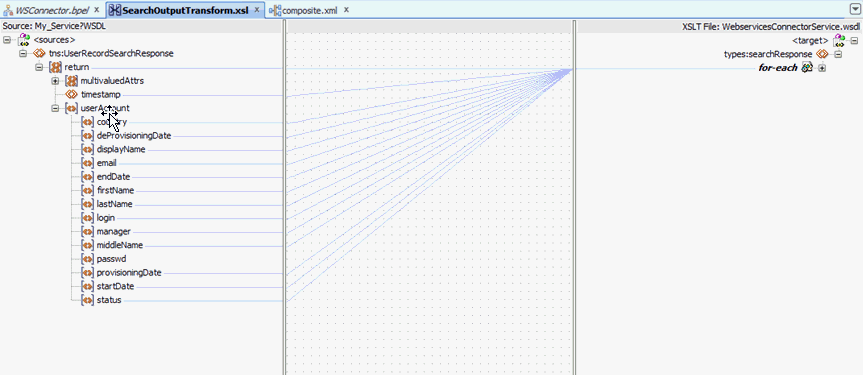
  16. The AutoMap feature automatically maps the source elements to similar names in the target webservice and includes a for-each statement before userSearchRecords for fetching a list of userRecords. If this is not accurate, map and transform the mappings manually. You can also switch to the Source tab and update the XSL transform code directly.
  17. Click OK. The following is a sample screenshot of the transformation mappings:
  18. Expand the nodes and verify if the transformation mappings are appropriate.

    Note:

    If the name and Uid attributes in the target system schema hold the same values, then ensure that the login field in the connector schema is mapped either to the name or Uid attribute. In the Transform after UserInvokeSearch, map the login field from the target wsdl to the login field in WebserviceConnectorService.wsdl.

    If the name and Uid attributes hold different values, then map the login attribute in the WSConnector SOA Composite to the Login attribute in the webservice process form of a user. See Adding Custom Attributes for Reconciling _UID_ Field for more information.

    If name and Uid attributes are same or different, it is mandatory for the login field to be mapped as internally the connector uses this value to set the Uid attributes and name of the connector object.

  19. After verifying the transformation mappings, save the project.
  20. Build and deploy the SOA composite. Test the search operation from Enterprise Manager. See Deploying and Testing the Webservice SOA Composite for more information.

Note:

If your target system version has complex multivalued attributes, perform the procedure mentioned in Reconciliation of Complex Child Forms With Multiple Attributes.

2.3.7.2 Mapping Simple Child Table Values in the SOA Composite

You can map simple child table values in the SOA Composite. To do so, in the search transform, perform the following mapping for the child table values:

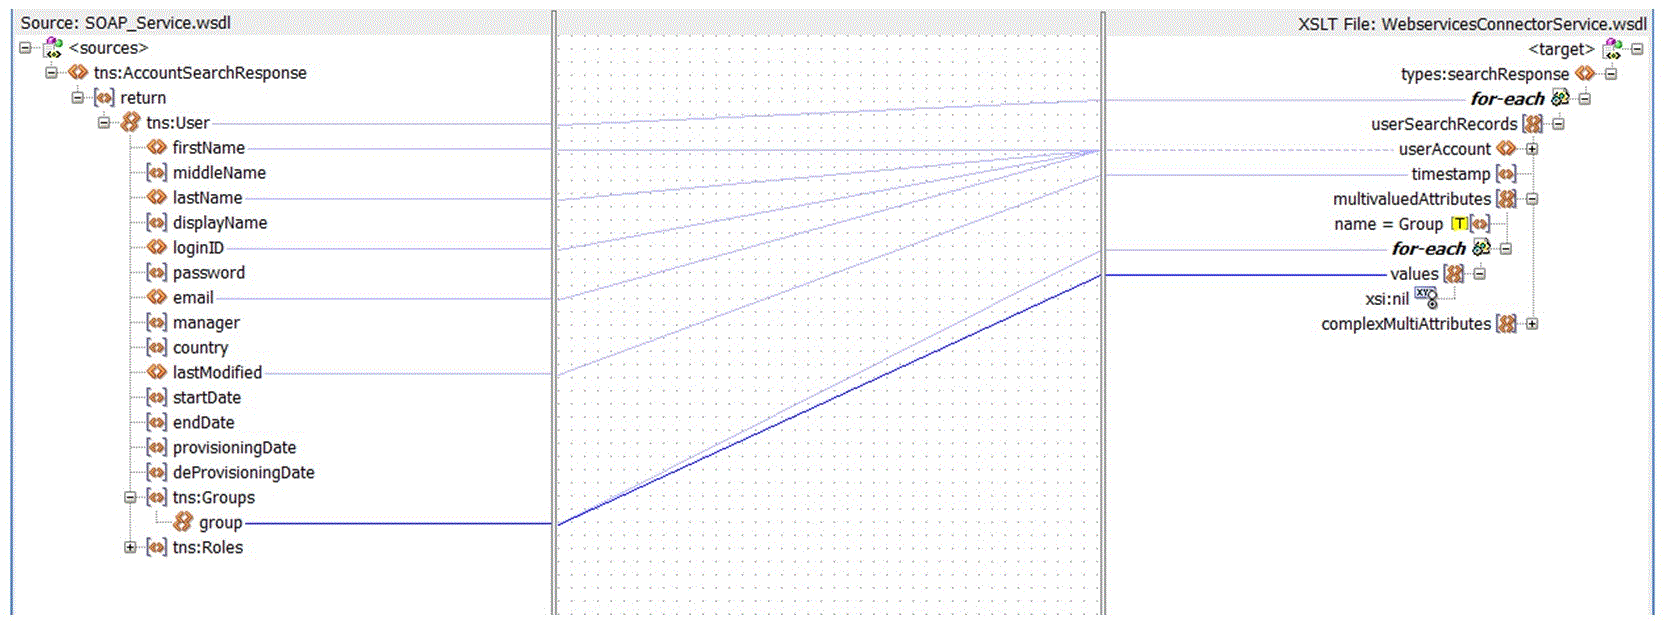
Add a "for each" loop for the child table value and map the child table value to the "values" attribute in the multivaluedAttribute.

For example, in this case, "Group" is the child table, and each group is mapped to the "values" element in the multivaluedAttribute.

This mapping will have the following values:

<multivaluedAttributes>
            <name>
              <xsl:text disable-output-escaping="no">Group</xsl:text>
            </name>
            <xsl:for-each select="tns:Groups/group">
              <values>
                <xsl:value-of select="."/>
              </values>
            </xsl:for-each>
          </multivaluedAttributes>

2.3.8 Configuring the Enable and Disable Operations for Reconciliation

As a prerequisite, configure the search operation and create the transformation XSL file as described in Configuring the Search Operation. Consider the target variable Status that can have a value of Active or Inactive.

To configure the enable or disable operation for reconciliation in the SOA composite:

  1. For reconciliation of the Status attribute, populate the otherAttributes named __ENABLE__.

    For example, if the status of the target user is either Active or Inactive, the following XSL code can be used for mapping the Status attribute:

    <otherAttributes>
       <name>
          <xsl:text disable-output-escaping="no">__ENABLE__</xsl:text>
       </name>
       <xsl:choose>
          <xsl:when test='userAccount/status = "Active"'>
              <value>
                  <xsl:text disable-output-escaping="no">true</xsl:text>
              </value>
          </xsl:when>
          <xsl:when test='userAccount/status = "Inactive"'>
              <value>
                  <xsl:text disable-output-escaping="no">false</xsl:text>
              </value>
          </xsl:when>
       </xsl:choose>
    </otherAttributes>
    

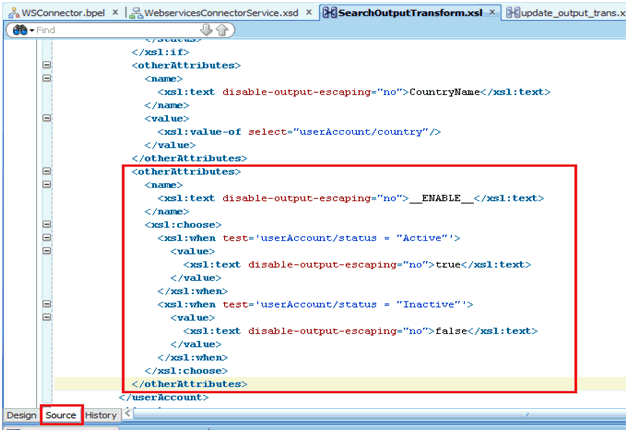
    The following is a sample screenshot of the Source tab:

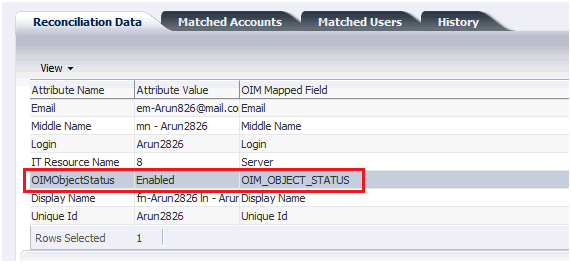
  2. The object status is reflected in Oracle Identity Manager as either Enabled or Disabled.

    Note:

    Entries in the lookup definition, process form, reconciliation field mappings, and profile need not be added for the __ENABLE__ attribute. They are configured by default.

  3. Save the project.

    You can compile and deploy the project. Test the operation from the Enterprise Manager. See Deploying and Testing the Webservice SOA Composite for more information.

2.3.9 Configuring the Lookup Search Operation

The lookup search branch is invoked when the webservice connector lookup scheduled job is run from Oracle Identity Manager. The lookup search operation accepts objectClass as input that is passed as scheduled task parameter and returns a list of lookupEntries, which is a list of name, value pair. The list of names and values in the output will be set as the Decode and Code Key values of the lookup definition respectively.

After performing the procedure described in Configuring the Partner Link, you can configure the lookup search operation as follows:

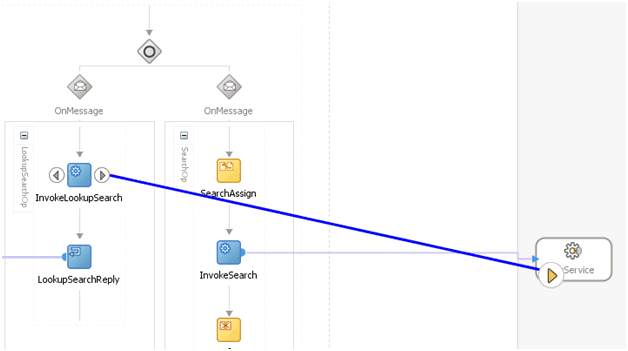
  1. Link the InvokeLookupSearch operation to the appropriate partner link for the lookup search operation.
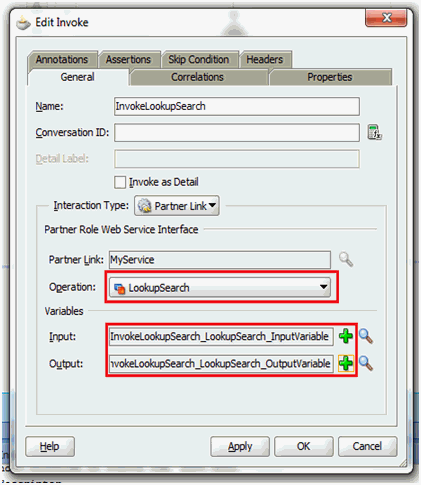
  2. Specify the operation and the input/output variables for the InvokeLookupSearch activity and click OK.
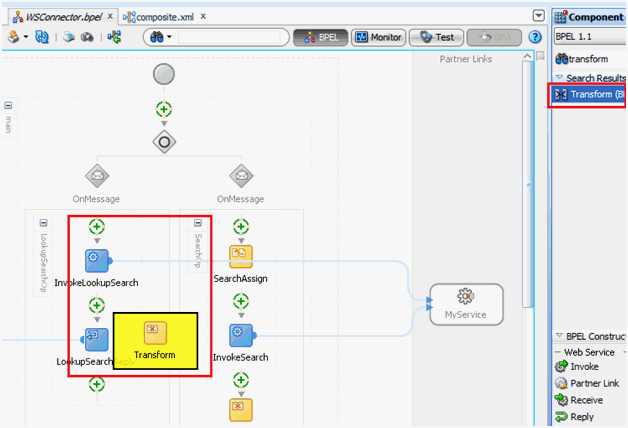
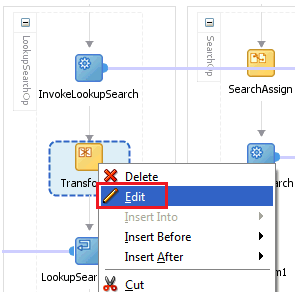
  3. The output received from the target webservice needs to be converted to a convention that the connector understands (list of name, value pairs). To do so, drag a Transform activity from the component palette and drop it after the InvokeLookupSearch activity.
  4. Edit the Transform activity.
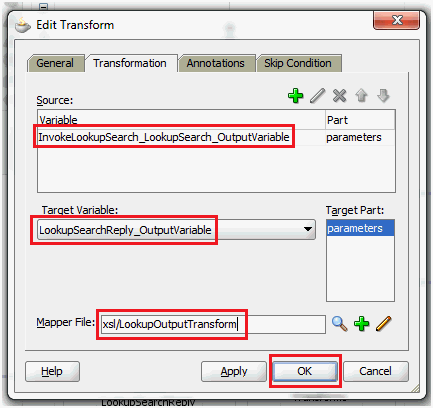
  5. In the Edit Transform window, add the source and target variables. Then, specify the mapper file name and click OK.
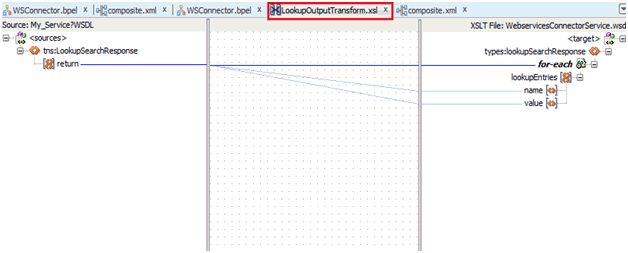
  6. An XSL file with the specified Mapper File name will be created and opened. The input variable will be on the left and the output structure will be on the right. Click OK.
  7. Expand the source and the target variables to verify the structures before mapping.
  8. Map the Lookup Search response appropriately. After the return variable is wired to the lookupEntries, JDeveloper automatically maps the variables using the AutoMap feature.

    The AutoMap feature automatically maps the source elements to similar names in the target webservice and includes a for-each statement before lookupEntries for fetching a list of roles. If this is not accurate, map and transform the mappings manually. You can also switch to the Source tab and update the XSL transform code directly. Click OK.

  9. After verifying the transformation mappings, save the project.
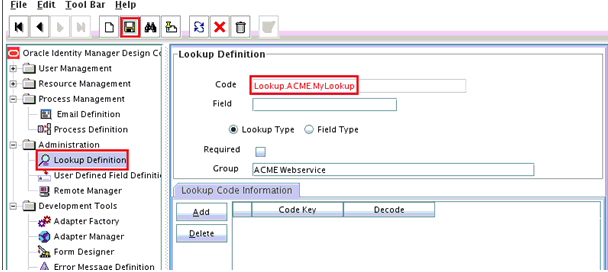
  10. In Oracle Identity Manager Design Console, create an empty lookup definition that will be populated as a result of the lookup search scheduled task.
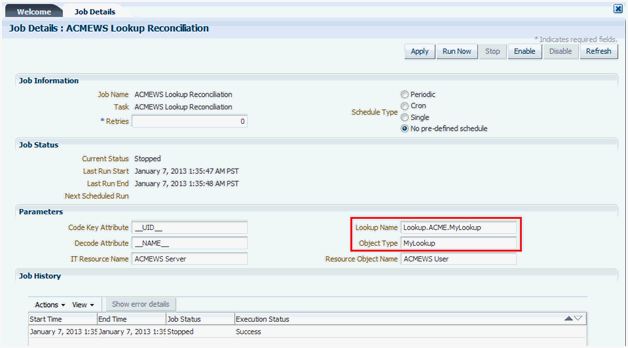
  11. Configure the scheduled task accordingly. Specify the lookup name and the ObjectType of the lookup.

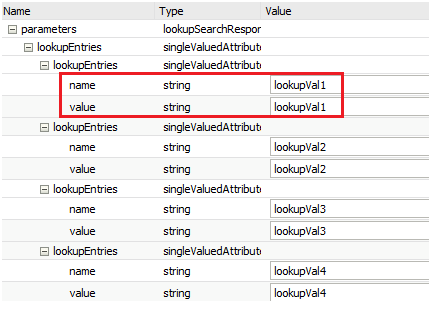
    The lookupSearch output will be transformed as follows:

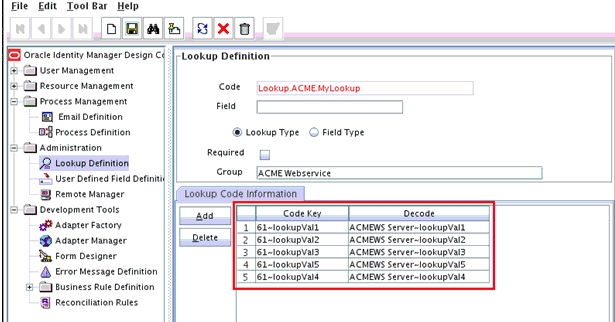
    After running the scheduled job, the lookup definition will be populated as follows:

  12. Build and deploy the SOA composite. Test the operation from Enterprise Manager. See Deploying and Testing the Webservice SOA Composite for more information.

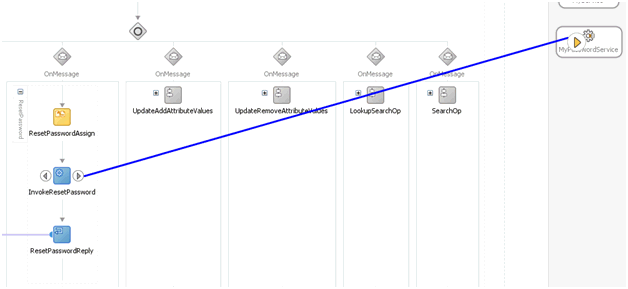
2.3.10 Configuring the Reset Password Operation

This section describes how to configure password reset operations from the SOA composite. After the mappings are configured, a custom outbound policy will be attached to decrypt the password fields. Sensitive fields that are sent from Oracle Identity Manager are encrypted. The outbound policy also ensures that the password fields do not appear in clear text in the SOAP payloads in Enterprise Manager.

After performing the procedure described in Configuring the Partner Link, you can configure the reset password operation as follows:

  1. Link the InvokeResetPassword operation to the appropriate partner link for reset password operation.
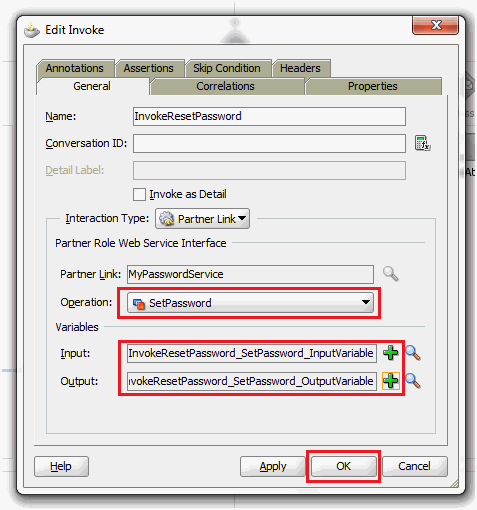
  2. Specify the operation and the input/output variables for this Invoke activity and click OK.
  3. Drag an Assign activity from the component palette before the Invoke activity.
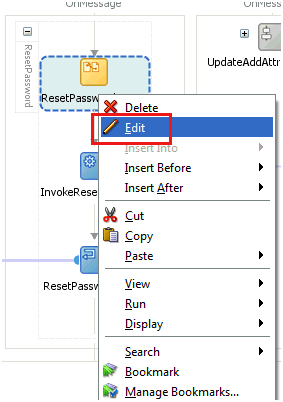
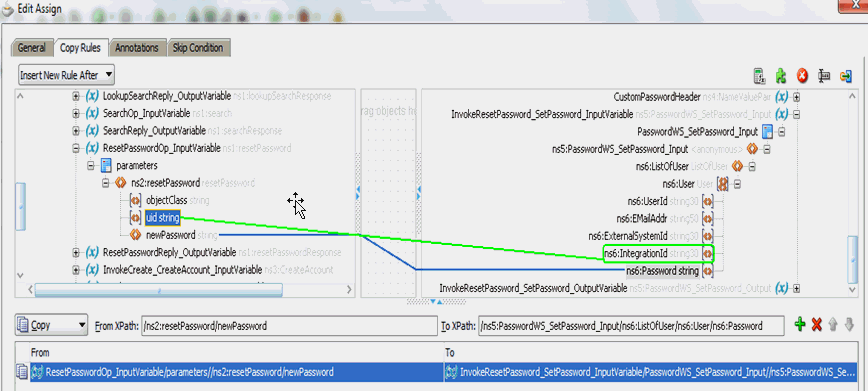
  4. Edit the ResetPasswordAssign activity to map the input variables for the reset password operation.
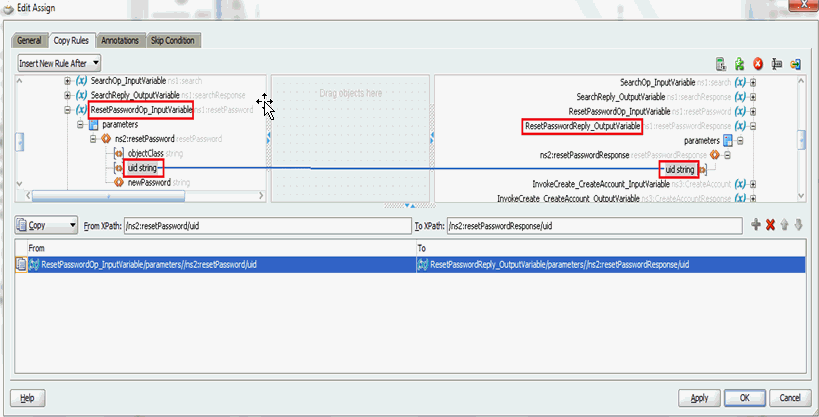
  5. By default, the uid field of ResetPasswordOp_InputVariable is mapped to the uid field of ResetPasswordOp_OutputVariable.
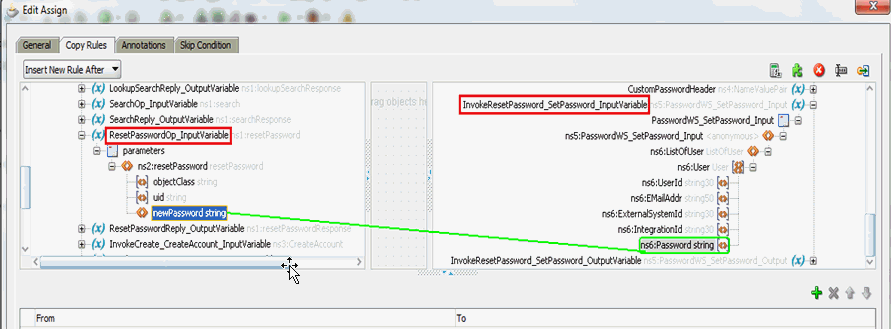
  6. In the Edit Assign window, map the fields in ResetPasswordOp_InputVariable to the target webservice payload for the new password that has to be updated.
  7. Map the uid field from ResetPasswordOp_InputVariable to the corresponding Unique Id field in the target webservice.
  8. After the variables are mapped, configure the custom outbound policy.

    See Handling Passwords for information about this procedure.

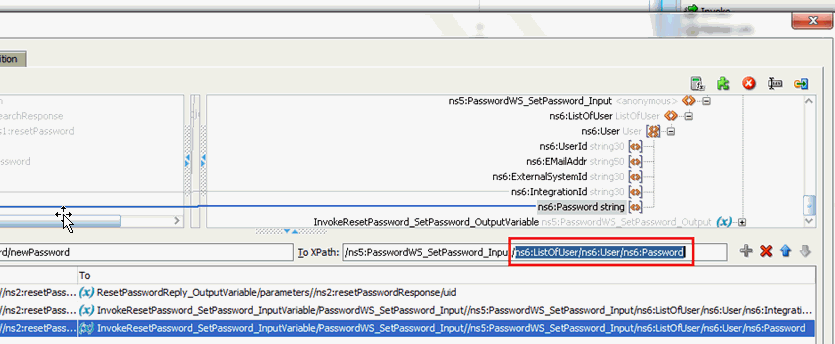
  9. Specify the password.field.xpath.locations property in the composite.

    This property can be obtained from the ResetPasswordAssign activity.

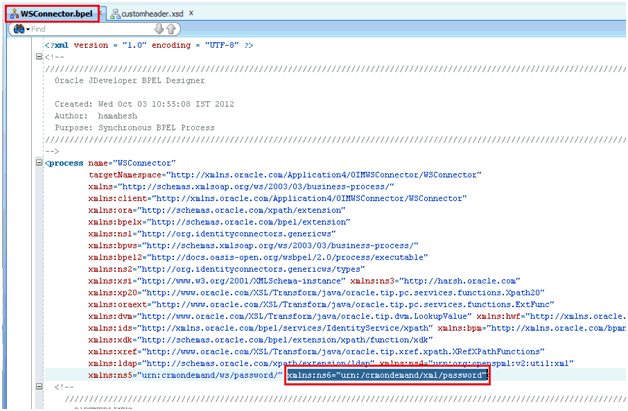
  10. Specify the target.payload.namespaces property.

    This property should be the corresponding namespace of the password field that is available in BPEL source.

    Note:

    Ensure that the namespace in the target.payload.namespace property does not include quotation marks.

  11. Build and deploy the SOA composite. Test the operation from Enterprise Manager. See Deploying and Testing the Webservice SOA Composite for more information.

2.4 Handling Faults

Learn about fault handing and how to configure it in the SOA composite.

This section discusses the following topics:

2.4.1 Understanding Fault Handling

Fault handling is an important aspect of configuring the SOA composite. In the case of any faults and errors, a correct response must be provided to the connector and to Oracle Identity Manager from the target webservice. This should be configured at the SOA composite level as the remote fault thrown by the target webservice operation has to be mapped against the corresponding connector-specific faults.

The following table lists the faults defined in the connector webservice (WebserviceConnectorService) WSDL:

Fault Description Operations that can throw this fault

AlreadyExistsException

An account already exists in the target webservice.

Create

UnknownUidException

The passed unique ID is invalid or does not exist in the target webservice.

All operations except Create

ConnectionBrokenException

The target webservice endpoint is not reachable.

All operations

ConnectorException

Any other fault.

All operations

2.4.2 Configuring Fault Handling

To configure fault handling in the SOA composite for the Create operation:

See Also:

Handling Faults with Catch Blocks for information about handling faults for the target webservice operations that throw faults instead of sending responses
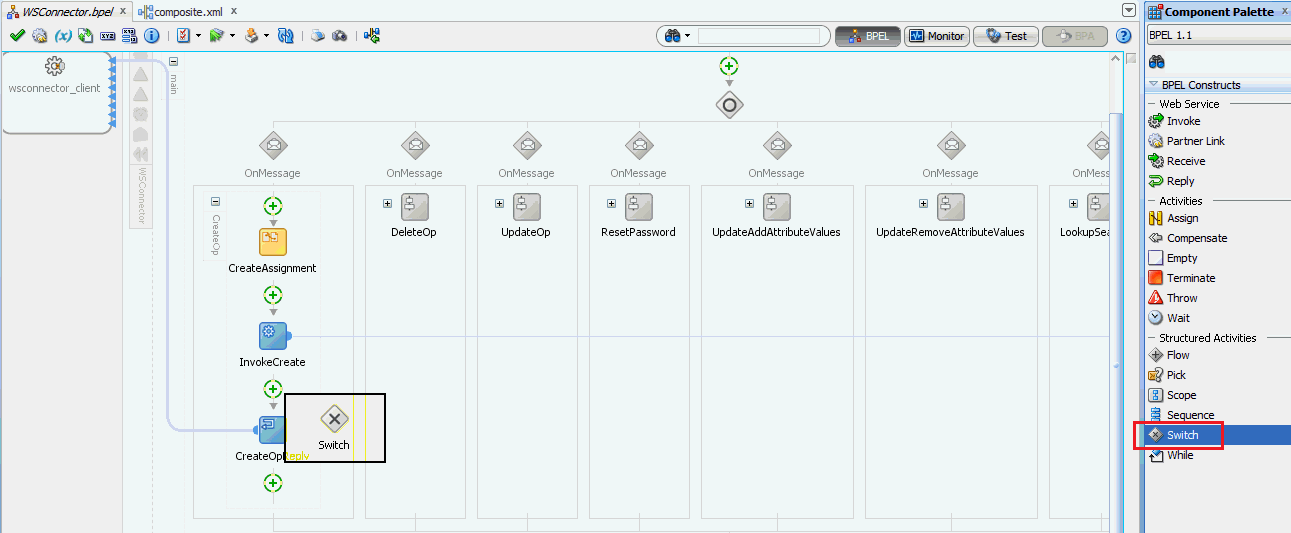
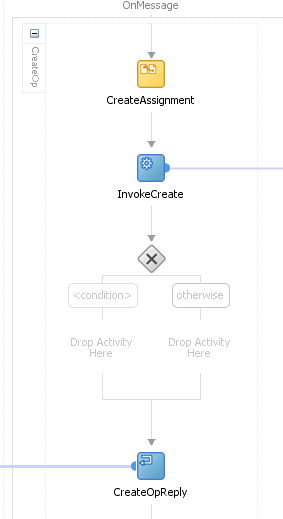
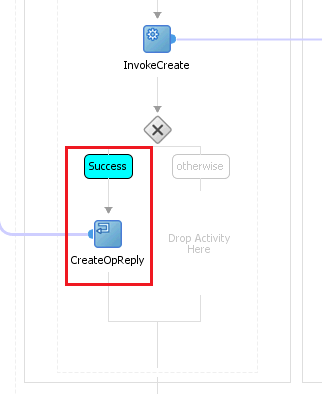
  1. Drag a Switch activity from the Component Palette and drop it after the InvokeCreate activity.

    The following is a sample screenshot after dragging the Switch activity:

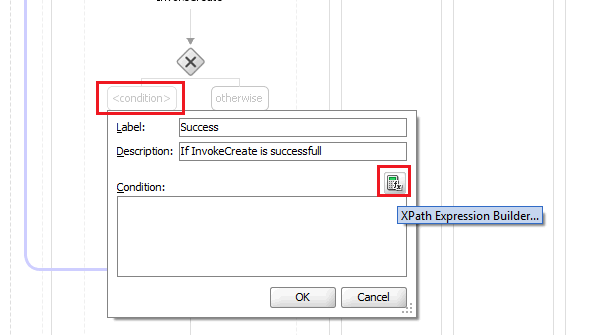
  2. Specify the Success condition in the first branch. Click the Expression Builder icon to specify the condition.
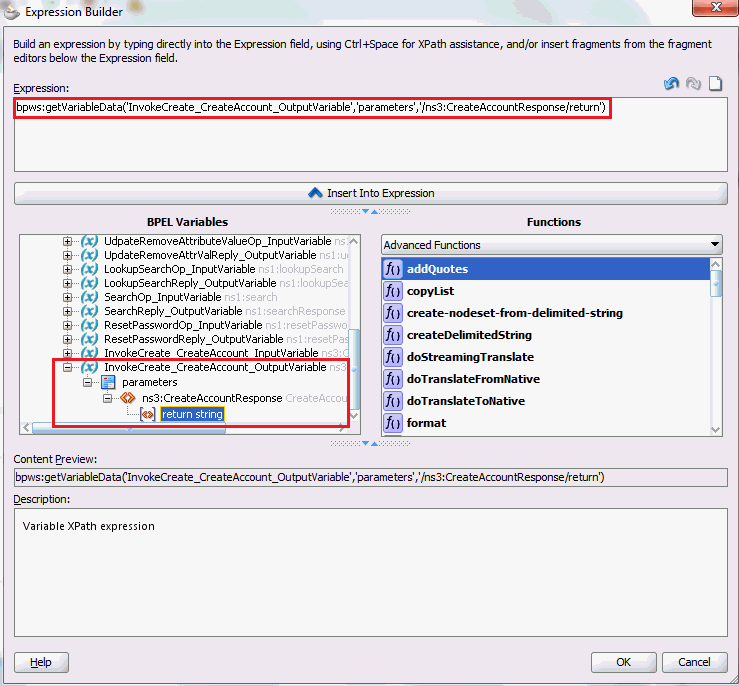
  3. Enter a valid expression for the Success condition that is based on the return output variable.

    You can browse for the variable under BPEL Variables pane and select the appropriate field.

  4. Enter a valid expression in the Expression Builder pane.

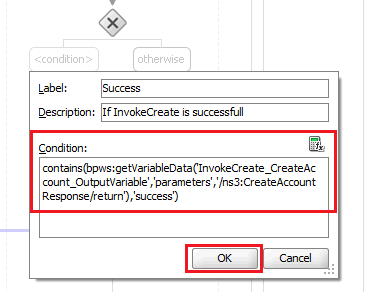
    The following sample screenshot uses a contains function:
  5. Verify the condition and click OK.
  6. Drag the CreateOpReply node into the Success branch.
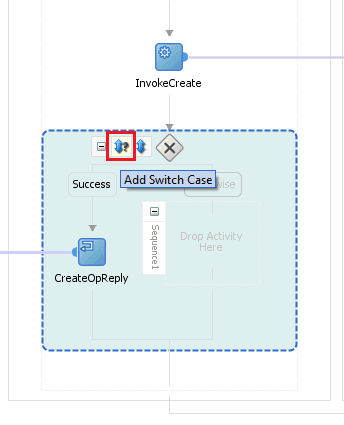
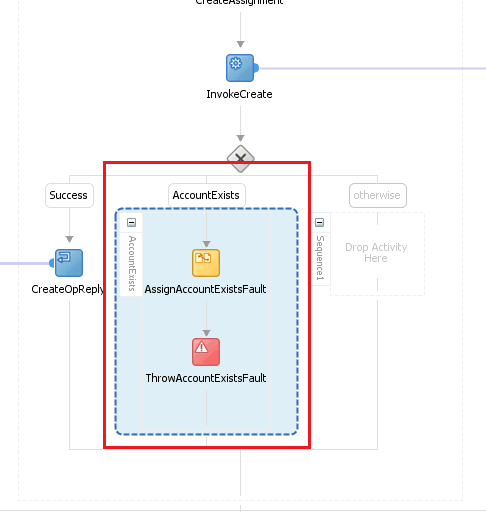
  7. You can add multiple Switch branches to define error conditions and throw the corresponding faults. As an example, a fault branch for the AlreadyExistsException fault (account already exists) will be added.
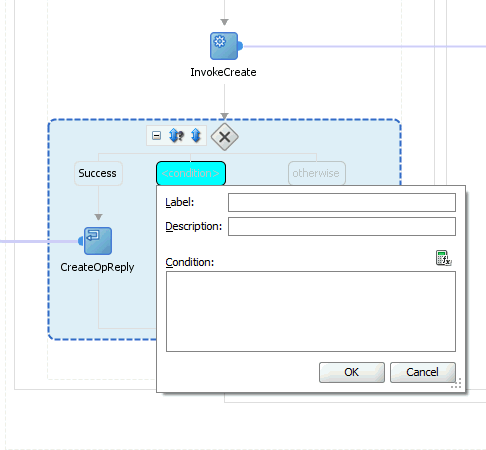
  8. Specify the condition for "account already exists" condition.
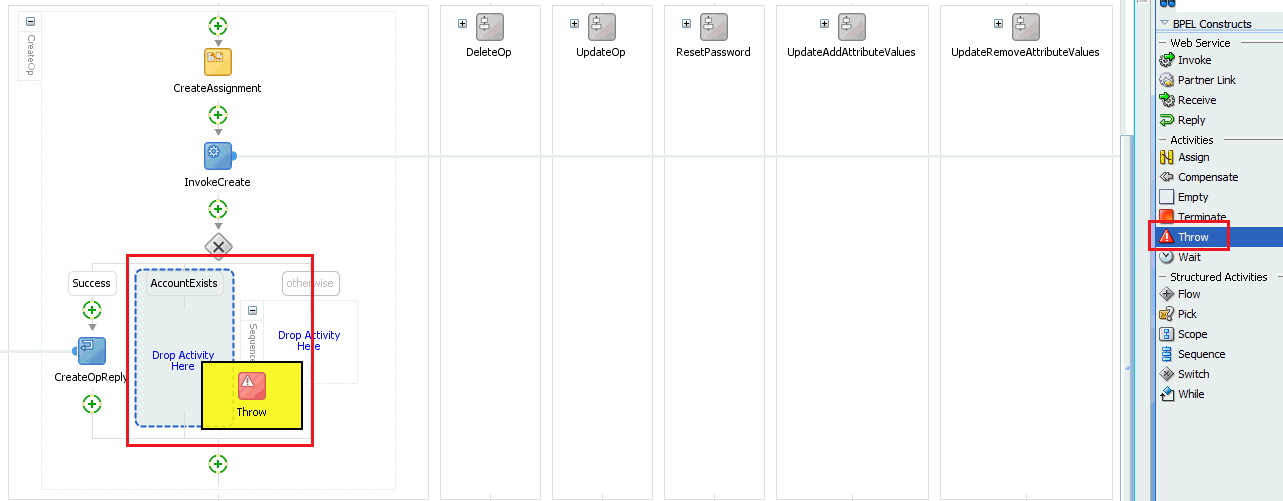
  9. Drag a Throw activity from the Component Palette and drop it under the AccountExists branch.
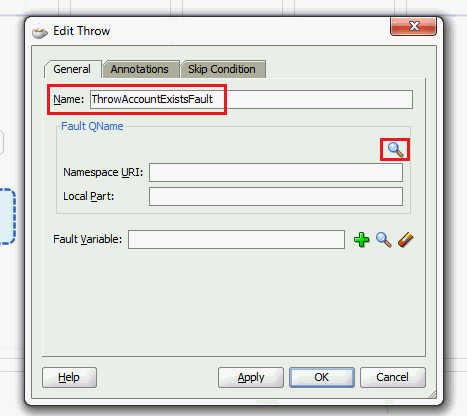
  10. Configure the Throw activity.
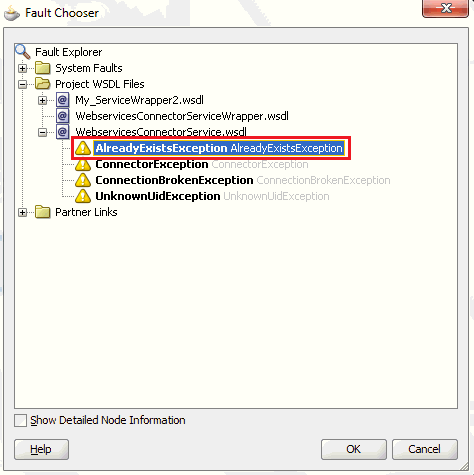
  11. Select the AlreadyExistsException fault from the WebserviceConnectorService WSDL.
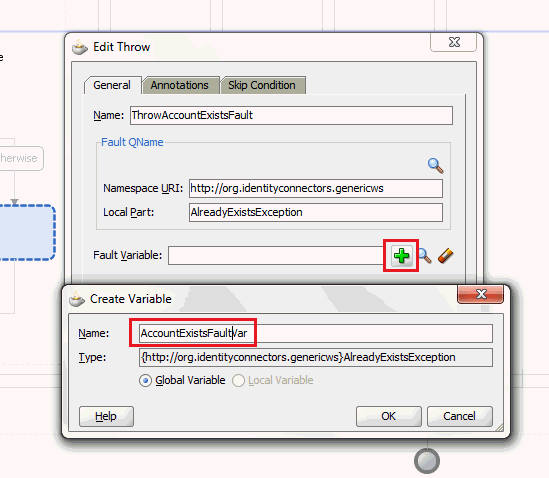
  12. Create a Fault Variable of the fault type.
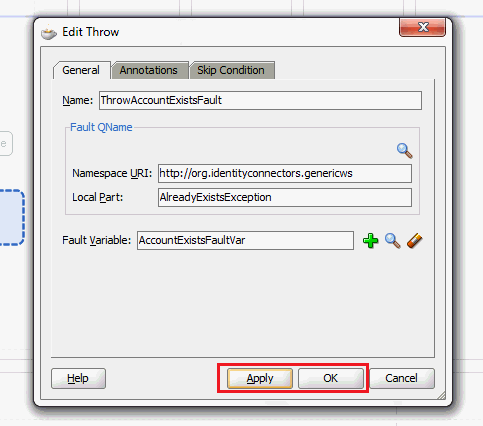
  13. Click Apply and OK.
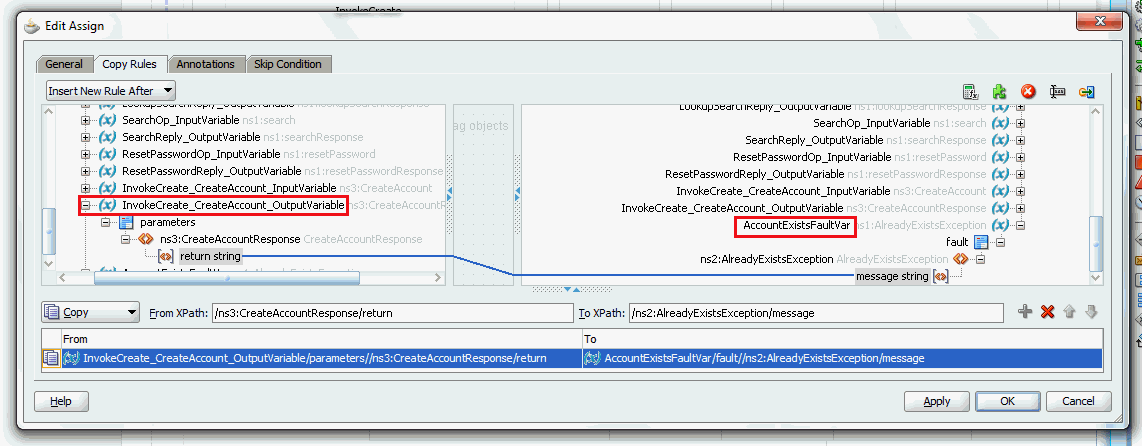
  14. Drag an Assign activity above the Throw activity to assign the fault message.

    The following is a sample screenshot of the AlreadyExistsException branch after configuration:

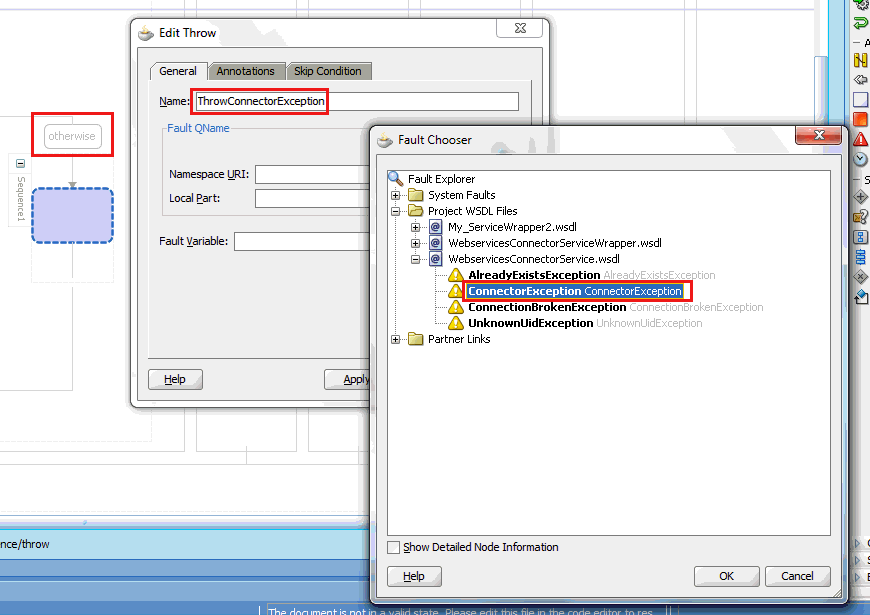
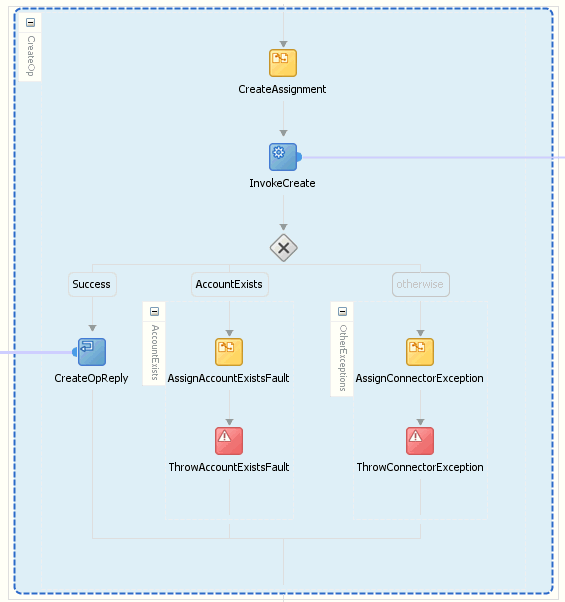
  15. You can catch the default exceptions in Otherwise branch and throw the generic ConnectorException fault in the WebserviceConnectorService WSDL.

    The following is a sample screenshot of the complete fault handling:

2.4.3 Handling Faults with Catch Blocks

If the target webservice operations throw faults instead of sending responses, fault handling can be configured by adding a Catch block in the SOA composite. The procedure for the Delete operation is as follows:

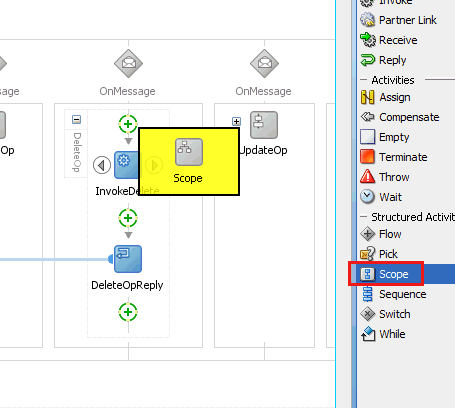
  1. Drag the Scope activity into the BPEL process to scope the Invoke operation.
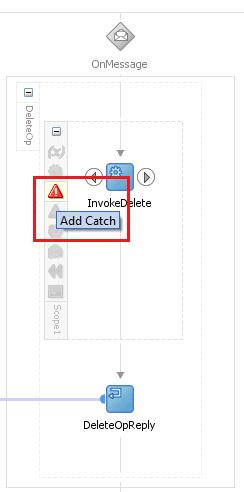
  2. Add a Catch statement by clicking the alarm icon in the scope context.

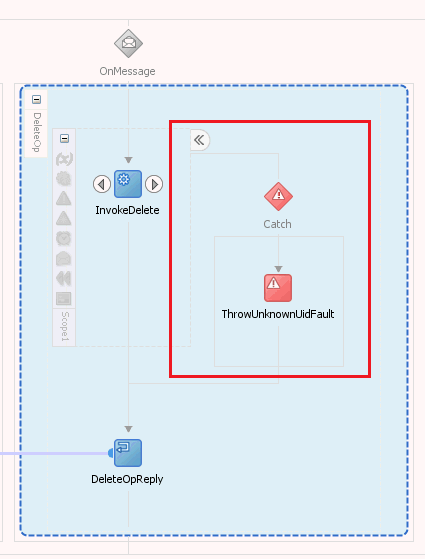
    You can configure the Catch block by specifying the type of fault thrown by the target webservice operation.

  3. Add a Throw activity in the Catch block to throw the corresponding connector-specific fault type.

    You can refer to the previous procedure (Step 10 onward) for information about configuring a Throw activity.

2.5 Deploying and Testing the Webservice SOA Composite

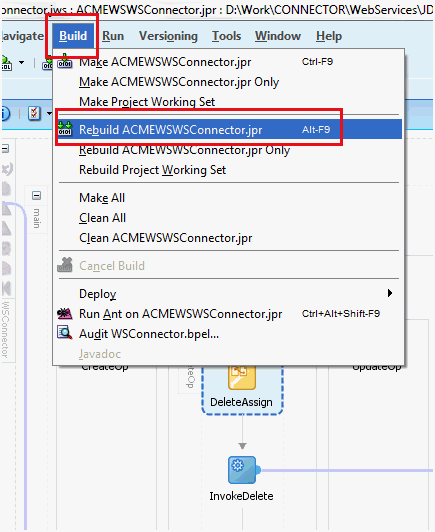
After the SOA composite is ready, you can build and deploy it to SOA server using JDeveloper. To perform this procedure:

  1. (Optional) If you need to pass sensitive data from Oracle Identity Manager to the composite and in turn to the target webservice, you can configure outbound policy as described in Securing the Connector.
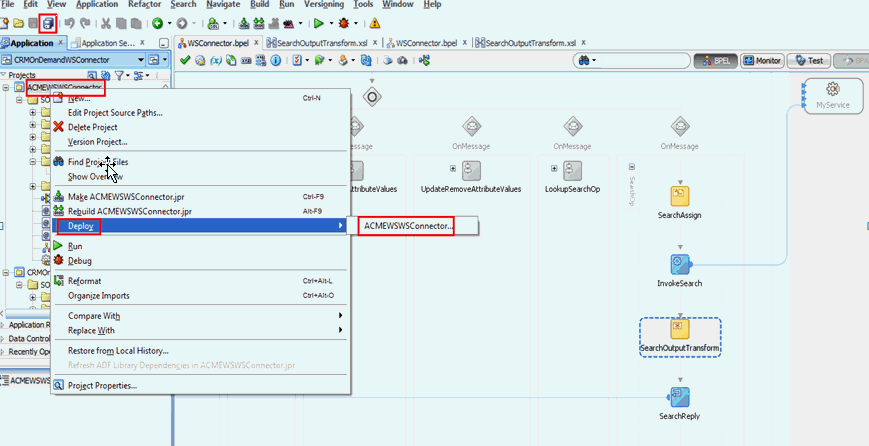
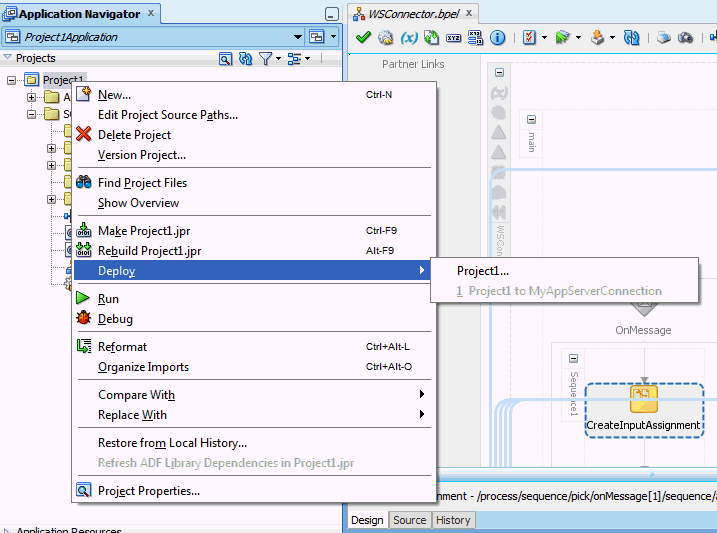
  2. Deploy the configured SOA composite on the SOA Server, as shown in the following sample screenshot.
  3. Test the composite from Enterprise Manager by visiting the URL (for example, http://adminhost:adminport/em) or from the Enterprise Manager console.