5 Extending the Functionality of the Connector
This chapter discusses the following optional procedures:
Note:
From Oracle Identity Manager Release 11.1.2 onward, lookup queries are not supported. See Managing Lookups in Oracle Fusion Middleware Administering Oracle Identity Manager guide for information about managing lookups by using the Form Designer in the Oracle Identity Manager System Administration console.
-
Configuring the Connector for Multiple Instances and Multiple Versions of the Target System
-
Configuring Validation of Data During Reconciliation and Provisioning
-
Configuring Transformation of Data During User Reconciliation
-
Reconciliation of Complex Child Forms With Multiple Attributes
Note:
In this guide, a target system that exposes webservice endpoint has been referred to as the target system. ACME Webservice is used as a sample target system to discuss the configurations and the connector objects.
5.1 Securing the Connector
This section describes the following procedures that enable you to secure the connector:
5.1.1 Handling Passwords
Learn about securing sensitive information.
This section discusses the following topics:
5.1.1.1 Custom Webservice Policy and Guidelines for Passcode
In this connector, the target webservice operations are invoked using SOAP messages, which by default are not encrypted and can be viewed by anyone from the Enterprise Manager or a testing utility. This poses a threat when you have to pass sensitive information like passwords. To secure sensitive information, the following custom webservice policy can be used:
Guidelines for Passcode
-
Sensitive fields are encrypted by Oracle Identity Manager and this encrypted value is sent to the SOA composite.
-
The passcode attribute in the IT Resource of the connector is used as a key for encrypting the value.
-
Passcode should contain alphabets, numbers, and special characters.
-
Passcode should contain both upper case and lower case characters.
-
Passcode should be minimum 8 characters long.
-
Passcode should be changed periodically.
-
Passcode should not resemble any known and obvious keywords.
-
Passcode provided in the SOA composite should match with the value of the passcode parameter in the connector IT Resource.
-
In the SOA composite, the custom outbound policy (oimcp_WS_CONNECTOR_OUTBOUND) that handles password decryption is attached to the target webservice partner link.
-
Passcode fields, password fields, and target namespaces are specified in the composite, which are used by the policy to decrypt the password fields.
-
In the runtime, the policy decrypts a password field using the passcode and replaces it in the target SOAP payload before invoking the target webservice operation.
-
Only the masked passwords are displayed in the Enterprise Manager and payloads.
5.1.1.2 Configuring the Custom Webservice Policy
To configure this custom webservice policy:
-
Adding the connector outbound policy to the Policy store. To do so:
-
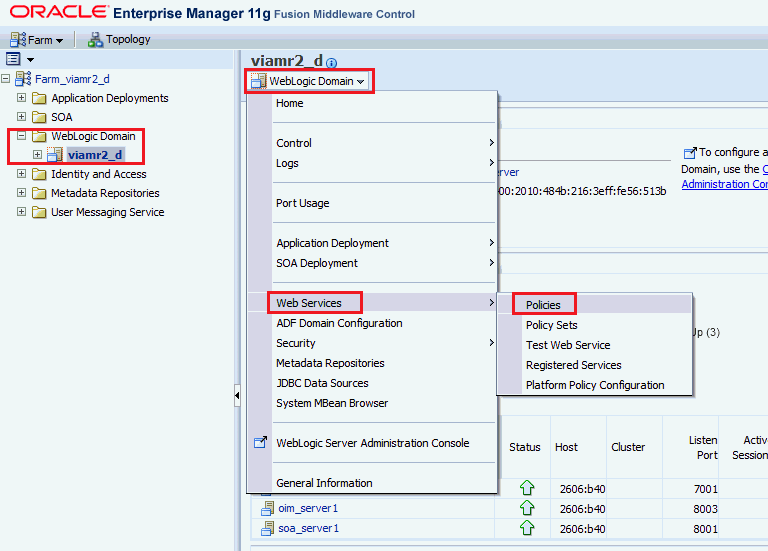
In the Enterprise Manager console, select the WebLogic domain in the left pane. In the main page, navigate to WebLogic Domain, Web Services, Policies.
-
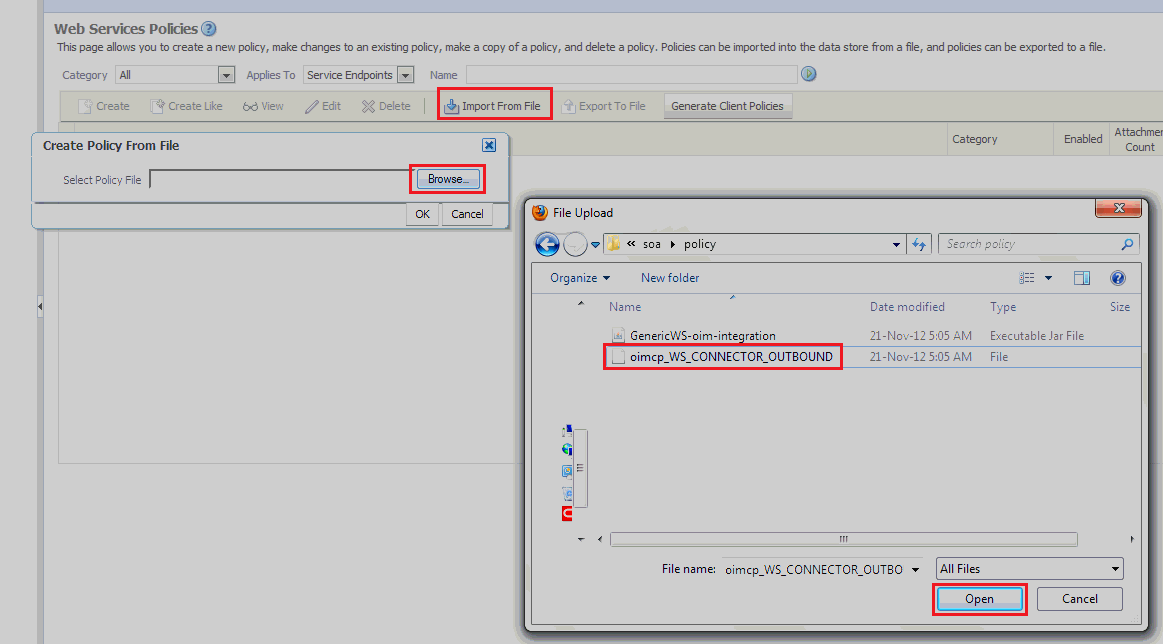
In the Web Service Policies page, click Import From File and browse for the outbound policy.
The oimcp_WS_CONNECTOR_OUTBOUND policy is available in the ConnectorDefaultDirectory/Webservices-11.1.1.5.0/soa/policy directory. Attach the sample outbound policy in Sample Outbound Policy.
-
Click OK to import the policy.
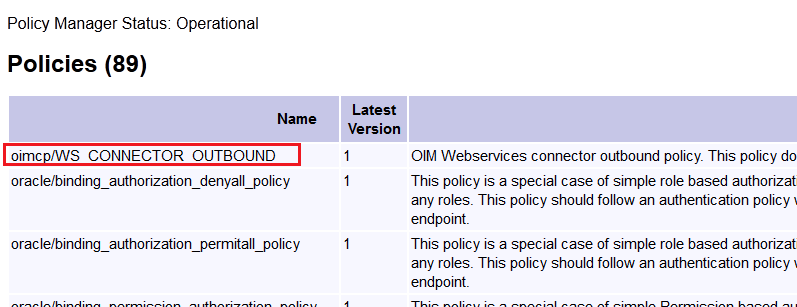
You can verify if the policy is imported by visiting http://soaserverhost:soaport/wsm-pm/validator and confirm if the imported policy is listed on this page.
-
-
Deploy the custom policy JAR file, Webservices-oim-integration.jar. To do so:
-
Stop the WebLogic (admin) server.
-
Copy the ConnectorDefaultDirectory/Webservices-11.1.1.5.0/soa/policy/ Webservices-oim-integration.jar file to the $DOMAIN_HOME/lib directory.
-
Restart WebLogic server.
-
Stop the SOA server.
-
Copy the ConnectorDefaultDirectory/Webservices-11.1.1.5.0/soa/policy/ Webservices-oim-integration.jar file to the $MW_HOME/Oracle_SOA/soa/modules/oracle.soa.ext_11.1.1/ directory.
-
Set the ANT_HOME environment variable and run the
antcommand. -
Restart the SOA server.
-
-
Configure the SOA composite in the composite.xml file. To do so, add the following entries within the
<binding.ws>tags of the webservice that requires password decryption.<wsp:PolicyReference URI="oimcp/WS_CONNECTOR_OUTBOUND" orawsp:category="security" orawsp:status="enabled"/> <property name="passcode" type="xs:string">abcd1234</property> <property name="password.field.xpath.locations" type="xs:string">/ns6:ListOfUser/ns6:User/ns6:Password</property> <property name="target.payload.namespaces" type="xs:string">ns6=urn:/acme/xml/password</property>
In these entries:
-
passcode is the
passcodefield of the connector IT ResourceSee "Guidelines for Passcode" listed earlier.
-
password.field.xpath.locations is the comma separated list of XPath locations that contain the encrypted password fields
-
target.payload.namespaces is the comma separated list of target namespaces corresponding to the values of password.field.xpath.locations
Note:
-
The property tags follow the PolicyReference tags in the composite.xml file. Ensure this structure when you configure other security policies for the same webservice.
-
Ensure that the namespace in the target.payload.namespace property does not include quotation marks.
-
-
Deploy the SOA composite in JDeveloper and test the password reset operation from Oracle Identity Manager. See Deploying and Testing the Webservice SOA Composite for more information.
5.1.2 Configuring Webservice Security Policy
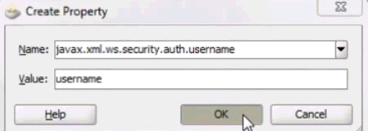
You can configure webservice security policy in the SOA composite in JDeveloper. To do so:
Note:
See Sample WSDL for Security Policy for SecurityPolicy.wsdl.
5.1.3 Passing Credentials Using CSF
You can pass target system credentials from the SOA composite using the Credential Store Factory (CSF) mechanism. The procedure is as follows:
-
Create a key for the target system credentials in CSF. To do so:
-
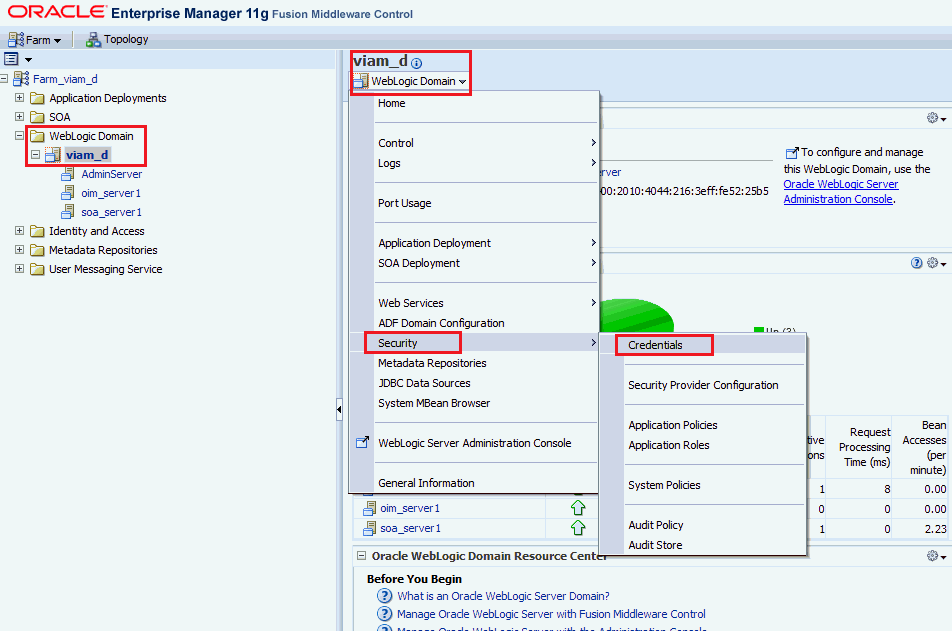
In the Enterprise Manager console, select the WebLogic domain in the left pane. In the main page, navigate to WebLogic Domain, Security, Credentials.
-
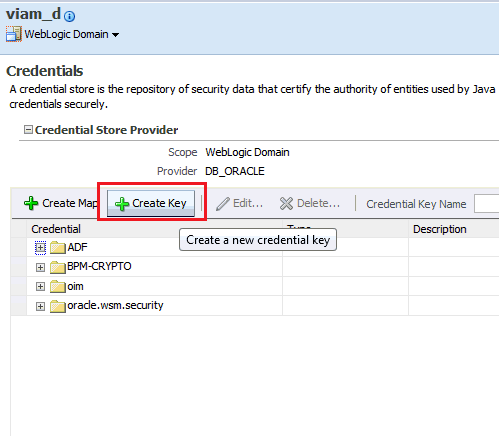
Click Create Key and add the credential details.
-
Click OK and save the key.
-
-
Configure the SOA composite in the composite.xml file. To do so:
-
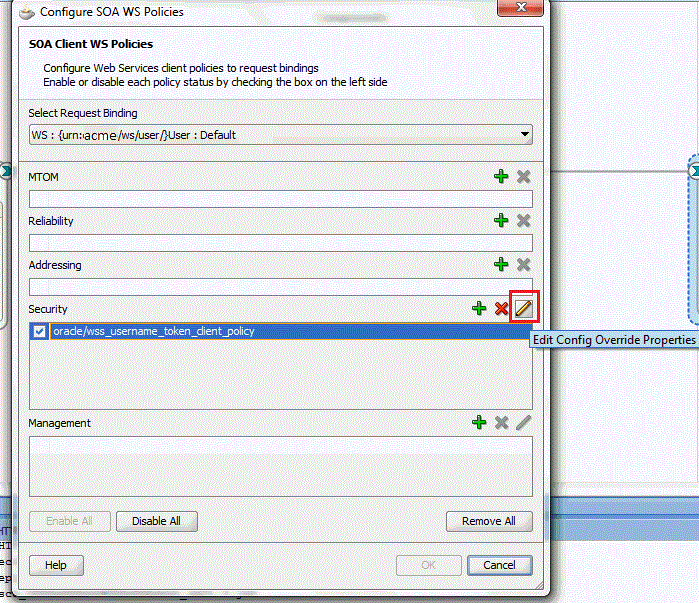
Right-click the target webservice and click Configure WS Policies.
-
In the Configure SOA WS Policies window, select the security policy under Security and click the pencil sign to edit.
-
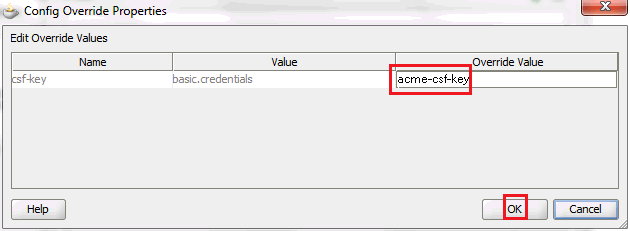
In the Override Value column, enter the name of the CSF key that was created in the previous step and click OK.
Alternatively, you can add the binding properties in the composite.xml file directly in text mode:
<binding.ws port="urn:acme/ws/user/#wsdl.endpoint(User/Default)" location="userWrapper.wsdl" soapVersion="1.1">
<wsp:PolicyReference URI="oracle/wss_username_token_client_policy" orawsp:category="security" orawsp:status="enabled"/>
<property name="csf-key" type="xs:string" many="false">acme-csf-key</property>
</binding.ws>
-
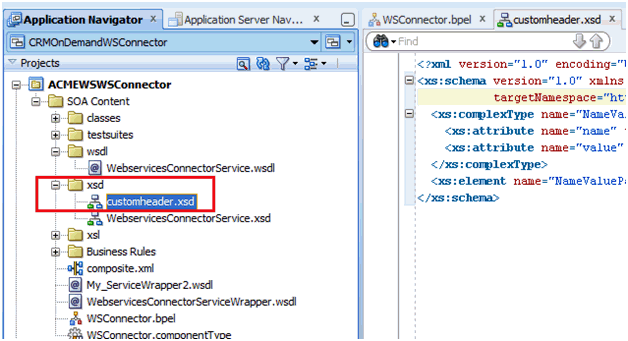
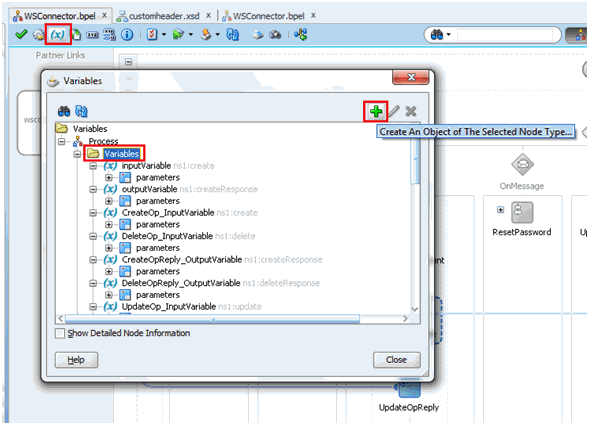
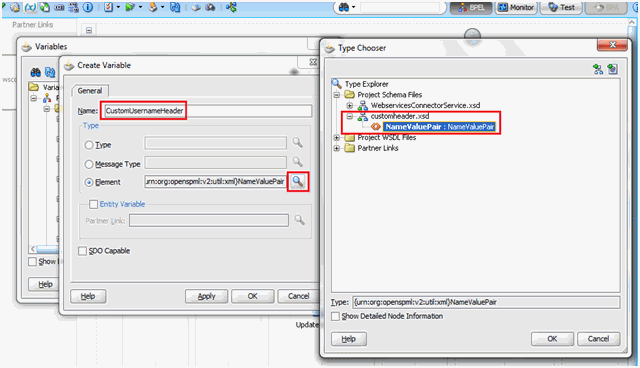
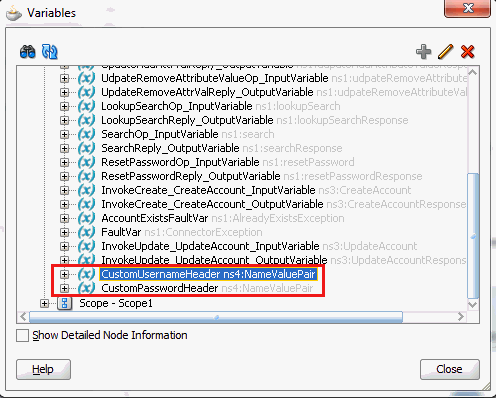
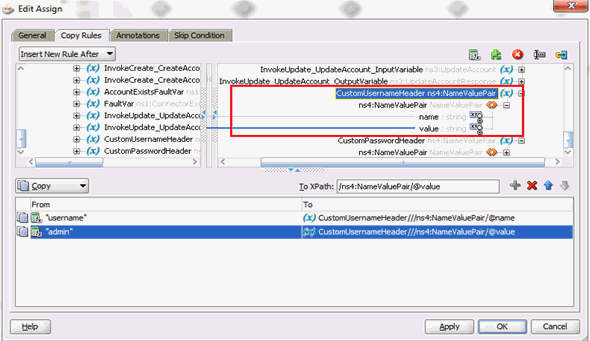
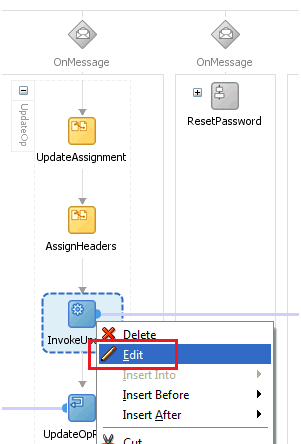
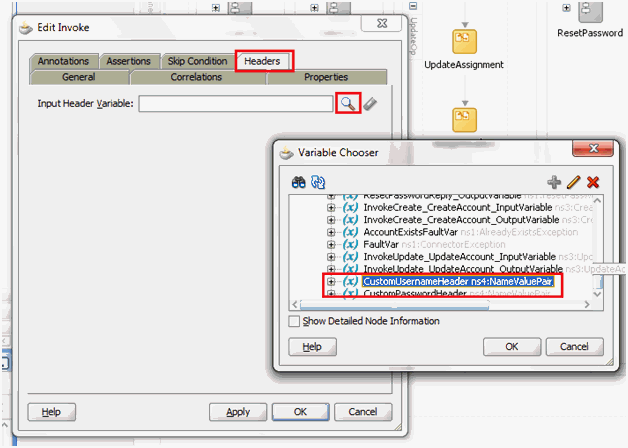
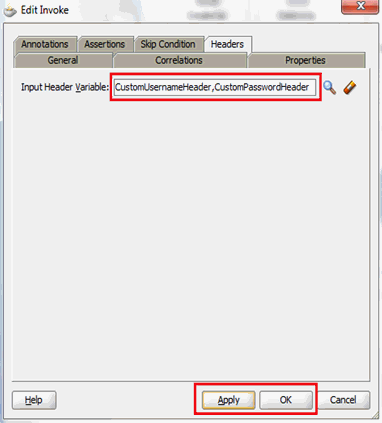
5.1.4 Passing Credentials Using Custom Headers
Apart from the webservice security policy authentication mechanisms, the webservices may be authenticated using custom SOAP headers. This mechanism would be useful for the target webservices whose format do not comply with webservice security policy.
To pass the credentials using custom headers:
5.2 Adding Custom Attributes for Provisioning
Note:
In this section, the term "attribute" refers to the identity data fields that store user data.
To add a custom attribute, you must ensure that the corresponding attribute exists on the target system. If it does not exist, then you must first add the custom attribute on the target system. Contact an administrator for information about adding a custom attribute on the target system.
You can add custom attributes for provisioning by configuring in Oracle Identity Manager and in the SOA Composite. These procedures are described in the following sections:
5.2.1 Adding Custom Attributes for Provisioning in Oracle Identity Manager
By default, the attributes listed in Connector Objects Used During Provisioning are mapped for provisioning b etween Oracle Identity Manager and the target system. If required, you can also configure the connector for provisioning after adding custom attributes or other user attributes that are not available out of the box (OOTB) with the connector.For example, if CountryName is a custom attribute added to the user profile on the target system, then you can configure the connector to provision this attribute by performing the following steps:
-
For the custom attribute, CountryName, determine the corresponding attribute name in ACME WSDL.
-
Log in to the Oracle Identity Manager Design Console.
If you are using Oracle Identity Manager release 11.1.2.x, then log in to Oracle Identity System Administration and perform the steps described in
http://docs.oracle.com/cd/E27559_01/admin.1112/e27149/form.htm#CACGHJIF. -
Create a new version of the process form as follows:
-
Expand Development Tools.
-
Double-click Form Designer.
-
Search for and open the UD_ACME_USR process form.
-
Click Create New Version.
On the Create a new version dialog box, enter a new version in the Label field, and then click Save.
-
-
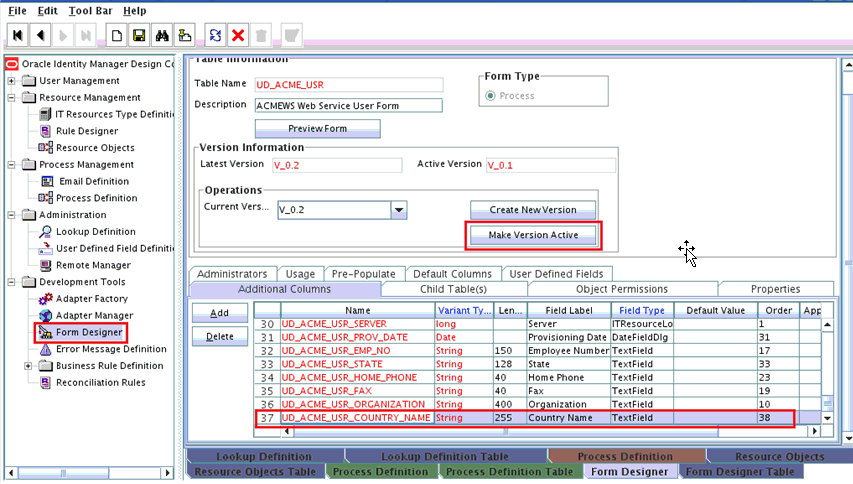
Add the new field on the process form as follows:
-
Click Add.
A field is added to the list. Enter the details of the field.
For example, if you are adding the CountryName field, enter
UD_ACME_USR_COUNTRYNAMEin the Name field,CountryNamein the Label Name field, and the remaining details of this field.If the field is a LookupField type, create a new lookup definition, for example, Lookup.ACME.CountryName. Then, add appropriate entries to the lookup definition.
Open the UD_ACME_USR process form and click Properties. Select the newly added property and click Add Property. Select Property Name as Lookup Code, and then enter the newly created lookup,
Lookup.ACME.CountryNameas the property value. -
Click Save.
-
To activate the newly created form, click Make Version Active.
-
-
Create an entry for the field in the lookup definition for provisioning as follows:
-
Expand Administration.
-
Double-click Lookup Definition.
-
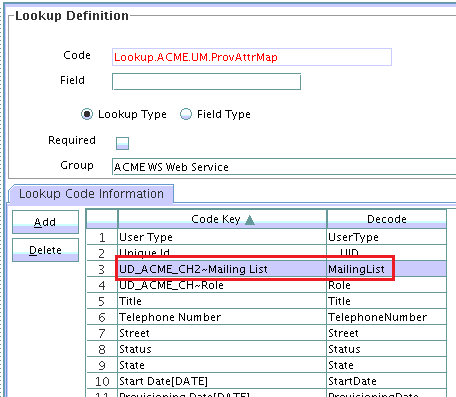
Search for and open the Lookup.ACME.UM.ProvAttrMap lookup definition.
-
Click Add and enter the Code Key and Decode values for the field.
The Code Key value must be the form field label name. The Decode value can be same as the Code Key value, as the mapping is done in the SOA composite.
For example, enter
CountryNamein the Code Key and the Decode fields. After this attribute is added in the Provisioning Attribute Map and in the process form, the attribute will appear in the Oracle Identity Manager App Instance form and the input values can be provided from Oracle Identity Manager. -
Click Save.
-
-
If you are using Oracle Identity Manager release 11.1.2.x or later, create a new UI form and attach it to the application instance to make this new attribute visible. See Creating a New UI Form and Updating an Existing Application Instance with a New Form for the procedures.
5.2.2 Adding Custom Attributes for Provisioning in SOA Composite
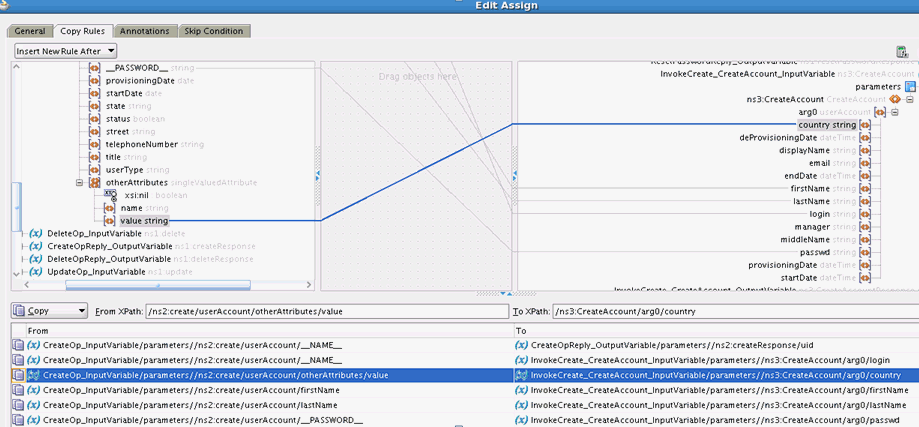
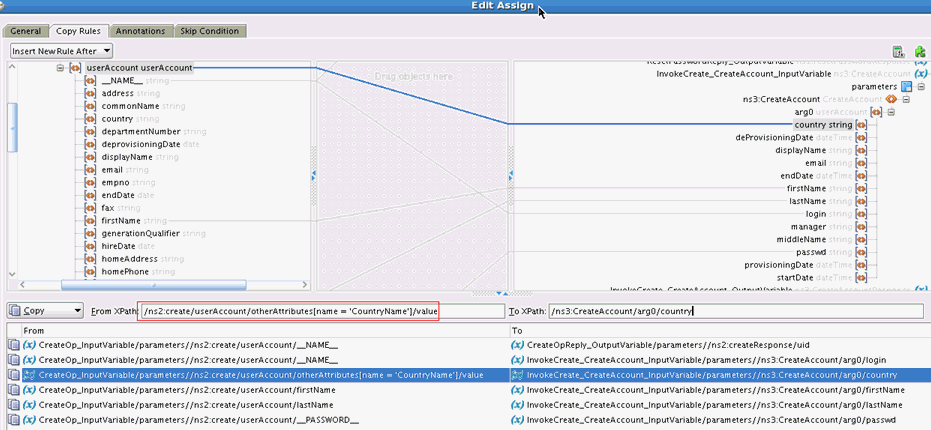
You can add custom attributes in the SOA composite for an operation such as Create. The custom attribute will be passed in the <otherAttributes> tag in the payload. The custom attribute can be the Decode value CountryName from the Lookup.ACME.UM.ProvAttrMap lookup definition. To do so:
5.3 Adding Custom Attributes for Reconciliation
You can add custom attributes for reconciliation by configuring in Oracle Identity Manager and in the SOA Composite. These procedures are described in the following sections:
5.3.1 Adding Custom Attributes for Reconciliation in Oracle Identity Manager
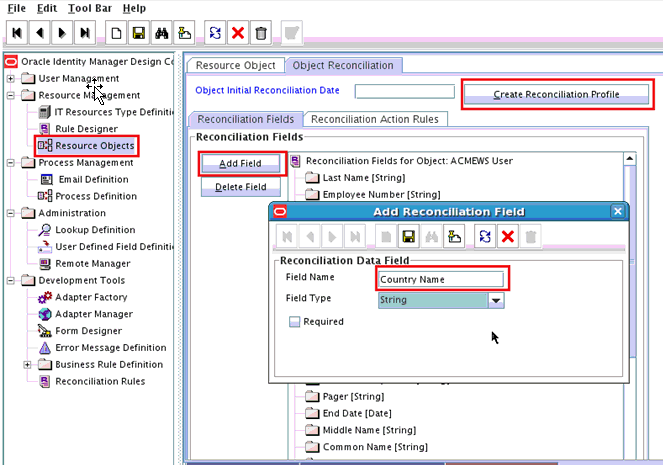
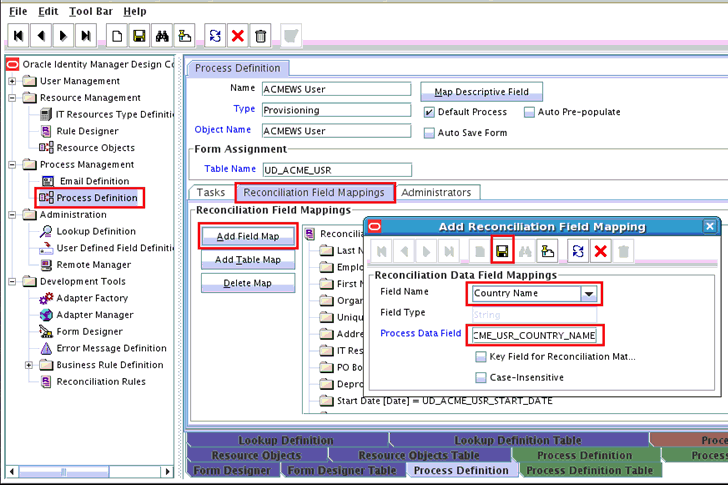
To add a custom attribute such as Country Name in Oracle Identity Manager:
Note:
If you have already added an attribute for provisioning, then you need not repeat steps performed as part of that procedure.
5.3.2 Adding Custom Attributes for Reconciliation in SOA Composite
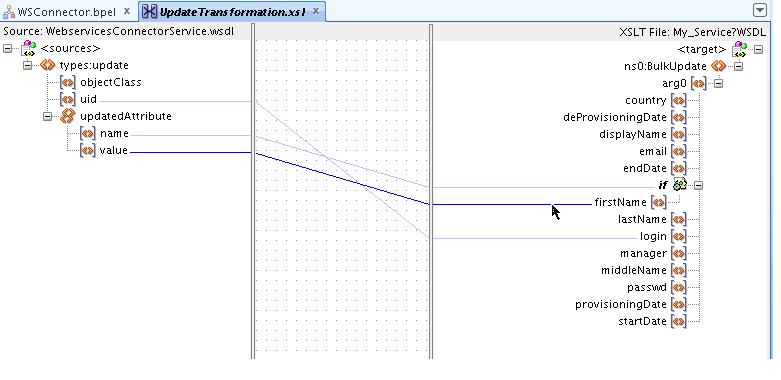
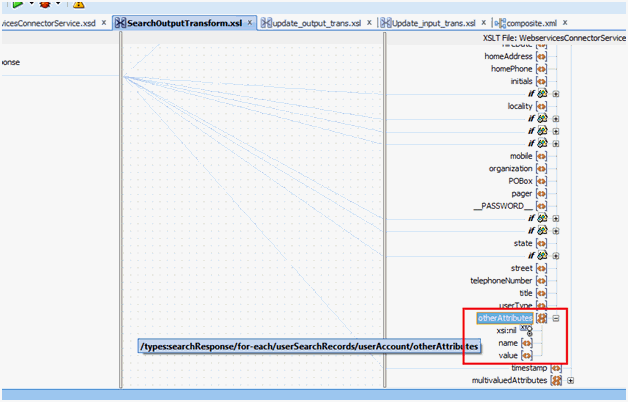
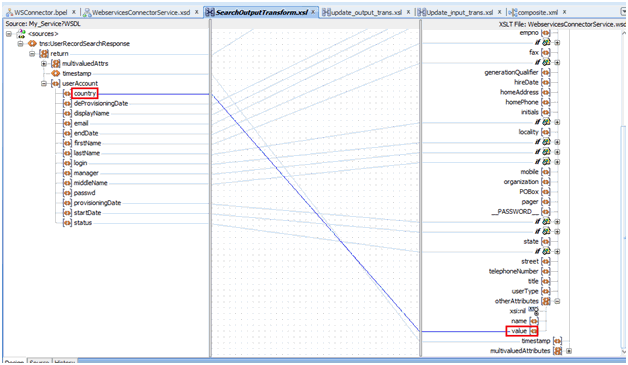
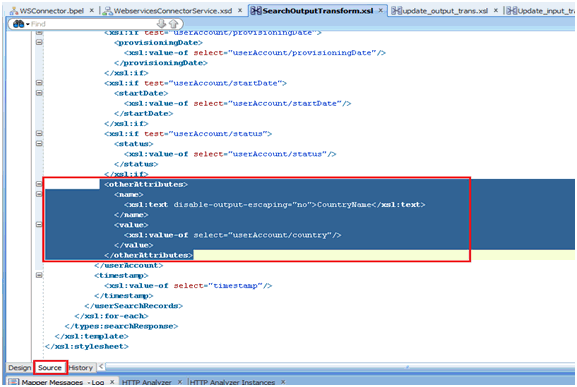
You can add custom attributes in the SOA composite for an operation such as Search. The custom attribute will be passed in the <otherAttributes> tag in the payload, as shown in SearchOutputTransform.xsl.
To perform this procedure:
5.3.3 Adding Custom Attributes for Reconciling _UID_ Field
Note:
Perform the procedure described in this section only when the name and Uid fields in your target system do not store the same values.
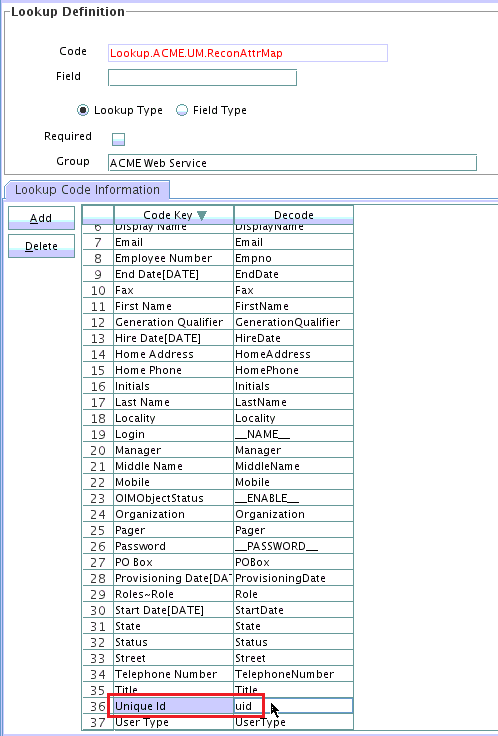
Customizing the Uid field includes configuring the otherAttributes attribute in the composite and then assigning it to the Unique Id field in the Lookup.ACME.UM.ReconAttrMap lookup definition.
To do so, perform the following steps in the Transform after UserInvokeSearch:
-
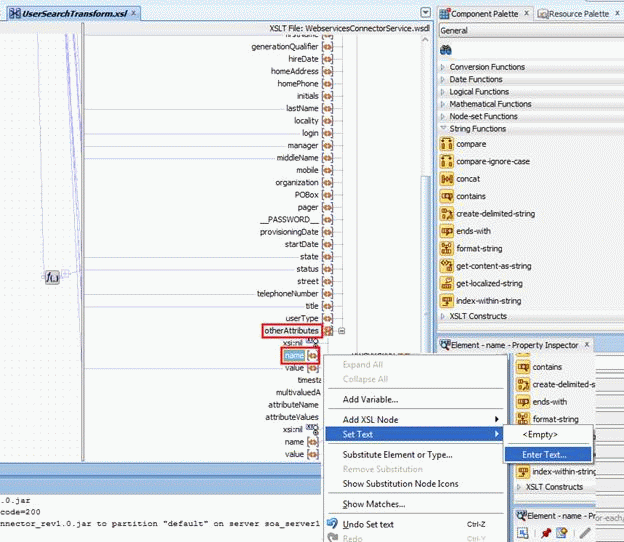
Open the search branch transform and map the Uid field to the otherAttributes attribute as follows:
-
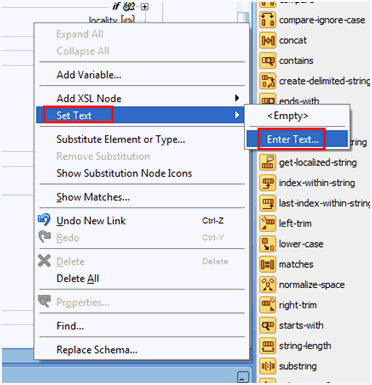
Search for and expand the otherAttributes attribute and right-click the Name attribute.
-
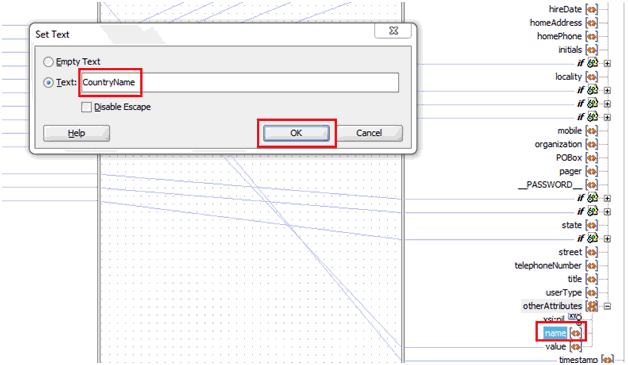
In the context menu that is displayed, select Set Text, and then select Enter Text.
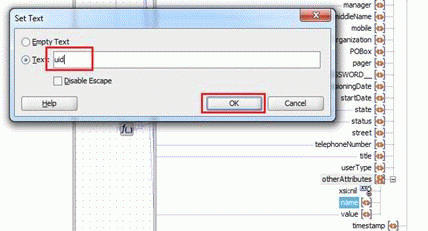
-
In the Set Text dialog box, select Text, enter
uidin the text field, and click OK. -
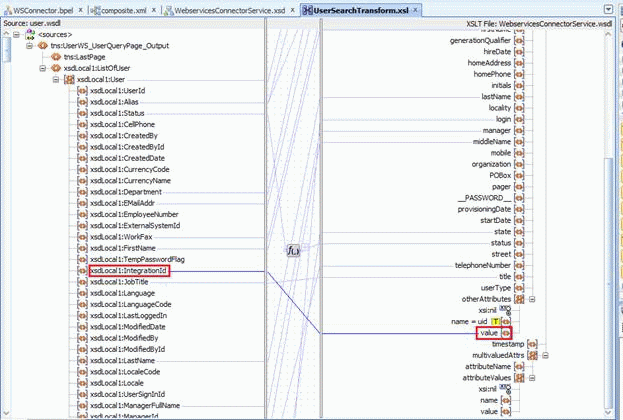
In the UserSearchTransform tab, map the target Uid field to the attribute value in otherAttributes.
-
-
Save, compile, and deploy the composite to the SOA server.
-
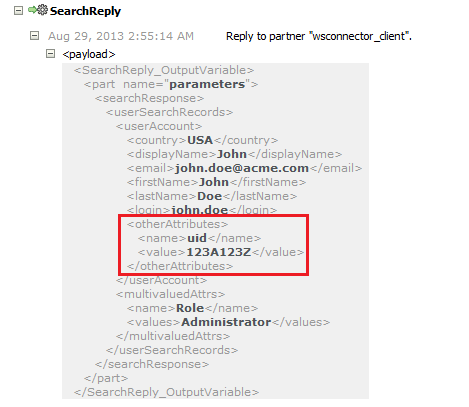
Test the Search operation from Enterprise Manager and observe the response payload.
Login is populated in the login field and Uid is set as uid in the otherAttributes attribute.
-
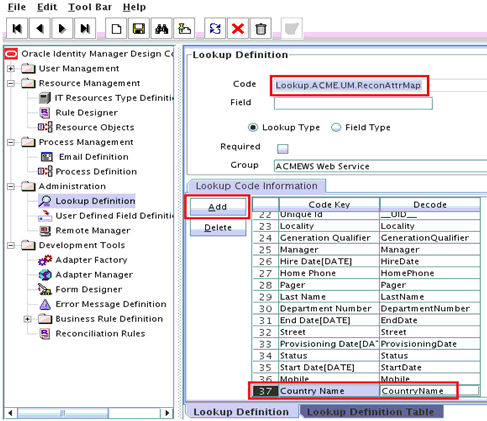
Update the Lookup.ACME.UM.ReconAttrMap lookup definition as follows:
-
Log in to the Design Console.
-
Expand Administration and then double-click Lookup Definition.
-
Search for and open the Lookup.ACME.UM.ReconAttrMap lookup definition.
-
Search for and update the decode value of Unique Id code key to
uid. -
Click Save.
-
-
Run the Target User Reconciliation scheduled job. See Scheduled Tasks for Reconciliation for more information about this scheduled job.
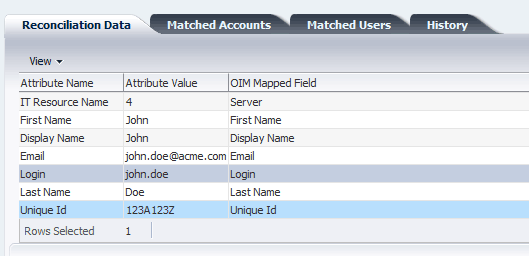
After the reconciliation run is successful, the unique ID value is mapped to the custom attribute. You can view this mapping in the Event Management region by opening the latest event ID.
5.4 Adding Custom Child Forms
You can add custom child forms by configuring in Oracle Identity Manager and in the SOA Composite. These procedures are described in the following sections:
5.4.1 Adding Custom Child Forms in Oracle Identity Manager
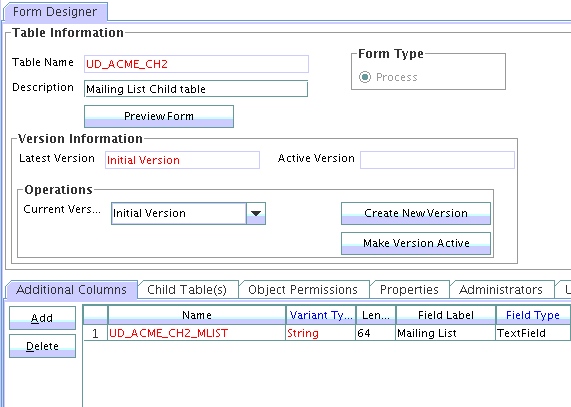
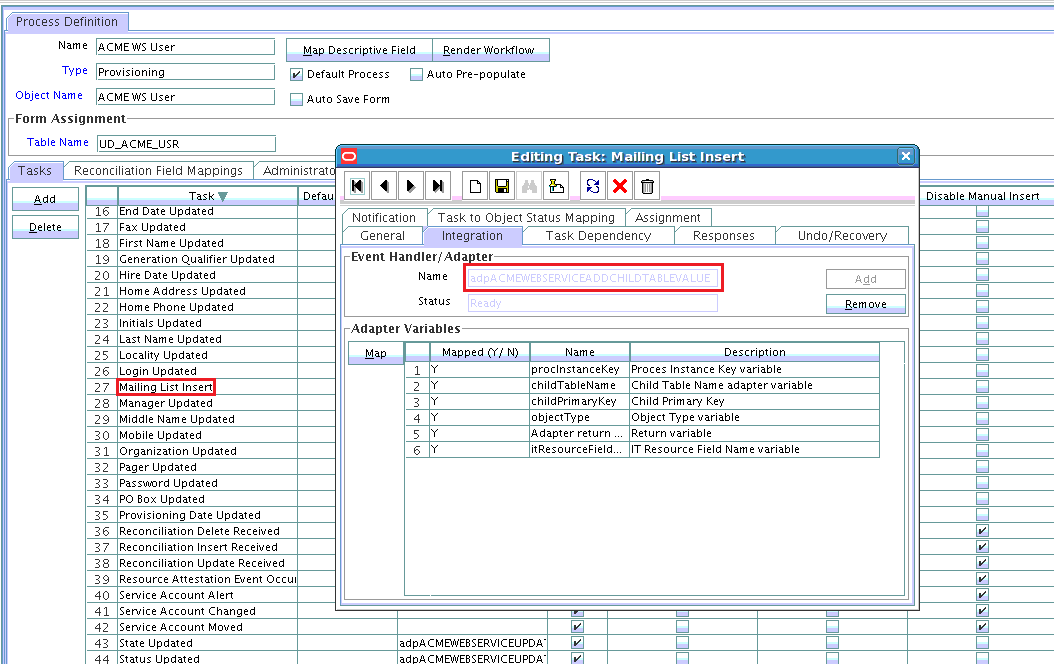
To add a custom child form for a field such as Mailing List in Oracle Identity Manager:
5.5 Adding Child Form Data
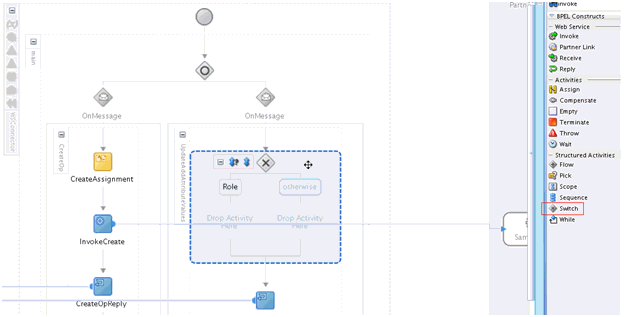
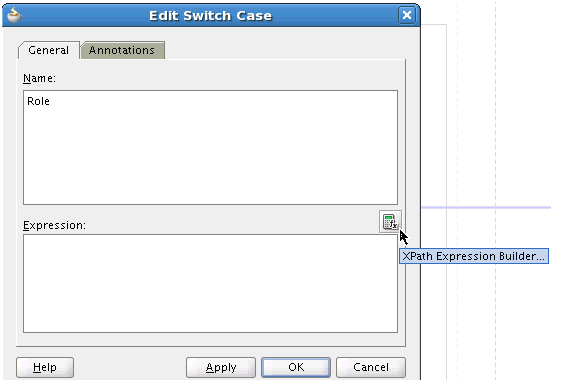
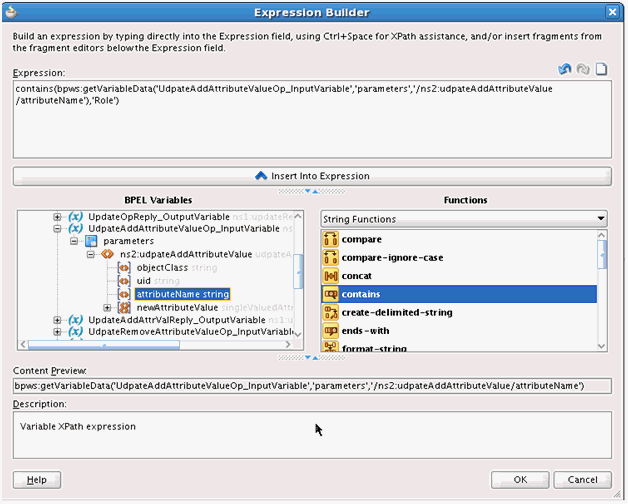
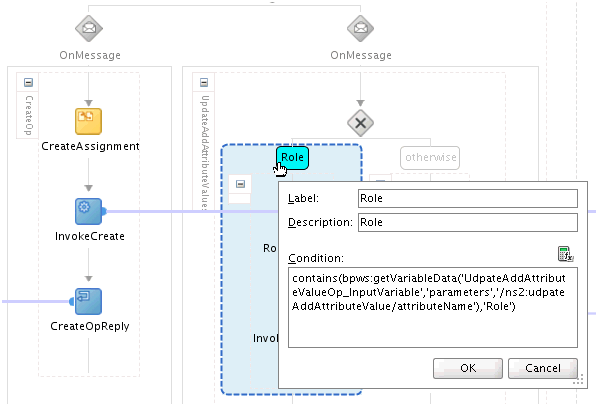
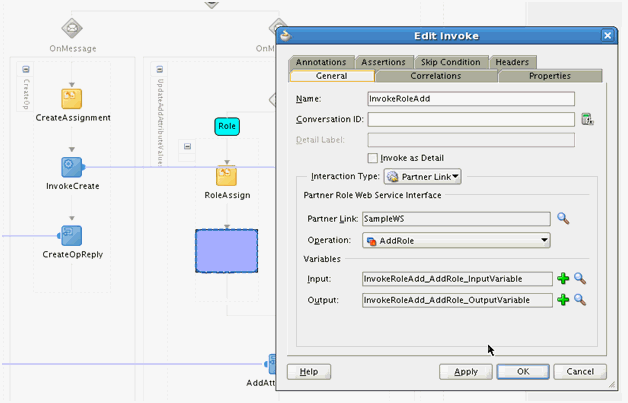
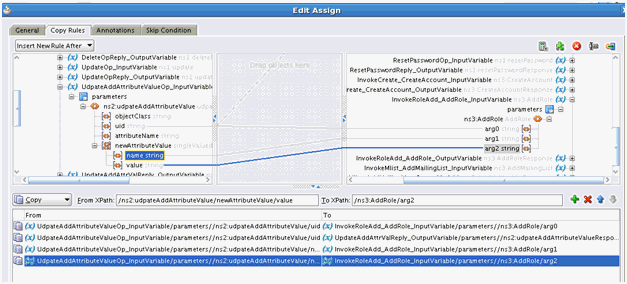
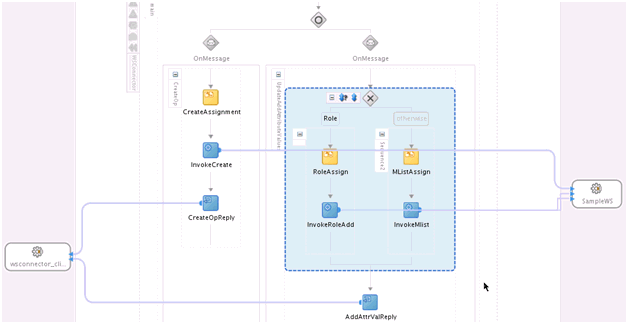
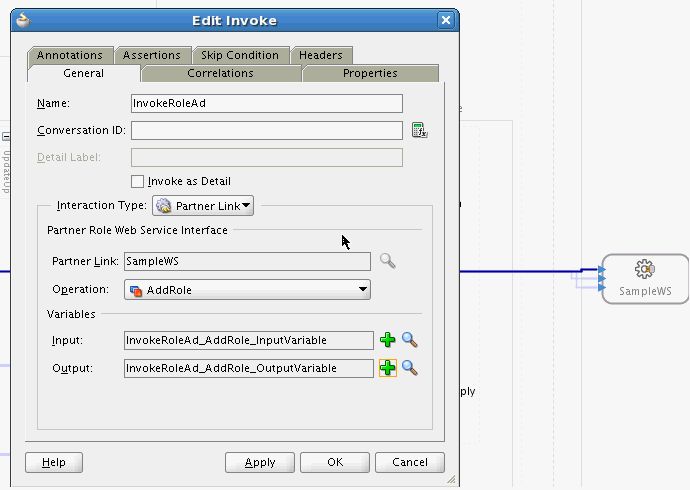
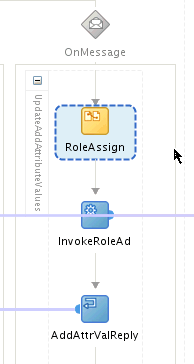
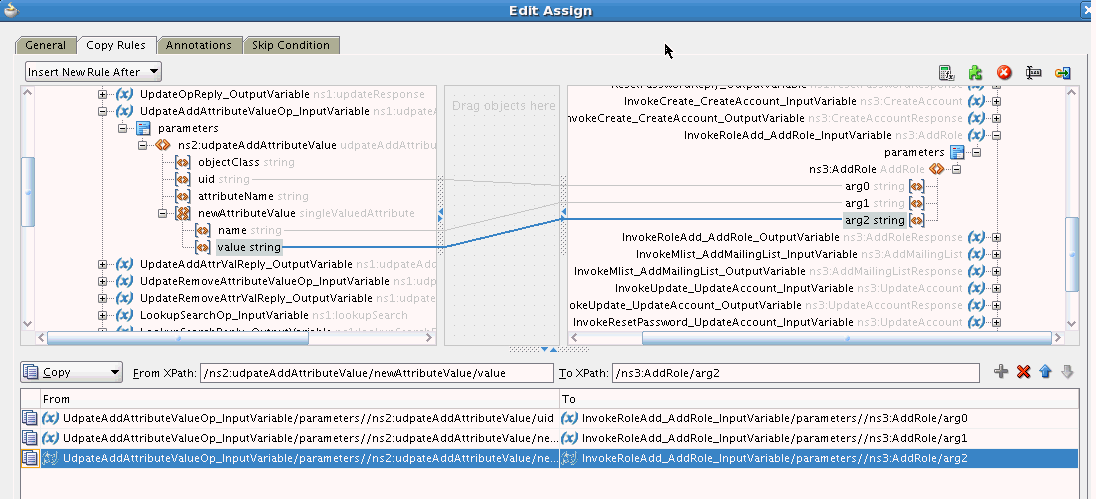
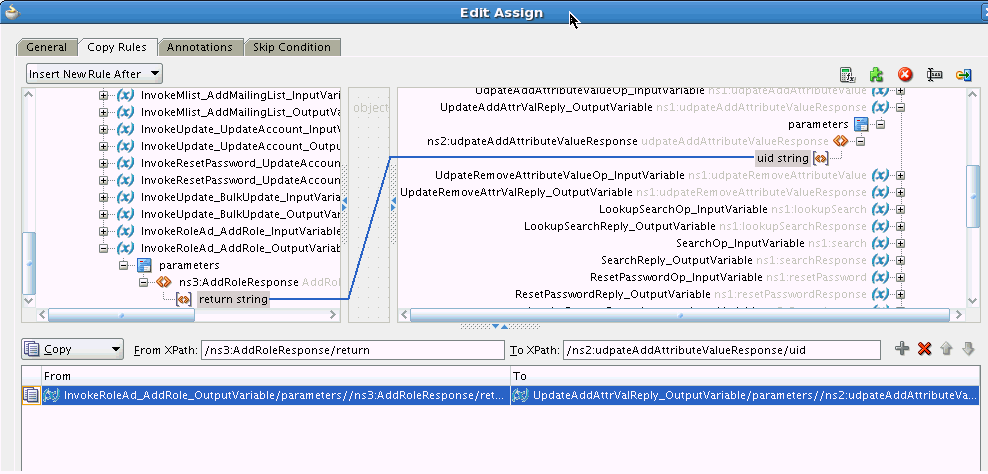
The UpdateAddAttributeValues and UdpateRemoveAttributeValues operations are used for adding and removing child form data such as Roles (multivalued data or entitlements) respectively.
The mappings for UpdateAddAttributeValues are as follows. The mappings for UdpateRemoveAttributeValues are similar.
5.6 Mapping Timestamp Attribute
The timestamp attribute in the connector is of long type. The attribute on some target webservices may be of a different type or format. For example, in Oracle CRM On Demand, if you want to use the modified date as the incremental reconciliation attribute, then you need to convert the attribute type to long.
See Also:
Table 4-2 for the usage of the timestamps in the scheduled task attributes
Initially, timestamp is a string in MM/dd/yyyy format. You can write a Java code to convert the string into java.sql.Timestamp format and then, use the getTime() method to derive the value of long type.
This Java code can be used to define a custom XPath function that can be used directly in the SOA composite, which takes the modified date as input and produces the long value as output. Then, this output can be mapped to the timestamp attribute.
Perform the procedure described in Creating User-Defined XPath Extension Functions in Oracle Fusion Middleware Developer's Guide for Oracle SOA Suite to create a custom (user-defined) XPath extension function.
The following is a sample Java code to define a custom XPath function to convert DateString to Long type:
package org.webservices.conversion;

import java.text.SimpleDateFormat;

import java.util.Date;
import java.util.List;

import oracle.fabric.common.xml.xpath.IXPathContext;
import oracle.fabric.common.xml.xpath.IXPathFunction;

public class ConvertDateStringToLong implements IXPathFunction {
  public ConvertDateStringToLong() {
    super();
  }

  public static Long convertDateStringToLong(String dateString) {

    Date date = null;

    SimpleDateFormat dateFormat = new SimpleDateFormat("MM/dd/yyyy HH:mm:ss");

    try {

      date = dateFormat.parse(dateString);

    } catch (Exception e) {
      e.printStackTrace();
    }

    long timeInLong = date.getTime();

    return timeInLong;
  }

  public Object call(IXPathContext ixPathContext, List<?> list) {
    return convertDateStringToLong((String)list.get(0));
  }
}
5.7 Configuring the Connector for Multiple Instances and Multiple Versions of the Target System
Note:
Perform this procedure only if you want to configure the connector for multiple installations of the target system.
You may want to configure the connector for multiple installations of the target system. The following example illustrates this requirement:
The Tokyo, London, and New York offices of Example Multinational Inc. have their own installations of the target system. The company has recently installed Oracle Identity Manager, and they want to configure Oracle Identity Manager to link all the installations of the target system.
To meet the requirement posed by such a scenario, you must configure the connector for multiple installations of the target system.
To configure the connector for multiple installations of the target system:
See Also:
Cloning Connectors in Oracle Fusion Middleware Administering Oracle Identity Manager for Oracle Identity Manager for detailed instructions on performing each step of this procedure
When you use the Administrative and User Console to perform provisioning, you can specify the IT resource corresponding to the target system installation to which you want to provision the user.
5.8 Configuring Validation of Data During Reconciliation and Provisioning
The Lookup.ACME.UM.ProvValidations and Lookup.ACME.UM.ReconValidations lookup definitions hold single-valued data to be validated during provisioning and reconciliation operations, respectively.
For example, you can validate data fetched from the First Name attribute to ensure that it does not contain the number sign (#). In addition, you can validate data entered in the First Name field on the process form so that the number sign (#) is not sent to the target system during provisioning operations.
Note:
The Lookup.ACME.UM.ProvValidations and Lookup.ACME.UM.ReconValidations lookup definitions are optional and do not exist by default.
You must add these lookups as decode values to the Lookup.ACME.UM.Configuration lookup definition to enable exclusions during provisioning and reconciliation operations.
To configure validation of data:
5.9 Configuring Transformation of Data During User Reconciliation
The Lookup.ACME.UM.ReconTransformations lookup definition holds single-valued user data to be transformed during reconciliation operations. For example, you can use First Name and Last Name values to create a value for the Full Name field in Oracle Identity Manager.
Note:
The Lookup.ACME.UM.ReconTransformations lookup definition is optional and does not exist by default.
You must add this lookup as decode value to the Lookup.ACME.UM.Configuration lookup definition to enable exclusions during provisioning and reconciliation operations.
To configure transformation of single-valued user data fetched during reconciliation:
5.10 Configuring Resource Exclusion Lists
The Lookup.ACME.UM.ProvExclusionList and Lookup.ACME.UM.ReconExclusionList lookup definitions hold user IDs of target system accounts for which you do not want to perform provisioning and reconciliation operations, respectively.
Note:
The Lookup.ACME.UM.ProvExclusionList and Lookup.ACME.UM.ReconExclusionList lookup definitions are optional and do not exist by default.
You must add these lookups as decode values to the Lookup.ACME.UM.Configuration lookup definition to enable exclusions during provisioning and reconciliation operations.
The following is the format of the values stored in these lookups:
| Code Key | Decode | Sample Values |
|---|---|---|
|
User Login Id resource object field name |
User ID of a user |
Code Key: User Login Id Decode: User001 |
|
User Login Id resource object field name with the [PATTERN] suffix |
A regular expression supported by the representation in the |
Code Key: User Login Id[PATTERN] To exclude users matching any of the user ID 's User001, User002, User088, then: Decode: User001|User002|User088 To exclude users whose user ID 's start with 00012, then: Decode: 00012* See Also: For information about the supported patterns, visit |
To add entries in the lookup for exclusions during provisioning operations:
5.11 Reconciliation of Complex Child Forms With Multiple Attributes
Learn how to configure reconciliation of complex child forms with multiple attributes.
This section discusses the following topic:
5.11.1 Mapping Child Tables with Attributes
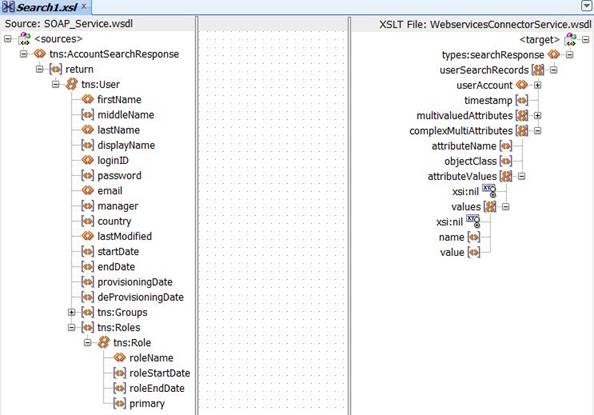
After performing the configuration procedure described in Configuring the Search Operation, you can map a child table with more than one attribute as follows:
-
Open and expand the transformation mappings created for the Search operation.
Note:
The complexMultiAttributes will be used to manage each complex child table in the transformation mappings that were created.
-
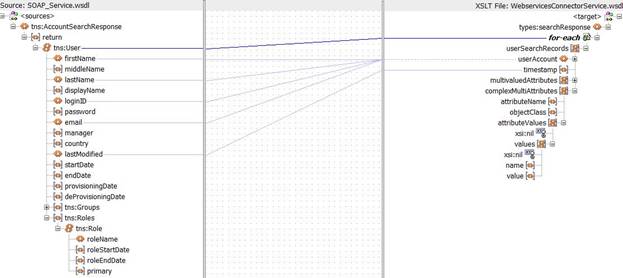
Create required mappings for the User fields, after which you must map the complex child attribute. To do so, perform the following procedure:
-
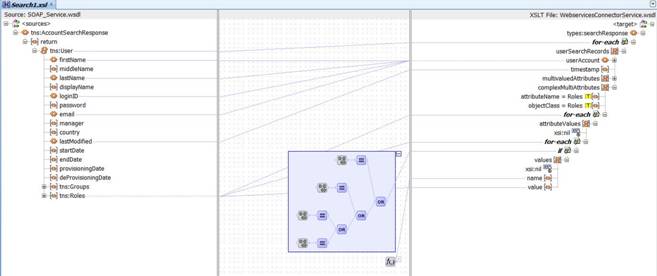
Add a "for each" loop to repeat the procedure through the child table values.
For example, in this case, you have to repeat the procedure continuously for each "Role" attribute of the User. Each attributeValue will represent a Role and the procedure is repeated continuously through each "Role" using the "for each" loop.
-
Add a "for each" loop to repeat the procedure through the values of each child table entry, and map it to the name and values in the complexAttributeValues.
For example, in this case, you have to repeat the procedure continuously through roleName, roleStartDate, roleEndDate, and primary for each "Role" attribute. Each of the attributes of Role will be represented as a name-value pair.
As an example, the name variable will have "RoleName" and the value variable will have "Developer". Similarly all the other attributes of Role such as RoleStartDate, RoleEndDate, and primary will also be represented by name-value pairs.
The repetition of each attribute in the child table is done using the following code, which is present inside the "for-loop" to repeat the procedure through each "Role" attribute:
<xsl:for-each select="node()"> <xsl:if test='(name() = "roleName") or ((name() = "roleStartDate") or ((name() = "roleEndDate") or (name() = "primary")))'> <complexAttributeValues> <name> <xsl:value-of select="name()"/> </name> <value> <xsl:value-of select="node()"/> </value> </complexAttributeValues> </xsl:if> </xsl:for-each> -
5.11.2 Configuring Reconciliation of Complex Child Tables
After completing the above procedure, you are required to perform the following steps in Oracle Identity Manager:
-
Log in to the Design Console.
-
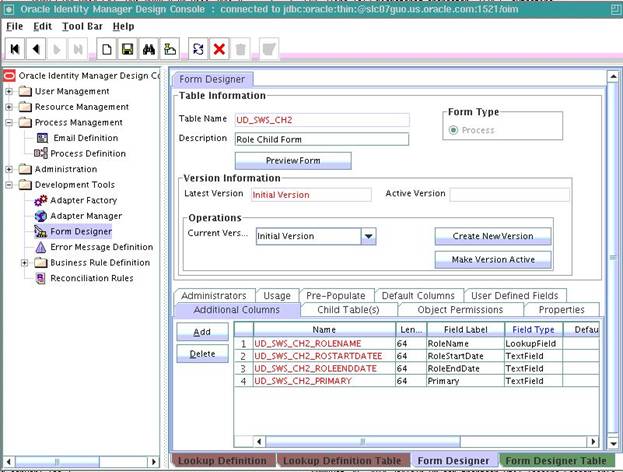
Create a new child table with more than one attribute as follows:
-
Create a new child table by following the procedure specified in Adding Custom Child Forms in Oracle Identity Manager.
-
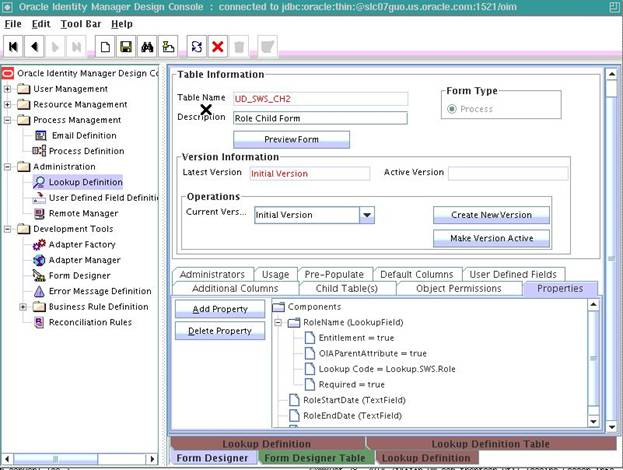
Add all the attributes of the child table to the additional columns.
For example, if you have created a child table for Role, you have to add the following attributes to the newly created child table:
- RoleName
- RoleStartDate
- RoleEndDate
- Primary
-
In the Properties tab, click Add Property and add the required properties of the attributes as shown below:
-
Click Save, and then click Make Version Active.
-
Create a new version of the parent form and add the new child form to it. Once this is complete, make the new version of the parent form active by clicking Make Version Active.
-
-
Add the new attribute to the list of reconciliation fields in the resource object as follows:
-
Expand Resource Management, and double-click Resource Objects.
-
Search for and open the SampleWS User resource object as per the example used in this procedure.
-
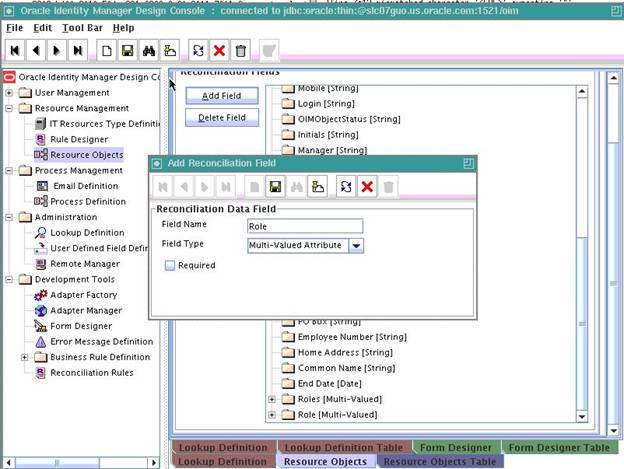
On the Object Reconciliation tab, click Add Field.
-
Enter the details of the field.
For example, enter
Rolein the Field Name field and select Multi-Valued Attribute from the Field Type list. -
Click Save and close the dialog box.
-
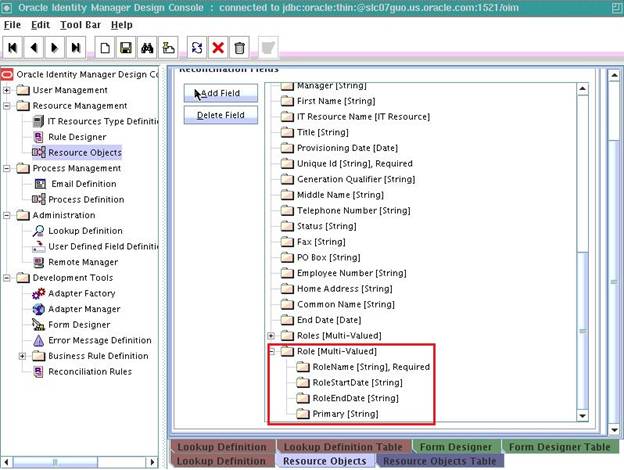
Right-click the newly created field and select Define Property Fields.
-
In the Add Reconciliation Fields dialog box, enter the details of the newly created field.
For example, enter
RoleNamein the Field Name field and select String from the Field Type list. -
Repeat step g for all the attributes of the child table with the following difference:
-
Enter
RoleStartDatein the Field Name field and select String from the Field Type list. -
Enter
RoleEndDatein the Field Name field and select String from the Field Type list. -
Enter
Primaryin the Field Name field and select String from the Field Type list.
Click Save and close the dialog box repeatedly after you enter the details for each new attribute.
-
-
-
Create a reconciliation field mapping for the new attribute in the process definition as follows:
-
Expand Process Management, and double-click Process Definition.
-
Search for and open SampleWS User process definition as per the example used in this procedure.
-
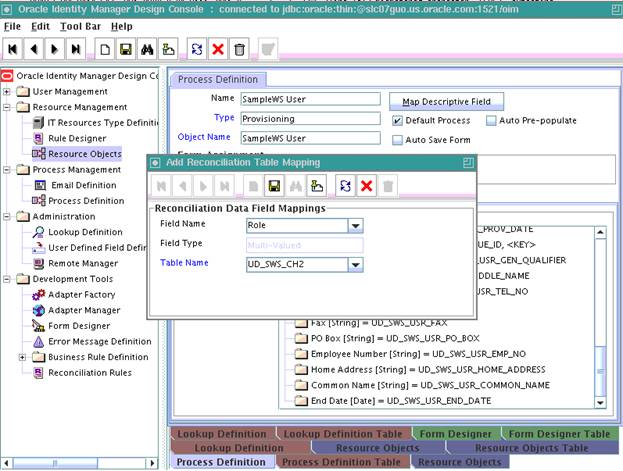
On the Reconciliation Field Mappings tab of the process definition form, click Add Field Map.
-
In the Add Reconciliation Table Mapping dialog box, select the field name and table name from the list displayed.
-
Click Save and close the dialog box.
The following screenshot displays the addition of field name Role to SampleWS User reconciliation mappings:
-
Right-click the newly created field, and select Define Property Field Map.
-
In the Field Name field, select the value for the field that you want to add.
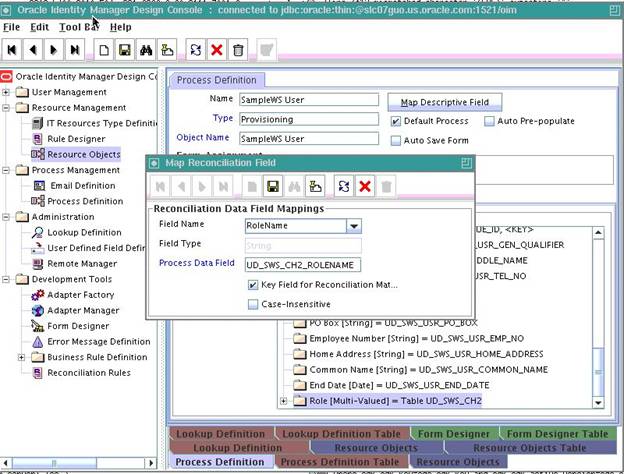
The following screenshot displays the addition of
RoleNamefield of the child table Role: -
Repeat steps f and g for fields RoleStartDate, RoleEndDate, and Primary.
-
-
Create an entry for the field in the lookup definition for reconciliation as follows:
-
Expand Administration.
-
Double-click Lookup Definition.
-
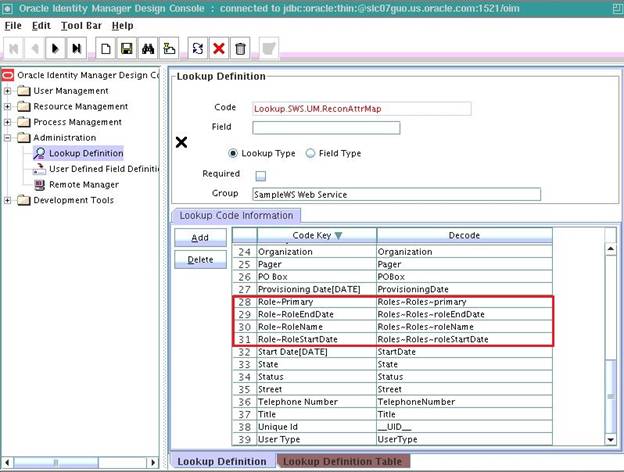
Click Add and enter the Code Key and Decode values for the field. The Code Key and Decode values must be in the following format:
Code Key: MULTIVALUED_FIELD_NAME~CHILD_RESOURCE_OBJECT_FIELD_NAME
Decode: AttributeName~ObjectClass~TargetFieldName
Note:
Provide the values for AttributeName and ObjectClass as specified in AttributeName and ObjectClass under ComplexMultiAttributes in the SOA composite.
-
Click Save.
-
Repeat steps c and d for all the attributes of the child table.
The below screenshot displays the Reconciliation Attribute Map of SampleWS User on completion of all the mappings:
-
