The goal of this roadmap is to install and configure Search in an integrated environment with ATG Commerce, Content Administration, and Merchandising. This configuration is often referred to as Commerce Search. It also includes the use of standalone Search engines.
You will need three ATG instances for this product combination:
One runs the administrative interfaces, including Merchandising and Search Administration; this is referred to as the asset management server in this roadmap.
The second runs your Commerce site for testing, and is referred to as the staging server.
The final instance runs your live site, and is referred to as the production server.
The servers can be set up on separate machines, or run as separate instances on one machine if it has plenty of memory. The latter option is not recommended for a live site, but you may use such a configuration for evaluation or testing purposes. You may also want to dedicate resources for additional Search engines.
Note that the staging server is not required for this product combination, though it is recommended. Your configuration may also include a preview server.
Some of the steps in this procedure can be performed using ATG’s CIM tool. These steps are noted in the roadmap. See Configuring Search with CIM and the CIM online help for additional information.
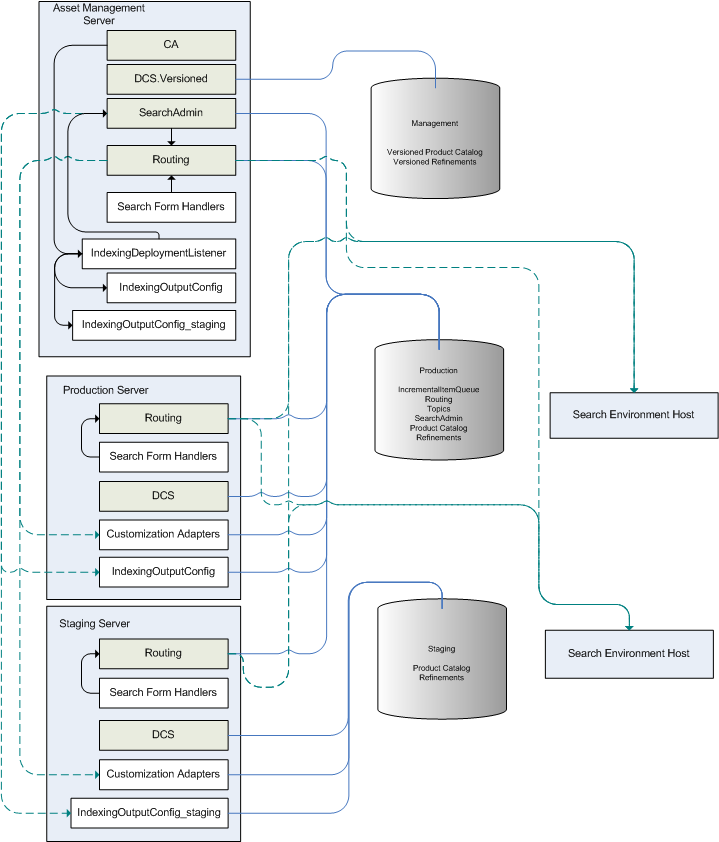
Architecture Diagram
This section provides a visual explanation of the pieces involved in a Commerce Search installation. For each server, the diagram shows key ATG modules and other components.
The diagram includes the following ATG databases, each of which includes data for several repositories:
Management—Versioned data for Content Administration and other non-catalog information.
Production—Catalog and other deployed asset information for your site. ATG recommends using the switching database feature described in the ATG Content Administration Programming Guide. If you use switching, the production database becomes in actuality three databases, two containing switched data and a third containing information that does not benefit from switching, such as user profiles and Search.
Staging—Duplicates that part of your production database that is necessary for staging and testing. In a Commerce Search installation, that includes at least your product catalog and refinements.
If you use ATG Customer Intelligence, you also have a data warehouse, not included in this diagram. See the ATG Customer Intelligence Installation and Configuration Guide for reporting information.
Servers, Products, and Databases for Commerce Search
Before You Begin
Before you begin installing Search with Commerce, CA, and Merchandising:
Make sure you have your database information at hand, and necessary drivers are installed.
Select a Search Deployment Share directory. See Configuring the DeployShare Directory in this guide.
Determine which server you want to designate as the lock manager. In this roadmap, the production server is used for this purpose. Any server can be used for lock management, or you can dedicate a server to the task.
Basic Installation Steps
This section covers the actual installation of the components and database configuration.
Install your application server on all machines that will be used for ATG instances. See the ATG Installation and Configuration Guide for information on configuring your application server for ATG products.
Note: If you are using standalone Search engines, those do not need to have an application server.
Download and install ATG products. Some applications will be included in more than one EAR file during deployment.
ATG platform; select all components when installing
The platform includes the
DAF.Search.Routingmodule, which will run on the production and staging servers using local routing (see the Recommended Search Architecture section).ATG Merchandising
ATG Search; select the Full Search Install option. Install the HTML and PDF components if needed (see Installing HTMLFilter and Installing PDF Extract in this guide).
If using standalone Search engines, see Adding Search Engines.
Create your asset management, staging, and production ATG servers. See the ATG Programming Guide for information.
Note: This step can be performed using CIM.
Configure database(s) and data sources for all applications.
Note: This step can be performed using CIM.
Note that the documentation referenced is extensive; review it carefully before proceeding.
ATG Platform. See Configuring Databases and Database Access in the ATG Installation and Configuration Guide. Note: If you are using the SOLID evaluation database, platform database tables are already loaded.
ATG Search. See Creating the Search Database Tables and Configuring Data Sources for Search in this guide.
ATG Commerce. See the Configuring and Populating a Production Database chapter of the ATG Commerce Programming Guide. This includes creating tables, importing data, and configuring data sources for both the publishing and target databases, and configuring a
SwitchingDataSourceif using.ATG Content Administration. See Setting up the ATG Content Administration Database in the ATG Content Administration Programming Guide.
ATG Merchandising. See Configuring a Purchased Content Administration Database in the ATG Merchandising User Guide.
Asset Management Server Configuration Steps
Configure the asset management server. This server runs Content Administration, Merchandising, and Search Administration.
Configure the
/atg/search/serviceproperties for the administration server. See Configuring SearchSQLRepository Components in this guide.Make sure that locking is enabled. The production server will be the
ServerLockManager. See Configuring the Lock Manager in this guide.Configure Commerce Components. See Configuring the IndexingOutputConfig Component and Configuring Customization Adapters for Search Merchandising in this guide, and also the ATG Commerce Search Guide.
Set up your asset management server. See the Setting Up an Asset Management Server chapter of the ATG Content Administration Programming Guide.
Staging and Production Server Configuration Steps
Configure the production and staging servers.
Create a client application. See the ATG Commerce Programming Guide.
Make sure that locking is enabled and that the production server is configured to be the
ServerLockManager. See Configuring the Lock Manager in this guide.Configure your Commerce client. See the ATG Commerce Search Guide.
Build and Deploy Applications
For information on building EAR files, see the Assembling Applications section in the Developing and Assembling Nucleus Applications chapter of the ATG Programming Guide. If using JBoss, you should also refer to the Using the startDynamoOnJBOSS Script section of the ATG Installation and Configuration Guide.
Note: These steps can be performed using CIM.
See Appendix E: ATG Modules in the ATG Programming Guide for a list of modules and their features.
Build and deploy the asset management server EAR file. Include the following modules:
DCS.Search.VersionedSearchAdmin.AdminUIDCS-UI.SearchPublishingDCS.UI.Management
Note: If you are going to run Search Administration as part of a standalone EAR, you must do the following:
Run the ATG Search installer and install a standalone Search engine on the machine to which you are going to deploy your EAR. See Adding Search Engines in this guide.
Add an
engineDirproperty to the/atg/search/routing/LaunchingServicecomponent, and set it to point to the new Search engine’s<Searchdir>\SearchEnginedirectory. For example:engineDir=c:\\ATG\\ATG9.3\\Search9.3\\SearchEngine
Build and deploy the production and staging server EAR files. Include the following modules:
DCS.SearchDCS.PublishingAgentDAF.Search.RoutingDafEar.Admin
Post-Deployment Configuration
The following tasks are performed in your running ATG applications.
Use Content Administration to create your deployment topology, and initialize your deployment targets by doing a full deployment. See the ATG Content Administration Programming Guide.
Note: If you are going to use Refinement Configurations (aka Facets), include the RefinementRepository in your repository mappings for your production and staging deployment targets.
After deploying your catalog from Content Administration to the production server, make sure the Product Catalog update and Catalog Maintenance services are run (this step is necessary in order to index your catalog). See the ATG Commerce Programming Guide.
Use the ATG Business Control Center to access ATG Search Administration. See Accessing Search Administration in this guide.
In Search Administration, create a Search project and add content and any customizations, such as languages and custom dictionaries. See the ATG Search Administration Guide. Use the following settings when you add the content:
Content Type—ATG Repository
IndexingOutputConfigPath—
/atg/commerce/search/ProductCatalogOutputConfigLocation—Remote
Set the Host Machine and Port as appropriate for the content location.
At this point, you can use the default environments to estimate the size of your index and evaluate whether you have dedicated sufficient resources for indexing and answer serving.
Note: A Search project bears no relationship to a Content Administration project. The Search project is a persistent item that defines the content you want to include in your index, what type of index you want to create and any customization data used during indexing. Search does not use workflows.
If using standalone Search engines, add those hosts to your Search environment. See the ATG Search Administration Guide. Search environments associate a project with the physical resources that project uses to index content and serve answers.
Index your catalog, using the “Full” indexing option.
Configure Merchandising as described in “Structuring the Search Configuration Tree” and the sections that follow in the ATG Merchandising User Guide.
Testing Your Installation
To test your installation, you can use the Search Query Console (see the Sample Application section of the ATG Commerce Search Guide) or Merchandising (see the ATG Merchandising User Guide). Use the following steps:
Deploy your content.
Index the content.
On your production site, make sure you get search results
Use Merchandising to change the catalog.
Deploy the changes.
Reindex the content.
Verify the change on your production site.
