 Prerequisites
This chapter provides overviews of pagelets, PeopleSoft portal architecture, pagelet development, and single signon and pagelets. This chapter also discusses how to:
Develop pagelets using PeopleSoft Pure Internet Architecture.
Develop pagelets using iScripts.
Develop pagelets using Java.
Develop contextual embeddable pagelets.
Administer pagelets in the portal registry.
PrerequisitesThis document provides a practical guide for technical users and programmers who develop pagelets (or portlets) for operation within a PeopleSoft portal. To take full advantage of the information covered in this document, we recommend that you have a basic understanding of the PeopleSoft Pure Internet Architecture and portal technology. Extensive information can be found in the PeopleBooks documentation. Many of the fundamental concepts related to the portal are discussed in the following PeopleSoft documents:
Enterprise PeopleTools 8.51 Hardware and Software Requirements
Enterprise PeopleTools 8.51 PeopleBook: System and Server Administration
Understanding PageletsThis section provides overviews of:
Pagelets.
Pagelet extensions.
Pagelet personalizations.
 Describing Pagelets
Pagelets are small pages that provide display-only snapshots of useful and relevant content from PeopleSoft or non-PeopleSoft applications, or websites. In other portal products, pagelets are sometimes referred to as portlets, gadgets, widgets, or modules.
Homepage pagelets are designed to appear on a portal homepage or WorkCenter operational dashboard homepages. They can be added to the homepage by way of the Personalize Content link that is in the upper left corner of the homepage. Homepage pagelets typically present general data and usually provide links to access more detailed information or a target transaction.
Template pagelets are small, narrow-format pagelets that are designed to appear in a template iframe, much like the Menu pagelet. Usually, you incorporate template pagelets into a portal template when you create and configure the template. You also use template pagelets when you configure the task panel of WorkCenter pages or context sensitive pagelets that use Context Manager. You should design template pagelets so that they display data that is related in some way to the target transaction.
Pagelets follow a basic set of rules so that they can be displayed properly on a PeopleSoft portal homepage or in the left iframe. Homepage pagelet size corresponds to the homepage layout specified by the user. A user can specify either a two-column layout of one narrow pagelet and one wide pagelet, or a three-column layout of three narrow pagelets. Template pagelets should use the narrow column format of a pagelet. Any pagelet that you design must conform to the dimensions of the narrow column and optionally, of the wide column. Column width is the only restriction on pagelet dimensions, although design principles suggest keeping pagelets as compact as possible.
The homepage pagelets that appear on the portal homepage depends on several factors, including the type of portal you implement, the permissions you grant to the user, and the manner in which the user customizes his homepage.
Simply put, PeopleSoft pagelets are URL-accessible HTML documents that are designed to be size-appropriate for display on a homepage. Pagelets can also originate from remote, non-PeopleSoft systems such as static HTML files or dynamically generated HTML from a variety of technologies.
Describing Pagelet Development
You can use PeopleTools to develop pagelets as smaller-than-normal pages, just as you would any other PeopleSoft transaction page. PeopleSoft portals are delivered with a suite of pagelets, primarily built using PeopleTools technology. However, you can also base the design of a pagelet on PeopleCode internet scripts (iScripts). Use iScripts only when you can't accomplish the same task with a PeopleSoft transaction page; for example, if you are developing a pagelet that uses external content (content that does not originate in a PeopleSoft application). You can also create pagelets using other leading web-enabling technology such as JavaServer pages (JSP), Java servlets, Microsoft Active Server Pages (ASP), Perl scripts, and common gateway interface (CGI) programs.
A well-designed and well-developed pagelet serves these primary functions:
Summarizes data that is relevant, personalized, and actionable. Page space is valuable; pagelets must be more than attractive.
Provide links to more detailed information, such as content in another application.
In addition, pagelets should also:
Aggregate data from multiple sources.
Be simple and intuitive.
Be sized appropriately.
The size of pagelets corresponds to the homepage layout that a user chooses. Any pagelet you design must first conform to the dimensions of the narrow column and optionally, of the wide column. Pagelet width is the only dimension to which you must adhere. The height of pagelets can vary, however, good design principles suggest keeping them as short as possible.
Avoid the use of scrollable grids.
Grids that you insert on pagelets are non-scrollable by default. If the grid appears on a pagelet and on a standard transaction page, Oracle recommends that you use the non-scrollable grid to insure consistent user experiences
Pagelet Header Icons
The icons that you see in the pagelet header function similarly across most pagelet types. You do not have to use all header icons on all pagelets. You can vary the icons that appear in the header based on business rules or technical constraints.
This table lists and describes the icons that you can use in pagelet headers.
|
|
Click to personalize the pagelet. When you click this icon, a page appears so that you can change any pagelet settings that you are allowed to configure. The options that the user can personalize vary among users and pagelets; and not all pagelets have options that you customize. |
|
|
Click to hide the body of the pagelet so that only the header is visible. When you click this icon, in its place you will see the Show icon. |
|
|
Click to show the content of the pagelet so that more than just the pagelet header is visible. When you click this icon, in its place you will see the Hide icon. |
|
|
Click to force an application server trip so that the pagelet data and settings are current. |
|
|
Click to remove the pagelet from the page. You will be prompted to confirm the action and must |
Pagelet Example
The Tasks pagelet demonstrates many characteristics of a well-designed pagelet. In addition, notice the pagelet header icons:
Describing Pagelet Extensions
Some pagelets utilize pagelet extensions, which are the supporting or supplementary components for a pagelet. They are not displayed on your homepage; you access pagelet extensions by associating them to links and buttons on pagelets. Pagelet extensions are optional. They are a means of providing additional information or editing capability that is too cumbersome to display on the pagelet.
You could configure a homepage pagelet so that each item is a link to the worklist item in another database, or to the personal task defined in the portal, or to a variety of resources.
The Tasks pagelet is a homepage pagelet that is designed to display a short list of relevant tasks. If there were dozens of open tasks, which is likely over time, the pagelet would grow to be too long and possibly crowd out relevant, actionable data on other pagelets. The Tasks pagelet is configured with active links and buttons that access pagelet extensions, which enhance the functionality of the pagelet.
Here you see two extension pages that you access from the Tasks pagelet:
The Task Details page.
Click a task name link to access the Task Details page, which you use to view or modify personal task information. The Task Details page enhances the pagelet by showing more detail and providing the user with the option to perform further actions, such as attaching a file or deleting the task.
The Tasks page.
Click the Show All/Enhanced... link to access the Tasks page, which provides the user with more options such as displaying all or certain types of tasks. Because it is a standard page, the extension page can use a grid to retrieve and display a longer list of tasks. In addition, the extension page is also better suited to display more details as it is wider than the pagelet and can show more columns.
Describing Pagelet PersonalizationsLike homepages, pagelets can be personalized in different ways. The data displayed can be automatically filtered to show only data relevant to a particular user. The user can also explicitly personalize the data shown by setting options on a personalization page.
Personalization pages are another type of pagelet extension. However, personalization page pagelet extensions are different from previously discussed pagelet extensions in the following ways:
They are not accessed by clicking a button or link on the pagelet. Instead, clicking the Customize icon on the pagelet header takes you to a personalization page where you can define user options specific to that pagelet.
Setting values on the personalization page will change the way data appears on the pagelet for that particular user. Detail pages usually display data in read-only mode or allow you to change application data.
Note. Any text that the pagelet designer entered during Step 3 in Pagelet Wizard appear as personalization instructions on the Personalize page.
The Personalize Tasks personalization page for the Tasks pagelet can be used to change the type and number of tasks shown on the pagelet. Clicking Save stores these values and returns you to the homepage. The Tasks pagelet now reflects these changes.
Understanding PeopleSoft Portal ArchitectureThis section provides overviews of:
PeopleSoft portal architecture.
Client access.
The web server.
The application server.
The database server.
The portal registry.
Portal components.
Page assembly.
Describing PeopleSoft Portal ArchitectureWhen developing pagelets, it is important to understand the overall architecture of the PeopleSoft portal, as well as the PeopleSoft Pure Internet Architecture. This will enable you to integrate your pagelets in the most efficient manner.
The PeopleSoft Pure Internet Architecture is the server-centric execution architecture used to deploy PeopleSoft internet applications to end users who access the applications through a web browser. This next generation architecture leverages a number of internet technologies and concepts to deliver simple, ubiquitous access to PeopleSoft applications and enable the open flow of information between systems.
Using PeopleSoft Pure Internet Architecture as the foundation, you are able to provide a wide range of end users with access to PeopleSoft applications over the web, as well as more easily integrate your PeopleSoft applications with existing internal systems and external trading partner systems.
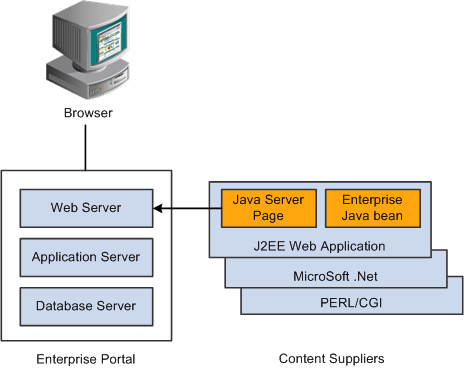
This diagram highlights the primary portal components of the PeopleSoft Pure Internet Architecture.
Web browser.
Web server.
Application server.
Database server.
Warning! Always refer to the Enterprise PeopleTools Hardware and Software Requirements Guide for supported configurations. Versions and products supported can change frequently.
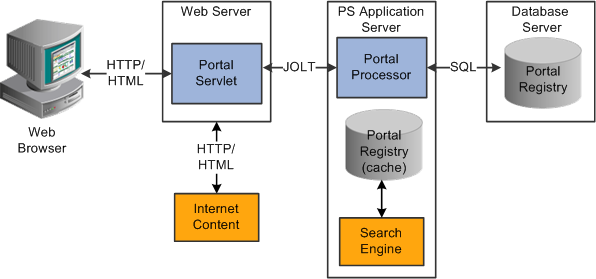
Primary PeopleSoft Pure Internet Architecture portal components
Describing Client AccessPeopleSoft Pure Internet Architecture is a completely server-based architecture. Clients to this architecture can be nearly any kind of internet access device:
Web browser running on supported operating system.
Wireless device or cell phone.
External or third-party system with extensible markup language (XML)/hypertext transfer protocol (HTTP) protocols.
There are no PeopleSoft executables on the client, thus the client can be any internet device that uses standard internet technologies such as HTTP, hypertext markup language (HTML), and XML to communicate with the PeopleSoft internet application server.
A web browser running on a PC is the most common internet client. The PeopleSoft internet application server simply serves HTML and JavaScript to the web browser and the end user navigates through the PeopleSoft application as if they are navigating any other website.
A key concept of PeopleSoft Pure Internet Architecture is that there is no complex client software installation. The internet client device accessing the internet architecture already has all of the software and configuration it needs. No additional software must be installed on the client for interaction with PeopleSoft applications. For example, no Java applets, Windows .DLLs, or browser plug-ins are needed.
Describing the Web ServerThe web server acts as the front end of PeopleSoft Pure Internet Architecture. When a client connects to the server by way of a URL, the system displays a signon screen sent to the browser in HTML. The web server manages communication with the browser.
The following web servers products can be configured to deploy your PeopleSoft applications:
Oracle WebLogic server.
IBM WebSphere server.
There are two key PeopleSoft servlets running on the web server – the presentation relay servlet and portal servlet.
Presentation Relay Servlet
The presentation relay servlet is used to process all inbound and outbound HTTP requests for PeopleSoft transactions and queries. This very thin servlet acts as a relay between the client device and the core back-end services on the application server. It receives and serves HTML, XML, and wireless markup language (WML) requests over HTTP.
Portal Servlet
The portal servlet is a Java servlet that runs on the portal web server. It intercepts user requests for HTML pages, retrieves the requested page, wraps additional content around it, and then sends the resulting page to the user's browser. The servlet acts like an invisible browser that sits between the user's browser and requested content.
The portal servlet:
Provides a consistent user interface.
The portal servlet checks properties associated with each content reference, including the name of a portal template. When a user accesses content through the portal, the portal servlet wraps the target page with the portal template specified in the content reference. This template provides a consistent user interface.
Ensures that PeopleSoft-specific tags are processed correctly.
Developers create portal pages using a template-based layout system. In addition to traditional HTML tags, templates can contain PeopleSoft-specific tags that a normal browser cannot interpret. At runtime, the portal servlet can interpret these PeopleSoft-specific tags when constructing templates, as well as any other HTML content. The portal servlet then sends the resulting page to a browser as a single HTML document.
One of the most important aspects of portal technology is its role in integrating content from a wide variety of data sources and displaying that content on a single page in a coherent, understandable, and presentable way. We refer to this complex process as “page assembly and proxying.” Portal processing assembles the page to be displayed based on the content retrieved from various data sources. It uses portal templates to wrap the contents of the assembled document into a single page that fits into the context of the site.
For page-based templates, the portal servlet assembles pages for the browser.
It ensures that all URL references in the HTML on the assembled page are references back to the portal servlet itself. In some cases, each URL in the HTML document assembled by the portal servlet must be rewritten to reference the portal servlet, not the originally requested URL. This process of redirecting URLs so that they point to the portal servlet is called proxying.
For frame-based templates, the portal server updates the “src” tags in the frameset with the target content and sends it to the browser.
When working with a frame-based template, the portal servlet inserts a URL into each frame in the “src” tag and sends it to the browser, rather than retrieving documents for the browser as it does with page-based templates.
Describing the Application ServerThe application server is the core of PeopleSoft Pure Internet Architecture; it executes business logic and issues SQL to the database server. The application processing logic that ran on the client in previous releases now runs on the application server. The application server consists of numerous PeopleSoft services and server processes that handle transaction requests. These include requests to:
Authenticate users.
Build application pages.
Save application pages.
Run some PeopleCode.
Execute SQL (prompts, page-specific SQL, validations, and so forth).
The application server is responsible for maintaining the SQL connection to the database for the browser requests and the Windows development environment. PeopleSoft uses Tuxedo to manage database transactions and Jolt, Tuxedo's counterpart, to facilitate transaction requests issued from the internet. Both Tuxedo and Jolt are products of Oracle Systems.
The Portal Processor executes as an application service of the PeopleSoft application server. It executes with the other application services, like the Component Processor, Security Manager, and SQL Access Manager. Portal Processor tasks include:
Fetching content templates from the database.
Fetching content references from the database portal registry and caching them in the application server portal registry.
Processing personalizations.
Interacting with other application services (lightweight directory access protocol (LDAP), role-based security, and so forth).
Describing the Database ServerThe PeopleSoft database is the repository for all information managed by PeopleSoft applications. Not only is application data stored in the database, but PeopleSoft metadata is also maintained in the database. PeopleSoft Application Designer enables you to define and maintain this metadata that the system uses to drive the run-time architecture. The application server executes business logic based on the PeopleSoft metadata.
At execution time, the application server fetches the most recent application object definitions from the metadata repository, compiles and caches the application object into memory, and executes the business rules based on the definition.
Note. In general, PeopleSoft Enterprise Portal 9.x can retrieve content from any RDBMS-based application as long as the content that is being retrieved is URL-accessible and is HTML-based. Always refer to the Enterprise PeopleTools Hardware and Software Guide for your release and the Supported Platforms database on Customer Connection for supported RDBMS products.
Describing the Portal RegistryThe portal registry is a key administrative component within the metadata of a PeopleSoft database. A portal registry is a hierarchical structure in which URLs accessed by way of the portal are organized, classified, and registered. Each portal registry consists of the following objects:
Folders.
Folders group and organize content references into a hierarchy. With the exception of the root folder, each folder has a parent folder. Each folder can contain content references as well as other folders.
Every portal registry contains a root folder and a Portal Objects folder. The Portal Objects folder contains administrative objects specific to the portal and includes the following folders: Templates, Pagelets, and Homepage.
In addition to these standard folders, there are typically several folders located directly under the root folder: one folder for PeopleTools (administrative references) and other main folders for each PeopleSoft application. These main application folders contain the folders and content references associated with each PeopleSoft application you've licensed.
Content references.
Content references are URLs that have been registered in a portal registry. They can be PeopleSoft application pages or external web pages. Content references fall into four main categories: pagelets, target content, templates, and homepage tabs.
In addition to specifying a URL, each content reference includes additional information such as its creator, effective dates, associated template, search keywords, and so forth. Registry URLs can point to any website that responds to HTTP requests with an HTML response – in other words, a static or dynamic web page.
For example, a content reference could be a URL pointing to a page in a PeopleSoft application. Or a content reference could point to static HTML pages on an intranet site, such as a procurement or expense policy document, or dynamic pages created by an analytic or reporting system. Access to content references is controlled by security permission lists assigned to each content reference. Any portal content can be limited to a specified group of users, or made public and available to any authorized portal users.
Nodes.
Nodes refer to a source of HTML content. They primarily identify the universal resource indicator (URI). A URI is a subset of the URL that points to the location of the resource. It does not include the content information, such as the target file or application and any parameters passed to that resource.
The portal registry's hierarchical structure enables a portal administrator to more easily create a classification and navigation system in which content references can be registered and managed for all portal users. PeopleSoft provides a Portal Administration web page for this purpose. Additionally, the portal includes a registry application programming interface (API) for maintaining the portal registry from PeopleCode.
To improve performance, a copy of the registry is also stored on the application server in cache files. This is how the portal servlet accesses the registry at runtime.
Describing Portal ComponentsThe portal technology framework includes the following services:
Personalization.
Pagelets can optionally be assigned a user personalization settings page. This allows the user of the pagelet to specify selections, settings, or attributes specific to the pagelet’s content. These personalizations commonly alter the content of the pagelet. An example of this would be setting the city for which a weather pagelet displays forecast information. A personalization page is accessible to the user by clicking on the Customization button on the pagelet’s frame header.
Search.
The portal uses a search engine to quickly search for registered content in the portal registry. This is a popular means of portal navigation. Verity, the industry leading search engine, is packaged with the portal technology. PeopleSoft’s search capabilities were built to assume multi-language support, including double-byte languages.
Navigation.
PeopleTools portal technology provides a set of navigation components based on the portal registry. These components are the drop-down menu and Favorites. Navigation has been engineered to provide rapid access to complex information based upon the role of the user.
Menu navigation.
PeopleTools portal menu navigation provides a consistent method of content access, categorization, and organization. The menu navigation presents a dynamic hierarchy-based view of the folders and references within the portal registry. Menu navigation is available through the Menu pagelet or from the Main Menu drop-down navigation depending on your portal settings.
Favorites.
The PeopleTools portal includes a My Favorites folder that you use to store frequently accessed pages. In the Menu pagelet, this folder is at the root level. In drop-down navigation, My Favorites appears under the Favorites drop-down menu .
Recently Used.
The PeopleTools portal drop-down menus include a Recently Used list that includes up to five of your most recently accessed components. This list appears under the Favorites drop-down menu.
See Also
Managing General Portal Settings
Describing Page AssemblyNow that we have looked at the individual components of PeopleSoft Pure Internet Architecture, let’s take a look at the big picture.
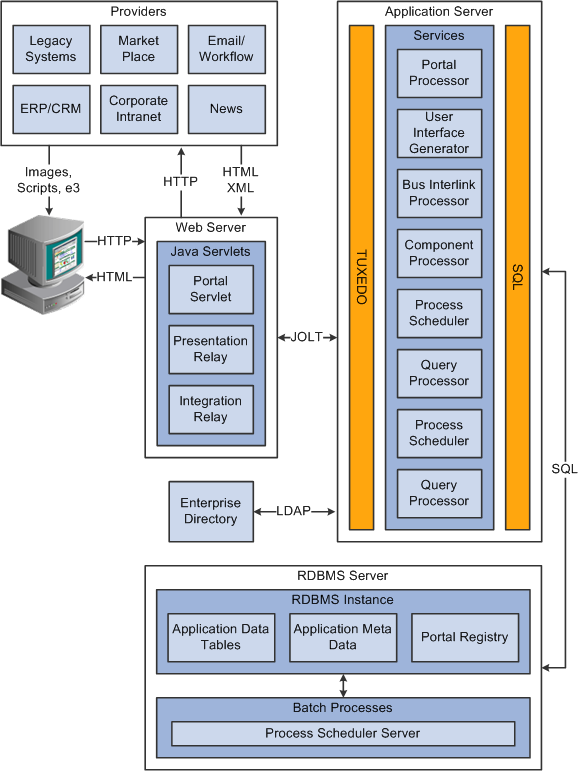
PeopleSoft Pure Internet Architecture processing flow
An HTTP request is sent from the user's browser to the portal’s web server, which invokes the portal servlet. Let's say that the browser is requesting a PeopleSoft application page.
The portal servlet makes a request to the Portal Processor to fetch the content reference for the hyperlink selected by the user. The Portal Processor fetches the content reference from the portal registry and passes a partially completed HTML document back to the portal servlet.
The content reference could be pointing to any or several of the content providers (specified by a node). Each content reference is referenced in a partially completed HTML document. The portal servlet issues the HTTP request to the appropriate web server and retrieves the HTML document.
The portal servlet then completes the page assembly process with the template, merging the content from the HTML document, and then serves the completed page back to the user’s web browser.
Understanding Pagelet DevelopmentThis section provides overviews of:
Pagelet development guidelines.
Pagelet development considerations.
Pagelet development options.
Size considerations.
HTML design considerations.
Branding considerations.
Describing Pagelet Development GuidelinesFollow these guidelines when developing new pagelets:
Adhere to object naming standards.
The pagelet must display without requiring any search interaction. Do not use search keys or default search key values. You can accomplish this in one of two ways:
Assign a search record to the component with no keys. Therefore there is only one row of data.
Add SearchInit PeopleCode that would put in default key values and call the function SetSearchDialogBehavior() to bypass the search interaction.
Note. If the user ID is needed for the pagelet, or template pagelet, then an alternative such as OPERID_VW can be used.
Use the Unlimited Occurs option in all grids and scroll areas.
Control the number of retrieved rows with the PeopleCode function StopFetching() in the RowSelect event of the selected record. Match the StopFetching() function when the user-specified or default value of the maximum displayed number of rows is reached. Pagelets should display no more than five rows by default.
Use deferred processing.
FieldChange/Prompts/FieldEdits other than button or link page transfers are not allowed for pagelets. These types of processing require trips to the application server, which causes the portal to redisplay any pagelet as a target page (wrapped in the default template). Therefore, such processing would result in the pagelet being displayed outside the context of the homepage. To work around this limitation you need to disable two options:
Deselect the Cache Generated HTML check box in the On the Browser group box of the Web Profile Configuration - Caching page. PeopleSoft page caching is enabled by default.
See On the Browser.
Deselect the Cache Target Content check box in the on the Web Server group box of the Web Profile Configuration - Caching page.
See On the Web Server.
Do not provide any filter, sort, or refresh buttons as they also require trips to the application server.
Because the portal servlet only performs page assembly and proxying on blocks of HTML, a pagelet must be:
URL-accessible.
The portal servlet will issue an HTTP request to the registered URL.
HTML 4.0 compliant.
The HTML returned will be combined with that from other pagelets to form the entire web page.
Sized appropriately.
The pagelet's width should conform to the narrow or wide guidelines discussed in the Sizing section in this document.
JavaScript namespacing.
If you write custom JavaScript code, ensure that JavaScript from multiple portlets can coexist on the same page. There is only one namespace that is shared by all portlets on a portal page. For example, if portletA and portletB, both use the GETURL function, there will be only one definition for GETURL defined by the most recently processed portlet. If you need a different GETURL function for each portlet, then you must uniquely name the GETURL function for each portlet. As in, portletA calls GETURL1 and portletB calls GETURL2. If the same GETURL function is called by both portlets, then you don't need to rename GETURL as the most recent definition of GETURL will be used by both functions.
Pages created by way of PeopleSoft Pure Internet Architecture conform to these requirements. However, these requirements are not exclusive to PeopleSoft. As mentioned, pagelets can also be from remote, non-PeopleSoft systems, such as static HTML files or dynamically generated HTML from a variety of technologies such as JavaServer Pages (JSPs), Java Servlets, Microsoft Active Server Pages (ASPs), Perl scripts, and CGI programs.
Describing Pagelet Development ConsiderationsWhen developing pagelets, you should also take the following topics into consideration.
Single Signon
PeopleSoft delivers a component interface named PRTL_SS_CI that enables external applications to support a single signon solution with PeopleSoft portal applications. This allows users to sign on once when entering the portal and not have additional signons for each system that is referenced in your portal.
See Understanding Single Signon and Pagelets.
Layout
Use the following rules for layouts:
Avoid horizontal scrolling.
Do not use page titles.
The name of the content reference in the portal registry is used as the default for the pagelet's title.
Pagelet instructions should not be necessary.
Avoid group boxes whenever possible.
Note. They may be necessary to separate sections.
Left-align text wherever possible.
Clear the Show Borders option for group boxes and scroll areas.
Select View, Internet Options in the PeopleSoft Application Designer to ensure that you have access to all the styles available.
Leave more than 20 percent spacing between field labels and field edit boxes because the rendered styles are larger in the browser than they appear in PeopleSoft Application Designer.
Before bringing your pagelet into the portal, view it in PeopleSoft Application Designer. Select Layout, View in Browser.
Look and Feel
The appearance of objects on pagelets, such as text, links, tables, and so forth, should be modified using the PeopleSoft style classes to retain a consistent look and feel between your pagelet and the rest of the portal. PeopleSoft utilizes Cascading Style Sheets (CSS). Style sheets are useful because they enable developers to change page attributes across multiple pages quickly and easily.
Each style sheet is composed of individual classes, which affect the formatting of each page. Classes control a broad range of characteristics, including font size, spacing, alignment, border width, weight, and color.
When creating the page, select the Use Default Style Sheet option. For any controls on the page select the Use Default Style option.
All style sheets used in each pagelet on the page are referenced on the final page that is assembled by the portal. Therefore, a pagelet should not redefine any class that might be shared by other pagelets on the assembled page. If a class needs to be changed, define a new one.
The order of precedence for style sheets is:
Template.
Target component.
Pagelets - in the order that they are assigned.
Note. In the same way that PeopleTools supports subrecords to enable shared definitions between records, you can define sub style sheets to share a common set of classes. A sub style sheet has all of the properties of a style sheet.
Style sheet definitions are stored in the database. They are accessed and modified using PeopleSoft Application Designer. The default style sheet used by PeopleTools depends on the your application release, but is either PSSTYLEDEF or PSSTYLEDEF_SWAN. The PeopleSoft Enterprise Portal uses a PSSTYLEDEF or PSSTYLEDEF_SWAN derivative.
You can determine which style sheet is being used by navigating to PeopleTools, Utilities, Administration, PeopleTools Options. The value in the Style Sheet Name field designates the style sheet used by the database.
There are two ways in which you can see the style classes defined in a style sheet. If you have access to PeopleSoft Application Designer, you can open the designated style sheet and view its definitions in a graphical interface.
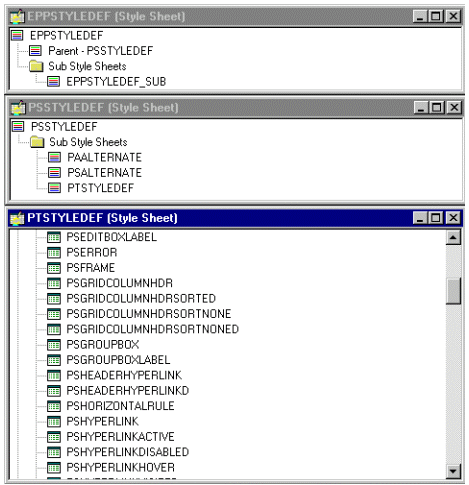
Style sheet definitions
Double-click on any style class to be able to view and modify its definition.
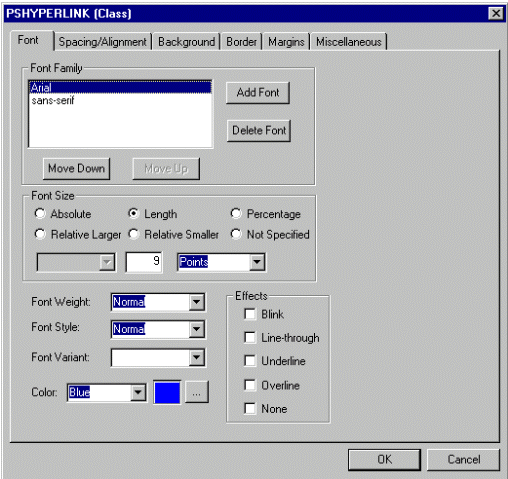
Style class definition
If you don't have access to PeopleSoft Application Designer and want to see the CSS file, you can access the file cached for the CSS on the web server. For example, on WebLogic you'll find the file in this directory:
....\peoplesoft\applications\PORTAL\<sitename>\cache.
The file is generally named PSSTYLEDEF_1.css or PSSTYLEDEF_SWAN_1; however it may have a slightly different name. For example, it might have a different numbered suffix.
Some of the most common styles used by pagelets include:
PSTEXT
General text label.
PAADDITIONALINSTRUCTIONS
Instructional text.
PABOLDTEXT or PABOLDBLUETEXT
Commonly used for group and category titles.
PSPSMALLTEXT
Commonly used for footers and branding (credits).
PSPAGE
Commonly used for background colors.
PSLEVEL1GRIDODDROW
Shaded row, which is typically light gray or light blue.
PSLEVEL1GRIDEVENROW
Lighter-colored row, which is typically white.
PSCHECKBOX
PSDROPDOWNLIST
PSEDITBOX
PSGROUPBOX
Commonly used to create groupings or dividers.
PSHYPERLINK
PSPUSHBUTTON
PSRADIOBUTTON
Following are some examples of the ways in which these styles are used in HTML and translated into elements in the PeopleSoft Pure Internet Architecture interface:
This HTML generates the following interface:
<table border='0' cellpadding='0' cellspacing='0' cols='1'⇒
 CLASS='PSGROUPBOX' style="border-style:none;" width='639'>
<tr><td class='PSGROUPBOXLABEL' align='LEFT'>Language Settings</td></tr>

...

<td colspan='2'  valign='top' align='LEFT'>
<label for='PSOPTIONS_LANGUAGE_CD' class='PSDROPDOWNLABEL'⇒
 >Language Code:</label>
</td>
<td  valign='top' align='LEFT'>
<span class='PSDROPDOWNLIST' >English</span>
</td>

...

<input type='check box' name='PSOPTIONS_TRANS_CHG_LASTUPD'⇒
 id='PSOPTIONS_TRANS_CHG_LASTUPD' tabindex='14' value="Y" />
<label for='PSOPTIONS_TRANS_CHG_LASTUPD' class='PSCHECKBOX'⇒
 >Translations Change Last Update</label>

Language Settings on the PeopleTools Options page
This HTML generates the following interface:
<input type='text' name='PSOPTIONS_TEMPTBLINSTANCES'⇒
 id='PSOPTIONS_TEMPTBLINSTANCES' tabindex='28' value="" ⇒
class='PSEDITBOX' style="width:23px; text-align:RIGHT;⇒
 " maxlength='2'  />
<label for='PSOPTIONS_TEMPTBLINSTANCES' class='PSEDITBOXLABEL'⇒
 >Temp Table Instances (Total):</label>
![]()
Style Sheet Name field on the PeopleTools Options page
This HTML generates the following interface:
<tr align="left" class="PSLEVEL1GRIDODDROW">
<td>3</td>
<td>Enterprise Menu</td>
</tr>
<tr align="left" class="PSLEVEL1GRIDEVENROW">
<td>2</td>
<td>My Stock Chart</td>
</tr>
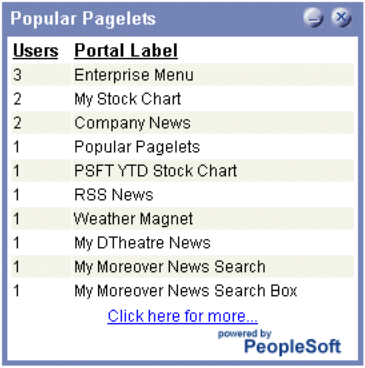
Popular Pagelets pagelet
Links and URLs
When processing page-based templates, the portal servlet uses a process called proxying to help ensure that users always stay within the context of the portal and that familiar portal features such as the universal navigation header do not disappear when a user clicks a link.
When a user logs in to a PeopleSoft portal, they log in to a web server on which the portal servlet is running. The portal servlet processes all HTML that isn’t in the simple URL format, converting all URL references to point to the portal web server rather than the original URL. The original URL is still necessary to retrieve the requested content; it is stored in the new URL in the URL query string parameter. The portal servlet proxies all links and all form actions in this manner.
For example, imagine that a user requests a page from an external website through a proxied link in the portal. The request arrives at the portal web server, invoking the portal servlet. The portal servlet then programmatically retrieves the page from the web server associated with the requested page. It proxies all the links on the retrieved response and sends the page (the contents of the HTTP response) back to the browser, formatted as the user would expect within the portal.
Note. If URLs are included in your HTML, you must use absolute URLs as opposed to relative URLS.
When a URL is invoked on a target page, as opposed to the homepage, the content associated with the URL is rendered within the target frame. The PeopleSoft Enterprise Portal and header and left-hand area will remain. Therefore, proxying isn’t required to have the new content rendered in the context of the PeopleSoft Enterprise Portal.
Performance
Homepages are cached on each user’s browser. The browser does not access the web server after the homepage is initially retrieved. You can turn this feature on or off, and also adjust the time interval before the web server is accessed again to get a fresh homepage. In any case, if a user clicks the browser Refresh button, the homepage is accessed from the web server again, overwriting the homepage cached on the browser.
The following PeopleCode function is used to trigger a refresh of the homepage:
FUNCLIB_PORTAL.TEMPLATE_FUNC.FieldFormula.ForceRefreshHomePage().
Additionally, the following configuration properties are associated with homepage caching. Any changes to these settings are applied to all users signing on to the web server.
PortalCacheHomepageOnBrowser=<True or False>
If set to True, the homepage is cached on the browser. If set to False, the homepage is not cached on the browser.
PortalHomepageStaleInterval=<seconds until stale>
A homepage cached on the browser is considered stale after the specified number of seconds. The next time a user accesses the homepage by clicking on a link, the web server is accessed and the homepage is refreshed on the browser.
Because different browser versions do not process HTML in exactly the same way, the browserprops.xml file on the web server on which the portal servlet is installed enables you to turn off homepage caching for selected browser versions.
This can be useful if you have one or two supported browsers and want to disable cache for non-standard browsers that could pose an administration problem. Follow the instructions in the file to disable caching for certain browser types.
As with homepages, navigation pages are cached on each user’s browser. You can set options for navigation caching by using the Time page held in cache (METAXP) option.
Set the Time page held in cache option navigating to My Personalizations and clicking the Personalize Option button for the General Options personalization category. Note that this option is set in minutes, not seconds. A change to this option is picked up by the application server immediately. However, since the users' browsers already have cache control set by the previous value of the option, you have to delete the browser cache for the new Time page held in cache value to take effect.
PeopleSoft provides the option to prevent the system from caching PeopleSoft pages to the browser. You control browser caching using the EnableBrowserCache property in the configuration.properties file.
Being able to control browser caching is useful for situations where PeopleSoft applications are deployed to kiosk workstations where multiple users access the applications. Enabling you to prevent caching means that users can't click the Back button to view another individual's transaction or view any other sensitive data.
The side effect of turning off caching completely is degraded performance. For each new page, the system must access the database. However, PeopleTools offers a compromise related to browser caching in the form of the Time page held in cache (METAXP) option discussed earlier.
You can turn on browser caching for the navigation pages that remain relatively static. This option applies to PeopleSoft Pure Internet Architecture navigation pages, portal homepages, and navigation pages. Use it to take advantage of the performance gains of caching while limiting the amount of time that navigation pages—the menu pages—remain in cache.
The Time page held in cache option is set to 20 by default. To disable this option, enter 0 in the Override Value edit box. The minimum value in minutes for this option is 0 (disabled) and the maximum value is 525600, which is one year.
If the Time page held in cache option is set to 20, and if you assume that the time is 7 p.m. on February 24, then the header information in the HTML is dated as follows:
Sun 24 Feb 2004 07:20:00 PM
This header information indicates that in 20 minutes the system needs to check for a new page. This reduces the performance degradation when there is no caching at all.
By default the EnableBrowserCache property is set to True.
If the EnableBrowserCache property is set to False:
The system never caches pages. When a user clicks the browser Back button, she receives a Data Missing message in Netscape and a Page Expired message in Internet Explorer.
The setting overrides any date/time header settings.
The following table helps illustrate the way in which the EnableBrowserCache option works with the METAXP option.
|
EnableBrowserCache |
METAXP |
Caching Behavior |
|
True |
0 |
No caching due to the 0 value in METAXP. |
|
True |
> 1 |
Pages are cached with expiration values set in Greenwich Mean Time (GMT) based on the Time page held in cache value (METAXP). |
|
False |
0 |
No caching. |
|
False |
>1 |
No caching. The EnableBrowserCache option setting overrides the Time page held in cache value (METAXP). |
Multi-Language Support
PeopleSoft currently supports the following 33 languages:
American English.
Arabic.
Bulgarian.
Canadian French.
Chinese (Simplified).
Chinese (Traditional).
Croatian.
Czech.
Danish.
Dutch.
Finnish.
French.
German.
Greek.
Hebrew.
Hungarian.
Italian.
Japanese.
Korean.
Malay.
Norwegian.
Polish.
Portuguese.
Romanian.
Russian.
Serbian.
Slovak.
Slovenian.
Spanish.
Swedish.
Thai.
Turkish
UK English
Pagelet Wizard can access the PeopleSoft run-time environment to determine details of a user’s profile, such as their language. For more information on how you can use this Pagelet Wizard feature to facilitate passing run-time parameters, such as language, see Pagelet Wizard documentation in this PeopleBook.
See Using Pagelet Wizard.
In addition, Java classes delivered with PeopleTools enable you to call PeopleCode from your Java program and access contextual information from the run-time system. If needed, language can be retrieved through a PeopleCode function that is accessible from Java. Further information about this can be found in this document.
See Developing Pagelets Using Java.
Describing Pagelet Development OptionsThere are several ways to create a pagelet. Ultimately, the portal servlet assembles HTML, so the key is determining how to generate the HTML. Some methods leverage PeopleTools, while other options allow pagelet creation without PeopleTools.
One set of options is to develop pagelets with PeopleTools. This is the most straightforward approach if you are dealing solely with data from PeopleSoft applications. The two types of PeopleTools-based pagelets are:
PeopleSoft Pure Internet Architecture pages.
PeopleTools dynamically generates the appropriate HTML to render the page data based on the definitions created within PeopleSoft Application Designer. This is the most straightforward approach when the data being rendered is in a PeopleSoft application database.
iScripts.
You can write a PeopleCode function that renders HTML using %Request and %Response objects, which are similar to ASP or JSP programs. This allows more control over data retrieved and allows you to conditionally render HTML. This approach gives you maximum flexibility, but unlike the PeopleSoft Pure Internet Architecture page approach, you must code for things such as multi-language and browser support.
The focus of this document is a set of options that can be used to create a pagelet application with one of the many technologies that generate HTML. This may be the approach you take if you’re integrating a non-PeopleSoft system with the PeopleSoft Enterprise Portal. For example, you’re applying business logic to data from a non-PeopleSoft system, or you might be combining data from a PeopleSoft application with other systems.
The pagelet can be written in a variety of technologies, including:
Adobe ColdFusion.
AJAX.
ASP.
CGI.
HTML.
Internet server API (ISAPI).
JavaScript.
JSP.
Perl.
Servlets.
Tool Command Language (Tcl).
Developing in a PeopleSoft environment with non-PeopleTools technologies
There are two methods you can use to turn your own HTML into a pagelet:
Pagelet Wizard.
Pagelet Wizard walks you through a series of steps involved in creating and publishing a pagelet. Portal administrators and non-technical users are able to integrate and transform data from a wide variety of data sources, both internal and external to PeopleSoft applications.
External sources include web applications that can be referenced with a URL, HTML block (such as a form or table), and Java classes. You do not have to have PeopleSoft-specific application development tools or skills to be able to create pagelets.
Registered URL.
You can also choose to register a URL, like a JSP or ASP, directly in the portal registry.
Describing Size ConsiderationsAs mentioned, the portal homepage is delivered to display two possible column widths: narrow and wide.
Narrow pagelets are designed to be 240 pixels wide. Subtracting the border and the internal margin leaves 218 pixels for the content. A narrow pagelet appears in a column that is one-third the width of the portal's homepage. Because the pagelet is narrow, you should provide a succinct list of values that users can quickly traverse. Select the minimum pieces of data that best encapsulate the pagelet’s content. A narrow pagelet typically accommodates a single 30-character field. Generally, all pagelets should be developed with the narrow column size as the default.
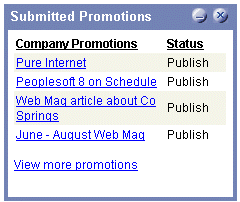
Example of a narrow pagelet
Wide pagelets are designed to span two-thirds of the width of the homepage. Although you can fit more data on the pagelet, the data must remain meaningful. Subtracting the border and the internal margin leaves 468 pixels for the content. A query string parameter is passed denoting the wide version. If the pagelet does not check nor use this parameter, the narrow pagelet will just be rendered in a wider area. Developing a wide version of a pagelet is optional.
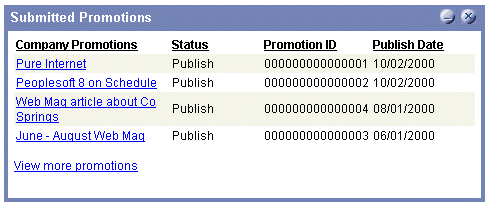
Example of a wide pagelet
The homepage layout can vary based on end-user personalizations. An end user can decide to have a two- or three-column homepage layout. With three-column layout, all pagelets are rendered as narrow pagelets. With two-column layout, the first column allows spacing for a narrow pagelet and the second column allows spacing for wide pagelets.
A pagelet that has been designed to fit in a narrow column can be rendered in a wide column as well. However, there may be user interface issues when a pagelet that has been designed to render in a wide column only, is rendered in a narrow column. Therefore, a pagelet should always be able to operate in a narrow format. Optionally, a pagelet can be designed to take advantage of the additional space when it is rendered in a wide column.
The query string parameter PORTALPARAM_COMPWIDTH can contain the values Wide or Narrow and can be used to determine whether a pagelet is being rendered in a narrow or wide column.
Here’s an example of some code that references the query string parameter PORTALPARAM_COMPWIDTH:
Component string &CompWidth;

&CompWidth = %Request.GetParameter("PORTALPARAM_COMPWIDTH");
If &CompWidth = "Wide" Then;
TransferPage(Page.EO_PE_CONTRK_PGLTW);
End-If;
Pagelet Extensions
Pagelet extensions are just regular web pages. They can be registered with a template that allows it to use the entire width of the browser with no left-hand frame for navigation, or with a template that includes a left-hand frame.
In the former case, there are no inherent sizing requirements. PeopleSoft pages are designed for browsers running with a resolution of least 800x600. Therefore, when a left-hand frame is not included, a pagelet extension should not be wider than 760 pixels, accounting for borders and so forth.
In the latter case, a pagelet extension should not be wider than 570 pixels.
Describing HTML Design ConsiderationsFollowing are some HTML-related pagelet design considerations:
The pagelet should encapsulate data to provide at-a-glance summary information.
It should provide links to detailed application pages.
Avoid large borders or a design that creates extraneous white space. Screen real estate on a homepage is valuable and data should be maximized.
Avoid designs that make the pagelet wider than the prescribed size. This undesirable design forces the user to scroll horizontally, so design your HTML to be vertically oriented. For instance, radio buttons should be arranged vertically, not side-by-side. When creating a form, buttons should appear below a text box, not next to it.
This is a business-oriented portal, so avoid extravagant or extraneous graphics. If you use graphics, they should be very small and unobtrusive. No graphic should be wider than 218 pixels, which would force the pagelet to be wider than a narrow pagelet.
Avoid using any text or HTML tags that force the pagelet to a width greater than 218 pixels.
In general, avoid explicit sizing. Let the browser render content in the space available, which should allow your text and graphics to fit appropriately. For example, place text in an HTML table to enable the table it to wrap any long strings.
When appropriate, utilize the PeopleSoft style sheet to ensure that the look and feel of your pagelet is consistent with the rest of the portal content.
If your pagelet does not utilize the entire width of the column, it’s best to center its contents.
If a hyperlink on the pagelet takes the user to another website and you want to display the content in a new window, rather than using target=_blank in the hyperlink tag, use the following code:
<a href="javascript:void window.open
('http://www.company.com/cgi-bin?article3');" class="PSHYPERLINK">
If a pagelet has personalization options, then it should have a default mode. Before a user personalizes the pagelet data, the pagelet should display a default set of data and a message conveying that default data can be personalized.
This section provides a listing of HTML-specific development guidelines for pagelets used with the PeopleSoft Enterprise Portal.
Within PeopleTools, attributes from all content are merged into the single <BODY> tag. The order of attribute precedence is template, target content, and then template components. Events beginning with "on" are naively combined, so if one of them issues a "return," the following events will not run. All other attributes are not examined, rather they are used in order of precedence. For example, if both the template and a content component contain "topmargin," the template attribute will be applied.
Avoid large borders or anything that creates extraneous white space. Screen real estate on a homepage is valuable and data should be maximized.
Avoid implementing anything that will make the pagelet width wider than the prescribed size. Making the user scroll horizontally is undesirable. Make your HTML vertically oriented. For instance, radio buttons should be placed vertically, not side-by-side. When creating a form, any buttons should appear under a text box, not next to it.
Avoid using any graphics, if possible. This is a business-oriented portal, so extravagant or extraneous bitmaps should not be used. If any are used, they should be very small and unobtrusive. No graphic should be wider than 218 pixels. A graphic larger than this size will force the width of the pagelet to exceed the size of a narrow pagelet.
Avoid using any text or directives that force the pagelet to a width greater than 218 pixels.
In general, it's best to avoid explicit sizing and allow the portal to set the width. Your text and graphics should then fit appropriately. For instance, placing text within an HTML table will allow it to wrap any long strings.
Utilize the PeopleSoft stylesheet, when appropriate, to ensure the look and feel of your pagelet is consistent with the rest of the portal content.
If your pagelet does not utilize the entire width of the column, it's best to center it.
If a hyperlink takes the user to another Web site and you want it to display the content in a new window, rather than using "target=_blank" within the hyperlink tag, use:<a href="javascript:void window.open ('http://www.company.com/cgi-bin?article3');" class="PSHYPERLINK">
Describing Branding ConsiderationsAs mentioned earlier, this is a business-oriented portal. Although content and name recognition are important, they are secondary to the primary goal of enabling end users to perform their work in a more efficient manner. Thus, any branding should be subtle and never detract from the pagelet content or the rest of the portal.
Thus, to operate within the PeopleSoft Enterprise Portal product, a pagelet developed outside of PeopleSoft can credit the source developer, but must follow these standards:
Branding on a homepage pagelet should be done using text only and should be placed at the bottom of the pagelet. No organization logos can be placed on the pagelet without permission from PeopleSoft. You can use “Provided by XXX,” where XXX is substituted with your company name. Also, XXX can be a hyperlink to an appropriate web page.
Organization logos and further information about your organization, products, and services should be located on the pagelet personalization page or other pagelet extensions.
Generally, graphics for organization logos should not be larger than 100 pixels wide x 40 pixels high.
Let's examine a sample HTML pagelet. If we wanted to create one that searched for keywords on another website, it might look like the following page.
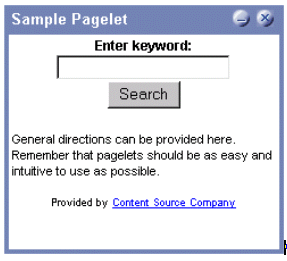
Sample pagelet
The HTML used is shown below:
<table border=0 cellspacing=1 cellpadding=0>
<tr>
<td><!-- start of search form -->
<form method="POST" action=
"http://www.contentSource.com/cgi-bin/dofind.cgi">
<center><font class=
"PSEDITBOXLABEL">Enter keyword:</font> <input name="word" value=""><br>
<input type="submit" value="Search"></center>
</form>
<!-- end of search form --></td>
</tr>

<tr>
<td><!-- start of optional directions --><font class=
"PAADDITIONALINSTRUCTIONS">General directions can be provided here.
Remember that pagelets should be as easy and intuitive to use
as possible.<br>
<br>
</font>
<!-- end of optional directions --></td>
</tr>

<tr>
<td><!-- start of footer for branding -->
<center><font class="PSPSMALLTEXT">Provided by <a href=
"http://www.contentSource.com/">Content Source Company</a></font></center>
<!-- end of footer for branding --></td>
</tr>
</table>
Let's examine how this adheres to the standards mentioned above.
It uses a table to help wrap words, rather than let long strings dictate the width of the pagelet.
All text should use the PeopleSoft styles, such as PSEDITBOXLABEL, PAADDITIONALINSTRUCTIONS, and PSPSMALLTEXT.
The branding is small and no graphics are used. They adhere to the branding standards mentioned earlier.
Understanding Single Signon and PageletsThis section provides overviews of:
Single signon.
The PeopleSoft authentication process.
The PeopleSoft authentication API.
Describing Single SignonThe examples shown thus far have utilized publicly available URLs. Even if the examples represent third-party applications, the discussion has concentrated on retrieving data and rendering a pagelet. We have not yet discussed the possible need to log in to a non-PeopleSoft system.
When there are two or more systems that need separate authentication, it is preferable to handle it in some automated fashion. It is inconvenient and annoying if a user needs to manually log in to several different systems each day. Users often expect a business portal to be similar to accessing a variety of internet websites. Once logged into the portal, there should rarely (if ever) be the need to log in to another system.
There are several means to accomplishing single signon between PeopleSoft and other systems. First, you need to determine the primary (or master) and secondary (or slave) authentication systems.
PeopleSoft as master.
Once a PeopleSoft user has logged in, an authentication cookie is sent to the browser's memory. Other applications can choose to authenticate using this cookie. PeopleSoft provides an API that other applications can leverage. This is the option that is discussed in detail in this section.
PeopleSoft as slave.
PeopleSoft's authentication process is flexible enough to allow for accessing another system.
PeopleSoft and other applications leverage third-party authentication.
A variant of the previous option would be that all applications (including PeopleSoft) leverage, or trust, a third-party authentication system such as Netegrity, Oblix, or Securant.
If you are writing a pagelet for the PeopleSoft portal, there is no guarantee that all possible customers for the pagelet would have access to a third-party authentication system. Thus, this option is not discussed in this document.
Describing the PeopleSoft Authentication ProcessBefore discussing how your pagelet could leverage PeopleSoft authentication, it is important to understand the process.
After the first application server/node authenticates a user, PeopleSoft delivers a web browser cookie containing an authentication token. PeopleSoft Pure Internet Architecture uses web browser cookies to store a unique access token for each user after they are initially authenticated. When the user connects to another PeopleSoft application server/node, the second application server uses the token in the browser cookie to re-authenticate the user behind the scenes so that they don't have to complete the signon process again. Your non-PeopleSoft application could do something similar.
Single signon is critical for PeopleSoft portal implementations because the portal integrates content from various data sources and application servers and presents them in a unified interface. When users sign on through the portal, they always take advantage of single signon. Users need to sign on once and be able to navigate freely without encountering numerous signon screens.
Note. The browser cookie is an in-memory cookie and is never written to disk. The cookie is also encrypted and digitally signed using a checksum to prevent tampering.
The following table presents the fields that appear in the PeopleSoft authentication token.
|
Field |
Description |
|
UserID |
Contains the user ID of the user to which the server issued the token. When the browser submits this token for single signon, this is the user that the application server logs on to the system. |
|
Language Code |
Specifies the language code of the user. When the system uses this token for single signon, it sets the language code for the session based on this value. |
|
Date and Time Issued |
Specifies the date and time the token was first issued. The system uses this field to enforce a time-out interval for the single signon token. Any application server that accepts tokens for signon has a "time-out minutes" parameter configured at the system level. A system administrator sets this parameter using the Single Signon page. The value is in Greenwich Mean Time (GMT), so the application server’s time zone is irrelevant. |
|
Issuing System |
Specifies the name of the system that issued the token. When it creates the token, the application server retrieves this value from the database. Specifically, it retrieves the defined Local Node. Single signon is not related to PeopleSoft Integration Broker messaging, except for the fact that single signon functionality leverages the messaging concept of nodes and local nodes. You configure a node to only trust single signon tokens from specific nodes. Consequently, an application server needs an Issuing System value so that it can check against its list of trusted nodes to see if it trusts the issued token. |
|
Signature |
Contains a digital signature that enables the application server using a token for single signon to ensure that the token hasn't been tampered with after it was originally issued. The system issuing the token generates the signature by concatenating the contents of the token (all of the fields that appear in this table) with the message node password for the local node. The system then hashes the resulting string using the SHA1 hash algorithm. For example ("+" indicates concatenation).
There is only one way to derive the 160 bits of data that make up the signature, and this is by hashing exactly the same User ID, Language, Date Time, Issuing System, and node password. Note. If you are using digital certificate authentication, the signature of the digital certificate occupies this space. The above description only applies to using password authentication. |
Note. Single signon does not depend on the use of a Lightweight Directory Access Protocol (LDAP) directory. You can store user credentials in an LDAP directory if desired, but it is not required.
The key security features of the cookie authentication token are:
The cookie exists in memory; it is not written to disk.
There is no password stored in the cookie.
You can set the expiration of the cookie to be a matter of minutes or hours. This expiration option is a useful security feature.
Describing the PeopleSoft Authentication APIPeopleSoft delivers a component interface named PRTL_SS_CI, which enables external applications to seamlessly integrate a single signon solution with the PeopleSoft portal applications. This component interface helps ensure that users who have already signed on to the portal don't have to sign on again for every system you reference in your portal.
Component interfaces are the focal points for externalizing access to existing PeopleSoft components. They provide real-time synchronous access to the PeopleSoft business rules and data associated with a component outside the PeopleSoft online system. Component interfaces can be viewed as "black boxes" that encapsulate PeopleSoft data and business processes, and hide the details of the structure and implementation of the underlying page and data.
To take advantage of the Single Signon API, you need to create a custom API, which includes building the dynamic link libraries, classes, and registry settings necessary to enable an external application to communicate with PeopleSoft. This can be done automatically through PeopleTools. More information about building dynamic link libraries, classes, and registry settings, as well as other details about PeopleSoft component interfaces can be found in the Enterprise PeopleTools 8.51 PeopleBook: PeopleSoft Component Interfaces
See PeopleTools 8.51 PeopleBook: PeopleSoft Component Interfaces.
Only external applications, such as COM, C/C++, or Java programs require a component interface API. PeopleCode programs do not require a component interface API, and in fact, we do not recommend building a component interface API if the component interface is to be accessed from PeopleCode only.
The files of your custom API need to reside on the client machine; that is, the web server for ASP and the machine running the Java program for Java. The registry file may also need to be executed to update the registry with the new libraries.
The Signon Process with the API
The PRTL_SS_CI component interface contains two user-defined methods:
Authenticate( ).
Your external authentication program distributes an authentication token that can be retrieved from a cookie in the browser. The Authenticate function determines if an authentication token is valid.
GetUserID( ).
If the token is valid, you use the GetUserID function to retrieve the user ID associated with the authentication token.
Before we describe the development requirements of your API, take a moment to examine the steps that occur internally when you use the API in conjunction with the delivered PRTL_SS_CI:
The user enters the user ID and password into the PeopleSoft portal signon page.
If the login to the portal application server is successful, the server generates a single signon token. The web server receives the single signon token from the application server and issues a cookie to the browser.
The user navigates in the portal and encounters a hyperlink to the external system. The user clicks the link.
The browser passes the PS_TOKEN cookie to the external web server.
The external web server checks for the PS_TOKEN cookie before displaying a signon page.
Once it is determined that the user is accessing the application through the PeopleSoft portal, you retrieve the authentication token and send it to the PRTL_SS_CI component interface to verify authentication. For instance, it calls PRTL_SS_CI.Authenticate(Auth. token string).
After the system authenticates the token, it can then make calls to the PRTL_SS_CI.Get_UserID() function to return the appropriate user ID.
In general, cookies are not transferable across domains. The only domain that can access the cookie is the domain that created it. Therefore, the web server for the non-PeopleSoft system must be on the same domain as the PeopleSoft system so that the cookies are passed appropriately.
External Application Support for Single Signon
Developers of external applications need to alter the signon process to conform to the following requirements:
Check for the PS_TOKEN cookie. If the cookie doesn't exist, continue with the normal signon process. Otherwise, bypass the signon screen.
Retrieve the authentication token from the PS_TOKEN cookie.
Make a connection to PeopleSoft through the PRTL_SS_CI API.
Pass the authentication token to the Authenticate() function of the API.
If Authenticate() returns True, retrieve the user ID associated with the authentication token using the Get_UserID() function.
Authentication API PeopleCode Example
The following PeopleCode example walks through the process of validating your authentication token and retrieving the user ID. The following sample is designed to provide a general idea of the process involved and help you to incorporate the PRTL_SS_CI API into your signon process.
Local ApiObject &THISSESSION;
Local ApiObject &THISCI;
Local string &AUTHTKN;
/* Assigns the Authentication Token to a variable */
&AUTHTKN = %AuthenticationToken;
/* Open a session and make a connection */
&THISSESSION = GetSession();
If &THISSESSION.connect(1, "EXISTING", "", "", 0) <> True Then
WinMessage(MsgGet(30000, 1, "Session Connect Failed."));
Exit (1);
End-If;
/* Retrieves the component interface PRTL_SS_CI */
&THISCI = &THISSESSION.GetCompIntfc(CompIntfc.PRTL_SS_CI);
/* Checks to see if the component interface is NULL */
If &THISCI = Null Then
WinMessage("Component Interface PRTL_SS_CI not found.
Please ensure Component Interface Security access is granted
to this user.");
Exit (1);
End-If;
/* Key fields would usually be set before the Get() function is
called in order to map the component interface to a particular
set of data. This component interface is not mapped to data.
* Therefore, the component interface is retrieved and then the
user defined methods are retrieved */
&THISCI.get();
PRTL_AUTH = &THISCI.Authenticate(&AUTHTKN);
PRTL_USER_ID = &THISCI.Get_UserID();
Note. The component interface is not mapped to data because the key field for the data would be the authentication token. This token is dynamically assigned when the user signs on to the portal, and it is not stored as data anywhere in the system. Therefore, there are no key fields and the token is passed directly to the user-defined functions.
Authentication API Java Example
Here is an example of a similar operation written in Java. This is a file named SingleSignon.java.
package examples.migration.sso;

import java.io.*;
import javax.servlet.*;
import javax.servlet.http.*;
import java.util.*;
import psft.pt8.joa.*;
import PeopleSoft.Generated.CompIntfc.*;

public class SingleSignon extends HttpServlet {
  public static ISession oSession;
  String psfttoken;
  public static void ErrorHandler() {
  		//***** Display PeopleSoft Error Messages *****
if (oSession.getErrorPending() || oSession.getWarningPending()) {
  			IPSMessageCollection oPSMessageCollection;
  			IPSMessage oPSMessage;

  			oPSMessageCollection = oSession.getPSMessages();
for (int i = 0; i < oPSMessageCollection.getCount(); i++) {
  				oPSMessage = oPSMessageCollection.item(i);
  				if (oPSMessage != null)
  					System.out.println⇒
("(" + oPSMessage.getMessageSetNumber() + ","
 + oPSMessage.getMessageSetNumber() + ") : " + oPSMessage.getText());
  			}
  			//***** Done processing messages in the collection;
OK to delete *****
  			oPSMessageCollection.deleteAll();
  		}
	}

  public void doGet(HttpServletRequest request,
                    HttpServletResponse response)
      throws ServletException, IOException {
		  try {
    response.setContentType("text/html");
    PrintWriter out = response.getWriter();

    Cookie[] cookies = request.getCookies();
	    if (cookies == null) {
	      out.println("<TR><TH COLSPAN=2>No cookies");
	    } else {
	      Cookie cookie;
	      for(int i=0; i<cookies.length; i++) {
	        cookie = cookies[i];

	        String pstoken = cookie.getName();
            psfttoken = cookie.getValue();
            if (pstoken.equals ("PS_TOKEN"))

               out.println("<TR>\n" +
	                  "  <TD>" + pstoken + "\n" +
	                  "  <TD>" + psfttoken);
	      }

	    }

     String strServerName, strServerPort, strAppServerPath;
		String strUserID, strPassword;
		strServerName = "jfinnon09";
                strServerPort = "9500";
                strUserID = "VP1";
                strPassword = "VP1";

		//Build Application Server Path
		strAppServerPath = strServerName + ":" + strServerPort;

      //***** Create PeopleSoft Session Object *****
      //       ISession oSession;

		oSession = API.createSession();

		//***** Connect to the App Server *****
		if (!oSession.connect(1, strAppServerPath, strUserID, strPassword,
 null)) {
			out.println("\nUnable for Jason to Connect to
Application Server.");
			ErrorHandler();
			return;
		}

     //***** Get Component Interface *****
		IPrtlSsCi oPrtlSsCi;
		String ciName;
	 	ciName = "PRTL_SS_CI";
		oPrtlSsCi = (IPrtlSsCi) oSession.getCompIntfc(ciName);
		if (oPrtlSsCi == null) {
			out.println("\nUnable to Get Component Interface " + ciName);
			ErrorHandler();
			return;
		}

		//***** Set the Component Interface Mode *****
				oPrtlSsCi.setInteractiveMode(false);
				oPrtlSsCi.setGetHistoryItems(true);
				oPrtlSsCi.setEditHistoryItems(false);

				//***** Set Component Interface Get/Create Keys *****

				//***** Execute Get *****
				if (!oPrtlSsCi.get()) {
					out.println("\nNo rows exist for the specified keys.
	\nFailed to get the Component Interface.");
					ErrorHandler();
					return;
				}

				//***** BEGIN:  Set/Get Component Interface Properties *****

				//***** Set Level 0 Properties *****
				//out.println("oPrtlSsCi.PrtlToken: " +
 oPrtlSsCi.getPrtlToken());
				//out.println("Checking token: " + psfttoken);

				//oPrtlSsCi.setPrtlToken(<*>);
		                //String psfttoken;
		                //psfttoken = oPrtlSsCi.getPrtlToken();
		                //System.out.println("oPrtlSsCi.PrtlToken: "
 + psfttoken);

				//***** END:  Set Component Interface Properties *****

				//***** Execute Standard and Custom Methods *****
				//***** Execute Authenticate *****
				boolean auth;

		         auth = oPrtlSsCi.authenticate(psfttoken);
		         //out.println("Auth: " + auth);
				//Execute Get_UserID
		                String psftuser;
				psftuser = oPrtlSsCi.getUserid();
                //out.println("Psftuserid: " + psftuser);

                 String title = "Welcome  " + psftuser;

                //****** Get HTML ***********
                 out.println(ServletUtilities.headWithTitle(title));
                 out.println("</BODY></HTML>");

                //***** Disconnect from the App Server *****
		        oSession.disconnect();
		        return;
  }


  catch (Exception e) {
  		e.printStackTrace();
  		System.out.println("An error occurred: ");
  		ErrorHandler();
  	}
	}


  /** Let the same servlet handle both GET and POST. */

  public void doPost(HttpServletRequest request,
                     HttpServletResponse response)
      throws ServletException, IOException {
    doGet(request, response);
  }

}
Developing Pagelets Using PeopleSoft Pure Internet ArchitectureThis section discusses how develop pagelets based on PeopleSoft Pure Internet Architecture pages.
Developing Pagelets Based on PeopleSoft Pure Internet Architecture
Pages
To design a PIA page-based pagelet:
Open PeopleSoft Application Designer
Select File, Open to display the Open Definition dialog box.
Use the drop-down list box to select Page as the definition.
Enter selection criteria and open the desired page.
Select File, Definition Properties and then select the Use tab.
Select a page size of 240xVar portal home page comp for narrow pagelets or 490xVar portal home page comp for wide pagelets. Note that you can adjust the height of the pagelet now or later.
Design the new pagelet using the guidelines described above and similar design techniques used when designing a page.
Save the page.
Note. When the page is added to a component, the search record is specified. As noted in the above guidelines, you should avoid a search interaction so that the pagelet can render its data on the homepage without any prompting for keys. If keys are needed, then the pagelet should be coded to use some default key values and the personalization options should initially reflect these defaults.
Register the pagelet in the portal registry. This step also involves setting up security access to the component and therefore the PIA page.
Developing Pagelets Using iScriptsThis section discusses how to develop pagelets based on iScripts.
Developing Pagelets Based on iScripts
Use an iScript only for pagelets that reference non-PeopleSoft data or if a PIA page does not provide the necessary functionality.
The advantages of iScripts include the following:
People may be familiar with the technique, since it's similar to creating Active Server Pages (ASP) or Java Server Pages (JSP). Basically, you are using a script to output HTML and JavaScript.
There is a some greater flexibility in the appearance since there is direct control of the HTML or JavaScript.
There is some greater flexibility of sizing. PeopleSoft Internet Architecture pages tend to be fairly static in their object placement and sizing.
However, the disadvantages of iScripts include the following:
Everything is manually coded. You must handle and account for support for multiple browsers and international considerations, such as language, date and currency formatting, and so forth. PeopleTools handles these considerations automatically on PIA pages.
There may be related coding or performance issues.
This section provides an example of developing an iScript-based pagelet that uses content from an external site for display in the PeopleSoft portal. The pagelet is based on a public-use form that is provided at www.onelook.com.
When developing a template pagelet based on an iScript, some of the functions provided by PeopleSoft Application Designer such as currency codes, language support, and multiple browser support are not automatically available in your iScript. Therefore, if they are desired, they will need to be developed.
Note. When using iScripts to create pagelets, use the styles (classes) that are defined in PeopleSoft Application Designer style sheets to specify the attributes of the objects referenced.
To create an iScript-based template pagelet:
Note. Use steps 1 and 2 when you are grabbing HTML from another Website, or if you basically want to create some relatively static HTML that is used by the iScript to render a pagelet. If you are creating a pagelet iScript that is going to render highly dynamic HTML, then skip to step 3 and create any necessary/complex PeopleCode to conditionally render the HTML/JavaScript.
Create the HTML code for the pagelet.
In many cases you can navigate to a Uniform Resource Locator (URL) that you want to turn into a pagelet and copy the HTML associated with that Web page. For form-based Web pages, copy all of the HTML code located between the Form tags of an existing HTML document.
Store the new HTML code in PeopleSoft Application Designer as an HTML definition.
Create an iScript that calls the new HTML definition in a Web library.
A Web library is a derived record that is created in PeopleTools for storing iScripts. The name of all Web library records begin with WEBLIB_.
Note. All iScripts should be coded in the FieldFormula PeopleCode event of a derived record called WEBLIB_XX, where XX is the product code. Only functions that start with IScript_, such as IScript_iTracker, can be invoked from a URL.
Navigate to the appropriate field name and edit the FieldFormula PeopleCode that is associated with the field.
This is where you create an iScript that calls the HTML definition that you created.
Create a new iScript and give it a meaningful name.
An easy way to create a new iScript is to copy and paste an existing iScript that is located in the Web library and then make the desired changes. All iScript names must begin with IScript_.
Save the web library.
Register the iScript as a pagelet in the portal registry. This step also involves setting up security access to the iScript.
Modifying Security For the Web Library
Security for the web library can be initially set up using the Registration Wizard. You can use the following steps to modify the security settings created by the wizard.
To modify security:
Select PeopleTools, Security, Permissions & Roles, Permission Lists.
Open the desired permission list, such as ALLPAGES or PAPP9000 .
Go to the Web Libraries tab.
Select the Edit link next to the appropriate web library.
Modify the Weblib Permissions as desired by changing the Access Permissions drop-down option. The choices are Full Access and No Access. Click OK to return to the main Permission List page.
Click Save to save your changes to the permission list.
See Also
Setting Web Library Permissions
Understanding the Registration Wizard
Developing Pagelets Using JavaThis section provides an overview of Java pagelet developing and Java pagelet development considerations and discusses how to:
Write business logic in Java.
Use Java to write business logic for a PeopleSoft or non-PeopleSoft system.
Invoke PeopleSoft components from Java.
Understanding Developing Pagelets in JavaJava is an extremely popular programming language today, especially for internet applications. PeopleTools provides support in several key areas to enable developers to create Java-based applications. Though the PeopleSoft development environment allows you to write PeopleSoft business logic in Java, the focus of the following sections is to provide information that is relevant to the developer who is integrating applications with the PeopleSoft Enterprise Portal. For example, development that is being done to integrate your non-PeopleSoft application with the PeopleSoft Enterprise Portal. Another example is a scenario in which you want to pull together data from your non-PeopleSoft system along with data from your PeopleSoft system for integration with the PeopleSoft Enterprise Portal.
There are two primary areas in which you can program in Java within the PeopleTools environment:
Writing business logic in Java.
Java can be used to write business logic for PeopleSoft or non-PeopleSoft applications that are to be rendered in the PeopleSoft Enterprise Portal. Java can be called from PeopleCode and the Java program can then reference PeopleSoft’s run-time environment as needed.
In addition, Pagelet Wizard facilitates Java development in that it allows the Java programmer to concentrate on business logic, while Pagelet Wizard takes care of all the development aspects of rendering the application in the portal framework without any coding necessary.
Invoking PeopleSoft components from Java.
All PeopleSoft components can be invoked from Java programs through the component interface technology. This is useful if you want to create Java servlets, applets, JSP programs, or Enterprise JavaBeans that invoke PeopleSoft business logic.
Another consideration when developing applications with Java is that any application developed using Java that is URL-addressable and produces HTML can be easily integrated into the PeopleSoft Enterprise Portal through the PeopleSoft Enterprise Portal’s registry functionality. This allows you to distribute your development and run-time environments making for better scalability for both.
For more information about leveraging the PeopleSoft Enterprise Portal’s registry functionality to integrate your Java application with the PeopleSoft Enterprise Portal, see the following documentation.
See Administering Pagelets in the Portal Registry.
These areas of Java programming within the PeopleTools development environment are discussed further in the following sections.
Describing Java Pagelet Development ConsiderationsThis section discusses the following Java development considerations:
Business rules.
User interface.
User personalization.
Navigation.
Business Rules
Java can be used to apply business logic to data to create a result set. Pagelet Wizard can then be used to invoke the Java program. Parameters that are required by the Java program can be defined, managed, and passed to the Java program through Pagelet Wizard. These parameters may be derived from user personalization parameters, as well as administrator-defined parameters and system variables.
For example, the Java program may need the user’s ID, the user’s language, and the user’s personalization selection regarding whether to include historical transaction information or just current information. These parameters can be defined in Pagelet Wizard in relation to a Java class. Pagelet Wizard can access the PeopleSoft run-time environment to determine the user’s ID as well as other profile information, such as the user’s language.
See Understanding System Variables Supported as Data Source Parameters.
Pagelet Wizard will also manage the user interface and storage of user personalization data. This is discussed in detail in the following “User Personalization” subtopic. When the Java program is invoked, Pagelet Wizard will handle passing all required parameters to the Java program.
In addition, Java classes delivered with PeopleTools enable you to call PeopleCode from your Java program and access contextual information from the run-time system. If needed, business data can be retrieved, as necessary, through the numerous PeopleCode functions that are accessible from Java.
The result set created by the Java program may be in an HTML format or in an XML format. Pagelet Wizard will accept the output from the Java program and will manage the presentation of the information within the portal. This is discussed in the following “User Interface” subtopic.
User Interface
Pagelet Wizard will manage all aspects of a pagelet’s user interface. No user-interface-related programming for the pagelet is required in the Java program. Pagelet Wizard can accept an HTML- or XML-based result set from a Java program. The HTML from the Java program can be rendered directly. Alternatively, XML can be transformed with XSL to create an appropriate pagelet user interface.
In either case, Pagelet Wizard will manage the XSL and invoke the transformation at runtime. Extensible Stylesheet Language templates are provided with Pagelet Wizard for general use scenarios. Extensible Stylesheet Language development may be required, depending on the specific user interface required for a pagelet.
See Defining Pagelet Wizard XSL Prototypes.
User Personalization
Pagelet Wizard supports the persistence of user personalization selections for a pagelet application and handles all aspects of the user interface that allows a user to enter their preferences and selections. Personalization parameters are defined within Pagelet Wizard’s administration pages. No programming is required, Java or otherwise.
User personalization selections can occur at two levels. From the homepage, users can select which pagelet applications they’d like to include on their homepage. After they’ve selected a pagelet application and have decided where they’d like the pagelet to display on their homepage, they can personalize a particular pagelet application.
Examples of user personalizations at the second level can include scenarios in which a user selects transactions from a particular region, or chooses to include transactions using a particular date as opposed to same-day transactions.
The user interface for all of these activities, as well as the storage of the personalization data for persistence, is managed by Pagelet Wizard without any additional programming, Java or otherwise.
Pagelet Wizard supports functionality that allows an end user to select a pagelet application to appear on their homepage. When a pagelet application is registered with Pagelet Wizard, a folder, which represents a portal application category, can be selected. When users personalize their homepage by selecting specific pagelet applications that they want to appear on their homepage, the selection will be presented within the category (folder) that is defined when registering the pagelet application through Pagelet Wizard.
See Step 6: Specifying Pagelet Publication Options.
Pagelet Wizard also supports functionality that allows an end user to select values that allow a specific pagelet application to be personalized. The functionality may dictate that some input parameters required by a Java program be entered by an end user, while other parameters can be set by an administrator. Pagelet Wizard manages parameter passing and the user interface. Pagelet Wizard introspects the Java source code for input parameters. Pagelet Wizard administrators can then select which parameters can be accessed by an end user for personalization. The user interface to allow an end user to personalize a pagelet application and update the appropriate Java input parameters is automatically generated and managed by Pagelet Wizard.
Navigation
When creating links in your pagelet application that allow a user to navigate to a related page for details and so forth, it may be important that the link be proxied by the portal to keep the user within the portal. For example, if a pagelet link is not proxied, then the pagelet can take a user to a site that is completely independent from the portal. In this scenario, the navigational links on the portal header, the homepage menu pagelet, and the left-hand menu pagelet will not be available to the user.
If the link is proxied by the portal, then the link can bring in content from a site that is independent of the portal. However, the content will be rendered within the portal. For example, the portal’s header and left-hand menu will be available.
With the PeopleSoft Enterprise Portal, links that are included in a pagelet will automatically be altered to support proxying by the portal. No programming is required, Java or otherwise.
Note. Content that is referenced by the link must be HTML-based to be rendered appropriately in the portal.
Navigation on Extended Pages
Invoking a link on an extended page will bring in content within the target frame. The PeopleSoft Enterprise Portal, header, and left-hand menu area will remain. Therefore, the new content will be rendered in the context of the PeopleSoft Enterprise Portal.
Note. Content that is referenced by the link must be HTML-based to be rendered appropriately in the portal.
The Return to Home link, which returns the user to the portal homepage, may be required from an extended page. The GenerateHomepagePortalURL function creates a URL string that represents an absolute reference to the portal homepage. Because you can access the PeopleSoft runtime environment from a Java program and you have access to PeopleCode built-in functions, you can invoke the GenerateHomepagePortalURL function from your Java program.
See Developing Pagelets Using Java.
See PeopleCode Built-in Functions.
Portal Integration
The pagelet application needs to be integrated with the PeopleSoft Enterprise Portal so that the pagelet application is managed, secured, and presented through the PeopleSoft Enterprise Portal. Registration in the PeopleSoft Enterprise Portal makes the portal aware of a pagelet application. Information included in registration determines the name and security for your pagelet application. In addition, registration data determines the category in which the pagelet application resides. Users view pagelet applications within these categories when selecting items that they want to see on their homepage. No programming is required, Java or otherwise, to complete portal registration.
Writing Business Logic in JavaThere are many reasons why you would want to write business logic for your non-PeopleSoft (and even your PeopleSoft applications) in Java. Perhaps you have licensed a third-party set of Java classes to do some very specific processing (tax calculation, for example). Or perhaps you have developed some internal Enterprise JavaBeans for your specific business processes. Or perhaps you simply like to code in Java. Whatever the reason, you can easily integrate Java code with your applications through the Java PeopleCode functions.
Invoking Java from PeopleCode
There are three primary Java PeopleCode functions that are used to invoke Java from PeopleCode:
GetJavaClass
CreateJavaObject
CreateJavaArray
|
Java PeopleCode Function |
Usage |
Example |
|
GetJavaClass |
Finds a Java class you can manipulate in PeopleCode. This is used for those classes that have static members, where it isn't appropriate to instantiate an object of the class. You can only call static methods, that is, class methods, with the object created with this function. |
In Java, you access such static members of a class by using the class name:
To do this in PeopleCode, do the following:
Following is a simple PeopleCode example that uses GetJavaClass to get a system class:
|
|
CreateJavaObject |
Creates a Java object that can be manipulated in your PeopleCode. You can use the CreateJavaObject function to create a Java array. If ClassName is the name of an array class (ending with [ ]), ConstructorParams are used to initialize the array. |
In Java, you would do the following to initialize an array:
Do the following to initialize a Java array from PeopleCode:
If you want to initialize a Java array without knowing the number of parameters until runtime, use the CreateJavaArray function. Following is a simple PeopleCode program that creates a Java object from a sample program that generates a random password:
|
|
CreateJavaArray |
Allows you to create a Java array without knowing the number or value of the elements. When you create an array in Java, you already know the number of elements in the array. If you don't know the number of elements in the array, but you want to use a Java array, use the CreateJavaArray function in PeopleCode. This will create a Java object that is a Java array, and you can pass in the number of elements that are to be in the array. |
The following PeopleCode example passes a PeopleCode array of strings (&Parms) to a Java method xyz of class Abc. This example assumes that when you are writing the code, you don't know how many parameters you will have.
|
Accessing the PeopleSoft Run-Time System From Java
After a Java class has been invoked, the PeopleSoft run-time system can then be accessed from Java. Java classes delivered with PeopleTools enable you to call PeopleCode from your Java program and access contextual information from the run-time system such as the current user’s role and language preference. By importing the PeopleTools-delivered Java classes in your Java program, you can have access to PeopleCode objects and methods. There are hundreds of PeopleSoft system variables, constants, and built-in functions available for use with this approach. Discussions of the various methods follow.
Accessing the run-time system works only from a Java program that was initially called from PeopleCode. You must call PeopleCode facilities only from the same thread that was used for the call into Java. You cannot call any PeopleCode facility that would cause the server to return to the browser for an end-user action because the state of the Java computation cannot be saved and restored when the action is complete.
|
Java Class |
Usage |
|
SysVar |
Use to refer to PeopleSoft system variables, such as %Language or %Oprid. For example, %Session, becomes SysVar.Session(). See System Variables. |
|
SysCon |
Use to refer to system constants, such as %SQLStatus_OK or %FilePath_Absolute. For example, %CharType_Matched becomes SysCon.CharType_Matched. See Constants. |
|
Name |
Allows you to use the PeopleSoft-reserved item references. This allows you to reference pages, components, records, fields, and so forth. For example, in PeopleCode you can refer to a record field using the following:
With the Name class, you can use a similar construct:
As another example, in PeopleCode you can refer to a PeopleSoft page using the following:
In Java, it would be:
|
|
Func |
Use to refer to built-in PeopleCode functions, such as CreateRowset or GetFile. For example, SetLanguage(LANG_CD) becomes Func.SetLanguage(LANG_CD). The existing PeopleCode classes (Array, Rowset, and so forth) have properties and methods you can access from Java. PeopleCode classes have the same name, so Record becomes Record, SQL becomes SQL, and so forth. Methods are accessed by the method name. The name of a property is pre-pended with either “get” or “set,” depending on whether you're reading or writing to the property. For example, to get the IsChanged property would be getIsChanged. To set the value for a field would be &MyField.setValue. |
|
Func (continued) |
Here is an example of a Java program that uses PeopleCode objects to access the database:
|
|
Func (continued) |
This can be run from PeopleCode as follows:
|
Using Java to Write Business Logic for a PeopleSoft or Non-PeopleSoft
SystemThis section presents an example of pagelet application development where it is desired that all programming be done in Java. Business logic might be for a PeopleSoft system or a non-PeopleSoft system. In this development example, PeopleTools programming is not required. All programming is done with Java.
The PeopleTools infrastructure can be leveraged without any PeopleTools programming through the use of PeopleSoft Enterprise Portal features that support administration, integration and implementation for the portal. The ability to leverage the PeopleTools infrastructure can significantly reduce the amount of Java programming that is required to develop a pagelet application for use in the PeopleSoft Enterprise Portal.
Some of the information in this section is covered in other Pagelets Wizard documentation. The main difference in this section is that it presents the information as a development scenario as opposed to a feature description. Also, the ability to access the PeopleSoft run-time environment from Java is discussed in this section.
The development scenario below will address the following elements of portal application development, integration, and implementation:
Business rules.
Apply business logic/rules to data in order to create a result set.
User interface.
Create the appropriate presentation format for a set of business data.
User personalization.
User personalization data.
Allow pagelet applications to be selected by the end user in order to be placed on their home page. Also, allow a user to personalize a specific pagelet application. These selections should persist.
User interface.
Create the appropriate presentation format for personalization data.
Navigation for a pagelet.
Create links on your pagelet to allow a user to navigate to a related page for details and so forth.
Navigation on extended pages.
An extended page is a page that a user can get to from a homepage pagelet. It might show details as well. An extended page may have links to allow a user to navigate to other related pages.
Links.
Create links from your extended page to allow a user to navigate to a related page for further details and so forth.
Return links.
Create links that allow the user to return to the portal’s homepage.
Portal integration and implementation.
Integrate the pagelet application with the PeopleSoft Enterprise Portal so that the pagelet application is managed, secured, and presented through the PeopleSoft Enterprise Portal.
Invoking PeopleSoft Components from JavaAll PeopleSoft components can be invoked from Java programs through component interface technology. This is useful for those developers who want to create Java servlets, applets, JSP programs, or Enterprise JavaBeans that invoke PeopleSoft business logic. This section walks through an example of how to invoke a PeopleSoft component from Java. A Business Expense component is used as the example.
Creating the Component Interface
To expose a component to a third party, you must first create a component interface definition. This is done through the Component Interface Designer. Using drag-and-drop functionality, you can specify the properties and methods of the component that you wishes to expose. Numerous component interface definitions are delivered out of the box.
The Business Expenses component definition is displayed in the left frame of the following example. The properties and methods that are exposed through this interface are displayed in the right frame.
Once the component interface definition is saved, you can then generate the Java classes for invoking this interface. This is also done using the Component Interface Designer:
See Component Interface Classes.
Invoking the Component Interface from Java
The following section walks through the steps involved in invoking the Business Expense component interface from Java.
Connect to the application server.
To access a component interface, you need to establish a PeopleSoft session. To create a session object, use the Session.Connect () method. The Connect method, which takes five parameters, actually logs in to a PeopleSoft session. The Connect() method connects a session object to a PeopleSoft application server. Note that there are various options available for using an existing connection and disconnecting and switching connections.
import PeopleSoft.ObjectAdapter.*;
import PeopleSoft.Generated.PeopleSoft.*;
import PeopleSoft.Generated.CompIntfc.*;
private ISession oSession;
private CAdapter oAdapter;
oAdapter = new CAdapter();
oSession = new CSession(oAdapter.getSession());
oSession.Connect(1,"//EHARRIS032000:9000","PTDMO","PTDMO",new byte[0]);
Get an instance of the component interface.
Use the GetComponent() method with a session object to get an instance of a previously created component interface.
busExpense = new CBusExp( oSession.GetComponent( "BUS_EXP" ));
Find an existing record.
You can query a component interface to find relevant data instances based on primary and alternate search keys.
busExpense.setName( searchDialogStrings[ 0 ]);
busExpense.setLastNameSrch( searchDialogStrings[ 1 ]);
busExpense.setEmplid( searchDialogStrings[ 2 ] );
return( busExpense.Find() );
Get an instance of data.
GetKeys are the key values required to return a unique instance of existing data. GetKeys can be set using simple assignment to the properties of the component interface and then the Get() method can be invoked. This will populate the component interface with data based on the key values you set; this is what has been referred to here as a data instance.
busExpense.setEmplid( getKey );
boolean result = busExpense.Get();
Migrate through collections of data.
After getting a data instance, the next step will be to get access to the data in the component interface. PeopleSoft organizes component interface data within collections. Rows of data in a collection are called items.
The following code creates a connection to the application server, gets the component interface, and fetches the first item in a collection.
oAdapter = new CAdapter();
oSession = new CSession(oAdapter.getSession());
oSession.Connect(1,"//EHARRIS032000:9000","PTDMO","PTDMO",new byte[0]);
busExpense = new CBusExp( oSession.GetComponent( "BUS_EXP" ));
busExpense.setEmplid( getKey );
boolean result = busExpense.Get();
busExpenseFirstScrollItemCollection = busExpense.getBusExpensePer();
busExpenseFirstScrollItem = firstScrollCollection.Item
( firstScrollIndex );
return( busExpenseFirstScrollItem.getBusExpenseDtl() );
Edit and access data in an item.
Editing and accessing component interface data in Java is rather straightforward. The following Java code accesses the various public members of the class.
long j = busExpenseSecondScrollCollection.getCount();
Object [][] data = new Object[ ((int)j + 1) ][ 7 ];
for( int i = 1; i < j + 1 ; i++ )
{
busExpenseSecondScrollItem = busExpenseSecondScrollCollection.Item( i );
data[(i - 1)][0] = busExpenseSecondScrollItem.getBusinessPurpose();
data[(i - 1)][1] = busExpenseSecondScrollItem.getChargeDt();
data[(i - 1)][2] = busExpenseSecondScrollItem.getCurrencyCd();
data[(i - 1)][3] = busExpenseSecondScrollItem.getDeptid();
data[(i - 1)][4] = busExpenseSecondScrollItem.getExpenseAmt();
data[(i - 1)][5] = busExpenseSecondScrollItem.GetPropertyByName
("ExpenseCd");
data[(i - 1)][6] = busExpenseSecondScrollItem.GetPropertyByName
("CurrencyCd");
}return( data );
In the following example, data is accessed using the getNAME_OF_PRPERTY() method of an item or by using the generic getPropertyByName() method. This code illustrates that way in which an entire collection of data can be captured and packaged into an object for transfer to a calling object.
busExpenseFirstScrollItem.setEmplid( emplid );
busExpenseFirstScrollItem.setExpensePeriodDt( expensePeriodDt );
return( busExpense.Save() );
Just as before, data is edited using item objects and the setNameOfPropery() method of those items. Also note that we needed to call the Save() method on the component interface to commit the changes.
Insert an item into a collection and delete an item from a collection.
Collection objects in Java contain the InsertItem() method in which the return value is the item that has just been inserted. After a new item is created, simply edit data in it and then remember to call the Save() method to commit the changes.
busExpenseSecondScrollItem = busExpenseSecondScrollCollection.
InsertItem( secondScrollIndex );
Similarly, there is a DeleteItem() method:
busExpenseSecondScrollCollection.DeleteItem( secondScrollIndex );
Disconnect from a session.
After a session is no longer needed, it should be disconnected from the application server. This is done by calling the Disconnect() method on the session object.
oSession.Disconnect();
Developing Contextual Embeddable PageletsThis section discusses how to develop contextually relevant pagelets that you embed in transaction pages.
Create an embeddable pagelet using Pagelet Wizard.
See Using Pagelet Wizard.
Create a transaction page definition using Application Designer.
Place an HTML Area on the page definition.
See Inserting HTML Areas.
Write a PeopleCode function and map the pagelet parameters with any available values from the component buffer.
PeopleCode Sample for Rendering the Context-Based Embeddable Pagelet/* Import the Pagelet Wizard application package to create the embeddable pagelet*/ import PTPPB_PAGELET:*; import PTPPB_PAGELET:UTILITY:*; Component object &Pagelet, &myDataSource; /* Create the Pagelet Wizard application pakage and assign the pagelet ID*/ &PWAPI = create PTPPB_PAGELET:PageletWizard(); &PageletID = "EMBEDED_PAGELET"; /* Get the pagelet's pointer by passing the pagelet id*/ &Pagelet = &PWAPI.getPageletByID(&PageletID, False); &myDataSource = &Pagelet.DataSource; /* Set the pagelet parameters to default values*/ &Pagelet.PopulateInputsWithDefaults(); /* Read the pagelet parameters */ &DSParamColl = &myDataSource.getParameterCollection(); &CollectionParamArray = &DSParamColl.getCollectionAsArray(); /* To override the pagelet parameter default values, */ /* read the CollectionParamArray and set the parameter values */ /* from the component buffer based on the business requirement */ If &CollectionParamArray.Len > 0 Then For &i = 1 To &CollectionParamArray.Len If (&i = 1) Then &DSParameter = &CollectionParamArray [&i]; &CollectionParamArray [&i].value = PSOPRDEFN.OPRDEFNDESC; End-If; End-For; End-If; /* Get the Embeddable Pagelet HTML */ &PgltHTML = &Pagelet.Execute(); /* Associate the Pagelet HTML with the HTML Area */ PSUSRPRFL_WRK.HTMLAREA = "<div class='PSTEXT'>" | &PgltHTML | "</div>";
Administering Pagelets in the Portal RegistryThis section discusses how to:
Register homepage and template pagelets.
Modify pagelet attributes and security.
Register URL-based pagelets.
Register pagelet extensions.
Note. When registering pagelets, Pagelet Wizard automates
the process of interacting with the portal registry. You supply some key information
in the pagelet definition, such as pagelet name, title, folder, and so forth,
and Pagelet Wizard passes this information on to the portal registry.
However, the portal registry encapsulates other metadata about URLs
accessed by way of the portal. Even if you use Pagelet Wizard to define and
initially register a pagelet, you may still need to access the portal registry
to update an attribute or to register additional entries.
See Also
Registering Homepage and Template PageletsBefore you can access a pagelet through the portal, or associate a template pagelet with a target or WorkCenter page, you must register the pagelet in the portal registry. You can register pagelets by using Registration Wizard, or use the following procedure:
To register a new homepage pagelet or template pagelet:
Select PeopleTools, Portal, Structure and Content. Then
For template pagelets, click these links in this order: Portal Objects, Template Pagelets.
Template pagelets must be registered in this folder.
For homepage pagelets, click these links in this order: Portal Objects, Pagelets. Then, select any subfolder; for example, you can register a homepage pagelet in the Portal Objects, Pagelets, Organizers folder.
Select the Add Content Referencelink.
For template pagelets, select Target as the Usage Type.
For homepage pagelets, select Pagelet as the Usage Type.
Select Always use Local as the Node Name.
Select the URL Type based on the location of the pagelet.
Select PeopleSoft Component for component-based template pagelets.
Select PeopleSoft Script for iScript-based template pagelets.
Select PeopleSoft Generic URL for Pagelet Wizard-based pagelets.
Set pagelet attributes as necessary.
Set the content reference parameters as necessary.
Set additional parameters, if needed.
Save the content reference.
Modifying Pagelet Attributes and SecurityAccess the Content Ref Administration - General page (PeopleTools, Portal, Structure and Content. Click the Edit link for a content reference).
The portal registry stores every content reference available through the portal. The label and description defined here affect the appearance of the label and description in the navigation menu. Other attributes on this page will have an effect on the URL that will be used to reference the content associated with a definition.
Access the Content Reference Security page. (PeopleTools, Portal, Structure and Content. Click the Edit link for a content reference. Click the Security tab.
Permission lists can be used to secure the ability to navigate to the content item associated with this definition. One or more permission lists can be used.
Registering URL-Based PageletsThis is an example of the portal registration for a URL-based pagelet application that was not built with PeopleTools.
Registering Pagelet ExtensionsThis is an example of the registration for a pagelet extension that supports pagelet application personalization. In this example, the personalization component was built with PeopleTools. However, a non-PeopleSoft URL-based personalization page could have been referenced instead.
A personalization page must be identified in the registry as being related to a specific pagelet application.
Note that the personalization page (EO_PE_RSS_NEWS) is referenced in the Component Parameters group box. This is where the personalization page that is related to the pagelet application is identified.
Handling Special SituationsThis section discusses how to:
Determine pagelet running location.
Use refresh tags in pagelets.
Pagelet Running Location
You can determine if your code is running within the portal environment (that is being invoked using an https request coming from a portal servlet), as opposed to running in PIA outside of the portal environment. The PeopleCode %RunningInPortal system variable returns a Boolean value that lets you know whether or not you're in the portal. This variable works in both frame templates and HTML templates.
Using Refresh Tags in Pagelets
The order of precedence of refresh tags in pagelets is as follows:
Template
Target content
Pagelet
Among pagelets, the first one in the HTML to include a meta refresh tag is applied. Subsequently found refresh tags are not included in the HTML.
See Also