 Understanding Portal Administration
This chapter provides an overview of portal administration and discusses how to:
Administer portal definitions.
Administer folders.
Administer content references.
Manage folders and content references.
Manage general portal settings.
Manage portal objects.
Review menu item information.
Build registry search indexes.
Understanding Portal Administration
Every component delivered with PeopleSoft applications is pre-registered within the portal registry as a content reference. Common administrative tasks include adding, deleting, and renaming portal definitions. If you have portal administrator access, you can use the administration pages to manage the registry, including folders, content references, and security.
Additionally, to provide programmatic access to the portal registry, PeopleSoft delivers a portal registry API. This API provides the same kind of registry management capability as the administration pages and is fully described in the PeopleCode documentation. You can also manage the registry with the registration wizard.
You use the administration pages to:
Manage the structure and content of a portal, including folders and external content references.
Manage general portal settings, including the portal description and node templates.
Populate a portal registry with custom menus by importing menu definitions.
Generate a Verity search index or collection for use with your portal, based on the content of the portal registry.
Add, edit, and delete local and remote portal definitions.
The following diagram shows the organizational structure of the portal administration pages and folder definitions. Note the location of the special Portal Objects folder. This folder contains folders and content references for all templates and pagelets associated with a given portal.
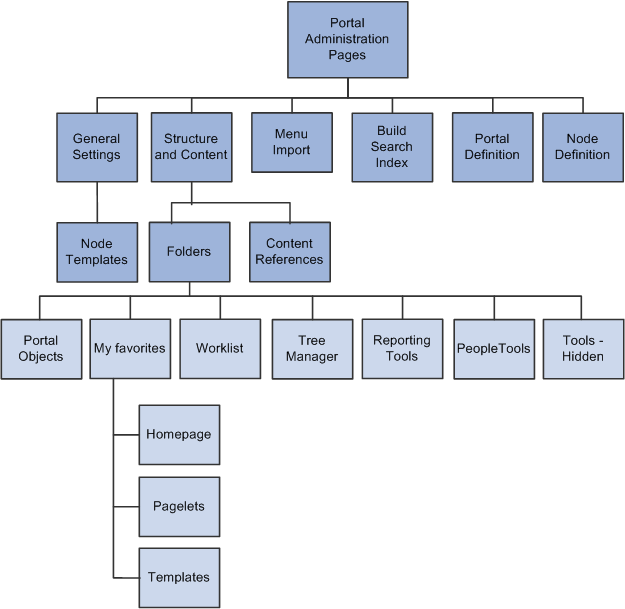
Portal administration pages
Note. To access the portal administration pages, you must have the appropriate permissions in PeopleSoft Security.
See Also
Understanding Folder Navigation
PeopleSoft applications integrate folder into the navigation structure. Folders are upper level containers that group other folders and content references into meaningful, organized, task-related sets. While most forms of navigation in PeopleSoft applications use folders, the term folder navigation has a specific meaning for PeopleTools portals. Folder navigation refers to a specific response by the portal when the user clicks a folder.
If folder navigation is not enabled, then when the user clicks any menu item in the menu structure, the item expands to display any sub menus and content reference. The user continues to expand folders by clicking them until the content reference is found. Nothing content appears in the target area until the user clicks the content reference.
Folder navigation provides the user with a more graphical and intuitive approach to traversing the menu structure. If folder navigation is enabled when the user clicks the folder label, instead of expanding the menu, the system displays a navigation page in the target content area. In this navigation page, the user sees graphical representations of folders and links to which she has access.
Folder navigation is the standard method of navigation delivered in PeopleSoft applications. Almost all folder navigation pages have the same look and feel because they use the default folder standard navigation object (page). This example shows the default navigation page that appears if you click the Portal menu when folder navigation is enabled:
Traversing the Menu Without Engaging Navigation Pages
When folder navigation is enabled, you can still quickly traverse a menu without triggering navigation pages by using one of these methods:
For drop-down navigation: Hover the mouse over the folder icon or the folder name. This action causes the menus to cascade sideward revealing sub folders and content references.
For left navigation: Click the triangle icon to the left of the menu name. This action causes the menus to expand downward revealing sub menus and content references.
Important! You enable folder navigation at the portal definition and general portal settings levels. Both must be enabled for this feature to work. When you enable folder navigation at the site level, all folders are navigable by using this method, however you can disable or override folder navigation at the individual folder level.
See Adding and Editing Portal Definitions.
See Managing General Portal Settings.
See Also
Understanding Navigation Pages
Common Elements Used in This Chapter|
Chart Navigation Object Name |
At the portal definition and general settings levels, specify the content reference that creates the look and feel of SmartNavigation folders. The system default value is PT_PORTAL_DEFAULT_CHART_NAV, which is a hidden iScript-based content reference that renders the basic SmartNavigation page. At the individual folder level, specify object that overrides the system-level chart navigation object. If you don't specify a value at the folder level, the portal uses the system-level chart navigation object. |
|
Folder Navigation Object Name |
At the portal definition and general settings levels, specify the content reference that system launches when the user clicks a folder name. The system default value is PT_PTPP_SCFNAV_BASEPAGE_SCR, which is a hidden iScript-based content reference that renders the PeopleSoft basic navigation page. At the individual folder level, specify an object that overrides the system-level default. If you don't specify a value at the folder level, the portal uses the system-level folder navigation object. |
|
Is Folder Navigation Disabled |
Select to override the system-level default setting and disable folder navigation for individual folders. Note. If you disable and then re-enable folder navigation at the system level, this field is automatically cleared. |
|
Is Folder Navigation Enabled |
Select to enable folder navigation for all folders in the current portal registry or selected portal definition. When enabled, if the user clicks the folder name in the menu structure, the navigation page or a content reference that you specify in the Folder Navigation Object Name field appears in the target area. |
|
(Object) Owner ID |
Select the owner of the portal object such as portal, folder, or content reference. The owner ID helps to determine the team that created or modified the object. You can define unique owner IDs for your organization by entering field translate values for the OBJECTOWNERID field using PeopleSoft Application Designer. Do not use PeopleSoft owner IDs. |
Administering Portal Definitions
This section discusses how to:
Define portals.
Add and edit portal definitions.
Change default portals.
 Common Elements Used in This Section
|
Name to appear as the portal label. This value is used for the browser window title when a long description has not been entered. |
|
|
Hosted by this node |
The node where the portal is defined. This is either a remote or local node. The node must be previously defined on the Maintain Node Definitions page. |
Pages Used to Administer Portal Definitions|
Page Name |
Definition Name |
Navigation |
Usage |
|
Portal Definitions |
PORTAL_DEFINITIONS |
PeopleTools, Portal, Portal Definitions |
Define portals from other databases and associate them with a node. |
|
Add Portal |
PORTAL_DEFN_ADD |
Click the Add button on the Portal Definitions page. |
Create a new portal definition. |
|
Edit Portal |
PORTAL_DEFN_ADD |
Click the Edit button on the Portal Definitions page. |
Update existing portal definitions. |
|
Removal Confirmation |
PORTAL_DEFN_DEL |
Click the Delete button on the Portal Definitions page. |
Delete portal definitions. |
Defining Portals
Access the Portal Definitions page (PeopleTools, Portal, Portal Definitions).
You can have multiple portals on a database or create one portal on multiple databases. You can define portals from other databases and associate them with a node. This supports transfers between portals and redirected requests for a portal not supported by the local web server.
|
Portal Type |
Displays the attribute of the selected node. Possible types are Local or Remote. |
|
Default |
Select to use this as the default node. Only local nodes can be the default. If you change the default, be sure to click the Save button. |
|
Edit |
Click to update the portal definition. Note. This button does not appear for the site template or the local node that is currently in use. To modify the current portal, use the General Settings page. |
|
Add |
Click to add a new portal definition. The new portal is listed in alphabetical order. |
|
Delete |
Click to delete a portal definition. You cannot delete the site template or node that is currently in use. |
See Also
Managing General Portal Settings
Adding and Editing Portal Definitions
Access the Portal Definitions - Add Portal page (Click the Add button on the Portal Definitions page).
Note. The Edit Portal page contains the same fields as the Add Portal page (Click the Edit button on the Portal Definitions page).
|
Long Description |
Enter a description to be used by screen readers if accessibility mode is turned on. This value is also used as the browser window title. If you don't enter a value in this field, the portal name is used as the browser window title. |
|
Default Template Name |
Select the template to use for this new portal. |
Use these fields to enable folder navigation and define the objects associated with folder navigation for portals other than the one your are currently signed into. To enable folder navigation for the current portal, use the General Settings page.
Important! Folder navigation is not enabled unless you select the Is Folder Navigation Enabled check box on both the Portal Definition and General Settings pages. Is Folder Navigation Enabled is selected by default in the standard PeopleTools portals.
See Managing General Portal Settings.
Changing Default Portals
There are two ways to change the default portal:
Change the default portal in the portal definition.
Insert the new default portal name into the URL.
Changing the Default Portal in the Portal Definition
To change the default portal:
In the current default portal, select PeopleTools, Portal, Portal Definitions.
Select the Default check box for the portal that you want to open.
Save.
Sign out.
Shut down and restart the portal's web server.
Sign in.
When you sign in, the new default portal is invoked.
Changing the Default Portal by Inserting the New Portal Name in the URL
You can also change the default portal by changing the URL. To change the URL, insert the new portal name instead of the existing portal name. For example, to change to the supplier portal from the employee portal, make the following substitution.
URL before the change:
http://localhost/psp/ps/EMPLOYEE/QE_LOCAL/c/UTILITIES.PORTAL_DEFINITIONS.GBL
URL after the change:
http://localhost/psp/ps/SUPPLIER/QE_LOCAL/c/UTILITIES.PORTAL_DEFINITIONS.GBL
Note. This type of portal change is valid until the browser session is closed.
Administering Folders
This section presents an overview of folders, their common elements, and discusses how to:
Define standard navigation folders.
Define SmartNavigation folders.
Delete folders.
Set folder security.
Understanding Folder Administration
In the portal registry, folders organize content references into a multilevel hierarchy. Each folder can contain content references as well as other folders. Folders and content references share many of the same properties.
You can define these two types of folders in PeopleSoft applications:
Standard navigation folders.
SmartNavigation folders.
Standard navigation folders are container structures that you create to group other folders and content references into meaningful collections of business processes or tasks. When you configure standard navigation folders, you must explicitly define the location of each folder, subfolder or content reference in the portal menu structure. The portal uses your configuration to build the menu, which remains static unless you modify the configuration.
Standard navigation folders cascade open when you hover your mouse over them and generate navigation pages when you click them. Standard navigation folders can appear at any level in the menu hierarchy in both the Menu pagelet or the Main Menu drop-down navigation. Most PeopleSoft application folders are standard navigation folders, like this one:
See Standard Navigation Pages.
SmartNavigation folders differ from standard folders in several ways. SmartNavigation folders can only appear in the Main Menu drop-down navigation; they are not accessible to the Menu pagelet. When you configure SmartNavigation folders, you explicitly define the root folder only. The portal uses your application data and the relationships among that data to dynamically generate subfolders and content references based on your data. Your menu structure changes as your data changes.
Similar to standard navigation folders, SmartNavigation folders cascade open when you click the label; however, when you click a SmartNavigation icon, instead of creating a navigation page, the portal servlet displays your data in an organizational chart structure.
Note. Because SmartNavigation folders integrate your data into the menu structure, you must specify the data that the system should retrieve. Currently, SmartNavigation folders support only rowsets and trees as data sources.
You can configure SmartNavigation pages to take advantage of related content services so that contextually relevant content references are accessible from each chart node. Users do not have to navigate back through any menu, the links are available under the Actions drop-down list box on the node.
See Understanding Related Actions Configuration.
Common Elements Used in This Section|
Name |
Enter a name for the folder. Note. The name can consist of letters, digits, and underscores ( _ ). It cannot contain any spaces and cannot begin with a digit. |
|
Label |
Enter the text to appear as the link for this folder. |
|
Copy object |
Click this button to access the Copy Object to a Different Portal Registry page, which enables you to copy an existing folder to a different portal registry. This button appears only when you're editing a folder. |
|
Select New Parent Folder |
Click to copy the folder to a new location within the current portal registry. This button appears only when you're editing a folder. |
|
Long Description |
Enter text to appear when the cursor rests over the link for this folder. If you leave this field blank, the label appears. |
|
(Optional) Portal-aware applications can use this field for group processing. All PeopleTools objects have the product name PT. |
|
|
Sequence number |
Enter a sequence number to define where this folder appears in its parent folder, and therefore where its associated menu entry appears within its parent menu. If you leave the sequence number blank, the folder is added to the top of the list of folders and is displayed in alphabetical order. You can change the sequence only one item at a time, and each time you do so, you must save your changes to see the result. |
|
Valid from date and Valid to date |
Enter a valid from date. The valid to date is optional and is blank by default. These dates can be used for application-specific processing by portal-aware applications and are used by the portal navigation to determine visibility. |
|
Select to replace the standard navigation page with chart-based SmartNavigation page. This field is disabled by default. To enable this field, select a value in the Data Source field. If you select this check box, then the application uses PT_ABN_ORGCHART, the default PeopleTools chart navigation page. If you clear this check box, then you must enter your own value in the Folder Navigation Object Name field. |
|
|
Specify the content reference of the chart navigation component that overrides the system-level folder navigation component. Important! You must use the definitions associated with the PT_ABN_ORGCHART component as the basis of any custom folder navigation object. See Creating Custom SmartNavigation Pages. Note. If you select a content reference that's hidden from portal navigation, the folder navigation occurs, but the menu name that you click remains highlighted. |
Pages Used to Administer Folders|
Page Name |
Definition Name |
Navigation |
Usage |
|
Folder Administration |
PORTAL_FLDR_ADM |
PeopleTools, Portal, Structure and Content, Portal Objects Navigate to the folder list and select Add Folder to add a new folder, or Edit to edit an existing folder. |
Add new folders or edit existing folders. |
|
Folder Security |
PORTAL_FLDR_SEC |
PeopleTools, Portal, Structure and Content, Portal Objects, Folder Administration, Folder Security |
Set folder security. |
Defining Standard Navigation Folders
Access the Folder Administration page (PeopleTools, Portal, Structure and Content, then click the Add Folder link.).
To define standard navigation folders:
Select PeopleTools, Portal, Structure and Content.
Navigate to the folder that you want by clicking the folder names.
Click the Add folder link to create a new folder.
Enter values in the Folder Administration and Folder Attributes fields.
Set the folder security.
Save the folder.
This table describes the fields that you use to define and maintain folders.
|
Name |
Enter a unique name for the folder. Note. The name can consist of letters, digits, and underscores ( _ ). It cannot contain any spaces and cannot begin with a digit. |
|
Label |
Enter the text to appear as the link for this folder. |
|
Copy object |
Click this button to access the Copy Object to a Different Portal Registry page, which enables you to copy an existing folder to a different portal registry. This button appears only when you're editing a folder. |
|
Parent Folder |
The name of the current parent folder. This field is display-only. |
|
Select New Parent Folder |
Click to copy the folder to a new location within the current portal registry. This button appears only when you're editing a folder. |
|
Long Description |
Enter text to appear when the cursor rests over the link for this folder. If you leave this field blank, the label appears. |
|
(Optional) Portal-aware applications can use this field for group processing. All PeopleTools objects have the product name PT. |
|
|
Sequence number |
Enter a sequence number to define where this folder appears in its parent folder, and therefore where its associated menu entry appears within its parent menu. If you leave the sequence number blank, the folder is added to the top of the list of folders and is displayed in alphabetical order. You can change the sequence only one item at a time, and each time you do so, you must save your changes to see the result. |
|
Valid from date and Valid to date |
Enter a valid from date. The valid to date is optional and is blank by default. These dates can be used for application-specific processing by portal-aware applications and are used by the portal navigation to determine visibility. |
|
Select to make this folder invisible to users. |
Application Navigation
Use these fields to define the data source parameters for SmartNavigation folders.
(Optional) Specify a name, a label, and an attribute value for each attribute. These values can be used by portal-aware applications for application-specific processing. Select the Translate check box to make an attribute's label and attribute value translatable.
See Also
Defining SmartNavigation Folders
Access the Folder Administration page (PeopleTools, Portal, Structure and Content, then click the Add Folder link.).
To define SmartNavigation folders:
Select PeopleTools, Portal, Structure and Content.
Navigate to the folder where you want to add the SmartNavigation folder and click the Add folder link.
Enter values in the Folder Administration fields.
In the Application Navigation group box, select a data source.
If you select Tree as the data source, then:
The Tree Properties fields appear.
Enter the tree properties.
Important! Use valid, active trees only; inactive, draft,
or unaudited trees render unexpected results.
SmartNavigation passes the values of several tree-specific fields to
the application via URL. Certain characters are inappropriate for use in
a URL and should be avoided. When you set up trees, do not use any of the
following characters in the tree name, setID, set control value, and tree
branch fields: pound (#). percent (%). dollar ($). ampersand (&).
plus (+). comma (,). forward slash/virgule (/). colon (:). semi-colon
(;). equals (=). question mark (?). at symbol (@). space ( ), quotation
marks("), less than symbol (<), greater than symbol (>), left curly
brace ({), right curly brace (}), vertical bar/pipe (|), backslash (\),
caret (^), tilde (~), left square bracket ([), right square bracket (]),
and grave accent (`).
The PeopleCode Type drop-down list box appears.
If the tree uses PeopleCode, select the PeopleCode type and enter the location of the program in the iScript or Application Package fields. If the tree does not use PeopleCode, leave the drop-down list blank.
If you select Rowset as the data source, then:
The PeopleCode Type drop-down list box appears. Rowsets are defined by PeopleCode, so you must select a value in this field.
Select iScript or Application Package and enter the location of the program in the iScript or Application Package fields, respectively.
Note. If you use an iScript with a tree or rowset, you must grant permissions to the web library and iScript for users who will access the SmartNavigation folder.
(Optional) To use a non-default chart navigation page, clear the Default Chart Navigation Page check box and enter a value in the Folder Navigation Object Name field.
Important! If the node is a remote content site, then you must clear the Default Chart Navigation Page field and then enter a remote content reference as the Folder Navigation Object field. Otherwise, the portal cannot generate the correct URL for the SmartNavigation folder. You also must enable single signon.
Set the folder security.
Save the folder.
Configure any related actions that are necessary.
Application Navigation
Use the fields in this group box to configure SmartNavigation.
|
Data Source |
Specify the source of the data that builds the SmartNavigation chart. Select Tree to build the chart using a tree. Selecting this value makes the Tree Properties group box appear. Select Rowset to build the chart using a rowset. Selecting this value makes the PeopleCode Type field appear. When you select a data source, the Default Chart Navigation Page check box is enabled and checked by default and the PeopleCode Type field appears. |
|
Display as Content Reference |
Select to replace the default SmartNavigation folder with a content reference icon and link so that the link does not display any submenus, but immediately opens the SmartNavigation chart in the target area. This check box is visible only when the Data Source drop-down list box contains a value. Note. Applies to the root-level SmartNavigation folder only. System generated drop-down navigation subfolders are not affected by this setting. |
|
Node Name |
Select the node where the content resides. |
|
PeopleCode Type |
Select Application Package or iScript as the PeopleCode type. This field appears only if a data source is specified. Selecting the type enables the corresponding group box and related fields so that you can specify the PeopleCode program to use. |
Application Package Parameters
If you select Rowset as the data source and Application Package as the PeopleCode type, these fields become visible for you to specify the application package that defines and populates the data in the rowset.
|
Application Package |
Enter PeopleCode application class name where the application class method is defined. |
|
Application Package Path |
Enter the names—delimited by colons—of each subpackage in the hierarchy that drills down to the class that contains the method. Beginning and ending colons are not required. For example, the path could be sub_package:sub_package:app_class or simply app_class if there are no sub application packages. |
|
Application Package Method |
Enter the name of the specific method that builds the rowset which that populates the navigation page in the target area. |
iScript Parameters
If you select Rowset or Tree as the data source and iScript as the PeopleCode type, these fields become visible for you to specify the iScript that builds the chart.
|
Record (Table) Name |
Enter the record that contains the iScript that defines the rowset. |
|
Field Name |
Enter the field that contains the iScript that defines the rowset. |
|
PeopleCode Event Name |
Enter the event that contains the iScript that defines the rowset. |
|
PeopleCode Function Name |
Enter the iScript function that creates the rowset. |
Tree Properties
If you select Tree as the data source, use these fields to specify the tree that builds the chart.
|
Tree Name |
Select the name of the tree that the portal is to use to render the menu. |
|
SetID |
Enter the SetID for the tree. |
|
Set Control Value |
Enter the set control value for the tree. |
|
Effective Date |
(Optional) Enter the effective date for the tree. |
|
Tree Branch |
(Optional) Enter the tree branch for the tree. |
Deleting Folders
To delete a folder:
Select PeopleTools, Portal, Structure and Content.
Navigate to the folder that you want to delete by clicking the folder names.
Click the Delete button next to the folder that you want to delete.
All child folders and child content references are deleted when you delete the selected folder. Make sure that no critical dependencies exist for these objects before deleting their parent folder.
Setting Folder Security
Access the Folder Security page (PeopleTools, Portal, Structure and Content. Navigate to the appropriate folder, click the Edit link, and then click the Folder Security tab.)
|
Public |
Select to make the folder available to all users. When this is selected, all other fields except Label are hidden. |
|
Author Access |
Select to indicate that you (the currently signed-in user and the author of the folder) can access the folder in the future, regardless of how other permissions are set. |
You can base non-inherited folder security on roles or permission lists. You can specify any combination of roles and permission lists to provide folder security.
|
Type |
Select from these types: Permission List: Enables access for users based on permission list membership. You then specify the permission lists that should have access to this folder. Role: Enables access for users based on role membership. You then specify the roles that should have access to this folder. |
|
Name |
Select the permission list or role that should have access to this folder. |
|
Cascade |
Select to indicate that this authorization should also apply to children of this folder. |
|
View Definition |
Click to access the security administration component for the permission list or role specified on the current row. |
Inherited Security Authorizations
Displays authorizations that have been inherited from parent folders. The fields in this grid have the same purpose as the corresponding fields in the Security Authorizations grid. You can change inherited authorizations by modifying the parent folders' authorizations and cascade settings.
See Also
Administering Content References
This section discusses how to:
Define content references.
Create related links.
Set content reference security.
Review content reference security.
Test content references.
Delete content references.
Define content reference links.
Set content reference link security.
Pages Used to Administer Content References|
Page Name |
Definition Name |
Navigation |
Usage |
|
Content Ref Administration (content reference administration) |
PORTAL_CREF_ADM |
PeopleTools, Portal, Structure and Content, Portal Objects Navigate to the Content References list and click Edit.. Or click Add Content Reference. |
Add new content references or edit existing content references. |
|
Content Reference Security |
PORTAL_CREF_SEC |
PeopleTools, Portal, Structure and Content, Portal Objects, Content Ref Administration, Security |
Set content reference security. |
|
User ID Queries |
USER_QUERY |
PeopleTools, Security, User Profiles, User Profiles, User ID Queries |
Review content reference security by user. |
|
Permission List Queries |
PLIST_QUERIES |
PeopleTools, Security, Permissions & Roles, Permission Lists, Permission List Queries |
Review content reference security by permission list. |
|
Role Queries |
ROLE_QUERY |
PeopleTools, Security, Permissions & Roles, Roles, Role Queries |
Review content reference security by role. |
|
Select a Content Reference or Content Reference Link |
PORTAL_CREF_SELECT |
PeopleTools, Portal, Structure and Content, Portal Objects Navigate to the Content References list and click Add Content Reference Link. |
Select a content reference or content reference link. |
|
Content Reference Link Administration |
PORTAL_CREF_LNK |
|
Add new or edit existing content reference links. |
|
Related Links Group |
PORTAL_RLNK_ADM |
|
Create related links groups. |
|
Security |
PORTAL_CLINK_SEC |
PeopleTools, Portal, Structure and Content, Portal Objects, Content Reference Link Administration, Security |
Set content reference link security. |
Defining Content References
Access the Content Ref Administration page (PeopleTools, Portal, Structure and Content. Navigate to the appropriate content reference; then click the Edit link.)
Note. Many of the fields described in this section only appear when you specify certain field values.
Many of these fields are similar to fields for administering folders on the Folder Administration page.
When you save a content reference that points to a PeopleSoft component or script on the default local node, the security settings for the content reference are automatically inherited from the menu or script security settings. Any permission lists or roles that you entered on the Content Reference Security page before saving the content reference are deleted and replaced by those of the component or script. These new security settings are also propagated up the folder hierarchy. This ensures that the content reference is visible and all folders are viewable, enabling users to navigate to the component.
Warning! Do not add internal PeopleSoft content references using the administration pages. Use the registration wizard instead, so that information is consistent between PeopleSoft Application Designer and the portal. Any changes made to the menu definition in PeopleSoft Application Designer and not made to the portal content reference definition break the content reference. The portal navigation system uses the portal registry, not the internal location of menu definitions in PeopleSoft Application Designer.
See Using the Registration Wizard.
|
Usage Type |
Select from: Frame template, HTML template, Homepage tab, Pagelet, Inline Frame Template,and Target. For a typical PeopleSoft application page, select Target (the default value) and set the URL type to PeopleSoft Component. The fields on the page may change based upon the information selected in this field. If you select a usage type of Pagelet, the Pagelet Attributes region appears. Specify the default column, node name, and edit URL to display a help icon allowing help to be accessed from a pagelet. Pagelets must be defined in the Portal Objects\Pagelets folder or they are not recognized as pagelets by the portal. This is not enforced by the portal, so it is possible to create a pagelet that is not recognized. Note. The name that you specify for a new pagelet can consist of letters, digits, and underscores ( _ ). It cannot contain any spaces and cannot begin with a digit. |
|
Storage Type |
This field is available only if you selected a usage type of Frame template or HTML template. Select from these storage types: Remote by URL: This is the default value. Local (in HTML Catalog) |
|
HTML Area |
This text area is available when you select Usage Type as HTML template or Frame Template and Local (in HTML Catalog) in the Storage Type field. A static template is based on HTML code that is entered into the HTML area of a template content reference (a content reference that exists in the Portal Objects\Templates folder of the portal registry). Bind variables cannot be used within the HTML area. The HTML includes any HTML that is required for the template itself, plus tags that specify the URLs for template pagelets. |
|
Template Name |
Select the template for this page. If you leave this field blank, the portal servlet automatically uses the template of the node at runtime. The node default template is set up on the General Settings page. If a node has not been specified, it uses the portal's default template. |
|
WSRP Producible |
This option appears only for usage types of Target and Pagelet. Select this option for PeopleSoft content that you intend to expose for remote, WSRP portals to consume. |
|
No Template |
Select to have the target content (your application page) not wrapped with a portal template at runtime; by viewing your page, the user is effectively taken outside of the portal environment (not usually desirable). When this check box is selected, the Template Name field is hidden. |
|
Create Content Reference Link |
Click this link to create or edit a content reference link. |
|
Add Content Reference |
Click this link to add a content reference. |
|
Test Content Reference |
Click this link to test a content reference. |
|
Hide from portal navigation |
Select to hide the content reference from portal navigation. |
|
Hide from MSF Navigation |
MSF is not currently supported. |
URL Information
The fields that appear in this group box are based upon the selection you make in the URL Type field.
|
Node Name |
Select the node for this page. Select Always use local to associate the page with the default local node. The default local node is designated on the Portal Definitions page. |
|
URL Type |
Select from these URL types: Non-PeopleSoft URL: Enter the URL in the Portal URL field that appears. This usage type can be used in conjunction with a defined node. The result is the concatenation of the selected node's URI text and the portal URL that you entered. PeopleSoft Component.The Component Parameters region appears. Select the menu name, market, and component name to use for this content reference. PeopleSoft Generic URL: Enter the URL in the Portal URL field that appears. This usage type can be used in conjunction with a defined node. The result is the concatenation of the selected node's URI text and the portal URL that you entered. PeopleSoft Homepage Tab: The Homepage tab attributes enable you to specify whether the tab can be renamed, and enables you to associate a help ID with the tab or hide the pagelet action bar. PeopleSoft Script: The iScript Parameters region appears. Select the record (table) and fields names, PeopleCode event name, and PeopleCode function name that describes the iScript to use for the content reference. PeopleSoft Worklist URL: Enter the URL in the Portal URL field that appears. Use the following format: w/WORKLIST? ICAction=ICViewWorklist&Menu=Worklist&Market=GBL&PanelGroupName=WORKLIST Remote Portlet:Select the producer and the portlet that you want to register manually. Only producers that have been registered are available for selection. Values for the fields Label and Long Description default to the portlet's title and description. You can change these values. Click Producer Details to display the Display Producers page and view remote producers that have been defined in the system. See Using WSRP to Consume and Produce Remote Portlets. Note. The availability of these options depends on the selected usage type. |
|
Additional Parameters |
Enter query string parameters to be appended onto a PeopleSoft component or PeopleSoft script. For example, enter emplid=8001. |
The Pagelet Attributes group box enables you to manage the pagelet's behavior and appearance.
See Managing Pagelet Attributes.
Content reference attributes provide a framework to specify and store free-form information about a content reference. For example, you can use content reference attributes to specify and store keywords, help information, and related links for content references.
In addition, portal-aware applications can use content reference attribute information for application-specific processing. Portal-aware applications are those that:
Know about the portal registry and API.
Know how to get information from a content reference.
Have the code to look at a content reference and do something meaningful with the information.
|
Name |
Enter an object name to identify the attribute programmatically. This name is not displayed to the user. Note. The name can consist of letters, digits and underscores ( _ ). It cannot contain any spaces and cannot begin with a digit. |
|
Translate |
Select to specify that the label and attribute values are translated. |
|
Attribute Information |
Click to create related links. You can create related links only after entering RELLINK in the Name field. |
|
Enter a descriptive name for the attribute to display to the user. Required if Translate is selected. |
|
|
Attribute value |
Enter information about the attribute that the portal uses to apply the attribute to the content reference. |
Links
This grid appears only if content reference links exist that connect to this content reference. Click Link Definition to view the definition of each listed content reference link.
Available Content Reference Attributes
This table describes the content reference attributes that are recognized by PeopleSoft portal technology:
|
Content Reference Attributes |
Description |
|
Use this attribute to specify keywords that you want to associate with this CREF. Any search using these keywords returns this CREF as a search result. |
|
|
Use this attribute to override a default HTML object or image used for homepage components, such as tabs and pagelets, by providing the name of an alternative HTML object or image. Note. You can override only a specified set of homepage objects and images. |
|
|
Use these attributes (numbered from 12 to 26) to insert additional custom images on a homepage tab. |
|
|
Use this attribute to indicate that the component or page should always open in a new browser window. Note. This option only affects the link behavior, when it is rendered in a navigation collection template pagelet inside the pagelet area of a WorkCenter page. |
|
|
Use this attribute to indicate that the component or page should open in the current browser window and replace the current page completely. Note. This option only affects the link behavior, when it is rendered in a navigation collection template pagelet inside the pagelet area of a WorkCenter page. |
|
|
Use this attribute to implement caching for individual pagelets and targets, based on user, role, or application. |
|
|
Use this attribute to override the character set encoding used by the content reference. |
|
|
Use this attribute to specify how long the portal should wait for a pagelet to load before it considers the pagelet unavailable. |
|
|
Use this attribute to specify a URL that you want to associate with the help link for a pagelet. Note. This attribute takes priority over a PeopleSoft Help ID if both properties are set, |
|
|
Use this attribute to create related links for the content reference. |
Content Reference Type Parameters
This table summarizes the valid combinations of usage type, storage type, and URL type or key HTML content supported for content references:
|
Usage Type |
Storage Type |
URL Type or Key HTML Content |
|
Target |
Remote by URL |
PeopleSoft Component |
|
Target |
Remote by URL |
PeopleSoft Script |
|
Target |
Remote by URL |
PeopleSoft Generic URL |
|
Target |
Remote by URL |
Non-PeopleSoft URL |
|
Target |
Remote by URL |
PeopleSoft Worklist URL |
|
Target |
Remote by URL |
Remote Portlet |
|
Pagelet |
Remote by URL |
PeopleSoft Component |
|
Pagelet |
Remote by URL |
PeopleSoft Script |
|
Pagelet |
Remote by URL |
PeopleSoft Generic URL |
|
Pagelet |
Remote by URL |
Non-PeopleSoft URL |
|
Pagelet |
Remote by URL |
PeopleSoft Worklist URL |
|
Pagelet |
Remote by URL |
Remote Portlet |
|
HTML template |
Remote by URL |
PeopleSoft Script |
|
HTML template |
Remote by URL |
Non-PeopleSoft URL |
|
HTML template |
Local (in HTML Catalog) |
Target, Pagelet, or Source element |
|
Frame template |
Remote by URL |
PeopleSoft Script |
|
Frame template |
Remote by URL |
Non-PeopleSoft URL |
|
Frame template |
Local (in HTML Catalog) |
Target or IClientComponent element |
|
Inline Frame template |
Remote by URL |
PeopleSoft Script |
|
Inline Frame template |
Remote by URL |
Non-PeopleSoft URL |
|
Inline Frame template |
Local (in HTML Catalog) |
Target or Pagelet component |
|
Homepage tab |
Local (in HTML Catalog) |
N/A |
See Also
Defining Standard Navigation Folders
Understanding Portal Templates
Managing General Portal Settings
Using Predefined Homepage HTML Objects
Administering Server-Based Caching
Creating Related Links
You can create related links for a portal page using the RELLINK content reference attribute. You can create related links to external sites, to internal sites, and to other portal pages.
Note. Related links are implemented with your choice of template on the content reference. Using the PeopleTools Related Links template displays the related links for the content reference, but not the portal menu navigation.
To create related links:
Define the RELLINK content reference attribute.
Create related links groups.
Create related links for each group.
Test the related links.
The following diagram shows an example of the related link template results when using the RELLINK attribute on a given content reference:
The items shown in the diagram are described in this table:
|
Item |
Description |
|
Related Links |
RELLINK content reference attribute with the label Related Links. |
|
External Sites |
A related link group defined with the label External Sites. |
|
Site #1, Site #2, Site #3 |
Related links for the External Sites group. |
|
PeopleSoft Sites |
A related link group defined with the label PeopleSoft Sites. |
|
Batch rules, Developers' site, and User maintenance |
Related links for the PeopleSoft Sites group. |
Defining the RELLINK Content Reference Attribute
To define a related link content reference attribute:
Access the Content Ref Administration page (PeopleTools, Portal, Structure and Content. Navigate to the appropriate content reference; then click the Edit link.)
Enter RELATEDLINKS_TEMPLATE. in the Template Name field,
In the Name field of the Content Reference Attributes region, enter RELLINK.
After you set this value and move out of the field, the Attribute Information link changes to Edit Related Links.
Verify that the Translate check box is selected.
Enter a label for the related links attribute.
Note. You do not need to enter any information in the Attribute Value field. After you create the related link group and the related links, the system populates this field with all defined attributes as a string.
Access the Related Links Group (PORTAL_RLNK_ADM) page.
To create a related link group:
In the Related Link Groups Label field, enter a name.
This name is the heading under which you place related links.
To create additional related link groups, click Add and repeat step 1.
Creating Related Links
To create a link:
In the Related Links region on the Related Links Group (PORTAL_RLNK_ADM) page, enter a name in the Related Link URL Label field.
This name appears as a link under the group name.
If you're linking to an internal site, select a node name from the list.
If you're linking to an external site, leave this field blank.
In the Related Link URL field, enter URL information for the link.
If the link is to an internal site, enter the URL or URI. The URL or URI can be to an internal site, to a portal, and so on. If you specified a value for the Portal URI Text field on the node definition, you can enter a specific document name as the target. The name is appended to the URI text for a full URL.
If the link is to an external site, enter the URL.
To define additional links for the group, click Add and repeat steps 2 through 3.
Click OK to save the entry and return to the Content Ref Administration page.
The Attribute Value field is populated with an XML-type formatted string. This string contains all the related link data and is stored in the PORTAL_ATTR_VAL field of the PSPRSMATTRVAL record for the content reference specified in the PORTAL_OBJNAME field. Following is an example of a generated XML-type formatted string:
<GRPLBL>Worklist Pages<URLLBL>Worklist Details</URLLBL><CP>Portal</CP>⇒
<URL>ICType=Panel&Menu=WORKLIST&Market=GBL&PanelGroupName=⇒
WORKLIST_DETAILS</URL><URLLBL>Worklist Monitor</URLLBL>⇒
<CP>Portal</CP>⇒
<URL>ICType=Panel&Menu=WORKFLOW_ADMINISTRATOR&Market=⇒
GBL&PanelGroupName=WF_MONITOR_01</URL></GRPLBL><GRPLBL>Tasks<URLLBL>Task List⇒
 Summary</URLLBL>⇒
<CP>Portal</CP><URL>ICType=Panel&Menu=⇒
PORTAL_COMPONENTS&Market=GBL&PanelGroupName=EO_PE_TASK_LIST⇒
</URL></GRPLBL>
You should test related links to view how the page appears to users, ensure that the labels are correct, and verify that the links function properly. To test related links, click Test Content Reference on the Content Ref Administration page just above the URL Information region.
Note the following:
If the portal cache is enabled on the web server, the related link template does not appear for a content reference page accessed from the menu until the cache expires.
Related link URLs are only displayed when a user has security access to the URLs.
To grant security access to a related link URL, register the related link URL as a separate content reference and associate permission lists with it.
If the related link is not separately registered, then it is treated as having public access.
If a related link group has no URLs underneath it to which the user has security access, the related link group is hidden. If the user does not have access to any of the related links associated with the target page, then the related links section of the template is hidden.
If the target page does not display any related links, ensure the following:
The application and portal databases are registered as content providers.
Also check for data-entry errors.
The templates are registered in PeopleSoft Application Designer with the correct names.
If the templates are registered, check for data-entry errors.
The correct related link template is specified for the target page.
Also ensure that the value of the PORTAL_TEMPL_NAME field in the PSPRSMDEFN record displays a correct related link template
The RELLINK string was saved on the target page in the content registry.
Check if an XML string appears in the Attribute Value field on the Content Ref Administration page. If not, delete and reenter the RELLINK attribute for all the related link information.
You assigned security in the registry to the user for the content references listed as related link URLs.
If not, assign security using the Content Reference Security page for registered related link URLs.
Setting Content Reference Security
Access the Content Reference Security page (PeopleTools, Portal, Structure and Content. Select the Edit link for a content reference; then select the Security tab.)
This page is similar to the Folder Security page, except that when you define a portal content reference for which the URL type is PeopleSoft Component, Worklist, or PeopleSoft Script, the content reference security is always inherited from the security settings of the referenced component or script. All fields except Public and Author Access are read-only.
However, when you define a content reference of any other type, you can specify the type of security to apply, just as you can with a portal folder. You can base non-inherited object security on any combination of permission lists and roles.
Note. If you copy, move, or add a content reference to a folder, the content reference's security settings are propagated up the folder hierarchy. This ensures that the content reference is visible and all folders are viewable, and enables users to navigate to the content reference. If you remove the content reference from that folder, the security settings that were applied when it was added to the folder are also removed from the folder hierarchy, without disturbing any settings still required for other content references remaining in that folder.
Note. Content reference links do not inherit cascaded security from folders.
See Also
Reviewing Content Reference Security
You can use automated queries to discover the content references to which a given user, permission list, or role has access. Each query provides a different degree of detail about the properties of the content references.
Content Reference Security by User
Access the User ID Queries page (PeopleTools, Security, User Profiles, User Profiles, User ID Queries).
This page contains several general purpose security queries, along with the following links to content reference access queries for the selected user, which are described on the page:
User ID's Content Reference Access.
User ID's Content Reference (includes Portal) Access.
User ID's Content Reference (includes Menu, Component and Market) Access.
User ID's Content Reference (includes Portal, Menu, Component and Market) Access.
When you click one of the query links, a page appears in a new window, containing a grid with the information described for each content reference.
Content Reference Security by Permission List
Access the Permission List Queries page (PeopleTools, Security, User Profiles, User Profiles, Permission List Queries).
This page is similar to the User ID Queries page, with equivalent links to content reference access queries for the selected permission list, as follows:
Permission List's Content Reference Access.
Permission List's Content Reference (includes Portal) Access.
Permission List's Content Reference (includes Menu, Component and Market) Access.
Permission List's Content Reference (includes Portal, Menu, Component and Market) Access.
When you click one of the query links, a page appears in a new window, containing a grid with the information described for each content reference.
Content Reference Security by Role
Access the Role Queries page (PeopleTools, Security, User Profiles, User Profiles, Role Queries).
This page is similar to the User ID Queries page, with equivalent links to content reference access queries for the selected role, as follows:
Role's Content Reference Access.
Role's Content Reference (includes Portal) Access.
Role's Content Reference (includes Menu, Component and Market) Access.
Role's Content Reference (includes Portal, Menu, Component and Market) Access.
When you click one of the query links, a page appears in a new window, containing a grid with the information described for each content reference.
Testing Content References
After creating or modifying a content reference and setting up permissions, test the content reference by clicking Home and navigating to it, or by clicking Test Content Reference on the Content Ref Administration page.
Note. The Test Content Reference link appears only for content references that are of the Target usage type.
Deleting Content References
You delete a content reference or a content reference link from the folder where it's located in the Structure and Content hierarchy. Select PeopleTools, Portal, Structure and Content, Portal Objects, then click the Delete button for the content reference that you want to delete.
Warning! Do not delete content references that are delivered with PeopleTools.
These default content references have special significance to your portal.
Changing them could make your portal unusable.
When you delete a content reference or a content reference link, all
content reference links that connect to it are also deleted. This behavior
propagates back through any content reference link chain.
Defining Content Reference Links
Access the Content Reference Link Administration page (PeopleTools, Portal, Structure and Content, Portal Objects and click a content reference link on the Content Reference or Content Reference Link page).
PeopleSoft portals store content references based on their URLs, so you can't register two different content references that specify the same URL. Content reference links overcome this limitation by enabling you to define more than one menu item that invokes a given URL. You define a content reference link like any other content reference, but instead of specifying a URL, you specify an existing content reference as its destination. At runtime, clicking the content reference link entry on the portal menu connects to the destination content reference, which invokes its URL.
Note. To the user, a content reference link looks and works the same as a content reference on the portal menu.
A content reference link can connect to:
A content reference of usage type Target.
Another content reference link.
You can define a content reference link in the same locations that you can define a content reference of usage type Target. Multiple content reference links can connect to a single destination content reference.
By connecting one content reference link to another content reference link, you can create a chain of redirection, which always ends in a content reference of usage type Target. You don’t need to know what the ultimate destination is when you define your new content reference link, and you can duplicate the property settings of the content reference link to which it connects, rather than those of the ultimate destination. However, it is recommended that you limit your use of chains of content reference links as they impose processing overhead on your portal when selected.
Warning! If you delete a destination content reference or content reference link, all content reference links that connect to it are also deleted. This behavior propagates back through any content reference link chain.
When you define a content reference link, it initially inherits its properties and security settings from the destination that you specify. You can override every property except the destination's URL, usage type, storage type, and security settings. The inherited security settings propagate upward through the folder hierarchy from the content reference link.
|
Name |
Select the destination content reference to which you want this content reference link to connect. |
|
Portal |
Select the portal that contains the destination content reference to which you want this content reference link to connect. LOCAL_PORTAL always refers to the portal where the content reference link is defined, so moving or copying it to a different portal changes the resolution of this value. Important! If you change this value, you must also select a new link content reference. |
|
Name |
Enter a unique object name for this content reference link. |
|
Test Content Reference Link |
Click to test this content reference link. Clicking this button should produce the same result as if you clicked the content reference link from the portal menu. |
If you leave the following fields blank, their values are inherited from the destination content reference:
Label.
Long Description.
Product.
Sequence number.
Object owner identifier.
No Template.
Template Name.
Valid from date.
Valid to date.
Content Reference Link Attributes
Content reference link attributes have the same page fields as content reference attributes.
You can define content reference link attributes directly here, or you can copy an attribute from the destination content reference using the Content Reference Attributes grid, and modify it to suit your purposes.
At runtime, the content reference link attributes defined here are combined with the content reference attributes defined at the link destination, and applied together.
Important! If a content reference link attribute defined
here has the same name as a content reference attribute defined at the link
destination, but a different attribute value, the value defined here takes
precedence and is applied at runtime.
Content reference link attributes are independent and separate from
the content reference attributes at the link destination. Modifying one has
no effect on the other.
If the destination content reference has defined content reference attributes, they're displayed in this grid. You can copy them from the grid to the Content Reference Link Attributes group box, using the following page elements:
|
Select |
Select to designate a content reference attribute for copying to the Content Reference Link Attributes group box. |
|
Copy |
Click to copy the selected content reference attributes to the Content Reference Link Attributes group box. |
Setting Content Reference Link Security
Access the Content Reference Link Security page (click the Security tab on the Content Reference Link Administration page.
This page is almost identical to the Content Reference Security page.
See Also
Setting Content Reference Security
Managing Folders and Content ReferencesThis section discusses how to:
Copy folders and content references.
Move folders and content references.
Synchronize portal object security.
Register components in multiple portals.
Register components multiple times.
Pages Used to Manage Folders and Content References|
Page Name |
Definition Name |
Navigation |
Usage |
|
Copy Object to a Different Portal Registry |
PORTAL_COPY_OBJ |
|
Copy existing folders or content references. |
|
Select New Parent Folder |
PORTAL_CREF_MOVE PORTAL_FLDR_MOVE |
|
Move folders or content references. |
|
Portal Security Synchronization |
PORTAL_SEC_SYNC |
PeopleTools, Portal, Portal Security Sync |
Reinstate the correct security relationships between objects in the portal registry and remove invalid roles and permission lists. |
|
General Settings |
PORTAL_REG_ADM |
PeopleTools, Portal, General Settings |
Manage the settings for the portal that you're signed in to. Note. To modify other portals, use the Portal Definitions page. |
Copying Folders and Content References
Access the Copy Object to a Different Portal Registry page (PeopleTools, Portal, Structure and Content, Portal Objects, Content Ref Administration and click the Copy Object button).
To copy an object:
Navigate to the portal registry to which you want to copy the object.
Click the portal name to copy the object to root level. To expand the folders and navigate further into the registry structure, click the folder icon (not the folder name).
Important! Clicking the folder name starts the copying process.
(Optional) If you are copying a folder, the Recurse subfolders? check box appears. Select this check box to copy the folder and all the subfolders and content references within it.
Click the folder name to copy the object into that folder.
Click the Yes - Copy button to proceed.
Warning! If you attempt to copy an object to a location that already contains an object of the same name and type, the newly copied object replaces the existing object. For example, if you copy a folder and subfolders to another portal where a subfolder by that name already exists, the existing subfolder is deleted and replaced by the subfolder from the source portal. There is no warning message.
Moving Folders and Content References
Access the Select New Parent Folder page (PeopleTools, Portal, Structure and Content, Portal Objects, Content Ref Administration and click the New Parent Folder button).
The current parent folder is shown in bold type, and the folder tree is expanded just enough to show the location of the current parent folder. All other folders are shown collapsed. You can expand the tree to show content references, which are displayed as tree leaves and appear in normal text.
To move a folder or content reference to a new parent folder:
Navigate to the new parent folder by clicking the appropriate folder icons with plus signs.
Note. When navigating, do not click the folder name, unless it’s the name of the new parent folder that you’d like to select. Once you click a folder name, as opposed to the icon, the folder name that you selected becomes the new parent folder.
Select the new parent folder by clicking the folder name.
Click Save.
Note. When you move a content reference that points to a component or script at the default local node, its security settings are cascaded up to its new parents all the way up to the root folder. In addition, when you move a folder, its security settings (not including security inherited from a subordinate object) are cascaded up to its new parent, all the way up to the root folder. This ensures that the folder or content reference is accessible in its new location.
Synchronizing Portal Object Security
Access the Portal Security Synchronization page (PeopleTools, Portal, Portal Security Sync).
The hierarchical relationships and dependencies between objects in the portal registry determine what security settings each object must have. The portal won't work correctly if these security relationships aren't maintained. Here are some examples of these relationships:
A folder that is not public or hidden must have at least the level of access that its immediate child objects (folders, content references, and content reference links) have.
A content reference link must have exactly the same level of access as the object (content reference or content reference link) to which it links.
A content reference that represents a PeopleSoft component or iScript must have exactly the same level of access as the object that it represents.
Portal object security settings can become unsynchronized when you move portal objects from one database to another using the Project Copy feature in PeopleSoft Application Designer. When you merge projects this way, if the projects contain any portal objects with identical names, the security settings of the portal objects in the last project copied overwrite the security settings of portal objects copied earlier. Also, when a copied portal object doesn't overwrite an existing object, it changes the structure of the resulting portal registry hierarchy.
Use the Portal Security Synchronization page to reinstate the correct security relationships between objects in the portal registry after you copy a project that contains portal objects.
This page enables you to run the Application Engine program PORTAL_CSS from the standard menu navigation. You can use this feature on local portals only, not on portals on remote databases. In addition, from any local portal, you can run this program against another local portal.
To synchronize portal object security, specify a local portal in the Portal Name field and click Run. The portal objects are synchronized as follows:
The security settings of each content reference are compared to the component or iScript that it represents, and updated to match.
The security settings of each content reference link are compared to the content reference or content reference link to which it connects, and updated to match.
The security settings of each content reference and content reference link are propagated to its parent folder, in addition to the parent folder's existing settings.
None of the parent folder's existing security access is reduced.
Note. The settings aren't propagated if the parent folder is public or hidden.
The security settings of each folder are propagated to its parent folder, in addition to the parent folder's existing settings.
None of the parent folder's existing security access is reduced.
Note. The settings aren't propagated if the parent folder is public or hidden.
The following warning messages may appear when security synchronization cannot occur:
No permissions in PSAUTHITEM for object %1
Cref %1 points to Menu: %2, Component: %3 which doesn't exist.
Note. When this message appears you need to delete the invalid cref.
It is the responsibility of the security administrator and portal administrator to determine why an object has no security or why an object does not exist.
Delete Invalid Security Option
When you move portal objects from one database to another, roles and permission lists assigned to folders and content references on the source database may not exist on the target database and therefore become invalid. Select the Delete Invalid Security check box on the Portal Security Sychronization page to remove non-existing roles and permission lists from folders and content references.
Note. When the Delete Invalid Security option is selected, the PORTAL_CSS process runs more slowly as it checks every role and permission list on every portal registry structure. When a non-existing role or permission list is found on the portal registry structure, it is removed from that portal registry structure.
Registering Components in Multiple Portals
After you've used the registration wizard to register a new component on a portal, you may need to register the component on other portals. There are two ways to register components on multiple portals:
Use the registration wizard again.
Select the second option: Add this component to a portal registry. Then reenter the content reference label, long description, and sequence number (if not 1) to match the other portal’s entry.
Copy the component to other portals.
When you have copied your component to another portal, open that portal to verify that it was copied as anticipated.
See Copying Folders and Content References.
See Also
Registering Components Multiple Times
The portal registry does not allow a URL to be registered more than once. When defining a content reference, the component name is part of the URL. If you must register the same component URL in more than one location, add a unique character to the parameter field. (Be sure you really must register a URL twice, because this creates upgrade and maintenance concerns.) See the following example, where the additional numeric character 1 is added to the Additional Parameter field:
See Also
Registering Components in Multiple Portals
Managing General Portal SettingsThis section discusses how to manage general portal settings.
Page Used to Manage General Portal Settings|
Page Name |
Definition Name |
Navigation |
Usage |
|
General Settings |
PORTAL_REG_ADM |
PeopleTools, Portal, General Settings. |
Manage the settings for the portal that you're signed in to. |
Managing General Portal Settings
Access the General Settings page (PeopleTools, Portal, General Settings).
Use this page to manage the settings for the portal that you're signed in to. To modify other portals, use the Portal Definitions page.
Note. You must sign out of the portal and sign back in before your changes take effect.
|
Default Template Name |
Select the template used to wrap all registered content that has not been associated with another template in this portal, as well as all unregistered content. Warning! If you change the default template, make sure that the new default is able to handle any arbitrary page. |
See Administering Portal Definitions.
You enter the current portal folder navigation default values on this page. Enabling folder navigation at the portal level enables folder navigation for all standard folders and SmartNavigation in the portal. You can subsequently disable folder navigation at the individual folder level
Folder navigation is not enabled unless you select the Is Folder Navigation Enabled check box on both the Portal Definition and General Settings pages. Is Folder Navigation Enabled is selected by default in the standard PeopleTools portals.
See Adding and Editing Portal Definitions.
Note. If you disable and then re-enable folder navigation at this level, folder navigation is re-enabled for all folders. All overrides at the individual folder level are cleared.
Use this section of the page to enable system-level search options.
|
Display search in navigation |
Select to display the search at the top of the menu pagelet or main menu. |
|
Display search in header |
Select to display the search field in universal navigation header. This search is limited to the current application. |
|
Auto Suggest Limit |
Enter the maximum number of rows to appear in the drop-down autocomplete list for edit and prompt fields that have autocomplete enabled at the record definition level. The default value is 50. |
Enter the names of the menu, component, and market for the Search Results page.
Select Left to enable menu navigation that uses the Menu pagelet, which appears to the side of the page.
Select Drop-down to enable menu navigation that uses the navigation header, which appears at the top of the page.
Important! Many PeopleTools portal-related features are available only when you use Drop-down navigation.
Favorites Options
|
Select to enable the application user to save favorite components and pages in the My Favorites folder, which appears in the menu structure. |
|
|
Select to enable the portal to store and display the five most recently visited components as a folder under the Favorites menu. This option is available only when you select Drop-down as your navigation option. |
Menu Text Options
|
Display menu text in header |
Select to show the menu title in the header rather than in the left frame above the menu. |
|
Display menu in nav pagelet |
Select to show the menu title in the pagelet header. Note. In PeopleTools, the menu title is displayed in the header. If both Display menu text in header and Display menu in nav pagelet are selected, the menu title appears twice. |
|
Menu title position |
The number of pixels from the top that the menu expand/collapse bar appears in a frame template. The default is 47. |
Enter the PeopleSoft language codes of the languages for which you would like to remove the drop-down menu sort functionality at the system level. The drop-down menu sort is disabled for these languages by default: Japanese, Korean, Thai, Simplified Chinese, and Traditional Chinese.
Enter PeopleSoft language codes in a comma separated list. Select PeopleTools, Utilities, International, Languages to see all PeopleSoft language codes.
Header Frame Options
This group box sets the number of header frame rows if you are using the PeopleTools default template. The value entered for this field determines the size of the header frame. The default for PeopleTools is 65 and the default for Enterprise Portal is 100.
Configure node-specific template information.
|
Node Name |
Select from the list of nodes defined for this portal. If you add a new node name, you must also specify the default template for that node. |
|
Default Template Name |
Select the default template for all content references using this node. The selected template is applied only to content references for which the No Template check box is clear, but no template is selected. |
See Also
Managing Portal Objects
The Portal Objects folder is of special significance to the portal. This section discusses how to:
View Portal Objects folder settings.
Manage templates.
Add and edit templates.
Delete templates.
Pages Used to Manage Portal Objects|
Page Name |
Definition Name |
Navigation |
Usage |
|
Structure and Content - Portal Objects |
PORTAL_OBJ_LIST |
PeopleTools, Portal, Structure and Content, Portal Objects |
View portal objects folder settings. |
|
Content Ref Administration |
PORTAL_CREF_ADM |
PeopleTools, Portal, Structure and Content, Portal Objects, Templates Click Edit next to the name of the template you want to access. |
Manage templates. |
Viewing Portal Objects Folder Settings
Access the Structure and Content - Portal Objects page (PeopleTools, Portal, Structure and Content. In the Folders group box, click the Edit link for Portal Objects).
Managing Templates
Templates are stored in the HTML catalog and are edited through the portal administration pages. For the portal to process templates properly, they must be referenced in the Templates folder within the Portal Objects folder. Storing templates in the HTML catalog enables them to be upgraded like other objects.
Templates are stored in the HTML catalog according to the following naming convention. Template names always begin with the literal PR_. Here's an example name: PR_PORTALNAME_CONTENT REFERENCE ID
The following example shows a sample template:
Templates can be larger than the maximum size permitted by the HTML catalog. Such templates are automatically divided into several files in the HTML catalog. In this case, a letter is appended to each HTML object that makes up the template, as follows:
PR_EMPLOYEE_123456789_A
PR_EMPLOYEE_123456789_B
See Also
Adding and Editing Templates
Access the Content Ref Administration page (PeopleTools, Portal, Structure and Content, Portal Objects, Templates).
The fields for adding a dynamic template are the same for as any content reference, except for additional iScript parameter fields. These fields are enabled only if the storage type is set to Remote by URL.
If the URL Type field is set to PeopleSoft Script, the iScript Parameters region appears. Select the record name, PeopleCode event name, field name, and PeopleCode function name that describe the iScript to use for the content reference.
To add a new template, click Add Content Reference. in the Content References region at the bottom of the Content Ref Administration page.
To edit an existing template, click the Edit link next to the template that you want to edit in the Content References region at the bottom of the Content Ref Administration page.
See Also
Defining Standard Navigation Folders
Deleting Templates
You delete templates just as you delete folders and content references.
Note. Do not delete the PORTAL_DEFAULT template. This template has special significance to your portal, and must always be available. Deleting this template could make your portal inoperative. Do not delete a template unless you are fully aware of how it's used within the portal.
See Deleting Content References.
Reviewing Menu Item InformationThis section discusses how to:
View menu item details.
View menu folder structure information.
View menu security details.
Common Elements Used in This Section|
Menu Item |
Displays the menu item ID. The menu item label is displayed to the right. |
|
Content Provider Name |
Displays the database node that contains the PeopleSoft page. |
|
Product |
(Optional) Displays text used to tag menu items for inquiry. Note. Each PeopleSoft product line has a naming standard. For example, PAPP is always used for PeopleSoft Enterprise Portal. |
|
Menu Path |
Displays the navigation path for this menu item. |
|
Hidden |
If selected, the menu item is hidden from portal menu navigation. However, the content can still be accessed by using a link that is incorporated on a target page or pagelet. |
|
Is Public |
If selected, the menu item is available for all users. No data appears in the Accessible Permissions, Accessible Roles, and Accessible Users scroll areas. |
|
Auth Access (author access) |
If selected, the author has access to the menu item regardless of how other permissions are set. |
Pages Used to Review Menu Item Information|
Page Name |
Definition Name |
Navigation |
Usage |
|
Menu Item Detail |
PT_IQREGITEM |
PeopleTools, Portal, View Menu Item Detail |
Review the portal registry information for a menu item. |
|
Menu Folder Structure |
PT_IQREGFOLDERS |
PeopleTools, Portal, View Menu Folder Structure |
View menu folder structure information. |
|
Menu Security |
PT_IQREGSECURTY |
PeopleTools, Portal, View Menu Security |
View a list of folders or content references that a user, role, or permission list has access to. |
|
Build Search Index |
PORTAL_SRCH_IDX |
PeopleTools, Portal, Build Registry Search Index |
Build a search index for a portal application. |
Viewing Menu Item Details
Access the Menu Item Details page (PeopleTools, Portal, View Menu Item Detail).
Use this page to review the portal registry information for a menu item. The details that appear include the exact users and the roles and permission lists that allow access to a given menu item.
|
Usage Type |
Displays the type of object that is registered in the portal as a content reference. Possible values are Target, Pagelet, Frame Template, HTML Template, and Homepage Tab. |
|
Template Name |
Displays the template that controls how content appears on the page. The default template is used unless there is a special circumstance. |
|
Component, iScript, and URL Type |
Information that appears depends on the URL type that is entered on the Content Ref Administration page. Possible URL type values are Non-PeopleSoft URL, PeopleSoft Component, PeopleSoft Generic URL, PeopleSoft Script, PeopleSoft Worklist URL, and Remote Portlet. The availability of these values depends on the selected usage type. |
|
Long Description |
Displays the hover text for the menu navigation link. |
Note. The Accessible Permissions, Accessible Roles, and Accessible Users scroll areas are only populated if the access type is set to permission list.
See Defining Content References.
Displays the permission name and description for all permission lists that have access to this menu item.
Note. If the component or iScript is using a local node with no extra parameters, the permission lists are automatically populated based on the menu object component security.
Displays the role name and description for all roles that have access to this menu item.
Displays the user ID and description for all users that have access to this menu item.
Viewing Menu Folder Structure Information
Access the Menu Folder Structure page (PeopleTools, Portal, View Menu Folder Structure).
Use this page to view a list of content references for a selected portal registry folder. You see the contents of one or several menu folders.
|
Portal Name |
Displays the name of the portal that you are currently using. |
|
Content Provider Name, Product, and Menu Folder |
Select a combination of criteria for filtering the results. If any of the fields are left blank, all possible information for those fields are shown. |
Objects Tab
Select the Objects tab.
|
Menu Item |
Displays the menu item description. |
|
|
Click to view more detail information on the Menu Item Detail page. |
|
Seq Nbr (sequence number) |
Displays where the menu item is located in its menu folder. If blank, the menu item is added to the top of the list of content references within its folder and displayed in alphabetical order. |
|
Portal Object Name |
Displays the menu item ID. |
Details Tab
Select the Details tab.
|
User ID |
If the Auth Access check box is selected, displays the author's user ID. |
Viewing Menu Security Details
Access the Menu Security page (PeopleTools, Portal, View Menu Security).
Use this page to view a list of folders or content references to which a user ID, role, or permission list has access.
Note. The Seq Nbr (sequence number) column is hidden in this illustration, and because of the large number of objects, not all are shown.
Object Security
Select the level of object security for the menu information that you want to see.
|
User, Role, and Permission List |
Select a type of object security, and then and then select an object. You can view the complete menu folder structure that is available in the navigation (or hidden, but accessible from another page) for the selected security value. |
Warning! To avoid unexpected errors and inordinately long retrieval times, do not select the ALLPAGES permission list in conjunction with the Show All folder option. Always narrow your folder options if you choose the ALLPAGES permission list.
Select the folder level of visibility for the menu information that you want to see.
|
Show All |
Select this option to view all objects. Note. To avoid unexpected errors and inordinately long retrieval times, it is recommended that you do not select this option if you choose the ALLPAGES permission list in the Object Security section. |
|
Choose Top Level |
Select a level-one folder. The Menu Security grid displays all content references and their complete paths below this level that are accessible by the selected object security level. |
|
Show Top Level Only |
Select to display only the level-one folders that are accessible by the object security type. |
Objects Tab
Select the Objects tab.
See Viewing Menu Folder Structure Information.
Details Tab
Select the Details tab.
See Viewing Menu Folder Structure Information.
If either the Role object security option or the Show Top Level Only folder visibility option is selected, then this scroll area appears, displaying the permission lists that are associated with each menu item.
Building Registry Search Indexes
This section discusses how to
Associate keywords to content references.
Build search indexes for PeopleSoft applications.
Note. If you use PeopleSoft Enterprise Portal, registry search implementation is different. Enterprise Search documentation supersedes PeopleTools Search documentation.
See PeopleSoft Enterprise Portal 9 PeopleBook: Enterprise Portal Application and Technology, Configuring the Enterprise Portal Search Infrastructure
Page Used to Build Registry Search Indexes|
Page Name |
Definition Name |
Navigation |
Usage |
|
Content Ref Administration (content reference administration) |
PORTAL_CREF_ADM |
PeopleTools, Portal, Structure and Content, Portal Objects. Navigate to the Content References list and click Add Content Reference or Edit. |
Use the attribute KEYWORD to associate keywords to a content reference. Any search for these keywords returns the content reference as a search result. |
|
Build Search Index |
PORTAL_SRCH_IDX |
PeopleTools, Portal, Build Registry Search Index |
Build search indexes for portal applications. |
Associating Keywords to Content ReferencesAccess the Content Ref Administration page (PeopleTools, Portal, Structure and Content. Click the Edit link for the appropriate content reference.)
The search index derives keywords from the content reference labels and long descriptions. Additional keywords can be assigned to a content reference by adding portal KEYWORD attributes. This is very useful if there are synonym-type keywords that are not mentioned in the title or description; for example, P.O. versus Purchase Order.
Note. Attribute values must be separated with a comma and a space.
Building Search Indexes For PeopleSoft Applications
Access the Build Search Index page (PeopleTools, Portal, Build Registry Search Index).
You can build a search index from the portal administration pages and schedule the build process using PeopleSoft Process Scheduler. Each time that you build the search index, the index is entirely rebuilt, and any previous entries are overwritten.
Note. Only content references can be indexed.
The process for building a search index for a portal application is fairly easy, because data in the portal registry is already in a known format and this data is used to build the search index. When you build a search index from the portal administration pages, an Application Engine program calls a C++ program, PORTAL_INDEX, which reads from the portal registry. The C++ program then generates the bulk insert files to create the search index. The following illustration represents this process:
Building a search index process
To build a search index:
Access the Build Search Index page.
Select or add a run control ID.
You may use any run control ID; however, you may want to use a portal name to associate the run control ID with the registry for which you are building the search index.
Select the All Installed Languages box to build the index for all installed languages.
Select the language code for which you want to build the search index.
The default language code is the base language.
Click Run to launch the build process.
PeopleSoft Process Scheduler initiates an Application Engine program named PORTAL_INDEX. Click the Process Monitor link to view the status of the index build. Click Report Monitor to review output.
See Also
Configuring Search and Building Search Indexes