4 JD Edwards EnterpriseOne HTML Server
This chapter contains these topics:
-
Section 4.1, "Understanding JD Edwards EnterpriseOne HTML Server"
-
Section 4.5, "Installing JD Edwards EnterpriseOne HTML Server"
-
Section 4.6, "Configuring Oracle HTTP Server for EnterpriseOne HTML Server"
-
Section 4.7, "Registering the WebGate Agent for EnterpriseOne HTML Server"
-
Section 4.8, "Enabling OAM SSO on the EnterpriseOne HTML Server"
-
Section 4.10, "Granting Permission to the Client Application to Request a Token from OpenSSO"
-
Section 4.11, "Synchronizing the System Clock on all Servers"
4.1 Understanding JD Edwards EnterpriseOne HTML Server
The JD Edwards EnterpriseOne HTML server is a WebLogic server. This server works with the OAM to ensure that SSO credentials are valid. When valid SSO credentials are entered, the user is granted access to JD Edwards EnterpriseOne.
When you download the software from Oracle Technology Network (OTN) note the directories to which you downloaded the software and replace the directory location specified in this chapter with your directory locations. This chapter also specifies executable files for a Windows platform. Be sure to install the executable files for your platform.
Note: The JD Edwards EnterpriseOne HTML server is installed on a different server than the OAM/OID server.
4.2 Installing SOA Suite 11g
You install SOA Suite 11g, version 11.1.1.5. You use the installer to download the Oracle Fusion Middleware 11g SOA Suite.
-
Install WebLogic Server 10.3.5. See Appendix B, "Installing WebLogic Server."
-
Download the Oracle Fusion Middleware 11g SOA Suite.
Use these steps to install Oracle SOA Suite 11.1.1.5.0
-
Launch the installer:
-
On Windows: setup.exe with Run as administrator option.
-
On Unix: ./runInstaller as a non-root user.
-
-
On the Welcome page, click Next.

Description of the illustration image107.gif
-
Select the appropriate update option for your company.

Description of the illustration image108.gif
-
The installer performs prerequisite checks.

Description of the illustration image109.gif
-
Enter the Middleware Home and a SOA Home Directory.

Description of the illustration image110.gif
-
Select WebLogic as the application server.
EnterpriseOne does not support the configuration with WebSphere Application Server.

Description of the illustration image111.gif
-
Review the Installation Summary.

Description of the illustration image112.gif
-
Click Next when the installation process is completed.

Description of the illustration image113.gif
-
Click Finish to exit the installer.

Description of the illustration image114.gif
-
Launch the Domain Configuration Wizard (config.cmd or config.sh) from <MW_Home>/Oracle_SOA/common/bin/.
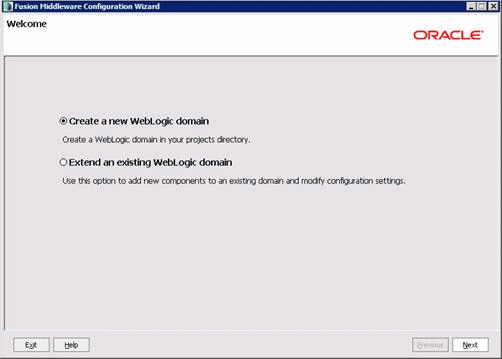
Description of the illustration image115.gif
-
Select Oracle WSM Policy Manager-11.1.1.0 and Oracle JRF-11.1.1.0 options.
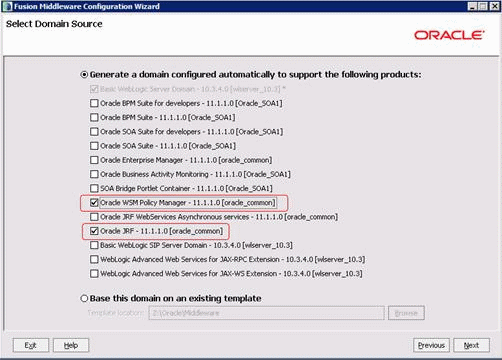
Description of the illustration image116.gif
-
Enter a domain name.
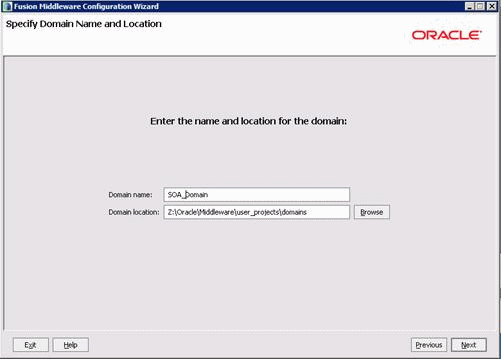
Description of the illustration image117.gif
-
Enter the Administrator User and Password.

Description of the illustration image118.gif
-
Select Production Mode and verify the JDK location.
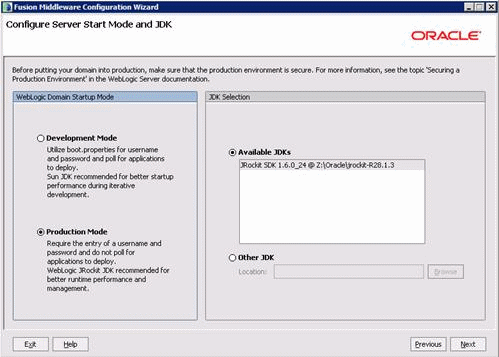
Description of the illustration image119.gif
-
Enter the JDBC Schema information.
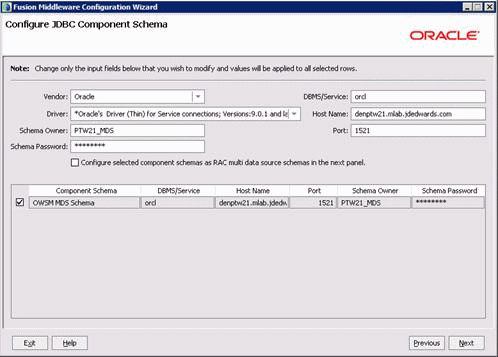
Description of the illustration image120.gif
-
Verify the schema connections.
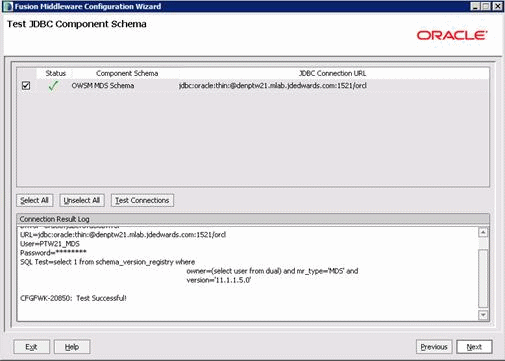
Description of the illustration image121.gif
-
Select Administration Server and Managed Servers, Clusters and Machines options.
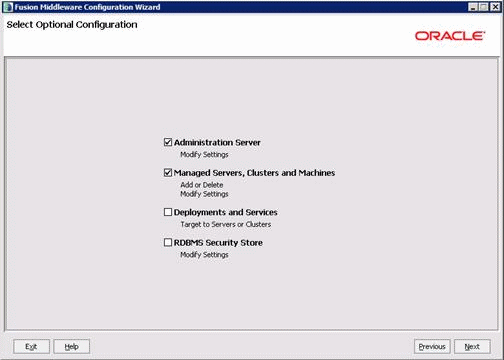
Description of the illustration image122.gif
-
Enter the Administration Server Name and Port.
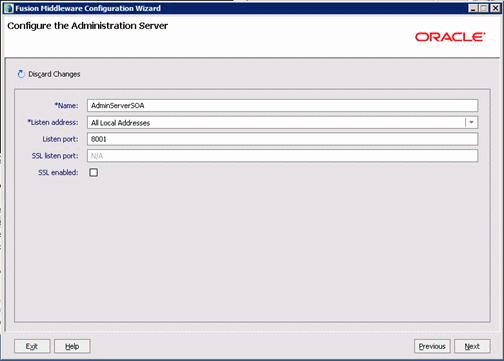
Description of the illustration image123.gif
-
Click Next on the Configure Managed Servers page.
-
Click Next on the Configure Clusters page.
-
Add a logic machine name.
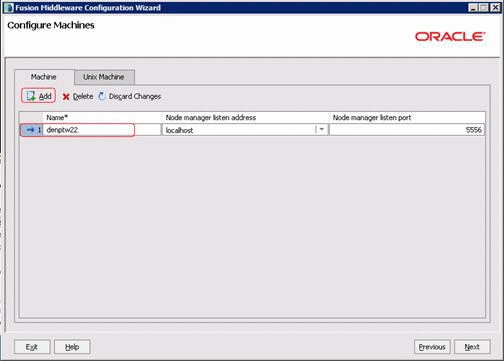
Description of the illustration image124.gif
-
Assign a server to the machines.

Description of the illustration image125.gif
-
Review the Configuration Summary and Click Create.

Description of the illustration image126.gif
-
Click Done and start the Administration Server.
Refer to Appendix B on how to start and stop the Administration Server.
4.2.1 Verify the Installation
You must have the Administration Server running.
-
Open an internet browser, and enter the following URL:
http://server:port:/wsm-pm/validator
-
Enter the Admin user and password.
-
The Policy Manager Status screen appears.
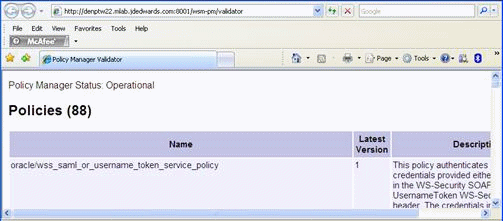
Description of the illustration image127.gif
-
If the following error message occurs, use the steps in the next task to resolve the error.
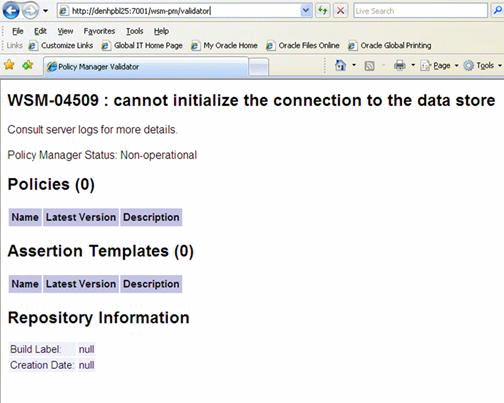
Description of the illustration image128.gif
Use these steps to fix errors:
-
Access Data Sources using this path from the left navigation:
base_domain -> Services -> JDBC -> Data Sources
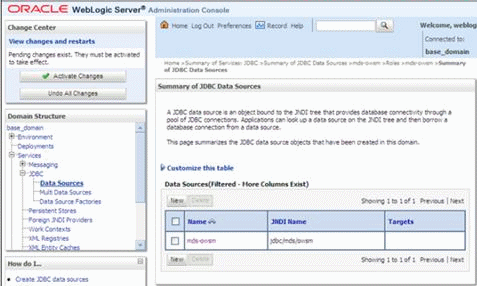
Description of the illustration image129.gif
-
Click the mds-owsm link.
-
On the Settings for mds-owsm page, click the Targets tab.
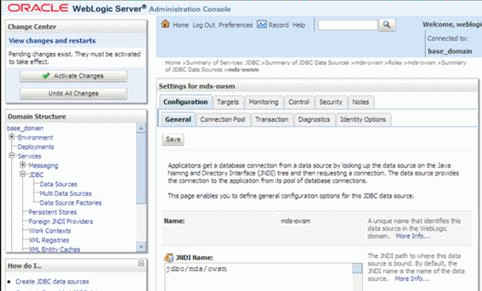
Description of the illustration image130.gif
-
On the Targets page, select AdminServer, and then click Save.
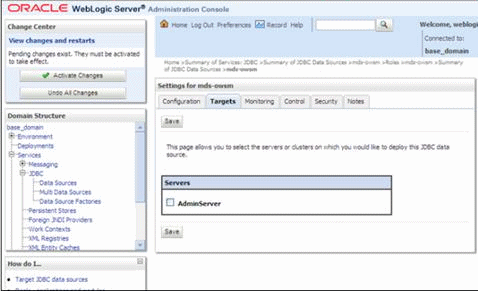
Description of the illustration image131.gif
-
Activate the change and restart the WLS Admin Server.
-
Launch the URL again.
4.3 Installing Oracle WebGate
Next, you install Oracle WebGate 11.1.1.5.0.
Oracle HTTP Server WebGate is a Web server plug-in that is shipped out-of-the-box with Oracle Access Manager. The Oracle HTTP Server WebGate intercepts HTTP requests from users for Web resources and forwards them to the Access Server for authentication and authorization. Oracle HTTP Server WebGate installation packages are found on media and virtual media that is separate from the core components.
-
You must have Oracle HTTP Server installed and configured. See Appendix C, "Installing Oracle HTTP Server."
-
If you are installing Oracle HTTP Server 11g WebGate for Oracle Access Manager on a Linux or Solaris operating system, you must download and install third-party GCC libraries on your machine.
You can download the appropriate GCC library from the following third-party website:
| Operating System | Architecture | GCC Libraries | Required Library Version |
|---|---|---|---|
| Linux 64-bit | x64 | libgcc_s.so.1
libstdc++.so.6 |
3.4.6 |
| Solaris 64-bit | SPARC | libgcc_s.so.1
libstdc++.so.5 |
3.3.2 |
-
If you are using Windows 2008 64-bit operating systems, you must install Microsoft Visual C++ 2005 libraries on the machine hosting the Oracle HTTP Server 11g WebGate.
The libraries are included in the Microsoft Visual C++ 2005 SP1 Redistributable Package (x64), which can be downloaded from the following website:
Use these steps to install Oracle HTTP 11g WebGate.
-
Download and unzip ofm_oam_webgates_generic_11.1.1.5.0_disk1_1of1.zip.
-
Launch the installer.
-
On Windows: setup.exe with Run as administrator option
-
On UNIX: ./RunInstaller as a non-root user
-
-
Specify JRE/JDK location.

Description of the illustration image084.gif
-
Click Next on the Welcome page.
Oracle HTTP WebGate supports Oracle HTTP version 11.1.1.2 or 11.1.1.3. EnterpriseOne configuration supports version 11.1.1.5. See Appendix A, "Create Database Schemas with Repository Creation Utility" to upgrade to version 11.1.1.5.
-
The installer performs prerequisite checks.

Description of the illustration image132.gif
This image shows the prerequisite checks on Linux operating system.
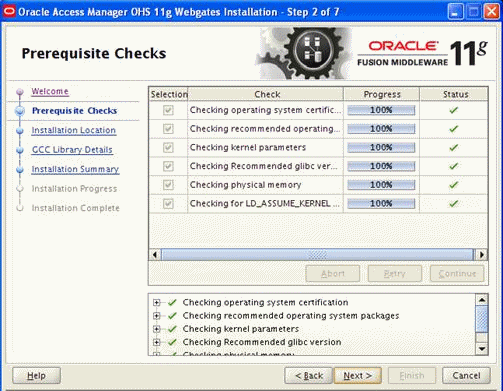
Description of the illustration image133.gif
-
Specify the Middleware Home and WebGate Home Directory.
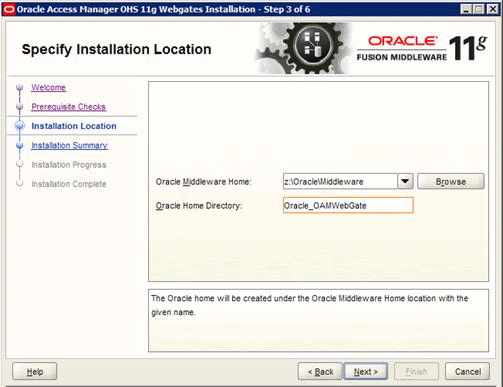
Description of the illustration image134.gif
-
Review the installation Summary.
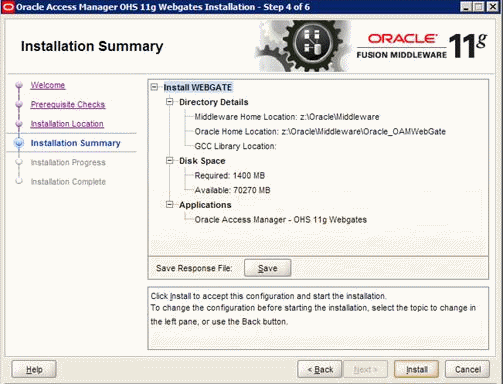
Description of the illustration image135.gif
-
Click Next when the installation is completed.
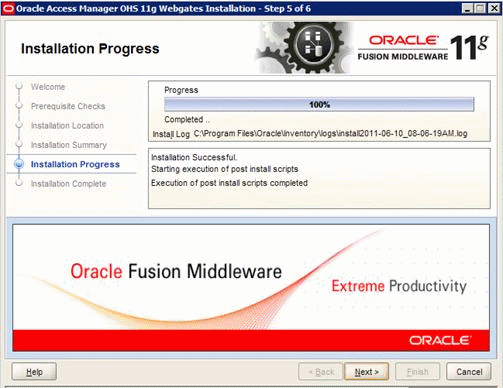
Description of the illustration image136.gif
-
Click Finish to exist the installer.

Description of the illustration image137.gif
4.3.1 Post-Installation Steps
You must complete the following steps after installing Oracle HTTP Server 11g WebGate for Oracle Access Manager:
-
Move to the following directory under your Oracle Home for WebGate:
-
On UNIX operating systems:
<webgate_home>/webgate/ohs/tools/deployWebGate
-
On Windows operating systems:
<webgate_home>\webgate\ohs\tools\deployWebGate
-
-
On the command line, run the following command to copy the required bits of agent from the Webgate_Home directory to the WebGate Instance location:
-
On UNIX operating systems:
./deployWebgateInstance.sh -w <Webgate_Instance_Directory> -oh <Webgate_Oracle_Home>

Description of the illustration image091.gif
-
On Windows operating systems:
deployWebgateInstance.bat -w <Webgate_Instance_Directory> -oh <Webgate_Oracle_Home>

Description of the illustration image138.gif
Where <Webgate_Oracle_Home> is the directory where you have installed Oracle HTTP Server WebGate and created as the Oracle Home for WebGate.
For example: <MW_Home>/Oracle_OAMWebGate1
The <Webgate_Instance_Directory> is the location of Webgate Instance Home, which is same as the Instance Home of Oracle HTTP Server.
For example: <MW_Home>/Oracle_WT1/instances/instance1/config/OHS/ohs1
-
-
Run the following command to ensure that the LD_LIBRARY_PATH variable contains <Oracle_Home_for_Oracle_HTTP_Server>/lib
-
On UNIX operating systems:
Export LD_LIBRARY_PATH=$LD_LIBRARY_PATH:<Oracle_Home_for_Oracle_HTTP_Server>/lib
-
On Windows operating systems:
Set the <Webgate_Installation_Directory>\webgate\ohs\lib location in the PATH environment variable.
-
-
From your present working directory, move up one directory level:
-
On UNIX operating systems:
<webgate_home>/webgate/ohs/tools/setup/InstallTools
-
On Windows operating systems:
<webgate_home>\webgate\ohs/tools\editHttpConf
-
-
On the command line, run the following command to copy the apache_webgate.template from the Webgate_Home directory to the WebGate Instance location (renamed to webgate.conf) and update the httpd.conf file to add one line to include the name of webgate.conf
-
On UNIX operating systems:
./EditHttpConf -w <Webgate_Instance_Directory> [-oh <Webgate_Oracle_Home>] [-o <output_file>]

Description of the illustration image139.gif
-
On Windows operating systems:
EditHttpConf.exe -w <Webgate_Instance_Directory> [-oh <Webgate_Oracle_Home>] [-o <output_file>]

Description of the illustration image140.gif
Note:
The [-oh <Webgate_Oracle_Home>] and [-o <output_file>] parameters are optional.
-
-
Verify the updated httpd.conf.
The following line is added to the bottom of the file
include "z:\oracle\Middleware\Oracle_WT1\instances\instance1\config\ohs\ohs1/webgate.conf"
-
Restart the Oracle HTTP server process.
Run opmnctl (stopall and startall) from <MW_Home>\Oracle_WT1\instances\instance1\bin
4.4 Configuring the KeyStore Connection
This section discusses configuring the KeyStore connection for WebCenter and EnterpriseOne.
Verify your Node Manger on your EnterpriseOne machine has the StartScriptEnable set to true:
-
Open the NodeManager.properties file from NMW_HOME>/wlserver_10.3/common/nodemanager folder and enter the following:
StartScriptEnable=true
-
Restart Node Manager.
4.4.1 Generate the KeyStore from the Oracle WebCenter Server
Use these steps to generate the KeyStore.
-
Log onto your WebCenter server.
-
From the <JDK_Home>/bin directory, enter the following:
./keytool -genkeypair -v -keyalg RSA -dname "cn+den60208jems,dc+us,dc=oracle,dc=com" -alias webcenter -keypass welcome1 -keystore webcenter.jks -storepass welcome1 -validity 365
-bash-3,2$ ./keytool -genkeypair -v -keyalg RSA -dname "cn=den60208jems,dc=us, dc=oracle,dc=com" -alias webenter -keypass welcome1 -keystore webcenter.jks -storepass welcom1 -validity 365 Generating 1,024 bit RSA key pair and self-signed certificate (SHA1withRSA) with a validity of 365 days for: CN=den60208jems, DC=us, DC=oracle, DC=com [Storing webcenter.jks]
./keytool -exportcert -v -alias webcenter -keystore webcenter.jks -storepass welcome1 -rfc -file webcenter.cer
-bash-3.2$ ./keytool -exportcert -v -alias webventer -keystore webventer.jks -storepass welcome1 -rfc -file webcenter.cer Certificate stored in file <webcenter.cer>
-
Copy the KeyStore files (keystore.jks and keystore.cer) to this location:
<MW_HOME>user_projects/domains/<your_domain>/config/fmwconfig
Note:
If you launched the keytool from the JRockit/bin directory, then the KeyStore files will be generated in the same location. -
Sign on to WebCenter Enterprise Manager console, select WebLogic Domain > Security > Security Provide Configuration.
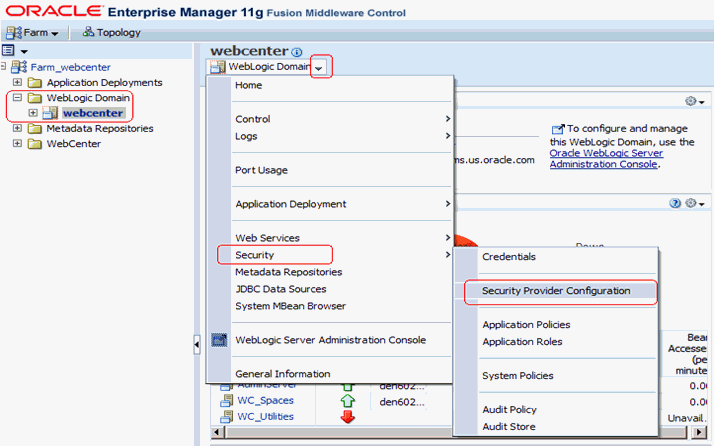
Description of the illustration keystore001.gif
-
Click Configure to set up the keystore.

Description of the illustration keystore002.gif
-
Enter the KeyStore file name and password.
-
Enter the Key Alias and Crypt Alias, these value are from your key export process.
-
Enter the passwords for both Signature Key and Encryption Key.
./keytool -exportcert -v -alias webcenter -keystore webcenter.jks -storepass welcome1 -rfc -file webcenter.cerIn this example, we used webcenter as the key alias and the certificate name is webcenter.cer.
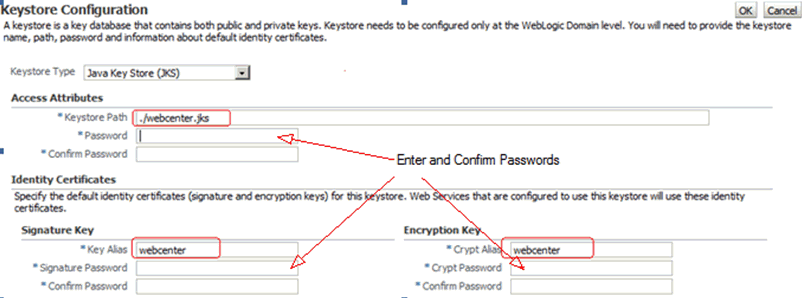
Description of the illustration keystore003.gif
-
Click OK.
-
Restart WebCenter Admin and WC_Spaces.
4.4.2 Configure KeyStore on EnterpriseOne
Use these steps to configure the KeyStore on EnterpriseOne.
-
Log onto your EnterpriseOne machine.
-
Change the directory to <MW_HOME>/user_projects/domains/<your_domain>/config/fmwconfig.
-
Copy these files from your WebCenter machine:
-
cwallet.sso
This file is different than the OAM configuration; do not copy it from your OAM server.
-
your keystore.jks
For example, webcenter.jks
-
your keystore.cer
For example, webcenter.cer
-
-
Open jps-config.xml from the same location.
-
Search for default-keystore.jks.
-
Replace the KeyStore location with your <keystore>.jks.
You can adjust the description as illustrated here:

Description of the illustration keystore004.gif
-
Save the file.
4.5 Installing JD Edwards EnterpriseOne HTML Server
You must install the JD Edwards EnterpriseOne HTML Server.
See the JD Edwards EnterpriseOne HTML Web Server Reference Guide for your platform in the JD Edwards EnterpriseOne Installation and Upgrade for Apps 9.0 & Apps 9.1 using Tools 9.1 Documentation Library http://docs.oracle.com/cd/E24902_01/nav/reference.htm.
-
For Related Information Application Framework configuration, EnterpriseOne HTML server must be installed within the SOA domain.
-
Install and configure the JD Edwards EnterpriseOne Server Manager
-
Install Server Manger Agent on the EnterpriseOne HTML Server.
-
Start the EnterpriseOne HTML Server.

Description of the illustration image141.gif
4.6 Configuring Oracle HTTP Server for EnterpriseOne HTML Server
After you install and configure the Oracle HTTP Server and Oracle HTTP WebGate, use the following example to configure mod_wl_ohs.conf (located at <MW_Home>/OracleWT1/instance/instance1/config/OHS/ohs1.). Verify that WebLogic port numbers match your configuration.
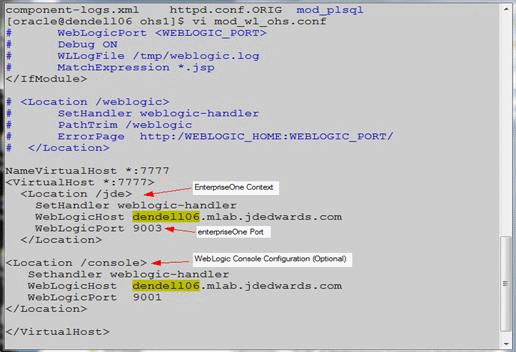
Description of the illustration image142.gif
4.7 Registering the WebGate Agent for EnterpriseOne HTML Server
-
Install Oracle HTTP Server and WebGate.
-
Install and configure OID and OAM Server.
-
Install and configure EnterpriseOne HTML Server.
Use these steps to register the WebGate Agent.
-
Open an internet browser and connect to the Oracle Access Manager.
-
Open the OAM console.
http://oamserver:oamport/oamconsole
-
Enter the Admin user and Password.
-
Select the New OAM 11g Webgate option.
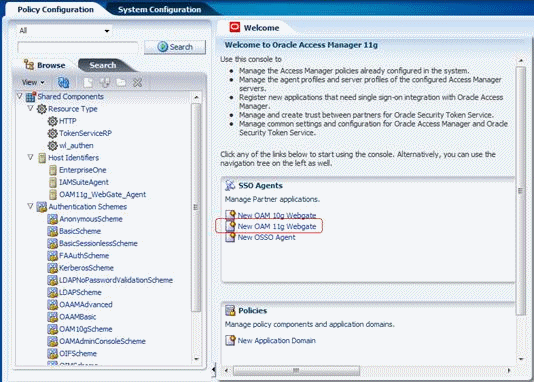
Description of the illustration image143.gif
-
Enter a WebGate agent name and select the Open Security option.
-
Enter the EnterpriseOne HTML URL in Base URL.
Use the http port number.
-
Click Apply.

Description of the illustration image144.gif
-
Host Identifiers and Application Domains are generated.

Description of the illustration image145.gif
-
Select Resources, and then click Create to create the Resource URL.

Description of the illustration image146.gif
-
Enter the following information:
-
Type = HTTP
-
Host Identifier = Select your Host Identifier
-
Resource URL = /jde
-
Protection Level = Protected
-
Authentication Policy = Protected Resource Policy
-
Authorization Policy = Protected Resource Policy
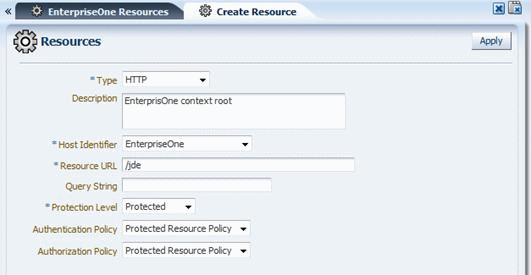
Description of the illustration image147.gif
-
-
Repeat the above step and add the resource URL = /…/*
-
Double-click the Protected Resource Policy to see the newly added resources listed.
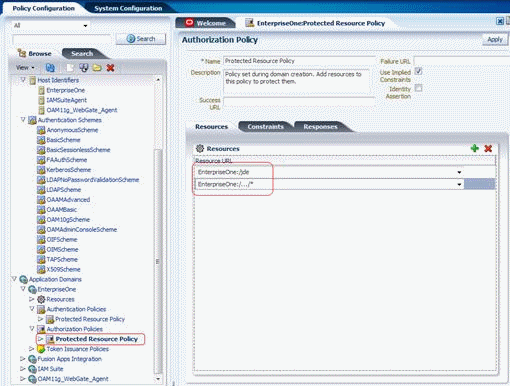
Description of the illustration image148.gif
-
Click the Responses tab, and then click the Add button
-
Enter the JDE SSO header field as follows:
-
Response Name = JDE_SSO_UID
-
Type = Header
-
Value = $user.userid

Description of the illustration image150.gif
-
-
Review all registered agents.
-
Select the System Configuration tab.
-
Open the Access Manager Settings section and open the SSO Agents option.
-
Double click OAM Agents, and then click the Search button.
The system displays a list of registered agents.
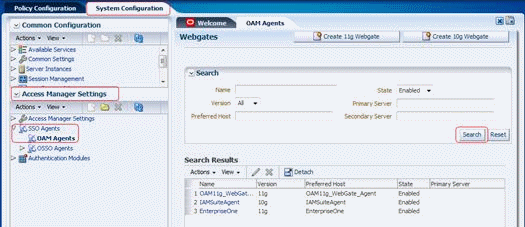
Description of the illustration image151.gif
-
The registered agent creates a cwallet.sso and ObAccessClient.xml file.
-
Copy these two file to the EnterpriseOne Server:
<MW_HOME>/user_projects/domain/OAMDomain/output/<Agent_name> location
<MW_Home>Oracle_WT1/config/instances/instance1/OHS/ohs1/webgate/config directory.
4.8 Enabling OAM SSO on the EnterpriseOne HTML Server
Use these steps to enable OAM SSO on the JD Edwards EnterpriseOne HTML server through JD Edwards EnterpriseOne Server Manger:
-
Open Server Manager from a browser.
-
Select your instance.
-
Select Network Settings from the Configuration section.
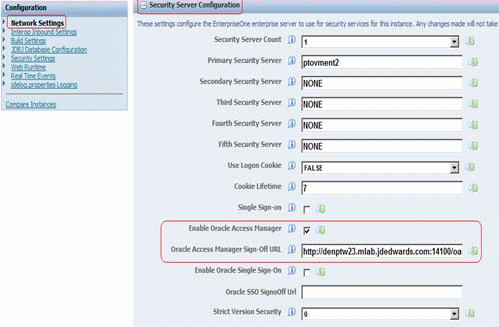
Description of the illustration image152.gif
-
Select the Enable Oracle Access Manager option.
-
Enter the Sign-Off URL
http://<OAM-Server>:<OAM-Port>/oamsso/logout.html?end_url=http://<JAS-Server:JAS-Port/jde/index.jsp
For example:
http://denptw23:14100/oamsso/logout.html?end_url=http://dendell06:7777/jde/index.jsp
-
Click Apply.
You are prompted to synchronize the ini changes.
-
Stop and restart the HTML server.
4.9 Copying JAR File to the HTML Web Server
Copy the following jar files from the WebCenter server to the HTML Web server:
-
spaces-api.jar
-
spaces-webservice-client.jar
-
webcenter-core-api.jar
The spaces-api.jar and webcenter-core-api.jar files are typically located at <WebCenter>\lib\java\internal\oracle.webcenter.spaces\11.1.1.0.0.
For example:
C:\oracle\Middleware\Oracle_WC1\lib\java\internal\oracle.webcenter.spaces\11.1.1.0.0
The spaces-webservice-client.jar file is typically located at <WebCenter>\webcenter\modules\oracle.webcenter.framework_11.1.1.
For example:
C:\oracle\Middleware\Oracle_WC1\webcenter\modules\oracle.webcenter.framework_11.1.1
Copy the jar files to the following location on the HTML Web server:
<Middleware>/user_projects/domains/< domain>/servers/<EnterpriseOne HTML server>/stage/<jas instance>/app/webclient.war/WEB-INF/lib
After you copy the files to the HTML Web server, restart the HTML Web server.
4.10 Granting Permission to the Client Application to Request a Token from OpenSSO
-
Open the <MW_HOME>/user_projects/domains/<domain>/config/fmwconfig/system-jazn-data.xml file.
-
Search for the oracle.wsm.security.WSIdentityPermission class.
-
Add the following permission section:
<permission>
<class>oracle.wsm.security.WSIdentityPermission</class>
<name>resource={your_JAS_server_name}</name>
<actions>assert</actions>
</permission>

Description of the illustration image153.gif
-
Save the file, and then stop and restart your EnterpriseOne Server using Server Manager.
4.11 Synchronizing the System Clock on all Servers
Important:
After all three of the machines (WebCenter, JD Edwards EnterpriseOne HTML Web Server, and the Oracle Access Manger (SSO Server) are successfully installed and configured, you MUST synchronize the clocks of all three machines. Otherwise you will not able to log in.See "Synchronizing Clocks" in the JD Edwards EnterpriseOne Tools System Administration Guide
4.12 Testing the SSO Configuration
Use these steps to test the SSO configuration.
-
Enter the following in the Address line:
http://<your host:your sso port>/jde/E1Menu.maf
Note:
Ensure you provide the HTTP port instead of the actual JAS port. You will not be able to log in with your original JAS port. -
The Oracle Access Manager 11g login page appears.
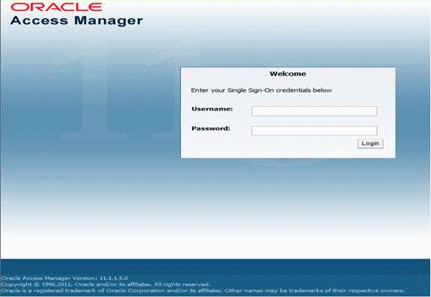
Description of the illustration image154.gif
-
After the sign-on is working, create a WebCenter connection and enable an application form.
See "Creating a WebCenter Connection" in the JD Edwards EnterpriseOne Tools System Administration Guide
See "Enabling Application Forms" in the JD Edwards EnterpriseOne Tools System Administration Guide
-
After the configuration is done, log onto EnterpriseOne and test the WebCenter Spaces configuration.
The WebCenter Spaces appear on your configured application.
-
You can click the green Plus icon to add new WebCenter Spaces.
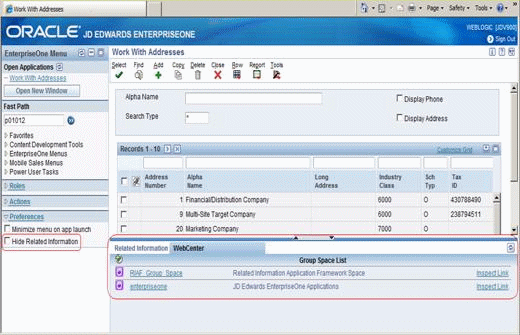
Description of the illustration image155.gif