17 Enter Charges Using Equipment Time Entry
This chapter contains these topics:
Use Equipment Time Entry when you want to charge equipment time directly to a job or business unit. You can:
-
Enter multiple pieces of equipment on the same screen
-
Charge more than one job or account number on the same screen
-
Override default billing rates
-
Use Time Entry Models to facilitate data entry
17.1 Entering Equipment Time Billing Information
From Equipment/Plan Management (G13), choose Equipment Time Billing
From Equipment Time Billing (G1313), choose Time Entry
When you enter equipment time, the system creates debit entries to update the Account Ledger table (F0911). When you post the entries to the Account Ledger table, the system creates the offsetting credit entries for the Account Balances table (F0902). You must then post the entries to the Item Balances table (F1202).
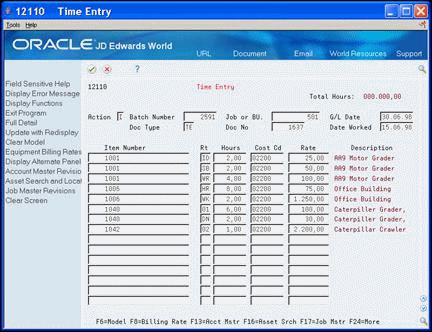
To enter equipment time billing information
-
On Time Entry, complete the following fields:
-
Job or Business Unit
-
G/L Date
-
Equipment Number (Item Number)
-
Hours
-
Cost Code
-
-
Complete the following optional fields:
-
Date Worked
-
Rate Code
-
Rate
-
-
Choose the Full Detail (F4).
Figure 17-2 Time Entry screen's Full Details view
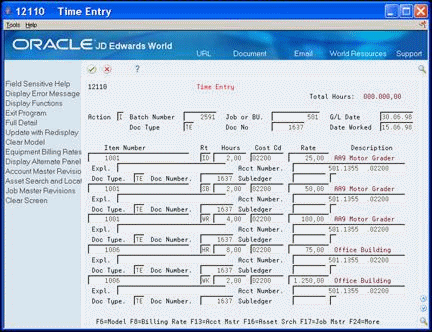
Description of "Figure 17-2 Time Entry screen's Full Details view"
-
Complete the following optional field:
-
Account Number
-
| Field | Explanation |
|---|---|
| Equipment Rate Code | A user defined code (00/RC) that indicates a billing rate, such as DY for daily, MO for monthly, and WK for weekly. You can set up multiple billing rates for a piece of equipment.
If you leave this field blank, the system searches for a valid billing rate in the following sequence: 1. – Account Ledger Master (F0901) - This table contains the most detailed rate information. You can assign multiple rates for a job. For example, you can set up separate rates for different equipment working conditions. 2. – Job or Business Unit Master (F0006) - This table contains less detailed rate information than the Account Ledger Master. You can only set up a single rate for a job based on this table. 3. – Rental Rules (F1302) - This table contains the least detailed rate code information. The system searches this table according to the criteria you establish when setting up the table. |
| Rate | A code that represents the amount you want to charge the job. Each piece of equipment can have numerous billing rates based on the rate code. The equipment billing rate can be composed of up to ten different rates. For example:
Billing Rate = 200 100 Rate 1 (Ownership Component) 25 Rate 2 (Operating Component) 50 Rate 3 (Maintenance Component) 25 Rate 4 (Other Costs Component) When you post time entries to the General Accounting system, the system recognizes credits in revenue accounts for each of the rate components. This allows you to separate portions of the equipment billing by type of cost. Note: You are not required to use rate components. Screen-specific information The system inserts a value in this field from the Rental Rates table. You can override this default value. |
17.2 Working with a Model Time Entry
From Equipment/Plan Management (G13), choose Equipment Time Billing
From Equipment Time Billing (G1313), choose Time Entry
You can save time and reduce the possibility for error by using a model time entry to create a new billing batch. A model time entry is based on any posted time entry batch. A model time entry is especially useful if you charge for equipment on a regular basis and can use the time entry batch from the prior period as a model.
17.2.1 Before You Begin
-
Post at least one time entry to the general ledger.
-
On Time Entry, complete the steps for locating a posted time entry batch.
-
Choose a batch that represents typical equipment billing transactions.
-
To clear the G/L Date, Date Worked, Rate, and Account Number fields, choose Clear Model (F6).
The following fields remain unchanged
-
Job or Business Unit
-
Document Type
-
Equipment Number
-
Rate Code
-
Hours
-
Cost Code
-
-
Make any necessary modifications to the data.
-
Create the new batch.
17.3 Processing Equipment Time Entries
After you enter equipment billing time, you can verify the entries and approve the batch of time entries for posting. You can also change the status of a batch from approved to pending, for example, if you find errors and want to prevent the batch from posting.
Processing time billing batches consists of the following tasks:
-
Reviewing and approving equipment time entries
-
Posting equipment time entries
See Also:
-
Processing Batch Journal Entries in the JD Edwards World General Accounting II Guide for more information
17.4 Reviewing and Approving Equipment Time Entries
From Equipment/Plan Management (G13), choose Equipment Time Billing
From Equipment Time Billing (G1313), choose Time Entry Journal Review
After you enter equipment billing time, you can verify the entries and approve the batch of time entries for posting. You can also change the status of a batch from approved to pending, for example, if you find errors and want to prevent it from posting.
To review and approve time entries
-
On Time Entry Journal Review, to locate the batch with the time journal entries for equipment time, complete any combination of the following fields:
-
User ID
-
Batch Number
-
Batch Date From
-
Thru
-
Batch Status
Figure 17-3 Time Entry Journal Review screen
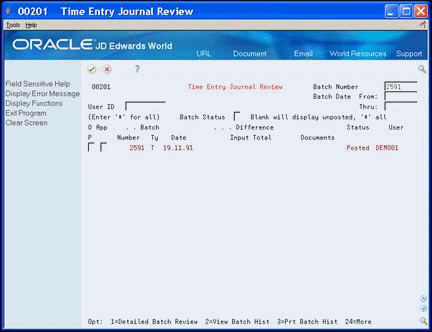
Description of "Figure 17-3 Time Entry Journal Review screen"
-
-
To approve the batch that you want to post, complete the following field:
-
App (Batch Approved for Posting)
-
17.4.1 What You Should Know About
| Topic | Description |
|---|---|
| Reviewing a detailed entry within a batch | You can review original time entries for unposted batches, or journal entries for posted batches. Locate a batch on Time Entry Journal Review. Enter 1 in the Option field to access General Ledger Batch Review and review each journal entry. From there, enter 1 in the Option field to access the Journal Entries screen and review individual documents. |
17.5 Posting Equipment Time Entries
After you review and approve journal entries for equipment time, you must post them to the general ledger and then to the equipment Item Balances table (F1202).
Posting equipment time entries consists of the following tasks:
-
Posting time entries to the G/L
-
Posting G/L entries to equipment
17.5.1 Posting Time Entries to the G/L
From Equipment/Plan Management (G13), choose Equipment Time Billing
From Equipment Time Billing (G1313), choose Post Time Entries to G/L
You must post time entries to update the general ledger and equipment balances. Post the entries to the general ledger first. When you select Post Time Entries to G/L, the system displays processing options for the Post General Ledger program before submitting the job for processing. After you select the appropriate processing options, the system displays a message that a batch was submitted to post.
17.5.3 Posting G/L Entries to Equipment
From Equipment/Plan Management (G13), choose Equipment Time Billing
From Equipment Time Billing (G1313), choose Post G/L Entries to Assets
After you post the entries to the general ledger, post them to the equipment Item Balances table (F1202). When you post billings to equipment, the system verifies that each of your batch transactions include the following:
-
A general ledger post code of P, which indicates that the transaction has been posted to G/L Account Balances table
-
An account that falls within the cost account range set up in automatic accounting instructions
-
A fixed asset post code of blank, which indicates the eligibility to post to the equipment Item Balances table (F1202)
-
A valid equipment number
-
A hold code of blank
When you select Post G/L Entries to Assets, the system displays processing options for the Post G/L Entries to Assets program before submitting the job for processing. After you select the appropriate processing options, the system displays a message that the batch was submitted to post. The post program updates the Item Balances table (F1202) and marks each transaction as posted.
17.5.4 Processing Options
See Section 51.5, "General Ledger Post (P09800)"
See Section 49.1, "Post Unposted F/A Entries (P12800)"
See Also:
-
Understand DREAM Writer in the JD Edwards World Technical Foundation Guide for more information about copying, changing, and running DREAM Writer versions
17.6 Printing Equipment Time Reports
You can print Equipment Time Billing reports to review information about equipment time billing transactions.
Printing Equipment Time Billing reports consists of the following tasks:
-
Printing the Posting Edit report
-
Printing the Posting Journal report
-
Printing the Time Entry Journal report
17.6.1 Printing the Posting Edit Report
From Equipment/Plan Management (G13), choose Equipment Time Billing
From Equipment Time Billing (G1313), choose Post Time Entries to G/L
When you run the post program to post journal entries to the general ledger, the system automatically creates the Posting Edit report. This is a standard report that indicates which batches posted successfully. An error message prints when a batch does not post.
17.6.2 Processing Options
See Section 51.5, "General Ledger Post (P09800)"
Figure 17-4 General Ledger Post-Time Billing report
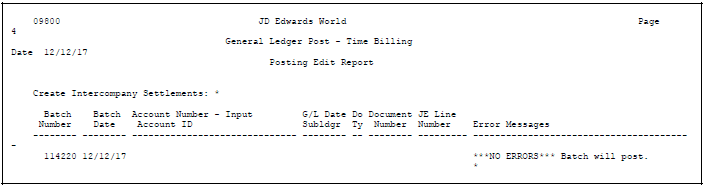
Description of "Figure 17-4 General Ledger Post-Time Billing report"
17.6.3 Printing the Posting Journal Report
From Equipment/Plan Management (G13), choose Equipment Time Billing
From Equipment Time Billing (G1313), choose Post Time Entries to G/L
When you run the post program to post journal entries to the general ledger, the system automatically creates the Posting Journal report. This report summarizes the transactions that post to the general ledger. If you do not want the report to print, you can specify so in the Print Selection processing option for the post program.
17.7 Posting Journal Report
Figure 17-5 General Ledger Post -Tme Billing report
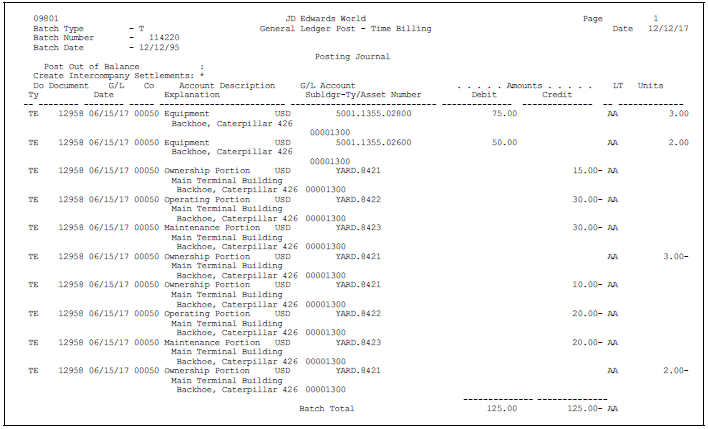
Description of "Figure 17-5 General Ledger Post -Tme Billing report"
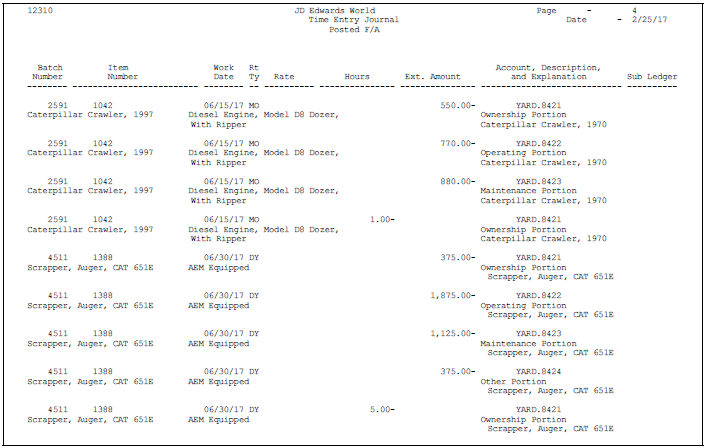
17.7.1 Printing the Time Entry Journal Report
From Equipment/Plan Management (G13), choose Equipment Time Billing
From Equipment Time Billing (G1313), choose Print Time Journals
Print the Time Entry Journal to review transactions that result from equipment time entries. You can print two versions of this report:
-
Posted F/A. Use this report to print equipment transactions that are posted to equipment as well as the general ledger.
-
Unposted F/A. Use this report to print equipment transactions that have not been posted to equipment and might or might not be posted to the general ledger.
Note:
You determine the accounts that post to equipment when you set up automatic accounting instructions FX01 - FX98. Only the accounts within this range appear on the posted transaction ledger report. The Unposted F/A report version includes all time entry transactions, regardless of the affected accounts.