36 Work with Applicant Information
After you add applicant records into the system, you can begin the process of evaluating applicants and matching them to open requisitions. When you work with applicant information, you can simplify the process of tracking the status of applicants as they move through the hiring process and eliminate many routine data entry tasks. For example, you can set up your system to:
-
Generate form letters that inform applicants of the status of their applications
-
Automatically transfer a hired applicant's information to the employee database
-
Automatically update the head-count for the requisition and position that a hired applicant fills
-
Remove a group of obsolete applicant records from your system
This chapter contains these topics:
You attach applicant records to a requisition so that you can monitor each applicant's status as you interview applicants and evaluate them for vacancies. When you make a job offer to an applicant and the applicant accepts it, you need to indicate that the applicant is hired. You can set up your system so that, when you hire an applicant, the system automatically transfers the applicant's information to the employee database.
To conserve computer disk space, you should periodically purge obsolete applicant information.
36.1 Attaching an Applicant Record to a Requisition
From Human Resources (G08), choose Applicant Information
From Applicant Information (G08A1), choose Applicant Entry
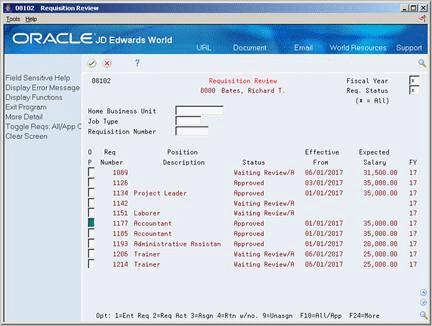
When you determine that an applicant might be suitable to fill an open requisition, you can attach the applicant's record to the requisition. Attaching applicant records to a requisition simplifies the process of monitoring each applicant's status as you interview applicants and evaluate them for the vacancy.
After you attach applicant records to a requisition, you can review the status of all of the candidates who are being considered for a requisition. You can also limit your review to include only a specific type of requisition, such as rejected requisitions or filled requisitions.
To attach an applicant record to a requisition
-
Locate the applicant record.
-
Choose the Requisition Review function.
-
On Requisition Review, complete the following fields to narrow your search:
-
Requisition Status
-
Home Business Unit
-
Job Type
-
Requisition Number
-
-
To attach the applicant to a requisition, choose the Assign option.
-
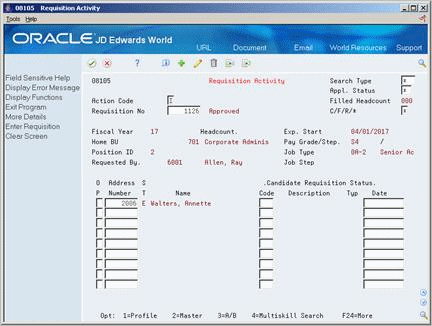
To review all of the candidates who are attached to a requisition, choose the Requisition Activity option.
36.1.1 What You Should Know About
| Topic | Description |
|---|---|
| Attaching applicant records to a requisition | An alternate method for attaching applicant records to a requisition is to enter them directly on the Requisition Activity form.
See Section 31.1, "Attaching a Candidate Record to a Requisition." |
| Removing applicant records from a requisition | If you attach an applicant records to the wrong requisition, choose the Unassign option to remove the attachment. |
36.2 Printing Letters of Acknowledgement
From Human Resources (G08), choose Applicant Information
From Applicant Information (G08A1), choose Applicant Entry
36.2.1 Before You Begin
-
Verify that OfficeVision AS/400 is installed on your system
-
Create one or more letter templates in OfficeVision AS/400 and put them in a folder
To simplify the process of responding to applications and communicating with applicants, you set up your system to print form letters for applicants. To print form letters from your Human Resources system, you must first create the letter template in the program, Office Vision/400. When you need to send a copy of the letter to a specific applicant, the system generates a copy of the letter that includes the applicant's name and address. You can then send the letter to the applicant.
You can create several standard letters that inform applicants of the status of their applications. For example, you can create one letter that informs applicants that their applications have been received, and another letter that informs applicants that they are no longer being considered for the position for which they applied.
To print letters of acknowledgement
-
Locate the applicant to whom you need to send a letter.
-
Choose the Letter function.
Figure 36-4 Send Applicant Letter screen

Description of ''Figure 36-4 Send Applicant Letter screen''
-
On Send Applicant Letter, complete the following fields:
-
Document
-
Folder Name
-
| Field | Explanation |
|---|---|
| Document | This field is for the name of a document in a folder. |
| Folder Name | The name of a folder used by OfficeVision/400. |
See Also:
-
The IBM OfficeVision/400 Manual for information about creating letters in OfficeVision.
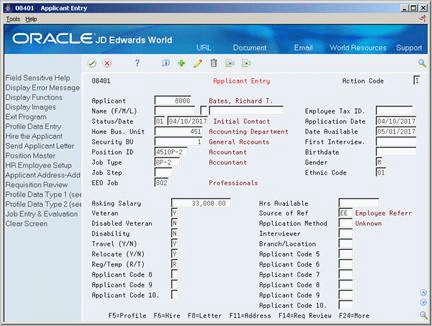
36.3 Hiring an Applicant
From Human Resources (G08), choose Applicant Information
From Applicant Information (G08A1), choose Applicant Entry
When you offer an applicant a job and the applicant accepts it, you need to indicate that the applicant is hired. To save time and eliminate redundant data entry, you can set up your system to automatically copy applicant information to the employee database when you hire an applicant. You can copy both initial applicant information, such as name, address, and position information, and applicant profile data.
Because you typically need to retain applicant records for government reporting requirements, copying applicant information to the employee database does not delete that information from the applicant database.
When you hire an applicant, you can also enter any additional employee information. To ensure that you enter the information required to process the employee through a payroll cycle, you can set a processing option that requires you to enter that information before you can complete the hiring process.
36.3.1 Before You Begin
-
Set up your system to transfer selected types of profile data when you hire an applicant. See Section 62.3, "Setting Up the Cross-Reference Table for Profile Data."
-
Review the processing options for this program and for HR Employee Entry (P0801). To transfer profile data for applicants to the employee profile database, you must set the appropriate processing options.
-
Verify that the applicant status is set up on Define Types of Data. See Section 62.1, "Defining Types of Profile Data."
-
Locate the applicant.
-
Choose the Hire function.
-
On Hire Applicant, complete the following fields and press Enter:
-
Employment Start Date
-
Employee Tax Identification
-
Requisition Number to be filled
-
Candidate Requisition Status
-
-
On HR Employee Entry, enter any additional employee information.

| Field | Explanation |
|---|---|
| Employment Start Date | The date on which the employee actually reported to work for the most recent period of hire. When an employee initially begins working, the default is the original hire date. If no original hire date exists, the system uses the current date. This field can be updated multiple times if, for example, an employee is a seasonal worker.
For the calculation tables in Payroll and the eligibility tables and date codes in Human Resources, the system also uses this date as a start date when it calculates deductions, benefits, and accruals. Form-specific information The date the applicant's employment begins with the company. |
| Candidate Requisition Status | The current activity level of a candidate that is attached to a requisition. The system retrieves these codes from user defined code table 08/CN.
You can group candidate requisition status codes based on the hard-coded Special Handling Code values in the table. These hard-coded values are: CAN – Any candidate code DET – Any code indicating that the position is detached or no longer filled FIL – Any code indicating that the position has been filled REJ – Rejected TMP – Temporarily filled Candidate requisition status codes that have special handling codes of either FIL or TMP update the Filled Headcount field. However, only those status codes that have special handling codes of FIL can cause the system to change the requisition status to "Filled and Closed." |
36.3.2 What You Should Know About
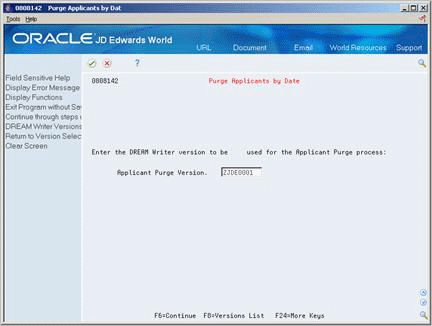
36.4 Purging Applicant Information
From Human Resources (G08), choose Applicant Information
From Applicant Information (G08A1), enter 27
From Applicant Technical Operations (G08A3), choose Purge Applicants by Date
Depending on your organization's policies, you typically purge information for applicants that you no longer consider as active. To conserve computer disk space, you can use a purge program to remove obsolete applicant records from your system.
Purging applicant information does not affect any of the related employee information for the applicants that you have hired.
You can purge applicant records according to application dates. You can enter other criteria to retain applicants who are still being considered for employment, are in the process of being tested, or who have already been hired. For example, if an applicant is waiting to take a scheduled examination, you can choose to exclude that applicant's record from the purge program.
36.4.1 Before You Begin
-
Create your own DREAM Writer version of the Applicant Purge Program. See the JD Edwards World Technical Foundation Guide for information about creating DREAM Writer versions.
Figure 36-6 Purge Applicant by Date screen
Description of ''Figure 36-6 Purge Applicant by Date screen''
-
Complete the following field and choose the continue function:
-
Applicant Purge Version
Figure 36-7 Purge Applicant by Date (Warning!) screen
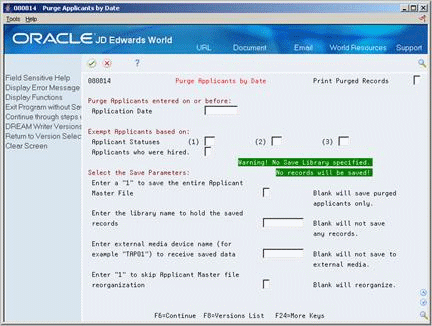
Description of ''Figure 36-7 Purge Applicant by Date (Warning!) screen''
-
-
On Purge Applicants by Date, complete the following fields:
-
Print Purged Records
-
Purge Applicants entered on or before: Application Date
-
Exempt Applicant Statuses
-
Applicants who were hired
-
Enter a "1" to save the entire Applicant Master File
-
Enter the library name to hold the saved records
-
Enter external media device name (for example, "TAP01") to receive saved data
-
Enter "1" to skip Applicant Master file reorganization
-
| Field | Explanation |
|---|---|
| Date - Applicant Master Purge Date | The system uses this date in one of two ways, depending on the application dates that were entered on the Applicant Entry form (F08401).
Note: If you use today's date as the purge date, the system purges all applicant records that are included in the DREAM Writer selection criteria. For selective purging, see DREAM Writer considerations in the program helps. |
| Applicant Statuses | A code that defines a step in the hiring process (such as initial contact, first interview, and so on) that the applicant has completed. You define these codes in user defined code table 08/AS.
When you enter or change the status of an applicant on the Applicant Entry form, the system adds a record to the profile data type for applicant status. To review the history of an applicant's status, you can review the information that was entered for the applicant in this profile data type. |
| Applicants who were hired | The Yes or No Entry field is a single character entry field for a yes or no response.
You may elect to purge applicant information for applicants who were hired as employees. Another option is to retain the applicant information for applicants who were hired even if all other criteria for purge is met. YES – Hired applicant information will not be purged. NO – Hired applicant information will be purged if all other criteria for purge is met. |
| Enter a "1" to save the entire Applicant Master File | A code that indicates which records the system copies to the save table. Valid values includes:
Blank – The system copies only the records that are purged to the save table. To reload the purged records, copy the saved table into the original table using the Add Action. (You can re-purge the saved records when necessary.) 1 – The system copies all records to the save table. To reload it, you must return the saved table to the system intact. For example, you could reload the saved table to a new library, use it, and then remove it from disk storage. In either case, you should copy the saved table to an external media, such as magnetic tape, and archive it for possible future needs. |
| Enter the library name to hold the saved records | These are the names of the libraries that contain JD Edwards World files and programs. Each file should exist in only one library in the environment other than the 'JDF' library (usually JDFDATA). You may, however, enter multiple 'COM' or 'DTA' libraries.
COM – Common Files (ex. DREAM Writer, Data Dictionary, etc.) CSO – Custom executable programs CSS – Custom source library DTA – Data files (ex. F0411, F0911, etc.) JDF – JD Edwards World data (ex. JDFDATA) KBG – World Case files OBJ – JD Edwards World executable programs (ex. JDFOBJ) SEC – Security files (ex. F0092, F0094) SRC – JD Edwards World source code (ex. JDFSRC) |
| Enter external media device name (for example "TAP01") to receive saved data | The name of the tape device to which magnetic media is to be sent. |
| Enter "1" to skip Applicant Master file reorganization | This code indicates whether the system reorganizes the table after a purge process has completed. Valid codes include:
blank – The system reorganizes the table after it purges the records you specified. 1 – The system does not reorganization the table. Although reorganizing the table requires extra processing time, it increases the speed and efficiency of the system when you access and report on applicant information. If the table is very large, reorganizing it might impact other jobs that the system is processing. |