19 Work with Employee History Records
This chapter contains these topics:
19.1 Working with Employee History Records
When current employee information changes, such as when an employee is promoted or changes marital status, you must update the employee's record to reflect the change. You can set up your system to create historical records of the information you changed when you update employee records to reflect such changes.
You can review historical information since the date you began tracking history. This allows you to analyze an employee's qualifications and work record. For example, you can:
-
Review an employee's job progression
-
Review salary increases given at the same time a job change was made
-
Analyze historical changes to employee information
-
Analyze an employee's job history to determine whether the employee is ready for a promotion
You can correct history records if you made a mistake when you entered employee information and the system stored that mistake in history records.
You might make a mistake and not want to maintain the record in history. You can delete a history record if it is inaccurate and if you do not want to maintain it in the history table.
To conserve computer disk space, you can transfer past years' history records to tape or to an alternate backup system.
19.1.1 Before You Begin
-
Specify the employee data items for which you want to track turnover. See Section 63.2, "Choosing Data for History Tracking Purposes."
-
Verify that the Human Resources constants are set to track turnover. See Section 63.1, "Setting Up History and Turnover Constants."
-
Verify that the history subsystem and monitor are set to run. See Section 63.4, "Activating History and Turnover Tracking."
19.2 Reviewing Employee History
From Human Resources (G08), choose Employee History
From Employee History (G08H1), choose Employee History Inquiry
You can set up your constants so that the system creates history records for employees whenever you change employee information. You might want to review this history to:
-
Analyze historical changes to employee information
-
Consider an employee's work record for promotions or raises
-
Consider an employee's work record for another position
To review the complete history records for an individual, from the oldest entry through the most recent entry, you can use Employee History Inquiry. You can also review all the history that is linked to a specific data item.
Figure 19-1 Employee History Inquiry screen
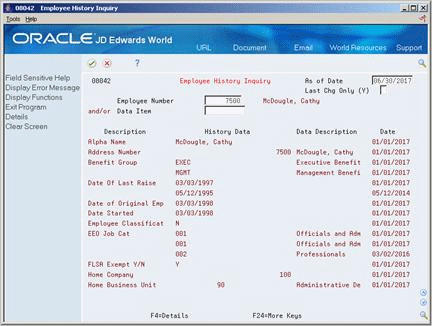
Description of ''Figure 19-1 Employee History Inquiry screen''
-
Complete the following field:
-
Employee Number
-
-
Complete any of the following optional fields:
-
As of Date
-
Last Change
-
Data Item
-
-
Access the detail area.
Figure 19-2 Employee History Inquiry (Details) screen
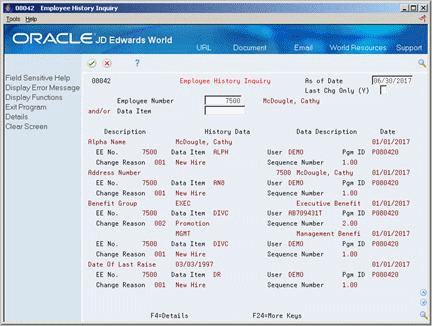
Description of ''Figure 19-2 Employee History Inquiry (Details) screen''
-
Review the information.
| Field | Explanation |
|---|---|
| As of Date | The date for which you want to review employee history and employee turnover. Any history or turnover that has an effective date after the date you enter in this field does not appear on the form. If you do not enter a date, the system date is the default date.
In the history or turnover purge programs, all data with an effective date (data item EFTO) on or before this date will be purged. You must enter this date. |
| Last Chg Only (Y) | A code that defines whether the form displays only employee history changes made through the date you indicate in the As of Date field. Valid codes are:
Y – Yes, display only the history changes in effect through the As of Date. N – No, display all changes. Blank – The same as N. Note: Since changes are based on effective date, if two changes were made on the same date, the form shows both changes. |
19.2.1 What You Should Know About
19.3 Correcting Employee History
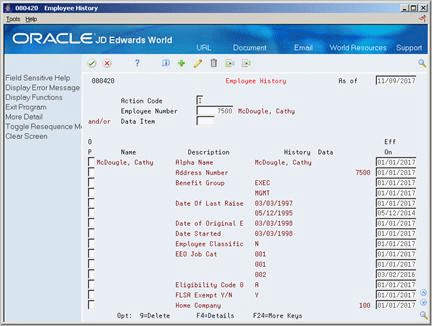
From Human Resources (G08), choose Employee History
From Employee History (G08H1), enter 27
From History & Turnover Advanced and Technical Operations (G08H3), choose Employee History
Each time you make an entry in an employee record, the system creates a record in the corresponding history table. If you make a mistake when you enter employee information and then correct the error, you must delete the incorrect record from the corresponding history table to maintain an accurate history trail. When you delete a record in the history table, you do not affect the information in the Employee Master table.
If the only information you incorrectly entered was the change reason or the effective date, you can correct that information in the history table. You do not need to delete the entire record to correct those two fields.
Correcting the error in the history table allows you to maintain accurate history records. If the history record you correct has a change reason, you must also correct the corresponding turnover record.
-
To locate the record, complete either or both of the following fields:
-
Employee
-
Data Item
-
-
If the entire record is incorrect and you do not want to maintain it in history, choose the Delete option.
-
If you want to maintain the history record, complete the following optional field:
-
Effective On
-
-
Access the detail area.
Figure 19-4 Employee History (Details) screen
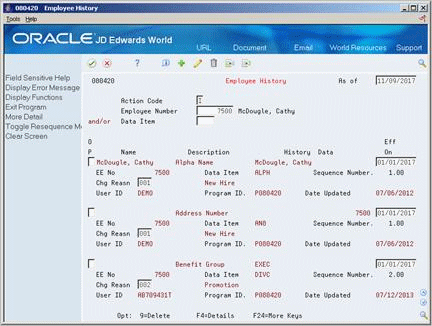
Description of ''Figure 19-4 Employee History (Details) screen''
-
Correct the information in the following optional field:
-
Change reason
-
-
To correct the sequence number for a data item, choose the Toggle Resequence Mode function.
-
Change the value in the following field:
-
Sequence Number
-