14 Set Up Advanced Pricing for Repasse
This chapter contains these topics:
-
Section 14.5, "Setting Up Customer Price Groups for Repasse"
-
Section 14.8, "Setting Up Price and Adjustment Definitions for Repasse"
14.1 Setting up Advanced Pricing for Repasse
Advanced pricing allows flexibility when defining pricing. You use pricing adjustments to compute discounts such as trade, Repasse, and Free Port Zone. Within each schedule, you can define unlimited price adjustments. You can also combine regular discounts and promotions within the same schedule, which allows you to apply multiple adjustments to each sales order line.
Repasse is a tax discount that is given when the ICMS rate in the state where the product originates is higher than the rate in the state where it is being sold. ICMS is a tax that is already included in the selling price of the product.
Free Port Zone is a tax discount given to customers located in a free port zone. The setup is the same as for Repasse.
14.1.1 Verify that Advanced Sales Pricing is Active
From Sales Order Management Setup (G4241), choose Branch/Plant Constants
In Branch/Plant Constants, select System Constants (F10) and then Pricing Constants (F10)
14.1.2 Verify User Defined Codes
To print the Repasse discount on the Nota Fiscal:
-
PREPAS must exist as a code in UDC 76/CN
-
REPASSE must exist as a code in UDC 40/TY, and must have PREPAS in the Special Handling code
To record the discount:
-
UDC 76/GL must have a code that begins with REP followed by the GL class code for the discount
To print the Free Zone discount on the Nota Fiscal:
-
PZONE must exist as a code in UDC 76/CN
-
ZONEAFRC must exist as a code in UDC 40/TY, and must have PZONE in the Special Handling code
For more information see Section 3.2, "Setting Up User Defined Codes for Brazil"
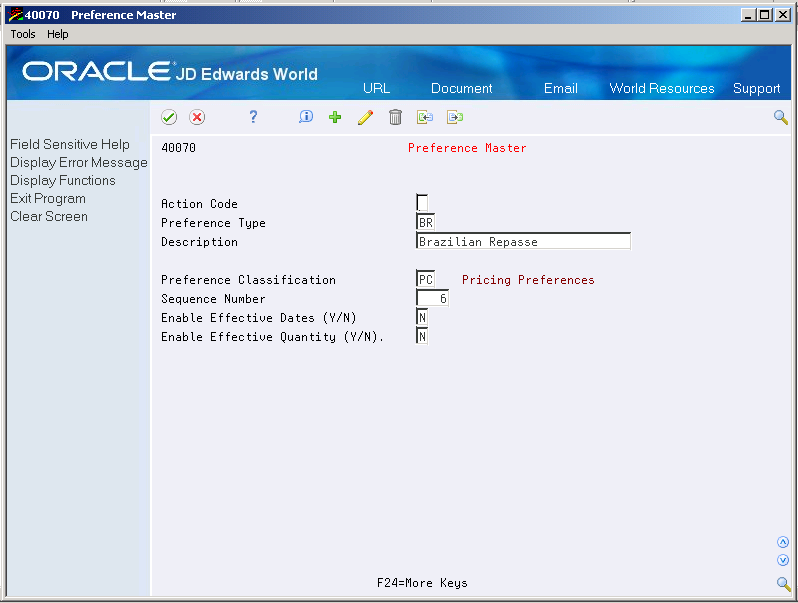
14.2 Setting Up a Preference Master for Repasse
From Sales Order Management (G42), choose Price Management
From Price Management (G4222), choose Preference Hierarchy
In Base Pricing, you are limited to using one preference hierarchy (preference hierarchy #51). In Advanced Pricing, you can create as many different preference hierarchies as you need.
You define the hierarchy and then attach it to an adjustment definition. You can create a hierarchy for each adjustment definition or you can use one hierarchy for several. JD Edwards World recommends that you set up a few hierarchies that can be used for multiple adjustment definitions.
-
To access the preference master, choose the function (F10).
-
Complete the following fields:
-
Preference Type
-
Description
-
| Field | Explanation |
|---|---|
| Preference Type | A user defined code (system 40/type PR) that identifies a preference type or a price adjustment hierarchy.
When you define pricing hierarchies, identify each table with this code. Later, when you create adjustments, you use this code to identify the hierarchy the system should follow for this adjustment. |
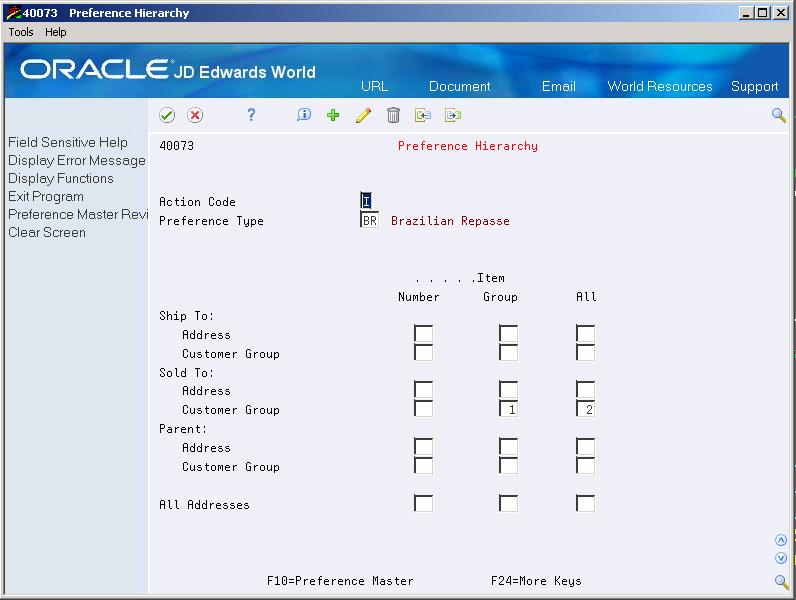
14.3 Defining a Pricing Hierarchy for Repasse
From Sales Order Management (G42), choose Price Management
From Price Management (G4222), choose Preference Hierarchy
You enter the order that adjustments are applied on the Preference Hierarchy screen. The screen contains rows identifying customers and customer groups and columns identifying items or item groups. You enter your hierarchy sequence at the intersections of the rows and columns. The pricing search begins with the intersection where you enter 1 (one) and looks for records defined for that customer and item combination. If no adjustment details are found for that intersection, the system goes to the intersection in which you enter 2, and so forth.
14.3.1 Before You Begin
-
Verify that a master record has been created for the preference hierarchy.
Beginning with 1 (one), enter numbers in the intersections to indicate the order in which you want the system to search the Price Adjustment Detail file.
| Field | Explanation |
|---|---|
| Ship To: | The address number of the location to which you want to ship this order. The address book provides default values for customer address, including street, city, state, zip code, and country. |
| Sold To: | A number that identifies an entry in the Address Book system. Use this number to identify employees, applicants, participants, customers, suppliers, tenants, and any other Address Book members. |
| Parent: | The Address Book number of the parent company. The system uses this number to associate a particular address with a parent company or location. For example:
Subsidiaries to parent companies Branches to a home office Job sites to a general contractor If you leave this field blank on an entry screen, the system supplies the primary address from the Address Number field. This address must exist in the Address Book Master file (F0101) for validation purposes. |
| All Addresses | A number that identifies an entry in the Address Book system. Use this number to identify employees, applicants, participants, customers, suppliers, tenants, and any other Address Book members. |
14.3.2 What You Should Know About
14.4 Setting Up Price Groups for Repasse
Advanced Pricing offers additional flexibility for working with pricing groups. You can create adjustments for single items, single customers, groups of items, or groups of customers. Customers can be identified by sold-to, ship-to, or parent addresses.
14.4.1 Customer and Item Groups
You can define customer and item groups to accommodate vastly different market sectors and product lines. Using customer group and item group definitions frees you from the tedious task of setting up price adjustment information for each item and customer.
Complete the following tasks to set up price groups for Brazil:
-
Setting up customer price groups for Repasse
-
Setting up item price groups for Repasse
-
Defining order detail groups for Repasse
14.4.2 Before You Begin
-
Verify that customer information has been set up in the address book and customer master. See Entering Address Book Records in the JD Edwards World Address Book and Electronic Mail Guide and Entering Customers in the JD Edwards World Accounts Receivable Guide.
-
Verify that customer billing instructions have been set up for your customers. See Setting Up Customer Billing Instructions in JD Edwards World Sales Order Management - ECS Guide.
-
Verify that item information has been set up in the Item Master (F4101), Item Branch (F4102), and Item Location (F41021) tables. See Entering Item Master Information in the JD Edwards World Inventory Management Guide.
-
Verify that you have set up customer and item price group names in the user defined codes table (40/PC). See Setting Up User Defined Codes in the JD Edwards World Technical Foundation Guide.
14.5 Setting Up Customer Price Groups for Repasse
From Sales Order Management (G42), choose Price Management
From Price Management (G4222), choose Define Customer Price Groups
You set up customer price groups to apply pricing schemes to specific groups of customers. The groups are an optional way of organizing your pricing schemes.
You use customer price groups to retrieve base price information for sales orders. For example, you create a customer price group named PARTNERS. You then set up this group to buy markers at 1.20 each, while all other customers buy the markers at 1.50 each.
Price groups allow you to enter the information for the entire group rather than for individual units.
To set up simple customer price groups
On Define Customer Price Groups
Figure 14-4 Define Customer Price Groups screen
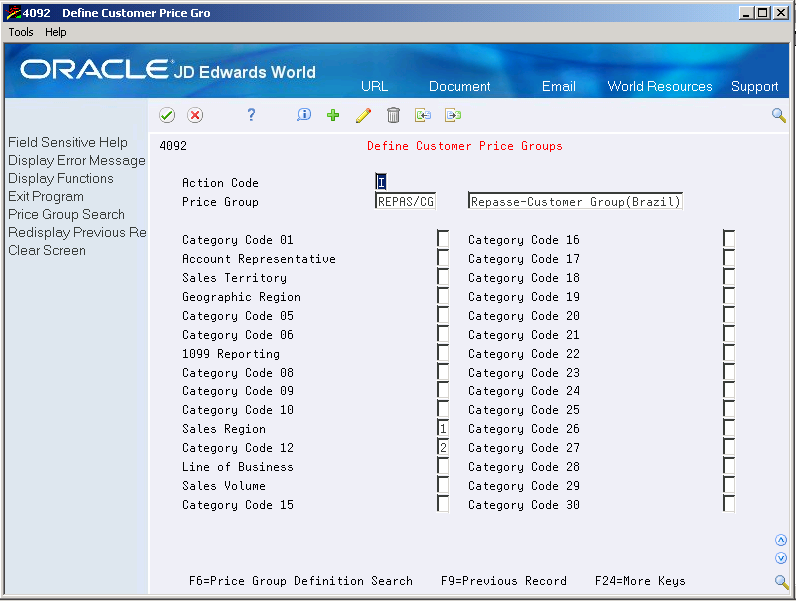
Description of "Figure 14-4 Define Customer Price Groups screen"
Complete the following field:
-
Price Group
14.5.1 What You Should Know About
14.6 Setting Up Item Price Groups for Repasse
From Sales Order Management (G42), choose Price Management
From Price Management (G4222), choose Define Item Price Groups
Item price groups are similar to customer price groups. You set up item price groups so that you can define base price information for a group of items rather than for items on an individual basis.
Set up simple item price groups to allow items to be grouped so that they are controlled by the group definitions. For example, if you sell several types of pens whose characteristics are identical except for their color, you can group these items to simplify pricing. You create a user defined code (40/PC) for the group, such as PENS, and assign the pens to the group name. You can then define one price for this group.
When you set up a price group, you must first define the price group and then assign specific instructions or definitions to the group. This allows you to enter the information for the entire group rather than for individual units.
To set up simple item price groups
Figure 14-5 Define Item Price Group screen
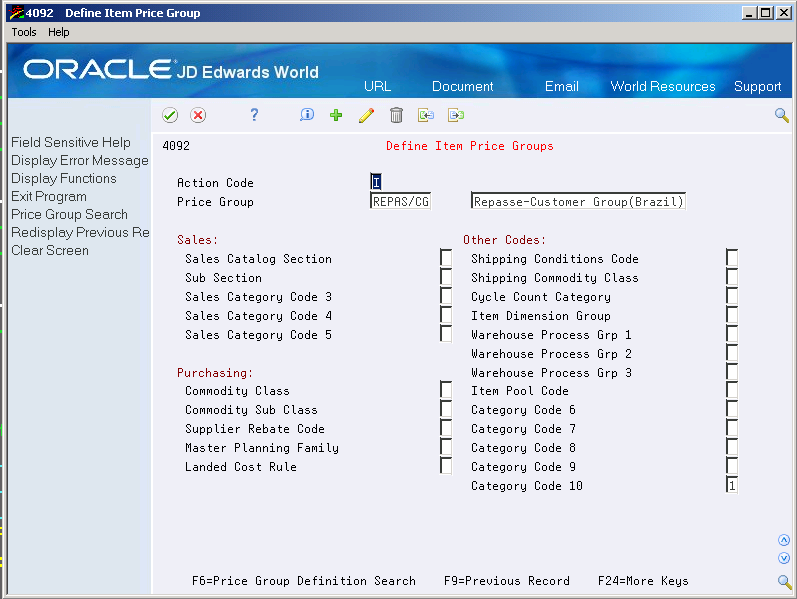
Description of "Figure 14-5 Define Item Price Group screen"
To assign an item to a simple item price group, complete the following field:
-
Item Price Group
14.6.1 What You Should Know About
| Topic | Description |
|---|---|
| Creating complex pricing groups | To allow for greater pricing flexibility, you can set up complex item price groups. You can create subgroups within your pricing groups to charge a different price based on category codes.
See Setting Up Complex Item Price Groups. in the JD Edwards World Advanced Pricing Guide. |
| Assigning an item to a group based on category codes | In Base Pricing, one item can belong to only one item price group.
In Advanced Pricing, an item can belong to a detail group without being attached to that group in Item Branch/Plant Information. An item can belong to numerous groups, depending on the category codes. |
14.7 Defining Order Detail Groups for Repasse
From Sales Order Management (G42), choose Price Management
From Price Management (G4222), choose Advanced Pricing and Rebates
From Advanced Price and Adjustments (G422311), choose Define Order Detail Groups
You can use order detail groups to create adjustments to the pricing line of an order based on information from sales order detail fields.
When you enter sales orders, some data in detail fields comes from system defaults, customer master information, customer billing instructions, items, and preferences. By using these fields, you have another method of defining pricing for a specific group.
For example, you want to give a special discount to a group of customers whose line of business is manufacturing. Preference profiles affect adjustment prices.
Figure 14-6 Define Order Detail Groups screen
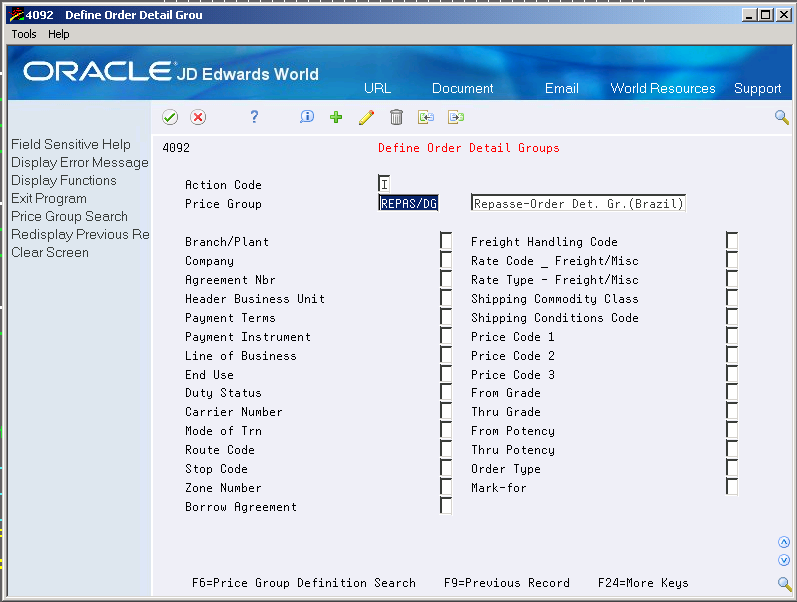
Description of "Figure 14-6 Define Order Detail Groups screen"
-
Complete the following field:
-
Price Group
-
-
Indicate the order detail fields to associate with the order detail group by entering 1, 2, or 3 next to three field names. You can use one or as many as three.
| Field | Explanation |
|---|---|
| Price Group | A numerical value that specifies the sequence of category codes within Group Codes. The value must be equal to or between 1 and 4. Also, you cannot slip sequence values. For example, do not enter sequence 3 unless you have already entered sequence numbers 1 and 2.
Screen-specific information For Agreement Penalty Schedules Enter 1 when defining penalty schedules. |
14.7.1 What You Should Know About
14.8 Setting Up Price and Adjustment Definitions for Repasse
From Sales Order Management (G42), choose Price Management
From Price Management (G4222), choose Advanced Pricing and Rebates
From Advanced Price and Adjustments (G42311), choose Price Adjustment Definitions
An adjustment is a record that describes a special pricing situation, such as a pricing plan or promotion. Before you can add an adjustment to a schedule, you must create adjustment definitions to specify the characteristics of the adjustment. These characteristics determine how the adjustment will:
-
Sequence the system searches for prices
-
Print on invoices
-
Apply basket-level or order-level price adjustments
-
Base the override price on quantity, amount, or weight
-
Offset a general ledger account based on AAIs
You can set up adjustments for both stock and nonstock items.
To set up adjustment definitions
On Price Adjustment Definitions
Figure 14-7 Price Adjustment Definition screen
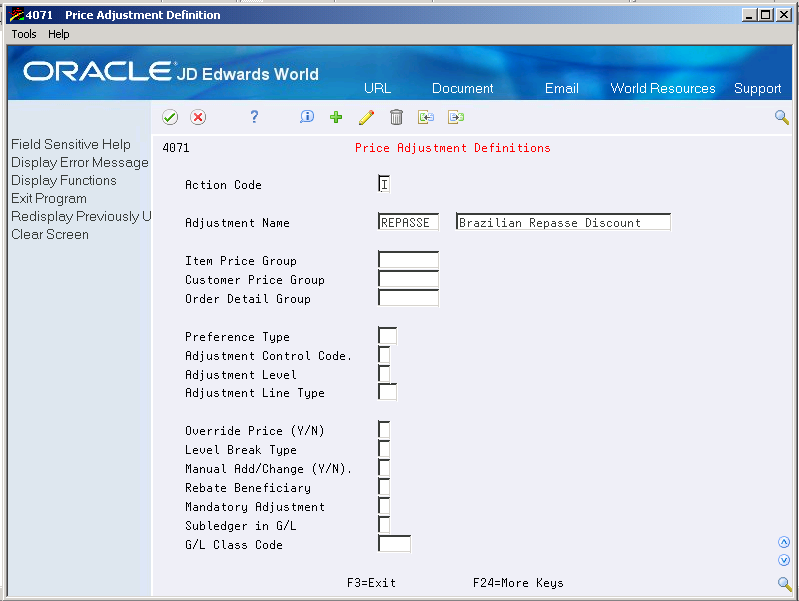
Description of "Figure 14-7 Price Adjustment Definition screen"
Complete the following fields:
| Field | Explanation |
|---|---|
| Adjustment Name | A user defined code (system 40, type TY) that identifies an adjustment definition. You define adjustments on Price Adjustment Definitions. See Section 3.2, "Setting Up User Defined Codes for Brazil". |
| Item Price Group | A user defined code (40/PI) that identifies an inventory price group for an item.
Inventory price groups have unique pricing structures that direct the system to incorporate discounts or markups on items on sales and purchase orders. The discounts or markups are based on the quantity, dollar amount, or weight of the item ordered. After you assign a price group to an item, the item uses the same pricing structure that was defined for the inventory price group. Screen-specific information Enter the code identifying the override item price group that you want to attach to this adjustment. |
| Customer Price Group | A user defined code (system 40, type PC) that identifies a customer group. You can group customers with similar characteristics, such as comparable pricing.
Screen-specific information Enter the code identifying the override customer price group that you want to attach to this adjustment. |
| Order Detail Group | A user defined code (system 40, type SD) that identifies a sales order detail group, which you can use to create pricing that is based on a field in the Sales Order Detail table (F4211).
If you enter a code in this field, the system uses this adjustment only for orders with details that match the criteria of the order detail group. Screen-specific information For Agreement Penalty Schedules, you should have already set up a UDC Penalty and defined it as an order detail group. Enter Penalty, or the correct UDC that defines your penalty schedules. |
| Preference Type | A user defined code (system 40/type PR) that identifies a preference type or a price adjustment hierarchy.
When you define pricing hierarchies, identify each table with this code. Later, when you create adjustments, you use this code to identify the hierarchy the system should follow for this adjustment. |
| Adjustment Control Code | A code that specifies how the adjustment appears on the invoice and whether you want the system to create a separate line in the Sales Order Detail table (F4211).
Valid values are: 1 The system adds the adjustment amount into the unit price and records the adjustment detail to the Price Adjustment History table (F4074). The system does not print the adjustment on the invoice. 2 The system adds the adjustment amount to the unit price and records the adjustment detail to the Price Adjustment History table (F4074). This prints the value on the Notal Fiscal. 3 The system creates a separate detail line in the Sales Order Detail table. It does not add the adjustment into the unit price or record it to the history table. The system does not include this type of adjustment when it calculates the current net price. 4 The system records the adjustment to history and posts it to the general ledger during a sales update. It does not add the adjustment into the unit price or print it on the invoice. Use Control Code 4 to create an accrual adjustment. 5 The system records the adjustment to history and posts it to the general ledger during a sales update. The system also accumulates each order line's quantity, weight, and amount to rebate history (F4078). It does not add the adjustment into the unit price or print it on the invoice. Use Control Code 5 to create a rebate adjustment. |
| Adjustment Level | Specifies the level at which the adjustment is calculated:
1 Line Level: The system calculates the adjustment based on information in the sales detail line. 2 Basket Level: The system lets you group multiple sales detail lines and calculate the adjustment based on information accumulated from all the lines. You group items by Basket Pricing Group (RPRC) in Item Branch Information (F4102). 3 Order Level: The system lets you group sales order lines from the same order and calculate the adjustment based on information accumulated from all the lines. You group items by Order Pricing Group (ORPR) in Item Branch Information. If you are defining a repricing adjustment, leave the Item Group, Customer Group, and Sales Group fields blank. |
| Adjustment Line Type | A code that controls how the system processes lines on a transaction. It controls the systems with which the transaction interfaces (General Ledger, Job Cost, Accounts Payable, Accounts Receivable, and Inventory Management). It also specifies the conditions under which a line prints on reports and is included in calculations. Codes include:
N Non-stock item F Freight M Miscellaneous charges and credits Screen-specific information A code the system assigns to new detail lines if it adds the line as a result of an adjustment. The Adjustment control Code field must be set to 3. |
| Override Price (Y/N) | A code indicating how the adjustment affects the price of a sales order line. Valid codes are:
Y The adjustment price overrides the base price. N The adjustment is used to calculate a discount or markup to the base price. |
| Level Break Type | A code that indicates how level breaks occur in the Price Adjustment Detail (V4072). Valid codes are:
1 Quantity. The system determines the correct adjustment based on the quantity ordered in the sales order. You can set up different adjustment breaks for different units of measure. 2 Weight. The system uses the weight of the line to retrieve the proper adjustment level break. 3 Amount. The system uses the extended amount of the sales detail line to retrieve the proper adjustment level break. When Currency Conversion is switched on, all amount level breaks will be stored and displayed based on the floating decimals of the currency code. |
| Manual Add/Change (Y/N) | Specifies whether the adjustment type can be manually added to or changed from the Price Adjustments screen (P4074W) when you enter sales orders. |
| Rebate Beneficiary | A code (system 40/type RA) that identifies the beneficiary of a rebate. The party you identify here becomes the recipient of the credit order you create when a customer reaches a rebate threshold. The customer and the beneficiary may or may not be the same address. The beneficiary becomes the Sold To Address of the create order. |
| Mandatory Adjustment | A code you use to specify whether an adjustment is mandatory. Valid codes are:
Y Yes, this adjustment is mandatory N No, this adjustment is not mandatory |
| Subledger in G/L | A user defined code (system 40, type SI) that identifies the type of information that you want the system to use to update the Subledger field in the General Ledger file (F0911) when you use this adjustment type to price a sales order. |
| G/L Class Code | The table of Automatic Accounting Instruction accounts that allows you to predefine classes of automatic offset accounts for Accounts Payable, Accounts Receivable, and other systems.
G/L offsets might be assigned as follows: blank or 1210- Trade Accounts Receivable RETN or 1220 - Retainages Receivable EMP or 1230 - Employee Accounts Receivable JIB or 1240 - JIB Receivable (See A/R Class Code - ARC) blank or 4110 - Trade Accounts Payable RETN or 4120 - Retainage Payable OTHR or 4230 - Other Accounts Payable (See A/P Class code - APC) If you leave this field blank during data entry, the system uses the default value from the Customer Master Information table (F0301) or the Supplier Master Information table (F0401). The post program uses the G/L Offset class to create automatic offset entries. Note: Do not use code 9999. It is reserved for the post program and indicates that offsets should not be created. |
14.8.1 What You Should Know About
| Topic | Description |
|---|---|
| Entering a price group | You enter an order, customer, or item price group if you want this adjustment to apply only to that price group. If the field is left blank, you can set up details for other price groups. |
| Entering kit or configured items | When entering a sales order for a kit or configured item, you should not use adjustment control 3.
Adding an item detail line to a sales order for kit or configured items is not supported. |
| Selection of Line Type | If the Adjustment Control Code is 3, the Adjustment Line Type must have an inventory interface of N. |