22 Work with Petty Cash Desk
This chapter contains these topics:
22.1 Understanding the Petty Cash Desk Program (P74R0011)
Cashiers receive and issue petty cash amounts on a daily basis. A Cash Issue Note or Cash Receipt Note must support each petty cash transaction. At the end of the work day, cashiers must collect all petty cash documents, print the Cash Book, and bring them to the accountant. Accountants use the Cash Book to reconcile cash transactions. Petty cash transactions from A/P, A/R, or G/L are available for processing from the Petty Cash Desk.
Use the Petty Cash Desk program to process Petty Cash Issue Notes and Petty Cash Receipt Notes. The Transaction Type code determines the display of cash issues, cash receipts, or both. You can process petty cash transactions in proof or final mode, or reprint an item by specifying the document type and number.
The processing options for P74R0011 provide default values for the screen header's fields:
-
Petty cash account
-
Currency code (RUB)
-
Currency mode (domestic or foreign)
-
Start and final date range to process
-
Transaction type (cash in / cash out / both)
-
Proof / final / reprinting mode
22.2 Working with Petty Cash Desk
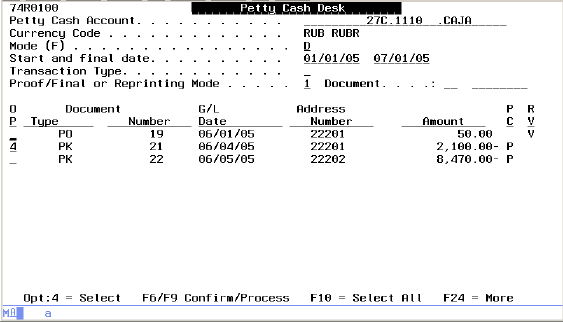
To process cash transactions from the Petty Cash Desk
From Petty Cash Printing (G74R00), choose2 (Petty Cash Desk)
-
On Petty Cash Desk, verify the following default selections and change the information, as needed:
-
Petty Cash Account - Default value is controlled by processing option selection.
-
Start and final date - Default values are controlled by processing option selection.
-
Transaction Type:
-
I - transaction number for Cash Receipt Note (cash in)
-
O - transaction number for Cash Issue Note (cash out)
-
Blanks - Both
-
-
Proof/Final or Reprinting Mode:
-
Blank = proof
-
1 = Final
-
2 = Reprint
-
-
-
Type 4 (Select) in the OP (Option) field for each transaction to process.
Note:
You can press F10 (Select All). -
Press F6 to confirm or F9 to process the transactions.
The system displays the ABM Petty Cash Desk additional screen.
Figure 22-2 ABM Petty Cash Desk Additional screen
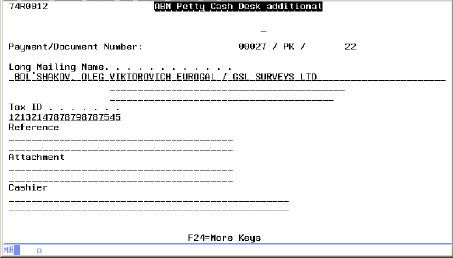
Description of "Figure 22-2 ABM Petty Cash Desk Additional screen"
Note:
There is a difference between pressing F6 or F9. If F6 is pressed, the additional information screen appears once for each selected transaction and allows users to enter different information for each one. If F9 is pressed, the additional information screen appears only once regardless of how many transactions were selected. In this case, the information entered applies to all the selected transactions. F9 is the global mode and F6 is detailed mode.See Also:
-
For more details about the information on this window, see Section 23.1, "Adding Additional Information for Petty Cash Transactions."
-
-
On ABM Petty Cash Desk additional, complete the following:
-
Long Mailing Name - The name, surname and middle name of the person who receives the petty cash (cash OUT) or the person who makes the cash payment (cash IN). This field cannot be blank.
-
(Address line 1) - The mailing address of the recipient/payee of the petty cash
-
(Address line 2) - Additional mailing address line of the recipient/payee of the petty cash
-
Tax ID - The identification documentation for tax ID of the recipient/payee of the petty cash
-
Reference - The reason for payment
-
Attachment - Free text (80 characters) to be printed in the attachment section in petty cash issue / receipt note
-
Cashier - The name, surname and middle name of the cashier who issues or receives the cash
-
-
Press Enter to accept the information and submit the cash issue or cash receipt note for printing.