F Importing 1099 Adjustments
Beginning with release A9.2, you can use the import feature to upload 1099 adjustments from a spreadsheet directly to the 1099 Adjustments program (P045101). Using the import feature allows you to quickly add numerous records and provides another alternative for processing 1099 returns.
Note:
You can only add records using the import feature; you cannot change or delete records.This appendix contains the following topics:
Set up an IFS directory. See Setting Up Import/Export in the Technical Tools Guide.
From either the G/L Method menu (G04221) or the A/P Ledger Method menu (G04222), choose 1099 Adjustments
F.1 Working with the Template
You create a spreadsheet to use as the template. When you import the data, the system requires you use the Comma Separated Value (CSV) format for the template.
After you create the spreadsheet, you enter the records that you want to import.
You do not need to complete all of the fields on the spreadsheet; you can remove any optional fields (columns) that you do not use.
You should consider grouping all transactions on the spreadsheet by supplier number so they import together. Otherwise, you must perform the import multiple times for the same supplier number.
JD Edwards World recommends that you use the Number format (as opposed to General) when formatting the cells for the Amount column so that the spreadsheet includes the decimal point to separate dollars and cents. For example, if you want to add an adjustment for 100.00 and you enter 10000 and do not format the column as a number, the system stores the amount as 10,000.00.
When you generate returns, the system retrieves all other necessary information, such as the Calendar Year and tax IDs from either the 1099 Processing Option Setup program or from the supplier or company address book records.
The following example spreadsheet includes the minimum fields required to add a 1099 adjustment:
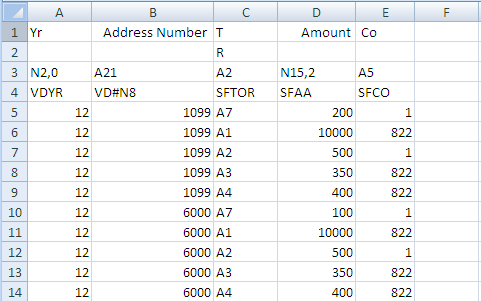
Description of the illustration ''template2.gif''
-
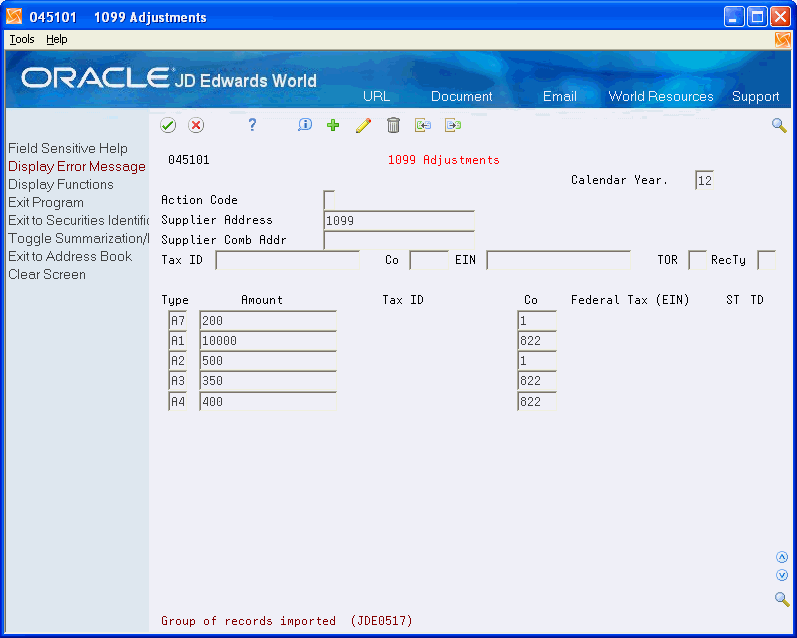
On 1099 Adjustments, enter F in the Action Code field and click Enter.
Figure F-1 Interactive Import Parameters
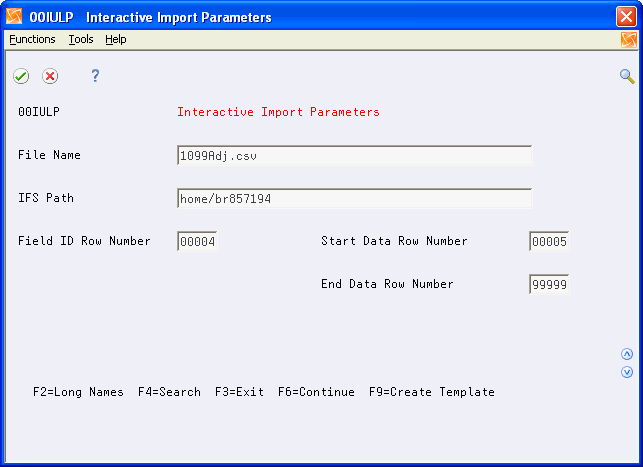
Description of ''Figure F-1 Interactive Import Parameters''
-
On Interactive Import Parameters, complete the following fields:
-
File Name
Enter the template name followed by the CSV extension. For example, enter 1099adj.csv.
-
IFS Path
Enter the path to the IFS directory or choose Search (F4) to select the IFS path.
-
-
Click Enter.
The first time you use the import/export feature you must complete the remaining fields. Otherwise, the system enters default values in these fields.
-
Enter values in the fields as follows and click Enter:
-
Enter 4 in Field ID Row Number
This is the row the system uses to update the data items for the program.
-
Enter 5 in Start Data Row Number
This is the first row on the spreadsheet that contains data to import.
-
Enter 99999 in End Data Row Number
This uploads all rows on the spreadsheet.
-
-
Choose Create Template (F9).
-
Locate the template in the IFS directory and open it.
Figure F-2 Template of 1099 Adjustments (Excel Spreadsheet)
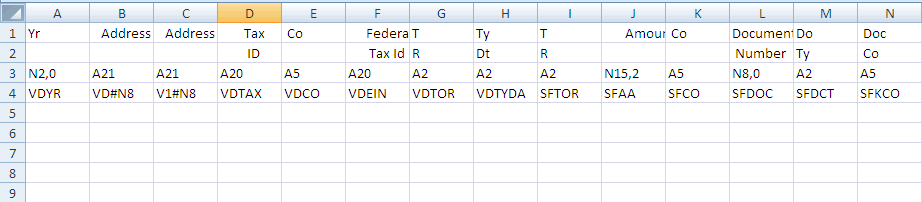
Description of ''Figure F-2 Template of 1099 Adjustments (Excel Spreadsheet)''
-
Complete the minimum fields for an adjustment including:
-
Supplier address book number (VD#N8)
-
Type of Return (SFTOR)
-
Amount (SFAA)
-
Company (SFCO)
-
-
Click Save.
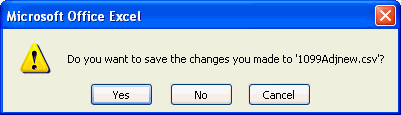
The system displays the following message:

Description of the illustration ''save1.gif''
-
Click Yes.
When you exit the spreadsheet, the system might display this message, depending on your Excel File settings:
Description of the illustration ''save2.gif''
-
Click No.
The CSV format does not retain cell formatting; therefore, if you choose Yes, the system prompts you to save the spreadsheet in an XLS or alternate format. If you choose to save it in the XLS or alternate format, you must save it in the CSV format before importing the data.
F.2 Importing the Data
After you complete the spreadsheet, you import the data into the 1099 Adjustments program. You complete the fields with the same values you use to create the template. See Section F.1, "Working with the Template".
-
On 1099 Adjustments, enter F in the Action Code field and click Enter.
-
On Interactive Import Parameters window, complete the following fields:
-
File Name
-
IFS Path
-
-
Click Enter, and then choose Continue (F6).
The system displays the records for the first supplier.
-
Click Add and then click Enter to add the record.
-
Repeat the previous steps for each supplier on the spreadsheet.