Managing Landed Cost for Any Document and Any Transaction
This chapter covers the following topics:
- Understanding Landed Cost for Any Document and Any Transaction
- Importing Estimated Landed Cost Information for Any Document and Any Transaction
- Searching for Automatically Created Shipments
- Viewing Shipments
- Viewing Shipment Lines
- Viewing a Specific Shipment Line
- Viewing Summarized Allocated and Unallocated Amounts By Component for the Shipment
- Viewing Estimated Landed Cost for the Shipment
- Updating Estimated Landed Cost Information on Completed Shipments
- Recalculating Estimated Landed Cost After Adjusting Shipment Line Quantities on Completed Shipments
- Calculating and Importing Actual Landed Costs for the Shipment
- Viewing Actual Landed Cost for the Shipment
Understanding Landed Cost for Any Document and Any Transaction
This diagram illustrates the use of Oracle Landed Cost Management for Any Document and Any Transaction Flow:
Landed Cost for Any Document and Any Transaction Flow
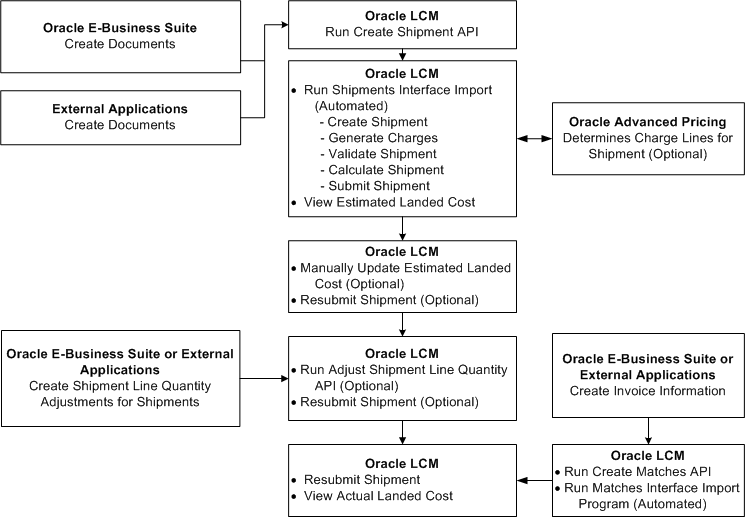
Oracle Landed Cost Management (LCM) enables you to calculate the landed cost for any document and any transaction (such as internal transfers and drop shipments) within Oracle E-Business Suite and for any document and any transaction from external applications that are outside of Oracle E-Business Suite. The calculation of landed costs for any document and any transaction provides extended analytic and actual calculation support for use by managers of cost information.
LCM provides the following to help with this process:
-
Three APIs: Create Shipment, Adjustment Shipment Line Quantity, and Create Matches
-
Three concurrent programs: Shipments Interface Import, Matches Interface Import, and Submit Pending Shipments
Plus, after the APIs and concurrent programs have run for this process, LCM enables you to view the estimated and actual landed cost information and cost adjustments for shipments using the Shipments Workbench and the Landed Cost Summary and Landed Cost Detail Reports.
The calculation of landed costs for purchase orders and blanket purchase orders in Oracle E-Business Suite is covered in the "Managing Landed Cost as a Pre-Receiving Application" chapter and the "Managing Landed Cost as a Service" chapter in this guide.
High-Level Process Flow
This is a basic process flow when using Oracle Landed Cost Management for any document and any transaction:
-
Populate the Oracle Landed Cost Management shipment interface tables by running the Create Shipment API.
You must specify a shipment type that is associated with any source type except Purchase Order.
For more information, see Setting Up Shipment Types.
In the Create Shipment API you can specify the last action to be performed for the shipment. For example: until validation, until landed cost calculation, or until submission.
In this process flow, the landed cost shipment is processed until submission. This means the shipments are loaded into Oracle Landed Cost Management with a "Completed" shipment status.
The Create Shipment API loads data from the shipment information you defined into the INL_SHIP_HEADERS_INT and INL_SHIP_LINES_INT interface tables.
For more information, see Importing Estimated Landed Cost Information for Any Document and Any Transaction.
-
Run the Shipments Interface Import concurrent program using Oracle Landed Cost Management.
The Shipments Interface Import program picks up the Oracle Landed Cost Management interface records and processes them into Oracle Landed Cost Management shipments. This concurrent program also calls routines for the following:
-
Calculate charges through the integration with the Advanced Pricing Engine, as well as the charges hook if applicable
-
Generate taxes through hook if applicable
-
Validate shipment
-
Calculate shipment
-
Submit shipment
Note: The Submit Shipment routine when performed against shipments created through the Create Shipment API only changes the shipment status on shipments to Completed.
For more information, see Importing Estimated Landed Cost Information for Any Document and Any Transaction.
-
-
View the estimated landed cost that was calculated from the document information and transaction information using the Oracle Landed Cost Management Shipments Workbench.
For more information, see Viewing Estimated Landed Cost for the Shipment.
-
(Optional) Update estimated landed information (price, amount, currency, association) on a completed shipment using the Oracle Landed Cost Management Update Shipment, Update Shipment Line, Manage Charges, Manage Charge Line, and Manage Associations pages.
For more information, see Updating Estimated Landed Cost Information on Completed Shipments.
-
(Optional) Submit the estimated landed cost updates for the shipment using the Oracle Landed Cost Management Shipments Workbench or the Update Shipment page.
For more information, see Processing Estimated Landed Cost Updates.
-
(Optional) Recalculate estimated landed cost after adjusting shipment line quantities on completed shipments using the Adjust Shipment Line Quantity API and then submit the estimated landed cost updates using the Oracle Landed Cost Management Shipments Workbench or the Update Shipment page.
For more information, see Recalculating Estimated Landed Cost After Adjusting Shipment Line Quantities on Completed Shipments.
-
Create invoice information for the documents and transactions for the landed cost shipments using the Create Matches API.
For more information see, Calculating and Importing Actual Landed Cost for the Shipment.
The Create Matches API loads the actual cost information from invoices for the shipment into the INL_MATCHES_INT interface tables.
-
Run the Matches Interface Import concurrent program using Oracle Landed Cost Management.
The Matches Interface Import program picks up the Oracle Landed Cost Management Match interface lines and processes them into Oracle Landed Cost Management Matches to be used later in Actual Landed Cost calculation. This process also sets the Pending Matching field to Yes for the Landed Cost shipments. At this time, the actual landed cost calculation has not been performed yet.
For more information see, Calculating and Importing Actual Landed Cost for the Shipment.
-
Run the Submit Pending Shipments concurrent program using Oracle Landed Cost Management.
This program performs the submit process again and calculates the actual landed cost for the shipment. After this process is complete, you can view the actual landed cost using the Shipment Hierarchy and Landed Cost Detail pages in Oracle Landed Cost Management.
Important: Instead of performing Step 9, you can access the Shipments Workbench and manually perform the Submit action for the shipment. The Submit Pending Shipments program performs the same action in a back ground process.
For more information see, Calculating and Importing Actual Landed Cost for the Shipment.
-
View the actual landed cost information for the shipment and compare the estimated landed cost to the actual landed cost for the shipment using the Oracle Landed Cost Management Shipments Workbench.
For more information see, Viewing Actual Landed Cost for the Shipment.
Importing Estimated Landed Cost Information for Any Document and Any Transaction
In the Managing Landed Cost for Any Document and Any Transaction flow, the creation of landed cost shipments and the calculation of estimated landed cost for those shipments is performed by the Create Shipment API and Shipments Interface Import concurrent program. The Create Shipment API must be run first and then the Shipments Interface Import program.
The Create Shipment API loads data from any document or transaction into the INL_SHIP_HEADERS_INT and INL_SHIP_LINES_INT interface tables.
The Shipments Interface Import program picks up the Oracle Landed Cost Management interface records and processes them into landed cost management shipments. This concurrent program also calls the routines for charges calculation, validation, landed cost calculation, and submission. By default, the records are created in the Oracle Landed Cost Management Shipments Header interface table in such a way that all tasks (get charges, perform validation, calculate landed cost, and submit) are automatically performed for the interfaced data. If imported landed cost management shipments pass validations they are given a Completed shipment status. If imported landed cost management shipments do not pass the validation routine you can fix them using the Shipments Workbench. These shipments have an On Hold Shipment Status.
The Shipments Interface Import concurrent program is owned by Oracle Landed Cost Management and must be run by the appropriate responsibility in that application.
Prerequisites
- All of the set up steps have been performed in Oracle Landed Cost Management.
- The Create Shipment API has been run.
To Run the Shipments Interface Import Program
-
Navigate to the Submit Request window.
The Submit a New Request window appears asking for the type of request you want to submit.
-
Select the Single Request option and click OK.
The Submit Request window appears.
-
Select Shipments Interface Import in the Name field.
The Parameters window appears.
-
(Optional) Enter a transaction Group ID and select an associated Operating Unit and click OK.
To run the program for all of the available data, do not enter any parameters.
-
Click Submit.
-
Click No in the Decision window.
-
To see the status of the concurrent request, navigate to the Requests window.
The Find Requests window appears.
-
Click Find to view the status of all the requests.
The Requests window appears displaying all of the requests.
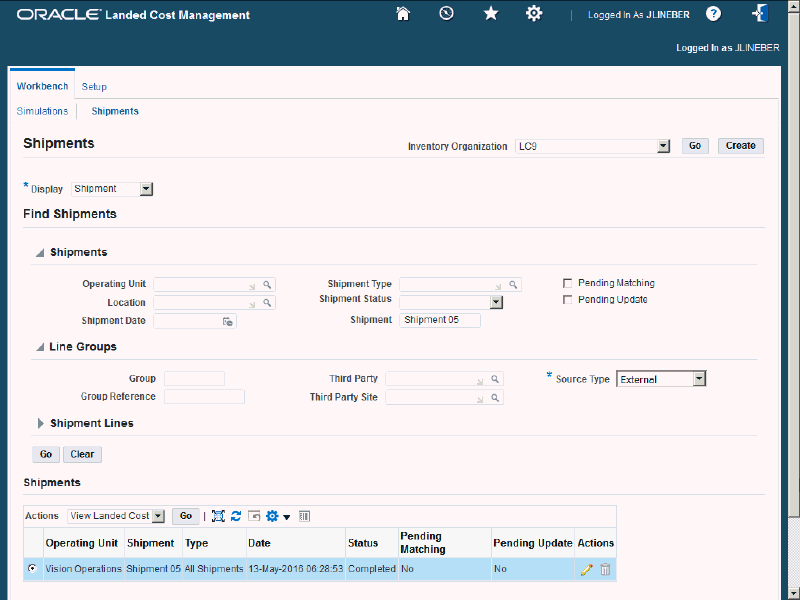
Searching for Automatically Created Shipments
Use the Shipments Workbench to search for shipments that were automatically created by the Shipments Interface Import concurrent program. After the estimated landed cost information is imported from the Create Shipment API and the shipment is automatically created, you can maintain Landed Cost shipments until the shipment status is Completed.
You can decide until which point the Create Shipment API processes an imported shipment by passing different values in the Last Task Code passed for the shipment. The Last Task Code values are:
-
10: Process until Import task
-
20: Process until Get Charges task
-
30: Process until Get Taxes task
-
40: Process until Validation task
-
50: Process until Landed Cost task
-
60: Process until Submit task
The Shipments Interface Import program assigns the shipment status depending on the Last Task Code passed in the Create Shipment API.
Use this procedure to search for automatically created shipments:
Prerequisites
- You have already run the Create Shipment API.
- You have already run the Shipments Interface Import concurrent program.
To Search for Automatically Created Shipments
-
Navigate to the Shipments Workbench.
Shipment Workbench
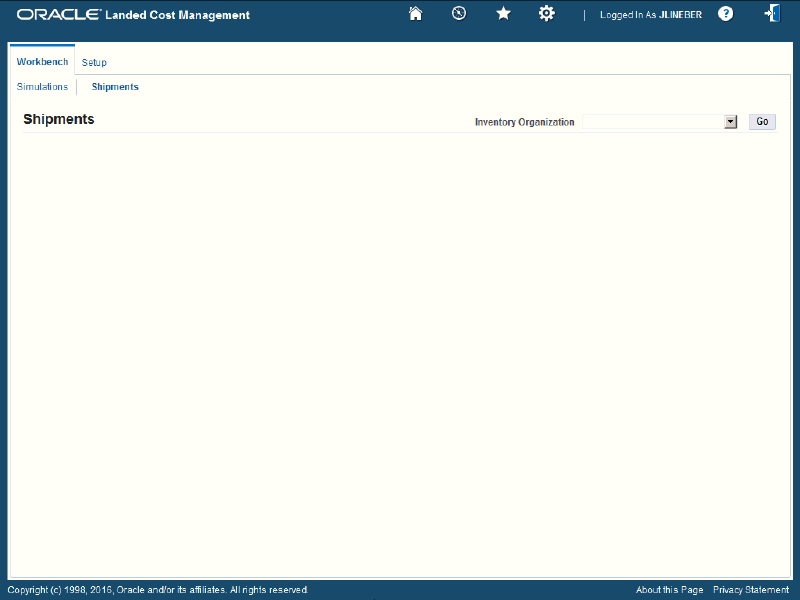
The Shipments Workbench appears with only the Inventory Organization field displayed.
-
Select the Inventory Organization.
-
Click Go.
Shipments Workbench
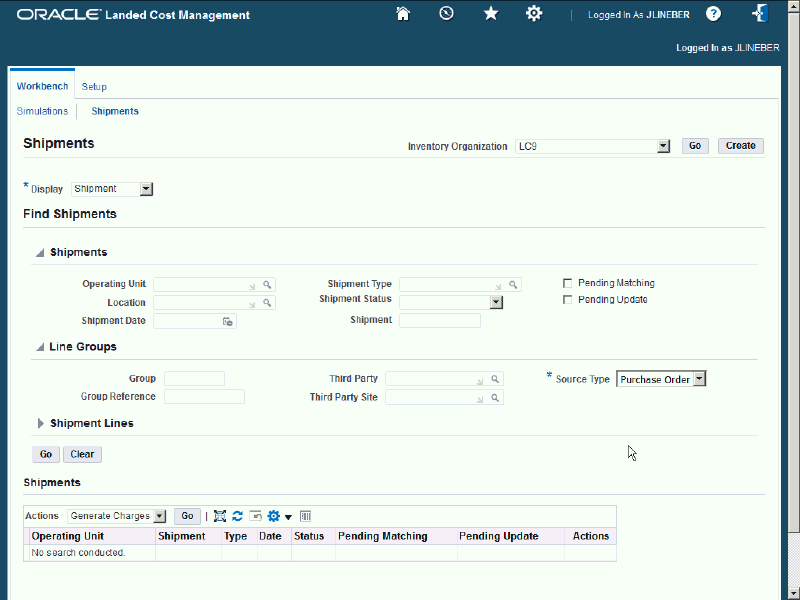
The complete Shipments Workbench appears.
-
Use the Display field to select the type of information you want to display at the bottom of the Shipments Workbench. The values are:
-
Shipment
-
Line Group
-
Shipment Line
By default, Shipment appears in the Display field.
-
-
In the Find Shipments region, expand the Shipments section and enter the fields you want to search on. Enter any of these fields:
Field Name Description Operating Unit Select a operating unit for the shipment. Location Select a location for the shipment. Shipment Date Enter a shipment date. Shipment Type Select the type of shipment. Shipment Status Select the status of the shipment. The values are: -
Closed
-
Completed
-
Incomplete
-
On Hold
-
Validated
-
Validation Required
Note: The shipment status depends on what is passed from the Create Shipment API to the interface tables.
Shipment Enter the specific shipment number. Pending Matching Select this check box if you want to search for shipments that are pending invoice matching (Create Matches API has been run but not the Matches Interface Import concurrent program). Pending Update Select this check box if you want to search for shipments that have estimated landed cost updates pending.
This field is only available if you have set the profile option INL: Allow Updates to Completed Shipment to Yes.If you click Go without entering search criteria, then all available shipments in the Inventory Organization will be displayed.
-
-
In the Find Shipments region, expand the Line Groups section and enter the fields you want to search on. Enter any of these fields:
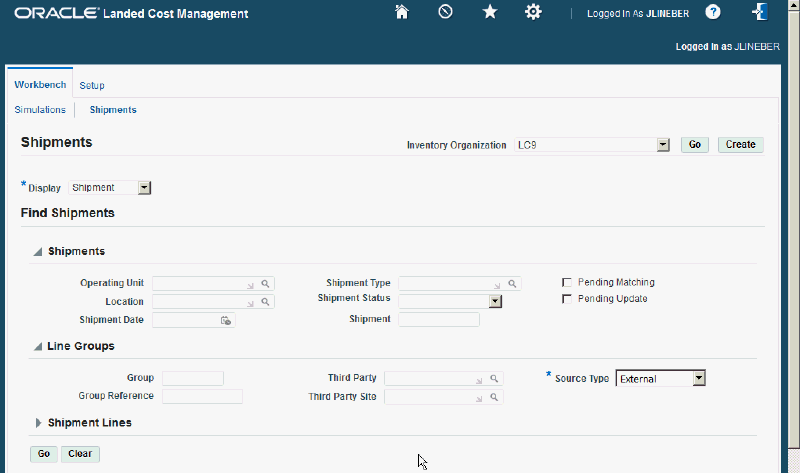
Field Name Description Group Enter a specific line group. Group Reference When using Landed Cost as Service, enter the receipt number. Third Party Select a third party associated with the line group. Third Party Site Select a third party site associated with the line group. Source Type Select a source type.
Source types are created using the Application Object Library Lookups window.
For more information, see Maintaining Lookup Codes.
When managing landed costs for any document and any transaction any source type other than PO (Purchase Order) must be selected. -
In the Find Shipments region, expand the Shipment Lines section and enter the fields you want to search on. Enter any of these fields:
Field Name Description Third Party Select a third party associated with the shipment line. Third Party Site Select a third party site associated with the shipment line. Shipment Line Type Select the shipment type for the line. Closed check box Select this check box if you want to search for closed shipment lines. Note: The Source Order field is not available when managing landed costs for any document and any transaction.
-
In the Shipment Lines section, expand the Show More Search Options section and enter the fields you want to search on. Enter any of these fields:
Item Field Name Description Item Select an item number. Description Enter a description for the item. Rev (revision) Select an item revision number. Supplier Item Select a supplier item. Receipt Details Packing Slip Select a packing slip number. Receiver Select an individual that is the receiver. Freight Carrier Select a freight carrier. Bills of Lading Select a bills of lading. Transaction Details Transaction Date From and Transaction Date To Select a transaction date range by using the from and to fields. Receipt Routing Select a receipt routing. The values are Delivery and Inspection. Shipment Container Number Select a container number for the shipment. Truck Number Select a truck number for the shipment. Bar Code Label Select a bar code label for the shipment. -
Click Go.
Shipments Workbench (1 of 2)
Shipments Workbench (2 of 2)
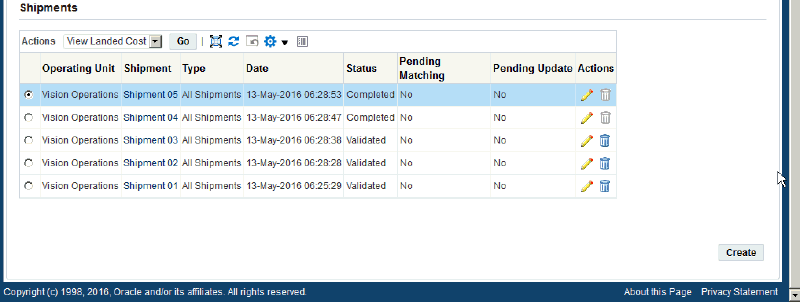
All of the data that matches the search criteria, displays at the bottom of the Shipments Workbench in a table format. Depending on the Display option that was selected, different columns appear in the table. Data is related to Shipments, Line Groups, or Shipment Lines.
Viewing Shipments
Use the View Shipment page and its related view pages to see all of the information related to a shipment.
Use this procedure to view shipments:
-
Navigate to the Shipments Workbench.
The Shipments Workbench appears with only the Inventory Organization field displayed.
-
In the Inventory Organization field, select the Inventory Organization that pertains to the shipment that was previously created using the Create Shipment API, and click Go.
The complete Shipments Workbench appears.
-
In the Display field, select the type of information you want to display at the bottom of the Shipments Workbench. The values are:
-
Shipment
-
Line Group
-
Shipment Line
By default, Shipment appears in the Display field.
-
-
Enter the search criteria for the shipments.
For more information about the search criteria fields, see Searching for Automatically Created Shipments.
-
Click Go.
All of the data that matches the search criteria displays at the bottom of the Shipments Workbench in a table format. Depending on the Display option that was selected, different columns appear in the table. Data is related to Shipments, Line Groups, or Shipment Lines.
-
Navigate to the View Shipment page.
Click the Shipment link for a specific line in the table.
View Shipment page - Header tab
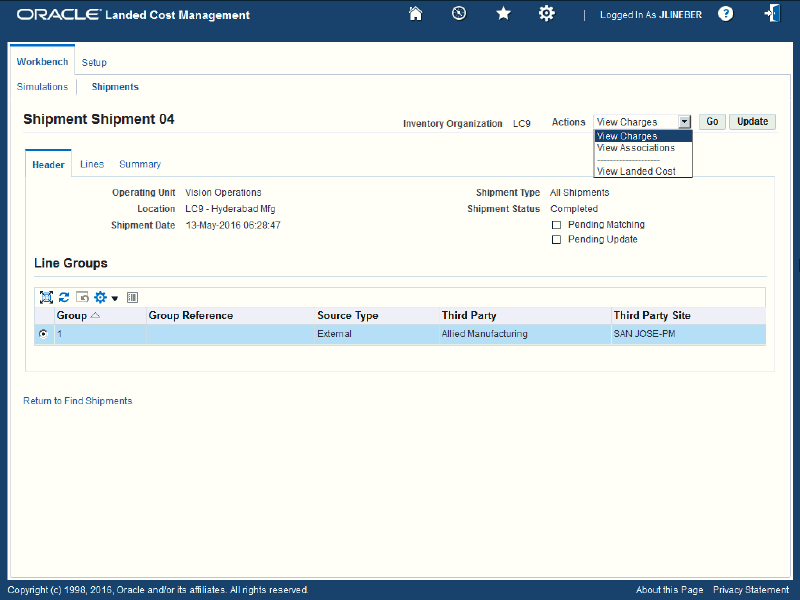
The View Shipment page appears displaying the Header tab.
The Actions field only has view functionality. The Actions for this page are:
-
View Charges
-
View Associations
-
View Landed Cost
-
-
(Optional) Select an Action and click Go.
-
(Optional) Click Update to navigate to the Update Shipment page where you can update the shipment or shipment lines.
-
Click the Return to Find Shipments link to return to the Shipments Workbench.
Viewing Shipment Lines
Use the View Shipment page and its related view pages to see all of the information related to a shipment.
Use this procedure to view shipment lines:
-
Navigate to the Shipments Workbench.
The Shipments Workbench appears with only the Inventory Organization field displayed.
-
In the Inventory Organization field, select the Inventory organization that pertains to the shipment that was previously created using the Create Shipment API, and click Go.
The complete Shipments Workbench appears.
-
In the Display field, select the type of information you want to display at the bottom of the Shipments Workbench. The values are:
-
Shipment
-
Line Group
-
Shipment Line
By default, Shipment appears in the Display field.
-
-
Enter the search criteria for the shipment lines.
For more information about the search criteria fields, see Searching for Automatically Created Shipments.
-
Click Go.
All of the data that matches the search criteria displays at the bottom of the Shipments Workbench in a table format. Depending on the Display option that was selected, different columns appear in the table. Data is related to Shipments, Line Groups, or Shipment Lines.
-
Navigate to the View Shipment page.
Click the Shipment link for a specific line in the table.
The View Shipment page appears displaying the Header tab.
-
Select the Lines tab.
View Shipment page - Lines tab
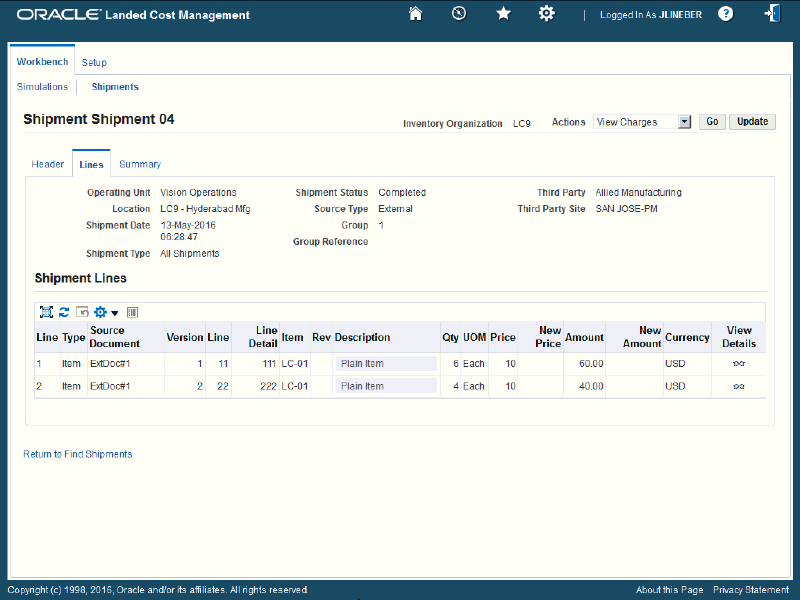
The View Shipment page appears displaying the Lines tab for the shipment. The Source Document, Version, Line and Line Detail information in the shipment lines table was imported from the Create Shipments API.
-
(Optional) You can update the shipment line by clicking Update.
The Update Shipment page appears. Use this page to update the shipment line.
-
(Optional) Click the View Details icon for a shipment line.
The View Shipment Line appears displaying additional details for the line.
-
(Optional) Click Update on the View Shipment Line page to update the shipment line details.
The Update Shipment Line page appears. Use this page to update the information for a specific shipment line.
-
Click the Return to Find Shipments link to return to the Shipments Workbench.
Viewing a Specific Shipment Line
Use the View Shipment page and its related view pages to see all of the information related to a shipment.
Use this procedure to view a specific shipment line:
To View a Specific Shipment Line
-
Navigate to the Shipments Workbench.
The Shipments Workbench appears with only the Inventory Organization field displayed.
-
In the Inventory Organization field, select the pre-receiving inventory organization that pertains to the shipment that was previously created in the Inventory Organization field and click Go.
The complete Shipments Workbench appears.
-
In the Display field, select the type of information you want to display at the bottom of the Shipments Workbench. The values are:
-
Shipment
-
Line Group
-
Shipment Line
By default, Shipment appears in the Display field.
-
-
Enter the search criteria for the shipment lines.
For more information about the search criteria fields, see Searching for Automatically Created Shipments.
-
Click Go.
All of the data that matches the search criteria displays at the bottom of the Shipments Workbench in a table format. Depending on the Display option that was selected, different columns appear in the table. Data is related to Shipments, Line Groups, or Shipment Lines.
-
Navigate to the View Shipment Line page.
If the Display option is Shipment or Line Group:
-
Click the Shipment link next to a shipment or line group.
-
Select the Lines tab.
-
Click the View Details icon next to a specific shipment line.
If the Display option is Shipment Line use one of these methods to navigate:
-
Click the Line number link next to a shipment line.
-
-
Click the Shipment link next to a shipment line.
-
Select the Lines tab.
-
Click the View Details icon next to a specific shipment line.
-
View Shipment Line page
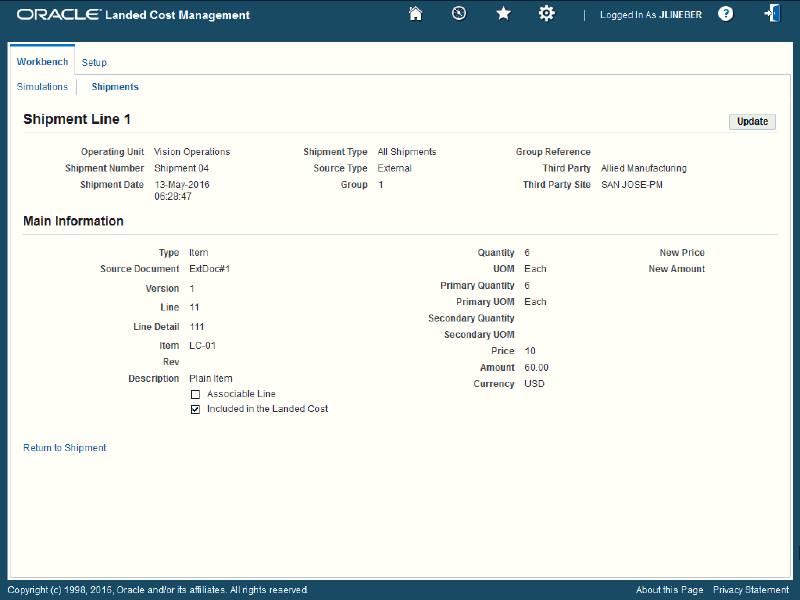
The View Shipment Line page appears displaying details for the specific shipment line.
-
-
Click the Return to Shipment link to return to the View Shipments page.
Viewing Summarized Allocated and Unallocated Amounts By Component for the Shipment
Use the View Shipment page and its related view pages to see all of the information related to a shipment. The View Shipment page - Summary tab displays the summarized allocated and unallocated amounts by component for the shipment.
Use this procedure to view summarized allocated and unallocated amounts by component:
To View Summarized Allocated and Unallocated Amounts By Component
-
Navigate to the Shipments Workbench.
The Shipments Workbench appears with only the Inventory Organization field displayed.
-
In the Inventory Organization field, select the pre-receiving inventory organization that pertains to the shipment that was previously created, and click Go.
The complete Shipments Workbench appears.
-
In the Display field, select the type of information you want to display at the bottom of the Shipments Workbench. The values are:
-
Shipment
-
Line Group
-
Shipment Line
By default, Shipment appears in the Display field.
-
-
Enter the search criteria for the shipments using the Find Shipments section of the page.
For more information about the search criteria fields, see Searching for Automatically Created Shipments.
-
Click Go.
All of the data that matches the search criteria displays at the bottom of the Shipments Workbench in a table format. Depending on the Display option that was selected, different columns appear in the table. Data is related to Shipments, Line Groups, or Shipment Lines.
-
Navigate to the View Shipment page.
Click the Shipment link for a specific shipment in the table.
The View Shipment page appears displaying the Header tab.
-
Select the Summary tab.
View Shipment page - Summary tab
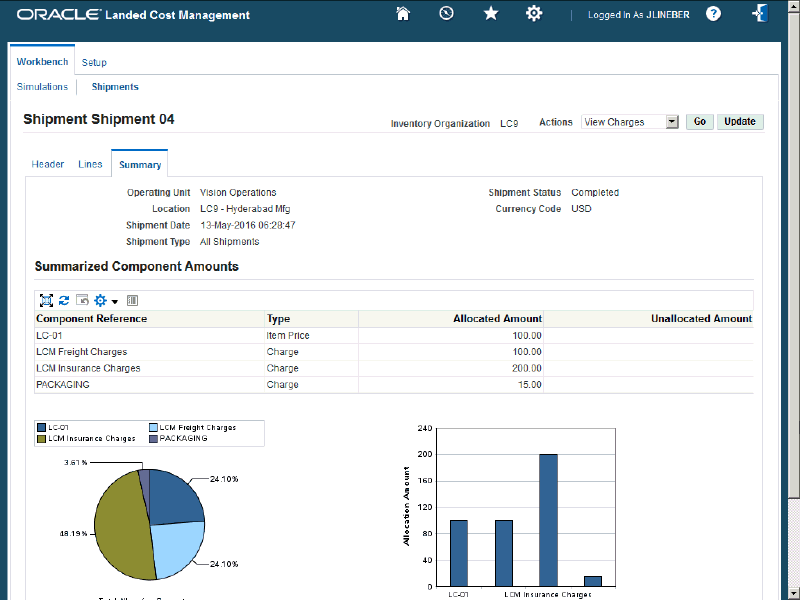
The View Shipment page appears displaying the Summary tab for the shipment. The shipment tab displays the break down for the total allocated and unallocated amounts by component for the shipment. The Component Reference, Type, Allocated Amount, and Unallocated Amount display for each component in the break down.
The Unallocated Amounts column displays only the amounts of charge amounts left in the shipment after the item quantities are fully returned through the Adjust Shipment Line Quantity API. You can click the Unallocated Amount link for a component to submit the Unaccounted Landed Costs for Full Returns (XML) Report for just that component.
For more information on recalculating the estimated landed cost after to return to suppler and correction transactions, see Understanding Refundable Versus Nonrefundable Cost Factors and Recalculating Estimated Landed Cost After Return to Supplier and Correction Transactions.
For more information on the Unaccounted Landed Costs for Full Returns (XML) Report, see Unaccounted Landed Costs for Full Returns Report.
At the bottom of the page these charts display:
-
Pie Graph: The Pie Graph displays the total allocation percentage by component for the shipment.
-
Bar Graph: The Bar Graph displays the total allocation amount by component for the shipment.
-
-
Click the Return to Find Shipments link to return to the Shipments Workbench.
Viewing Estimated Landed Cost for the Shipment
Use the Shipment Hierarchy and Landed Cost Details pages to view the estimated landed cost for a shipment. After the shipment is automatically created you can view the estimated landed cost for the shipment as long as the Last Task Code informed is 50 or 60 in the Create Shipment API.
You can also view estimated and actual landed cost information using the Landed Cost Detail Report and the Landed Cost Summary Report.
For more information on these reports, see Landed Cost Detail Report and Landed Cost Summary Report.
Use this procedure to view estimated landed cost:
To View Estimated Landed Cost for the Shipment
-
Navigate to the Shipments Workbench.
The Shipments Workbench appears.
-
Search for shipments that were automatically created.
For more information, see Searching for Automatically Created Shipments.
Shipments Workbench

All of the data that matches the search criteria displays at the bottom of the Shipments Workbench in a table format. Depending on the Display option that was selected, different columns appear in the table. Data is related to Shipments, Line Groups, or Shipment Lines.
-
Navigate to the Shipment Hierarchy page using one of these methods:
-
-
Select the shipment in the table on the Shipments Workbench.
-
Select View Landed Cost in the Actions field.
-
Click Go.
-
-
-
Select the Shipment link in the table for a shipment on the Shipments Workbench.
The View Shipments page appears.
-
Select View Landed Cost in the Actions field.
-
Click Go.
-
-
-
Select the shipment in the table on the Shipments Workbench.
-
Click the Update icon next to the shipment.
The Update Shipment page appears.
-
Select View Landed Cost in the Actions field.
-
Click Go.
-
Shipment Hierarchy page (1 of 2)
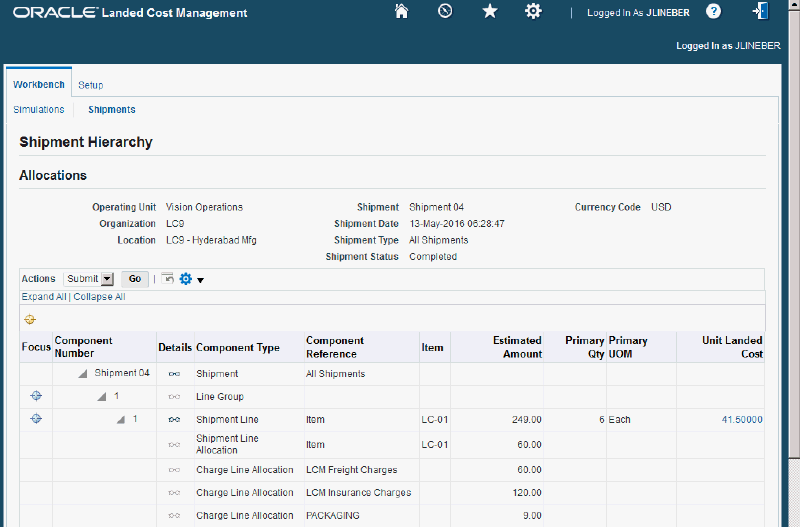
Shipment Hierarchy (2 of 2)
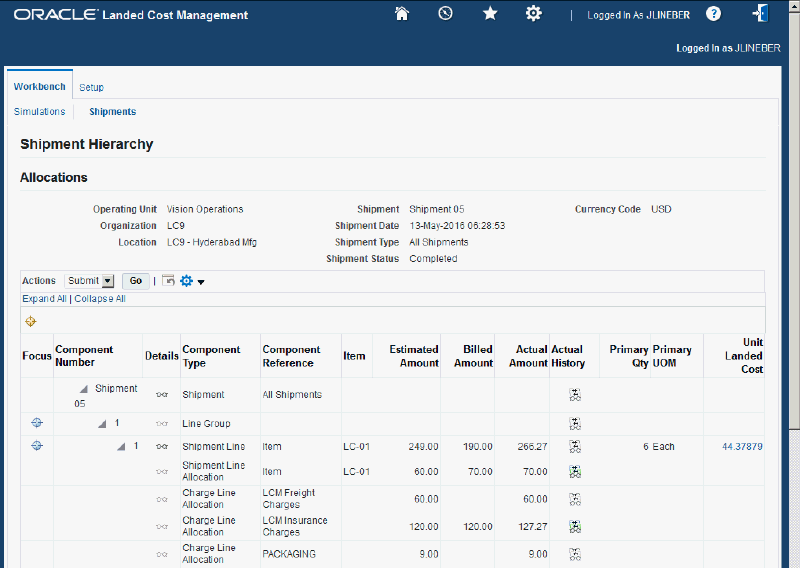
The Shipment Hierarchy page appears displaying the estimated landed cost for each shipment, line group, and line.
The hierarchy for the shipment is as follows:
-
At the top of the hierarchy is the Shipment itself. Depicted with a Component Number equal to the shipment number and a Component Type of shipment.
-
Next is the line group for the shipment. Depicted with the Component Number equal to the line group number and a Component Type of Line Group.
-
After that is the shipment line. Depicted with the Component Number equal to the shipment line number and a Component Type of Shipment Line. At this level the total estimated landed cost is displayed for the shipment line in the Estimated Amount column and the unit estimated landed cost is displayed in the Unit Landed Cost column. The Estimated Amount is the sum of all allocation amounts for a shipment line.
-
Finally, under each shipment line is the shipment line, and charge line allocations. Depicted with a Component Type equal to Shipment Line Allocation or Charge Line Allocation and the specific cost factor displayed in the Component Reference field.
Note: The Billed Amount, Actual Amount, and Actual History columns do not appear on this page until after the invoice information is imported using the Create Matches API and the Matches Interface Import concurrent program.
-
-
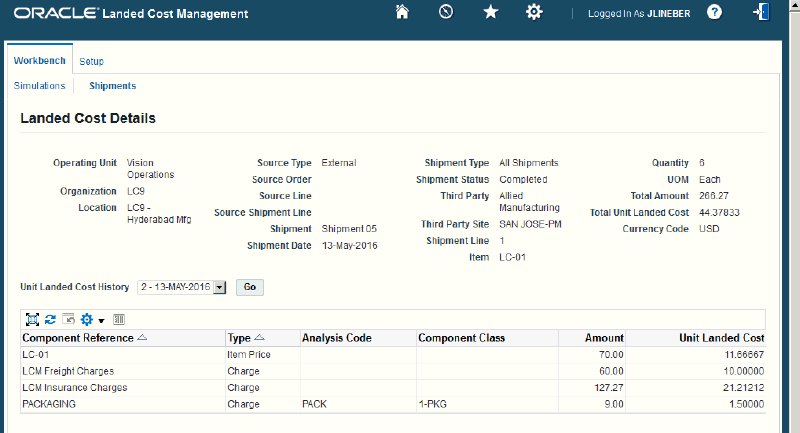
To view landed cost details, click the Unit Landed Cost link for a shipment line.
Landed Cost Details page (1 of 2)
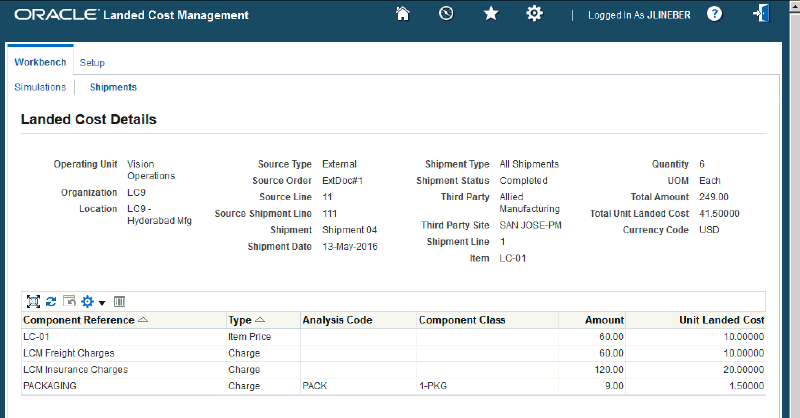
Landed Cost Details page (2 of 2)
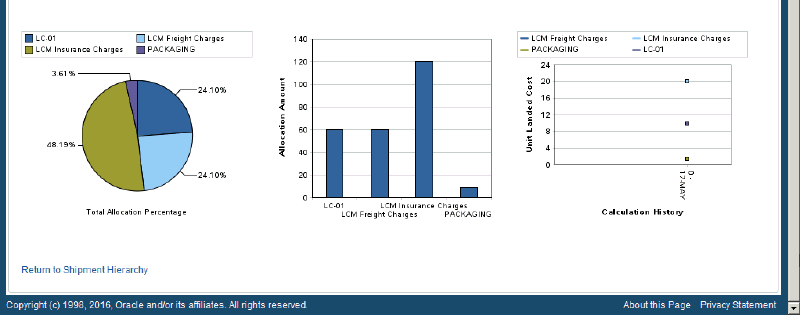
The Landed Cost Details page appears displaying the break down for the total estimated landed cost for the shipment and for the estimated unit landed cost. The cost factor (analysis code and component class) display for each line in the break down.
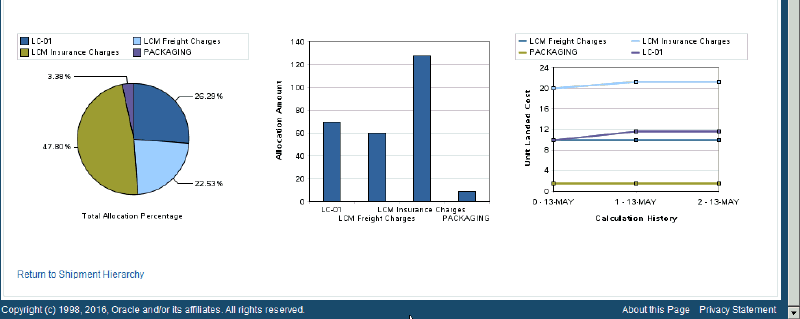
At the bottom of the page these charts display:
-
Pie Graph: The pie graph displays the total allocation percentage for each cost that make up the shipment line.
-
Bar Graph: The bar graph displays the total allocation amount for each cost in the shipment line.
-
Calculation History: This graph displays the landed cost adjustment calculation history for the unit landed cost.
When only estimated landed cost has been calculated and not updated this chart displays just as individual points on the graph. After estimated landed cost has been updated or actual landed cost is calculated, you can view lines in this graph that depict the calculation history.
-
-
(Optional) Select another cost adjustment using the Unit Landed Cost History field.
Note: The Unit Landed Cost History field is only available when viewing estimated landed costs after estimated landed cost information has been updated on a completed shipment and processed.
The values that appear for the field are equal to the Adjustment Number from the shipment line plus the date it occurred.
The system refreshes the page displaying the details for that cost adjustment. The Pie Chart and Bar Graph refresh with the new information and the Calculation History graph displays as a line.
Updating Estimated Landed Cost Information on Completed Shipments
After a shipment is completed but before the actual landed cost is calculated you can go back to the shipment and modify the estimated landed cost information for the shipment. This give you the ability to make changes or corrections to the estimated landed cost before the actual cost information arrives. Updating the estimated landed cost information after shipment completion enables you to keep the landed cost updated with new pricing information and to accommodate the changes in freight charges, shipping methods and so on.
For more information on updating estimated landed cost information on completed shipments, see Understanding the Estimated Landed Cost Update Process and the Updating Estimated Landed Cost Information on Completed Shipments chapter in this guide.
Recalculating Estimated Landed Cost After Adjusting Shipment Line Quantities on Completed Shipments
During the processing of landed cost management shipments different sorts of transactions can occur against the item associated with the landed cost shipment. For example, the estimated landed cost for an item on a landed cost shipment may have already been created for a specific quantity and charge amounts. Then a quantity of that item on the landed cost shipment may need to be adjusted for various reasons. To recalculate the new estimated landed cost for the item on the landed cost shipment after shipment line quantities have been adjusted you have the option to run the Adjust Shipment Line Quantity API.
The Adjust Shipment Line Quantity API creates adjustments for these quantity changes on the shipment lines for the shipment and changes the Pending Updates flag to Yes on the shipment.
After you run the API, since the Pending Updates flag is set to Yes, you need to submit the shipments using the Shipments Workbench to process these changes and to recalculate the estimated landed costs for the shipment.
You can also view the cost adjustment transactions using the Landed Cost Detail Report and the Landed Cost Summary Report.
For more information on these reports, see Landed Cost Detail Report and Landed Cost Summary Report.
Prerequisites
- The Adjust Shipment Line Quantity API has already run to create the shipment line quantity adjustments.
To Resubmit the Shipment Using the Shipments Workbench
-
Navigate to the Shipments Workbench.
-
Select the Inventory Organization associated to the shipment, and click Go.
-
Enter search criteria for the shipments by selecting the Pending Updated check box and click Go.
-
Select the shipment.
-
Select Submit in the Actions field and click Go.
The Submit process is initiated and after the process completes you are able to view the updates to the estimated landed cost for the shipment.
Calculating and Importing Actual Landed Costs for the Shipment
Before you can view the actual landed cost for a shipment in Oracle Landed Cost Management, you must:
-
Execute the Create Matches API
-
Run the Matches Interface Import concurrent program.
-
Submit the shipments by running the Submit Pending Shipments concurrent program or performing the Submit action for individual shipment on the Shipments Workbench.
The Create Matches API loads the actual cost information from invoices for the shipment into the matches interface tables.
The Matches Interface Import program is responsible for importing the actual cost information from the matches interface tables into Oracle Landed Cost Management. During this program execution, all shipments that need to be resubmitted that are being impacted by the capture of actual amounts are set as “Pending Matching” shipments. Pending matching landed cost management shipments must be resubmitted, so that a new landed cost can be figured out as “actual landed cost” and the differences between estimated and actual landed costs can be sent to Oracle Cost Management.
Pending landed cost management shipments can be submitted either one by one, through the Oracle Landed Cost Management Shipments Workbench, or in batch, through the Submit Pending Shipments concurrent program. The Submit Pending Shipments program calculates actual landed cost and then performs the submit action again for the shipment. In both cases, all the routines necessary to recalculate landed costs and generate the Oracle Cost Management integration transactions are performed.
Use these procedures to calculate and import the actual landed cost:
Prerequisites
- The Create Matches API has already been run to create the actual cost information from the invoice information.
To Run the Matches Interface Import Program
-
Navigate to the Submit Request window.
The Submit a New Request window appears asking for the type of request you want to submit.
-
Select the Single Request option and click OK.
The Submit Request window appears.
-
Select Matches Interface Import in the Name field.
-
Click Submit.
-
Click No in the Decision window.
-
To see the status of the concurrent request, navigate to the Requests window.
The Find Requests window appears.
-
Click Find to view the status of all the requests.
The Requests window appears displaying all of the requests.
-
Perform one of these procedures to submit pending shipments:
To Run the Submit Pending Shipments Program
-
Navigate to the Submit Request window
The Submit a New Request window appears asking for the type of request you want to submit.
-
Select the Single Request option and click OK.
The Submit Request window appears.
-
Select Submit Pending Shipments in the Name field.
The Parameters window appears.
-
(Optional) Enter an Inventory Organization or an Inventory Organization and a Shipment Number and click OK.
To run the program for all of the available data do not enter any parameters.
-
Click Submit.
The Submit Pending Shipments program skips the shipments that have pending updates and finishes with a warning status.
A message is included in the log stating that the shipment has not been processed and the "Submit" or "Discard Updates" action must be performed from the Shipments Workbench.
For more information on shipments that have pending updates, see the Updating Estimated Landed Cost on Completed Shipments chapter in this guide.
-
Click No in the Decision window.
-
To see the status of the concurrent request, navigate to the Requests window
The Find Requests window appears.
-
Click Find to view the status of all the requests.
The Requests window appears displaying all of the requests.
To Resubmit the Shipment Using the Shipments Workbench
-
Navigate to the Shipments Workbench.
Note: The shipments that require resubmitting for actual landed cost calculation have the Pending Matching field set to Yes. The Matches Interface Import program sets this field during its processing.
-
Select the Inventory Organization associated to the shipment, and click Go.
-
Enter search criteria for the shipments by selecting the Pending Matching check box and click Go.
-
Select the shipment.
-
Select Submit in the Actions field and click Go.
The Submit process is initiated and after the process completes you are able to view the actual landed cost for the shipment.
-
Viewing Actual Landed Cost for the Shipment
Use the Shipment Hierarchy and Landed Cost Details pages to view the actual landed cost for a shipment. These pages itemize all of the allocation values that make up the total landed cost.
Using the Actual Matching History page you can view the detailed invoicing history for the shipment line.
Plus, you can view the proportion of each landed cost component making up the total landed cost in a Pie Chart or Bar Graph and the unit landed cost calculations in the Calculation History graph.
You can also view estimated and actual landed cost information using the Landed Cost Detail Report and the Landed Cost Summary Report.
For more information on these reports, see Landed Cost Detail Report and Landed Cost Summary Report.
Use this procedure to view actual landed cost for the shipment:
Prerequisites
- Invoice information related to the landed cost management shipment has been imported from the Create Matches API.
- Actual landed cost has been calculated for the shipment.
To View Actual Landed Cost for the Shipment
-
Navigate to the Shipments Workbench.
The Shipments Workbench appears.
-
Search for shipments that were automatically created.
For more information, see Searching for Automatically Created Shipments.
Shipments Workbench
All of the data that matches the search criteria displays at the bottom of the Shipments Workbench in a table format. Depending on the Display option that was selected, different columns of data appear in the table. Data is related to Shipments, Line Groups, or Shipment Lines.
-
Navigate to the Shipment Hierarchy page using one of these methods:
-
-
Select the shipment in the table on the Shipments Workbench.
-
Select View Landed Cost in the Actions field.
-
Click the Go.
-
-
-
Select the Shipment link in the table for a shipment on the Shipments Workbench.
The View Shipment page appears.
-
Select View Landed Cost in the Actions field.
-
Click the Go.
-
Shipment Hierarchy page (1 of 2)
Shipment Hierarchy page (2 of 2)

The Shipment Hierarchy page appears displaying the actual landed cost for each shipment, line group, and line.
The Billed Amount, Actual Amount, and Actual History columns appear on this page after the Create Matches API is run and then the actual landed cost is calculated and imported to Landed Cost Management for the shipment. The actual amount columns are next to the Estimated Amount column so that the difference between the estimated and actual landed cost are easily viewed.
The hierarchy for the shipment is as follows:
-
At the top of the hierarchy is the Shipment itself. Depicted with a Component Number equal to the shipment number and a Component Type of shipment.
-
Next is the line group for the shipment. Depicted with the Component Number equal to the line group number and a Component Type of Line Group.
-
After that is the shipment line. Depicted with the Component Number equal to the shipment line number and a Component Type of Shipment Line. At this level the actual landed cost is displayed for the shipment line in the Actual Amount column and the unit actual landed cost is displayed in the Unit Landed Cost column. The Actual Amount is the sum of all allocation amounts for a shipment line.
-
Finally, under each shipment line is the shipment line and charge line allocations. Depicted with a Component Type equal to Shipment Line Allocation or Charge Line Allocation and the specific cost factor displayed in the Component Reference field.
-
-
(Optional) To view the shipment or shipment line details, click the View Details icon in the Details column next to a shipment or shipment line.
The View Shipment page or the View Shipment Line page appear displaying the shipment or shipment line details.
-
To view the detailed invoicing history, click the View Actual History icon in the Actual History column next to an allocation line.
Note: The Actual History icon is only available for each allocation line. It is not available for the shipment, line group, or shipment lines levels.
Actual Matching History page
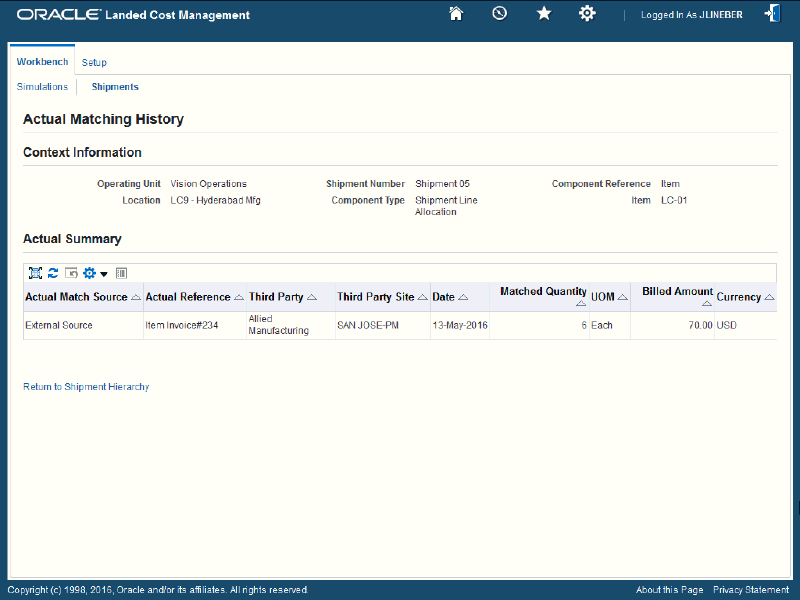
The Actual Matching History page appears displaying the details for the invoice history. The Actual Reference column displays the Source Document Number passed to the Create Matches API.
-
To view landed cost details, click the Unit Landed Cost link for a shipment line.
Landed Cost Details page (1 of 2)
Landed Cost Details page (2 of 2)
The Landed Cost Details page appears displaying the break down for the total actual landed cost for the shipment and for the actual unit landed cost. The cost factor (analysis code and component class) display for each line in the break down. The latest landed cost adjustment details appear by default.
At the bottom of the page these charts display:
-
Pie Graph: The pie graph displays the total allocation percentage for each cost that make up the shipment line.
-
Bar Graph: The bar graph displays the total allocation amount for each cost in the shipment line.
-
Calculation History: This graph displays the landed cost adjustment calculation history for the unit landed cost.
-
-
(Optional) Select another cost adjustment using the Unit Landed Cost History field. The values that appear for the field are equal to the Adjustment Number from the shipment line plus the date it occurred.
The system refreshes the page displaying the details for that cost adjustment. The Pie Chart and Bar Graph refresh with the new information but the Calculation History graph stays the same.