Setting Up Oracle Landed Cost Management
This chapter covers the following topics:
- Understanding the Oracle Landed Cost Management Setup Process
- Setting Up Inventory Organization Options
- Setting Up Location Options
- Setting Up Receiving Options
- Setting Up Cost Factors
- Setting Up Advanced Pricing Profile Options
- Maintaining Lookup Codes
- Maintaining Shipment Line Types
- Maintaining Shipment Types
- Maintaining Rules
- Setting Up Landed Cost Management Options
- Setting Up Oracle Landed Cost Management Profile Options
Understanding the Oracle Landed Cost Management Setup Process
Before you can use the Oracle Landed Cost Management application you must set up the application. A part of the Oracle Landed Cost Management setup occurs in other Oracle E-Business applications and then some of the setup is performed within the Oracle Landed Cost Management application itself.
Since Oracle Landed Cost Management integrates with several Oracle E-Business applications these applications need to be implemented and set up as well before you can successfully use the Oracle Landed Cost Management application. The other Oracle E-Business applications that need to be set up are:
-
Oracle Inventory
-
Oracle Purchasing
-
Oracle Payables (required for actual landed cost calculation)
-
(Conditionally Optional) Oracle Cost Management
-
(Conditionally Optional) Oracle Process Manufacturing
The use of Oracle Landed Cost Management is optional for Oracle Discrete and Process manufacturing implementations.
-
(Conditionally Optional) Oracle Projects
-
(Conditionally Optional) Oracle Project Manufacturing
Plus, Oracle Landed Cost Management can integrate with Oracle Advanced Pricing but it is not required. Oracle recommends that you integrate with Oracle Advanced Pricing so automatic charge calculation occurs in the processing of landed costs. Oracle Landed Cost Management also provides a hook (an object that can be modified by you) to enable you to load charges from external charge providers in the case where you are using another charge defaulting rule besides Oracle Advanced Pricing. Otherwise, you have to enter all of the charge lines manually.
For information on customizing Oracle Landed Cost Management hooks, see Note ID: 1211843.1 How to proceed for customizing LCM Hooks INLPCUSB.pls in My Oracle Support.
Setting Up Oracle Landed Cost Management
Follow this high-level process flow to set up Oracle Landed Cost Management:
-
Implement and set up all the other Oracle E-Business applications that are integrating with Landed Cost Management:
-
Inventory
Using Oracle Landed Cost Management (LCM) you can optionally restrict the purchase order shipments to be integrated with LCM based on item categories. Otherwise, landed cost is calculated for all eligible items of an LCM enabled organization. Setting up item category sets for use by LCM is optional.
For more information on defining item category sets, see the Item Setup and Control chapter in the Oracle Inventory User's Guide.
To use item category sets in LCM, set up the site level system profile option (INL: Item Category Set) with the name of the category set for which landed cost is calculated.
For more information, see Setting Up Landed Cost Profile Options.
-
Purchasing
-
Cost Management
-
Process Manufacturing
-
Payables
-
Advanced Pricing
-
Projects
-
Project Manufacturing
For more information on setting up these applications, see the specific implementation guide and user guide for each application.
-
-
Set up Inventory organization options.
For more information, see Setting Up Inventory Organization Options.
-
Set up Receiving options.
For more information, see Setting Up Receiving Options.
-
Set up cost factors.
For more information, see Setting Up Cost Factors.
-
Set up Oracle Advanced Pricing profile options.
For more information, see Setting Up Advanced Pricing Profile Options.
-
Create lookup codes associated with the Shipment Line Source Types lookup.
This step is only necessary if you plan to use Managing Landed Cost for Any Document and Any Transaction.
For more information, see Maintaining Lookup Codes and the "Managing Landed Cost for Any Document and Any Transaction" chapter in this guide.
-
Set up shipment line types.
For more information, see Maintaining Shipment Line Types.
-
Set up shipment types.
For more information, see Maintaining Shipment Types.
-
(Optional) Set up rules.
For more information, see Maintaining Rules.
-
Set up Oracle Landed Cost Management Options.
For more information, see Setting Up Oracle Landed Cost Management Options.
-
Set up Oracle Landed Cost Management profile options.
For more information, see Setting Up Oracle Landed Cost Management Profile Options.
Setting Up Inventory Organization Options
To use Oracle Landed Cost Management you must specify the inventory organizations that you want to have use Landed Cost Management and you must specify the Landed Cost Management variance account for that organization. Use the Organization Parameters - Inventory Parameters window in Oracle Inventory to define this information.
For more information on Inventory organization options, see the Inventory Structure chapter in the Oracle Inventory User's Guide.
Use this procedure to set up Inventory organization options:
To Set Up Inventory Organization Options
-
Navigate to the Organization Parameters - Inventory Parameters window.
Organization Parameters - Inventory Parameters window
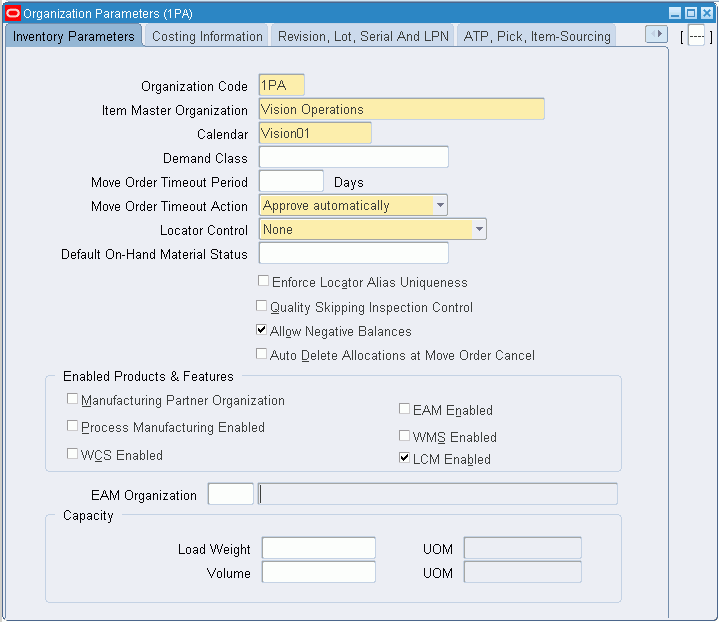
The Organization Parameters - Inventory Parameters window appears.
-
In the Enabled Products & Features region of the window, select the LCM Enabled check box.
Note: If you are using Oracle Process Manufacturing, the Process Manufacturing Enabled check box is already selected for the organization. You then select the LCM Enabled check box for that organization so that the integration between Oracle Process Manufacturing and Oracle Landed Cost Management can occur.
Note: If you are using Oracle Project Manufacturing, you can enable a Project Manufacturing organization to integrate with Oracle Landed Cost Management by selecting the LCM Enabled check box in the Organization Parameters - Inventory Parameters window.
-
Navigate to the Organization Parameters - Other Accounts window by selecting the Other Accounts tab.
Organization Parameters - Other Accounts window
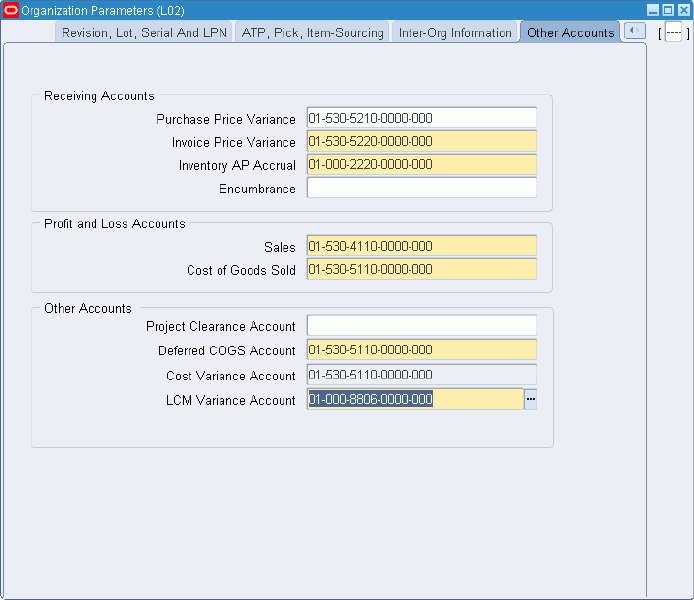
The Organization Parameters - Other Accounts page appears.
-
In the Other Accounts region of the page, enter a LCM Variance Account.
-
Save your work.
Setting Up Location Options
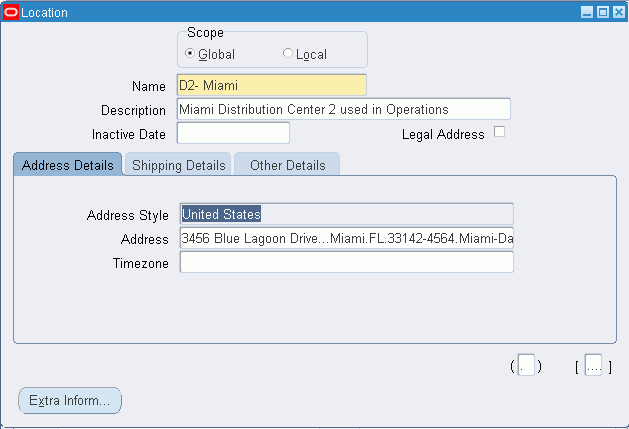
To use Oracle Landed Cost Management you must specify the country for the address on the locations that are used by Oracle Landed Cost Management. Use the Location window to maintain locations and location details.
Oracle Landed Cost Management compares the country of the third party sites (suppliers) with the country of the Inventory location to determine whether the supplier is domestic or foreign. Then the Third Party Sites Allowed field in the Shipment Types page in Oracle Landed Cost Management determines what sort of suppliers can be used for the Oracle Landed Cost Management shipment. Options for the Third Party Sites Allowed field are: Domestic, Foreign, or Both (Domestic and Foreign).
For more information on defining locations, see the Setting Up chapter in the Oracle Inventory User's Guide.
Use this procedure to set up location options:
-
Navigate to the Location window.
-
Query for an existing location.
Location window
-
Select the Address Details sub tab.
-
Click in the Address field for the location.
The Location Address window appears.
-
Select a Country for the address or add an address for the location including country.
Location Address window

-
Click the OK button.
-
Save your work.
Setting Up Receiving Options
To use Oracle Landed Cost Management you must setup several receiving options. Using the receiving options you specify whether Oracle Landed Cost Management is used as a pre-receiving application and you also specify the accounts that are used pertaining to Oracle Landed Cost Management in the accrual accounting process. Use the Receiving Options page in Oracle Purchasing to define this information.
For more information on setting up receiving options, see the Setting Up chapter in the Oracle Purchasing User's Guide.
Use the procedure to set up receiving options:
-
Navigate to the Receiving Options page.
The Receiving Options page appears.
-
Select an Inventory organization from the list of values in the Inventory Organization field.
-
Click Go.
Receiving Options page (1 of 2)
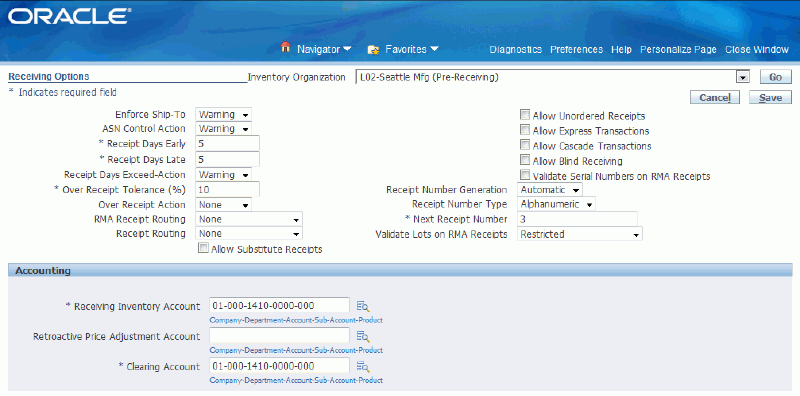
Receiving Options page (2 of 2)
The Receiving Options page appears, displaying the receiving options that pertain to the Inventory organization you selected.
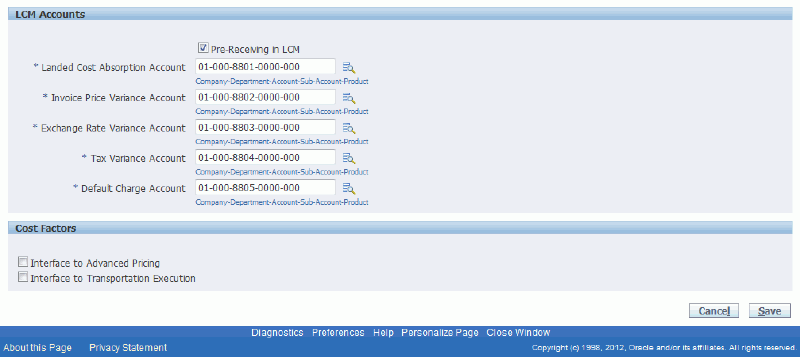
-
(Optional) Select the Pre-Receiving in LCM check box in the LCM Accounts region to indicate that you want the organization to operate with Landed Cost as a pre-receiving application.
Select this check box if you need to review or collect landed cost information before receiving activities occur. In the pre-receiving mode (Landed Cost as a pre-receiving application), the received quantity is equal to the landed cost shipment quantity and cannot be updated.
If not selected, Oracle Landed Cost Management operates as a calculation service (Landed Cost as a Service) without any need for user intervention. In this case, the Oracle Landed Cost Management process starts in the Receiving windows but all the integration and calculation for landed costs is performed as a calculation service using API's and concurrent programs. The create button on the Shipments Workbench is not available.
-
Select an account from the list of values in the Landed Cost Absorption Account field. This account is used during the receiving accrual accounting process.
-
Select an account from the list of values in the Invoice Price Variance Account field. This account is used during the receiving accrual accounting process.
-
Select an account from the list of values in the Exchange Rate Variance Account field. This account is used during the receiving accrual accounting process.
-
Select an account in the Tax Variance Account field. This account is used during the receiving accrual accounting process.
-
Select an account in the Default Charge Account field. This account is used during the receiving accrual accounting process.
Setting Up Cost Factors
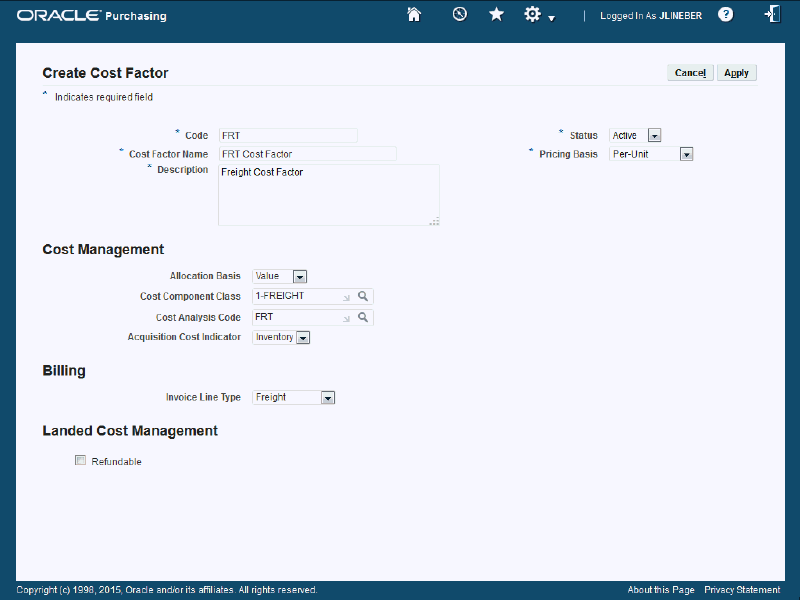
Oracle Landed Cost Management uses cost factors to define charge types. Charge types are used in Oracle Landed Cost Management when adding a new charge line in the Shipments Workbench. Use the Create Cost Factor page in Oracle Purchasing to set up cost factors.
For more information on setting up cost factors, see the Oracle Sourcing Implementation and Administration Guide.
Use this procedure to set up cost factors:
-
Navigate to the Cost Factors page.
The Cost Factors page appears displaying all of the cost factors.
-
Click the Create button.
The Create Cost Factor page appears.
-
Enter the code for the cost factor in the Code field.
This code appears in the Charge Type list of values in the Shipments Workbench.
-
Select Active for the Status.
Oracle Landed Cost Management only uses cost factors with an active status for charge line creation.
-
Enter a name for the cost factor in the Cost Factor Name field.
-
Select the basis for pricing using the Pricing Basis field. Values are:
-
Fixed Amount
-
% (percent) of Line Price
-
Per-Unit
Per-Unit appears by default for the pricing basis.
-
-
Enter the description for the cost factor in the Description field.
-
In the Cost Management region, select the Allocation Basis for the cost factor. Options are:
-
Quantity
-
Value
-
Volume
-
Weight
Oracle Landed Cost Management supports all of these basisses for allocation. The allocation basis is used to prorate the charge amounts to the items on the landed cost management shipment.
Note: If the Allocation Basis is blank, Oracle Landed Cost Management defaults the allocation basis to Value.
-
-
In the Billing region, select the Invoice Line Type.
-
In the Landed Cost Management region, select the Refundable check box if the cost factor is refundable.
Landed Cost Management references the Refundable check box associated to a cost factor to control the landed cost calculation behavior for the charge line amount during return to suppliers or receiving corrections of items associated with the landed cost shipment. Landed cost calculations use cost factors.
For more information on the use of refundable versus nonrefundable cost factors, see Understanding Refundable Versus Nonrefundable Cost Factors and Recalculating Estimated Landed Cost After Return to Supplier and Correction Transactions.
Create Cost Factor page
-
Click the Apply button.
The cost factor is saved.
Setting Up Advanced Pricing Profile Options
If you are using Oracle Advanced Pricing to integrate with Oracle Landed Cost Management then you need to define Advanced Pricing profile options in a manner recognized by Oracle Landed Cost Management. The Advanced Pricing application is required if you need automatic charge lines generation when using Oracle Landed Cost Management.
Advanced Pricing has several profile options. This table lists the Advanced Pricing profile options and the profile value settings that must be entered to enable the integration between Oracle Landed Cost Management and Oracle Advanced Pricing.
| Profile Option | Profile Value | Supported Levels |
|---|---|---|
| QP: Blind Discount Option | Yes | Site and Application |
| QP: Licensed for Product | Purchasing | Application and User |
| QP: Pricing Perspective Request Type | Purchase Order | Site and Application |
| QP: Pricing Transaction Entity | Procurement | Site, Application, and User |
| QP: Source System Code | Oracle Purchasing | Site, Application, and User |
For more detailed information on these profile options, see the Oracle Advanced Pricing Implementation Guide.
Use this procedure to set up Advanced Pricing profile options:
To Set Up Advanced Pricing Profile Options
Typically, the System Administrator is responsible for setting up and updating profile option values. For more information, see Oracle Applications System Administrator's Guide, Setting User Profile Options.
-
Navigate to the System Profile Values window.
The Find System Profile Values window appears.
-
Enter QP% in the Profile field and click Find.
The System Profile Values window appears displaying all of the Advanced Pricing (QP) profile options.
-
Locate the specific profile option and enter the appropriate profile value.
-
Click the Save icon in the tool bar.
Maintaining Lookup Codes
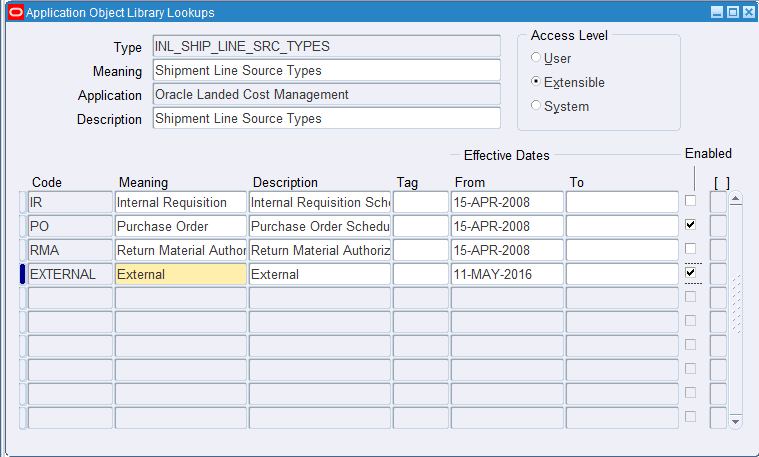
Before you can begin to use the Managing Landed Cost for Any Document and Any Transaction process flow, you must create lookup codes for shipment line source types, and associate those codes with the Shipment Line Source Types (INL_SHIP_LINE_SRC_TYPES) lookup. When you create a shipment type in Oracle Landed Cost Management you enter the source types that are enabled with that shipment type.
Before you can begin to use the Managing Landed Cost for Any Document and Any Transaction process flow, you must create shipment line source types lookup codes associated to the Shipment Line Source Types (INL_SHIP_LINE_SRC_TYPES) lookup. When you create a shipment type in Oracle Landed Cost Management you enter the source types that are enabled with that shipment type.
Oracle Landed Cost Management delivers the lookup code of PO (Purchase Order) already created and enabled for the Shipment Line Source Types lookup. The Purchase Order source type must be associated with the shipment types that are used in the process flows for Managing Landed Cost as a Pre-Receiving Application and for Managing Landed Cost as a Service.
For more information about shipment types, see Maintaining Shipment Types.
Use these procedures to maintain shipment line source types lookup codes associated with the Shipment Line Source Types lookup:
To View Lookup Codes Associated with the Shipment Line Source Types Lookup
-
Navigate to the Application Objects Library Lookups window.
-
Click the Find icon in the tool bar.
-
Find the INL_SHIP_LINE_SRC_TYPES lookup type and click the OK button.
Application Object Library Lookups window
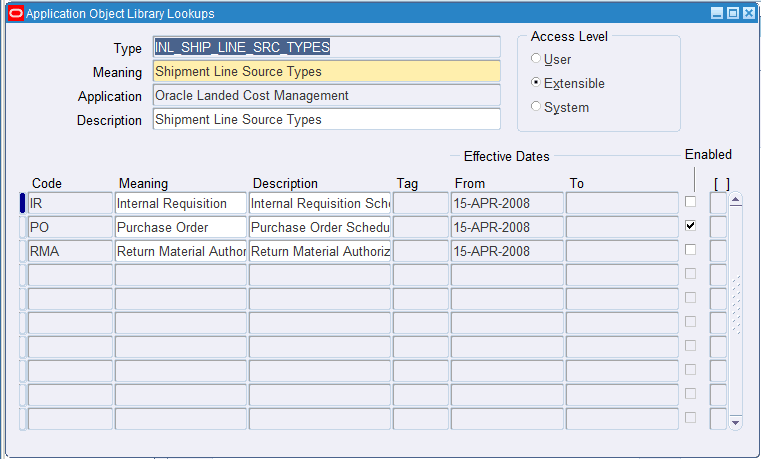
All of the source type codes associated with the Shipment Line Source Types lookup type are displayed. Oracle Landed Cost Management is delivered these source type codes:
-
IR: Internal Requisition
-
PO: Purchase Order - Enabled
-
RMA: Return Material Authorization
You cannot enable IR or RMA.
-
To Create Lookup Codes Associated with the Shipment Line Source Types Lookup
-
Navigate to the Application Objects Library Lookups window.
-
Click the Find icon in the tool bar.
-
Find the INL_SHIP_LINE_SRC_TYPES lookup type and click the OK button.
Application Object Library Lookups window
All of the source type codes associated with the Shipment Line Source Types lookup type are displayed.
-
Click in the Code column of the first empty row or click the New icon.
Application Object Library Lookups window
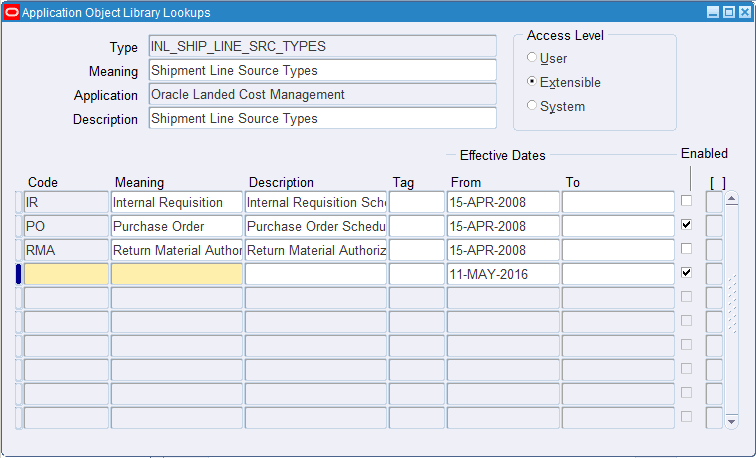
The Code and Meaning fields become available for entry.
-
Enter this information:
Field Description Code Enter a source type code. Meaning Enter a meaning for the source type. Description (Optional) Enter a description for the source type. Tag (Optional) Enter a tag to describe the lookup. The tag can be used to categorize lookup values. Effective Dates From Enter the date this source type becomes available for use.
The current date appears by default.Effective Dates To (Optional) Enter the date this source type is no longer available for use. Enable check box Select this check box to enable this source type to be assigned to shipment types.
This check box is selected by default. -
Click the Save icon.
Application Object Library Lookups window
To Update Lookup Codes Associated with the Shipment Line Source Types Lookup
-
Navigate to the Application Objects Library Lookups window.
-
Click the Find icon in the tool bar.
-
Find the INL_SHIP_LINE_SRC_TYPES lookup type and click the OK button.
All of the source type codes associated with the Shipment Line Source Types lookup type are displayed.
-
Change the meaning or the description of a source type code.
-
Click the Save icon.
To Delete Lookup Codes Associated with the Shipment Line Source Types Lookup
-
Navigate to the Application Objects Library Lookups window.
-
Click the Find icon in the tool bar.
-
Find the INL_SHIP_LINE_SRC_TYPES lookup type and click the OK button.
All of the source type codes associated with the Shipment Line Source Types lookup type are displayed.
-
Click in the row for the source type code you want to delete.
Note: Instead of deleting the source type code you also have the option of no longer enabling the source type code by clearing the Enabled check box.
-
Click the Delete icon.
-
Click the Save icon.
Maintaining Shipment Line Types
Setting up shipment line types is a mandatory step before you can use Oracle Landed Cost Management. Shipment line type is a mandatory attribute of all shipment lines on a landed cost management shipment. It provides a shipment line categorization and also drives the landed cost calculation behavior. Use the Shipment Line Types pages to maintain the shipment line types.
Use these procedures to maintain shipment line types:
-
Navigate to the Shipment Line Types page.
Shipment Line Types page
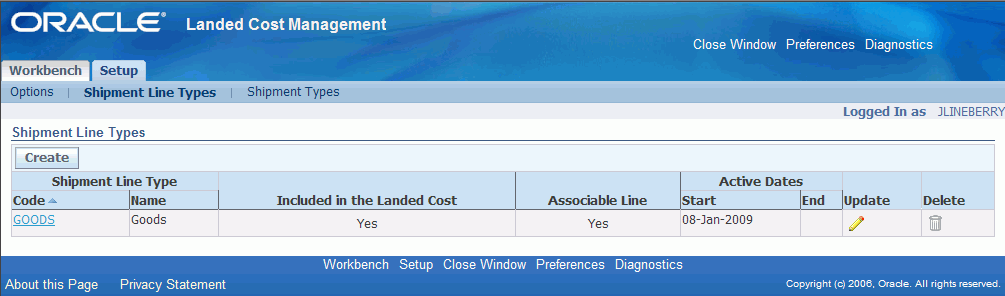
The Shipment Line Types page appears displaying all of the existing Shipment Line Types in a table.
-
Click the Code link.
The Shipment Line Type page appears displaying information just for that shipment line type. From this page you can update the shipment line type.
-
Navigate to the Shipment Line Types page.
The Shipment Line Types page appears displaying all of the existing shipment line types in a table.
-
Click the Create button.
Create Shipment Line Type page
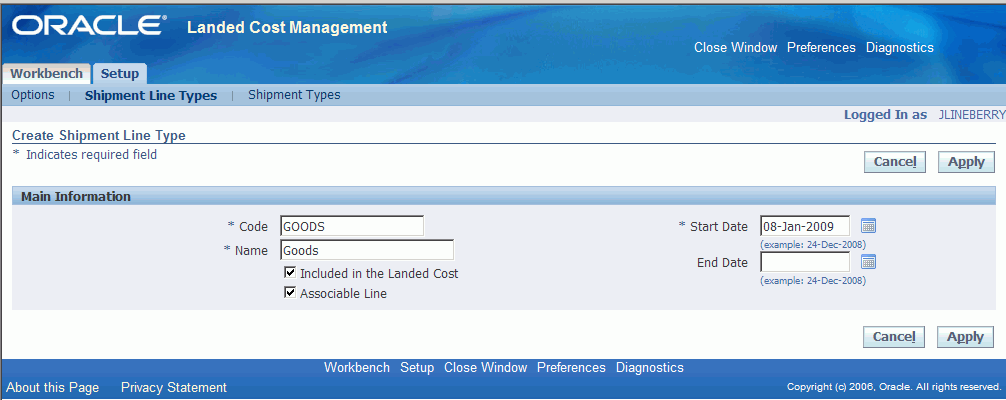
The Create Shipment Line Type page appears.
-
Enter a short code definition for the shipment line type in the Code field.
-
Enter a description for the shipment line type in the Name field.
-
Select the Included in Landed Cost check box if want the landed cost engine to include the line amount for this shipment type in the landed cost for the item.
-
Select the Associable Line check box if the shipment line can be associated to another shipment line. For example, the amount of the first line is prorated and allocated to the landed cost of the second shipment line.
-
Enter the Start Date when this shipment line type becomes active. By default the current date appears.
-
(Optional) Enter the date when this shipment line type is no longer active in the End Date.
-
Click the Apply button to save your work.
-
Navigate to the Shipment Line Types page.
The Shipment Line Types page appears displaying all of the existing shipment line types in a table.
-
Click the Update icon next to the shipment line type that you want to update.
Alternate navigation: Click the Code link for a shipment line type in the table and then click the Update button.
The Update Shipment Line Type page appears.
-
Change the information you want associated with the shipment line type.
-
Click the Apply button to save your work.
To Delete a Shipment Line Type
-
Navigate to the Shipment Line Types page.
The Shipment Line Types page appears displaying all of the existing shipment line types in a table.
-
Click the Delete icon next to the shipment line type that you want to delete.
You receive a warning message asking if you are sure you want to delete the shipment line type.
-
Click the Yes button.
The Shipment Line Type is deleted.
Maintaining Shipment Types
Before you can begin to use Oracle Landed Cost Management you must create shipment types. Shipment type determines the validations that occur for a shipment. Use the Shipment Types pages to maintain shipment types.
Use these procedures to maintain shipment types:
-
Navigate to the Shipment Types page.
Shipment Types page
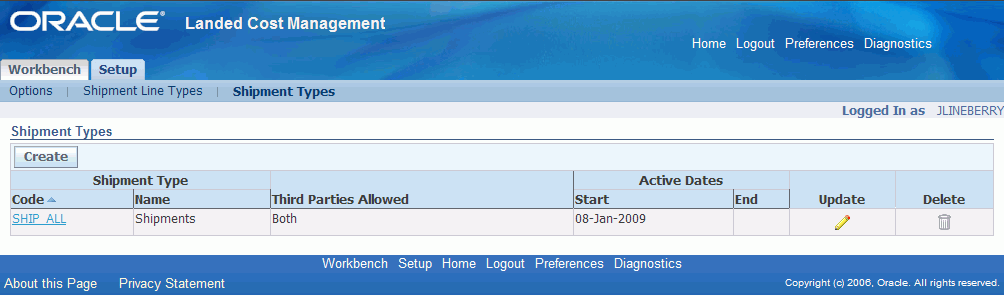
The Shipment Types page appears displaying all of the existing Shipment Types in a table.
-
Click the Code link.
The Shipment Type page appears displaying information just for that shipment type. From this page you can update the shipment type.
-
Navigate to the Shipment Types page.
The Shipment Types page appears displaying all of the existing shipment types in a table.
-
Click the Create button.
Create Shipment Type page
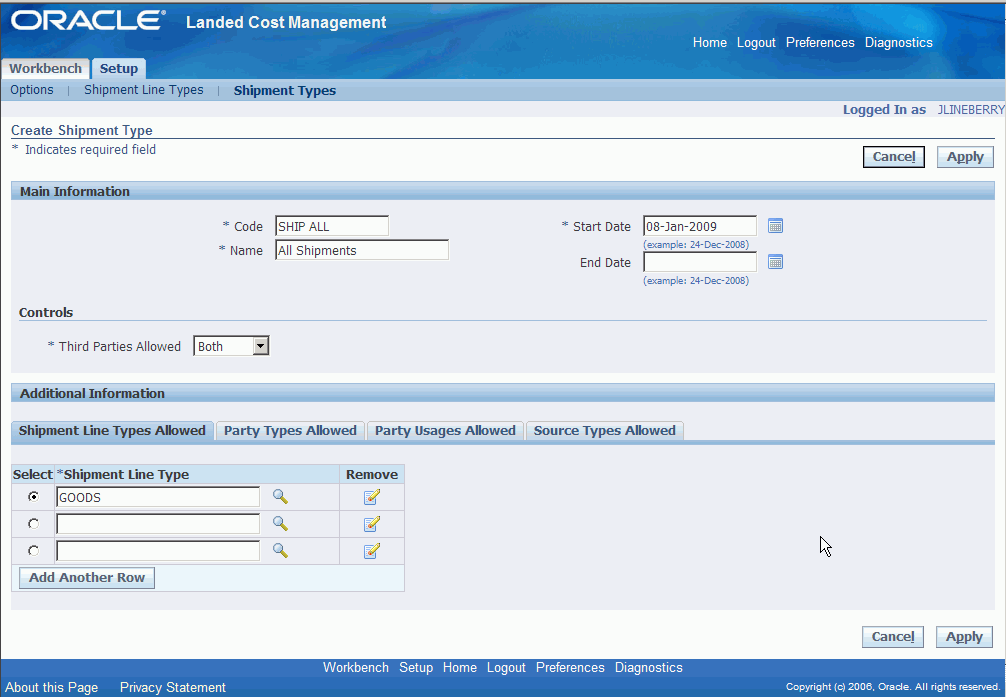
The Create Shipment Type page appears.
-
In the Main region of the page, enter this information:
Field Name Description Code Enter a short code definition for the shipment type. Name Enter a description for the shipment type. Start Date Enter the start date when the shipment type becomes active. By default the current date appears. (Optional) End Date Enter the date when the shipment type is no longer active. -
In the Controls region of the page, select the Third Parties Allowed option. Options are:
-
Both: Both Domestic and Foreign
-
Domestic
-
Foreign
-
-
Under the Shipment Line Types Allowed tab, select the shipment line types that can be used with this shipment type.
-
Using the Select column, select the shipment line type that is the default.
-
(Optional) To add another row for additional shipment line types, click the Add Another Row button and then select another shipment line type.
-
(Optional) To delete a shipment line type from the shipment type, click the Remove icon next to the shipment line type you wish to remove.
-
Select the Party Types Allowed tab.
Party Types Allowed tab
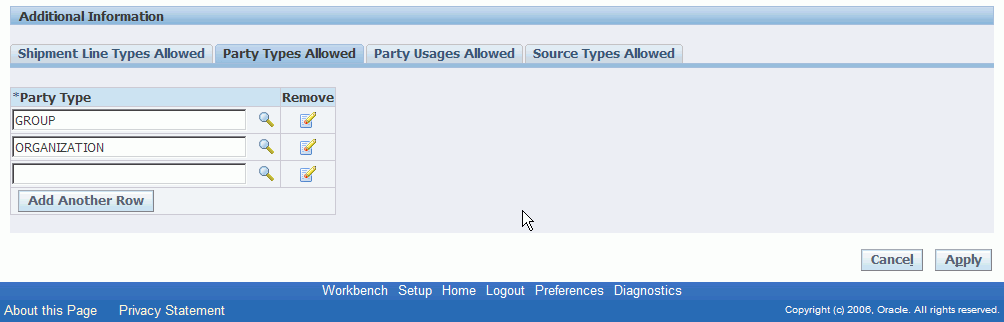
The Party Types Allowed tab appears.
-
Select the Party Types that can be used with this shipment type.
The system restricts the parties that can be chosen by filtering parties that are classified as one of the party types selected for the shipment type.
Party types are defined as part of the Trade Community Architecture (TCA) setup.
-
(Optional) To add another row for party types, click the Add Another Row button and then select another party type.
-
(Optional) To delete a party type from the shipment type, click the Remove icon next to the party type you wish to remove.
-
Select the Party Usages Allowed tab.
Party Usages Allowed tab
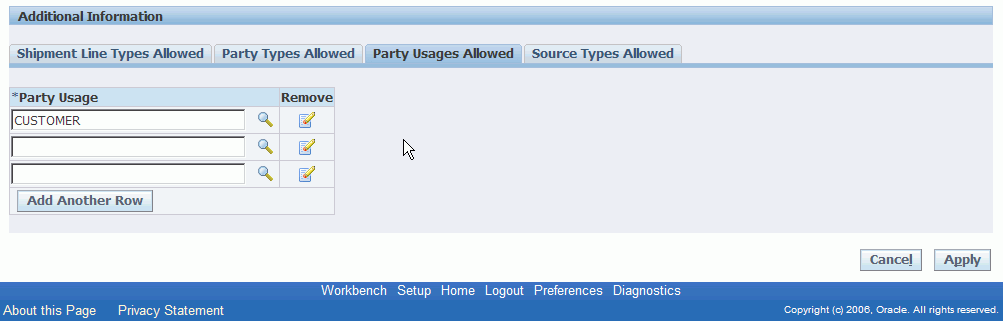
The Party Usages Allowed tab appears.
-
Select the Party Usages that can be used with this shipment type.
The system restricts the parties that can be chosen by filtering parties that have party usage defined as one of the party usages selected for the shipment type. Party usage is defined as part of the Oracle Trade Community Architecture (TCA) setup.
-
(Optional) To add another row for party usage, click the Add Another Row button and then select another party usage.
-
(Optional) To delete a party usage from the shipment type, click the Remove icon next to the party usage you wish to remove.
-
Select the Source Types Allowed tab.
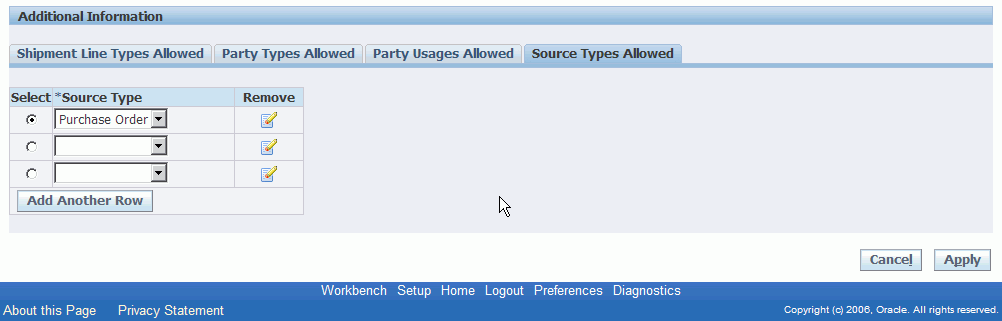
The Source Types Allowed tab appears.
-
Select the Source Types that can be used with this shipment type. User-defined source types can be created using the Application Object Library Lookups window.
For more information about source types, see Maintaining Lookup Codes.
-
(Optional) To add another row for source type, click the Add Another Row button and then select another source type.
-
(Optional) To delete a source type from the shipment type, click the Remove icon next to the source type you wish to remove.
-
Click the Apply button to save your work.
-
Navigate to the Shipment Types page.
The Shipment Types page appears displaying all of the existing shipment types in a table.
-
Click the Update icon next to the shipment type that you want to update.
Alternate navigation: Click the Code link for a shipment type in the table and then click the Update button.
The Update Shipment Type page appears.
-
Change the information you want associated with the shipment type.
-
Click the Apply button to save your work.
-
Navigate to the Shipment Types page.
The Shipment Types page appears displaying all of the existing shipment line types in a table.
-
Click the Delete icon next to the shipment type that you want to delete.
You receive a warning message asking if you are sure you want to delete the shipment type.
-
Click the Yes button.
The Shipment Line Type is deleted.
Maintaining Rules
Use the Rules page in Oracle Landed Cost Management to maintain the rules that are used by Oracle Landed Cost Management. Rules only apply to shipments that are processed when Oracle Landed Cost Management is operating as a calculation service (Landed Cost as a Service) without any need for user intervention. Using Rules is an optional step.
After you create a rule you can associate it to an Inventory organization using the Landed Cost Management Options page. If a rule is specified for an Inventory organization, then when the shipments are imported from Receiving into LCM if they match the rule criteria they are not automatically completed. At that time, you can search for the shipments, manually update the estimated landed cost information on the shipments, and then manually submit the shipments for completion using the Shipments Workbench page.
For more information on managing landed cost as a service, see Understanding Landed Cost as a Service.
Use these procedures to view, set up, and update rules:
-
Navigate to the Rules page.
Rules page

The Rules page appears displaying all of the existing rules in a table.
-
Click the Rule Name link in the table.
Rule page
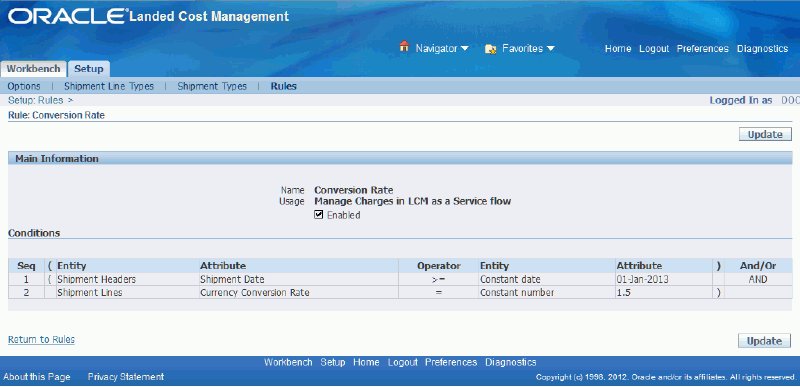
The Rule detail page appears displaying the complete information for that rule.
-
Navigate to the Rules page.
The Rules page appears displaying all of the existing rules in a table.
-
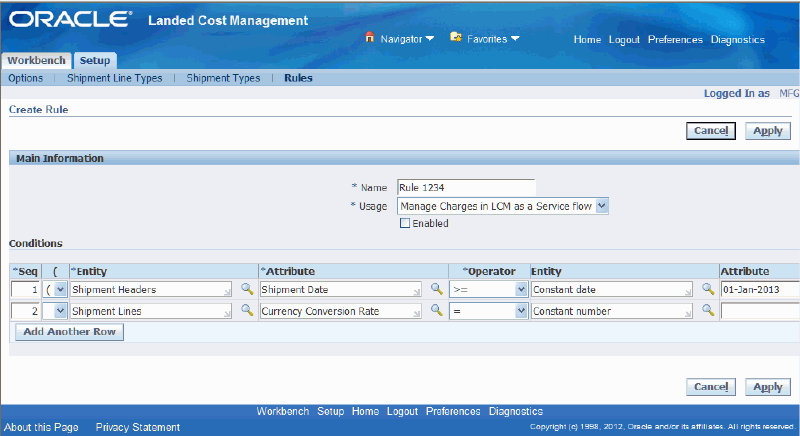
Click the Create button.
Create Rule page
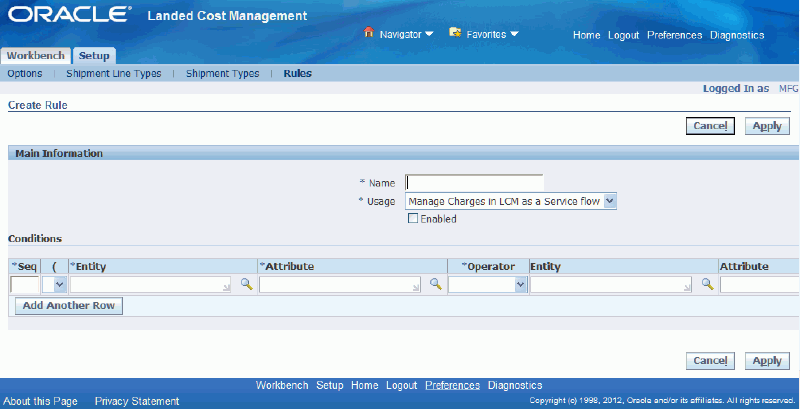
The Create Rule page appears.
-
Enter a name for the rule in the Name field.
-
Select Manage Charges in LCM as a service in the Usage field.
-
In the Conditions region, enter the rule definition using one or more of these fields:
Field Name Description Seq (sequence) Enter a value for the sequence. The rule actions are performed in the sequence order. ( (left parenthesis) (Optional) Select a left parenthesis for the rule if necessary. Entity Select a left entity name for the rule. Values are: -
Shipment Headers
-
Shipment Line Groups
-
Shipment Lines
Attribute Select an left attribute name associated with the left entity. Values are: Shipment Headers
-
Attribute Category
-
Attribute 1-15
-
Inventory Organization Identifier
-
Legal Entity Identifier
-
Location Identifier
-
Operating Unit Identifier
-
Shipment Date
-
Shipment Number
-
Shipment Status Code
-
Ship Type Identifier
-
Simulation Identifier
-
Taxation Country
Shipment Line Groups
-
Line Group Number
-
Line Group Reference
-
Party Identifier
-
Party Site Identifier
-
Source Type Code
Shipment Lines
-
Adjustment Number
-
Allocation Enabled Flag
-
Bill From Party Identifier
-
Bill From Site Identifier
-
Bill To Location Identifier
-
Bill To Organization Identifier
-
Currency Code
-
Currency Conversion Date
-
Currency Conversion Rate
-
Currency Conversion Type
-
EBTAX Assessable Value
-
Intended Use
-
Inventory Item Identifier
-
Landed Cost Flag
-
Point of Order Acceptance Party Identifier
-
Point of Order Origin Location Identifier
-
Point of Order Origin Organization Identifier
-
Primary Quantity
-
Primary Unit of Measure Code
-
Product Category
-
Product Fiscal Classification
-
Product Type
-
Secondary Quantity
-
Secondary Unit Price
-
Secondary Unit of Measure
-
Ship From Party Identifier
-
Ship From Party Site Identifier
-
Ship To Location Identifier
-
Ship To Organization Identifier
-
Shipment Line Number
-
Shipment Line Source Identifier
-
Shipment Line Type Code
-
Shipment Line Type Identifier
-
Tax Already Calculated Flag
-
Tax Classification Code
-
Transaction Business Category
-
Transaction Quantity
-
Transaction Unit Price
-
Transaction Uom Code
-
User Defined Fiscal Classification
-
Point of Order Acceptance Party Site Identifier
Operator Select an operator for the rule. Values are: -
!= (Not equal to)
-
= (Equal to)
-
> (Greater than)
-
>= (Greater than or equal to)
-
< (Less than)
-
<= (Less than or equal to)
-
IS NULL (Has no value)
-
IS NOT NULL (Has value)
Entity Select a right entity name for the rule. Right entity values are associated with the left attribute entered. Values are: -
Constant character
-
Constant date
-
constant number
-
Expression
-
Shipment Headers
-
Shipment Line Groups
-
Shipment Lines
Attribute Select a right attribute name associated with the entity. Values are: Constant Character
-
Enter a character value
Constant Date
-
Enter a date
Constant Number
-
Enter a number
Expression
-
Enter an expression
Shipment Headers
-
Attribute Category
-
Attribute 1-15
-
Inventory Organization Identifier
-
Legal Entity Identifier
-
Location Identifier
-
Operating Unit Identifier
-
Shipment Date
-
Shipment Number
-
Shipment Status Code
-
Ship Type Identifier
-
Simulation Identifier
-
Taxation Country
Shipment Line Groups
-
Line Group Number
-
Line Group Reference
-
Party Identifier
-
Party Site Identifier
-
Source Type Code
Shipment Lines
-
Adjustment Number
-
Allocation Enabled Flag
-
Bill From Party Identifier
-
Bill From Site Identifier
-
Bill To Location Identifier
-
Bill To Organization Identifier
-
Currency Code
-
Currency Conversion Date
-
Currency Conversion Rate
-
Currency Conversion Type
-
EBTAX Assessable Value
-
Intended Use
-
Inventory Item Identifier
-
Landed Cost Flag
-
Point of Order Acceptance Party Identifier
-
Point of Order Origin Location Identifier
-
Point of Order Origin Organization Identifier
-
Primary Quantity
-
Primary Unit of Measure Code
-
Product Category
-
Product Fiscal Classification
-
Product Type
-
Secondary Quantity
-
Secondary Unit Price
-
Secondary Unit of Measure
-
Ship From Party Identifier
-
Ship From Party Site Identifier
-
Ship To Location Identifier
-
Ship To Organization Identifier
-
Shipment Line Number
-
Shipment Line Source Identifier
-
Shipment Line Type Code
-
Shipment Line Type Identifier
-
Tax Already Calculated Flag
-
Tax Classification Code
-
Transaction Business Category
-
Transaction Quantity
-
Transaction Unit Price
-
Transaction Uom Code
-
User Defined Fiscal Classification
-
Point of Order Acceptance Party Site Identifier
) (right parenthesis) (Optional) Select a right parenthesis for the rule if necessary. and/or Select the and or or clause. Values are: -
AND
-
OR
-
-
Click the Add Another Row button if necessary to add additional row for the rule.
A new row appears is the Condition table.
-
Repeat steps 5 - 6 until the complete rule is created.
Create Rule page
-
Click the Enabled check box to enable the rule.
A rule cannot be associated to an Inventory organization unless it is enabled.
Create Rule page

The rule conditions are no longer available to be updated.
-
Click the Apply button to save your work and return back to the Rules page.
-
Navigate to the Rules page.
The Rules page appears displaying all of the existing rules in a table.
-
Click the Update icon next to the rule you want to update.
Note: You cannot update a rule once it has been associated to a inventory organization on the LCM Options page.
Update Rule page
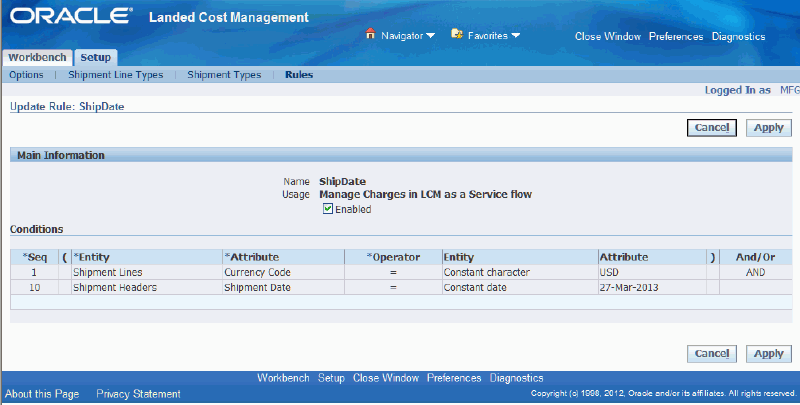
The Update Rule page appears displaying the details of the rule.
-
Clear the Enabled check box if it is selected.
Update Rule page
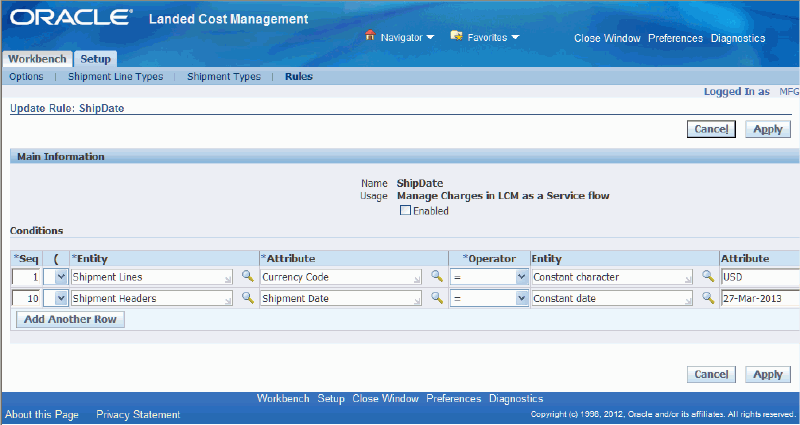
The fields in the Conditions region become available for updating.
-
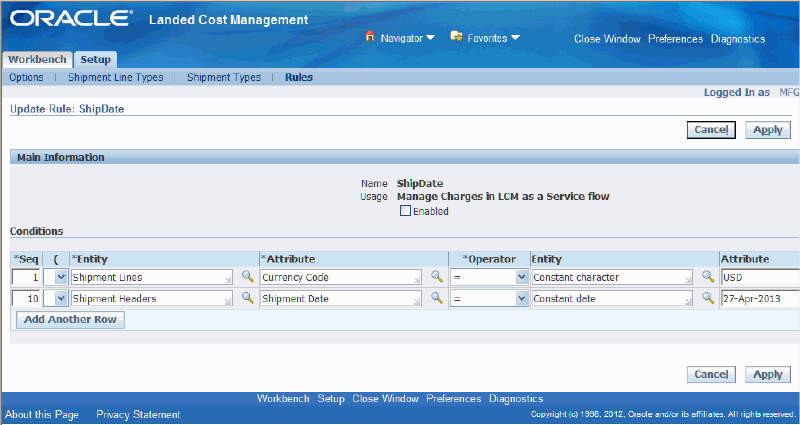
Change the information you want associated with the rule:
To Change Information
-
Change any of the fields currently associated with the rule.
Update Rule page (Shipment Date Changed)
To Add Information
-
Click the Add Another Row button and add additional criteria to the rule.
To Delete Information
-
Click the Remove icon next to a row in the rule conditions table.
-
-
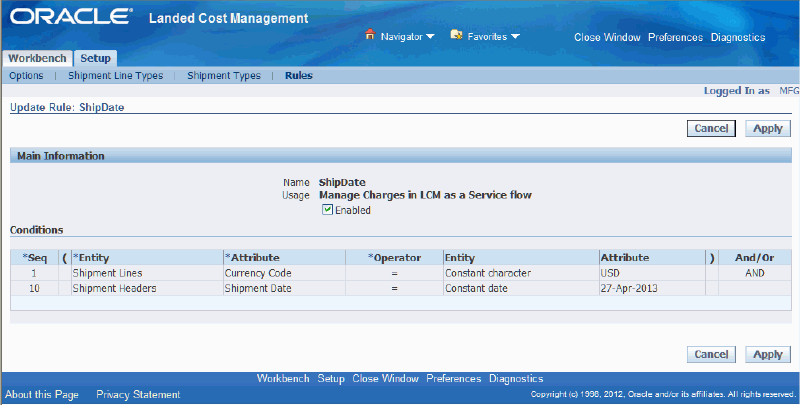
Click the Enabled check box to enable the rule.
Update Rule page
-
Click the Apply button to save your work and return back to the Rules page.
-
Navigate to the Rules page.
The Rules page appears displaying all of the existing rules in a table.
-
Click the Delete icon next to a rule in the table.
Note: You cannot delete a rule once it has been associated to a inventory organization on the LCM Options page. Remove the rule from the LCM Options page and then you can delete the rule.
You receive a warning message asking if you are sure you want to delete the rule.
-
Click the Yes button.
The rule is deleted.
Setting Up Landed Cost Management Options
Use the LCM Options page to set up the Oracle Landed Cost Management options. The options you can set up are numbering behavior, tolerance control, and optionally the rule that are used for the landed cost management shipments. Setting up the numbering behavior is a mandatory step before using the Oracle Landed Cost Management application. Setting up tolerance control and the rule that are used when managing shipments as a service are optional steps.
Use this procedure to set up Landed Cost Management options:
To Set Up Landed Cost Management Options
-
Navigate to the LCM Options page.
The LCM Options page appears with only the Inventory Organization field available for selection.
-
Select an Inventory Organization and click the Go button.
Only the inventory organizations that have LCM enabled appear for selection.
LCM Options page
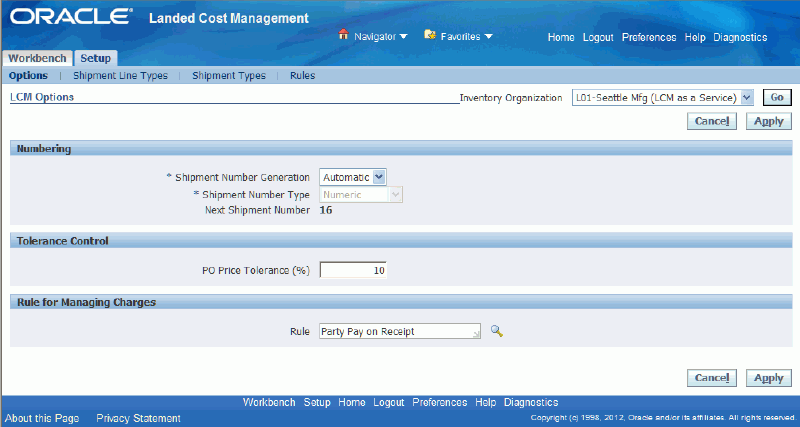
The landed cost management options display for the inventory organization you selected.
-
Select how the shipment number is generated for a landed cost management shipment in the Shipment Number Generation field. Options are:
-
Automatic
Use this option when using Landed Cost as a Service.
-
Manual
Use this option when using Landed Cost as a pre-receiving application.
-
-
If Manual is selected for the Shipment Number Generation, then select a Shipment Number Type. Options are:
-
Alphanumeric
-
Numeric
The system defaults Numeric as the Shipment Number Type for automatic shipment number generation.
In the case of automatic shipment number generation, the system starts the numbering at "1" and displays the next shipment number that will be created in the Next Shipment Number field.
-
-
Enter a price tolerance percent in the PO Price Tolerance (%) field.
Oracle Land Cost Management provides a consolidated tolerance control for the purchase price entered in Oracle Landed Cost Management (equivalent to the quantity tolerance for a receipt in Receiving). Prices out of the tolerance interval are rejected.
-
(Optional) Enter the rule that is used when managing landed cost shipments as a service in the Rule field.
This field is only available when you select an Inventory Organization that operates as a calculation service (managing landed cost as a service) without any need for user intervention.
For more information on rules, see Maintaining Rules.
-
Click the Apply button to save your work.
Setting Up Oracle Landed Cost Management Profile Options
Oracle Landed Cost Management has several profile options. Use the System Profile Values window to set up the profile options. This table describes the profile options:
| Profile Option | Profile Option Description |
|---|---|
| INL: Allow Simulations for Approved Purchase Orders | The profile options determines whether landed cost simulations can be created or updated for approved purchase orders. For more information, see Understanding Simulated Landed Cost. |
| INL: Allow Updates to Completed Shipments | This profile option determines whether you can make changes to a completed shipment or not. For more information, see Understanding the Estimated Landed Cost Update Process. |
| INL: Default Currency Code for QP Charges Generation | This profile option is used in Advanced Pricing integration with Oracle Landed Cost Management. The system uses this profile option to determine the base currency code when integrating to Oracle Advanced Pricing. All of the shipment line amounts are converted to the currency indicated in this profile option. For more information, see Generating Charges for the Shipment. |
| INL: Default Currency Conversion Type for QP Charges Generation | This profile option is used in Advanced Pricing integration with Oracle Landed Cost Management. The system uses this profile option to determine the currency conversion type when integrating to Oracle Advanced Pricing. All of the shipment line amounts are converted to the currency conversion type indicated in this profile option. For more information, see Generating Charges for the Shipment. |
| INL: Default Shipment Type for Open Interface | The system uses this profile option to determine the Shipment Type the landed cost management shipment headers are created with, in the Managing Landed Cost as a Service flow, where landed cost management shipments are automatically created for the receipts. For more information, seeUnderstanding Landed Cost as a Service. |
| INL: Item Category Set | (Optional) The system uses this profile option to restrict the purchase order shipments to be integrated with Oracle Landed Cost Management based on the category set entered. For more information on defining item category sets, see the Item Setup and Control chapter in the Oracle Inventory User's Guide. |
| INL: Number of Days Filter for Landed Cost Analysis | (Optional) The system uses this profile option as the default number of days filter for the Landed Cost Analysis page. For more information on the Landed Cost Analysis page, see Analyzing Landed Cost. Note: If Oracle Information Discovery is installed and licensed in your environment, then refer to the Oracle E-Business Suite Information Discovery Integration and System Administration Guide for detailed information about the Information Discovery enhancements to the product. |
| INL: Number of Days Filter for Monitor Daily Operations | (Optional) The system uses this profile option as the default number of days filter for the Monitor Daily Operations page. For more information on the Monitor Daily Operations page, see Monitoring Daily Operations. Note: If Oracle Information Discovery is installed and licensed in your environment, then refer to the Oracle E-Business Suite Information Discovery Integration and System Administration Guide for detailed information about the Information Discovery enhancements to the product. |
| INL: Quantity UOM Class | Use this profile to indicate the class defined for each unit associated with quantity cost factors. The system uses this profile option to drive the landed cost management cost factor UOM conversions during the Generate Charges and Calculate processes. For more information, seeUnderstanding Landed Cost as a Pre-Receiving Application and Understanding Landed Cost as a Service. |
| INL: Re-Prorate Charge Invoice Amounts | This profile option is used in the Oracle Payables integration with Oracle Landed Cost Management. The system (Matches Interface Import concurrent program) uses this profile to indicate how charge invoice amounts that were automatically prorated in Oracle Payables (through Invoice matching of freight and miscellaneous charges to receipt lines) are reallocated in Oracle Landed Management. These charge line amounts are used in determining the actual landed cost of a shipment. Values are:
For more information, see:
|
| INL: Volume UOM Class | Use this profile to indicate the class defined for each unit associated with volume cost factors. The system uses this profile option to drive the landed cost management cost factor UOM conversions during the Generate Charges and Calculate processes. For more information, see Understanding Landed Cost as a Pre-Receiving Application and Understanding Landed Cost as a Service. |
| INL: Weight UOM Class | Use this profile to indicate the class defined for each unit associated with weight cost factors. The system uses this profile option to drive the landed cost management cost factor UOM conversions during the Generate Charges and Calculate processes. For more information, see Understanding Landed Cost as a Pre-Receiving Application and Understanding Landed Cost as a Service. |
For more information on the Oracle Landed Cost Management Profile Options, see Overview of Profile Options in the Profile Options appendix.
Use this procedure to set up Oracle Landed Cost Management profile options:
Prerequisites
- Before you can define the INL: Default Shipment Type for Open Interface profile option you must have already set up shipment types in Oracle Landed Cost Management.
To Set Up Oracle Landed Cost Management Profile Options
Typically, the System Administrator is responsible for setting up and updating profile option values. For more information, see Oracle Applications System Administrator's Guide, Setting User Profile Options.
-
Navigate to the System Profile Values window.
The Find System Profile Values window appears.
-
Enter INL% in the Profile field and click Find.
The System Profile Values window appears displaying all of the Oracle Landed Cost Management (INL) profile options.
-
Locate the specific profile option and enter the appropriate profile value.
-
Click the Save icon to save your work.