Working With Master Configurations
This chapter covers the following topics:
- Overview
- Master Configurations
- Creating Master Configuration Records
- Working with Positions
- Creating Positions in a Master Configuration
- Copying Existing Configurations to a Position
- Associating Item Groups with a Position
- Associating a Sub-Configuration or Alternate Sub-Configuration with a Position
- Creating Rules for a Configuration or Sub-Configuration
- Editing Position Ratios
- Attaching Documents to a Position
- Managing Alternate Items Information
- Adding Alternate Items Information
- Finding Alternate Items Information
- Editing Alternate Items Information
- Creating Item Group Revisions
- Editing Master Configuration Records
- Creating Master Configuration Revisions
- Approving Master Configurations
- Viewing Master Configuration Records
- Viewing Position Details
- Viewing Position Ratios Associated with a Position
- Viewing Documents Attached to a Position
- Viewing Alternate items Associated with a Position
- Viewing Positions Associated with an Alternate Item Group
- Viewing Rules
- Closing Master Configuration Records
- Reopening Closed Records
Overview
Modeling a complex assembly or system involves defining the hierarchy or structure, including the parts or sub-configurations allowed at each position or location, rules to control the configuration, documents which apply to the configuration, and ratios applicable between positions by which counter updates to will flow down, if other than one to one. The assembly configuration for an aircraft type, locomotive, ship, or any other complex system or assembly, is described by the Oracle Complex Maintenance Repair and Overhaul module called Master Configuration.
This chapter discusses the key functions supported by the Oracle Complex Maintenance Repair and Overhaul Master Configuration module. The chapter provides process oriented, task based procedures for using the application to perform essential tasks for managing configuration models.
See:
Master Configurations
A master configuration is the template or control structure for an assembly, system, sub-assembly, or subsystem that provides a model of the structure of an electrical, hydraulic, pneumatic, or mechanical system or assembly, with rules for component location and component selection, and applicable maintenance operations. For example, a Boeing 757-300 can be configured with either a pair of Pratt & Whitney PW2043 engines, or a pair of slightly more powerful Rolls-Royce RB211-535E4B engines. The master configuration is used to create and maintain instances or units derived from the configuration hierarchy, parts, subassemblies, and defined rules. The presence of a master configuration simplifies route development, by serving as the basis for material requirements and their disposition in a disposition list. The master configuration also simplifies maintenance requirement development, by serving as an association point for which maintenance requirements will apply.
For more information about maintenance routes, see Route Management.
For more information about maintenance requirements, see Fleet Maintenance Program.
Key Business Processes
The Master Configuration module supports the following business processes:
Definition of Allowable Configuration
A master configuration is a template that represents the hierarchy of component positions in an assembly. The relative component positions define the parent-child relationship among the items within a master configuration. The Master Configuration module identifies the tracked parts that make up a unit, and enables you to construct a logical tree structure to illustrate the component positions in an assembly. You can define multiple master configurations for a product to suit different operation modes. You can also define the allowable part alternates for each component position.
Provide Configuration Templates for Unit Configurations
A fleet operator may have multiple units of the same configuration. The Master Configuration module provides a template to create a unit configuration, which reflects the current “as-installed” configuration of a product. A unit configuration replicates the position structure of a master configuration.
Attach Applicable Maintenance Requirements
When defining a unit's applicable maintenance requirement, organizations can use several grouping mechanisms to streamline the process. Oracle Complex Maintenance, Repair, and Overhaul (CMRO) enables you to apply maintenance requirements, directly to a unit configuration, to a node in a product classification that a unit configuration inherits, or to a position in a master configuration that a unit configuration inherits. For example, if you associate maintenance requirements to a node in a master configuration, any unit configuration that you create based on the master will receive those maintenance requirements.
Provide Checklists for User
The physical breakdown of a complex assembly decides the shop floor processes and information requirements. You can associate such information with a node or position in a master configuration. During the overhaul of an assembly, maintenance personnel, remove, reinstall, and replace serialized parts. The service provider has to provide an on-off log for such operations. The off log indicates the item number and serial number of a item installed at a certain position before the maintenance event. The on log indicates the item number and serial number of the item installed at a certain position during maintenance. Oracle CMRO enables you to provide an on-off log template indicating all the positions and item alternates for the nodes (positions) where users can install or remove items.
Definition of Air Transport Association of America (ATA) Codes
ATA codes are used in the Minimum Equipment List (MEL) and Configuration Deviation List (CDL) functionality. This functionality identifies equipment that can be inoperative on aircraft, but still enable the aircraft to maintain airworthiness.
Creating Master Configuration Records
A master configuration represents the structure of a complete electromechanical assembly, consisting of the required nodes to fully represent the assembly. There is no limit to the number of nodes that an assembly representing a fleet unit can comprise.
To create a master configuration record
-
Navigate to the Create Master Configuration page.
-
Select information in the following fields:
Field Description Name Name for the configuration template hierarchy. Description Descriptive text field. Status Status of the master configuration. Options are: Complete, Draft, Approval Pending, Approval Rejected, Closed or Expired. Position Position in the assembly that is the topmost node of the master configuration hierarchy. Position Description Descriptive text field for this position in the configuration hierarchy. ATA Code Air Transport Association of America (ATA) codes used for the Minimum Equipment List (MEL) and Configuration Deviation List (CDL) functionality. See: Minimum Equipment List (MEL) and Configuration Deviation List (CDL) Setup Quantity Number of items in the item selection option set for this position. UOM Unit of measure. Start and End Dates Effectivity of this position in the configuration hierarchy. Item Group Name and Description Name for the set of item option selections at this node. Display Order The order that the configuration positions are displayed. Revision The revision number to indicate that the master configuration is under revision control. Revision control enables multiple configuration revisions to be active at one time. This is necessary because all of the units cannot be migrated to the new master configuration at the same time. During the transition phase, the user will maintain units based on two different revisions of the same master configuration. This also aids in implementing configuration modifications throughout the master configuration lifecycle. Necessity Indicates if the position is mandatory or optional. Model Used to identify the type of document. This field is displayed on the Create Master Configuration page if you associate Enigma Configuration information to the Master Configuration module. For example, if the model is PW4000, then this corresponds to Engine Maintenance Manual in Enigma. 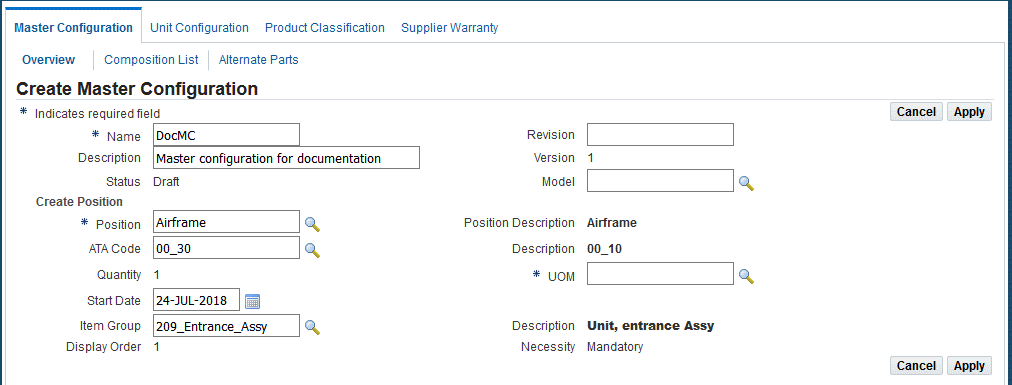
-
Select the Apply button to save your work.
To create the top node of the hierarchy
-
Select a position on the Master Configuration page.
-
Optionally, associate an item group with this node.
-
Click the Apply button to save this master configuration record.
The Edit Master Configuration page appears displaying the configuration tree. The details associated with the top node appear next to the configuration tree.
-
You can perform the following tasks using the Edit Configuration page:
-
Add, delete, and copy positions.
-
Edit alternate items information.
-
Attach documents to a position.
-
Edit position ratios.
-
Submit the configuration for approval.
-
Create rules.
-
Add or remove sub-configurations.
-
Related Topics
Editing Master Configuration Records
Working with Positions
After you define the general master configuration attributes, you can create each position in the hierarchy. For each position in the hierarchy, you can define a set of valid items, with maintenance requirements for each item. Oracle CMRO stores this information in the database. Also, you can retrieve master configuration records to add other master configurations, item locations, and valid items to a position in the selected configuration.
Related Topics
Creating Positions in a Master Configuration
Copying Existing Configurations to a Position
Associating Item Groups with a Position
Associating a Sub-Configuration/ Alternate Sub-Configuration with a Position
Creating Rules for a Configuration or Sub-configuration
Attaching Documents to a Position
Managing Alternate Items Information
Creating Positions in a Master Configuration
Use the Edit Master configuration page to create a position in your master configuration. The top node in the hierarchy is created when defining the master configuration template, in the Create Master Configuration page. All additional nodes are defined later. The position you create in the Edit Configuration page will form an additional node in the selected master configuration hierarchy.
Prerequisites
- The master configuration for which you want to define a position must exist in the database.
- Position references must have been defined. For information, refer to the master configuration setup in Oracle Complex Maintenance, Repair, and Overhaul Implementation Guide.
To create a position
-
Navigate to the Search Master Configuration page (Configuration > Master Configuration).
-
Click the Create button to launch the Create Master Configuration page.
-
Enter the master configuration information in the fields. For field descriptions, see Description of fields related to master configuration records.
-
Create the top node of the configuration hierarchy by entering values for these required fields:
-
Name
-
Position - you must add at least one position during creation
-
UOM
-
-
Click the Apply button to save the master configuration record in the database.
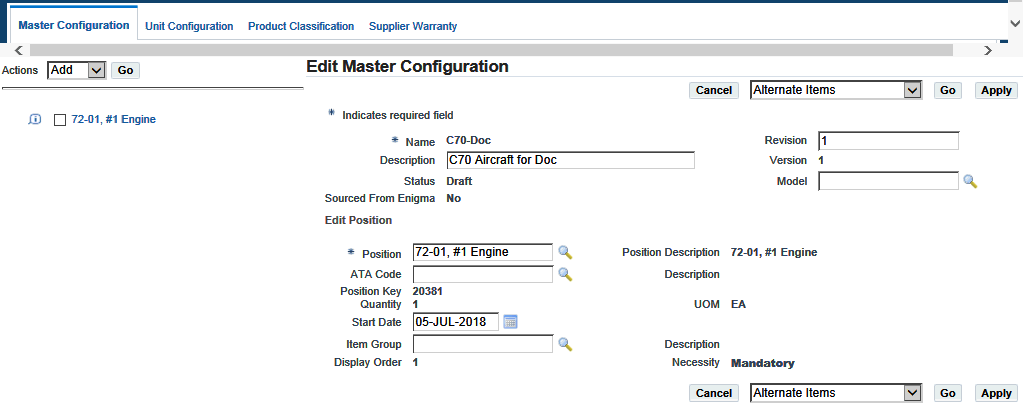
The Edit Master Configuration page appears displaying the top node of the master configuration tree.
Edit Master Configuration
-
Select the node where you want to add a position, and then choose Add from the drop-down list.
-
Click the Go button and the Create Position section appears on the page.
-
Use the information in the following table to enter information in the Create Position page.
Field Description Position The positions in the assembly that can be the parent or child node in the master configuration hierarchy. Enter a partial search string with the generic substitution meta character% (example, Engine%), and click the Go button to access the Select Position page. Position Description The field containing phrases or sentences that describe this configuration hierarchy. Quantity The number of items in the item selection option set for this position in the configuration hierarchy. Enter a number greater than zero. UOM The unit of measure of the items in the current hierarchy position. You cannot enter text directly in this field because the text value must exist in the database. Enter a text search argument with the generic substitution meta character%, and click the Go button to retrieve and display all records from the database that match the search argument. Select the correct value. Start Date The date of the first day of effectivity of this position in the configuration hierarchy. Enter a date directly, or click the icon beside the date field access the calendar, and select a date to insert it in the field. End Date The date that represents the last day on which the position in the configuration is valid. Enter a date directly, or click the icon beside the date field to access the calendar. Choose a date to insert it in the field. Item Group Name The name for the set of item option selections at this node. You cannot enter text directly in this field because the text value must exist in the database. Enter a text search argument (example, MACHINE%), and click the Go button to retrieve and view the search results. Click the correct value. Item Group Description The description of the item options set, and is displayed automatically when you retrieve the item group name. Display Order An ordinal number that determines the order in which the configuration positions are displayed. Necessity Value that defines a node as Mandatory or Optional. This field defines whether the item represented by the node is a required installation, or is only an option. -
Click the Apply button to add the position to the master configuration record.
Edit Master Configuration
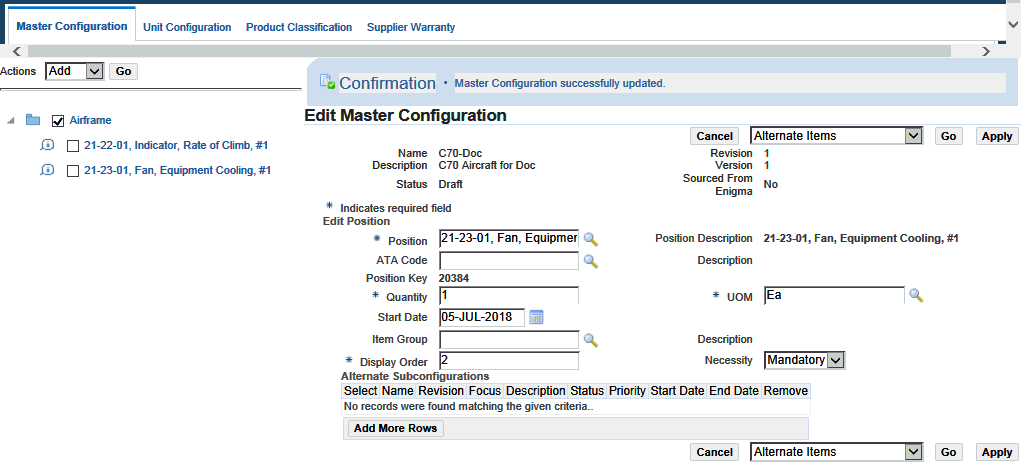
The Edit Master Configuration page appears and you can edit the position details if necessary.
-
Attach position ratios, documents, or alternate items to the node position by using the appropriate buttons on this page.
-
Click the Apply button to save the changes.
Related Topics
Attaching Documents to a Position
Adding Alternate Items Information
Copying Existing Configurations to a Position
The Edit Master Configuration page enables you to access the Search Master Configuration page. Use the page to search for an existing master configuration record that you want to add to a selected master configuration position. This process enables you to build configuration template hierarchies using existing master configuration records.
Prerequisites
- The master configuration records that you want to add to the position must exist in the database.
To copy configurations to a position
-
Navigate to the node to which you want to add a configuration. See Creating Positions in a Master Configuration.
-
To copy an existing configuration to a node, click the check box next to the node then select Copy from the drop-down menu.
-
Click the Go button, and the Search Master Configuration page appears.
-
Search for the master configuration that you want to add.
The results appear in the lower half of the page.
-
Select the pertinent record from the Master Configuration List.
The View Master Configuration page appears.
For more information, refer to the following sections:
-
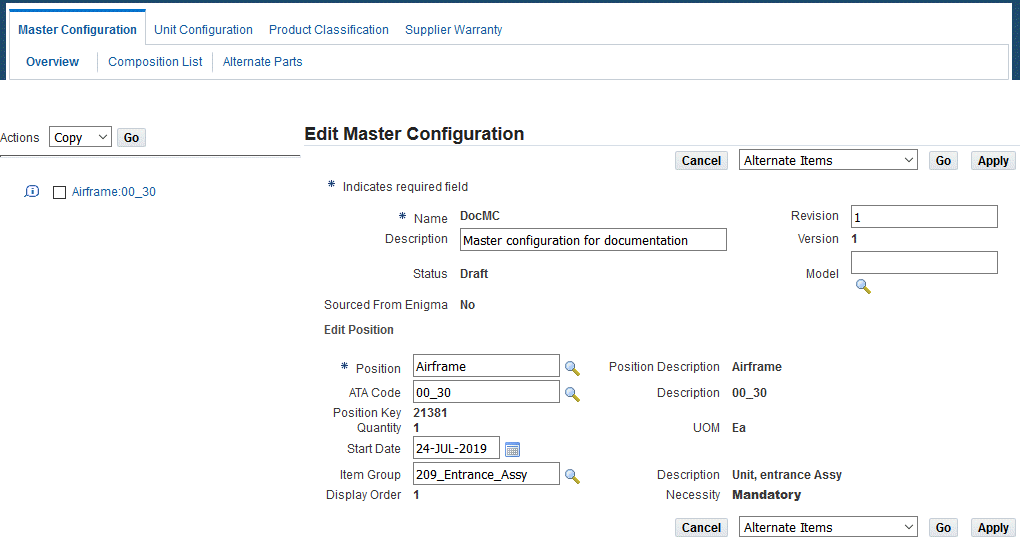
Click the Copy button to add this master configuration to the selected position. The Edit Configuration page appears.
Edit Master Configuration
-
Click the Apply button, and the Master Configuration will now appear in the configuration tree.
Associating Item Groups with a Position
A tracked item group is comprised of items that can be assigned to a particular position in a master configuration. You can associate an item group with a position. You can then select the item instances to be added to the position. Non-tracked item groups are created for use in item compositions. Item groups can be revised independently from the master configuration. The master configuration gets updated with the changes upon the item group approval.
See Managing Alternate Items Information for information on creating item groups.
Prerequisites
- The item group must exist in the database.
- The configurations and positions must have been defined.
To associate item groups with a position
-
Use the Create Master Configuration page to create a position and click the Apply button. See Working with Positions.
-
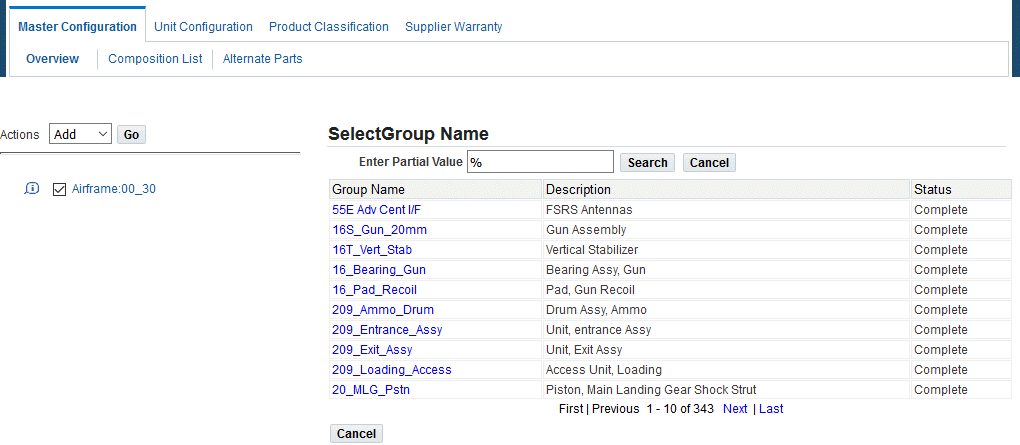
Search for an item group, and the Select Group Name page appears. Click the Go button to view a list of item groups.
Select Group Name
-
Select the item, which you want to associate with the position. The Edit Master configuration page appears displaying the association.
Note: If any item in item group has a quantity greater than 1, it cannot be associated to a position which has child nodes.
-
Optionally, you can choose the Alternate Items value from the drop-down list to add alternate item instances. See Managing Alternate Items Information.
Associating a Sub-Configuration or Alternate Sub-Configuration with a Position
A master configuration can be created as a hierarchy of positions and assembly of other master configurations. A master configuration can be defined for a sub-component of a higher assembly. This sub-configuration can exist by itself, and also be added to the configuration hierarchy of another master configuration. For example, the master configuration of the engine can be included in the master configuration of the aircraft. You can add sub-configurations to the master configuration positions, thus enabling the association of configurations within a configuration.
To attach a sub-configuration to a position
-
Create a position, and click the Apply button. See Creating Positions in a Master Configuration.
The Edit Position page appears.
-
Select the Add More Rows button to add sub-configurations to the position that you defined.
-
Click the Name search button to select a sub-configuration. Enter a value in the Priority field.
Use the information in the following table to enter information related to sub-configuration association.
Field Description Name Name of the child master configuration or sub-configuration. Revision The item revision identifier. The revision number indicates that the master configuration is under revision control. Revision control enables multiple configuration revisions to be active at one time. Focus Icon used to change the page context to the sub master configuration (sub master configuration). Description Description of the sub master configuration. Status Status of the sub master configuration. The sub master configuration should not be in Closed or Expired status. Priority Field used to specify the highest priority assembly to be used by Planning when planning for a replacement. Start Date Start date of the sub master configuration mapping. End Date End date of the sub master configuration mapping. Remove Is used to remove the sub master configuration mapping. -
Select Apply, and the sub-configuration is associated with the position.
-
Select the sub-configuration, and click the Apply button. The sub-configuration is added to the configuration tree.
Note: After adding the sub-configuration to the assembly hierarchy, the tree can be expanded and positions within the sub-configuration selected and their positions changed. The position code for a sub-configuration position defaults to the value defined within the sub master configuration. You can override that by defining the position code from the context of a higher level master configuration. The new position will only affect the sub-configuration when the subassembly is installed in this higher assembly allowing for the position to be applicable based on the installation.
-
Click the sub-configuration Focus icon to change the focus of the entire configuration to the sub-configuration. You can view the master configuration header and position details of the sub master configuration.
View Master Configuration
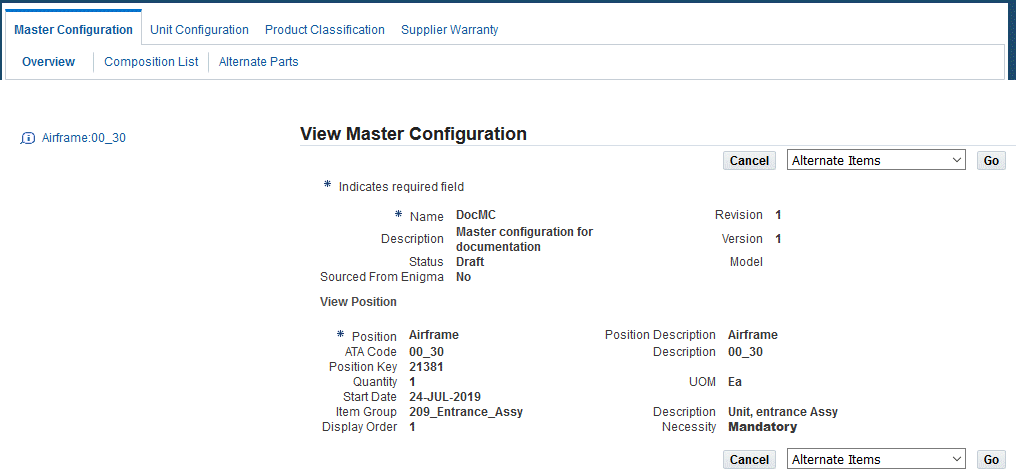
Note: You can associate sub master configurations with a position only when a sub-assembly has been defined under that position.
Creating Rules for a Configuration or Sub-Configuration
You can set up rules for configurations, sub-configurations, positions, and items that work together, to control the allowable items to be installed into the configuration. The definition of the configuration rules enables the enforcement of regulations for equipment configurations issued by OEM's and regulatory institutions such as the FAA. You can create rules for:
-
Restricting items for a position.
-
Restricting configurations for a position.
-
Restricting positions based on other positions.
-
A reference for desired fleet percentages.
To create rules for a configuration
-
Choose Rules from the drop-down list on the Edit Configuration page.
-
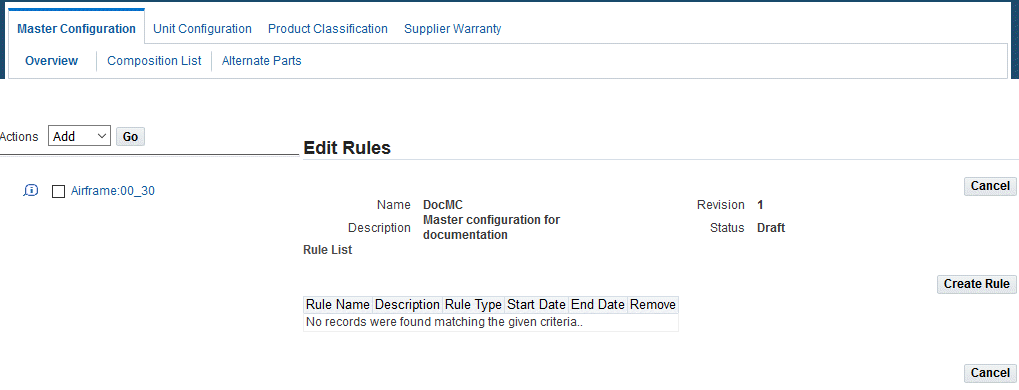
Click the Go button, and the Edit Rules page appears.
Edit Rules
-
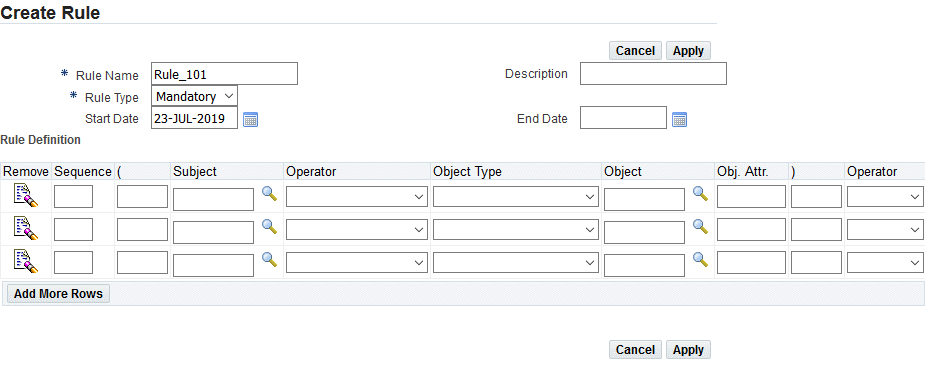
To create rules, click the Create Rule button, and the Create Rule page appears.
-
Use the following information to define rules.
Field Description Rule Name User-defined rule name (required) Description Description of the rule (optional). Rule Type Can be Mandatory or Fleet (required). A rule type of mandatory indicates that the rule will be evaluated during installations, and a rule type of fleet indicates that the rule is created only as a reference to the fleet percentages. Start Date/End Date Select from calendar (optional). The end date must be greater than the start date. Sequence User defined value to determine the order of the rules defined. Left and Right Parenthesis Used to group two rule statements. Subject Use the search icon to access the Select Positions to select the position path for which you are defining the rule. Operator (Predicate) Conditions in a rule. The possible values are: is installed, is not installed, has, does not have, must have, must not have, has same sub-configuration installed, does not have same sub-configuration installed. Object Type You can select from the following object types: total quantity of children, item, configuration, configuration as position, item as position (1), or item as position. Object Use the search icon to select an object based on the object type chosen. Operator You can select And, Or, Implies, or Requires. The rule statements may be combined with these operators. -
Choose a rule type.
-
Define the rule statement by entering data in the Rule Definition region.
Create Rule
-
Click the Apply button to save the rule.
-
To edit a rule, select the link under Rule Name in the Edit Rules page. The rule details are displayed.
You can set up rule control for configurations, sub-configurations, positions, and items that work together to produce the rule or rule set to control a configuration. Each control area may be combined with one or multiple rule control methods to effectively control the assembly. Note the following rule controls:
Configuration Rule Control
The following applies to configuration rule control:
Subject: Configuration
Objects: Positions and Instances
Using a configuration as the subject, the direct object pointers are one or many positions or the percent of instances to plan. The rule will include a chain or sub-construct of the other rule controls. Referencing Positions: requires, excludes, or negates though the use of Necessity - mandatory, optional, and optional with a rule (containing Empty/Is Null, Installed / Is Not Null, Same As). Referencing Instances: implies the minimum and maximum percent or quantities by state/condition per configuration.
The outcome produces the following:
-
Installation Allowed
-
Installation Not Allowed
-
Configuration Not Valid
-
Configuration Valid
Position Rule Control
For the Position Rule Control, the following apply:
Subject: Position
Objects: Sub-Configurations/Alternate Sub-Configurations, and Items
Using positions as the subject, will be in a sub-construct, if configuration control, or as a stand alone which contain sub-constructs, if node specific.
Referencing Sub-Configurations/Alternate Sub-Configurations implies that it will be allowed by the association, excludes allowed by adding a rule, and requires by the use of mandatory or a rule.
Referencing Items though the item group association implies allowed and excludes or requires through a rule.
The outcome produces the following:
-
Installation Allowed
-
Installation Not Allowed
-
Configuration Not Valid
-
Configuration Valid
Sub-Configuration/Alternate Sub-Configuration Rule Control
For the Sub-Configuration/Alternate Sub-Configuration Control, the following apply:
Subject: Sub-Configuration/Alternate Sub-Configuration
Object: Position and Instances
Referencing Positions: Requires, excludes, or negates though the use of Necessity - mandatory, optional, and optional with a rule (containing Empty Is Null or Installed/Is Not Null).
Referencing Instances: Implies the minimum and maximum percent or quantities by state/condition per configuration.
The outcome produces the following:
-
Installation Allowed
-
Installation Not Allowed
-
Configuration Not Valid
-
Configuration Valid
Item Rule Control
For the Item Control the following apply:
Subject: Item or Item #
Object: Item #, Is Installed, Previously Installed, Interchangeability Type, Interchangeability Code, and Instances
Referencing the item number: excludes, requires, or negates based on the hierarchy for which the rule is contained.
Referencing Item # and Is Installed or Previously Installed requires, excludes, or negates based on the current or historical reference.
Referencing Interchangeability Type and Interchangeability Code with the item # requires, excludes, negates, or implies based the type, code, or combination.
Referencing the priority with the item # provides defaults.
Referencing Instances : implies the minimum and maximum percent or quantities by state / condition per configuration. This rule is not evaluated.
The outcome produces the following:
-
Installation Allowed
-
Installation Not Allowed
-
Configuration Not Valid
-
Configuration Valid
Instance Rule Control
For the Instance Control the following apply:
Subject: Instance (Implied)
Object: Minimum, Maximum, Percent, Quantity, State / Condition
Referencing the object combination implies the instance quantity allowed per condition. This rule is not evaluated.
The following table includes examples of some legal rule statements:
Subject Predicate Object Outcome Position is installed / is not installed T/F Position has / does not have item T/F/U if uninstalled Position has / does not have sub-master configuration
(rev specificT/F/U if uninstalled Position must have / must not have item T/F The outcome of each rule evaluation is as follows:
-
Success (T)
-
Unable to determine true or false (U)
-
Rule failed in evaluation (F)
When a rule is applied, the units affected by the configuration are validated. Once a list of applicable rules are defined for each position, then each rule is evaluated individually. The statements will require mapping position path to UC item instance and comparing instance properties against the rule requirements. The result of validation is either status “S” for success or a table of rule violations. If the validation fails the status of the configuration changes to incomplete. When you add a rule to a configuration or update a rule for a sub-configuration, the configuration and position path information are populated into the rule when the selection is made. When updating a rule for a sub-configuration from a higher assembly the modified rule will only apply to the higher assembly. You cannot alter the base rule.
-
Editing Position Ratios
The Edit Position Ratio page enables you to add information about service timer ratios in cases where the value derived from a service timer should be a multiple of the timer reading. For example, a power-plant operated in a high-temperature, high-altitude environment might run at a much higher RPM to produce the same torque as compared to a less severe environment.
Prerequisites
- The master configuration record with the position that you want to define the position ratio for, must exist in the database. The values for the fields UOM and Rule Code should be set up by your organization.
To edit position ratios
-
Retrieve the master configuration records that match your requirement.
-
Select the pertinent record from the Master Configuration List on the Search Master Configuration page.
-
The Edit Master Configuration page appears. Use the tree to find the position that needs to be changed. Click Position Ratio.
-
The Add Position Ratio page appears on the right.
-
Enter the information in the fields provided.
If no position ratios are defined, the page will be empty. To define a position ratio, click Add More Rows. This will add three rows to the table. Enter information in the provided fields.
-
UOM indicates the unit of measurement that the operational service timer for this position represents.
In most cases, this unit will be hours of time. You cannot enter text directly in this field because the text value must exist in the database. Enter a text search argument (e.g., MACHINE%), and click Go to retrieve and display all records from the database that match the search argument. Click the correct value from the records displayed on the Select UOM page to have the text value returned to the field.
-
Description refers to a text description of the unit of measure, and is automatically placed in this field when the UOM is selected from the database.
-
Ratio is a multiplying factor to be applied to an operational service timer to yield the service life value of the component.
Typically, this ratio will be a number greater than or equal to 1.
-
Rule Code is a field containing a drop-down list box from which you can select a value.
The set of values in this list is created when your configuration of Oracle Complex Maintenance, Repair, and Overhaul is installed.
-
-
Click Apply to retain the Position Ratio information in the database.
-
Select the record from the Position Ratio List to remove a position ratio from the configuration hierarchy.
-
Select the Remove check box.
-
Click the Apply button.
Attaching Documents to a Position
The Edit Master Configuration page enables you to access the Attach Documents page, where you can search for, and enter documents that you want to attach as references for a component position in the hierarchy. This allows maintenance personnel to refer to the right documents while carrying out maintenance activities at a specific location in a system assembly. For more information on document references, see Managing Maintenance Documents.
Prerequisites
- The master configuration with the position to which you want to attach the documents must exist in the database.
To attach documents to a position
-
Retrieve the master configuration records that match your requirement.
-
Select the pertinent record from the Master Configuration List on the Search Master Configuration page.
-
Click the Edit icon next to the record you want to edit. The Edit Master Configuration page appears.
-
Select a position.
-
Choose Documents from the drop-down menu.
-
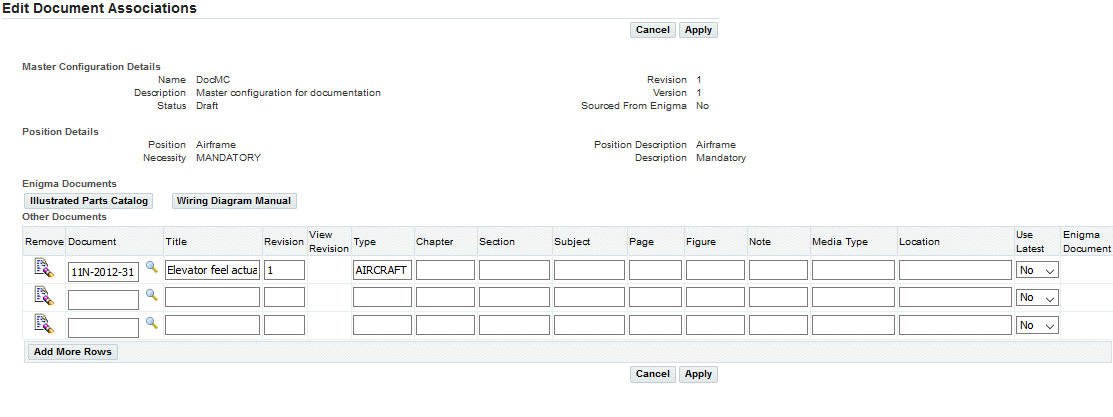
Click the Go button, and the Edit Document Associations page appears.
-
The Enigma Documents region enables you to look up configuration information in Enigma's 3C application and associate it to Oracle's Master Configuration.
Associating Enigma configuration information enables you to retrieve, view and associate Enigma 3C content on master configuration. You can associate three different types of documents namely, Illustrated Parts Catalog (IPC), Engine Manual (EM), and Wiring Diagram Manual (WDM). You can select a document type and navigate to the relevant Enigma URL for the document selection.
The Edit Document Associations page shows buttons for viewing Engine Manual (EM), Wiring Diagram Manual (WDM) and Illustrated Parts Catalog (IPC) as applicable.
Click the Illustrated Parts Catalog, Engine Manual, and Wiring Diagram Manual buttons to navigate to the Enigma interface showing the relevant pages respectively.
Important: To enable these buttons, set the following profile options to Yes:
-
AHL: Enigma IPC Documents associated
-
AHL: Enigma EM Documents associated
-
AHL: Enigma WDM Documents associated
The Engine Manual button is available when you enable the previously mentioned profile option and if the ATA code for the corresponding node starts from the number 72.
Alternatively, you can associate documents from the document index as mentioned in the steps below.
-
-
Click the Add More Rows button to attach documents to the position.
Enter the following information:
-
Document: The name of a maintenance document previously recorded using the Document Index module.
You cannot enter text directly in this field. Enter a search string with the generic substitution meta character%, and click Go to launch the Select Document Number page. The lower half of the Select Document Number page displays the list of documents in the database.
Click the pertinent document record to return this value to the Document List fields in the Attach Documents page.
-
Title: The document title that is automatically placed in this field when the Document Name is selected.
-
Chapter: The chapter number where the required reference is available.
If the component at this level in the hierarchy is described by a single chapter or less in the maintenance document, enter the chapter number here in this field.
-
Section: The section identifier of the maintenance document that describes maintenance procedures for the component described by the current configuration position.
-
Page, Figure, and Note fields: Fields used to provide additional information about the maintenance documentation for the items in the current configuration hierarchy position.
-
The Latest field: Field contains a drop-down list where you can select a value from a set of values set up when your Oracle CMRO configuration was installed.
If you have attached a document reference to the selected position, the page will display the attached document name in the Document List field.
Edit Document Associations
-
-
Click the Apply button to store your maintenance document definition for the selected configuration position.
-
Click the Remove icon to delete a document reference attachment.
-
Click the Apply button.
Managing Alternate Items Information
Fleet vehicles with long service lives are designed and constructed with similar items from different suppliers. For example, aircraft can often be ordered from manufacturers with a power plant choice. A master configuration template definition that serves as a general model for a unit configuration definition, provides the fleet operator an opportunity to define an optional item group for any part position in the configuration.
The alternate items listed in the master configuration template allows you to derive a unit configuration that represents the “as-operated” configuration of a fleet unit. You can create tracked item groups for association with master configurations, and non-tracked item groups for use in item compositions. After creating the item group, you may submit it for approval. Once approved, the new revision will replace the current revision. This allows the item group to be revised independently from the master configuration eliminating the need to revise the master configuration for each item group change. The new changes will be incorporated into the master configuration upon the item group approval.
Related Topics
Adding Alternate Items Information
Finding Alternate Items Information
Editing Alternate Items Information
Adding Alternate Items Information
The Alternate Parts tab enables you to access the Add Alternates page where you can add items to a particular group name. The group name specifies the set of item option selections at a node. You can also record any revision made to alternate item information in a group. You can create a tracked item group or a non-tracked item group.
Prerequisites
- Values for Group Name, Item Number, Revision, Type, Interchangeability, and Reason fields must exist in the database.
To add alternate items
-
Navigate to the Search Alternate Items page (Configuration > Master Configuration).
The Master Configuration page appears.
-
Click the Alternate Parts tab to access the Search Alternate Items page.
-
Click the Create button to access the Add Alternates page.
The Add Alternates page appears.
-
Use the information in the following table to add alternate items details.
Field Description Group Name The name for the set of item option selections at this node. Description The description of the item options set. Type Item group types.
Tracked: Group of Oracle Installed Base tracked items, which can be associated with positions in a master configuration.
Non-tracked: Group of non-tracked items that are contained in a tracked item and may be required for use in a route to maintain a component.Item The identifier of the item that you want to add to the group of items that can be installed in this position. Select a value or if you do not know the specific item, enter a text search argument (example, MACHINE%). Click the Search button to retrieve a list of items, and select the appropriate item. Status Status of the item group. The options are Complete, Draft, Approval Pending, Removed, and Approval Rejected. Description (item) The item description automatically appears in this field when the Item Number is selected. You cannot enter a value in this field. Organization Code The code for the inventory organization assigned to the alternate item when the item information is created in inventory. Revision A item revision identifier. You cannot enter text directly in this field because the revision must exist in the inventory database. Enter a text search argument (example, MACHINE%). Click the Go button to retrieve the information and select the appropriate revision. UOM The unit of measure in which the item is usually supplied. You cannot enter text directly in this field because the text value must exist in the database. However, you can enter a text search argument (example, MACHINE%), and click the Go button to retrieve and view the results. Select the appropriate UOM value. Quantity Specifies the number of optional items in this group that are to be installed. Priority The preferred selection order of the items in the group. The most preferred item should be assigned a value of 1. Interchangeability Type The selection of a item for a configuration. The one-way-interchangeable means that an item is a valid item to be installed under certain circumstances. When you install an item with One-way-interchangeability in CMRO, the system displays a warning that this item is One-way-interchangeable. Two-way interchangeability means that the item can be used in multiple configurations.
Other values are Deleted, Obsoleted, Reference, and Superceded.Reason The technical justification for one-way or 2-way interchangeability. You can enter text directly in this field. Composition Button that provides access to the Item Composition List Page for the selected item. 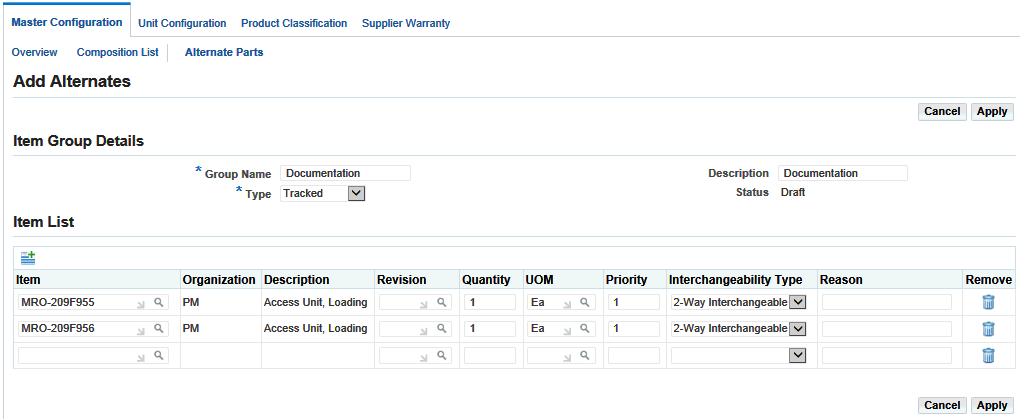
-
Click the Apply button to add the alternate items information.
Finding Alternate Items Information
Use the Search Alternate Items page to retrieve alternate item information that you want to edit. You can search for alternate items based on Group Name, Description, Item, Type, Status, and the Organization Code for the item.
Prerequisites
- The alternate item groups must be created.
To find alternate items
-
Navigate to the Search Master Configuration page (Configuration > Master Configuration).
The Master Configuration page appears.
-
Click Alternate Parts tab to launch the Search Alternate Items page.
-
Enter the alternate item information in the fields.
For field descriptions, see Description of fields related to alternate items.
-
Click the Go button to retrieve all alternate item groups that match the search criteria.
Editing Alternate Items Information
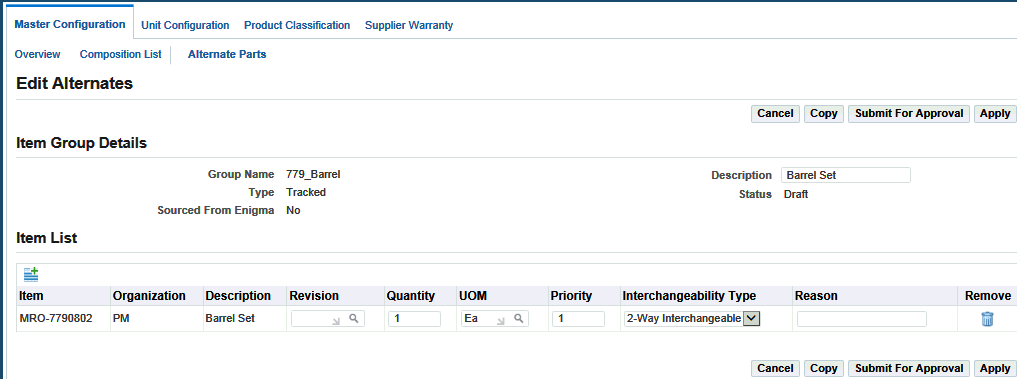
The Search Alternate Items page enables you to access the Edit Alternates page, where you can make necessary changes to alternate item information.
Prerequisites
- Values for the Item Number/Item, Revision, Type, Interchangeability, and Reason fields should exist in the database.
To edit alternate item information
-
Retrieve the pertinent alternate item group record using the Search Alternate Items page. See Finding Alternate Items Information.
-
Select the group to view the configurations with which an alternate item group is associated.
-
Enter a value in any of these fields:
-
Revision
-
Quantity
-
UOM
-
Reason
Edit Alternates
-
-
Click the Apply button to save your work.
-
Click the Remove icon for the alternate item group that you want to delete.
Only alternate item groups that are not associated to a master configuration position can be deleted.
-
Click the Submit for Approval button to submit the alternate item group for approval.
To initiate the approval workflow, at least one item should have the interchangeability of 1-Way or 2-Way and the quantity should not exceed 1, if any position has child position associations.
Any modifications to an item group or items in the group, impacts the associated unit configuration in the following ways:
-
If the interchangeability of an item is changed to Deleted or Referenced, it affects all the units where this item is associated.
-
If the interchangeability is changed to Obsolete or Supersede, there is no impact on the existing unit configuration associations; however, these items are no longer allowed for the position.
Note: The status of the item group changes from Draft to Approval Pending and finally to Complete on approval. A newly created item group in Draft status can be associated with master configurations. When its status changes to Complete on approval, the information is recorded in the history tables.
-
-
Click the Copy button to copy the alternate item group.
Note: A temporary copy of the group is created to enable the editing of a completed item group, while the completed group is in use. You can also access this page from the Edit Master Configuration page by clicking the Alternates button (Search > Search Master Configuration page > Edit > Edit Master Configuration page > Edit Master Configuration tree page >Alternate Items).
-
Select the Remove check box for the alternate item that you want to remove from the item group.
-
Click the Apply button.
If the alternate item group that you edited is not attached to additional master configurations and positions, the changes are saved. If the alternate item group you selected is attached to a master configuration or position other than the one currently being edited, and if you click the Remove or Apply button, the application will prompt you with the following message:
This item group is associated with more than one position. Do you want to force the changes to all positions?
Creating Item Group Revisions
You can create multiple versions of an item group. If an item group in Draft status with a version status of Complete is submitted for approval, it overwrites the existing item group, and the change is recorded in the history tables.
Prerequisites
- The item group that you want to revise must exist in the database.
To create item group revisions
-
Navigate to the Search Alternates Items page. See Finding Alternate Items Information.
-
To create an item group revision, select the item group.
Revisions can only be created for alternate item groups in Complete status.
-
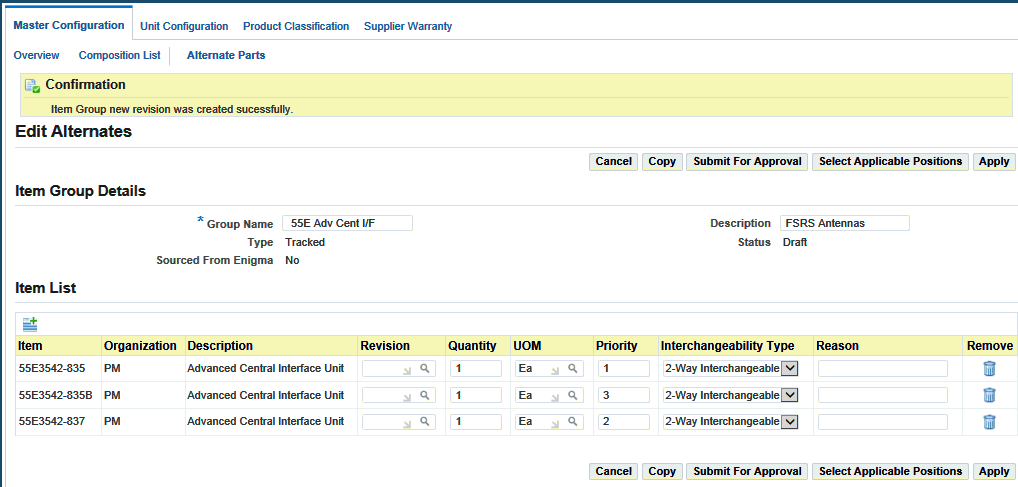
Click the Edit button, and the Edit Alternates page appears.
-
Click the Create Revision button.
A new revision is created, and the system displays a confirmation that the item group revision has been successfully created.
Edit Alternates
Editing Master Configuration Records
After you create a master configuration template, you can edit the record to add additional attributes. Because the configuration template must consist of all item locations, item installation options, and pertinent maintenance documents, the configuration hierarchy is completed by retrieving a previously created master configuration record.
After you view the topmost position in the configuration template, you can drill down into the hierarchy by clicking the Position link.
To edit master configuration records
-
Navigate to the Search Master Configuration page (Configuration > Master Configuration).
-
Click the Edit button and the Edit Master Configuration page appears.
-
Enter new values in the Description or Revision fields if applicable.

-
Navigate through the tree to the position for editing.
Make necessary changes in the fields. For field descriptions, see Fields Associated with Master Configuration Records.
-
Select Item Groups to change the item groups associated with a position.
-
You can change the sub-configurations associated to a position in a master configuration by adding or deleting version specific child master configurations.
-
Click the Apply button to save your work.
-
You can choose the following options from the menu:
-
Alternate Items - to view the alternate items associated with the master configuration or with a specific position.
-
Documents - to view and edit the document references attached to the master configuration.
-
View MEL/CDL Instructions - to view any associated MEL or CDL instructions.
-
Submit for Approval - to submit the entire master configuration for approval. This option is only available for a master configuration in the status of Draft or Approval Rejected.
-
Position Ratio - to view the position ratio for the node.
-
Rules - to view the list of rules that pertain to this position.
-
Related Topics
Attaching Documents to a Position
Editing Alternate items Information
Creating Positions in a Master Configuration
Copying Existing Configurations to a Position
Associating Item Groups with a Position
Associating a Sub-Configuration/Alternate Sub-Configuration with a Position
Creating Rules for a Configuration or Sub-Configuration
Creating Master Configuration Revisions
- The master configuration record must be the latest version of that record, and should have a status of Complete.
To create a master configuration revision
-
Navigate to the Search Master Configuration page (Configuration > Master Configuration).
-
Retrieve the master configuration records that match your requirement.
-
Select the record from the Master Configuration List on the Search Master Configuration page.
-
Click the Go button.
-
Click the radiobutton for the master configuration record.
-
Select the Create Revision value from the Select Master Configuration drop-down list.
-
Click Go.
If the validations pass, then the master configuration header details, relationships, counter rules, document associations, rules, and rule statements will be copied to a new version. A confirmation message appears, and the new revision will appear in the master configuration list in Draft status. You can edit the new master configuration version while it is in the Draft status.
Approving Master Configurations
You can set up an approval hierarchy to review and approve master configurations. Master configurations can be submitted for approval at the time of creation or modification. Changes made to the master configurations affect unit configurations and maintenance plans for all the units based on the updated master configuration. The Approval Workflow tracks and controls these changes. When a configuration is submitted for approval, a validation is performed to ensure that the configuration is complete, and that complete item groups or complete sub-configurations have been associated to each position. Errors are returned if the configuration is incomplete.
Prerequisites
- The Master configuration record that you want to submit for approval must exist in the database.
-
All positions must have been defined.
-
The item groups and sub-configurations associated with these positions must be in a Complete status.
To approve master configurations
-
Use the Search Master Configuration page to retrieve the master configuration records that match your requirement.
-
Select the pertinent master configuration from the Master Configuration List and choose Submit for Approval from the drop-down list.
Completeness Check - A concurrent program that checks for the completeness of the unit to determine if the unit is Complete or Incomplete.
Each mandatory position must be mapped to an instance. If any optional positions are mapped to item instances, then its child mandatory positions must be mapped to instances as well. Any sub-units mapped within the main unit must be complete. If all sub-units are Complete and all mandatory positions (except those with “Optional” parent positions and no corresponding parent item instance) are mapped, the completeness check is successful, the configuration is approved, and the status changes from Approval Pending to Complete.
If the completeness check is rejected, the configuration status changes to Approval Rejected and a list of position paths that are missing or additional mandatory item instances, and rule violations are displayed. The configuration is treated like a draft configuration, which the user can modify.
Viewing Master Configuration Records
View master configuration details using the following procedure.
Prerequisites
- The master configuration record must exist in the database.
To view master configuration details
-
Use the Search Master Configuration page to retrieve the master configuration records that match your requirement.
-
Click the Master Configuration Name link. The View Master Configuration page appears. The topmost node in the configuration appears in the Position List.
-
You can view the position ratio, documents, alternate items, and rules associated with a node in the configuration, by choosing the corresponding option from the drop-down menu.
Related Topics
Viewing Documents Associated with a Position
Viewing Alternate Items Associated with a Position
Viewing Position Details
You can view the position details of master configuration nodes using the following procedure.
Prerequisites
- The master configuration record must exist in the database.
To view position details
-
Use the Search Master Configuration page to retrieve the master configuration records that match your requirement.
-
Select the Option button next to the pertinent master configuration from the Master Configuration List.
-
Click the Master Configuration Name link, and the View Master Configuration page appears.
The topmost node in the configuration appears in the Position List.
-
The node hierarchy is represented by the tree structure on the left. Navigate to the node that you want to view using the tree structure; click the plus icon next to a node listing to display subordinate nodes.
-
Click a node to display the node position details.
Viewing Position Ratios Associated with a Position
You can view position ratios associated with a position in a master configuration using the following procedure.
Prerequisites
- The position ratios of the master configuration position must be defined. See Editing Position Ratios.
To view position ratios associated with a position
-
Use the Search Master Configuration page to retrieve the master configuration records that match your requirement.
-
Select the option button next to the pertinent master configuration from the Master Configuration List. Click the Master Configuration Name link. The View Master Configuration page appears. The topmost node in the configuration appears in the position list.
-
Use the tree structure to access the node for which you want to view the position ratios. Click the plus icon next to a node listing to display the subordinate nodes. Click a node to view the position details.
-
Choose Position Ratio from the drop down menu. The View Position Ratio page appears.
-
View the position ratio details.
Viewing Documents Attached to a Position
Use the following procedure to view documents attached to a master configuration node.
Prerequisites
- Documents relating to the master configuration node must be defined. See Attaching Documents to a Position.
To view the documents attached to a position
-
Use the Search Master Configuration page to retrieve the master configuration records that match your requirement.
-
Select the option button next to the pertinent master configuration from the Master Configuration List on the Search Master Configuration page.
-
Click the Master Configuration Name link. The View Master Configuration page appears showing the Name, Description, and Status of the configuration.
The topmost node in the configuration is shown in the position list.
-
The node hierarchy is represented by the tree structure on the left.
Navigate to the node for which you want to view the documents association for, using the tree structure; click on the plus icon next to a node listing to display subordinate nodes. Click a node to select it. The position details corresponding to the node appear.
-
Choose Documents from the drop-down list. The Documents List appears, displaying all documents associated with the selected position.
Viewing Alternate items Associated with a Position
Use the following procedure to view alternate items associated with different nodes in a master configuration.
Prerequisites
- Alternate items must be defined for the position prior to viewing the items associated with a position in a master configuration. See Adding Alternate Items Information.
To view alternate items associated with a position
-
Use the Search Master Configuration page to retrieve the master configuration records that match your requirement.
-
Select the option button next to the pertinent master configuration in the Master Configuration List.
-
Click the Master Configuration Name link, and the View Master Configuration page appears.
The topmost node in the configuration displays in the Position List.
-
Navigate to the node you want to view documents for using the tree structure.
Click the Expand icon next to a node listing to display subordinate nodes.
-
Click a node to view position details.
-
Choose Alternate Items and the item group details appear.
Viewing Positions Associated with an Alternate Item Group
Use the following procedure to view the configuration positions with which an alternate item group is associated.
Prerequisites
- The alternate item group must be created.
To view positions associated with an alternate item group
-
Use the Search Alternate Items page to retrieve the pertinent alternate item group record from the database (see Finding Alternate Items Information).
-
Select the appropriate item group to view the configurations with which an alternate item group is associated and click the View Positions button.
The Edit Associated Positions page appears. The Configuration Positions List displays all the configurations and positions where the item group is associated.
Viewing Rules
Use the following procedure to view the rules defined for configurations, sub-configurations, positions, and items.
Prerequisites
- The rule that you want to view must exist in the database.
To view rules
-
Navigate to the View Master Configuration page. See Viewing Master Configuration Records.
-
Choose Rules from the drop-down list.
The View Rules page appears, displaying the rules defined for the selected master configuration.
Closing Master Configuration Records
- The master configuration record that you want to close must exist in the database.
- The master configuration must have a status of Complete, and no unit configurations can be associated to it.
To close master configuration records
-
Use the Search Master Configuration page to retrieve the master configuration records that match your requirement.
-
Select a record, and click the corresponding icon in the Close column.
A message is displayed asking you to confirm whether you want to close the record.
-
Click the OK button.
A confirmation message is displayed, and the status for the selected master configuration changes to Closed.
Reopening Closed Records
You can reopen a master configuration record that was previously deleted.
Prerequisites
- The master configuration record must have been previously defined and then closed.
- The master configuration record must have a status of Closed or Expired.
To reopen closed master configuration records
-
Use the Search Master Configuration page to retrieve the master configuration records that match your requirement.
-
Select the pertinent record in the Master Configuration List.
-
Select Reopen from the Select Master Configuration drop-down list.
The status reverts to Complete or Draft, depending on the status from which it was closed.